
|
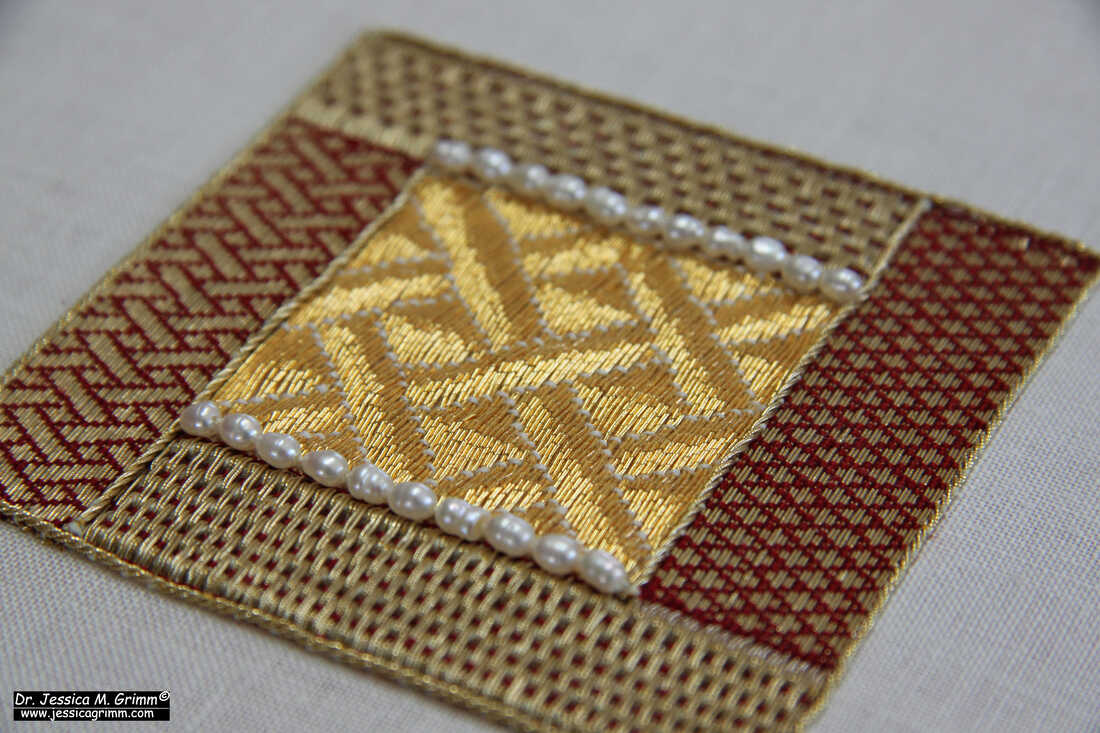
Two weeks ago, I travelled by train from Oberau to Geneva Airport to be picked up by Nadine for a week of teaching embroidery at the Alpine Experience. Door to door, it takes me about nine hours to arrive at Le Carroz in a more environmentally responsible way. Not bad at all. Why it still costs about twice as much as taking a plane will always be beyond my logic. Anyway, this year, nine students worked the background of an orphrey. The design combines two orphreys found on this late-medieval chasuble in the collection of Museum Catharijneconvent in the Netherlands. 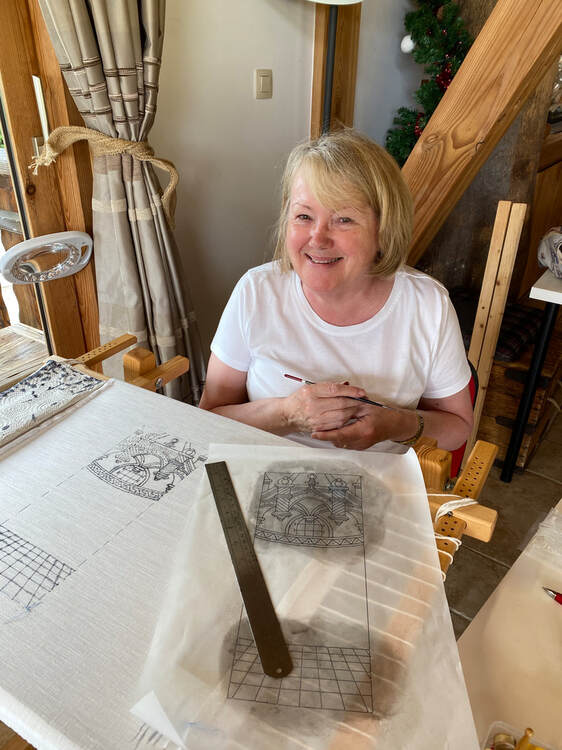 Stephanie having fun transferring the design: the best proof that it IS fun to transfer a design the old school way! In my embroidery courses, I always try to work with procedures, materials and tools that were also commonly used in the medieval period. In this way, I am able to study how these things might have worked back then. After all, regrettably, I cannot time-travel to ask Jacob van Malborch how he pulled it off at his late-medieval embroidery workshop in Utrecht. This means that students usually will need to make their own prickings and paint on the design with paint or ink. You will also always use a professional slate frame. Not only are they medieval, but they also ensure the best results when creating goldwork embroidery. Being able to dress a slate frame and transfer the design in a traditional way is a valuable skill to master when you want to progress as an embroiderer.
A whole week of embroidery sounds like you can really make a head start with your new project. At the Alpine Experience, you have about 30 hours of tuition in between meals and a day-long excursion :). However, as most students are not used to embroidering all day, this actually isn't a lot of time. After all, you are learning new skills. This means that, with a large project such as my orphrey, you will embroider the majority on your own at home. To ensure that you are well equipped to master this, I touch upon all techniques used in the project during the 30 hours of tuition. In addition, students have access to instruction videos and downloadable PDFs. And I am only an email away when they get stuck!
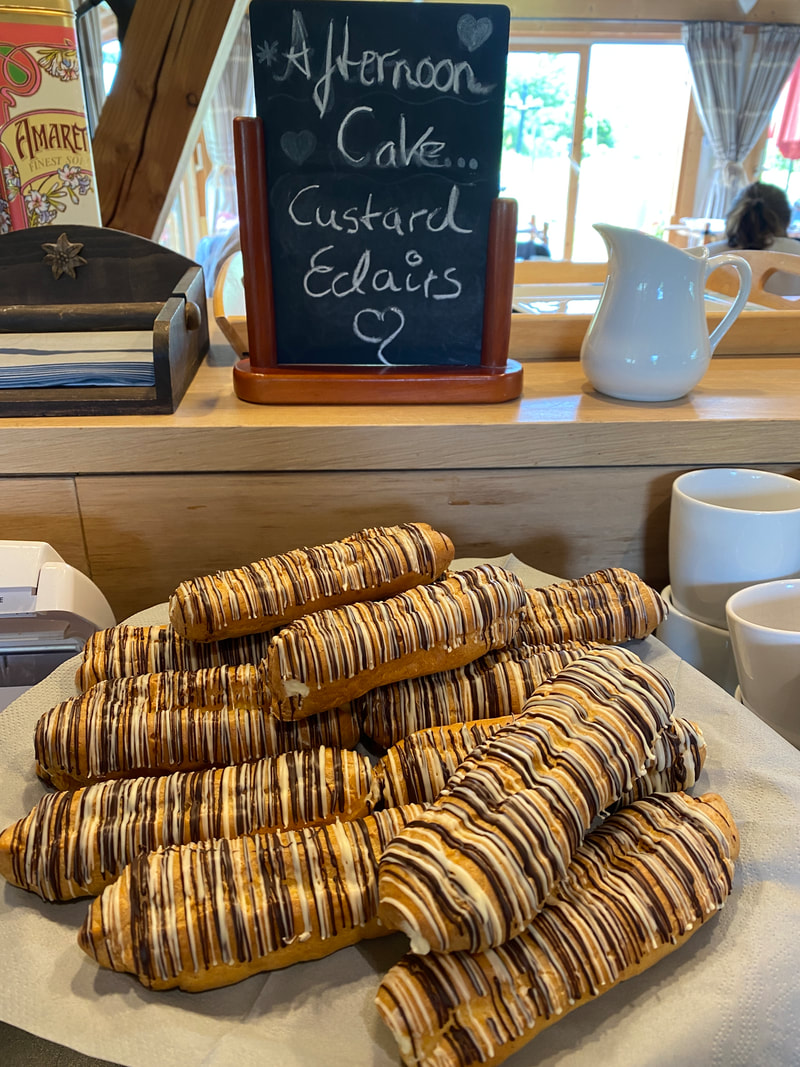
As you need a lot of energy to keep going for a whole week, Mark makes sure that there is plenty of delicious food to keep you fuelled. The desserts are absolutely fabulous and my personal favourites. No surprises there for those who also know my father. I am genetically handicapped :). 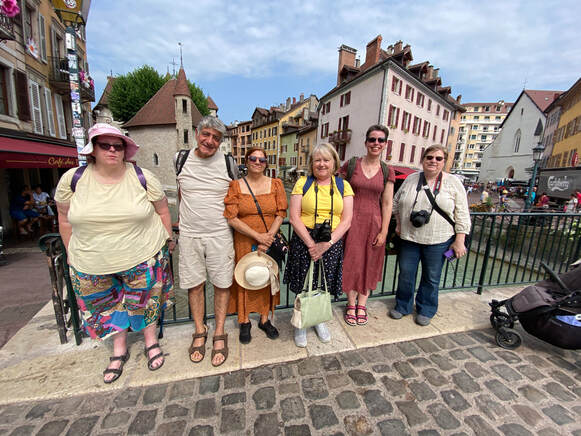 Gail, Namik, Gülnaz, Stephanie, me and Michelle shopping in Annecy. As mentioned before, we take a break from stitching on excursion day. The area around Les Carroz is very beautiful and you can easily go for a walk in nature after class. On excursion day, however, you might visit a charming medieval small town, an area of outstanding natural beauty or a typical French market. I joined the excursion to Annecy this year. Mainly because they have something very rare there: an embroidery shop! I have plenty of natural beauty at home. However, I have no idea where my nearest true embroidery shop is located now that the London Bead Company has sadly closed. I love going through the boxes with cross-stitch designs by Le Bonheur des Dames. This year, I came away with a beautiful sampler of summerly designs.
If you are thinking of joining me (again) for a lovely embroidery retreat under the expert guidance of Mark and Nadine, then mark your calendar. I will return to Les Carroz from the 15th until the 22nd of April next year. More information will appear soon on the new website of Creative Experiences, the new name for the Alpine Experience. Hope to see you next year!
4 Comments
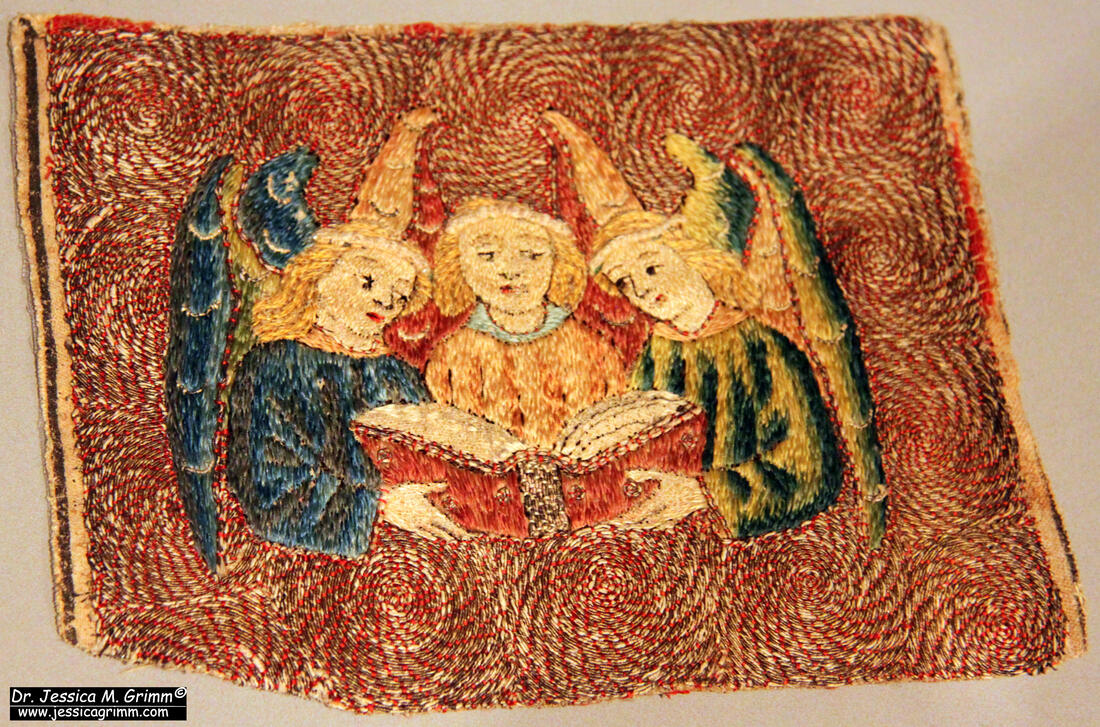
Last year, I visited the CIETA conference in Switzerland and we made a field trip to the Bernisches Historisches Museum. It has a large permanent display of medieval textiles well worth a visit. One of the many beautiful pieces is a large two-part antependium made in Vienna around AD 1340-1350. It was gifted by Albert II, Duke of Austria (AD 1298-1358) to the abbey of Königsfelden (now in Switzerland) where his sister, Agnes of Austria (AD 1281-1364) resided. Very kind of him, indeed. It is a stunning piece of embroidery and very well preserved. Let's explore! 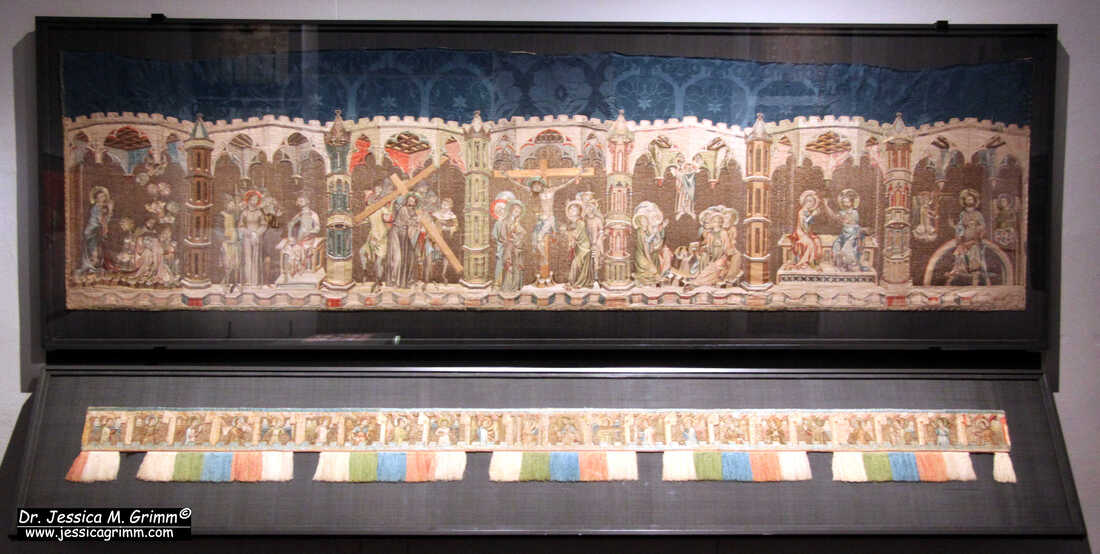 Königsfelden Antependium (c. AD 1340-1350), Bernisches Historisches Museum Inv. 27 & 51. The antependium consists of a larger part (90 x 318 cm) with seven scenes from the life of Jesus. From left to right we see: Gethsemane, Christ in front of Pilate, Christ carrying the cross, Crucifixion, Ascension, Crowning of the Virgin and Christ in Majesty. And a smaller band (18 x 292 cm (cut)) with angels surrounding Mary and Jesus in the middle. 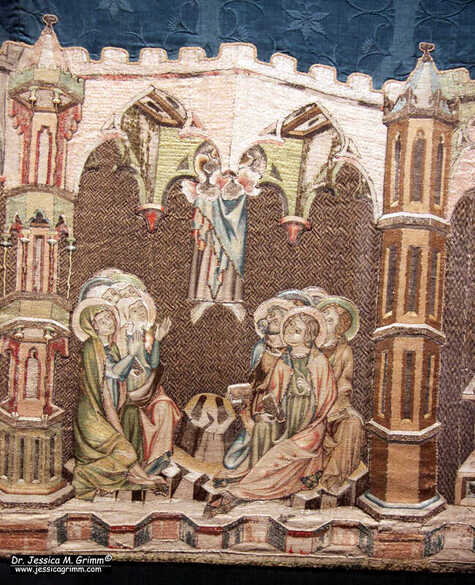 Ascension scene, Königsfelden Antependium (c. AD 1340-1350), Bernisches Historisches Museum Inv. 27 & 51. My personal favourite is this Ascension scene. I just love the naive way this is depicted in medieval art. And this is a particularly detailed depiction. We even have the footprints :).  Angel clapping its hands, Königsfelden Antependium (c. AD 1340-1350), Bernisches Historisches Museum Inv. 27 & 51. The smaller band with the angels is really lovely. Two of the angels are playing string instruments. Two others are carrying what looks like a tall white candle. The rest is having a blast. They seem to dance and clap their hands to the music. They form a rich resource for anyone looking to work a medieval musical angel.
The embroidery itself is very fine. The under drawing on the linen is of high quality. The faces of the angels are worked in very fine directional split stitch in untwisted silk. The same technique is used in Opus anglicanum. The other parts of the angels are worked in slightly longer split stitches. Probably because they don't need to be as detailed as the faces. The noses seem to be a little bit padded. And I think they used a knotted stitch for the hair. And it seems that the silk in the halos is laid flat and then couched down. A few additional embellishments on the clothing are stitched in couched gold thread on top of the silk. The background is formed by couching down parallel rows of gold thread with a light-coloured silk. The diaper patterns are relatively simple for the angels but more elaborate for the scenes of the life of Jesus. All in all, the embroidery reminds me a lot of the embroidery made in Bohemia at the same time. This isn't too surprising as Vienna and Prague are relatively close. The Habsburg rulers and the Bohemian kings were also related by marriage and fighting for supremacy in the region. If you ever have the chance, do visit the Bernisches Historischen Museum in Bern, Switzerland. My Journeyman Patrons will have access to many more pictures of this gorgeous embroidery. Please note: I will take a two-week blogging pause whilst teaching for the Alpine Experience. A fresh blog post will go up on the 10th of July. Literature Schuette, M., Müller-Christensen, S., 1963. Das Stickereiwerk. Wasmmuth, Tübingen. Stammler, J., 1891. Königsfelder Kirchenparamente im historischen Museum zu Bern, Berner Taschenbuch 40, p. 26-54. Those of you who listen to the FiberTalk podcast will probably know that Gary and Beth have this thing going whereby they are not adding to their stash until June next year. Some (most?) of their listeners are predicting that their resolve will crumble very soon. I am of a different opinion. I think that they will last. They will just add another exception to their already very long list of exceptions:). And as always, they have no problem coming up with ways in which we, their loyal listeners, can spend our money. In my case, on a membership of the EGA. I was a Member at Large many years ago, but this wasn't really what I was looking for. I was missing out on connecting with a local chapter. Thanks to the pandemic and some promotion on FiberTalk, I am now a happy virtual member of the Day Lilies chapter in Medina, Ohio. I think this might be a solution for others too, so let me explain how it works.  Hybrid EGA chapter meeting on Zoom. For years, I have tried to set up stitching groups both in my native Netherlands and, once I moved, here in Germany. To no avail. Some ran for a while and then faltered as the commitment to travel, make time or spent a little bit of money was just not there. At other times, people just did not get along with each other and I had to dissolve the group. However, I very much like to stitch and chat! So, when Beth mentioned that some EGA chapters now offer Zoom meetings, I wondered if that could be the solution for me. After all, the EGA has been going for a while and has a strong structure in place. No inventing the wheel here. I contacted EGA and they were very helpful in helping me find a chapter with hybrid meetings at a time that's compatible with my time zone. I also preferred a small town/rural chapter as that would match better with where I live (a small village with 725 inhabitants). Last Thursday, I attended my very first 'local' chapter meeting. About 18 members live in the Medina library, two members Zooming in from Georgia and me Zooming in from Germany. Chapter President Angelia moderated us through the meeting and carried us through the room so that it really felt like we were there too. I did a quick screenshot to show you what that looked like. I made sure that Marie from Georgia ducked, and all others are only recognisable when you know them. It is just me staring into the camera like a deer into the headlights :). It turns out that another relatively new member has better cameras which we can use next time to make the experience even better. We are going to try that out on Thursday 13th of July during our Stitch in Public Day at the Medina Library. I will be there too; on a screen. 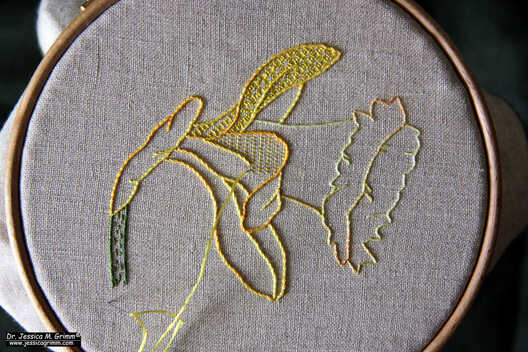 Blackwork Daffodil pattern by Bonnie Rhodes. Apart from meeting so many other stitchers, I also got to participate in a blackwork project. Bonnie, a Master Craftsman and member of my chapter, taught her blackwork daffodil design. This was the perfect opportunity for me to try my hand at something new. Yes, I had done blackwork before for my RSN Certificate and I have taught it many times for the RSN, but that's different. This time, I could play.
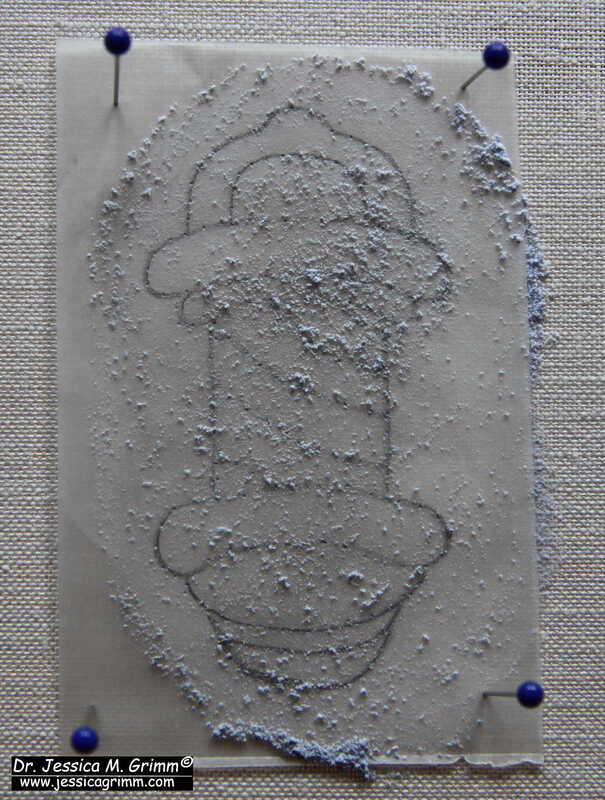
First of all, I changed the colours. I had never tried blackwork in colour and was wondering what that would look like. Furthermore, the way blackwork is taught at the RSN is very specific and not historically correct. Bonnie's approach is much more in line with historical blackwork. At first, this new approach was very hard for me to get my head around! In the instructions, Bonnie provides a sequence of diagrams that would make up a single blackwork filling pattern. You work layers of darning patterns on top of each other and that makes the pattern. At the RSN, you get a diagram of the complete pattern, and you are told to stitch that as economically as you can with as few 'wandering' threads on the back as you can. Not having a 'complete' diagram to work off was very hard for me at first. But it provided me with an alternative way of how to teach somebody how to 'read' these patterns. Not all students see the best stitching paths when confronted with a traditional diagram. And this is exactly why I still take classes and work kits. There is always something new to discover! When I started my embroidery business many years ago, freshly out of the Royal School of Needlework, I simply continued to use the materials they use there. It was very convenient. I was familiar with the product, and I knew where to get it. After a while, I discovered products I liked better and so started to swap things out as and when needed. When the catastrophe of BREXIT became final in 2021, I needed to find even more replacements for 'typical' British products or pay 19% extra tax + a customs handling fee. One of the last products I have so far not found a replacement for is pounce powder. Theoretically, you could make your own from drawing charcoal (white chalk powder is easily available in a good art store). Practically, though, it is very messy, and you might end up with a black powder that smudges your white embroidery fabrics when you apply the baby brush to brush the excess off. Not good. So, I still ordered my pounce from Sarah Homfray. However, she has been having supply problems herself. Time to find an alternative. And no, it won't be an aqua trick marker :). 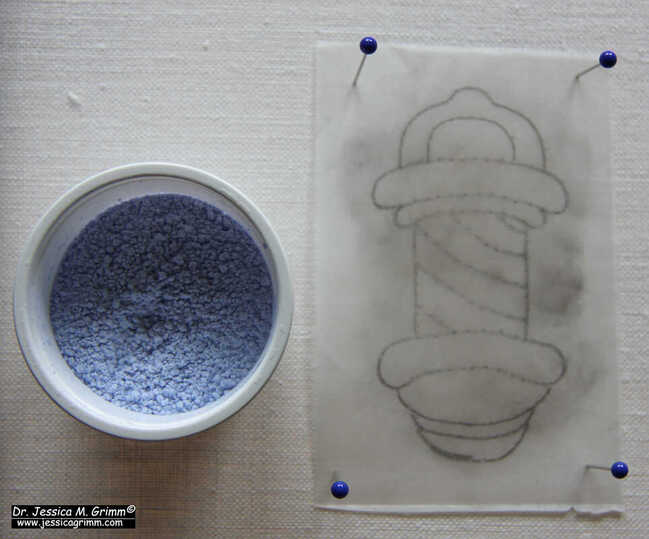 light blue pounce and pinned pricking To my surprise, there is a small family business in Germany that has been making and selling pounce since 1876! That's like since dinosaurs roamed the earth. The only drawback: there's no black. They do white, light blue, yellow and red. I decided to order the white and the blue. On their website, the blue looks rather dark. In real life, it is VERY light baby blue (DMC 3747). Main question: is the pounce suitable for the prick-and-pounce method? Let's run a few experiments!
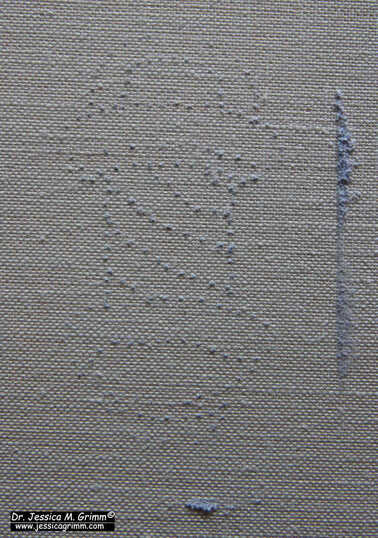
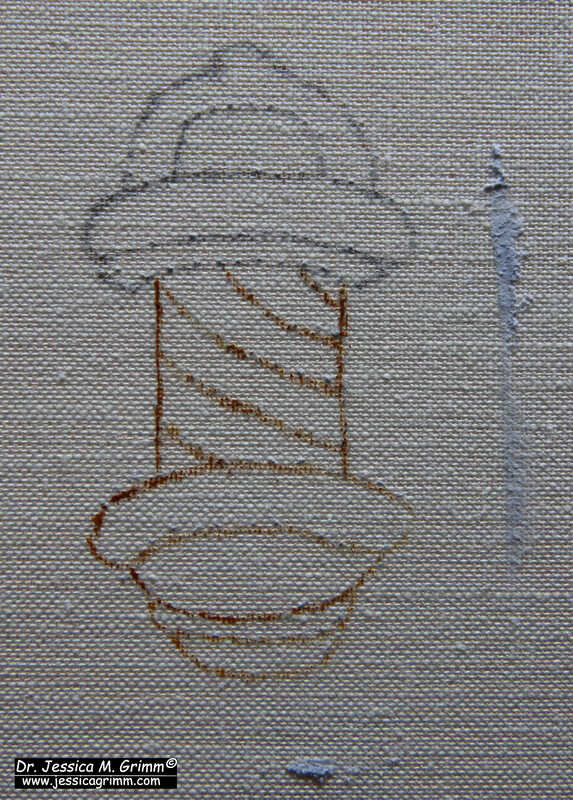
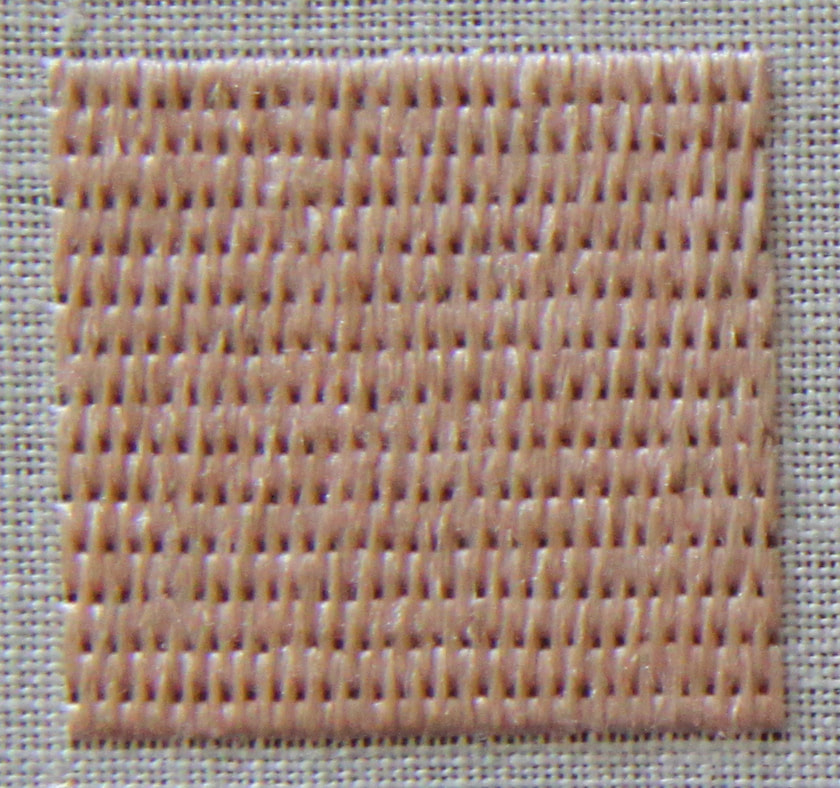
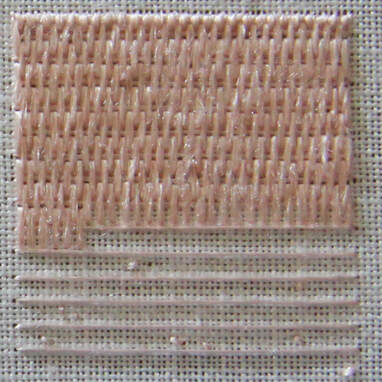
For my experiment, I used a small pricking from my collection. Pinned it to 46 ct linen that's on my slate frame at the moment. Rubbing the pounce through was not a problem. It made nice small dots on my fabric. Although the blue is very light, I found the dots easy to see. I was working in front of my window: no direct sunlight and no additional artificial light either. I used some iron gall ink for part of the design and some watercolour paint for the rest. The ink was nicely inhibited by the pounce so that it didn't spread. The only blobs are actually in the area where there was no pounce dot. The pounce also worked well with the paint. Overall, I had the impression that my brush did not clog up as much as it does with charcoal pounce.
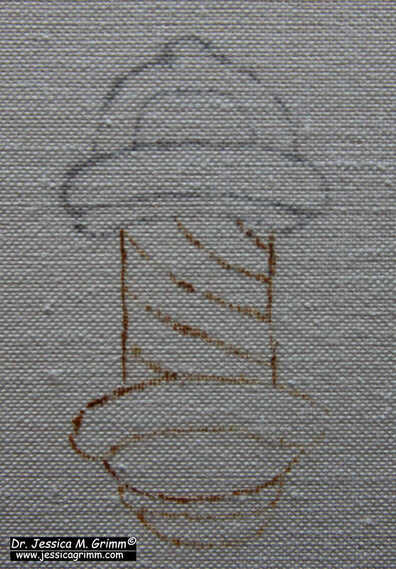
Once the paint had dried, I brushed the excess pounce off with a baby brush. The pounce was easy to brush off and it did not leave a trace on the fabric. The design lines are crisp and easy to work with. I think I have found myself a new favourite pounce! How historically accurate coloured pounce is, is difficult to say. We know about the white (chalk/burnt bone) and the black (charcoal). And possibly a yellow. Unfortunately, not much research has been done on the actual materials used in the Middle Ages. I did not yet experiment with the white pounce as it looks and feels exactly the same as the white pounces I already have. 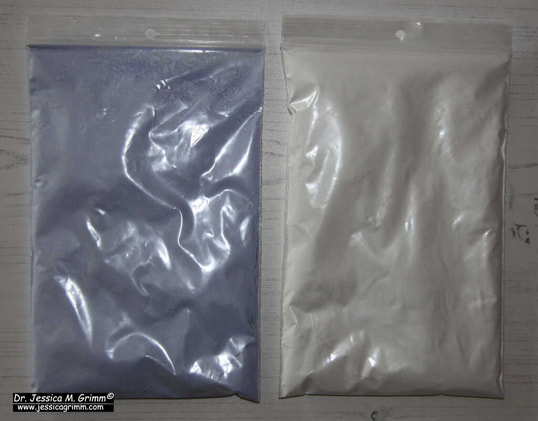 100 gr bags of pounce The pounce powder comes in a box with 10x 100 gr bags in one colour. Most stitchers won't go through a kilo of pounce in their stitching lives. Besides, you probably want more than one colour. Maybe order as a group? Or see if they are willing to sell a combi-pack where you get a 100 gr bag of each of the four colours? Although I could see the light-blue dots perfectly well, I am going to order a box of the red and the yellow pounce as well. If those colours behave as well as the blue did, I will see if they are open to selling specifically to embroiderers and doing the combi-pack. It is probably a market they have not thought of. By the way, their pounce is normally sold for those puff machines with which you encircle a person wearing a skirt that's too long and needs shortening.
For your chance of winning a bag of blue and a bag of white pounce: please consider becoming a Patron. Your monthly contribution keeps this blog and website running. I'll pick a winner from my Patrons on Friday 9th of June, 9:00h CEST. Still time to join! Adding an area of Burden Stitch to my orphrey a couple of weeks ago resulted in some questions and remarks regarding this lovely stitch. First up was the name. A stitch in use during the Middle Ages should probably not be named after a woman who lived in the 19th century. Good point. However, renaming (well-known) stitches is a bit tricky. How do you safeguard that people still know what you are talking about? I could start calling Burden Stitch something like 'Brick Stitch over a foundation thread/padding'. That's technically what Burden Stitch is. Next question: Was Brick Stitch called Brick Stitch during the Middle Ages? I don't know. As far as I am aware, and please correct me if I am wrong, the only technique for which the name can be traced to French accounts of the High Middle Ages is or nue. We could sure do with a Re rustica or Re metallica for embroidery. No such luck. And then there was the mermaid ... 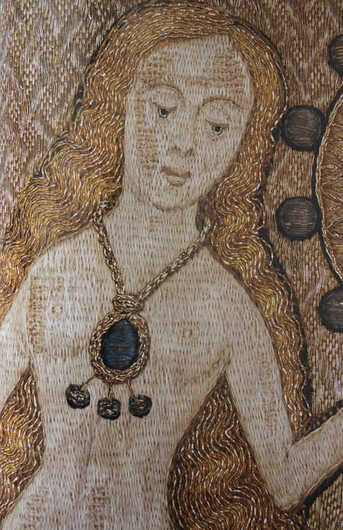 From: Browne, C., G. Davies & M.A. Michael (eds), 2016. English medieval embroidery Opus Anglicanum. London: Victoria & Albert Museum. This mermaid. She is lovely and a bit problematic. Typically mermaid I would say :). Due to a free reference to the website of a textile conservation company in an article by Natalie Dupuis for Piecework magazine, this mermaid is quite well-known in the embroidery world. It was later mentioned on Cynthia Jackson's blog too. After all, it is one of the few free online resources with good pictures of the embroidery. Neither Natalie nor Cynthia mentioned the Burden Stitch in their articles as they focussed on a completely different aspect of the Fishmonger's Pall. Burden Stitch is only mentioned on the website of the conservation company. And I think it is a mistake. The skin of the mermaid (and Saint Peter) is not stitched in Burden Stitch. 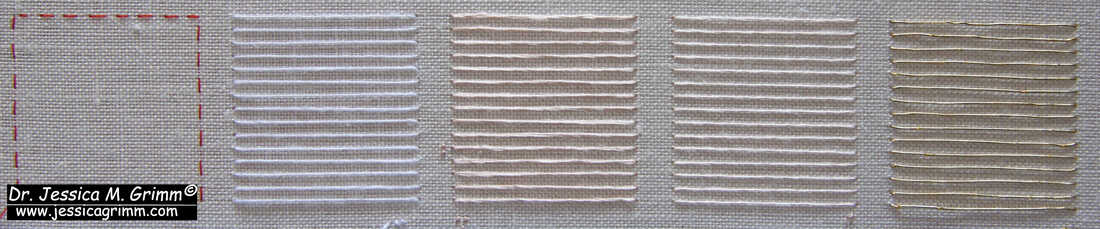 From left: empty square for Brick Stitch, linen thread, double silk, single silk, Stech (passing thread). Identifying embroidery stitches from photographs can be really tricky. When I was alerted to the 'Burden Stitch' on the Fishmonger's Pall by one of my Patrons, I eventually got confused too. When I looked at the pictures, I saw Brick Stitch, not Burden Stitch. As mentioned above, they are similar. Burden Stitch has an added foundation or padding thread. Most needle painting or long-and-short we see in medieval embroidery is actually Brick Stitch or something close to the orderly needle painting as seen in Chinese embroidery. Free-form needle painting as taught by the Royal School of Needlework or Trish Burr, simply does not exist. The medieval embroiderer was a master craftsman and not an artist. Free expression in embroidery was not invented yet. In order to better understand what was going on on the Fishmonger's Pall, I decided to stitch up some samples. I used 46ct even-weave embroidery linen with Chinese flat silk. In order to cover the fabric nicely, I do go over each stitch twice. This gives a flatter result than when you use a double thread in the needle. For my foundation threads, I used: Barkonie linen thread 50/2, a double thread of the Chinese flat silk, a single thread of the Chinese flat silk and gilt Stech 80/90 (passing thread).  From left: Brick Stitch, Burden Stitch over linen thread, Burden Stitch over double silk, Burden Stitch over single silk, Burden Stitch over Stech (passing thread). Burden Stitch produces a textured surface. To me, skin should be smooth. As you can see from my samples, even the single thread of silk produces a textured surface. Furthermore, it is really hard not to catch any fibres of the foundation threads (not so with the Stech). No matter if you use a sharp or a blunt needle. But my biggest argument why the stitch seen on the Fishmonger's Pall is not a Burden Stitch is the fact that you always see the foundation thread in Burden Stitch. And we do not see one in the pristine areas of the skin of the mermaid. This rules out Burden Stitch for me. The V&A catalogue for the Opus anglicanum exhibition does also not mention Burden Stitch. I, therefore, think that the conservation company misnamed the stitch.
What do you think? Have I missed something? Very well possible! Please chime in below. I will also organise a Zoom meeting on Saturday the 3rd of June for my Journeyman Patrons to further discuss the mermaid and my experiments. Let's see what we can learn!
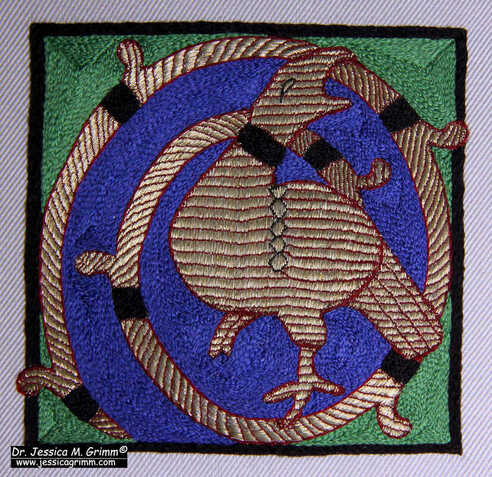
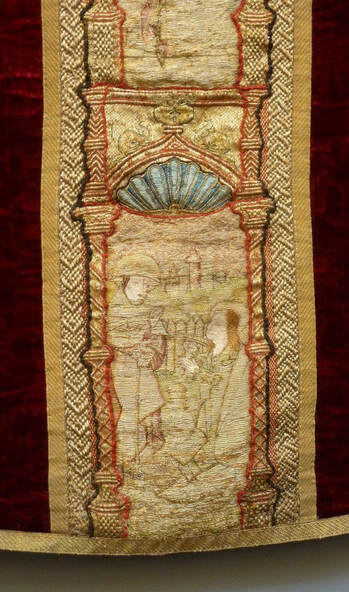
Literature Browne, C., G. Davies & M.A. Michael (eds), 2016. English medieval embroidery Opus Anglicanum. London: Victoria & Albert Museum. Since I don't have any official information on the beautiful chasuble from the Diocesan Museum Freising, I am trying to find parallels with the help of my database. I've started with the figure of Saint Margaret. She is quite common in medieval embroidery, yet not too common. I was hoping to find a twin relatively easily. No such luck. Although I was able to collate 32 embroidered versions of Saint Margaret, they turned out to be remarkably diverse. And it quickly became clear that medieval people did not really know what a dragon looked like :). Renditions range from angry dogs to very elaborate dinosaurs. Still, there seems to be some regional agreement on what dragons look like. Let's explore!  Museum Catharijneconvent ABM t2123a, last quarter 15th-century, Dutch. Museum Catharijneconvent, Utrecht, foto Ruben de Heer First things first: why does Margaret have a pet dragon? Margaret refused to renounce her Christianity and was tortured. At one point, she was swallowed by a dragon. The cross she carried gave the poor beast a sore tummy and Margaret was spit out. The story does not tell whether the dragon lived happily ever after. Margaret did not. She was decapitated and became a martyr. In iconography, Margaret is often depicted with a dragon and/or with a cross. 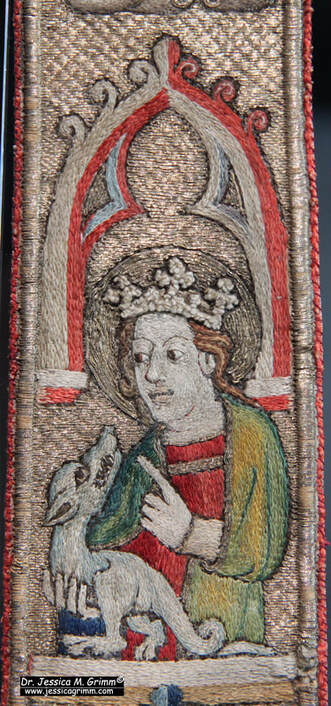 Rüstkammer Dresden i.0084, c. AD 1360-1370, Bohemia My favourite depiction of Margaret can be found on the lappet of a Mitre held in the Rüstkammer, Dresden. My husband and I refer to it as 'the blue angry dog'. I think it is adorable. The interaction between Margaret and the blue angry dog makes me smile. And besides, the embroidery is stunning too! 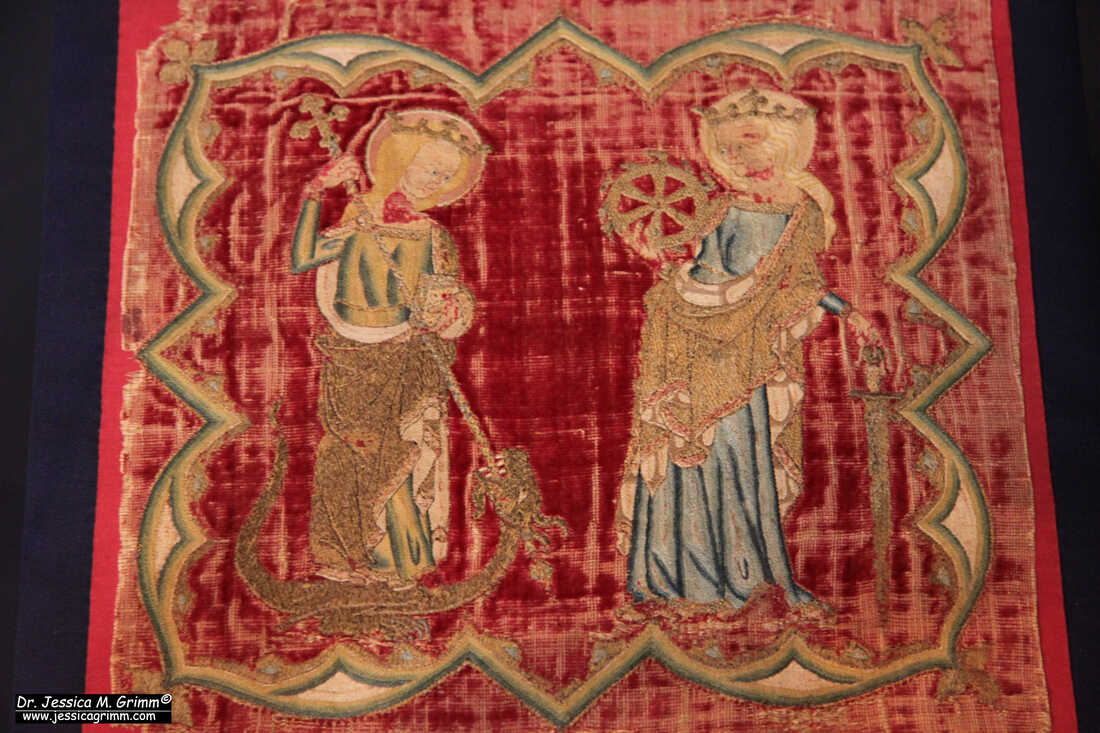 Victoria & Albert Museum T.2-1940, AD 1335-1345, England As said, the depiction of the dragon is very diverse in medieval embroidery. However, the depiction is remarkably uniform in England. Still, no two dragons are exactly the same. But the overall depiction is quite uniform. This is likely due to the fact that most of the surviving pieces date to a relatively short period: AD 1280-1375. That's classic Opus anglicanum. I love the elegance of this snake-like dragon and the action-pose of Margaret.
I did find twin dragons on two pieces from Germany. It is a cute blue dragon sitting on Margaret's hand. Both renditions clearly had the same master copy. The embroideries belong to a whole corpus of embroideries that have relatively naive depictions of saints and biblical scenes. They often have a characteristic background of gold threads couched down in a 'sunny spiral' pattern. It is believed that these designs were possibly block-printed onto the linen and then embroidered.
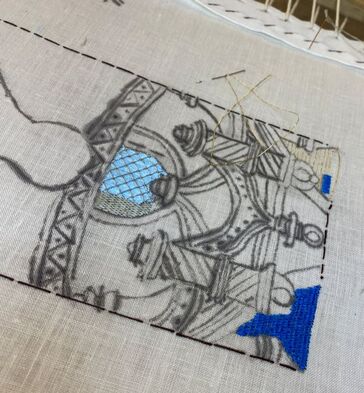
Margaret's dragon would make a good study subject when you want to learn medieval embroidery. They come in all sorts and shapes and can be very elaborate. They can be easily turned into a lovely design on their own or with their 'owner' Margaret. My Journeyman Patrons have access to a Padlet with all 32 embroidered depictions of Margaret and her pet dragon. Next week, we'll dive into the Burden stitch again. A little discussion on Patreon left me puzzled :). I ran a few experiments and I'll share the results with you next week! Currently, I am mainly working on my orphrey background. I will be teaching this design at the Alpine Experience in June. For the past couple of years, I have always combined written instructions with video. This seems to work well for my students. However, as the apartment next door is being gutted and then put back together again, my stitching and recording are very dependent on when the workmen are quiet :). So, let's check in on my progress. 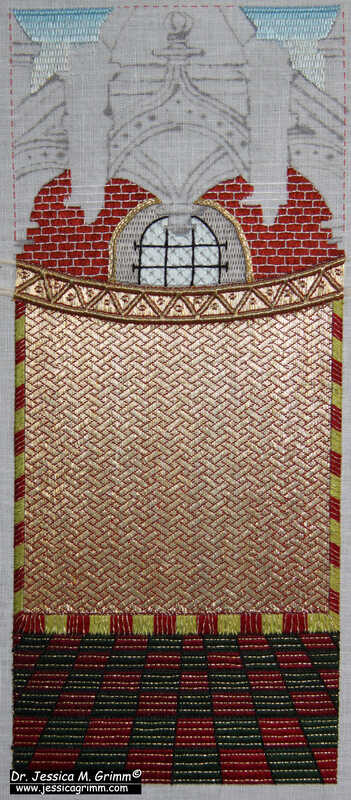 As you can see, the tiled floor is in, the wall with the window has been completed, the sky was added and the basis of cloth of gold with the diaper pattern is in. The cloth of gold needs some minor further embellishment. I was going to do that today, but alas, the workmen are plastering, and it sounds like they are standing right next to me :(. Let's aim for tomorrow! The diaper pattern has been a terrific candidate for demonstrating goldwork embroidery at my local open-air museum Glentleiten. People were fascinated by the simplicity of it and the lovely effect achieved. I even managed to get people hands-on involved. Two young girls, aged 8 (!), plunged right in and happily stitched a row on my orphrey. In the beginning, they stabbed around a bit before they found the correct hole with their needle. But I kid you not, after about 5 stitches their hand-eye coordination caught up and it all went very smoothly. By the way, I am happy for interested people to work on my orphrey. They can't really break anything. And it is much more fun than when you stitch a mock-up row on the side somewhere. Equally, I don't believe in doodle cloths. But that's a different story :). Would you be happy for strangers to have a go at your embroidery project?  My orphrey background also contains a technique I had not tried before: Burden stitch over gold thread. It is used in the sky. I was familiar with Burden stitch but was a bit sceptical about the gold thread. When you are working the stitch it almost completely disappears below the silk. So, my thought was: "at least the texture is pretty". However, when the Burden stitched area catches the light it really glows! It never ceases the amaze me how little light, natural or artificial, goldwork embroidery needs to reveal its full potential.
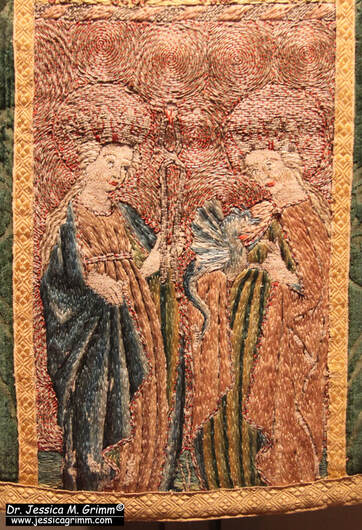
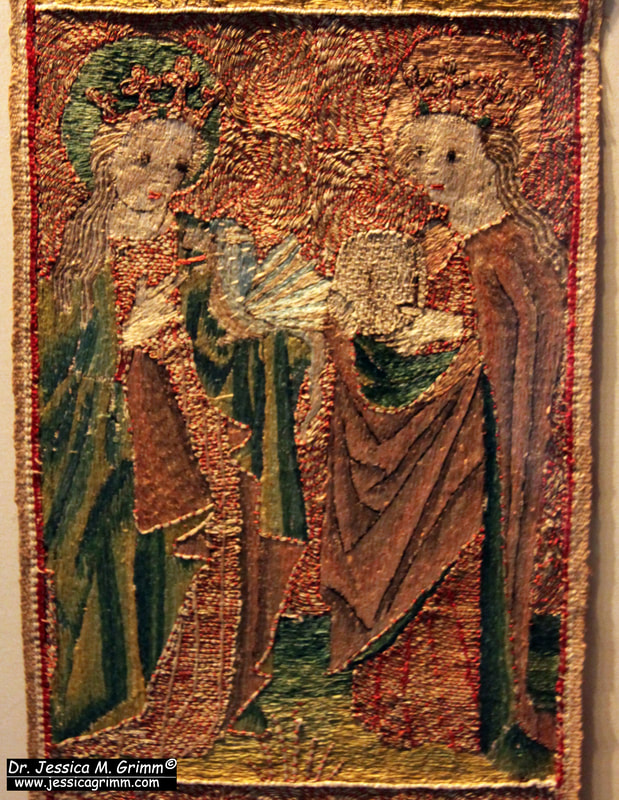
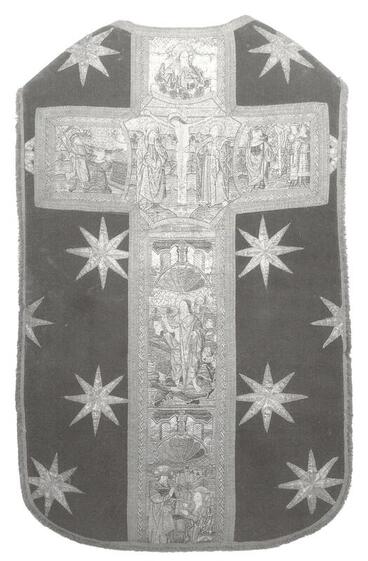
Have you ever worked Burden stitch over a gold thread in any of your projects? Would you like to have a go? My Journeyman Patrons find handy PDF instructions on my Patreon page! Earlier this year, the Diocesan Museum Freising opened its doors again after extensive remodelling. As it is not too far from where I live, I decided to check it out in case any medieval embroidery was on display. It turned out that they have a stunning chasuble with very high-end embroidery on it. Unfortunately, there were no captions in the museum. I emailed them and wrote an official letter. To no avail. They never answered. Frustrating as this is, it is unfortunately, a reality when it comes to European museums. Museums in the UK or the USA are usually very helpful. Museums in Europe usually do not even bother to answer, let alone host me for a research visit. This undoubtedly is the result of how museums were and are financed in the respective countries. And with the 'distance' between lay people and experts. Despite having a doctorate in archaeology, being a professional embroiderer and having studied medieval goldwork embroidery for a number of years, this does not always make me an expert :). So, let's see what we can find out on our own about this stunning piece of embroidery!  Chasuble with medieval goldwork embroidery at the Diözesanmuseum Freising The chasuble cross on the back shows an interesting scene at the top: the mystical marriage of Saint Catherine. As far as I am aware, this is the only embroidered version of this particular episode. There are more embroidered scenes of the life of Catherine, but this one seems unique. The scene is flanked by two angles. One playing the harp and the other a lute. Below the central scene, Saint Margaret is depicted with the dragon. The beast playfully bites into her standard. The Saint at the bottom is Dorothea with her basket of flowers. Catherine, Margaret and Dorothea are known as the virgines capitales. As you can see, the orphrey has been cut at the top and at the bottom. Furthermore, we cannot see the front of the chasuble which might also have an orphrey. But the fact that the virgines capitales are usually four saints gives us an idea of what is missing: Saint Barbara with the tower. A further likely candidate is Mary Magdalene. 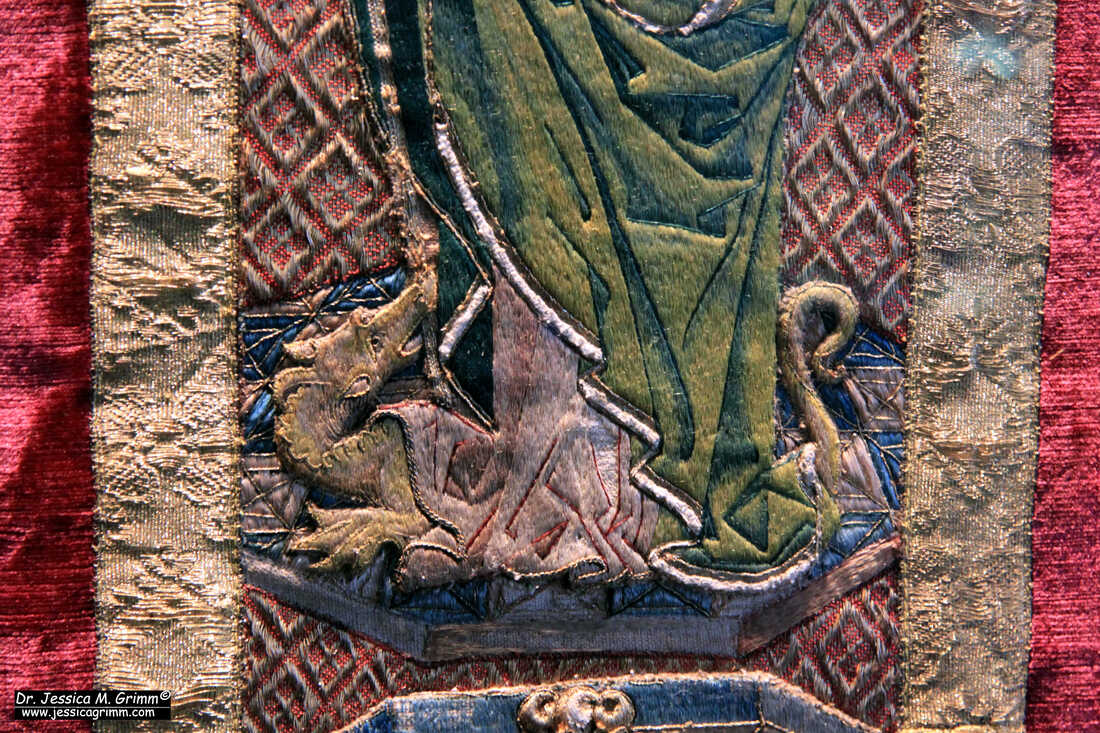 Detail Saint Margaret with the dragon. As said, the embroidery is very high-end. The silk-shading is very finely executed. Both in the actual shading and in the regularity of the stitches. There's no or nue, which gives us our first hint of where the orphrey was made. Or nue is typically something of northwestern Europe (the Low Countries and Northern France) and Southern Europe. It was not really used in England or in Central Europe. As the stitching is very high-end and England does not seem to produce outstanding medieval embroideries after the heyday of Opus anglicanum, we can rule out England as the place of origin. This leaves Central Europe as the most likely candidate. The diaper pattern used in the background of all three sections of the orphrey is unusual too. I know of only one other instance where this pattern has been used: on an Italian orphrey with Bartholomew the Apostle in the Indianapolis Museum of Arts. Those orphreys are clearly Italian and date to AD 1500-1550. The orphreys on the chasuble from Freising are clearly not Italian. And the strong red couching stitches also support this (yellow is preferred in Italy). 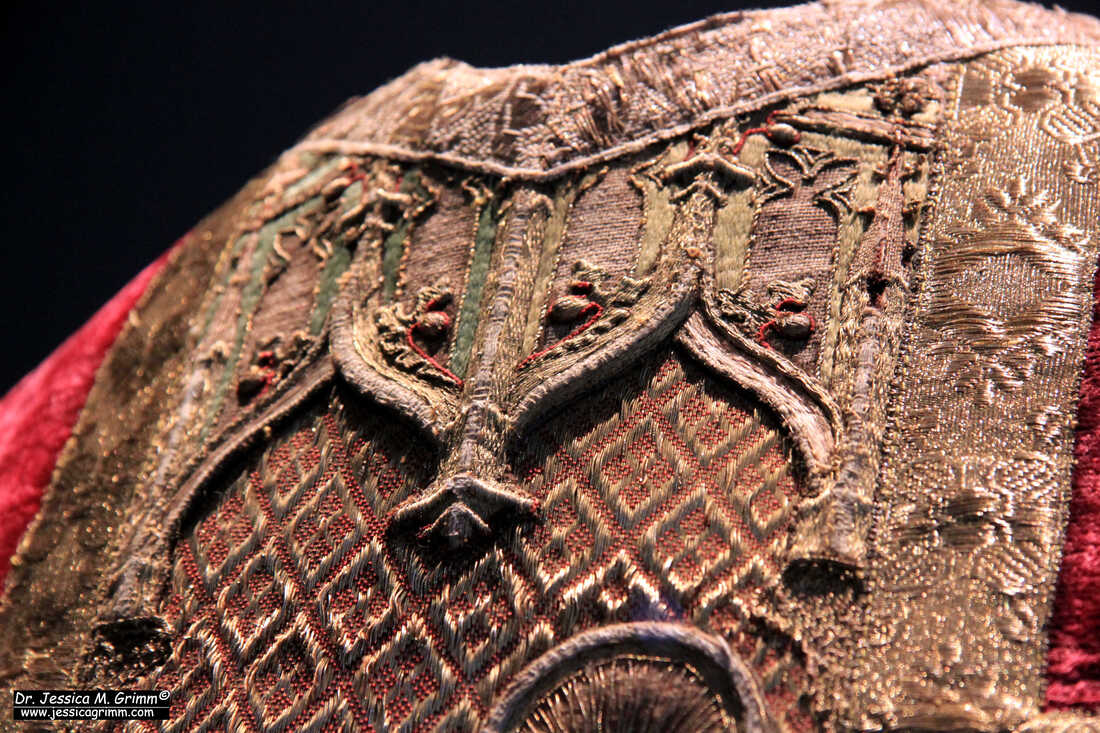 Padding of the arches above the central scene. Another important characteristic of the embroidery on this orphrey is the padding. Especially the arches above the central scene and above Saint Margaret are very highly padded. It would not surprise me if a little bit of wood is hiding in the most-padded parts. In contrast, the figures and the rest of the scenes show very little padding. 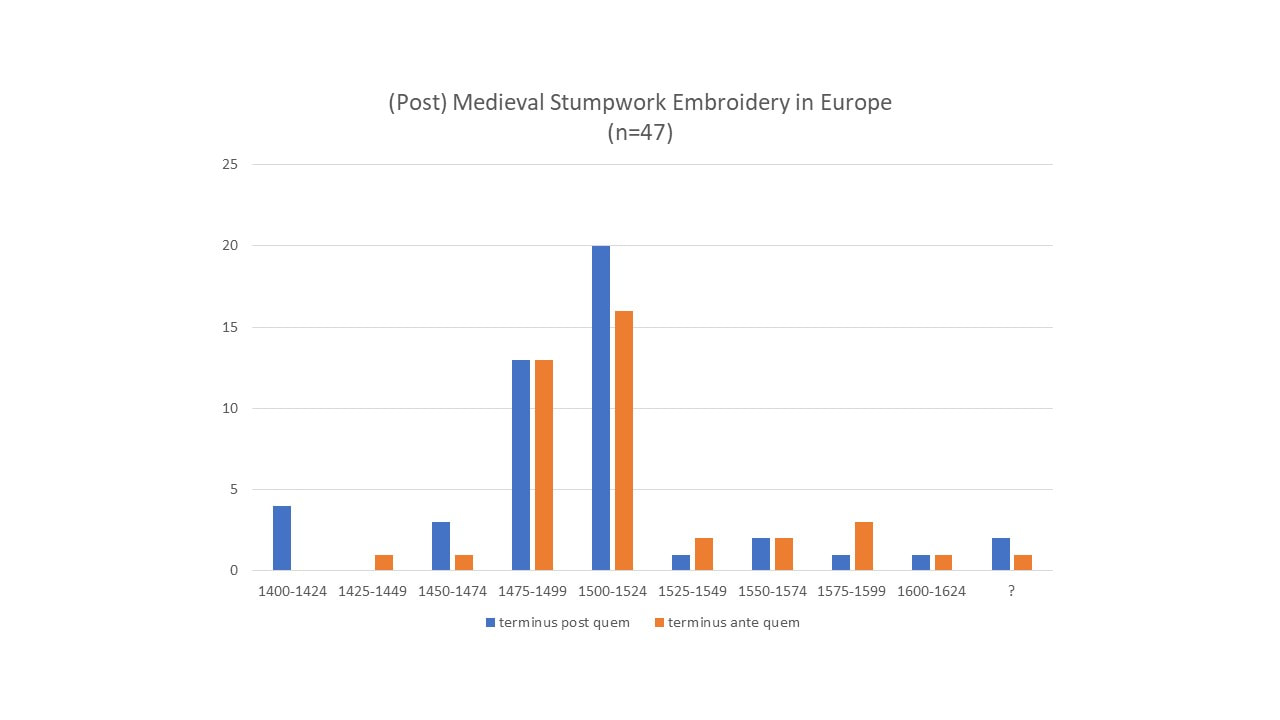 There's a relatively short period in the history of Central European goldwork when voluminous padding techniques (think stumpwork) really take off. Pieces belonging to this form of embroidery date from about AD 1400 until 1600 (some have a really wide date range assigned to them). However, when the dates are plotted for the 47 pieces in my database, we see that they cluster on either side of AD 1500. I, therefore, think that the orphreys on the Freising chasuble probably date between AD 1475 and AD 1525.
It is thus probably safe to say that the beautiful orphrey on the Freising chasuble was made somewhere in Central Europe around the turn of the 16th century. If you would like to see more pictures of this piece, please consider becoming a Journeyman Patron. As a Journeyman Patron you'll have instant access to a further 12 pictures of this piece. The monthly support of my Patrons enables me to keep this website running! As I was studying a Portuguese book on medieval embroidery, I came across an article by José Alberto Seabra Carvalho on the craft of embroidery in the Middle Ages and Early Modern period. Although he acknowledged that some embroidery was undertaken by the women in noble households and by nuns in convents, he also came to the conclusion, by studying the surviving pieces and combining them with the historical records, that those were made by men in commercially run workshops. Their quality is simply too high. It requires many years of training before one is able to make a living from making orphreys. At the same time, he briefly investigates this ideal of the 'pious woman'. As long as her hands were busy doing needlework, she could not daydream and get into trouble. In addition, her handy work could contribute a bit to the household. These opinions are not his but come from contemporary sources. And here we have precisely this duality: needlework itself is not much valued as it is done by women to keep them from having a wandering mind. While at the same time, commercially produced goldwork embroidery requires many years of training and is thus the domain of men. The duality and stigma embroidery 'enjoys' today is thus an old one. Art versus craft. And only for women. Let's explore what that looks like in medieval and early modern images!
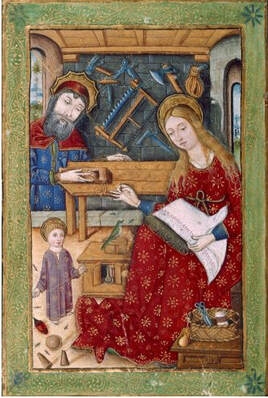
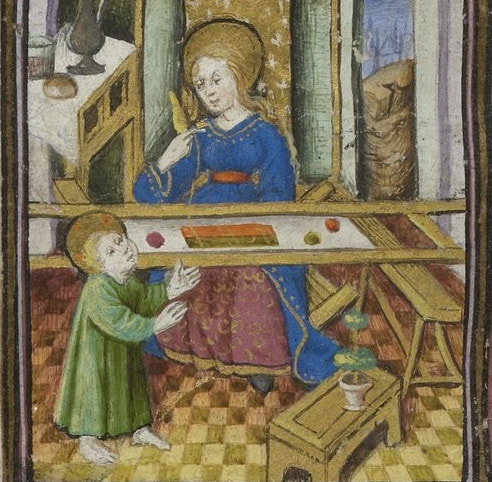
Female embroiderers are depicted in two different ways: stitching in hand or sitting behind a slate frame resting on trestles. Usually, it is not ordinary women that are depicted embroidering. Especially not in the earlier periods. It is either Mary employing a needle or a queen/noblewoman stitching. Stitching in hand requires very little in terms of professional tools. Mary on the left has a simple basket filled with scissors and a bobbin with thread. This is in strong contrast to Joseph's array of professional carpenter tools hanging on the wall. By the way: I don't think St Francis would approve of Jesus tying a rope to a bird :). Contrary, Mary on the right, is shown in a much more professional setting. She uses a large slate frame and a pair of trestles. The spool she is holding might be wound with gold thread. It looks like she is using her slate frame and trestles set-up as a kind of working table with balls of yarn laying on top. Some people argue that this shows Mary making a tapestry instead of an embroidery. However, I think she is in the process of couching down a gold thread on top of red and green silk embroidery. In both images, combining embroidery with childcare seems not to be a problem. Maybe that's why the child is harassing the bird?
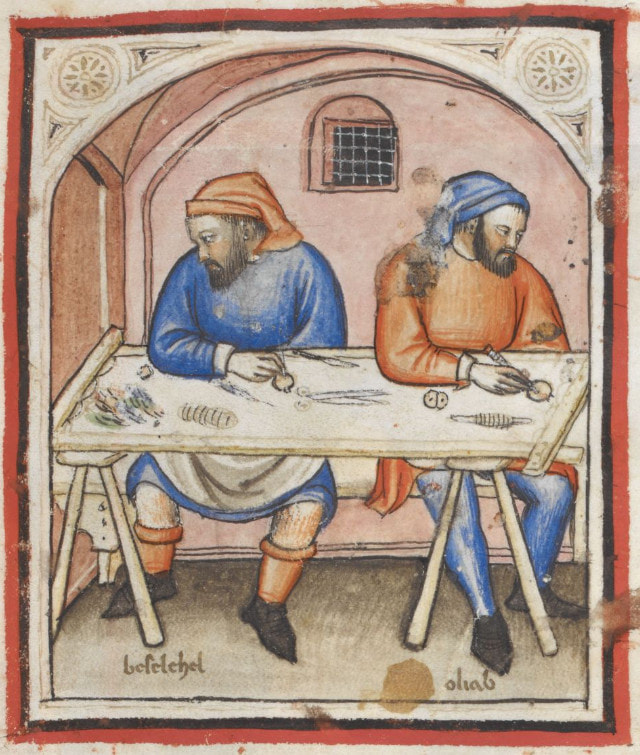
Male embroiderers, on the other hand, are depicted in one way only. As professionals. No cosy stitching whilst watching a child. Maybe medieval and early modern men were just not prone to 'daydreaming and getting into trouble'?
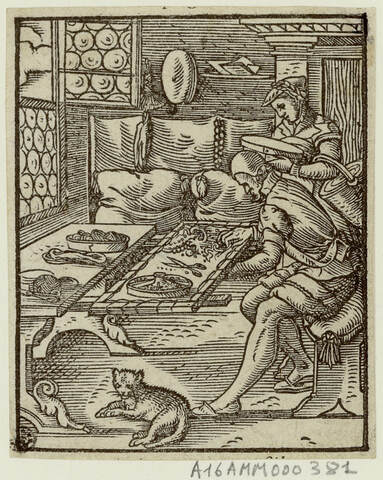
The above illustrations show men sitting behind slate frames in the typical posture of an embroiderer. One hand above the frame and one hand below to speed up the process. And I love the non-ergonomic posture of the man on the right. At least none of the above men can be told off for crossing their legs :). By the way, I think we also see very realistic depictions of how these professional workshops were set up back in the day. The men on the left are probably working outside under a portico. Maximal use of daylight, but a bit sheltered from the weather conditions. The man on the right has the luxury of window glass. But he still needs to sit right in front of them and even needs to open the top window for clear, unfiltered daylight. The stereotypes depicted in the above images, some over 600 years old, seem to persist today. When I am demonstrating professional goldwork embroidery at my local open-air museum I get many stereotypical reactions. Many women equate what I am doing with cross-stitch embroidery. And when they hear that this is not my hobby, but my profession, I get 'the look'. It is not a kind look :). Some even react very irritated. How can a woman, who has gone successfully through university, want to stitch for a living?! How on earth did I sink so low? Very few women admit that they themselves stitch. And the ones that do, get younger from year to year. So, there is hope! Many men, on the other hand, have a very different reaction. They univocally acknowledge that what I am doing is very different from the needlework their mums and wives did or do. They are interested in my tools and the mechanics of it all. Some remark that this is 'typical' women's work. When I then explain that this was a male profession for hundreds of years, I have their full attention. Some even ask if I personally know male embroiderers (Gary Parr, you are getting famous here in Bavaria!). A few are so intrigued, they revisit the museum and seek me out to see how the work has progressed. And as they can precisely point out what I had accomplished last time, it is clearly about the embroidery and not about me :). I really hope that some people who see me stitch in the museum pick up a needle. Regardless of their reaction. Embroidery is fun! The ancient forms should be studied and revived. The professionalism of the makers should be acknowledged and valued. I hope you liked this blog post. Maybe it can contribute a bit of 'fact' to the craft versus art debate. Knowing that we are repeating the medieval and early modern idea of the 'ideal woman' when we see embroidery solely as a craft (in the modern sense), might make people think twice before they argue their case. The above images are not the only ones I have collected over the years. My valued Journeyman Patrons will have access to a Padlet with 10 additional images. Literature Seabra Carvalho, J.A., 1993. O Ofício. In: T. Alarcão & J. A. Seabra Carvalho (eds), Imagens em paramentos bordados seculos XIV a XVI, Instituto Portugues Museus, p. 16-21. In the last few years, there's been an increased focus on the benefit of needlework on your mental health. However, 'modern' principles of good mental health are sometimes also depicted in medieval embroidery itself. One such famous depiction is the scene of 'Noli me tangere' (cease holding on to me). It is based on a biblical story in the gospel of St John. Mary Magdalene returns to the grave site. She talks to a man whom she thinks is the gardener. He tells her not to hold onto him when she finally recognises him to be Jesus. Their former relationship has to change. Depending on what you believe, this is either because Jesus has died or because he just became responsible for the salvation of mankind and is now kinda busy. Either way, they need to let go of what has been. Being able to properly let go is a sign of good mental health. Let's have a look at the different depictions of this intimate encounter. 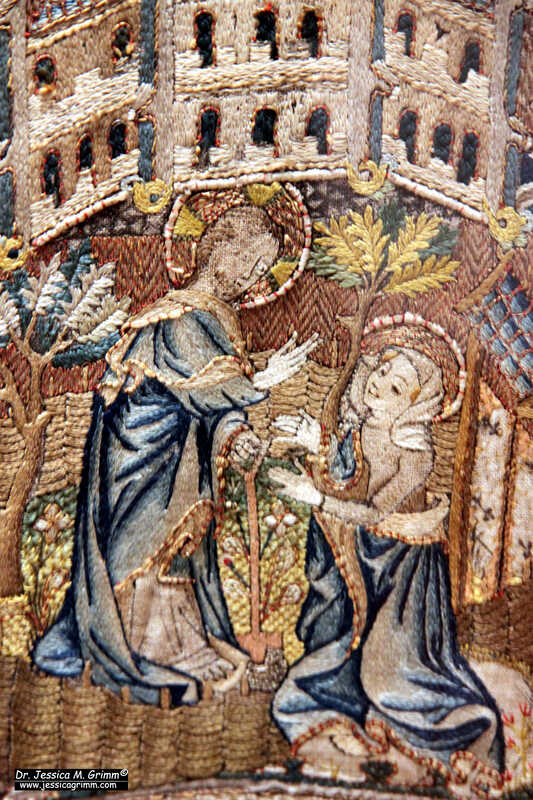 Noli me tangere scene on a cope from the Marienkirche, Danzig. Among the 1650 pieces of medieval goldwork embroidery, only 21 depict this particular scene. It is clearly not overly popular, but also not completely rare. The oldest pieces date to the 13th century and the youngest to the 16th century. By pulling them together, you start to observe some interesting things. Firstly, most of the embroideries depict Jesus as the risen Christ and not as a gardener. The first 'gardener-Jesus' is depicted on a cope from the St Marienkirche in Danzig (now Gdansk, Poland) (kept at St Annenmuseum Lübeck). It dates from after AD 1460 (but probably not long after). Between AD 1520 and 1530, the 'gardener-Jesus' becomes the norm. And you can clearly tell that the embroiderer knew what a gardener looked like and what equipment they used. In fact, the depiction of Jesus' shovel is so accurate, that medieval archaeologists have no trouble matching them to excavated originals. In the above picture, the brown silk embroidery represents the wooden part of the shovel and the silver threads depict the iron 'shoe' which protects the wooden edge and hardens it for digging. Neat, don't you think? 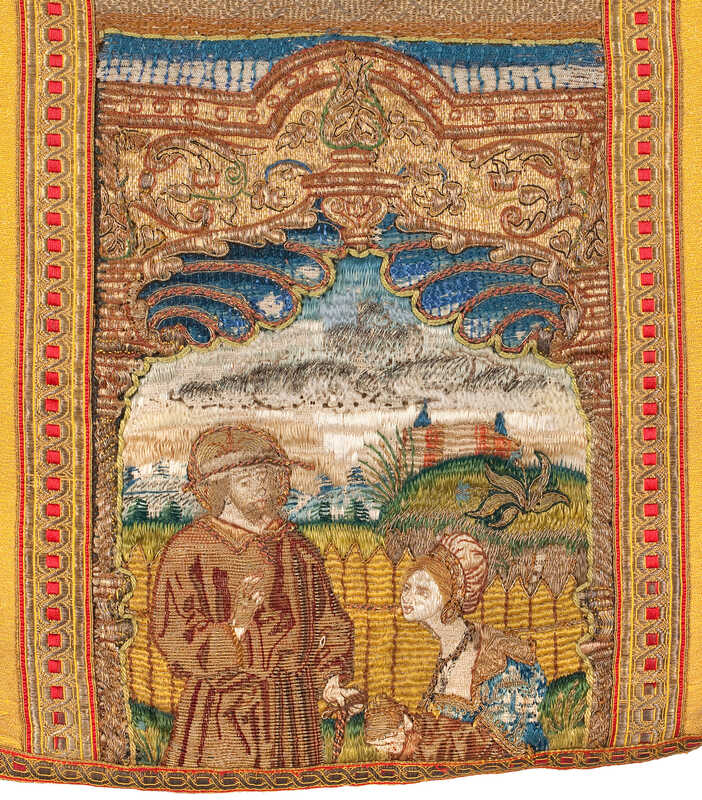 ABM t2327 is a good example of embroideries becoming less refined (the or nue is blocky and the castle in the distance is a disaster), Museum Catharijneconvent, Utrecht, foto Ruben de Heer. Putting the 21 embroideries in chronological order also shows developments in embroidery techniques and materials. The two oldest pieces from the 13th century are very different. One is a case of Opus florentinum from Italy (kept in the Aachener Domschatz, inv. nr. T 01001). It shows this characteristic treatment of the golden background: string padding in the form of foliage. The gold threads have been couched over it to create an embossed look (as I don't own a picture of this piece, please compare it with this piece from the MET 60.148.1). The other piece, the so-called Hedwigkasel (now kept in the Muzeum Archidiecezjalne we Wroclawiu, nr inw. 23/29a), is very different indeed. It is worked on red silk and reminds a bit of the earlier Opus anglicanum pieces. The figures are completely worked in metal thread embroidery. Many different, often very intricate, diaper patterns have been used to fill in the different parts of the figures. It even looks like the embroidery is done in underside couching. In the later pieces, we see an increased use of the or nue technique. In the beginning (late 15th century), it is only used on parts of the clothing of the most important figure in the scene. Pieces from the 16th century, often show the use of or nue for the full width of the orphrey. Only bare skin is voided. Figures and background are worked in one go. And whilst the youngest piece is also one of the finest when it comes to the execution of the embroidery, two slightly younger pieces show the decline likely caused by the Reformation.
And then there was this absolutely thrilling discovery of another 'twin image'. A chasuble (inv. nr. 138) held in the Frankfurter Domschatz shares an identical depiction of Noli me tangere with a chasuble (inv. nr. BMH t2912a) from the Museum Catherijneconvent. The embroidery techniques used differ a bit, but the design drawing is identical. I have alerted both museums to the discovery just in case they are unaware. As there seems to be little known about the piece in the Netherlands, finding a twin on a piece with known provenance is always very nice!
My Journeyman Patrons have access to a Padlet on which all 21 pieces are introduced. |

Want to keep up with my embroidery adventures? Sign up for my weekly Newsletter to get notified of new blogs, courses and workshops!
Liked my blog? Please consider making a donation or becoming a Patron so that I can keep up the good work and my blog ad-free!

Categories
All
Archives
April 2024
|
 RSS Feed
Contact: info(at)jessicagrimm.com
Copyright Dr Jessica M. Grimm - Mandlweg 3, 82488 Ettal, Deutschland - +49(0)8822 2782219 (Monday, Tuesday, Friday & Saturday 9.00-17.00 CET)
Impressum - Legal Notice - Datenschutzerklärung - Privacy Policy - Webshop ABG - Widerrufsrecht - Disclaimer
Copyright Dr Jessica M. Grimm - Mandlweg 3, 82488 Ettal, Deutschland - +49(0)8822 2782219 (Monday, Tuesday, Friday & Saturday 9.00-17.00 CET)
Impressum - Legal Notice - Datenschutzerklärung - Privacy Policy - Webshop ABG - Widerrufsrecht - Disclaimer