
|
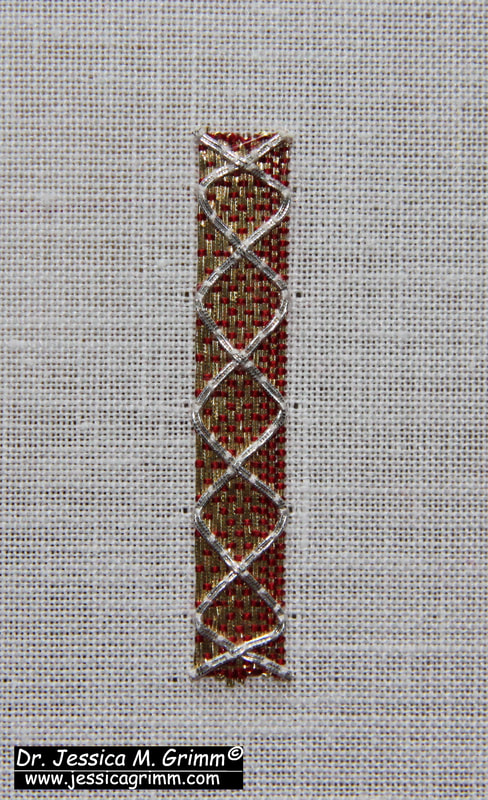
When I started work on this week's stitch tutorial, I had the increasing feeling that things weren't quite what they seemed to be at first. That's the great thing about doing research. I usually have no idea where the medieval embroideries will lead me. Dead ends are common. But so are those 'aha' moments. In this case, it was the latter. Let's dive in!  Detail Dalmatic (Nativity) of the Schlosser Ornat, Inv. Nr. 124 I-III, Dommuseum Frankfurt. And here is the culprit. No, not Saint Andrew. It is the columns on either side of him. They are odd. The layering of goldwork is a common thing in late-medieval goldwork embroidery. But this is simply too OTT. It does not make sense. Let's start our tutorial proper and I'll point the oddness out to you. 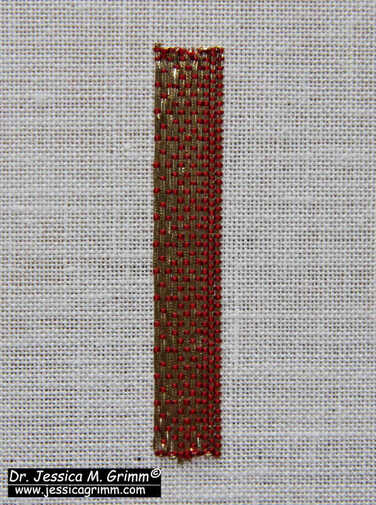 Start with a layer of shaded couched goldwork. For my sample (c. 0.8 x 5.0 cm), I used 46ct linen and passing thread #3 couched down with a single ply of red Chinese flat silk.
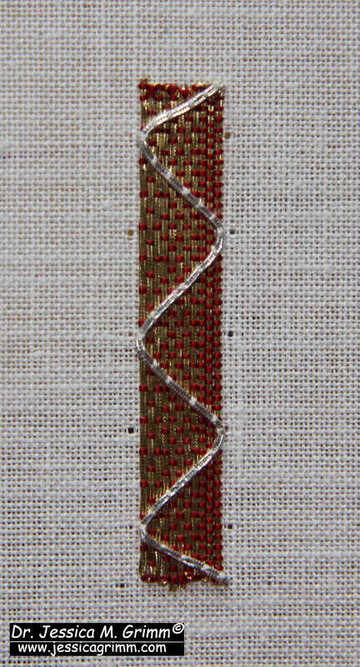
Next up, add the silver passing thread. You will be mainly stitching in between the rows of gold thread of the first layer. However, you will inevitably hit threads of the first layer. Make sure you use a fine needle. A new #12 would be perfect. You might also like to wax your silken couching thread (one ply of grey silk).  The "original" embroiderer then went on to add a layer of thicker red stitches along each side of the silver passing thread. I've used a full thread of red Chinese flat silk to do this for the inside of the right-hand side only. By now, I was pretty certain that this was not all done in the late Middle Ages ... So much additional stitching in such a relatively small space is nuts. It does not add anything to the design. On the contrary, you lose quite a bit of the original lovely shading of the first layer. When additional details are stitched in, they usually add to the design. They bling things up or they make the design easier to read by accentuating things. That does not seem to be the case here. So, what's going on? 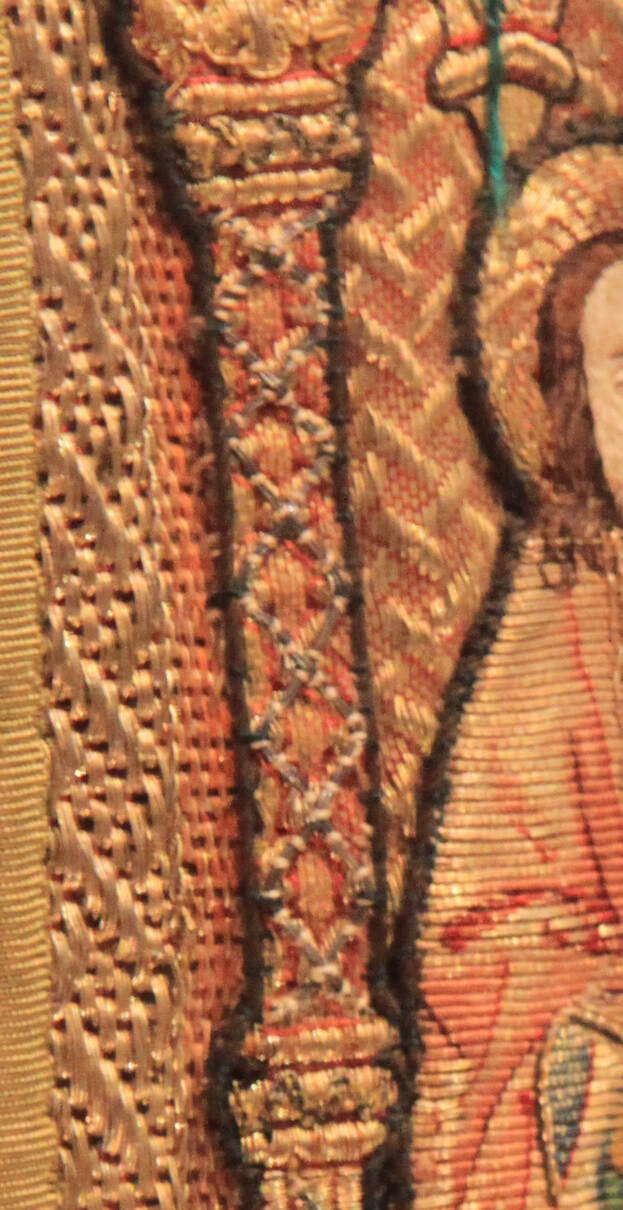 Detail Dalmatic (Nativity) of the Schlosser Ornat, Inv. Nr. 124 I-III, Dommuseum Frankfurt. Here's an extreme blown-up detail of that same column. Can you see the thick white/beige couching stitches used to couch down those silver threads? The silver threads themselves are also much thicker than all the other threads used in the embroidery. The added red stitches to the outside of the silver threads are also comparable in thickness to the white/beige stuff. It all looks so much cruder than the original very high-quality stitching done in the medieval period.
As I already told you in my earlier blog posts, these vestments saw extensive restoration in the 1840s. The addition of these silver passing threads on top of the columns was likely done then. It likely serves several purposes. Maybe some columns had so many damaged loose gold threads that this was a decorative way of cleaning things up. But it also does something else. This additional stitching likely goes through many of the layers that these vestments are made of. This stabilizes the whole construction. You often see horrible bulging on non-restored late-medieval vestments. By stitching through multiple layers, you have a chance to make things very stable and secure. It can't really bulge anymore. Is that was what attempted here? What do you think? Do you also feel that not all of the embroidery on these columns is original? My Journeyman and Master Patrons find a downloadable PDF of this tutorial on my Patreon page. After all, working layers of metal thread on top of each other is quite fun to do!
2 Comments
Two weeks ago, we looked at a late 15th century embroidered chasuble kept in the Domschatz of Fritzlar. It had these lovely textured bands or borders between the individual orphreys. The border is made my couching gold threads and coloured silks over string padding. It seems to be a very 'Central European' thing to do. The technique is not difficult at all and would look great in a modern piece of goldwork embroidery or on a piece of needlepoint/canvaswork. So, let me show you how it is done. As always, my Journeyman and Master Patrons can download a practical PDF with all the instructions from my Patreon page. 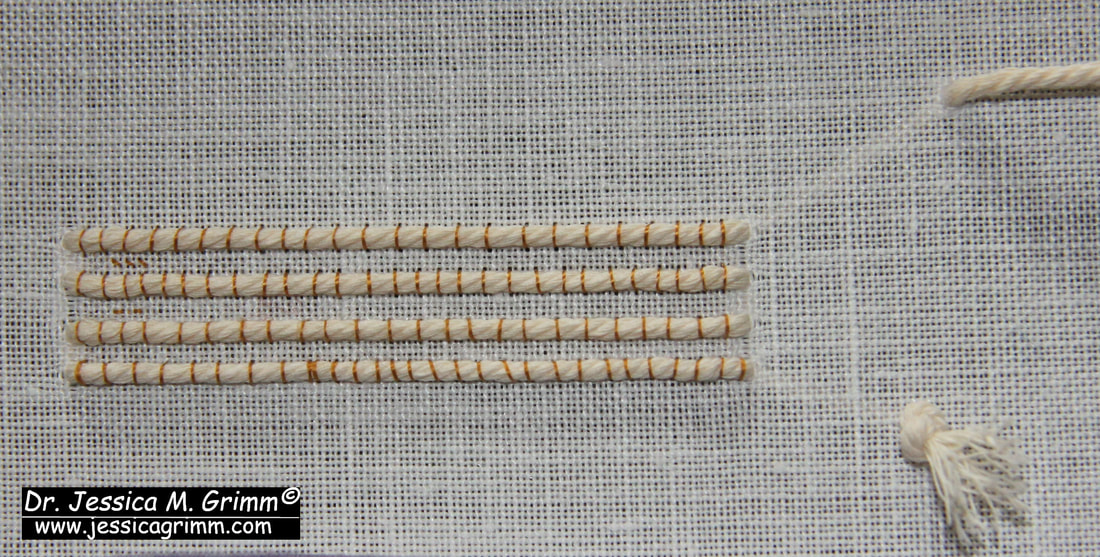 Tutorial for a padded goldwork border Start by couching down four parallel rows of padding thread or string on your embroidery linen. I am working on a 46ct evenweave. For my couching thread, I used DeVere yarns #6 silk in a gold colour. 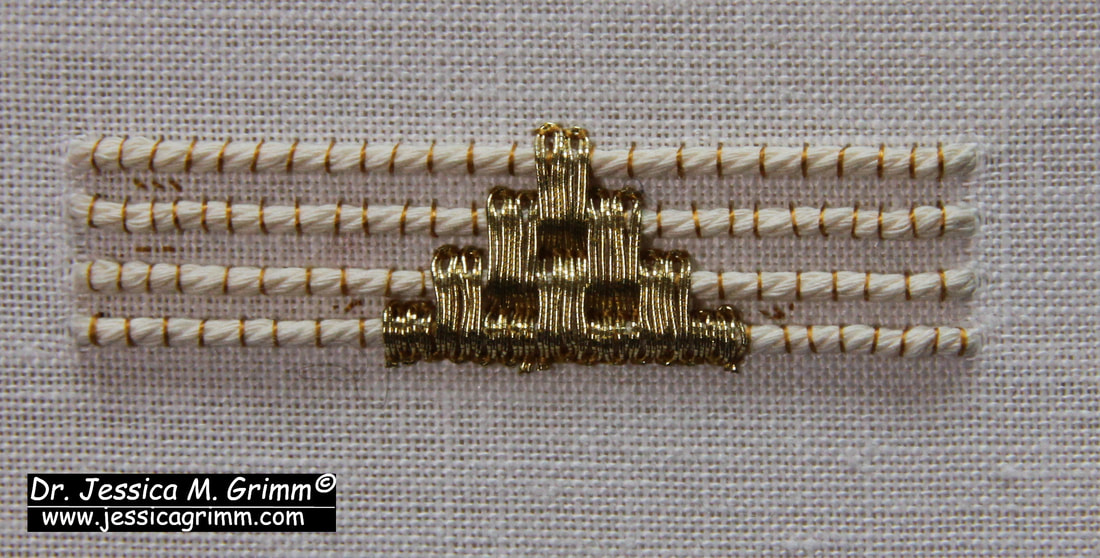 Tutorial for a padded goldwork border By looking closely at the original, I could see that the gold threads were applied first followed by the silk. The golden triangles consists of 7 blocks of 4 rows of gold thread. The gold threads are couched down in pairs. I've used a passing thread #3 and the same DeVere yarns gold-coloured silk. Start from the middle. As the border is quite narrow, your gold threads need a lot of manipulation at the turns. Tweezers might come in handy and you might need an extra couching stitch in the turn. As silk is very slippery, I like to go over my couching stitches twice (i.e. place two couching stitches on top of each other). Alternatively, you can wax your silk thread. Remove any exess wax crumbs before you start to stitch. 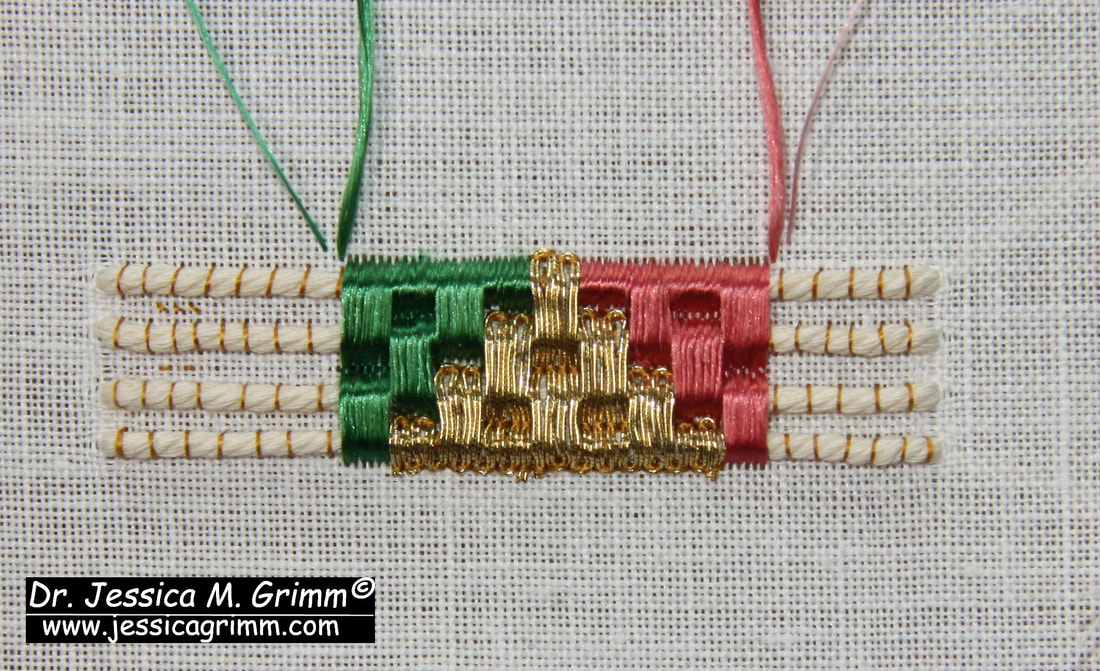 Tutorial for a padded goldwork border In the original, it becomes clear that the embroiderer went over the turns with their silks when they added the silken triangles. That's how I can see that the gold was stitched first. However, I don't like that as your silk snags so easily on the gold. Instead, I angled my needle under the turns. I've used Au ver a soie ovale with a matching colour DeVere yarns #6 for the couching. Start with only half a silken triangle. Measure the top of the golden triangle and match that for the silken triangles.  Tutorial for a padded goldwork border Add golden triangles before finishing the silken triangles. Your threads will have a tendency to roll off the end of your string padding. In the original, this was solved with a red binding. Very clever indeed.  Tutorial for a padded goldwork border And this is what my finished sample looks like. Wouldn't it be fun to figure out how to turn a 90 degree corner with this technique?
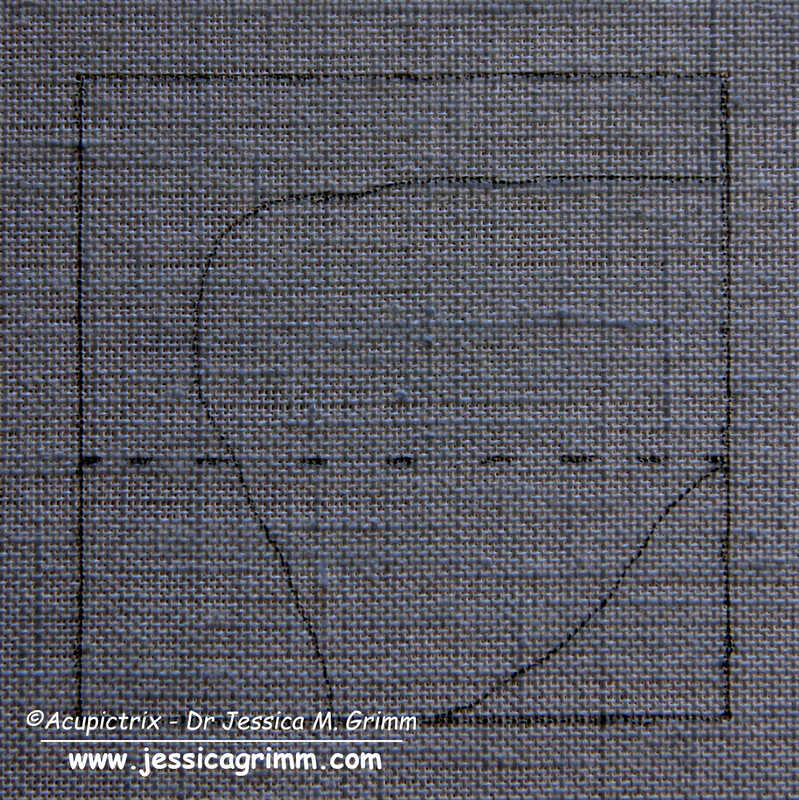
Have you seen my new blog index? So far, all blogs up until January 2020 have been neatly indexed. You'll find a list of book reviews, my projects listed according to embroidery techniques, historical embroideries listed according to century and a complete list of all tutorials. Today's tutorial is all about the white string we see in many medieval goldwork embroideries. This padding is often all that remains from the original bead embroidery worked with freshwater pearls. When we are really lucky, a few pearls still adhere. As is the case for the chasuble I showed you two weeks ago. In this tutorial, I will show you how the padding and the beading were worked. I was really surprised by how sturdy this technique actually is. The beaded edge is VERY firm. 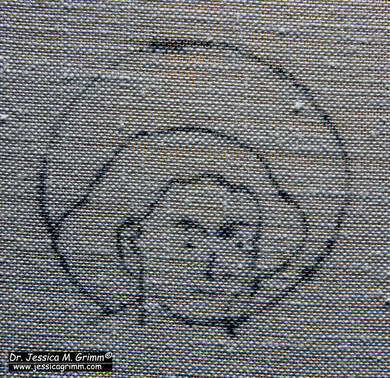 Inked design drawing on my linen embroidery fabric As always, I worked my sample on a piece of high-count (think 40ct and up) linen stretched on my slate frame. I determined the approximate size of St John's head with nimbus from the original embroidery. It is about 5.3 x 5.9 cm. I made a pricking on transparent paper and transferred the design with pounce powder and ink. 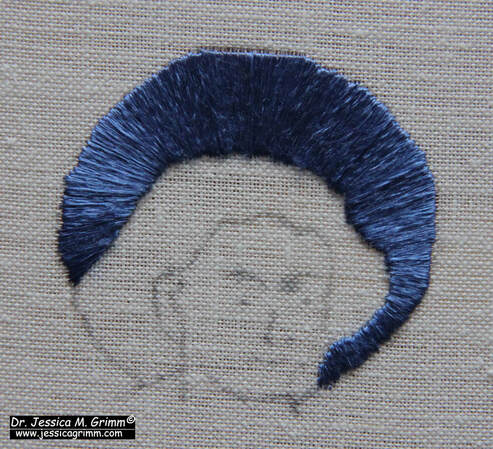 Adding a layer of satin stitches As is a favourite with medieval embroiderers, the simple nimbus is actually built up of several layers of embroidery. Start with a layer of radiating satin stitches in blue flat silk. The radiating does not need to be super precise. You can hardly spot the radiating stitches once the next layer of embroidery has been worked. 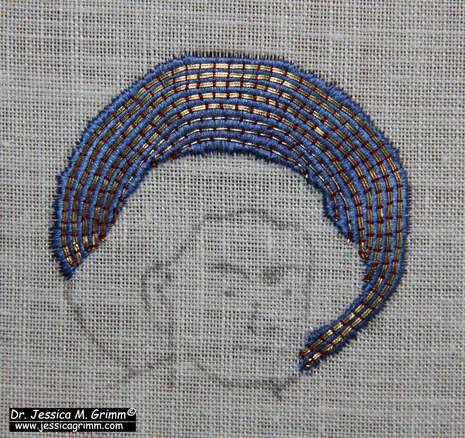 Adding the couched gold The next layer consists of couched gold thread. Use a fine red silken thread for the couching. Work from the outside in. The first few rows consist of a double gold thread, whilst the last couple of rows consist of a single thread. In the original, the embroiderer would have hidden de turns under the slip of the head of St John. I have turned my threads on the edge of the nimbus. 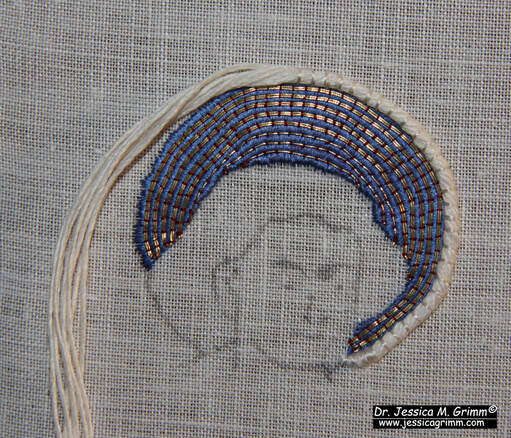 Adding the string padding for the beads It is now time to add the actual string padding. It is made up of a twisted-together bundle of linen threads. These are couched down with white silk. Start from the middle and retwist your bundle as you go. The ends seem to be tapered in the original. To achieve this, start to cut away pairs of threads from your bundle about a cm before the end. Keep couching and removing pairs of threads until you are left with a single pair on the design line. 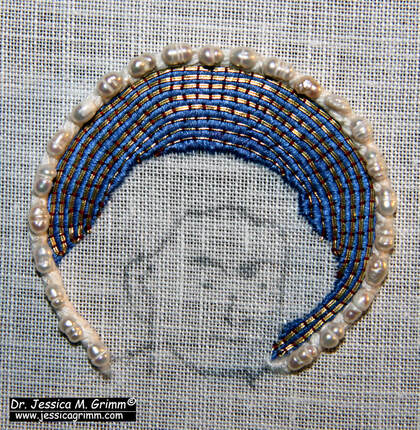 Adding the freshwater pearls onto the string padding Sew down the freshwater pearls (Etsy is a good source for these!) onto the string padding using white silk. You might want to wax your thread as the holes of the pearls can be quite rough. Go through each bead twice. In the original, the pearls are sewn down with a little bit of space between them. This was possible done to save costs. 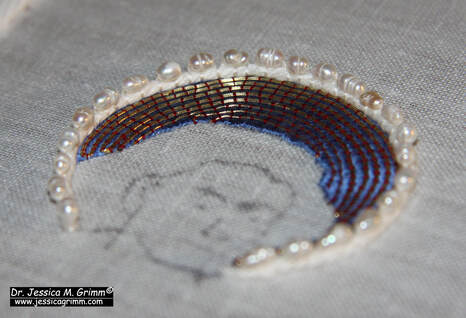 Finished pearl-edged nimbus It is said that the string padding was used to elevate the pearls away from the very shiny gold. It also provided a continuous white edging for when the pearls were slightly spaced apart to save on costs. The end result is very stunning!
As always, my Journeymen and Master Patrons find a downloadable PDF of this tutorial on my Patreon page. For as little as €5 per month, you can build your own library of medieval embroidery technique tutorials. Not a bad deal at all! Last week, we looked at a mid-15th century orphrey from Venice with an interesting goldwork background worked on silk. I've adapted the design slightly and turned it into a goldwork tutorial. The stitching is relatively simple but teaches you a few key things when it comes to medieval goldwork embroidery. Journeyman and Master Patrons find a downloadable PDF on my Patreon page. Becoming a Journeyman or Master Patron is an affordable way to obtain an archivable goldwork lesson each month. Let's dive in! 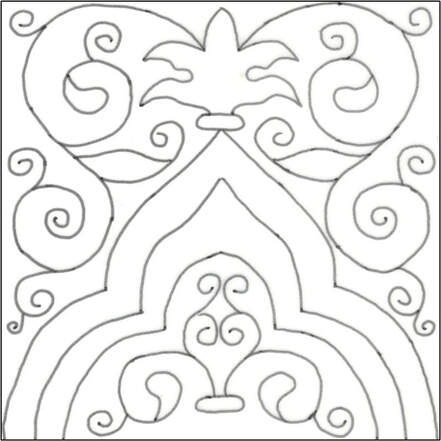 The design should measure c. 10 x 10 cm. This is approximately the size of the original. However, I've squared it off a little to make it look like a Moroccan tile. It is best to work a project like this, there is some heavy goldwork, on a professional slate frame. Dress it with a layer of high-count linen (40 ct or up would be good) and apply a piece of silk on top. You can find my free video tutorial on the process here. Transfer the design any way you prefer. I've used prick-and-pounce and watercolour paint. 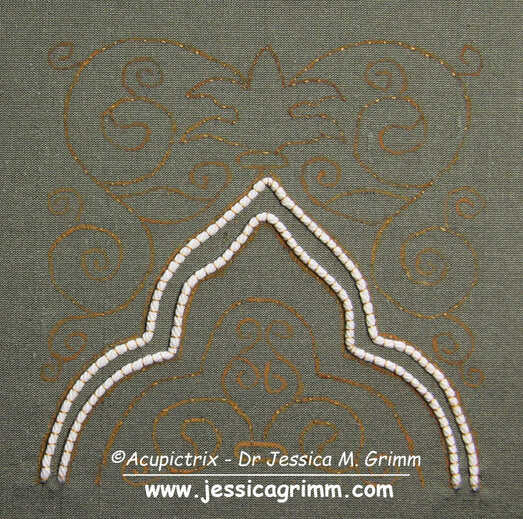 You will need to fuse your silk to the linen with tacking stitches on all the major design lines. This is basically a running stitch with a short stitch on the top and a long stitch on the back. Use a gold-coloured silk or sewing thread for this. Next, attach the white string padding by couching it down securely with the same gold-coloured thread. The padding threads need to lay well within the design lines. The design line is where your gold threads will turn. You do not want the padded area to encroach on the rest of the design. 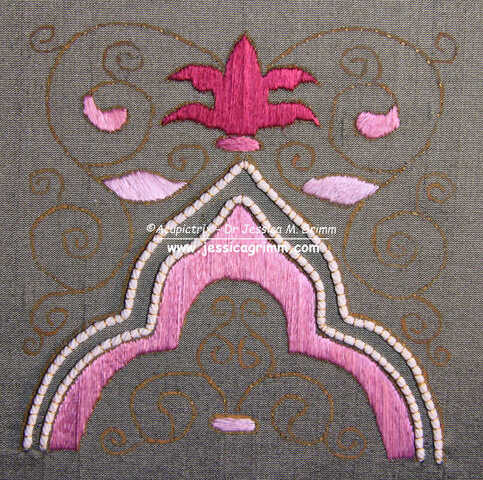 Time to fill the appropriate areas with silken satin stitches. The original shows quite stark shading and the silken areas have a very stripey appearance. The satin stitches are also worked a little 'open' with some background fabric showing. Instead, I've opted for solid fillings. There is no split stitch edge beneath the satin stitches as all the edges are going to be covered with gold. This will neaten them automatically. (Please note: I forgot to fill in the two small leaves at the bottom!). 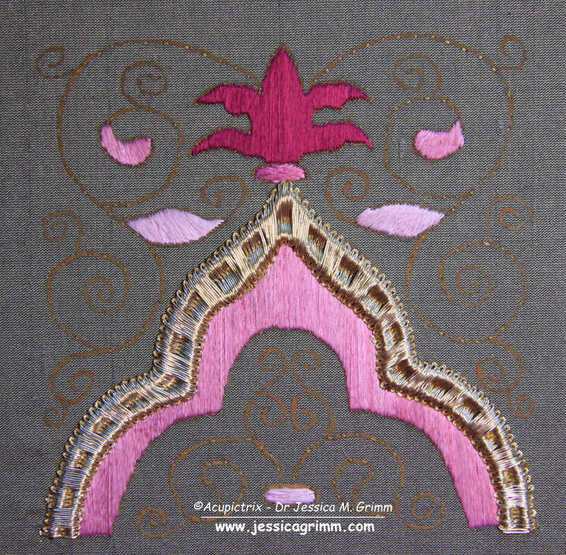 Couch down the gold threads over the padding. Gold threads are couched down in pairs. Start in the middle of the shape. I've used Stech 70/80 which is comparable to passing thread #3. The couching rhythm is as follows: 5x with an extra couching stitch in between the padding threads and 5x without this extra stitch. Alternate all the way down. You will need to fudge a little as you start vertical, but need to end horizontal. 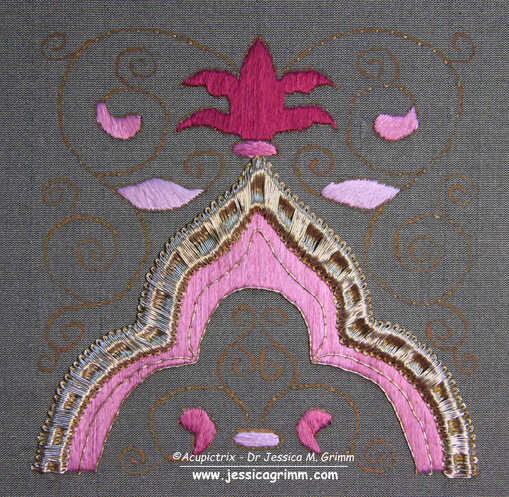 Couch two single lines of gold thread in place on the pink area underneath the padded gold. How you end your gold threads is up to you. You can either plunge and tie back on the back or you can oversew on the front and clip. 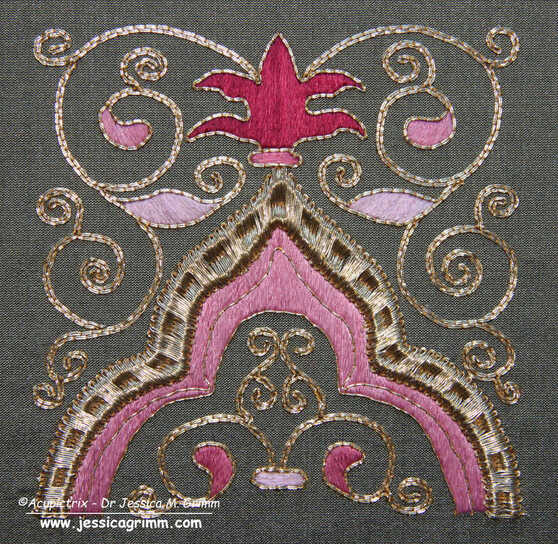 The 'only' thing left to do, is to cover the tendrils with couched gold. You aim for as few starting and stopping points as possible. And you try to hide starting and stopping under subsequent goldwork. This was common practice in medieval goldwork embroidery as it made the finished product more durable. And that's your goldwork project finished!
This is the last blog of the year. The next one will appear on the 8th of January 2024. Between now and then, I will be finishing off some loose threads. I will probably need to close the webshop just before the end of the year to implement some changes. Next year will hopefully see the delayed release of my next self-paced online embroidery course. I am very close to finishing it! Wishing you all a lovely holiday season and all the best for 2024! Thank you for being such a loyal audience. In the past two weeks, we have explored the early 15th century gold embroidery from Venice, Italy. One of its characteristics is the ornate orphrey borders with the twisted columns. I've always been curious how they were made! So out came the cotton padding threads and the gold threads and off I went. 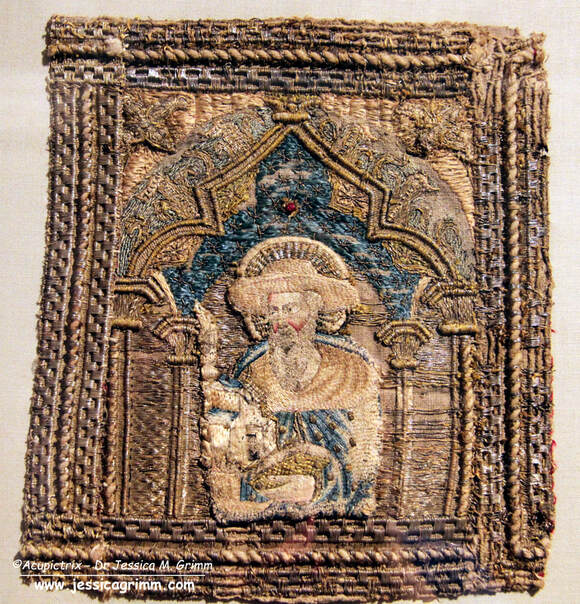 Orphrey with Saint Jerome kept at the Museo Diocesano Recanati, Italy. This kind of embroidery is best done on a slate frame. If you would like a reminder of what this is and how to set it up, please have a look at my instruction videos. Next, you will need to attach your string padding. The original uses two different kinds of padding. There seems to be something like soft cotton underneath the twisted columns. And a thinner string is used as padding on either side. I've used two thicknesses of the same cotton string for the padding. In order for the gold threads to be able to sit crisp on the padding, make sure that you couch down your padding well. 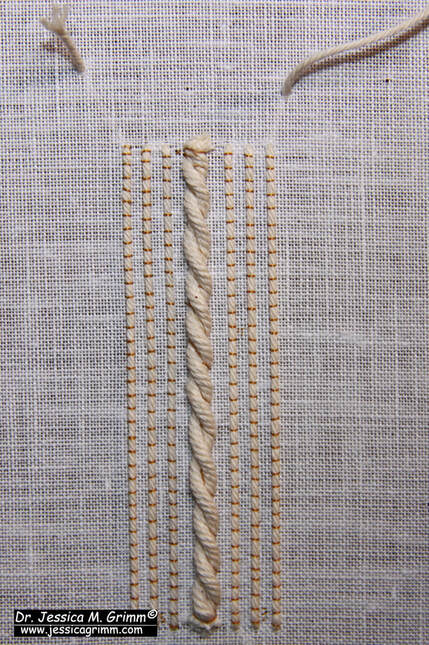 String padding couched down and ready for the gold threads. The gold thread used in the original embroidery is a passing thread. In my recreation, I've opted for Stech 70/80, which is comparable to passing #3. I was also curious to know what the difference would be between a gilt and a real gold thread. I worked the main part of the sample with the cheaper gilt and the bottom section with the real gold (more yellow). I prefer the real gold :). It is a tat better at going and staying where I want it to go and stay. The result is a bit crisper. Still not as crisp as the original, but closer. If you have the opportunity to try different brands of passing thread, please do and see how they behave. 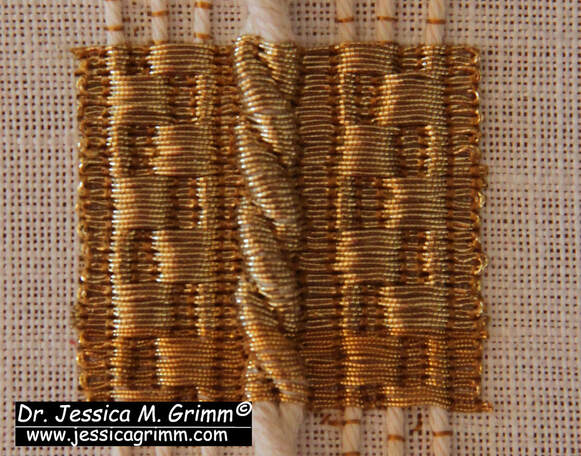 The couching rythm alternates every 6th row. Working over this amount of padding will cause slight problems. Although you place a couching stitch over the gold and in the 'groove' of the twisted column, the gold is not very securely attached in this place. The twisted padding threads are also very round. Your gold thread wants to 'escape' and roll off. This is also visible in the original embroidery. And it comes as no surprise that the embroidery is most damaged in this area.
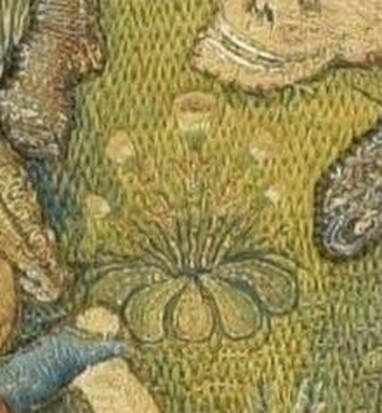
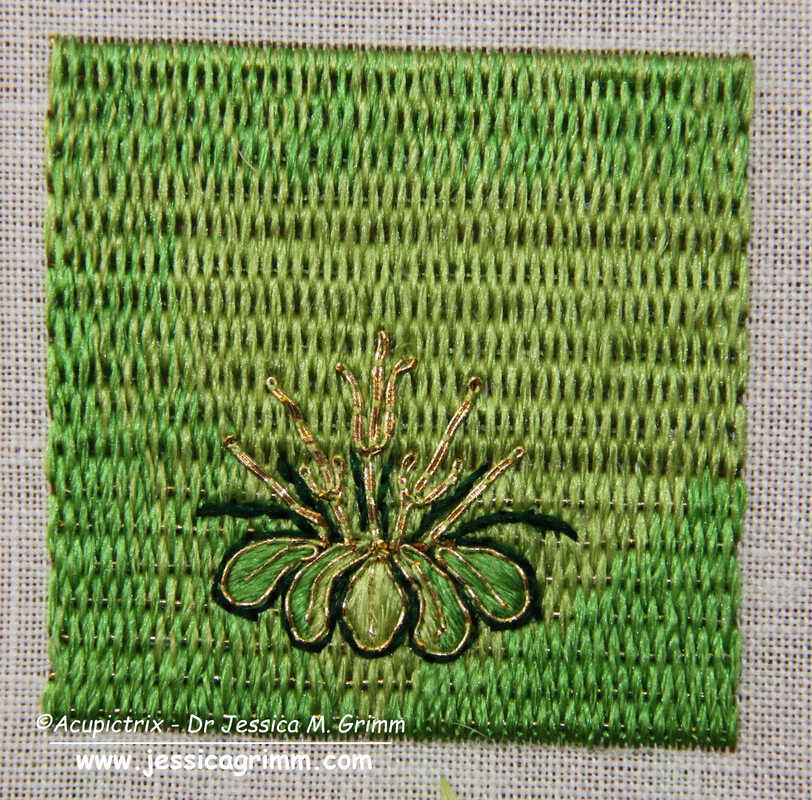
My Journeyman and Master Patrons will find a downloadable PDF with this stitch sample on my Patreon page. As I am travelling in the coming week, there will be no blog post next Monday. I will be visiting various Diocesan Museums in Germany and the Netherlands. All my Patrons will be able to virtually travel with me as I hope to be able to post some pictures along the way. There will also be a meeting of the Medieval Embroidery Study Group for my Master Patrons on Saturday the 2nd of December at 19h CET. Details can be found on my Patreon page. We have been exploring the embroidery and the iconography on the lone cope hood from the V&A (990-1888) in the past two weeks (part 1 & part 2). This week, I'll show you how to work a small embroidery sample based on one of the flowers seen on that cope hood. It is an exercise in both counted threadwork and free-hand embroidery. It also teaches you to work goldwork embroidery on top of a base layer of goldwork embroidery. This was common practice in late-medieval goldwork embroidery. It is often done to hide the ends/turns of gold threads and it adds some depth. Below is a summary of how the sample was probably originally stitched. Journeyman and Master Patrons can download a 9-page PDF with detailed instructions.
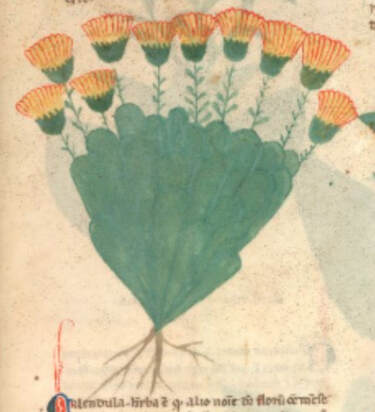
My clever husband happened to have a book on medieval flowers and was able to identify one of the flowers on the original cope hood as marigolds. The Egerton Manuscript from c. AD 1300 (MS 747, f. 30r) shows a drawing of the marigold that is quite comparable to the embroidered version. The embroidered version is about 3,5 cm high, and the detail is amazing. As you can see in the original, the marigolds are stitched on top of a layer of Brick Stitches (upper part) and Burden Stitch (lower part). These are both counted thread techniques. The foundation thread for the Burden Stitch (a passing thread) also runs under the Brick stitches. It is just being ignored. It is needed under the Brick stitches as padding. If you omit it, this section will be flatter compared to the Burden stitches. As the gold thread is (nearly) completely covered by the Brick stitches it shows that the price of gold thread had come down considerably by the end of the medieval period.
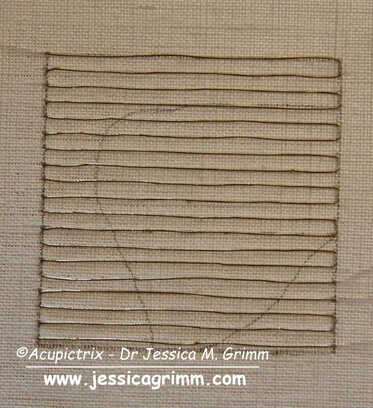
Start your sample by drawing a 5 x 5 cm square on the grain of the fabric. You can also add guidelines for the shading and for when you want to change from Brick to Burden stitch. I am using a 46 ct linen, Stech vergoldet 80/90 (comparable to passing thread #4) and Chinese flat silk from Oriental Cultures. Start by laying the passing thread foundation. My passing threads are spaced 5 fabric threads apart.
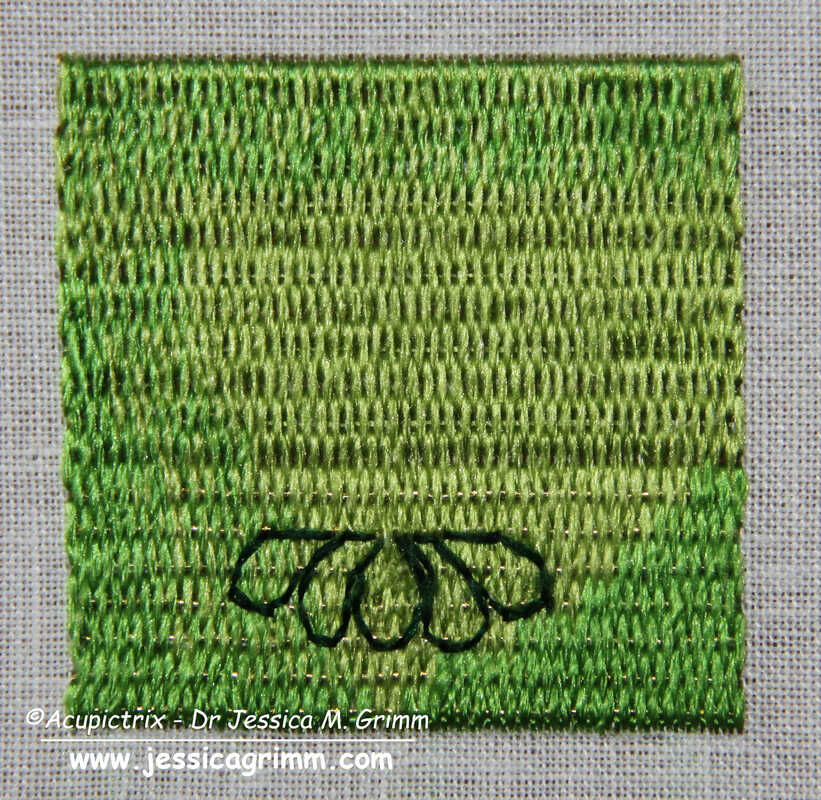
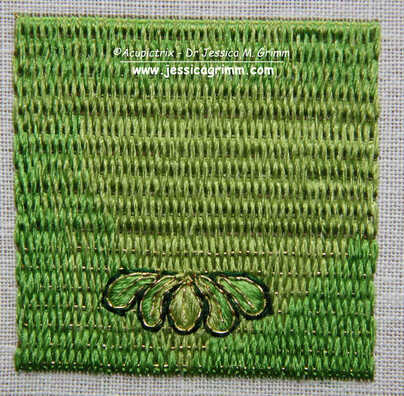
Once your base layer of Brick and Burden stitches is in, the fun free-hand part begins! And this is where each sample will become truly unique. Start with outlining the five green leaves. I've used a simple back stitch, but you can also use stem stitch. These are then filled with a few satin/straight stitches. On top comes an outline and vein (stitched in one go) in couched gold thread.
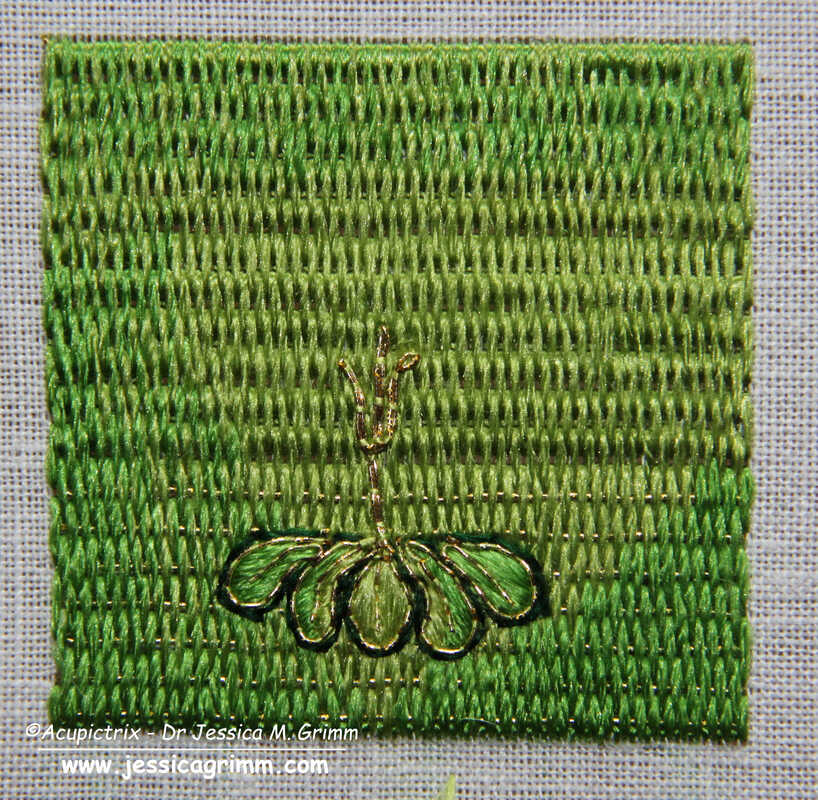
Next up are the stems. They are made of gold thread. Start at the top (where the flower attaches) and separate the two threads to form a leaf on either side of the stem. Re-unite the threads again to form the bottom of the stem. Add dark green stems for a bit more definition. I've used stem stitches. 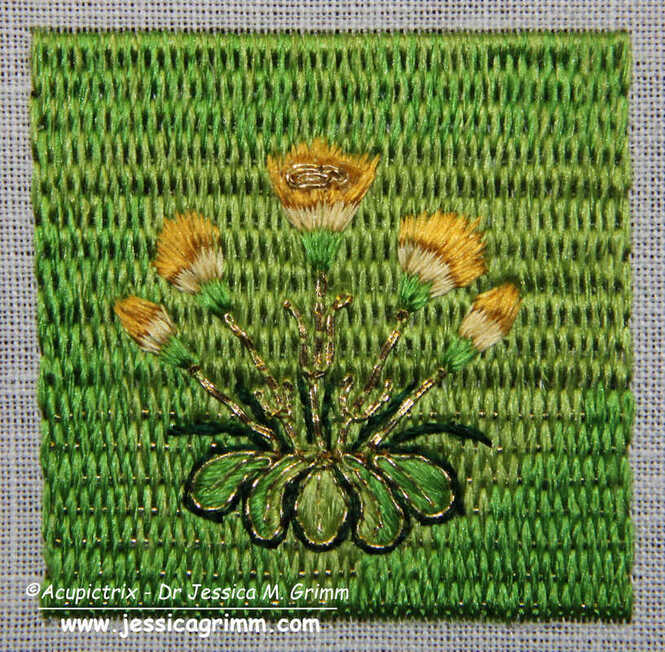 The flower heads are stitched in long-and-short stitches (i.e. split your stitches). Start with the green bits at the bottom. Then add the light-yellow bottoms of the petals and end with the dark yellow tops. The central flower gets a flower heart made of a couched piece of gold thread. And that's your marigolds finished! Mine turned out more like dandelions ...
One of the things that amazed me when I was whipping up this embroidery sample, is the fineness of the original embroidery. My rendition looks bulky in comparison. Another hint that the original cope hood was once part of a very high-end vestment intended for an important clergyman and/or church! Literature Fisher, C., 2007. The Medieval Flower Book. The British Library, London. Currently, I am mainly working on my orphrey background. I will be teaching this design at the Alpine Experience in June. For the past couple of years, I have always combined written instructions with video. This seems to work well for my students. However, as the apartment next door is being gutted and then put back together again, my stitching and recording are very dependent on when the workmen are quiet :). So, let's check in on my progress. 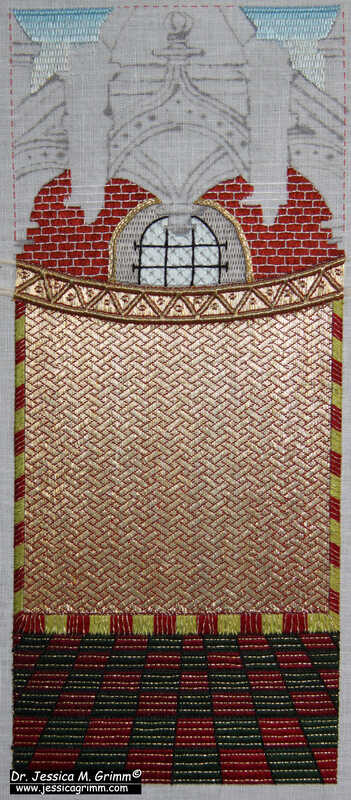 As you can see, the tiled floor is in, the wall with the window has been completed, the sky was added and the basis of cloth of gold with the diaper pattern is in. The cloth of gold needs some minor further embellishment. I was going to do that today, but alas, the workmen are plastering, and it sounds like they are standing right next to me :(. Let's aim for tomorrow! The diaper pattern has been a terrific candidate for demonstrating goldwork embroidery at my local open-air museum Glentleiten. People were fascinated by the simplicity of it and the lovely effect achieved. I even managed to get people hands-on involved. Two young girls, aged 8 (!), plunged right in and happily stitched a row on my orphrey. In the beginning, they stabbed around a bit before they found the correct hole with their needle. But I kid you not, after about 5 stitches their hand-eye coordination caught up and it all went very smoothly. By the way, I am happy for interested people to work on my orphrey. They can't really break anything. And it is much more fun than when you stitch a mock-up row on the side somewhere. Equally, I don't believe in doodle cloths. But that's a different story :). Would you be happy for strangers to have a go at your embroidery project? My orphrey background also contains a technique I had not tried before: Burden stitch over gold thread. It is used in the sky. I was familiar with Burden stitch but was a bit sceptical about the gold thread. When you are working the stitch it almost completely disappears below the silk. So, my thought was: "at least the texture is pretty". However, when the Burden stitched area catches the light it really glows! It never ceases the amaze me how little light, natural or artificial, goldwork embroidery needs to reveal its full potential.
Have you ever worked Burden stitch over a gold thread in any of your projects? Would you like to have a go? My Journeyman Patrons find handy PDF instructions on my Patreon page!
Quite a while ago, I filmed myself setting up a small slate frame. When I started filming the instructional videos for the 2023 Glentleiten workshop, I finally came around to editing the old video and uploading it. The older video is in English and shows you how to apply a piece of linen to your slate frame. The newer video is in German and goes a step beyond the linen. It shows you how to sew a piece of silk onto your linen. Even if your German isn't very good or non-existent, you will probably still understand the procedure when you first watch the English video. I hope these videos give you a good impression of my teaching style and the teaching materials I provide for embroidery courses and workshops. Please enjoy!
From 12-14 February, the Bavarian Academy of Sciences will host the 15th international conference on medieval and early modern epigraphy. They have asked me to demonstrate the various ways in which lettering can be represented in goldwork embroidery during this long period. I've decided to concentrate my efforts on five different historical pieces: 1) the Sternenmantel of Henry II Holy Roman Emperor, dating to AD 1010-20, 2) the Bamberger Antependium from AD 1300, 3) the Vice cope from AD 1350-75, 4) the funeral pall of Maria of Mangup AD 1477 and 5) a podea (icon cover) donated by Serban Cantacuzino in AD 1671. I have seen all these pieces in the past couple of years and taken my own pictures. However, determining how the lettering was stitched, proved to be difficult. In order to keep a log of my findings and to teach you a thing or two about goldwork embroidery, I am going to write four blog posts on this project.
First up is preparation. Apart from the Bamberger Antependium, all these goldwork letters were stitched on very luxurious silk fabric. So I dressed my slate frame with Zweigart Bergen linen and kept the tension a bit slack. Then I applied pieces of my silk fabrics using herringbone stitch. It is important to orientate the fabric pieces on the grain of the linen fabric. Once the pieces are applied, the frame is stretched to drum taut. In the two short videos above, you'll see slack on the left and drum taut on the right. 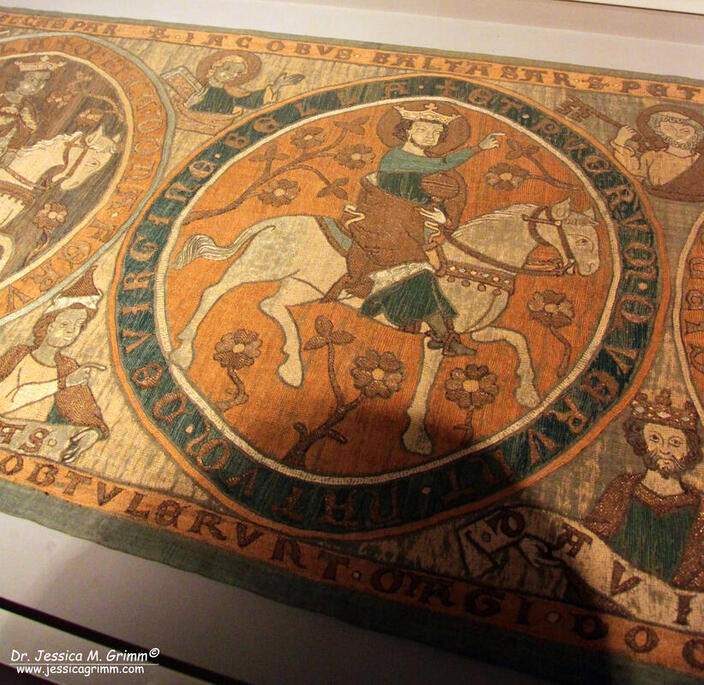 Bamberger Antependium with the Magi (Baltasar written above this figure) I'd like my lettering to be as close to the originals as possible. The first thing to do is to determine how large the lettering in question is. Lighting in the textile department of the Bayrische Nationalmuseum is rather poor and I had to take all of my pictures under an angle. Not suitable. Luckily, I found a perfect picture in a book. It had the whole height of the Antependium on there and since I knew that height in centimetres, basic math led me to an approximation of their size. The word Baltasar measures about 25 cm from B to S. Since the goldwork was stitched directly onto the linen, I used a pencil and a lightbox for the transfer. The original transfer was probably done free-hand: look at the irregular spacing between the individual letters and the irregular shape of the three As. 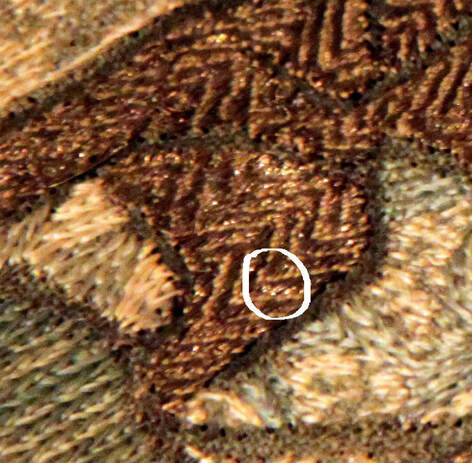 Detail Bamberger Antependium Next up I tried to determine the size of the gold threads used. Without actually measuring them, this is a rather wild guess. Since the piece is quite old, the gold thread used is probably very fine. But from my memory, it was not as fine as what I recently saw in Bamberg. So I originally went for a gilt passing thread #3 (but had to later change to the even finer gilt Stech 50/60 CS as my edges became too round compared to the original). From the literature, I knew that couching in goldwork embroidery went from single thread to pairs of thread being couched down in one go, somewhere in the 12th century. Since the Bamberger Antependium was stitched around AD 1300, it could well be that this newer and faster method of couching down pairs of thread was employed. And I think the picture above proves this. From the literature, I knew that yellow silk was used for the couching stitches. I went with DeVere Yarns Chamoix #682. 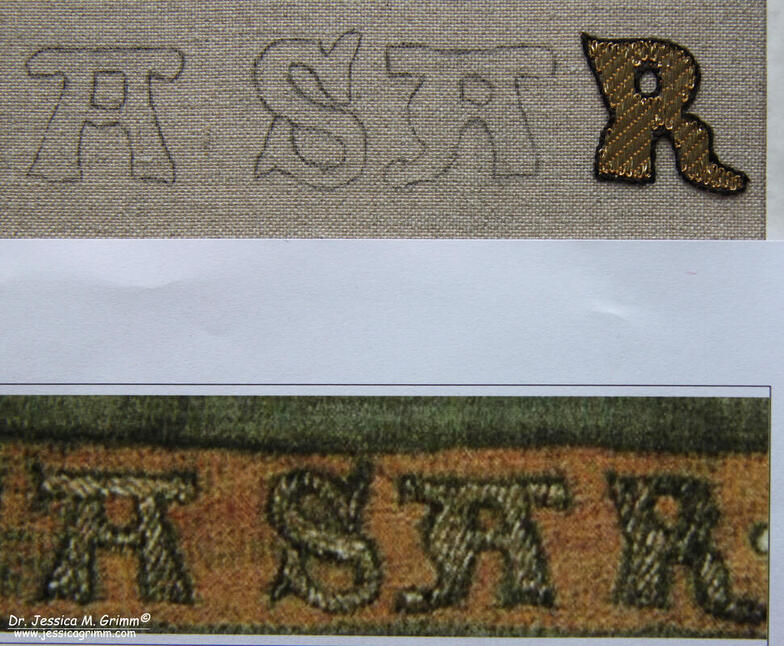 Detail Bamberger Antependium One of the things I can't tell from my pictures nor is it mentioned in the literature: what happened to the tail of the goldthread? Was it plunged? Did they simply secure them on the surface and clip them close? The latter method is used in the orphreys from the 15th and 16th centuries, so I went with that. The couching pattern used is not our now very common bricking pattern. Instead, it is a slanted line or slash. And since the ground fabric is linen, the couching process becomes a counted thread embroidery technique. I opted for five fabric threads between each couching stitch. As stated above, I did stitch the first letter twice as I couldn't copy the sharp turns of the original with the ticker thread. The way the letter is shaped also meant that I had to start and stop my goldthreads several times as just bending them would not have accommodated the shape of the letter. Once I was happy with how my R turned out, I needed to stitch a black silken outline around it. As all of the silk embroidery in this piece is done in stem stitch (yup, everything! Rows and rows of alternating stem stitch to fill every design element that's not filled with couched goldthreads), I used stem stitch for the outline too. I used four plies of black Chinese flat silk. Literature
Durian-Ress, S., 1986. Meisterwerke mittelalterliche Textilkunst aus dem Bayrischen Nationalmuseum. Schnell & Steiner. ISBN 3-7954-0636-6. Grimm, J.M., 2021. A hands-on approach - Epigraphy in medieval textile art, in: Kohwagner-Nikolai, T., Päffgen, B., Steininger, C. (Eds.), Über Stoff und Stein. Knotenpunkte von Textilkunst und Epigraphik. Harrassowitz, Wiesbaden, pp. 141–147. Müller-Christensen, S. & M. Schuette, 1963. Das Stickereiwerk. Wasmuth. No ISBN. P.S. Did you like this blog article? Did you learn something new? When yes, then please consider making a small donation. Visiting museums and doing research inevitably costs money. Supporting me and my research is much appreciated ❤! Ever since my visit to Cheb in the Czech Republic earlier this year, when we went to see the Egerer antependium, I wanted to try my hand at a small replica. Since the beading on the antependium is done on parchment/vellum, that was easier said than done! However, I finally managed to recreate a small portion of this stunning medieval beadwork. And I am going to share my journey with you in this blog post. 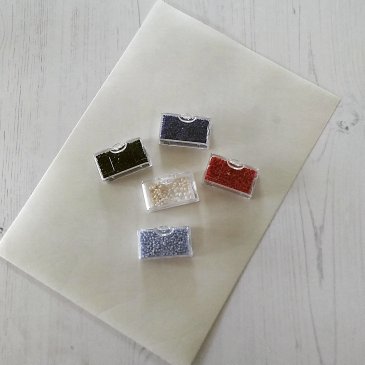 Parchment and glass beads The first thing I needed for my efforts was a piece of parchment/vellum. Luckily there is a German online-shop (run by archaeologists!) who sell all sorts of re-enactment stuff. And they do parchment/vellum too. I ended up buying good quality parchment rather than vellum, I think. They are in essence the same material: thinly scraped animal skin. Vellum is the absolute premium version made of the skins of young animals. For months I was actually afraid to start the stitching. On the one hand my fingers were itching to start, but on the other hand I did not quite know where to begin. So my sheet of parchment sat on the shelves, patiently waiting. 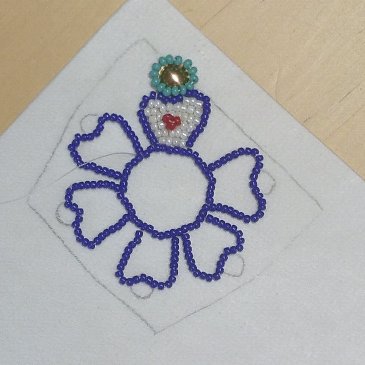 Bead embroidery on parchment The main question I needed to get answered was how to work with the parchment. Does one hold it in hand and stitch or does one put it in some sort of embroidery frame? Searching the internet, I came across a blog entry of a re-enactment lady. She just stitched a small motive in the hand and was successful. I decided to do the same and worry about the framing of a larger piece of parchment later :). The parchment is actually so stiff that you can hold it comfortably in hand whilst stitching. 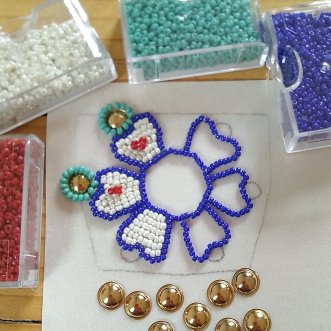 Bead embroidery on parchment The second main component would be the beads. On the original, the beads are quite small but irregular. Using some of my collection of perfectly formed Japanese high-quality beads would just not be the same. Luckily, I hade some, otherwise crappy, cheap hobby beads in about a size 9 and a size 10. Perfectly irregular :). The original beads are more like a size 11. I even had these in roughly the right colours: sea-green, dark blue, pearly white and coral red. 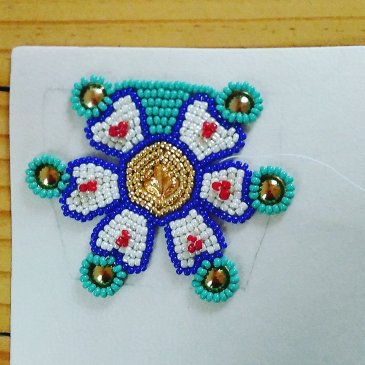 Bead embroidery on parchment The third component proved to be quite difficult and partly impossible to get. In amongst the beadwork on the original are stamped metal decorations. The closest I could get were those gilt 'folien' used to make a bundle of grapes in goldwork embroidery. Whilst they worked fine for some parts of the capital motive I had chosen to replicate, it did not work for the centre. I ended up using a fancy 'folie' and filled in the empty space with small golden-coloured beads. 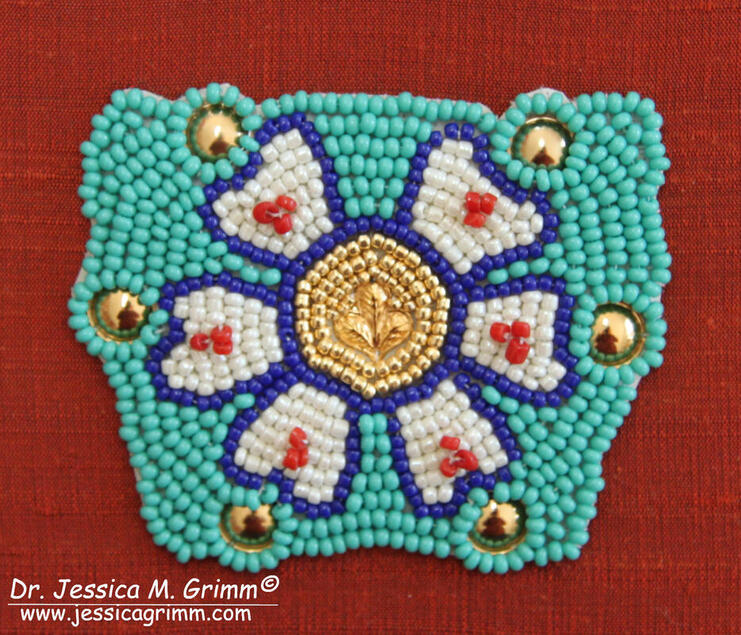 Bead embroidery on parchment On to the stitching! But first, I transferred my chosen motive onto the parchment using a pencil. From my pictures and the written information I had on the antependium, I was able to deduce that the capitals of the columns between the saints were about 5.4 cm in height. That's what I based my pattern on. I then started by stitching the design lines of the petals first using my blue beads, a number 10 needle and Coats Dual Duty glaced hand-quilting thread made of polyester and cotton. In the original piece they probably used a linen thread. According to the written sources and from what I could see in my pictures, the appropriate number of beads were strung first and then couched down with a separate thread and needle every two beads or so. At first, this felt as if I needed an extra pair of hands! Holding the parchment in one and manipulating two working threads with the other wasn't easy. Especially not as the needle only pierces the parchment when a certain amount of force is applied. However, after struggling for a while, I changed my method slightly. Firstly, I did away with the couching thread. Instead, I laid out the strung beads carefully on the design-line, go down with my needle in the appropriate spot, and then couched between the beads using the same thread. In this way I could eliminate the extra pair of hands :). As it proved very hard to hit the exact spot from the back of the parchment (parchment is surprisingly slippery stuff), I ended up making holes from the front and subsequently finding them from the back. Much, much easier! To attach my 'folien', I carefully punched two small holes in the rim using a larger needle and a normal hammer. Usually only one hole turned out successfully, but that proved to be enough to hold the piece in place long enough until I had couched the beads around it. As the folien have a small flat rim or lip, the couched ring of beads keeps it in place. 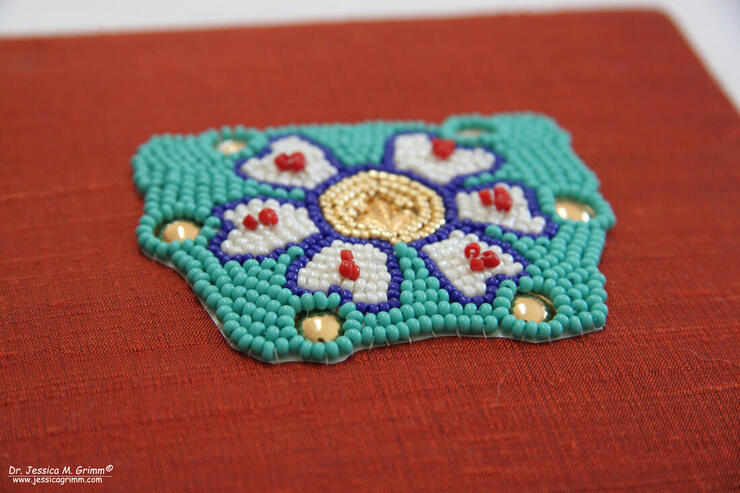 Bead embroidery on parchment Once all the beading was done, I cut out the beaded element as close to the beads as I dared. In my embroidery hoop, I stretched a piece of terracotta dupion silk over 36ct even-weave linen (the original has a linen support too) and appliqued the beaded element in place using the Coats Dual Duty thread. Last but not least, I mounted my small replica onto acid-free cardboard and added a linen backing. I am planning on sending it to the museum so they can use it for educational purposes. As I used slightly larger beads than were used in the original, my motive measures 6.2 cm in height.
I hope you liked my foray into medieval bead embroidery. At some point I would like to attempt one of the saints. However, I will need to find a solution for framing the parchment as that will be too large to hold in hand. I would also like to find a source for larger stamped metal decorations such as were used in the original. If you know of a source, please let me know! |

Want to keep up with my embroidery adventures? Sign up for my weekly Newsletter to get notified of new blogs, courses and workshops!
Liked my blog? Please consider making a donation or becoming a Patron so that I can keep up the good work and my blog ad-free!

Categories
All
Archives
April 2024
|
 RSS Feed
Contact: info(at)jessicagrimm.com
Copyright Dr Jessica M. Grimm - Mandlweg 3, 82488 Ettal, Deutschland - +49(0)8822 2782219 (Monday, Tuesday, Friday & Saturday 9.00-17.00 CET)
Impressum - Legal Notice - Datenschutzerklärung - Privacy Policy - Webshop ABG - Widerrufsrecht - Disclaimer
Copyright Dr Jessica M. Grimm - Mandlweg 3, 82488 Ettal, Deutschland - +49(0)8822 2782219 (Monday, Tuesday, Friday & Saturday 9.00-17.00 CET)
Impressum - Legal Notice - Datenschutzerklärung - Privacy Policy - Webshop ABG - Widerrufsrecht - Disclaimer