
|
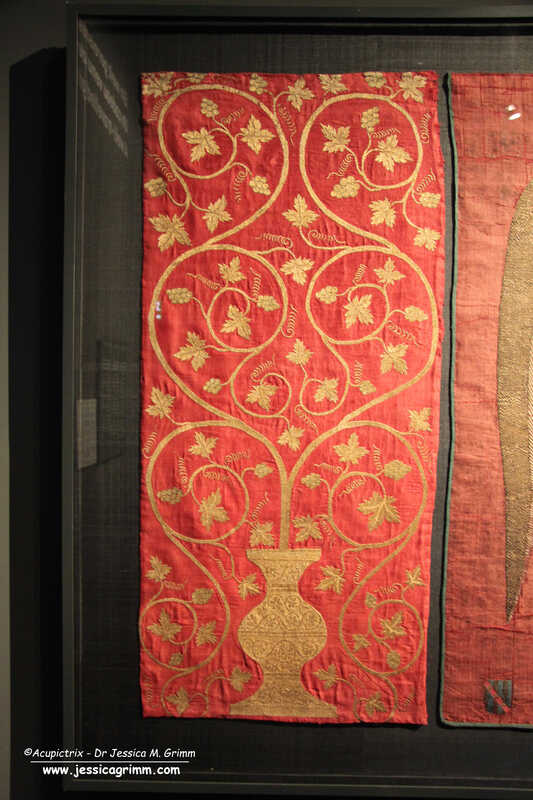
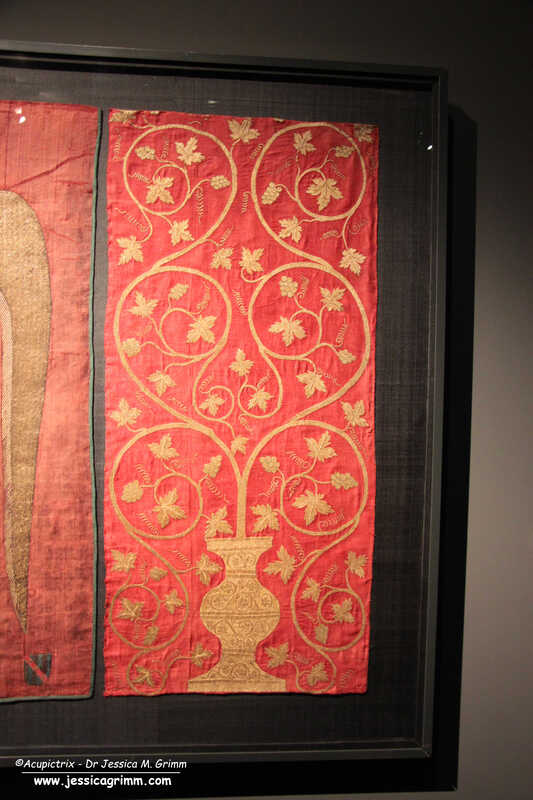
From last week's blog post, you might have gotten the idea that Venetian goldwork embroideries from the early 15th century are somewhat plentiful. They are not. However, another magnificent piece was exhibited at Castello del Buonconsiglio in Trento, Northern Italy. Some parts are remarkably modern in their appearance. Parts of the design could be easily adapted for modern goldwork embroidery. Let's have a look at the medieval eye candy. 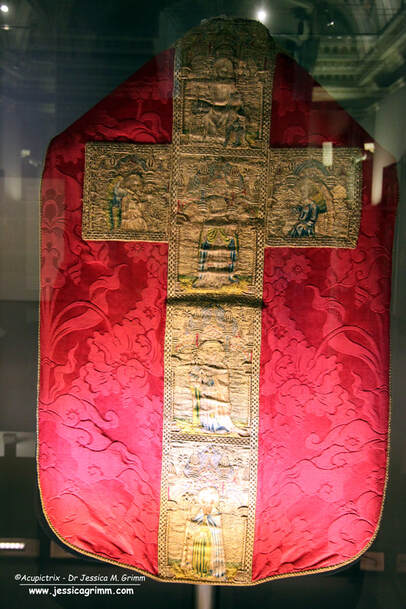 Chasuble, Venice 1410-1420, the Basilica of Santa Maria Gloriosa dei Frari (from the church of San Pantalon) The embroidered chasuble cross on the red chasuble comes originally from the Church of San Pantalon in Venice. It is now kept in the Frari church in Venice. From the top, we see the Resurrection of Christ, Gregory the Great, Saint Jerome and Saint Augustine with angels in the side arms of the cross. There is another corresponding chasuble cross on the front. Unfortunately, the way it was exhibited did not permit the viewer to see the front as well. On that chasuble cross are depicted Saint Mark (tentative identification), Saint Ambrose and Saint Catherine with John the Baptist and a male saint on the side arms of the cross. Personally, I love this type of iconography. We have the four fathers of the church: Gregory the Great, Ambrose, Augustine of Hippo and Jerome. All four are seen as important theologians of the late Roman-Early medieval church (that's roughly 800-1000 years before this embroidery was made). Then there are Saint Catherine and John the Baptist. Two very important saints seen throughout the Middle Ages all over Europe. The story of Saint Catherine is also all about learning, philosophy and theology. A chasuble with a high IQ. 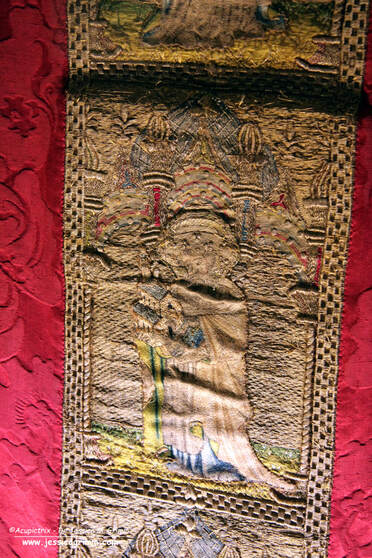 Orphrey with Saint Jerome, Venice 1410-1420, the Basilica of Santa Maria Gloriosa dei Frari (from the church of San Pantalon) As you can see from the orphrey of Jerome in the picture above, the embroidery is a bit damaged. The orphrey has warped quite a bit and this made it difficult to take good pictures. The shaded inky underdrawing is very fine and of exceptional quality. And so is the embroidery (made with gilded silver foil around a yellow silk core or silver foil around a white silk core). The goldwork is very accurate and the silken directional split stitches are very small and regular. As seen on last week's embroidery, the frame around the orphrey is padded. And we see the twisted padded columns again. 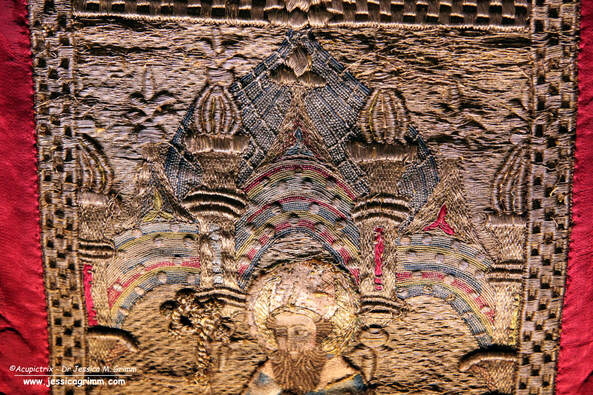 Detail orphrey with Saint Augustine, Venice 1410-1420, the Basilica of Santa Maria Gloriosa dei Frari (from the church of San Pantalon) And did you spot the 'measles'? This time, they are not located on the clothing (except for the hat of Jerome, see above). Instead, they decorate the multi-coloured arches (not really or nue as there is no shading; there is on the armour of the soldiers in the Resurrection scene) beneath the pinnacles and the large blue dome. In this case, the 'measles' are made over a disc of pressed paper. The same padding material is also used in the thicker parts of the pinnacles. Paper was a rather 'modern' material. Its use in Italian embroidery shows that trading ports such as Venice had easier access to it. It is not seen as a padding material in embroideries from Northern Europe. I absolutely love this background! It looks so very modern and oriental. This would make for a lovely modern embroidery design.
If you would like to see more downloadable pictures of this amazing embroidery and if you would like to join our Zoom call on the early 15th century embroideries from Venice, then please consider becoming a Patron. Your monthly contribution keeps this blog and my research going. Thank you very much! Literature Prá, Laura Dal; Carmignani, Marina; Peri, Paolo (Eds.) (2019): Fili d'oro e dipinti di seta. Velluti e ricami tra Gotico e Rinascimento. Trento: Castello del Buonconsiglio.
1 Comment
In September 2019, I visited the exquisite exhibition "Fili d'oro e dipinti di seta" in the Castello del Buonconsiglio in Trento, Northern Italy. Together with the 2015 exhibition in the Catharijneconvent and the 2016 Opus Anglicanum exhibition in the V&A, this was one of those 'must-see' exhibitions. This one visit provided me with research material for several years. Especially as I was allowed to take as many pictures as I liked. As long as you don't use flash, the textiles absolutely do not mind. Today, we are going to look at some early Venetian embroidery. It includes some techniques unique to the Venetian embroidery workshops. Let's dive in! 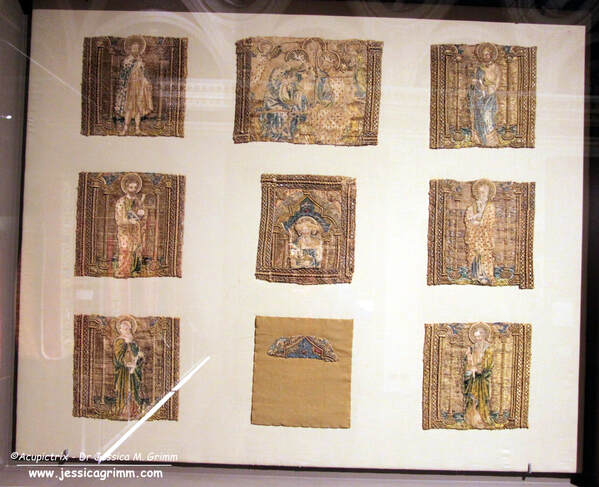 Nine orphreys kept at the Museo Diocesano Recanati, Italy. As you can see in the picture above, the cope is no longer an actual vestment. Only the mutilated orphreys have survived. They were used secondarily on an antependium which was probably made at the end of the 19th century. The orphreys were taken of this newer antependium in 2006 when they were restored and applied to a neutral backing. The orphreys represent three pairs of saints facing each other, a smaller square orphrey that would have sat on the neck of the wearer and which connected the two sets of three and part of the cope's hood with the Coronation of the Virgin. Identifiable among the saints are: John the Baptist (top left), James the Great (top right), Bartholomew or Peter (middle left) and Saint Jerome (square in the middle). The embroideries were made in a Venetian embroidery workshop around AD 1410-1417. 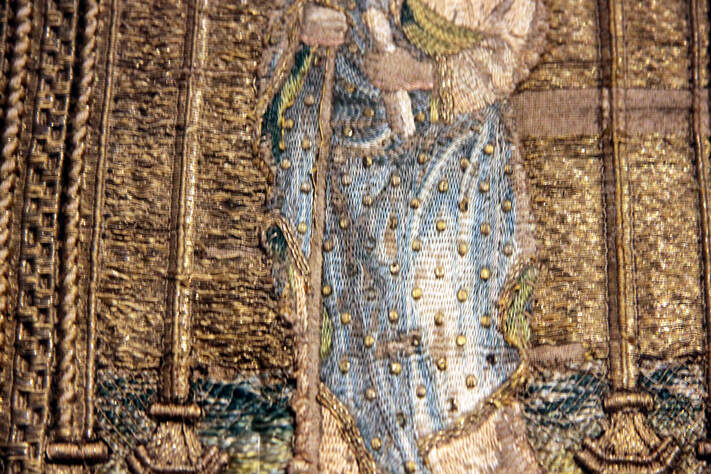 Orphrey with James the Great kept at the Museo Diocesano Recanati, Italy. When you look at the outer garments of the figures, it looks like they have the measles. These 'measles' are actually characteristic of Venetian embroidery. The 'measles' are made by covering a metal disc, with a central or off-centre hole (think spangle/sequin), with gold thread. Some discs are made of pressed paper. The gold threads that cover the discs are worked in gimped couching, but with an underside couching stitch. Proof again that underside couching is not exclusively English. Keeping the gold threads from rolling off the edges of the padding was probably no small feat! 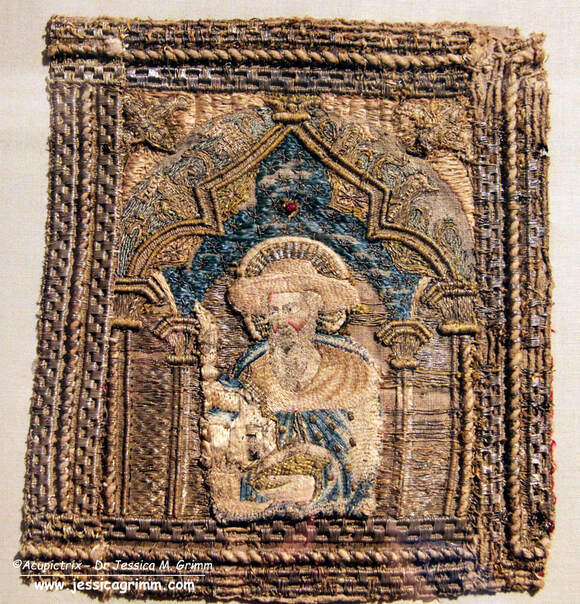 Orphrey with Saint Jerome kept at the Museo Diocesano Recanati, Italy. Another characteristic of Venetian embroidery is the elaborate dimensional frame around the orphreys. String padding is used to achieve the different textures. By using strings with different thicknesses, they could achieve several 'levels' in the frame.
In general, many different embroidery techniques are used in these Italian embroideries from the Middle Ages. There is beautiful (directional) split stitch in silk, there is laid work, diaper couching and trellises. Or nue is absent as that was probably invented in the Southern Netherlands/Northern France and had not yet made its way to Italy. If you would like to see more (detailed) pictures of these nine orphreys, then please visit my Patreon page. Journeyman and Master members will find 23 images which can be downloaded. Literature Prá, Laura Dal; Carmignani, Marina; Peri, Paolo (Eds.) (2019): Fili d'oro e dipinti di seta. Velluti e ricami tra Gotico e Rinascimento. Trento: Castello del Buonconsiglio. Today should have seen the launch of a new self-paced online course based on the bird and the lion of the Wolfgang chasuble (c. AD 1050). I planned on having a nice cash flow coming in before my next research trip. Not happening quite yet. I was stopped by a customer. It meant that I spent most of my time researching what my options were, how to prevent it from happening again and chasing said customer. It took and takes a lot of time and energy as the issue is sadly still not resolved. When you follow Yvette Stanton, you have probably read about her woes with cancelled classes and a massive copyright breach. Being self-employed in the embroidery business is not always fun. Some customers forget that there is a real human being on the other end. A little mindfulness goes a long way. So, what happened?  Last week, I was contacted by Stripe (the payment portal for direct credit card payments on my website) that a customer had filed fraud charges against me with her bank. Wow. Me, fraudulent? That's a first. Stripe explained to me that the US bank would take the money out of my bank account together with a fine. But I could appeal against this. I only needed to prove to the bank that this customer had really purchased from me. That I, nor anyone else, was charging or using her credit card illegally. An invoice would not do. Anyone could produce one. I needed her signature. Small problem: there is none when you use your credit card online... Next option: contact the customer and sort things out. In the meantime, the US bank was in a hurry and plundered my bank account. The order dates back to the end of August. My efforts to contact the customer by email were in vain. She is subscribed to my newsletter and I could see that she opened those occasionally. My emails thus did come through. After a week of using all my email addresses and the one belonging to my husband, I decided to call her. I called her repeatedly. The phone was not picked up. I hoped it was a cell phone. In Germany and the Netherlands, the number tells you if it belongs to a landline or a cell phone. This is not the case in the US. But it was now my last resort. I texted said customer. I could see that she had read the message, but she did not reply. Finally, she did, and things went even more bizarre.
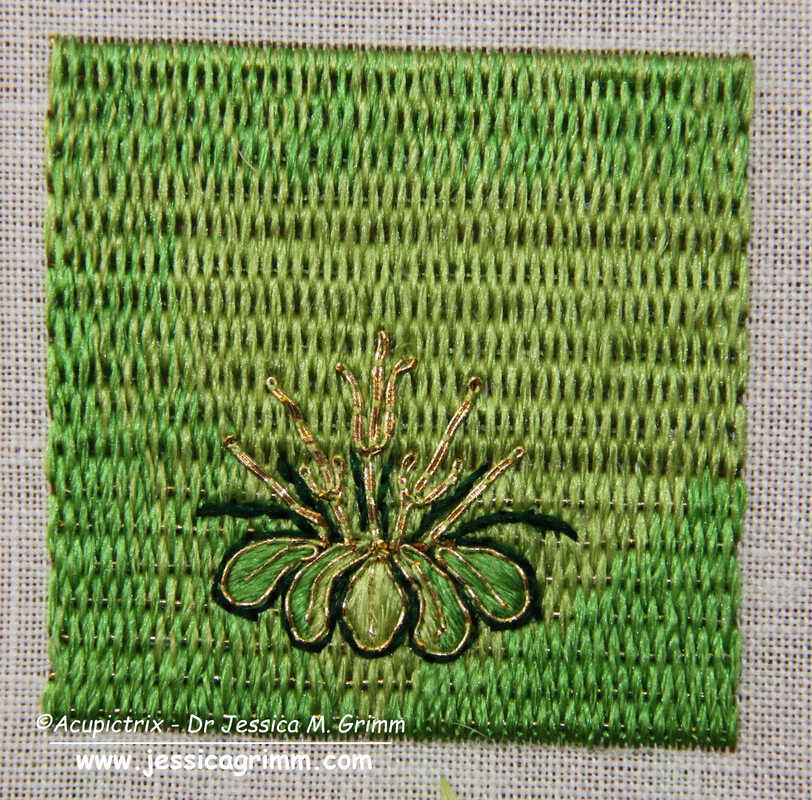
Apparently, she has had memory problems for a while. She could not remember ordering from me. Could I please just cancel the order? No, I can't. The case has now been escalated on the side of the customer and that customer is now the only one who can put things straight. I explained to her that she needed to contact her bank and have the fraud charges against me lifted. She promised she would. I lost contact with her until she contacted me in the middle of the night (!). She needed to know which credit card she had used for the purchase. As I was afraid to lose contact with her again, I opened my laptop and gave her the details. Now I have lost contact again. It does not look like I will win this dispute with the US bank. And I doubt the customer gets things sorted. And even when she does, I will not be reimbursed for the fraud fine. Most of my sales go through PayPal. I have had one or two disputes there in the past. All solved in a civil manner. Quick and without financial harm to either me or the customer. PayPal has buyer's and seller's protection. As it should be. The way forward? All orders are from now on handled by PayPal. You cannot use your credit card directly in my webshop anymore. I am sorry to those loyal customers who have previously bought from me using their credit card. But I am sure that they will understand that this is now no longer an option. We have been exploring the embroidery and the iconography on the lone cope hood from the V&A (990-1888) in the past two weeks (part 1 & part 2). This week, I'll show you how to work a small embroidery sample based on one of the flowers seen on that cope hood. It is an exercise in both counted threadwork and free-hand embroidery. It also teaches you to work goldwork embroidery on top of a base layer of goldwork embroidery. This was common practice in late-medieval goldwork embroidery. It is often done to hide the ends/turns of gold threads and it adds some depth. Below is a summary of how the sample was probably originally stitched. Journeyman and Master Patrons can download a 9-page PDF with detailed instructions.
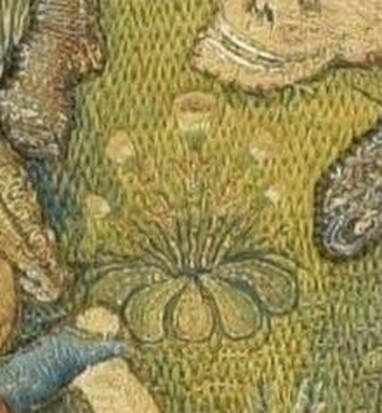
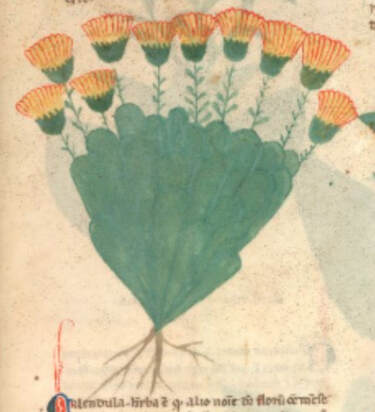
My clever husband happened to have a book on medieval flowers and was able to identify one of the flowers on the original cope hood as marigolds. The Egerton Manuscript from c. AD 1300 (MS 747, f. 30r) shows a drawing of the marigold that is quite comparable to the embroidered version. The embroidered version is about 3,5 cm high, and the detail is amazing. As you can see in the original, the marigolds are stitched on top of a layer of Brick Stitches (upper part) and Burden Stitch (lower part). These are both counted thread techniques. The foundation thread for the Burden Stitch (a passing thread) also runs under the Brick stitches. It is just being ignored. It is needed under the Brick stitches as padding. If you omit it, this section will be flatter compared to the Burden stitches. As the gold thread is (nearly) completely covered by the Brick stitches it shows that the price of gold thread had come down considerably by the end of the medieval period.
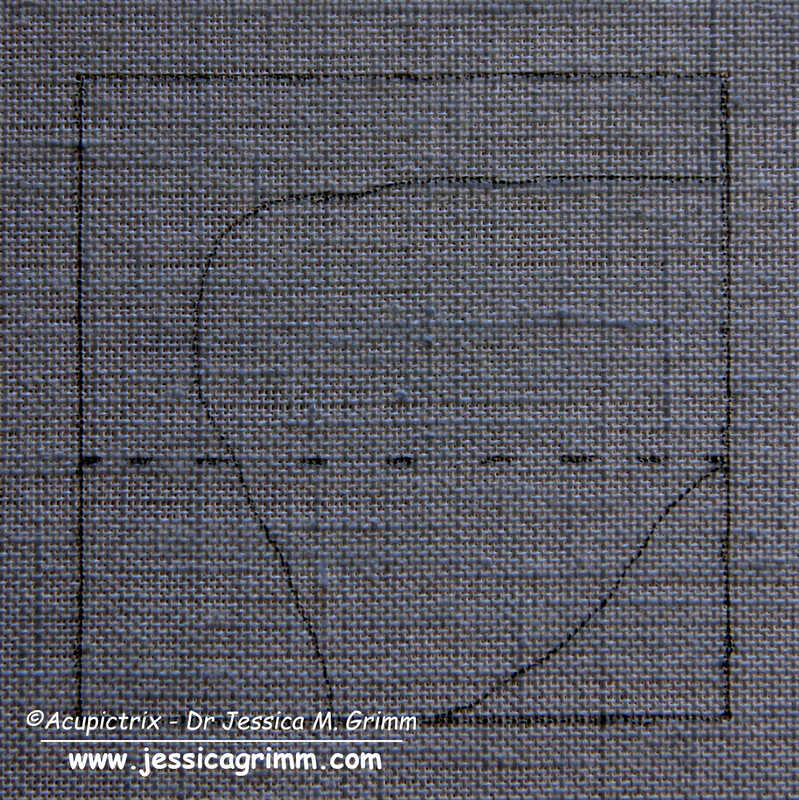
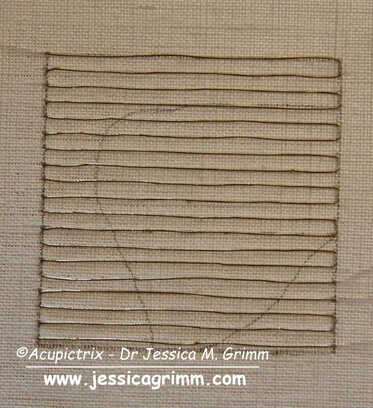
Start your sample by drawing a 5 x 5 cm square on the grain of the fabric. You can also add guidelines for the shading and for when you want to change from Brick to Burden stitch. I am using a 46 ct linen, Stech vergoldet 80/90 (comparable to passing thread #4) and Chinese flat silk from Oriental Cultures. Start by laying the passing thread foundation. My passing threads are spaced 5 fabric threads apart.
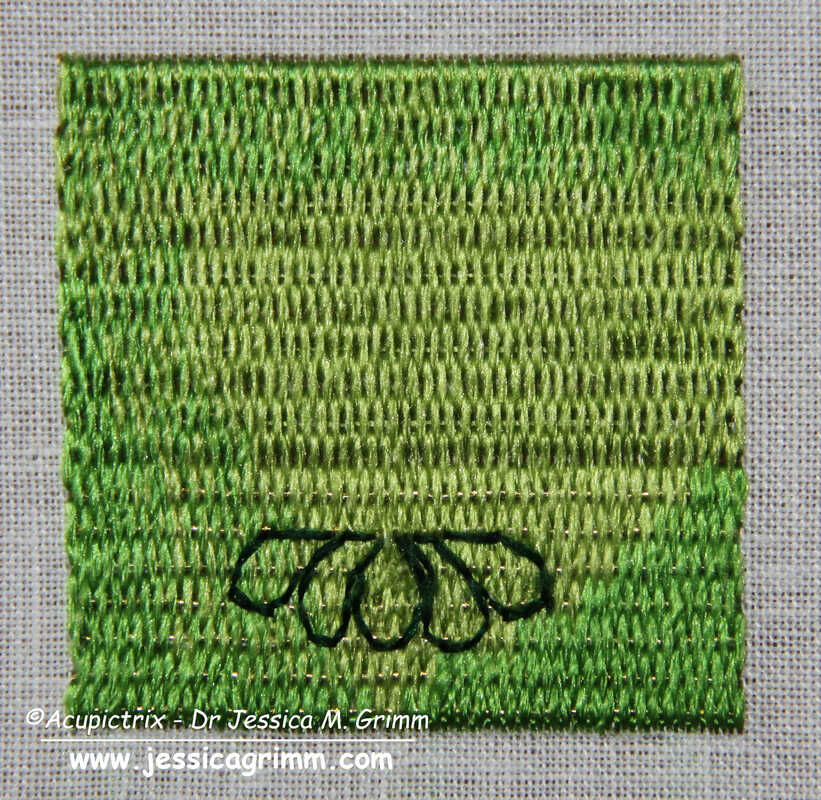
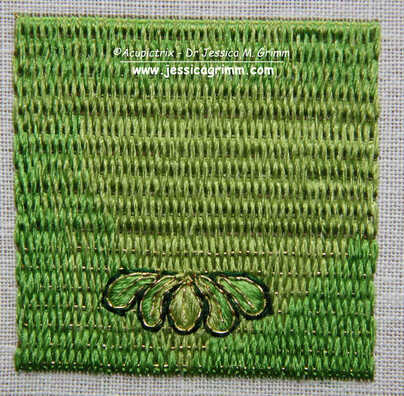
Once your base layer of Brick and Burden stitches is in, the fun free-hand part begins! And this is where each sample will become truly unique. Start with outlining the five green leaves. I've used a simple back stitch, but you can also use stem stitch. These are then filled with a few satin/straight stitches. On top comes an outline and vein (stitched in one go) in couched gold thread.
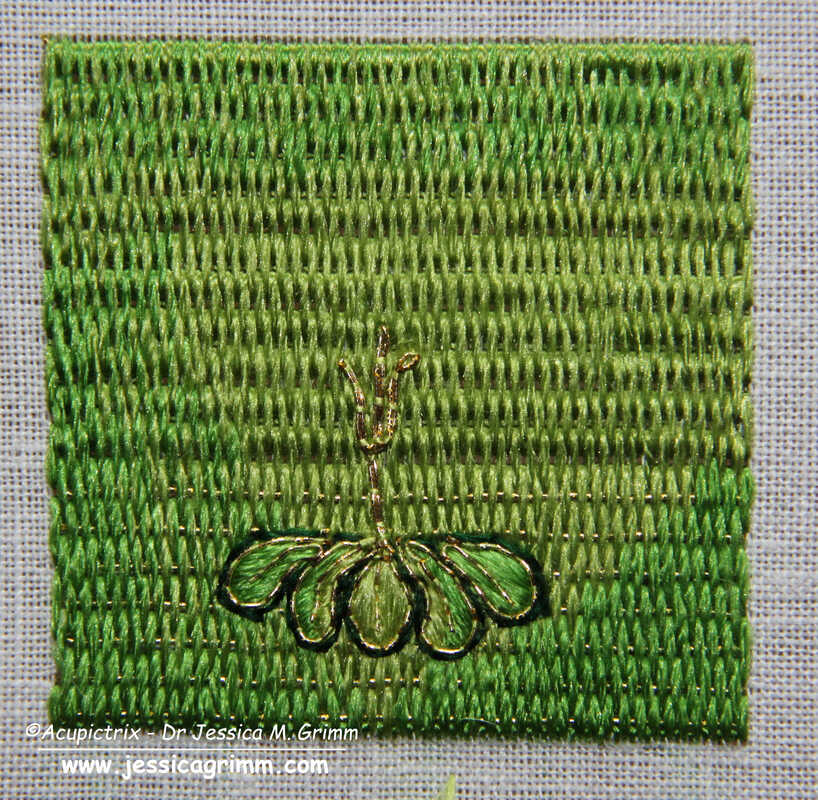
Next up are the stems. They are made of gold thread. Start at the top (where the flower attaches) and separate the two threads to form a leaf on either side of the stem. Re-unite the threads again to form the bottom of the stem. Add dark green stems for a bit more definition. I've used stem stitches. 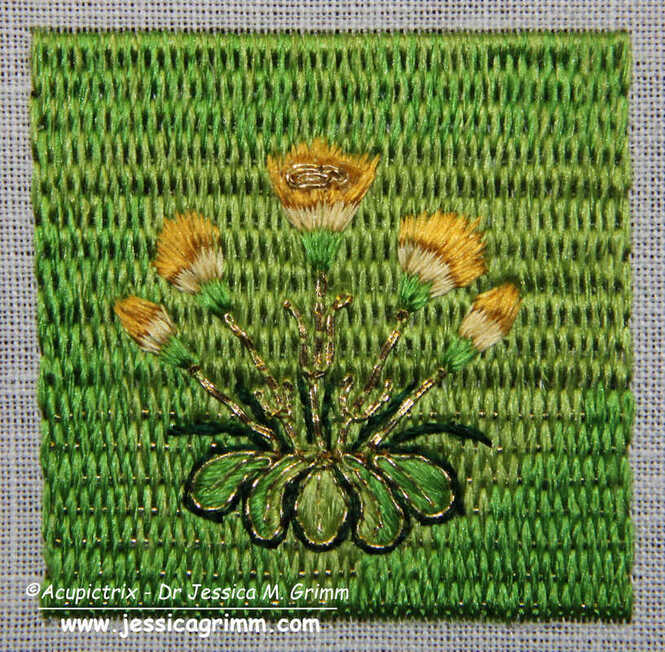 The flower heads are stitched in long-and-short stitches (i.e. split your stitches). Start with the green bits at the bottom. Then add the light-yellow bottoms of the petals and end with the dark yellow tops. The central flower gets a flower heart made of a couched piece of gold thread. And that's your marigolds finished! Mine turned out more like dandelions ...
One of the things that amazed me when I was whipping up this embroidery sample, is the fineness of the original embroidery. My rendition looks bulky in comparison. Another hint that the original cope hood was once part of a very high-end vestment intended for an important clergyman and/or church! Literature Fisher, C., 2007. The Medieval Flower Book. The British Library, London. Last week, we explored the iconography and the embroidery techniques used on a cope hood from the V&A. The museum acquired the cope hood in 1888 and nothing more is known about it. Ever since I saw the piece in November 2019, I have wanted to know more about this outstanding piece of embroidery. And I have found some intriguing parallels in my ever-growing database of medieval goldwork embroidery. By now, my database contains 40 cope hoods that date to the 15th and 16th centuries and that are made in the historic Netherlands (present-day Belgium and the Netherlands). Of these, only 22 also have their matching orphreys preserved. Not a huge amount of data to work with ... 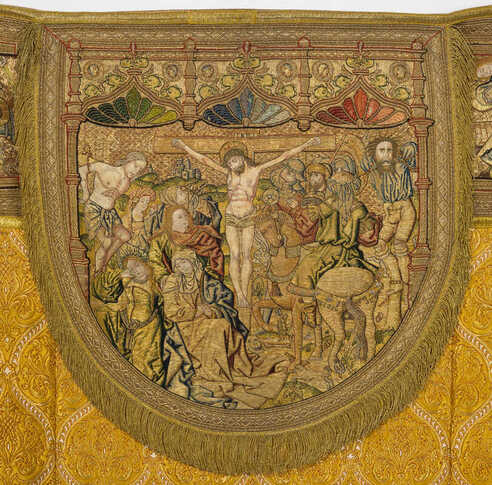 © KIK-IRPA, Brussels (Belgium), cope with crucifixion from Averbode Abbey, Belgium. My closest match is a cope hood from a cope from Averbode Abbey in Belgium. The scene is very similar to the crucifixion scene on the lone cope hood from the V&A. And the embroidery techniques are similar too. There's a lot of high-quality or nue in the figures. And the grassland is partly stitched in Burden stitch with additional plant motives on top (some grassland is or nue). Thanks to the accounts of Averbode Abbey, this cope can be precisely dated to AD 1530. The lone cope hood from the V&A dates to the second half of the 15th century (1450-1499). This would mean that there is a time difference of 30-80 years between the two. As this cope is still complete, we also have an idea of what the matching cope orphreys of the lone cope hood of the V&A might have looked like. There are six orphreys in total and they show: Agony in the Garden of Gethsemane, Betrayal of Christ, Christ before Pontius Pilate, Flagellation of Christ, Crowning with thorns and Christ carrying the cross. Do click on the link above to see more pictures of the cope. You can enlarge them and/or download them. 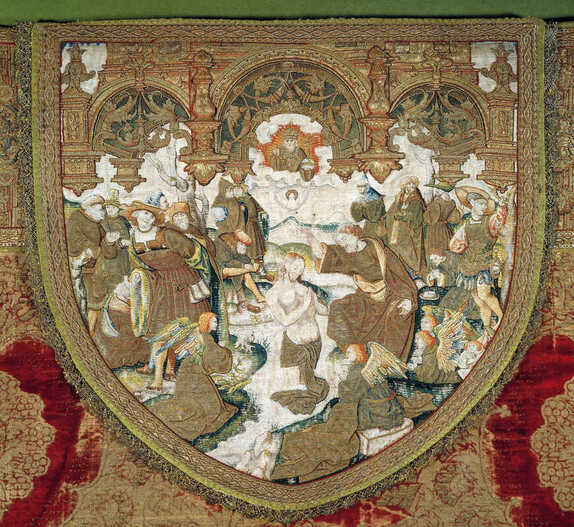 BMH t5788b, Museum Catharijneconvent, Utrecht, foto Ruben de Heer One of the things that makes the design of the lone cope hood from the V&A so outstanding is the amount of storytelling that's going on. Embroidered art can be pretty static. The above cope hood from Museum Catharijneconvent also has a very dynamic design with whimsical details. See the man untying his shoes? And the woman being helped out of her coat? These people are preparing for their own baptism. Some people look on in quiet contemplation whilst others look a bit sceptical. It needs a good designer, in this case, Jacob Corneliz van Oostsanen, and an equally brilliant embroiderer to put it into stitch!
This cope hood was made around AD 1520-1529 in Amsterdam. That's about 30-70 years after the supposed stitching date of the lone cope hood from the V&A. Maybe the lone cope hood from the V&A should be dated a little later? Any art historians in the audience that could chime in on this? When everything goes to plan (hear the universe roar with laughter?), we will try our hands at a little bit of recreation of a small part of the lone cope hood next week! Literature: Gerits, T. J. (1973): Historische schoonheid van Averbode. Averbode: Abdij der Norbertijnen. In November 2019, I visited the Clothworkers' Centre in London to study several pieces of embroidery kept in the V&A collection. One of these pieces was a cope hood from Flanders made in the second half of the 15th century (Accession Nr. 990-1888). The piece was bought in 1888 by the museum and lacks any further provenance. Lone cope hoods are pretty common in museum collections. This part of a cope is already relatively loose and could easily be separated before being sold on the art market. Pieces without provenance, like this lone cope hood, always make me a bit sad. So much information was lost. Nevertheless, it is a very fine piece of late-medieval goldwork embroidery. Let's explore! 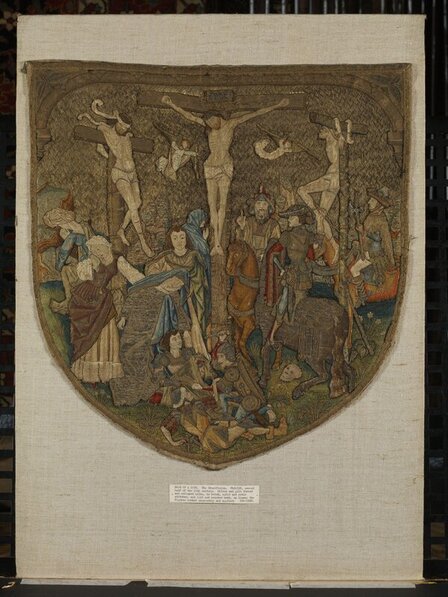 © Victoria and Albert Museum, London The cope hood measures 53.3 x 51.4 cm and the embroidery fabric is a finely woven linen. Originally, the hood would have been trimmed with some sort of decorative fringe. It likely also had a tassel of some sort dangling from its lowest point. In those areas where the embroidery has fallen out (lower part of the undergarment of the lady with the red dress on the left), a finely shaded underdrawing is visible. Although I am generally not very keen on crucifixion scenes, this one I quite 'like'. There is so much going on. There is so much movement. And there are so many fine details. This is late-medieval art at its best! The design is very high quality and was likely made by a famous artist. Maybe a painter or someone who designed church windows (we know from written sources that they provided embroiderers with designs too). It is highly unlikely that the design stems from an embroiderer who happened to be a fine draftsman too. So, what do we see? And how was it embroidered? 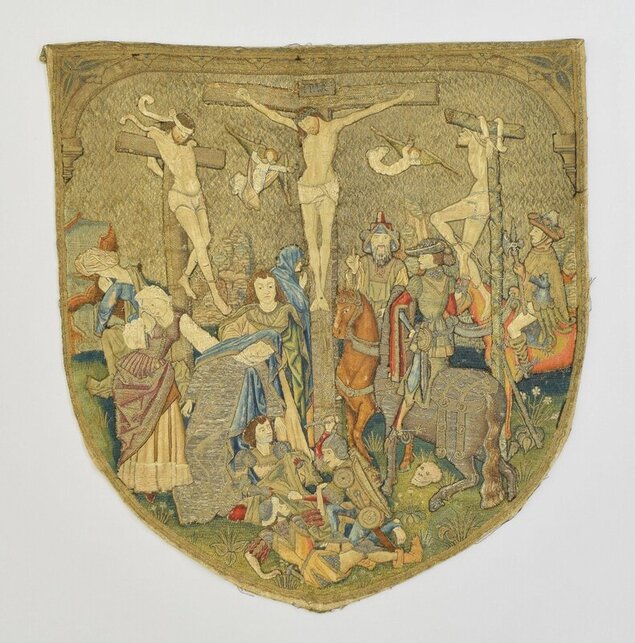 © Victoria and Albert Museum, London We, the viewers, are looking towards Golgotha from under an arch (probably the city gate of Jerusalem as Golgotha was 'outside the city gate' according to Hebrews 13:12). The arch is a far more intricate piece of embroidery than what it looks at first glance. It is partly embroidered as a continuation of the diaper pattern background (capitals on the sides), whilst the gold threads of the rounded arch neatly cover the turns of that same diaper pattern. The silver trefoils in the corners are also very intricately embroidered. There's twist and something that looks like a chain stitch executed with passing thread. On the arch itself, halved quatrefoils are embroidered at regular intervals. Their 'petals' are actually part of the arch. By couching 'petal' outlines onto the arch, the quatrefoils emerge. The diaper pattern used for the background is of the common open basketweave type. The couching stitches were once bright red; the most common colour used. Also part of the background are beautifully stitched rocks. They are embroidered directly onto the background linen. The rocks are made with Burden stitch and use a variety of green and brown silks. On top of this base layer, additional details are stitched with silks and gold thread. The rest of the background consists of a meadow stitched with several shades of green in Burden stitch. At the top, the Burden stitch is worked very densely so that the foundation gold thread can hardly be seen. Towards the bottom, we see the gold thread clearly. On top of the grassy base layer, grasses and several species of plants are stitched with silk and gold. None of the plant shapes is repeated. The flowering plants have different flowers. Maybe the plant lovers in my audience can identify them? Also present in the meadow is a rather funny-looking skull. It has lost most of its embroidery but is still readily identifiable. The skull is a hint to show that we are at Golgotha. According to the bible, Golgotha means 'place of the skull'.  © Victoria and Albert Museum, London And what's with all the people on this piece? They actually tell different parts of the gospels in one very lively scene. Firstly, there are the three crucified people: Jesus in the middle flanked by two criminals. See the body language of those two criminals? The one on the left looks submissive. The one on the right not so much. He even sticks out his tongue. The story of the good thief and the unrepentant thief is told in the gospel of Luke. Interestingly, the crosses of Jesus and the good thief are identical (made of timber), whereas the cross of the unrepentant thief is made of green wood. Has anyone seen this before in embroidery or a painting? Oh, and then there are the two angels with their chalices catching Jesus' blood for the Eucharist.
Next up, are the people on the left. They are on the good side with the good thief. We see four women and a man. The woman on the left with a fancy laced red dress is Mary Magdalene. The woman to her right is Mary mother of Jesus. She is fainting and being caught by Saint John who stands behind her. The two other women in the back are sometimes known as Salome and Mary the wife of Clopas. The bible is vague about these other women. Is this why the designer decided to show them only from the back? On the 'wrong' side are three horsemen. Two are clearly soldiers as they wear weapons. But who is the guy with the strange hat? He points up. What does he want? Is he pointing at Jesus? Is he the centurion who according to the gospel of Mark identifies Jesus as the son of God? Or is he a Jewish priest (as the V&A website suggests)? Any ideas? The last group of figures sits at the bottom of the cross. Three soldiers are dividing Jesus' garment to each have a piece. This is also a well-known story from the gospels. Whoever drew the design for this cope hood was very well acquainted with the biblical stories. Far more so than most people are today. How are all these different figures stitched? None of them are stitched directly onto the background linen. Instead, single figures or a group of figures are stitched on a separate piece of linen and then appliqued onto the background. This creates a little bit of depth in the embroidery. Can you see some of the crude white tacking stitches along the edges of parts of some of these figures? These are later repairs. It never ceases to amaze me that people repaired these very high-class embroideries with such crude stitching in later times! Have a good look at the embroidery of the figures. You will see beautiful or nue in the clothing of some of the figures, on the crosses and on the horse. There is also beautifully shaded medieval long and short stitch (it is more a counted thread technique than our modern version of long and short). The use of both gold and silver thread further enhances the design. The quality of the embroidery matches the quality of the design. This would once have been a very expensive piece of embroidery. It was probably commissioned by an important church or important church leader. Think cathedral or bishop. If we only knew for which church it was originally intended. Or who designed or stitched it! Before we dive into today's topic involving cartoon, pricking and finished embroidery, just a quick heads up that there is a new batch of embroidery kits for the self-paced online medieval sampler course in the shop. The prices are up by a bit due to the price of gold being a bit higher. At the same time, I was able to find a cheaper direct source for the prickers in the transfer kits. My shop isn't as sophisticated as I would like. If the kit you want is no longer available, just put a comment in your order form and I will be able to sort it out for you. When all kits are gone and you missed out, just shoot me a quick email so that I know that there is still interest in another batch of kits. Thanks! Let's explore today's topic. How much does the size of the finished embroidery differ from the cartoon and the pricking it was made with? Any idea? Me neither. But I read a reference by Evelin Wetter a couple of years ago that tried to link a rare surviving medieval pricking to a surviving embroidery. However, the measurements of both were slightly different. So how different are cartoons, prickings and the resulting embroideries? Time for an experiment and in comes Elisabeth. 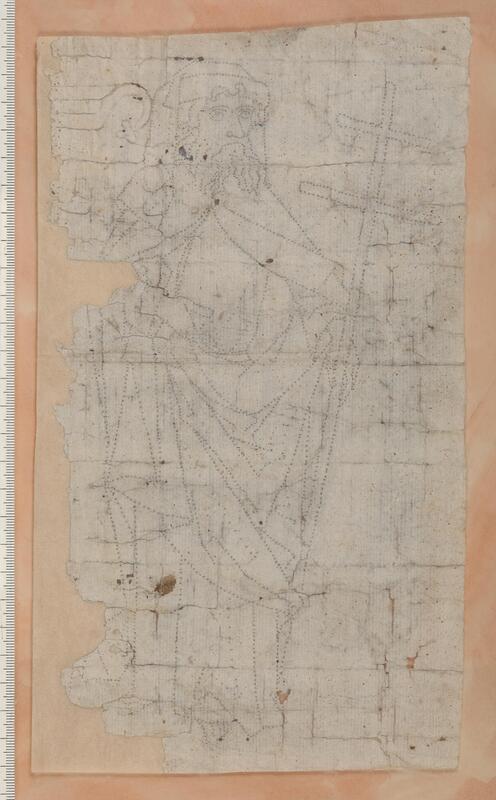 Pricking of Philip the Apostle, Historiska Museet Stockholm, Inv. Nr. 21324. Upphov: Hildebrand, Gabriel, Historiska museet/SHM (CC BY 4.0) The original reference mentions the find of a pricking being reused as the backing for a finished embroidered antependium (to stiffen it) found in Hillersjö, Sweden. The pricking shows Philip the Apostle. The pricking is identical to an embroidered Philip the Apostle on a cope orphrey from Linköping Cathedral in Sweden. According to the reference, "compared to the pricking, the embroidery appears to have shrunk by a few millimeters". Unfortunately, I wasn't able to find precise measurements of either the pricking or the finished embroideries on the cope orphrey. From the ruler depicted in the picture of the pricking, the pricked figure must be about 24,75 cm. 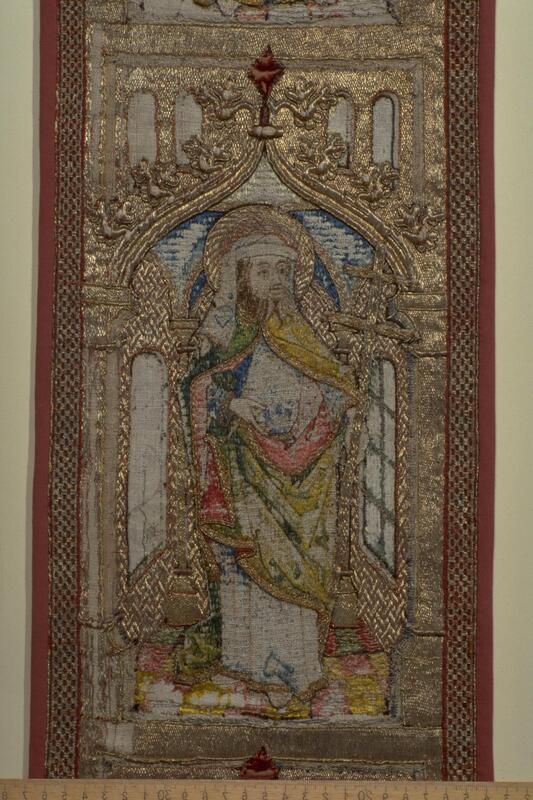 Pricking of Philip the Apostle, Historiska Museet Stockholm, Inv. Nr. 2920:2. Upphov: Hildebrand, Gabriel, Historiska museet/SHM (CC BY 4.0) From the ruler in the picture with the orphrey of Philip the Apostle, the embroidered figure must be about 23.7 cm high (excluding the halo, just as in the pricking). If we compare this with the height of the pricked figure (24.75 cm) we have a difference of about 10.5 millimeters (slightly over a cm!). This would more or less correspond with the original reference's mention of 'a few millimeters'. It looks a little high to me, to be honest. And when my deducted measurements are correct, I doubt pricking and embroidery are identical. In the original reference, the difference between the size of the pricking and that of the embroidery is explained by the transfer process described by Cennini in his Libro dell'Arte of c. AD 1370. In it, a near-dry sponge is used to slightly wet the free-hand drawing to add shading. Now, there's several things mixed up here. Cennini described the embroidery design transfer process for a design drawn onto the embroidery process free-hand. The pricking of Philip the Apostle and the resulting embroidery stem from a very different process. No free-hand drawing. And as we can see in the damaged parts of the finished embroidery: it is a line drawing with no shading. The embroidery linen can thus not have shrunk, as the original reference of Evelin Wetter suggests, due to the application of a little water in the wetting process to add shading. 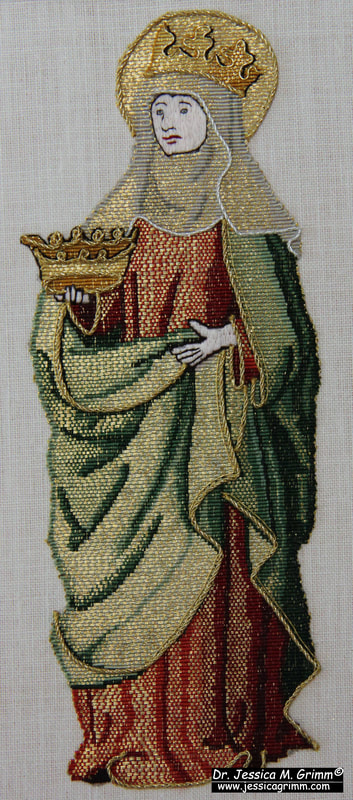 If art historians make assumptions like the one by Evelin Wetter, you might think that they have conducted an experiment with modern embroiderers, don't you? But, nope. So, I decided to use my teaching at the Alpine Experience in 2022 as such an experiment. Just having my own measurements would be a bit skimpy on the data side of things. And I am very grateful that three students of that class finished their embroideries and that I was able to measure their embroideries during 2023's class. Here are the results: 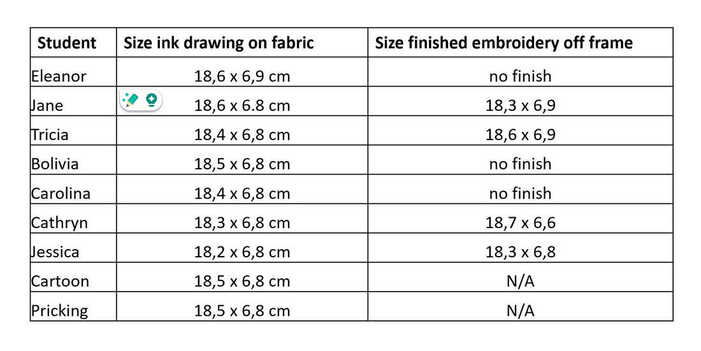 As you can see from the above table, the cartoon (design drawing) and the resulting pricking do not differ in their measurements. Everyone used the same pricking. The resulting design drawing on the embroidery fabric made with pounce and ink already differs slightly: up to 3 millimeters in height and 1 millimetre in width. Some are larger, others are smaller than the pricking. The finished embroidery differs up to 2 mm in height and 2 mm in width. Again, some are larger and some are smaller. This is the comparison we are after as this compares the pricking with the finished embroidery just as for Philip the Apostle.
My conclusion thus is that small differences in measurements between a pricking and the resulting embroidery are normal. These differences can go either way: larger or smaller. They are the result of the maker going through several transfer steps: pounce dots from the pricking, turned into an inked line drawing, turned into an embroidery. The absolute difference in millimetres thus directly relates to the size of the brush for the inking and the size of the embroidery materials. Particularly the width of the gold thread at the turns on the design line probably attributes the most to the size differences seen. A huge thank you to my students who were brave enough to tackle Elisabeth! You have provided me, and the wider research community, with tangible data on this particular topic. Literature Nisbeth, Åke; Estham, Inger (Eds.) (2001): Linköpings domkyrka. Inredning och inventarier. Linköping: Linköping Domkyrka. Wetter, Evelin (2012): Mittelalterliche Textilien III. Stickerei bis um 1500 und figürlich gewebte Borten. Riggisberg: Abegg-Stiftung. P.S. There will be no blog post next week as I am attending the CIETA conference in Krakow, Poland. Last week, we looked into the history and the different parts of the Grandson Antependium. This week, we will have a closer look at the actual embroidery techniques used to produce the piece around AD 1300. As I needed to try out a new mixture of pounce powder, I even worked a small sample of freehand pattern couching. Journeyman and Master Patrons will be able to download PDF instructions with lots of tips and tricks. Medieval goldwork embroidery is perfect for beginners as the techniques are simple and quite forgiving! This Saturday 23-09-23, I will meet with my Master Patrons for a Zoom lecture with Q&A on the Grandson Antependium. If this interests you, please consider becoming a Patron. It helps me cover the bills and do my research into medieval goldwork embroidery. And now, onto some early 14th-century stitching! 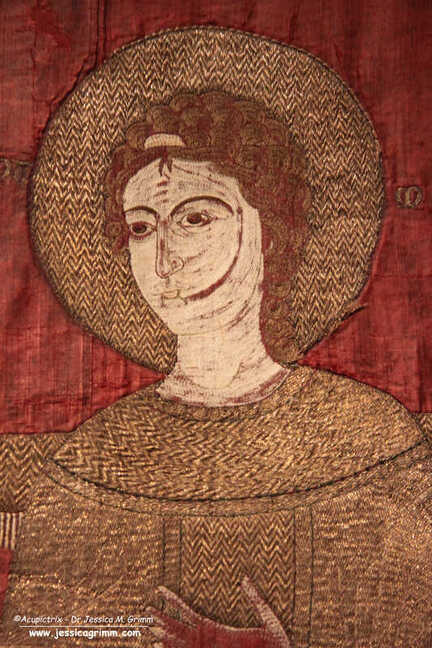 Grandson Antependium, Historisches Museum Bern, Nr. 18, around AD 1300. The central part of the embroidery is worked on a layer of waxed purple silk (tabby weave) backed with a layer of linen. The two components of the purple have not aged in equal measure, resulting in the silk now looking more red than purple. The original colour can be glimpsed along the edge of the halo of the angel where some of the goldwork embroidery has come undone. The goldwork and the silk embroidery are worked through both layers of fabric. As you can see in the picture of the angel above, the silk embroidery mainly consists of directional split stitch. This technique is often associated with Opus anglicanum. However, it was also used in other parts of Europe and bordering Asia at this time. 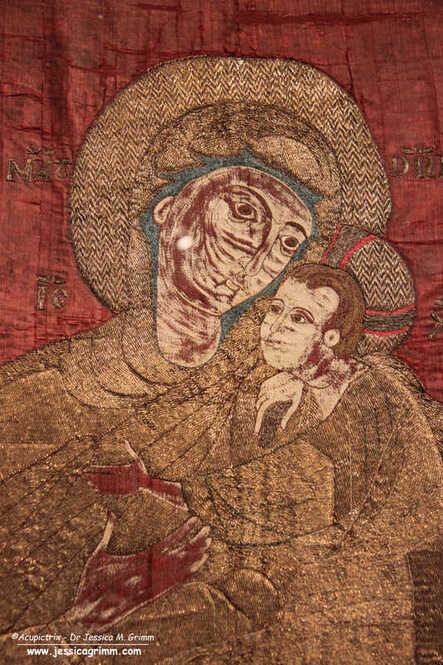 Grandson Antependium, Historisches Museum Bern, Nr. 18, around AD 1300. The other technique extensively used on the central part of the Antependium is surface couching over two parallel gold threads (gilded silver, yellow silken core). And although I think that there are possibly only two different couching patterns present, they are used to great effect. By following the contours of the drapery, the simple bricking pattern can change its appearance drastically. The way the light plays of gold threads that are laid in different directions accounts for different hues and thus movement in the design. The other couching pattern used is a nine-step chevron. As the chevron pattern isn't entirely regular, I suspect it was not drawn onto the embroidery fabric. With practice, a master embroiderer probably becomes quite good at keeping the pattern regular and simply does not need to go through the hassle of transferring the pattern onto the embroidery fabric first. Also, as soon as the chevron pattern is worked to follow the shape of the design, drawing it out first is probably almost as complicated as just stitching it. But I might be wrong and there might be guidelines underneath the gold. 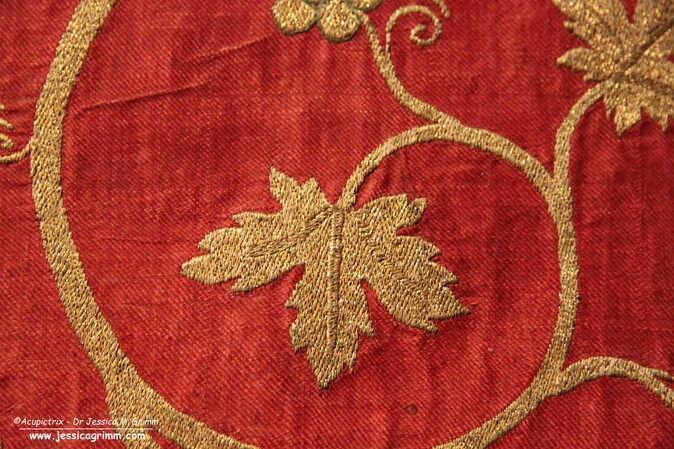 Grandson Antependium, Historisches Museum Bern, Nr. 18, around AD 1300. The two side parts were clearly not made by the same embroidery workshop. Firstly, the embroidery fabric is different: it is a red silk twill. And the embroidery technique is very different too: underside couching with a pair of gold threads (gilded silver, yellow silken core). In order to see the different parts of the design clearly, the direction of the gold threads is changed. Not unlike the method used in the central part of the design.
One of the things that keeps puzzling me when I see this composite piece is how different in age the three pieces look. The central part looks so much older than the two side parts. Is this just due to the difference in materials and techniques used? Or are the side parts of a later date? What do you think? Literature Martiniani-Reber, Marielle (2007): An exceptional piece of embroidery held in Switzerland: the Grandson Antependium. In Matteo Campagnolo, Marielle Martiniani-Reber (Eds.): From Aphrodite to Melusine: Reflections on the Archaeology and the History of Cyprus. Geneva: La pomme d'Or, pp. 85–89. Schuette, Marie; Müller-Christensen, Sigrid (1963): Das Stickereiwerk. Tübingen: Wasmmuth. Before we launch into this blog's topic: there are 4 kits left of the initial batch of 10 kits of the self-paced Medieval Sampler online course. You have a choice of just the embroidery kit or the embroidery kit + transfer materials. Should your option no longer be available, choose the other one and leave a comment with your order. I will gladly sort you out. If you miss out on this first batch of kits please email me. This will enable me to guess better if a re-run is needed and how large it should be. Thank you! And now: on to the Grandson Antependium. It is a pretty mix of embroidery techniques, styles, languages and geographical areas. The Grandson antependium is housed at the Historisches Museum in Bern, Switzerland and catalogued under Nr. 18. It is 244 cm wide and 88 cm high and consists of three separate parts. The knight kneeling to the left of the central figure of the Virgin and Child is the donor of the piece. His coat of arms identifies him as Othon de Grandson (c. 1238-1328). Although born near Lausanne in Switzerland, he became a close friend of King Edward I of England. Othon de Grandson travelled widely throughout Europe and the Mediterranean area when he joined the 9th Crusade. Othon accumulated great wealth and donated it to various religious institutions in both England and Switzerland. This particular antependium was donated to the Cathedral of Lausanne where Othon is entombed. With the amount of gold used for the embroidery, it must have been a very expensive piece. 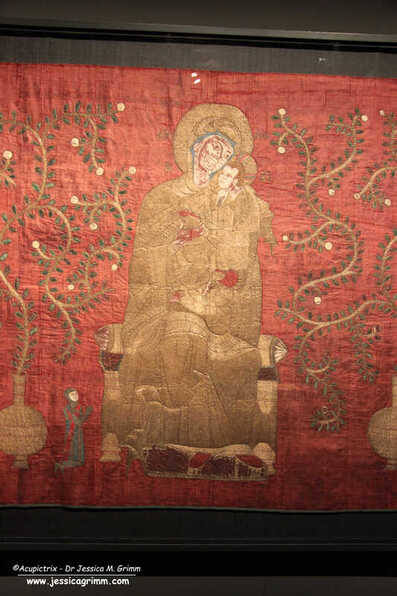 Grandson Antependium, Historisches Museum Bern, Nr. 18, around AD 1300. The central part of the antependium shows the enthroned Virgin and Child with two vases with foliage and two angels with censers on either side. The design has a Byzantine flavour which is emphasised by the Greek embroidered inscription for the name of Christ. But that's not the only language used. Mary is addressed in Latin and the two angels are addressed in ancient French. The design isn't purely Byzantine either: the censers are distinctively Western European. Byzantine embroideries with embroidered donor figures are not known in this era either. Where was this piece made? And for whom originally? Most scholars now agree that the central part of the embroidery was likely made in Cyprus. The island is conveniently placed en route to the Holy Land and also served as a retreat base when things went wrong during the crusade. Cyprus belonged to the Byzantine Empire with its Eastern Orthodox version of Christianity. At the same time, it had ample visitors from the West. Was the central composition mostly finished when Othon saw it at a Cypriot embroidery workshop? Where the texts added on his request? The knightly figure and the coats of arms certainly were.
And then we have the two separate side panels. Very different from the central panel. Style, embroidery technique and materials used differ from the central panel. And their design is non-religious. The side panels are thought to have been embroidered in England as they sport underside couching. Is this a rare remnant of non-religious opus anglicanum? Did Othon come across two embroidered soft furnishings in England that together with the panel he probably acquired in Cyprus would make up a fitting antependium for the high altar in his cathedral back home? As the embroidery is cut at the top, the two panels were not specifically intended for that high altar when they were made. I think we see a rare glimpse of opus anglicanum 'for the noble home' preserved in this extraordinary antependium. What do you think? Literature
Martiniani-Reber, Marielle (2007): An exceptional piece of embroidery held in Switzerland: the Grandson Antependium. In Matteo Campagnolo, Marielle Martiniani-Reber (Eds.): From Aphrodite to Melusine: Reflections on the Archaeology and the History of Cyprus. Geneva: La pomme d'Or, pp. 85–89. Stammler, Jakob (1895): Der Paramentenschatz im historischen Museum zu Bern in Wort und Bild. Bern: Buchdruckerei K.J. Wyss. Schuette, Marie; Müller-Christensen, Sigrid (1963): Das Stickereiwerk. Tübingen: Wasmmuth. Woodfin, Warren T. (2021): Underside couching in the Byzantine world. In Cahiers Balkaniques 48, pp. 47–64. I am back from a wonderful stitching weekend in Halberstadt! My husband and I drove up there on Friday and back again yesterday. It takes us about 8 hours to get there. On the contrary, most stitchers from the Netherlands have a far shorter drive. Maybe some Dutch stitchers could join us next year? Stitching in the medieval cloisters with the largest medieval textile collection next door is after all a pretty unique experience! Especially when the museum's director, Dr. Uta-Christiane Bergemann, is on hand to give us an exclusive tour of the cathedral and the exhibition. It worked out really well for all of us. This means that we will do it again next year. And this time, we will take our inspiration directly from the museum's textile collection. So, watch this blog and the newsletter for more information. For those of you who would like to see more of the Cathedral and the collection, please download the free Domschatz Halberstadt App. It is available in English and German and has some nice close-ups of the embroidered textiles. 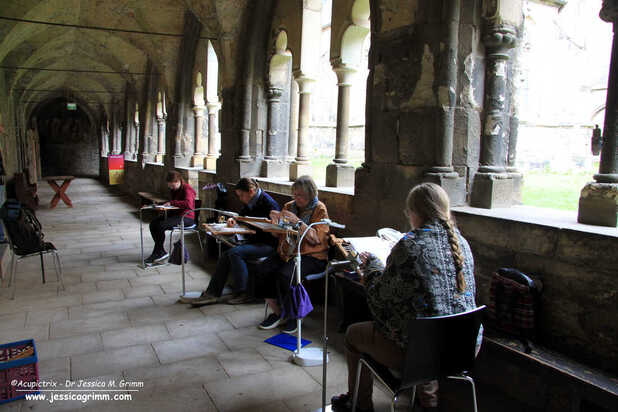 Although we had one American lady joining us in Halberstadt, I do understand that not all of you can make such journeys (I still recommend it as this is a collection you really want to see!). Since she needed instruction videos in English, I decided to turn the workshop into a self-paced online course. It consists of five instruction videos and an embroidery kit. There's one video on setting up your slate frame (always available for free on my website). Then there is a video on traditional pattern transfer with prick and pounce and iron gall ink. Buying a full kit for this step is optional as you can also use the transfer method of your choice. The other three videos show you the different couching and embellishment techniques used in the sampler. You will have access to these videos for a whole year from the time of purchase (this will entice you to not only buy a course but also work on it :)). The embroidery kit will contain a large piece of linen (so it will fit a traditional 24-inch slate frame), Japanese thread, gilded silver passing thread with a silken core (otherwise known as 'real gold thread'), real gold twist, fresh-water pearls, Chinese flat silk, linen sewing thread, linen string, cotton string, beeswax and needles.  So, how does one sign up for the course? Through my webshop. Very soon. Unfortunately, I still don't have all the ingredients for the embroidery kits in. But as soon as it has all arrived, I will start kitting them up. Equally, I don't know the exact price yet due to invoices still being on their way. And then there is the small, but pretty important, matter of calculating the shipping costs. This can equally only be done once everything is in.
I will announce the course first on my Patreon site and then through the blog and newsletter. As it has proven to be very difficult to guess how many people end up signing up for courses like these, I will have an initial trial run of 10 kits. There will not be a waiting list. New batches will be announced in the same way as the first batch. Happy Stitching! |

Want to keep up with my embroidery adventures? Sign up for my weekly Newsletter to get notified of new blogs, courses and workshops!
Liked my blog? Please consider making a donation or becoming a Patron so that I can keep up the good work and my blog ad-free!

Categories
All
Archives
April 2024
|
 RSS Feed
Contact: info(at)jessicagrimm.com
Copyright Dr Jessica M. Grimm - Mandlweg 3, 82488 Ettal, Deutschland - +49(0)8822 2782219 (Monday, Tuesday, Friday & Saturday 9.00-17.00 CET)
Impressum - Legal Notice - Datenschutzerklärung - Privacy Policy - Webshop ABG - Widerrufsrecht - Disclaimer
Copyright Dr Jessica M. Grimm - Mandlweg 3, 82488 Ettal, Deutschland - +49(0)8822 2782219 (Monday, Tuesday, Friday & Saturday 9.00-17.00 CET)
Impressum - Legal Notice - Datenschutzerklärung - Privacy Policy - Webshop ABG - Widerrufsrecht - Disclaimer