|
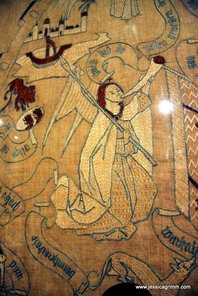
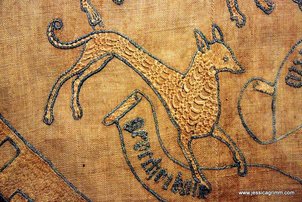
As promised in my last post, a few more deliciously stitched goodies from the National Museum in Munich. One of my favourite pieces is this golden dragon slip (Inv. Nr. T3792). The dragon looks really live like and three dimensional. This is achieved by couching the membrane gold (comparable to Japanese Thread) over clever padding. The darker underside of the dragon's belly and the shadow side of its tail and neck are worked in or nue with red silk. I particularly like his face with its detailed expression. 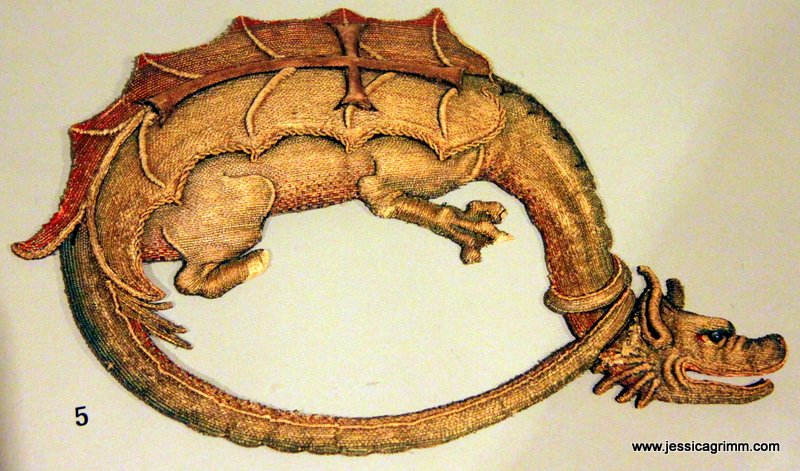 This dragon was probably once stitched onto a banner or a cape. It was stitched around AD 1430 in southern Germany. The dragon is besieged by the Christian cross on its back. This symbol was part of the late medieval Order of the Dragon founded by Sigismund, Holy Roman Emperor. The noble knights were obliged to defend the cross and fight the infidels. 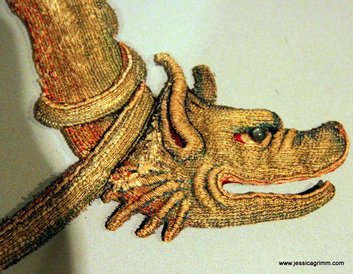 Another adorable little piece consists of an Agnus Dei capsule stitched around AD 1450-1470 in southern Germany. These capsules were made to preserve a piece of the burned down Easter candle. This particular capsule shows the Lamb of God on one side and the head of Christ on the other. The body of the lamb is covered in freshwater pearls. Red velvet covered with spangles is used as a sparkling background. Unfortunately, the museum does not have a picture of the other side of the capsule on display. 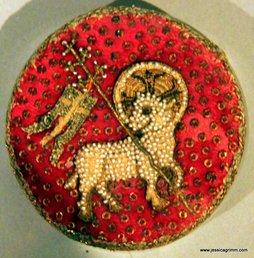 And last but not least, a huge piece of fantastic surface embroidery (Inv. Nr. T1742). The piece probably once adored the altar. Stitched around AD 1500 in Swabia, Germany with linen yarn on linen. The cloth shows the popular imagery of a unicorn hunt in a secluded garden. 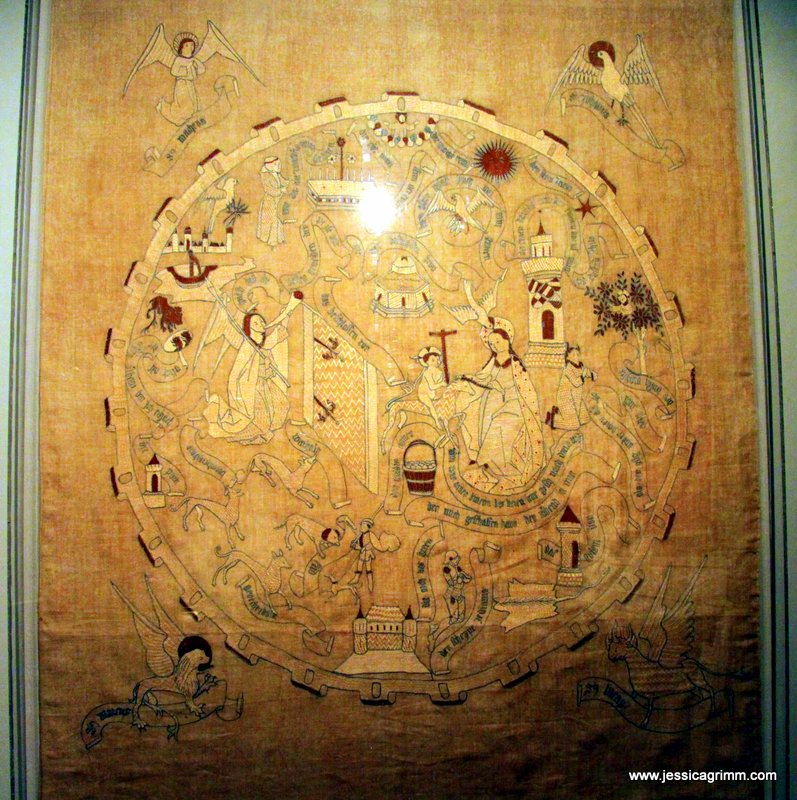 Remarkable about the piece are the many different filling patterns in needle lace technique. The figures are outlined in a dark chain stitch and then some areas are filled with intricate patterns of needle lace. Other areas are filled with what seems satin stitch, couching and cretan stitch. Truly a piece I could study for hours!
2 Comments
Hear the drum roll: Maxi's Hosenträger are finished! Or as they say 'Ich habe fertig' :). After 123 hours of stitching and pretty sore fingers, all flowers are in the right place. And what a beauty she is:  Each strap is 85 cm long and 4,5 cm wide. Stitched on 18 count canvas it means that each strap has 19.200 (!) individual tent stitches. It also means that I am able to put in 350 stitches an hour on average. That's a little mad and a little scary. And it should probably come with the obligatory warning: 'Don't try this at home'.  Above is a close up of the pattern repeat. There are five repeats for each strap. As the braces are intended for a child, I did not 'turn' the pattern on that part of the strap that will run on the back. In a child, due to different anatomical proportions and the fact that they still grow (the braces will be assembled in such a way, that they can be opened up twice to allow for 10-15cm growth in the next few years), it is rather difficult to guess where the turning point will be. Instead, my husband drew the pattern in such a way that it is pleasing to the eye going up as well as going down. His inspiration came from a wonderful little book called: 'Schöne alte Stickvorlagen' by Ravensburger. It is out of print, but still widely available used online. As the braces are intended for a child, I picked rather bright colours. Maxi is a great fan of the bright greens and has a matching white shirt with green monograms to go with it. 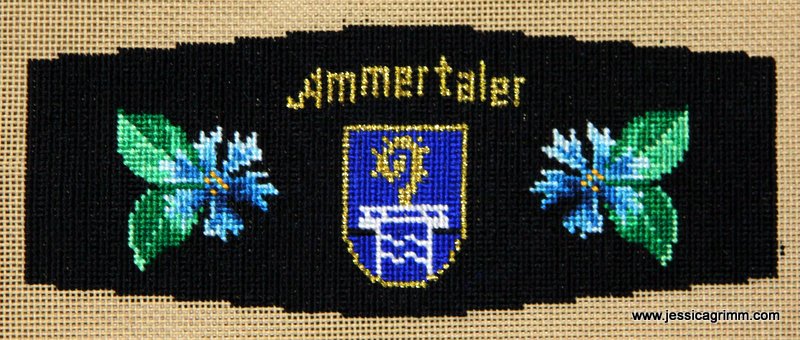 The breast piece or Steg features the coat of arms of Bad Bayersoien. The crosier of an abbot above a bridge over a river. This refers to the monastries of Ettal and Rottenbuch that owned buildings and land in the village before the dissolution of 1803. The bridge refers to the crossing over the river Ammer at Echelsbach. 'Ammertaler' (Ammer valley) is the name of the Trachtenverein (folklore club) Maxi belongs to.
I hope you liked my babble about this very much alive-and-kicking piece of Bavarian folklore. For my part, I love to stitch these Hosenträger. Although not as technically challinging as a piece of surface embroidery, the fact that the finished piece is part of a living and cherished tradition, makes me really proud to be a part of that too. Next time we will have a look at some more stunning pieces in the collection of the Bavarian National Museum. Beware of the golden dragon... My current embroidery project consists of a pair of Bavarian braces which will be worn at first communion by Maxi. The straps are nearly finished and then there is only the breast piece (Steg) to be stitched. These braces are part of the Bavarian folk costume and were first seen in the early 18th century. From what I have seen, the oldest surviving ones are from about the mid-19th century. These were stitched in tent stitch on a linen background. The patterns are the same as for Berlin Wool work: mainly roses and other flowers, as well as animals and foliage. Me and my husband find a lot of inspiration in the old patterns. It is great fun to use new colour combinations and introduce new flowers. Maxi's pattern consists of a rose, followed by a cornflower, a fuchsia and a pansy. The Steg will feature the coat of arms of Bad Bayersoien. We use Crossstitch Professional Platinum to design our patterns. It easily allows us to adjust colours and to shift or flip design elements about. 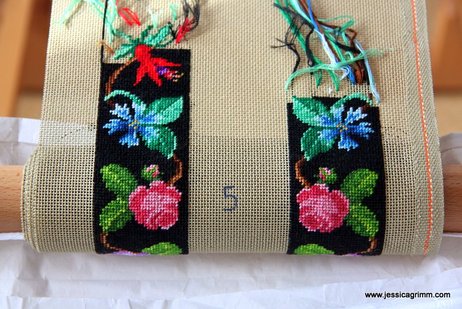 Nowadays, mainly canvas is used instead of linen. I am working on brown 18 count mono canvas made by Zweigart and I use a whole strand of DMC or Anchor stranded cotton. As the background of the braces are covered with black stitches, I have found that on occasions white canvas shines through. Please don't be tempted to remedy this by 'painting' your white canvas black with a thick marker pen! These inks are not stable. The embroidery will be steam pressed at high temperatures when the leather backings are put on and you don't want black ink spoiling your lovely pink roses. Another thing to avoid is the thin double canvas. It is not sturdy enough and may rip during the construction process. As tent stitch is a repeated stitch in one diagonal direction, there is a heightened risk of the straps becoming askew. To avoid this, I use a slate frame. As an added bonus, my posture whilst stitching is better too. Quite important as only the straps have taken 101 stitching hours so far. It also allows me to work with both hands and to 'automatically' start and finish my threads. This speeds up the work enormously. First: working with two hands. My slate frame rests on two adjustable standers. For this kind of work, I like my frame tipped slightly towards me. As I am right handed, my right hand stays on the back of the frame, whilst my 'weaker' left hand is guided by my eyes on the front of my embroidery. With each stitch I pass my needle from my left hand to my right hand and back. Much more economical movements then when I would only use my 'good' right hand and would have to move my whole arm forwards and backwards. 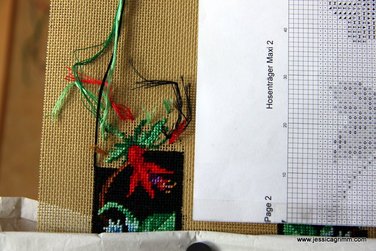 Secondly: automatically start and end threads. This method was such a huge eye opener when I studied at the Royal School of Needlework in London! And now I am met with a lot of 'aha, that's genius' when I pass the skill on as a tutor. Have a look at the picture above. You might think my embroidery has a bad hair day, but that is not the case (the same can unfortunately not be said of me...). Every tail of thread you see is either the start of a thread or the end. When I now continue stitching these threads are caught on the back and secured. Once I reach one of these tails, I can snip it off knowing that it is indeed secured on the back. For this method to work, it is paramount that pattern and background are stitched more or less simultaneously. The practice of firstly stitching the flowers and then fill out the black background in one go is not only tedious, but also adds the risk of differences in thread tension. Occasionally, I do unintentionally pull up a fibre of a starting or ending thread. No worries, I just pull or push it back. With practice, this occasional annoyance becomes less frequent. I hope you enjoyed reading about my current embroidery project. Soon, I hope to post some pictures of the end result.
|

Want to keep up with my embroidery adventures? Sign up for my weekly Newsletter to get notified of new blogs, courses and workshops!
Liked my blog? Please consider making a donation or becoming a Patron so that I can keep up the good work and my blog ad-free!

Categories
All
Archives
July 2024
|

 RSS Feed
Contact: info(at)jessicagrimm.com
Copyright Dr Jessica M. Grimm - Mandlweg 3, 82488 Ettal, Deutschland - +49(0)8822 2782219 (Monday, Tuesday, Friday & Saturday 9.00-17.00 CET)
Impressum - Legal Notice - Datenschutzerklärung - Privacy Policy - Webshop ABG - Widerrufsrecht - Disclaimer
Copyright Dr Jessica M. Grimm - Mandlweg 3, 82488 Ettal, Deutschland - +49(0)8822 2782219 (Monday, Tuesday, Friday & Saturday 9.00-17.00 CET)
Impressum - Legal Notice - Datenschutzerklärung - Privacy Policy - Webshop ABG - Widerrufsrecht - Disclaimer