|
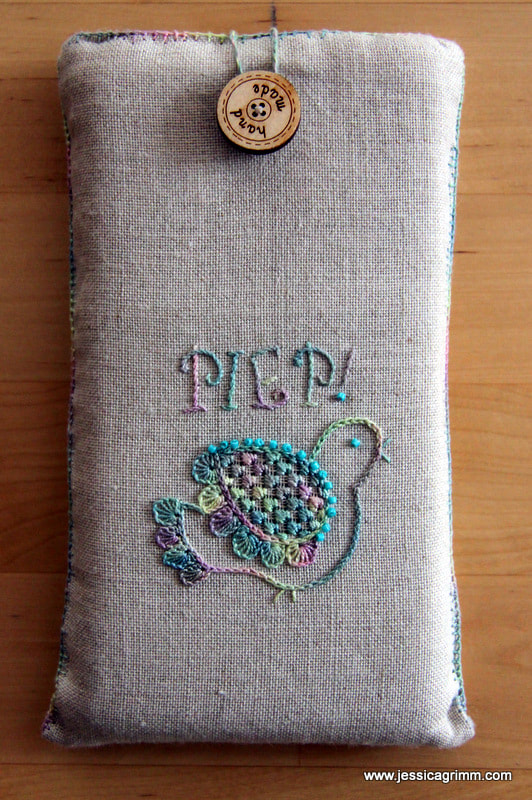
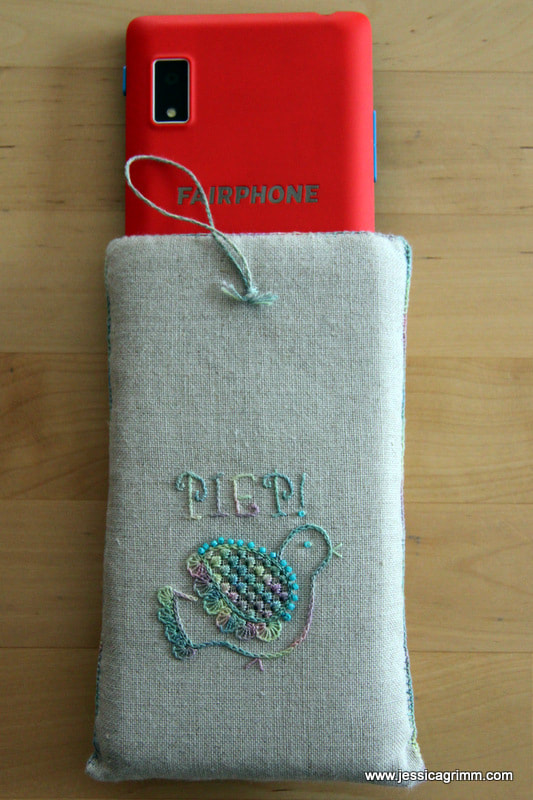
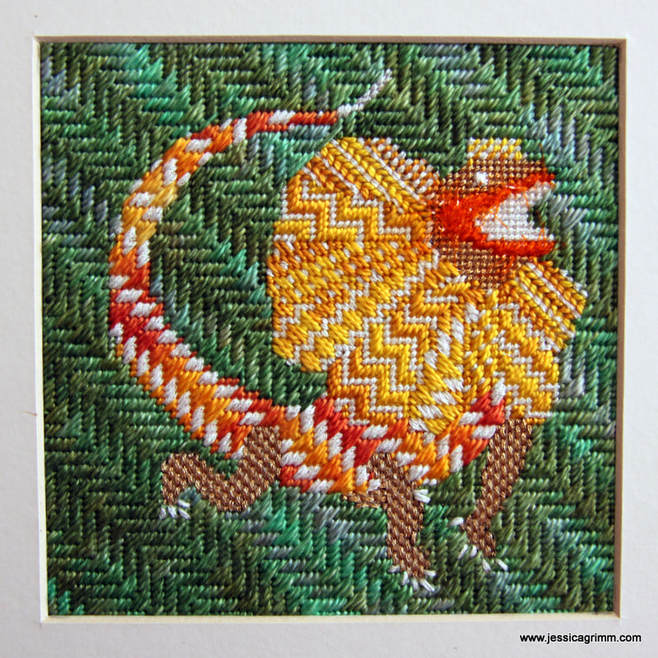
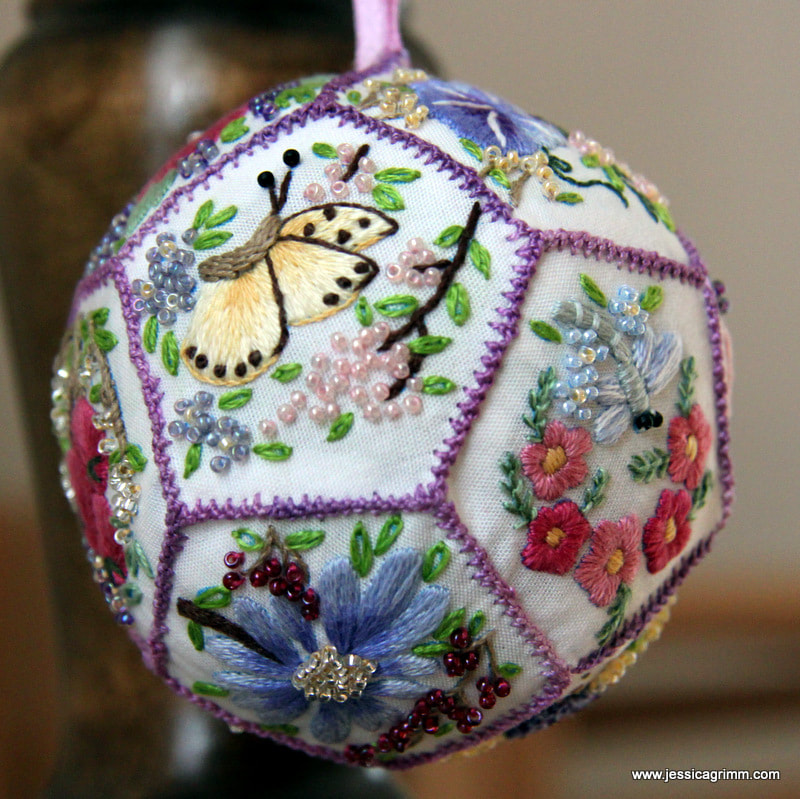
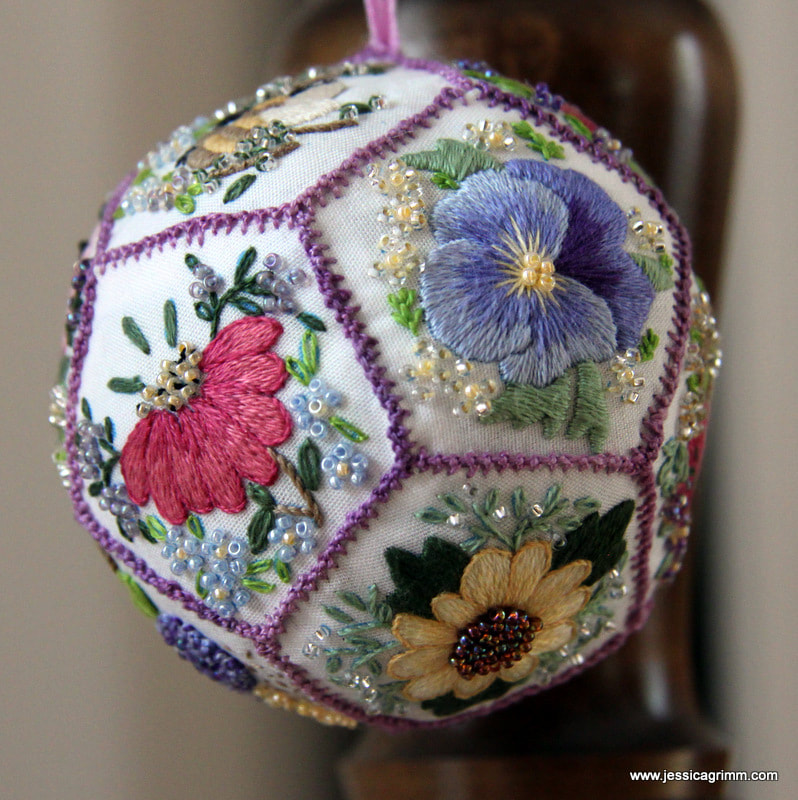
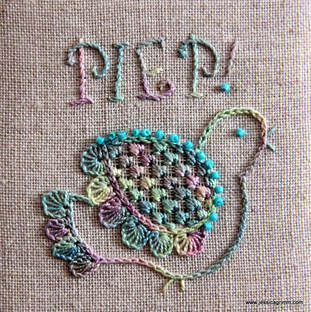
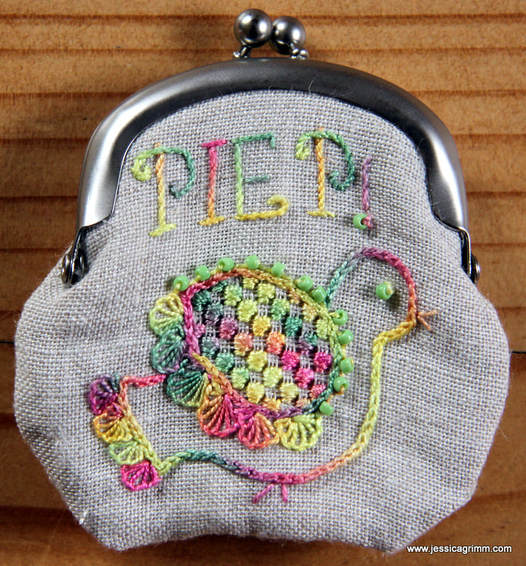
Yup, it is true: I have arrived in the modern area too. It took me years. But when I heard that Fairphone makes smart phones that last, are repairable and don't use blood minerals; I ordered one. So far, I have used it to download (and use!) a 5K running app, WhatsApp with my family, use Google for directions and information AND made the very occasional phone call :). Still much prefer my Ipad and Laptop... Maybe I should seek professional help? Pondering this option, I did make my Fairphone a cozy home to live in. On Zweigart Newcastle natural coloured 40ct linen, I outlined the bird with chainstitch using a #12 variegated House of Embroidery perle colour Grapes C. Then I stitched partial buttonhole wheels for the feathers on the tail and the wing. I added straight stitches for the feet and the beak and attached some blue beads along the upper-edge of the wing. From the back, I withdrew every fourth thread in both directions and then added a Schwalm filling stitch called 'Gefieder'. The lettering was stitched using stem stitch. To make my 'phone home' a bit sturdier, I added wadding and a sheet of template plastic. The seams were then pimped with knotted pearl stitch. So far, my phone seems to be pretty comfy in her new home! I've asked my very talented husband to make a nice clean digital drawing of my scribbled birdy pattern. You can download it at the end of this article. Apart from using it as I did in a Schwalm embroidery way (finished design including lettering H 55mm), there is tons of other possibilities. How about stitching it monochrome on a piece of felt? Or applique with a few simple stitches for embellishment? Surprise me! Next up is another broderibox project using a design of a Chlamydosaurus by Millie Marotta. This amazing creature can impress by unfolding his neck frill. However, it can only do so in opening its mouth widely. The bones in the frill are extensions of the hyoid or tongue bone. Isn't nature amazing?! The lovely people of Nordic Needle had put in a glow-in-the-dark thread made by Rainbow Gallery. I made sure to add it to every canvas stitch I used on the chlamydosaurus (it is the white thread you see). And it glows beautifully at night! Unfortunately, it doesn't translate well in a picture. You have to take my word for it. Last finish for today: the Floral Pomander by Hazel Blomkamp. I really enjoyed this project with all the little flowery scenes using simple embroidery stitches and tiny beads. However, the instructions were a bit messy with tiny pictures of the finished panels. And piecing the pomander together was a little fiddley. That said, it makes a great project if you like miniature embroidery, beads and a different way of finishing your embroidery. Oh, and thanks to the dried lavender mixed in with the toy stuffing, it is my best smelling project ever :)!
14 Comments
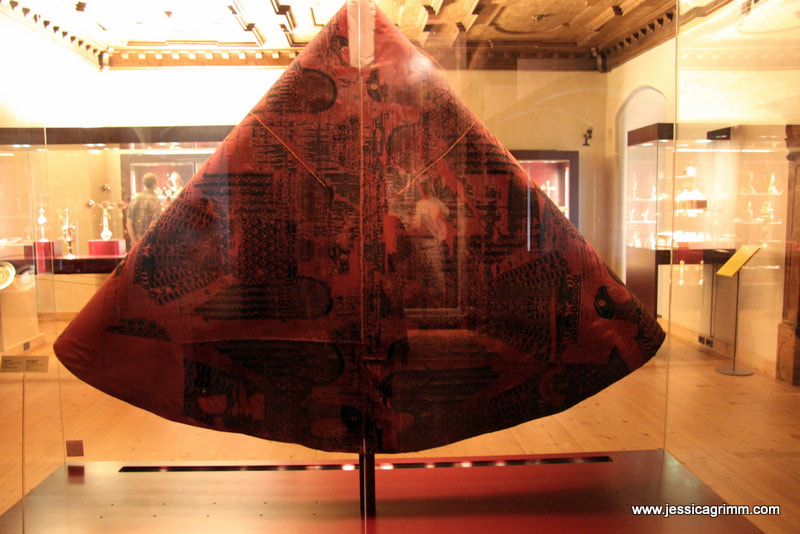
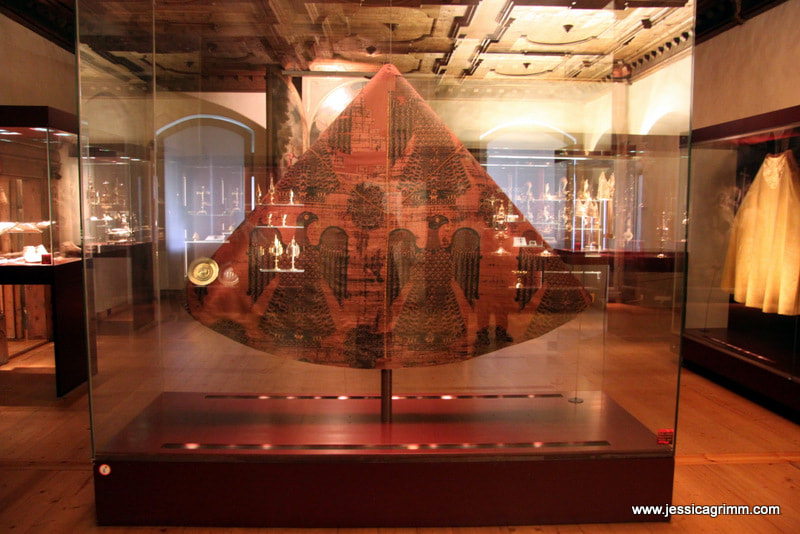
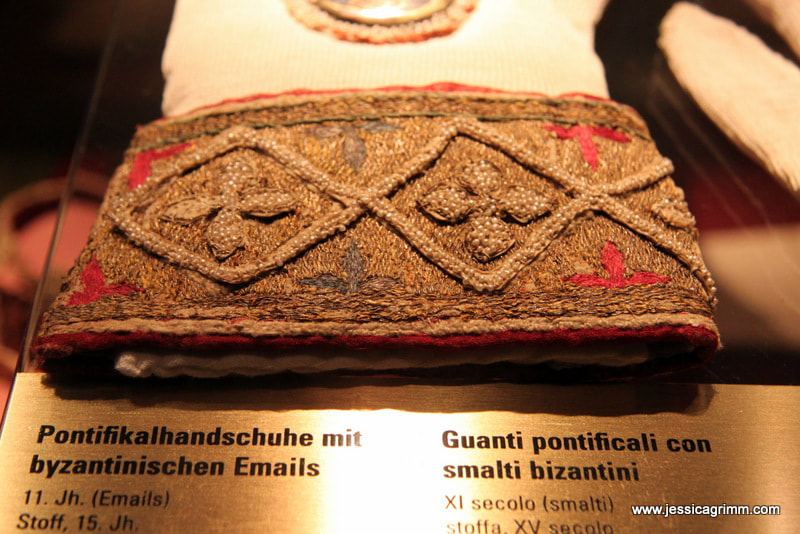
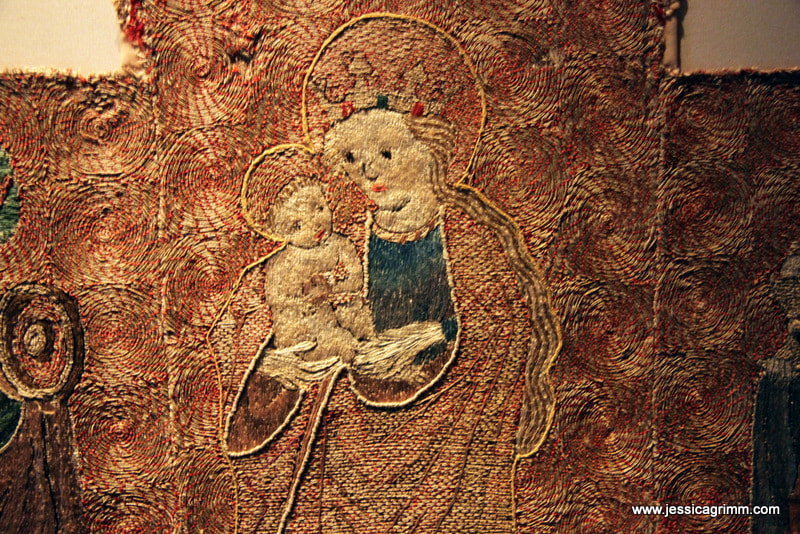
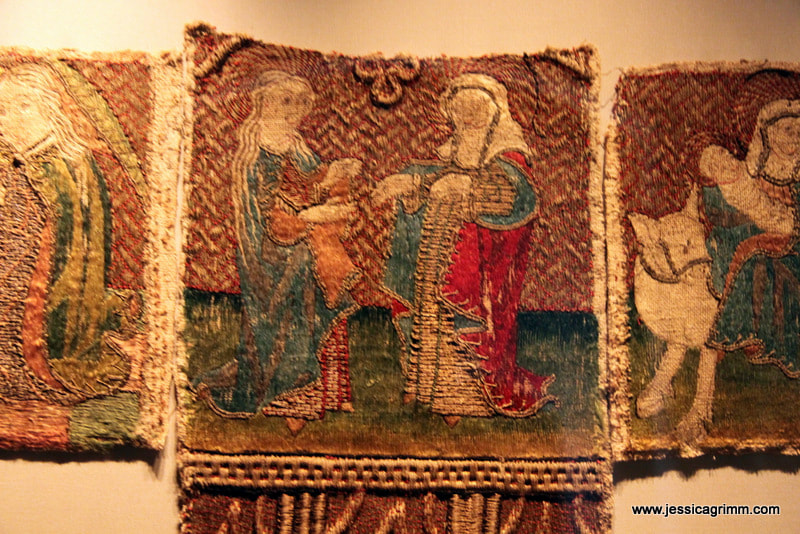
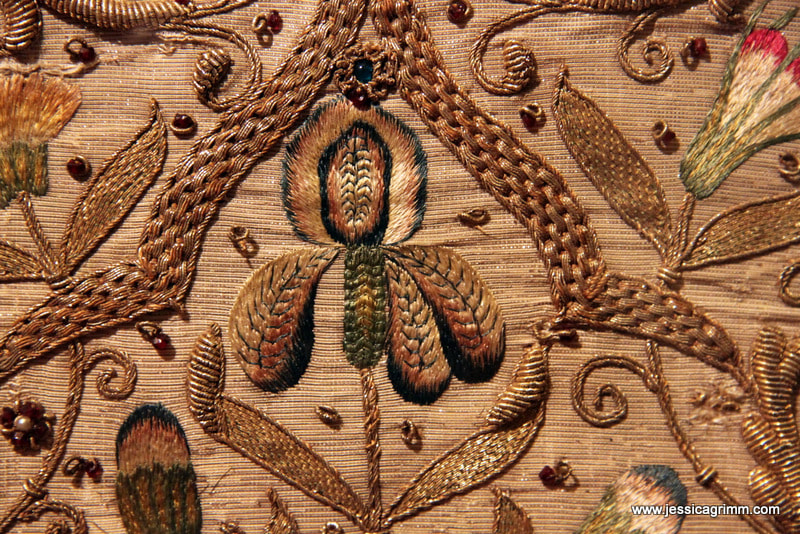
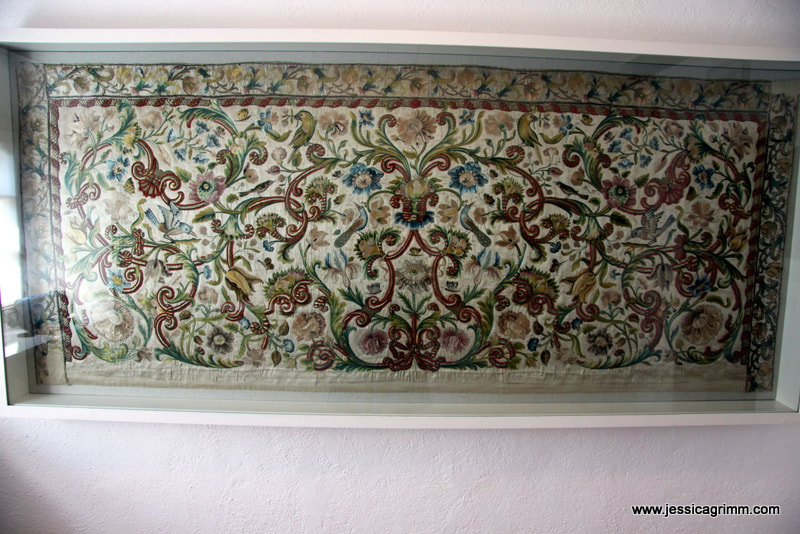
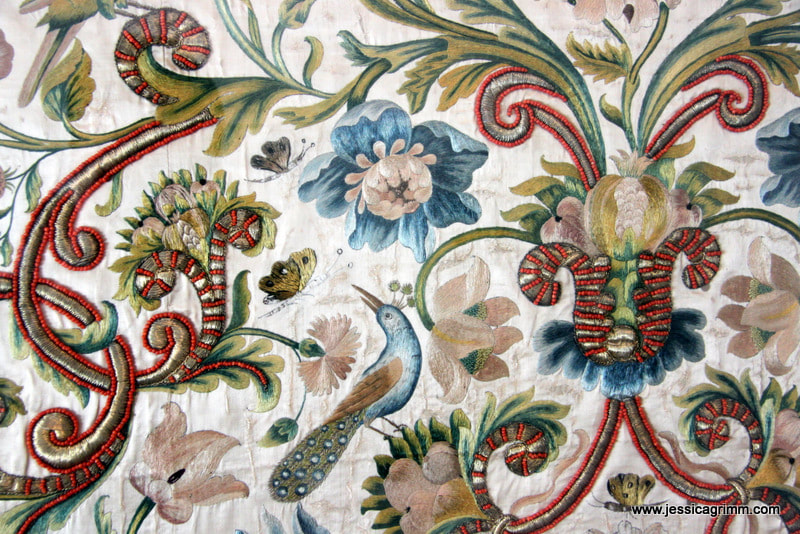
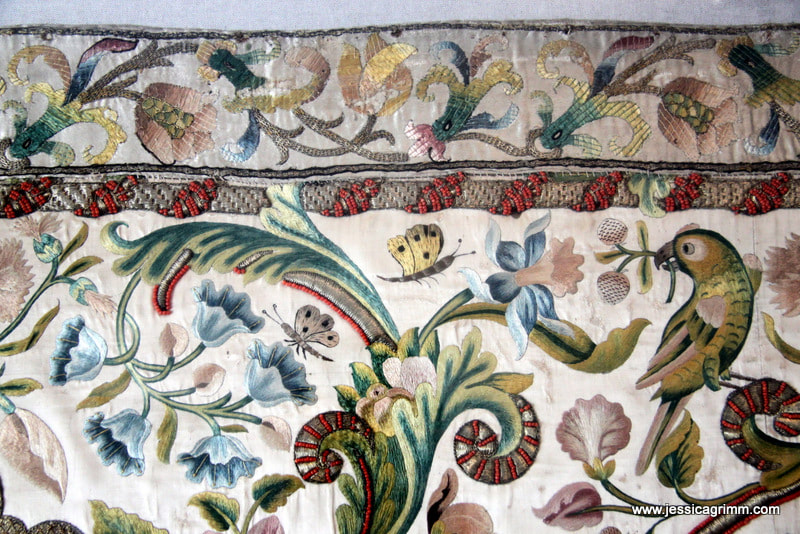
As part of the 'Samt und Seide 1000-1914. Eine Reise durch das Historische Tirol' (Velvet and Silk 1000-1914. A trip through historical Tyrol) exhibitions organised by the European Textile Academy, I and my husband visited Brixen/Bressanone and Klausen/Chiusa. We were completely blown away with the high quality embroidered textiles we saw and are already planning two more trips. Unfortunately, for most of you, Northern Italy is a bit further away than our three-hour drive. However, if you are ever in the neighbourhood, do visit the two museums I am going to introduce you to further below! They are absolutely worth it. And do take a print-out of this blog with you if you are not proficient in either German or Italian, as English is not the lingua franca in Northern Italy... First up is the Diözesanmuseum in Brixen. It houses the cathedral treasure of the former Diocese of Brixen. A large part of their permanent exhibition is devoted to textiles. The oldest being from around 1000 AD! However, this museum follows the modern concept of presenting historical art as art. Descriptions of the individual objects are very meagre and only available in German and Italian. There is nothing wrong with appreciating pieces as they are and enjoying the display in front of you. However, I would have liked to have the option of getting more information. Preferably as laminated information available in the display room AND a decent catalogue to take home. After all, I like to go to museums to learn and broaden my knowledge. That said, the sheer amount of high-quality exhibition pieces gets you into textile heaven in no time. My favourite pieces were the oldest pieces. Just the idea that the Eagle Chasuble (Adlerkasel) dates to 1000 AD. It was made at the court of the Emperor of Byzantium and given to Bishop Albuin of Brixen. It was probably one of the first silken vestments which arrived in this part of Europe. Due to its great antiquity and pretty good conservational status, it is one of the most important textiles of Europe. Another highlight were these pontifical gloves dating to the 15th century. They feature email medallions from 11th century Byzantium, showing again how important this imperial city once was in medieval Christian Europe. And aren't these tiny beads made of freshwater pearls to die for? I definitely want a pair! The museum also has several 15th. century orphreys on display. These heavily embroidered gold- and silk pieces were once appliqued onto a chasuble. Look at those couched diaper patterns forming a pretty background for the holy figures. Just unbelievable that someone cut through them to make them fit onto a new vestment... Then there were 17th. century chasubles with colourful silk and goldwork embroidery. I particularly liked the one with the small and detailed flowers. Look at the iris worked in long-and-short stitch and then further embellished with tiny fly-stitches to give the speckled impression often seen on an iris. The other chasuble shows a particular style of silken laid-work with couching stitches I first encountered on an Italian piece in the Wemyss School of Needlework Archive. I think it is very colourful and pretty. Great sources of inspiration! The next museum we visited was the Stadtmuseum in Klausen/Chiusa. They have by far the better (=higher quality embroidery) textile collection and it is displayed in such a way that you can get very close to the pieces and the lighting is excellent. Unfortunately, I wasn't allowed to take pictures. I didn't know I wasn't allowed to take any, so I can at least show you an antependium, or altar cover, from the Loreto treasure. And I (and the very friendly museum wardens) hope that it will whet your appetite so that you plan a visit too. And that you will help spread the word that this museum has a textile collection of high importance. As they are a tiny museum with an equally tiny budget, they need our help. So please show them some love. But first, let me tell you a little bit more about what is called the Loreto Treasure. Maria Anna of Neuburg became queen of Spain, Sicily, Naples and Sardinia when she married king Charles II of Spain in 1690. She brought with her her confessor Pater Gabriel Pontifeser born in Klausen. He was a trusted and loyal advisor and she pledged to build him a monastery in his hometown of Klausen. The house he was born in was turned into a Loreto chapel. Queen Maria Anna, her husband and the Spanish nobility gave beautiful religious objects to the chapel. The Loreto treasure was born. Permanently on display in the museum are several highly decorated altar covers. Apart from the one displayed above, which was probably stitched in Sicily, there is a further piece stitched in wool on linen and a silk- and goldwork piece in the Ottoman-style. Interestingly with the piece I was able to photograph, the main part with its flowers, birds and butterflies is stitched with long-and-short stitch. However, the border shows the same laidwork technique as seen before on the chasuble in the Diözesanmuseum Brixen. Besides silk and gold threads, the piece is adorned with red coral beads. This piece is truly to die for! It is very seldom that you encounter embroidery of such high quality that has kept so well. Other spectacular pieces were several chasubles with the same high-quality silk and goldwork embroidery. If you are ever near, this is a museum not to be missed! I for my part, will be back to study these pieces in greater detail.
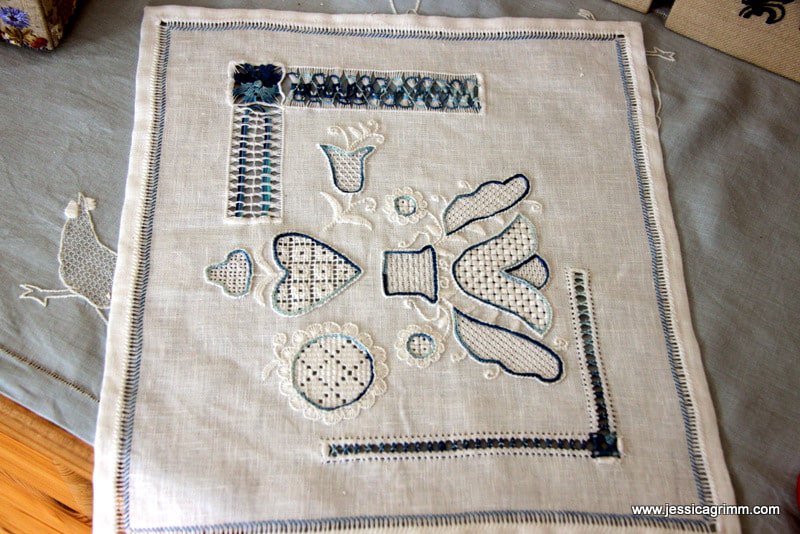
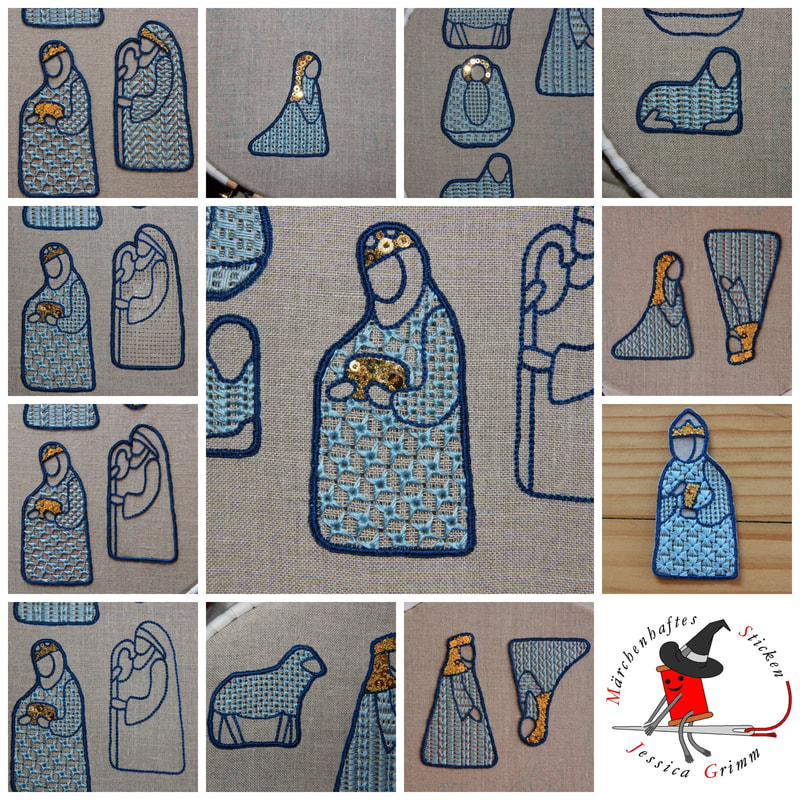
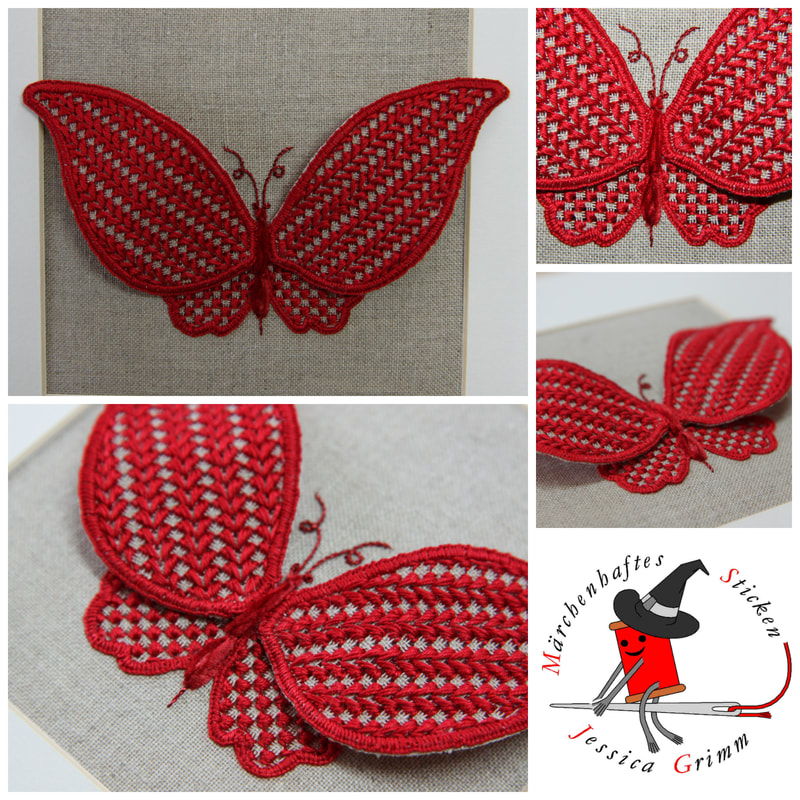
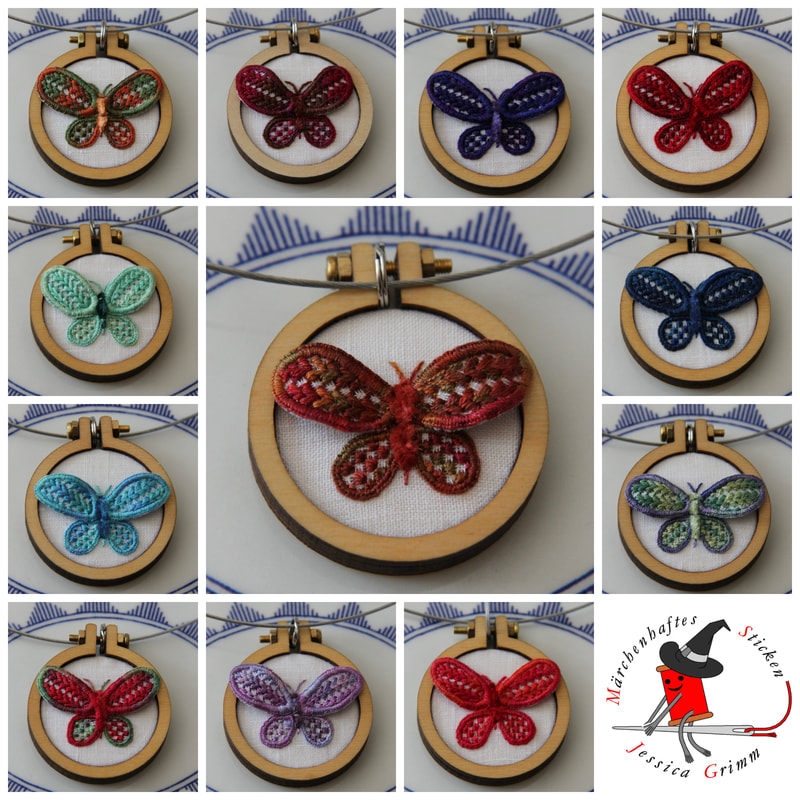
Today I am going to write a bit about my love affair with Schwalm embroidery. You see, I can pinpoint exactly where I encountered this pretty whitework embroidery technique for the first time. Not in its native Hessia, one of the federal states of Germany. Nope. It was Inspirations issue 69 in the spring of 2011. The beautiful 'Sense of Place' by Luzine Happel featured hearts, sunflowers and tulips filled with pretty patterns. I so wanted to learn this embroidery technique! But, I had never done any whitework embroidery other than a huge Richelieu window pane featured in an embroidery special of the Dutch Libelle. Luckily, I had just started my Royal School of Needlework Diploma course. And it happened to include a whitework module. Little did I know that they had never heard of this type of embroidery. And my tutors weren't thrilled at the prospect of teaching me something they were not familiar with. So I ended up with a whitework sampler featuring only a little bit of true Schwalm embroidery. And yes, I didn't like the prospect of an all-white piece either :). Now most of you will by now know that I don't like table cloths. Although, to be honest, there is nothing wrong with these pieces of textile. It is just that when I tell people that I embroider for a living, THEY picture me amidst heaps of neatly stacked embroidered table cloths. Now that gives me goose bumps. But for the wrong reasons. It truly freaks me out. Embroidery is so much more than just a means to adore a table cloth! Instead, one of the Schwalm-things I made was a nativity scene to be hung in front of my kitchen window. It is an ongoing process and I hope to add camels, a donkey and an ox this year. And although I like white, I like colour better. White reminds me of those pretty shoes I once had as a girl. They were lovely, but not so white for long. The same with those pretty lacily white stockings me and my younger sister wore under our Sunday dresses as girls. They attracted dirt like nobody's business. So in came the use of colour in my Schwalm embroidery projects. Now, traditional Schwalm embroidery is done with cotton a broder. A not so shiny non-strandable cotton thread. It is nice, but cotton perle and silk threads are nicer. Or at least in my opinion they are. I especially like to use variegated threads as they form pretty colour patterns when used with the many different Schwalm filling stitches. So, by now, I had changed the colour of things, the materials and the stitching topic. What's next? How about adding a stumpwork technique to the mix? Using wired elements with Schwalm embroidery really tickled my fancy! It looks so elegant and yet isn't too hard to create at all. But I wasn't quite finished yet! How about one shrinks the butterfly? For instance, until it fits a tiny 4cm Dandelyne wooden hoop. Thanks to my training in Appenzeller whitework embroidery, I knew that you can add tiny filling stitches (some the same as in Schwalm embroidery; after all there is only so much you can do with a blank grid) into a tiny grid of withdrawn threads. Born where the elegant butterfly pendants! Still using original heritage skills, but sans the table cloth. After weeks of stitching (one butterfly takes about six hours to create), I now have a colourful bunch of lovely butterfly pendants.
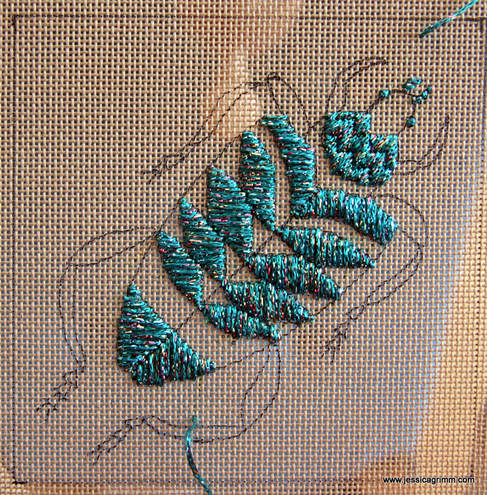
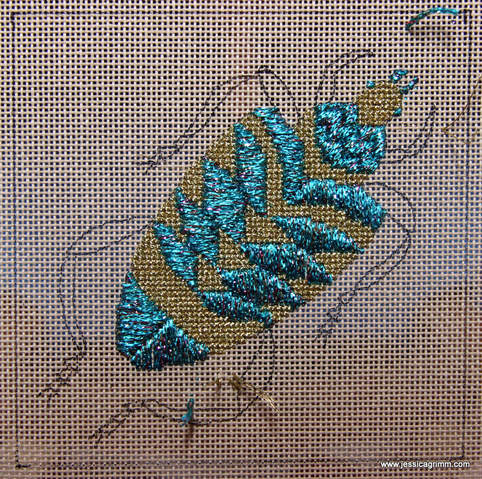
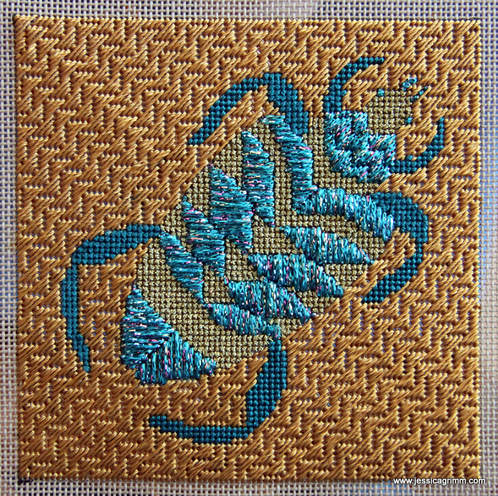
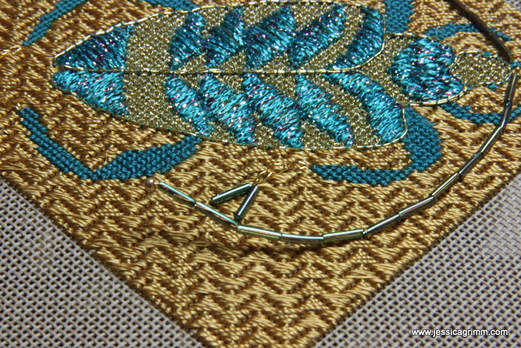
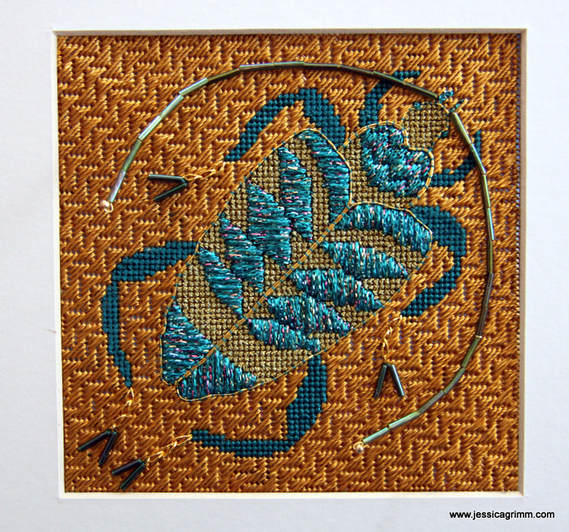
If you would like to know more about the traditional form of Schwalm embroidery (including its use on folk costumes), check out Luzine Happel's website and blog. Also available in English. Luzine self-published a whole library on Schwalm embroidery. These are very good books if you want to learn this pretty whitework technique. I highly recommend them! The books are available in German, English and even French. Happy stitching! But before I'll address my latest stitched beetle, a bit of new additional information regarding Hiroko's cat embroidery book featured in my last blog post. Remember from last week's post that I recommended looking at the pictures in the book through a magnifier? Well, not only Mary Corbet and I remarked upon the small size of the pictures, more people did. To overcome this, Hiroko opened a password protected website for those who purchased the book. She will upload key pictures from the cat embroidery projects featured in her book onto that website. These pictures can then be downloaded onto your computer and zoomed in on as much as you like. I downloaded the first project and it works a treat! Unfortunately, for security reasons, Hiroko can't upload all the pictures. But this is a very good compromise! Hiroko has also let me know that she will not re-print the book once it sells out. So, if you want one, visit Hiroko's shop and order! Let's now move on to the beetle. I picked a line drawing from one of Millie Marotta's genius colouring books and transferred it onto 18 TPI Antique brown canvas with a black permanent marker. Why a permanent marker? Well if you'll need to block your embroidery afterwards, you don't want the black ink to run and ruin it :). I then started to play with the contents of my June broderibox by Nordic Needle based in the US. First up was a lovely blue metallic braid called Variegated GoldRush by Rainbow Gallery. It is a mixture of 20% metalized polyester and 80% viscose and it comes in 10 yards on a card. I decided to stitch long stitches to cover various parts of the beetle's body. The thread is just a little bit too meagre to fill out the canvas completely. However, it is not so sparse that I could have used a double thread. Instead, I just added a second stitch here and there on top of the first until I was happy with the coverage. For the neck, I used Byzantine stitch and since the single stitches making up the pattern are shorter here, I had no problems with coverage. Last but not least, I used tent stitches to stitch the mouth pieces and French knots for the eyes. This particular soft metallic braid is a joy to work with and doesn't snag or become worn. Will certainly keep it in mind for future uses! Next up was another metallic thread: DMC Diamant colour D3852, a three-ply metallic. I filled the blanks on the body and the head with cross-stitches. In order to get good coverage, I doubled my thread. I like DMC Diamant as it is much better than many metallic threads out there. However, it isn't perfect. It unravels, wears and snags. That said, it is manageable as long as you use short lengths and watch your thread tension. Up next were the beetle's legs. I used Soie Cristale by Caron to stitch them. In order to get a subtle difference between the meatier upper legs and the thinner lower legs, I stitched the upper legs with a cross-stitch and the lower legs with a tent stitch. This particular silk thread is a dream to work with and the colour is just gorgeous. It is nicely behaving silk thread and thus particularly suitable for silk embroidery virgins! And now it is time for a serious confession: I do love Rayon. Or at least the type sold as Panache by Rainbow Gallery. The shine is unbelievable and gives the Byzantine stitch pattern a whole different quality. Hard to describe, but it shows a little in the above photograph. It adds movement to the background as the light comes off differently on different parts of the embroidery. And you can actually stitch quite nicely with this particular rayon! Yup, I am not lying. Yes, this three-ply thread unravels a bit, but nothing really serious. Yes, it is a bit slippery, but as long as you maintain good thread tension, it is a dream to stitch with. Conclusion: I do like at least some rayon threads. Still not sure if I should seek out professional help, though... Now it was time for the really fun part: embellishment. I started by couching a Japan Thread #7 by Kreinik around the edge of the beetle's body. I used one strand of the Soie Cristale for the couching stitches. Then I decided to stitch three chain stitches at the end of each leg with the Japan Thread. Quite heavy duty for the Japan Thread, but it worked perfectly. It didn't even harm the rayon stitches in the slightest. At the end of the Japan Thread chain stitches, I stitched down two Mill Hill medium bugle beads #82045 using Soie Cristale again. And then it was time for the really, really fun part: the feelers. I used brass wire to string up the bugle beads and placed a golden bead at the end before stringing back through the bugle beads. I plunged the ends of the wire through the canvas and secured them on the back. As the feelers are quite long and therefore had a will of their own, I partly couched them down with the DMC Diamant. And here is the finished beetle: I hope you had fun reading about another one of my broderibox projects! On a personal note, my husband started his new job today! After officially being laid-off in April when his employer filed for insolvency, he initially looked for a new job as an archaeologist. It quickly became clear that nobody really wanted a 50-year old digger. My husband realized that he didn't want to start at the bottom of the career ladder again. And we both realized that we didn't want to spend the next 17 years living the crazy living-apart life we had lived the previous 17 years. It was high-time to find an alternative. And luckily we found one! My husband now works part-time in a bookstore and part-time as a self-employed archaeometallurgist. Onwards and upwards from here :).
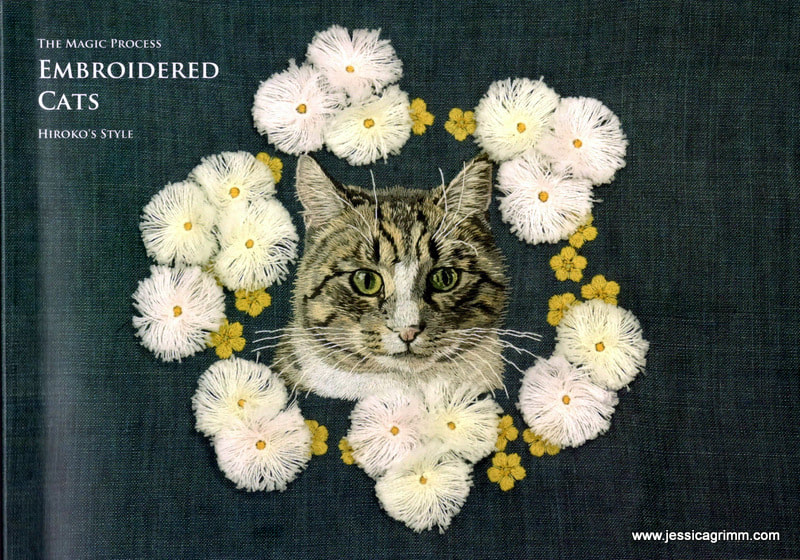
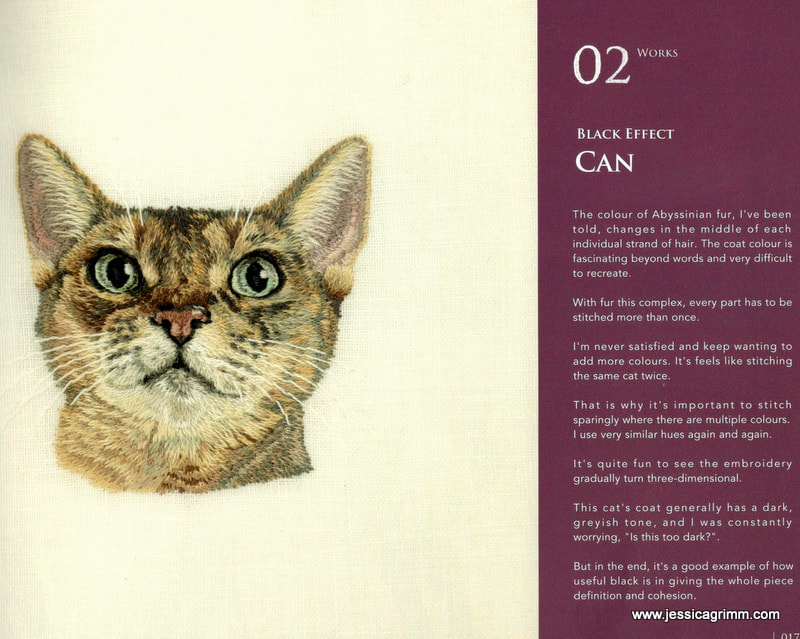
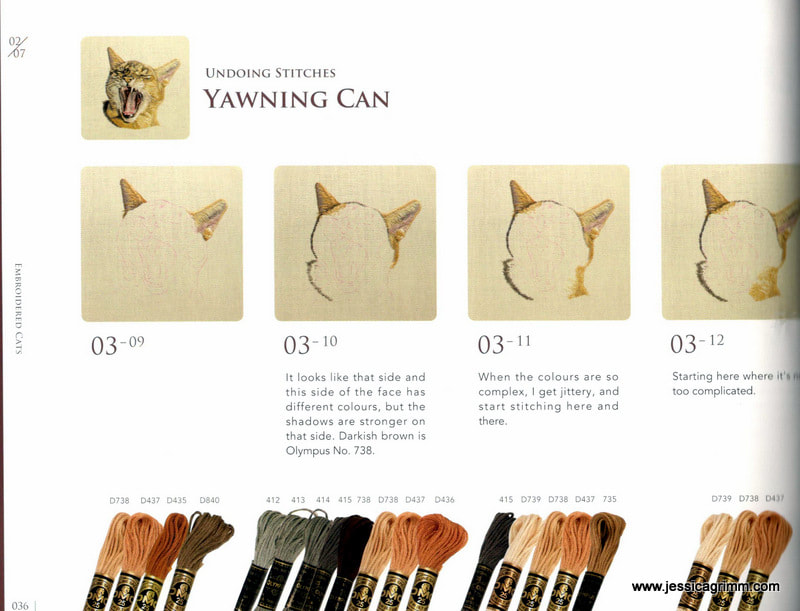
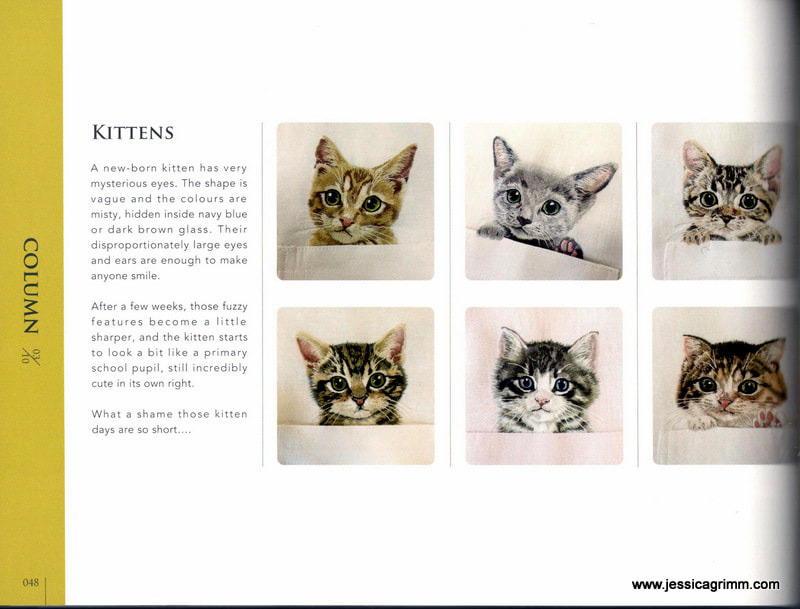
Some of you might have already read Mary Corbet's review of this stunning book on embroidering cat portraits. I did! And since I had seen pictures of Hiroko's work on Pinterest, I really (REALLY) wanted this book. Hiroko shipped it super-fast from Japan; so here is my review. Hiroko's cat (and dog) portraits are mainly stitched on items of clothing. Cat pops out of shirt pocket is probably the image most of us have seen before. Besides good quality natural fibre clothing as her canvas, Hiroko uses one strand of good quality stranded cotton (DMC, Anchor or the Japanese Olympus/Cosmo). The stitching technique used by Hiroko is a form of thread painting. But it is not the same technique as is taught at the Royal School of Needlework and with which I am most familiar. The main difference? Hiroko does not use long stitches which she subsequently splits in order to get the required shading, instead she layers her stitches. And those of you who are familiar with the RSN-way of silk shading will have heard the phrase that it 'shouldn't be called long-and-short-stitch but long-and-longer-stitch'. Well, Hiroko uses tiny, tiny stitches to get the desired effect. Fascinating, I must say! Hiroko's book is not a project book and it certainly isn't a book for silk shading virgins. Although Hiroko shows her order of work in step-by-step pictures for six cat portraits and one dog portrait, it isn't a step-by-step instruction book. This may sound a bit contradictory, so let me explain. The first cat up in the book is a black-and-white puss called Sora. According to Hiroko they are the easiest to do as they have a relatively simple fur pattern and a limited colour palette. The project is broken down in 40 pictures. Now, that sounds like a lot. But it really isn't if you think of the many different directions cat fur flows in. And then there are the tricky areas like nose, ears and eyes... That said, if you are a regular silk-shader/thread painter, you will marvel at her technique! The step by step pictures with their explanatory texts are delightful. Hiroko has great wit and I laughed out loud several times. And I agree with Mary Corbet that although the pictures are too small to see each stitch clearly, a small magnifier solves this problem. I used my Mighty Bright Light and had no problem to follow Hiroko's projects. And at the back of her book there are the original cat pictures too. This enables you even better to understand how Hiroko tackles each cat. Throughout the book, Hiroko dispenses sound advice on how to become a good (cat portrait) embroiderer. It all boils down to observing the original thoroughly, diligence and self-critique in order to improve your work. And it becomes very clear from the book that these magnificently stitched cats do not appear as by magic; Hiroko works hard to make them happen. I think that's very honest and good to keep in mind.
So, where to get this latest addition to your ever-growing embroidery library? Straight from Hiroko through her Etsy store! The book is self-published and entirely written in English. A big round of applause for that! Including shipping (Japan-Germany took about a week) it cost me €37. In my opinion, very good value for your money! |
Want to keep up with my embroidery adventures? Sign up for my weekly Newsletter to get notified of new blogs, courses and workshops!
Liked my blog? Please consider making a donation or becoming a Patron so that I can keep up the good work and my blog ad-free!
Categories
All
Archives
July 2024
|
||||||||
Contact: info(at)jessicagrimm.com
Copyright Dr Jessica M. Grimm - Mandlweg 3, 82488 Ettal, Deutschland - +49(0)8822 2782219 (Monday, Tuesday, Friday & Saturday 9.00-17.00 CET)
Impressum - Legal Notice - Datenschutzerklärung - Privacy Policy - Webshop ABG - Widerrufsrecht - Disclaimer
Copyright Dr Jessica M. Grimm - Mandlweg 3, 82488 Ettal, Deutschland - +49(0)8822 2782219 (Monday, Tuesday, Friday & Saturday 9.00-17.00 CET)
Impressum - Legal Notice - Datenschutzerklärung - Privacy Policy - Webshop ABG - Widerrufsrecht - Disclaimer



 RSS Feed