|
Last week, Dr Katrin Kania, a fellow archaeologist and medieval textiles researcher, posted an intriguing article on her blog on gummy silk. In it, she mentioned a conversation she had had in the past with a conservator who had stated that medieval silk had a much firmer structure. This firmer structure probably has to do with the fact that this silk was only partly de-gummed (i.e. cleaned of silkworm spittle, the stuff that glues the silk threads together to form the cocoon). In contrast, the Chinese flat silk I like to use for my medieval embroideries is completely de-gummed. This results in a soft thread with a very high sheen. As I love silk and anything medieval, the combination of the two sounded like a real treat. In addition, questions on silk gum had also come up with my students. So, I ordered a spool of gummed silk from Katrin to see the stuff for myself. When it arrived, Katrin had kindly included some samples of the silk experiments she talked about in her blog. Time for me to test these in some simple stitching experiments! First things first. I started by taking macro-pictures of all the silk threads. When you compare the silk samples provided by Katrin with the Chinese flat silk, you'll see that Katrin's samples are all more twisted. Such threads are not ideal for for instance silk shading. With silk shading, you try to achieve a smooth surface for maximal sheen and optimal blending of colours. Additionally, the silks that still have gum in them are very stiff/stringy and don't feel like silk at all. When used in embroidery, they would not naturally 'spread' as embroidery silk does. This would create bumps when using in or nue. So, I don't think that gummed or partly de-gummed silk threads were used in the making of medieval orphreys. To illustrate this further, I have stitched a few samples. Here you see the four samples I have stitched using simple long-and-short stitch. From left to right: gummed silk, partly de-gummed silk, de-gummed silk and Chinese flat silk. Although very different in thickness, the de-gummed silk and the Chinese flat silk performed similarly. The thicker de-gummed silk from Katrin has just a little more twist than I would like. The two silks that still have gum on them were unsuitable for long-and-short stitch, just as I predicted. As the thread does not 'spread' it was difficult to cover the ground fabric completely. The surface looks very bumpy and unruly. I've also done some simple couching with a left-over piece of passing thread. Again, the de-gummed silk and the Chinese flat silk performed best. They produced uniform couching stitches. The silk with gum produced couching stitches of various thicknesses.
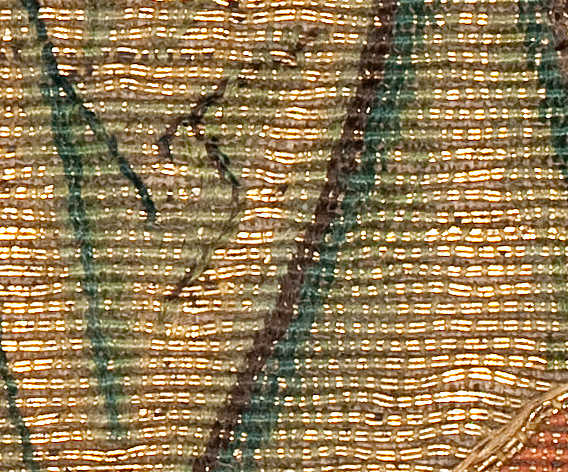
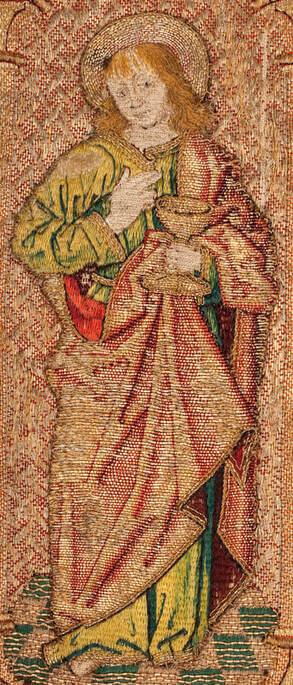
How do my samples compare to the long-and-short stitched areas and the couching areas of medieval orphreys? Even though the silk on the face of St Lawrence has deteroriated somewhat, it compares best to the completely de-gummed silks. As various thicknesses of very fine silk threads were used, Chinese flat silk works best. As an embroiderer, you have total control over the thickness of your thread as you can split as you like. The same holds true for the or nue detail from St Lawrence. You can download a very high-resolution picture from the website of Museum Catharijneconvent so that you can zoom in even more. You will then also see that the couching stitches of the or nue lay flat and that there is a minimal twist. That's the same when you use Chinese flat silk. As long as you pay attention to your thread and let it 'dangle' every so often, you will have minimal twist too.
My conclusion is that the fine embroidery on medieval orphreys was made with fully de-gummed silk. Comparing my samples with the close-up pictures in the publication of the Imperial Vestments held at Bamberg also shows that they were made with un-twisted fully de-gummed silk. Literature Kohwagner-Nikolai, T., 2020. Kaisergewänder im Wandel - Goldgestickte Vergangenheitsinszenierung: Rekonstruktion der tausendjährigen Veränderungsgeschichte. Schnell + Steiner, Regensburg.
14 Comments
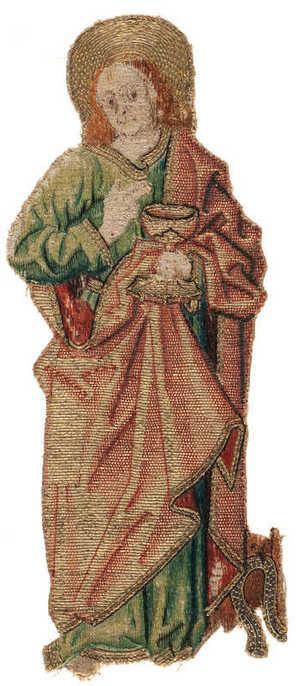
Last week, we looked at the very fine silk embroidery used to render the face and hands of St John. Today, we will have a look at how his clothing was stitched. We will start with the silk embroidery and look at the or nue and further embellishment with metal threads next week.
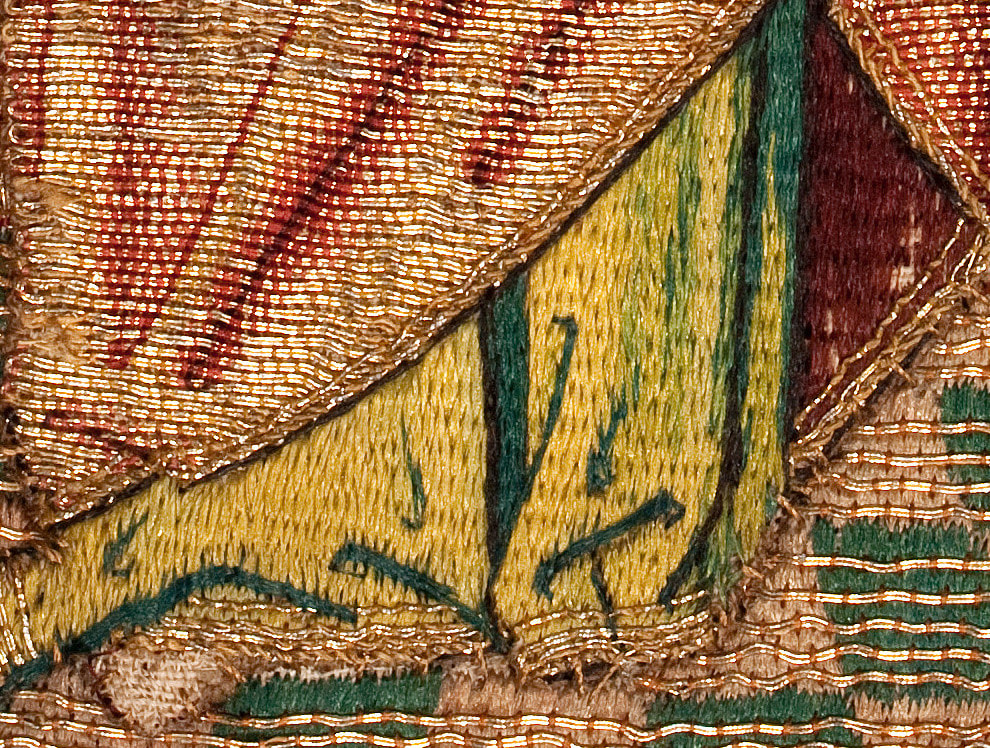
The green undergarment and the lining of his red mantle are stitched in silk. This is the same form of vertical silk shading, or tapestry shading, as seen in the face. Last week, we saw that the face of OKM t90a was more finely stitched than that of ABM t2165. We now see a contrast between this finely stitched face and the embroidery of the undergarment and the lining; both are stitched less fine. Contrary, in ABM t2165 there is no such difference; both face and garments are stitched the same way. We know that the fact that the figures and the background were separately made in these orphreys, lead to labour division and thus sped up the embroidery process. In larger workshops, the different jobs were likely awarded according to skill. The stitcher who could realistically render columns and vaults and who was an ace in counting worked the architectural backgrounds. His colleague, who was world-class in shading, worked the figures in tapestry shading and or nue. And I have proposed in the past that there was a third person. A highly skilled one, probably near-sighted, who worked the very fine faces. This seems to have been the workflow for OKM t90a. Contrary, when the workshop was a one-man affair (with an apprentice or journeyman) labour division was less or even absent. I think this is what we see in ABM t2165.
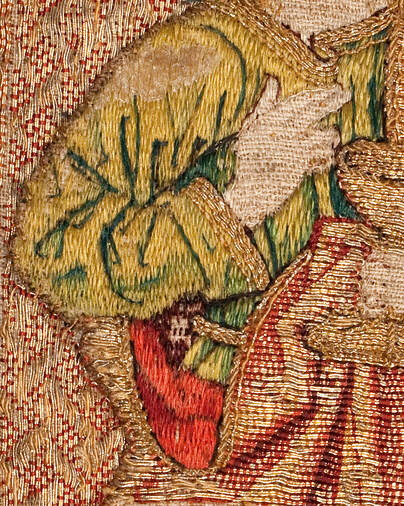
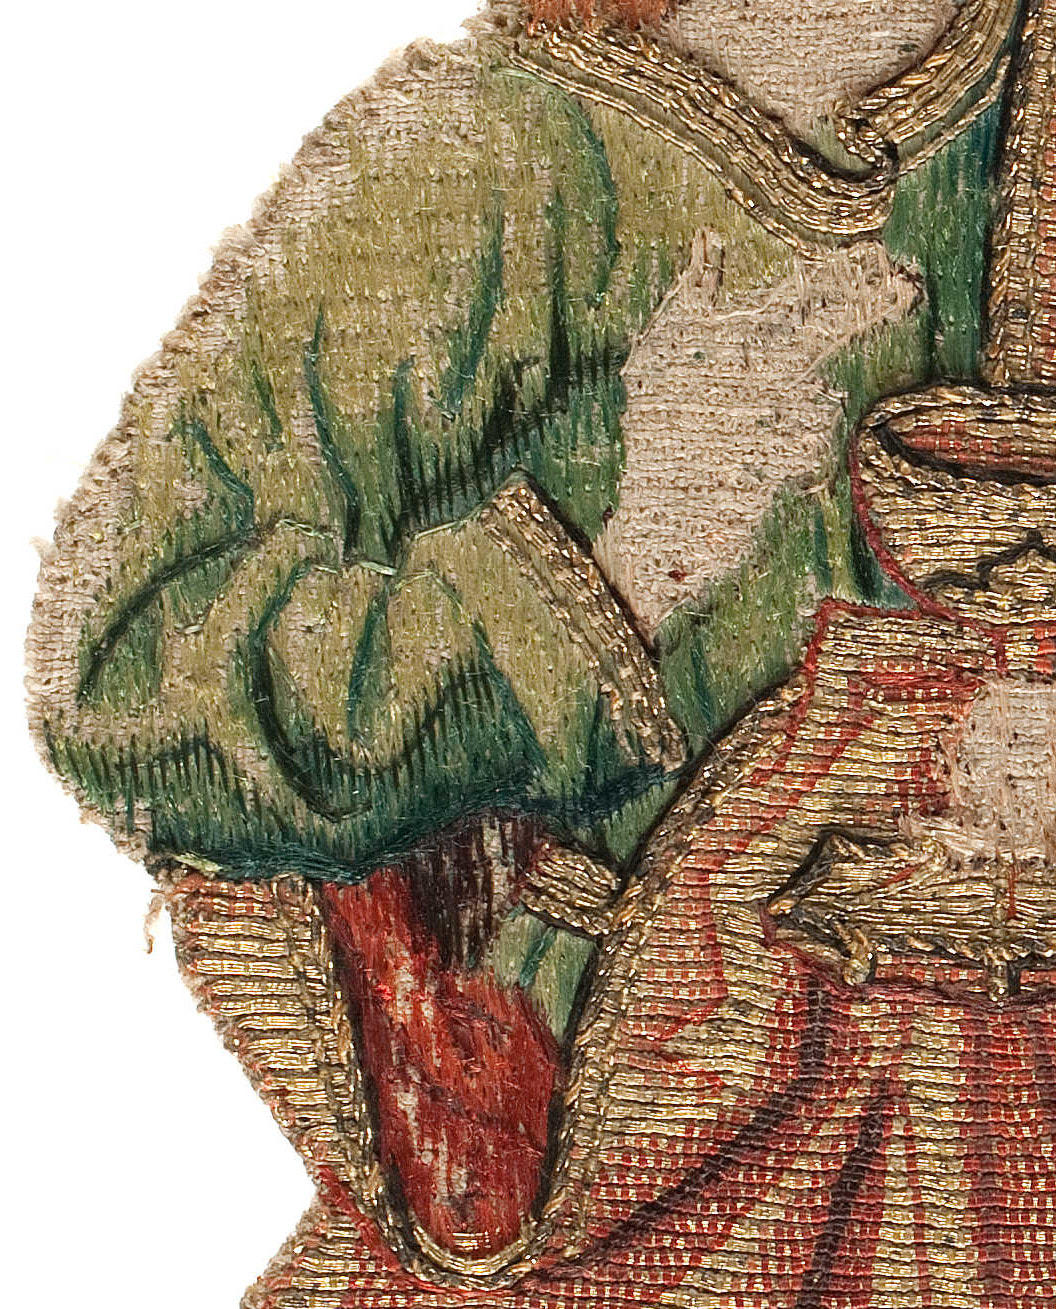
Here you see the upper part of St John's green undergarment. One thing strikes: the silk on OKM t90a is in much better condition than on ABM t2165! How did that happen? Is it simple "wear and tear"? Then the silk of the or nue should have similarly deteriorated. Interestingly, the or nue of OKM t90a is in worse condition than that of ABM t2165. Maybe the silk used was of different quality? Or the linen ground fabric? It looks like the linen of ABM t2165 is a tat more finely woven than that of OKM t90a. Maybe this led to higher abrasion when stitching. Or was the stitcher to blame? As an embroidery teacher, I was often amazed how threads could wear rapidly when used by certain students and not at all whit other students. It is likely that the condition of your skin plays a major role. Was the stitcher of ABM t2165 forced to work with rough winter hands? When we look at the actual stitches, it becomes clear that the maker of ABM t2165 worked very methodical. The stitches go over five horizontal fabric threads and you can clearly see rows forming. Not so with OKM t90a. This is all a bit more irregular. When you look at the dark red patch under the green sleeve (next to his belt) you see three tiny stitches. The other dark red stitches in the vicinity are much larger.
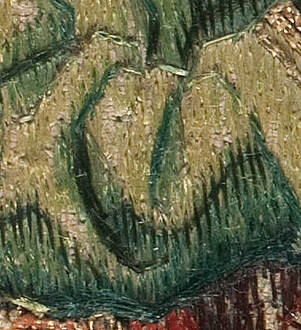
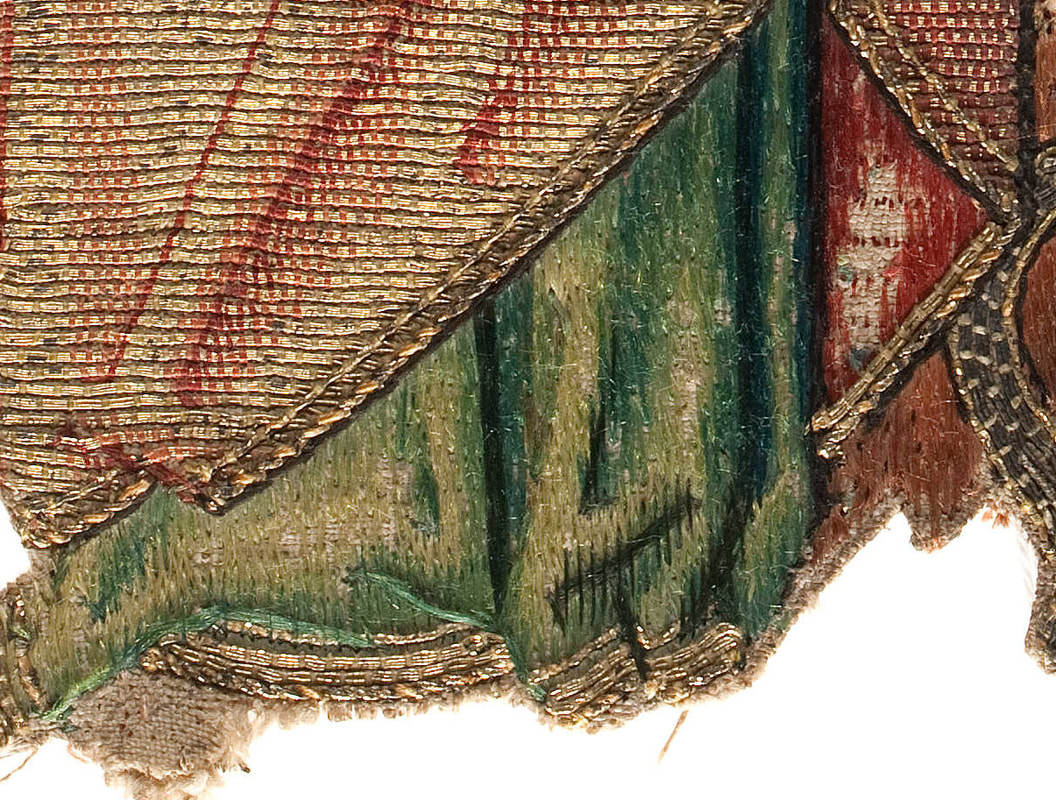
Interestingly, the shading of the sleeve of the green garment is much better on ABM t2165. You really get the impression of a heavy fabric falling in soft rounded folds. Whilst the embroidery on OKM t90a is crude as if the stitcher did not understand how fabric drapes. In both cases, the suggested folds are the result of shading in the satin stitching followed by additional couching on top. In my eyes, the expert rendition of the hair (and probably face) in OKM t90a combined with the sloppy stitching of the folds of the green garment doesn't make sense when we assume that this was done by the same stitcher. Especially not as this isn't a simple case of speeding up the process. The number of stitches on both sleeves seems to be similar. Contrary, the similarities in the stitching of the hair and the green garment on ABM t2165 make it likely that these were stitched by the same person. Who was very apt at stitching garments, but maybe not so good at faces. Maybe the stitcher's eye-sight was no longer good enough to stitch the very fine details needed for the face?
And here you see the bottom part of the green undergarment and the red lining. Interestingly, you can see that both stitchers used the very regular stitching for the dark red part of the lining. The green stitches, on the other hand, look rather crammed towards the left-side on OKM t90a. The stitcher of ABM t2165 kept a much more regular stitch going.
The more I compare these two pieces, the more questions I have! Please do let me know what you think in the comments below. Last week, we looked at two identical orphrey figures of St John held at Museum Catharijneconvent in the Netherlands. From my analysis, it became clear that they were not made with the same pricking. However, they did have the same "origin source" which I called a model book. What these model books looked like, we don't know as they have not survived. Today we will look in-depth at the actual embroidery. How are the different parts of the figures worked? Could this have been done by people in the same workshop or even by the same person? Let's look at the evidence.
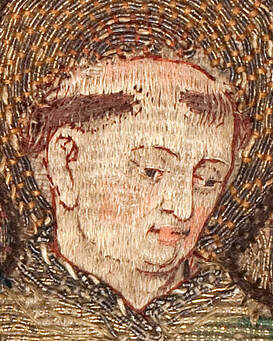
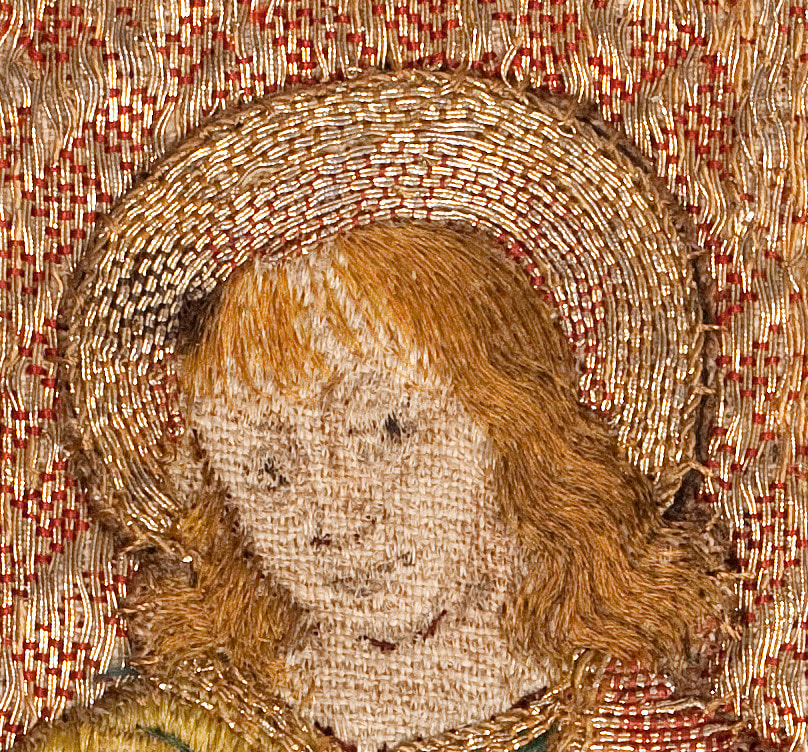
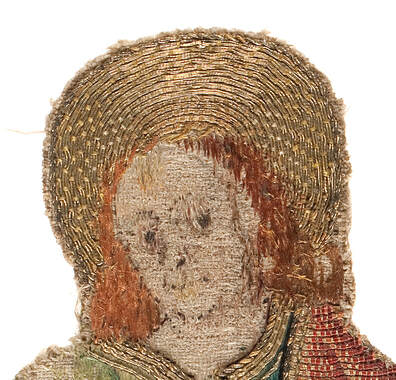
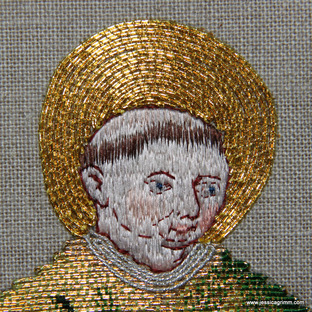
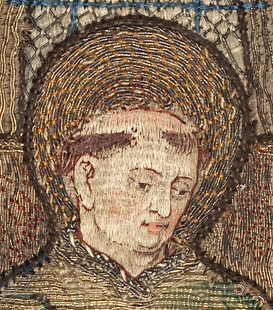
Above, you see a close-up of the faces of the embroideries. It becomes clear that the design drawing differs for both. What is really sad is that the fine silk shading of the faces has completely deteriorated. By working a copy of the orphrey of St Lawrence, I came to understand that the quality of the silk shading in the faces determines the quality of the embroidery. You often read in the literature that the or nue is the most difficult embroidery technique used in these pieces and thus defines the quality. This is not true. After all, or nue is a counted thread technique and as long as you are not colour-blind and you have ample dexterity, you will be able to copy medieval or nue to the highest level. Not so with the very fine silk shading of the faces. Unless you started learning this technique at a very young age (many Chinese for instance start at age three!), you will not be able to reach the highest level in medieval silk shading. 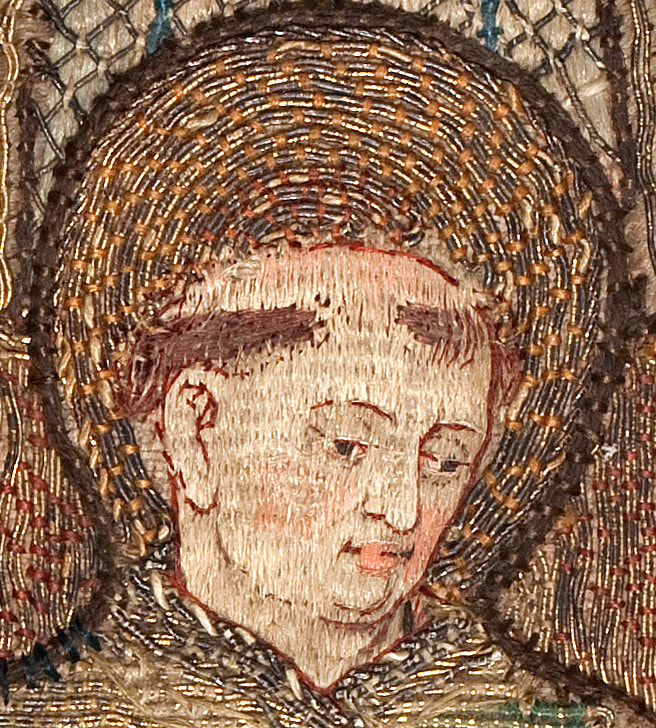 ABM t2107h, Museum Catharijneconvent, Utrecht, foto Ruben de Heer Here is a close-up of the face of St Lawrence. The actual face is about 2,5 cm in height. I call the embroidery technique silk-shading, but this is not quite accurate. This is not the silk-shading as taught at the Royal School of Needlework. You can clearly see rows of stitches. And these rows correspond to the shape of the face and give it the illusion of 3D. Splitting threads is not a necessity. It probably happened, but it wasn't aimed for. This variety of silk shading is closer to certain types of Chinese silk embroidery. Again, just like the or nue, it is for the most part a counted thread technique. Additional details are stitched on top of this foundation of silk-shading stitches. Note the multiple colours in the eyes: blue-grey iris, darker pupil, white of the eye and pink of the corner of the eye!
Back to the heads of St John. The reason that the faces often not survive is due to the fact that the lighter shades of silk were achieved by bleaching the silk. This weakens the fibre. Luckily, the ginger hair of St John did survive. And here we see marked differences in embroidery quality. The stitch direction in ABM t2165 is plain vertical. Contrary, the stitching in OKM t90a gives the illusion of curls. The silk thread has been split into a very fine fraction and multiple colours have been used to achieve this realistic imitation of hair. It is therefore likely that the face of OKM t90a was once more finely stitched too. I even get the impression that the design drawing hints at this too. Furthermore, the halo of OKM t90a is more elaborate too. Whilst for ABM t2165 the halo is plain with no shading, there is elaborate shading in the halo of OKM t90a. But there are similarities too. Both halos are framed with a fine couched down twist.
Although nearly all the stitches have gone, let's have a look at the hands. They are usually stitched in the same technique as the face (but not always: sometimes the silk-shading pierces the underlying or nue, as is the case with St Lawrence). What you can see in the above close-ups is that the stitches of the silk-shading orientate themselves on the grain of the linen fabric. This underlines that this form of silk-shading is indeed different from our modern form of silk-shading.
Next time, we will compare the stitching on other areas. Last week, I showed you the vestments from the 17th and 18th century on display at the Dommuseum in Fulda. This week we will have a look at the medieval ones. Although the lighting was much better in this part of the exhibition, the glass of the showcases posed a huge problem when photographing the pieces. And to make matters worse, the warden revoked my permission to photograph. Nevertheless, I have a hand-full of nice pictures of very high-end goldwork and silk embroidery to share with you! 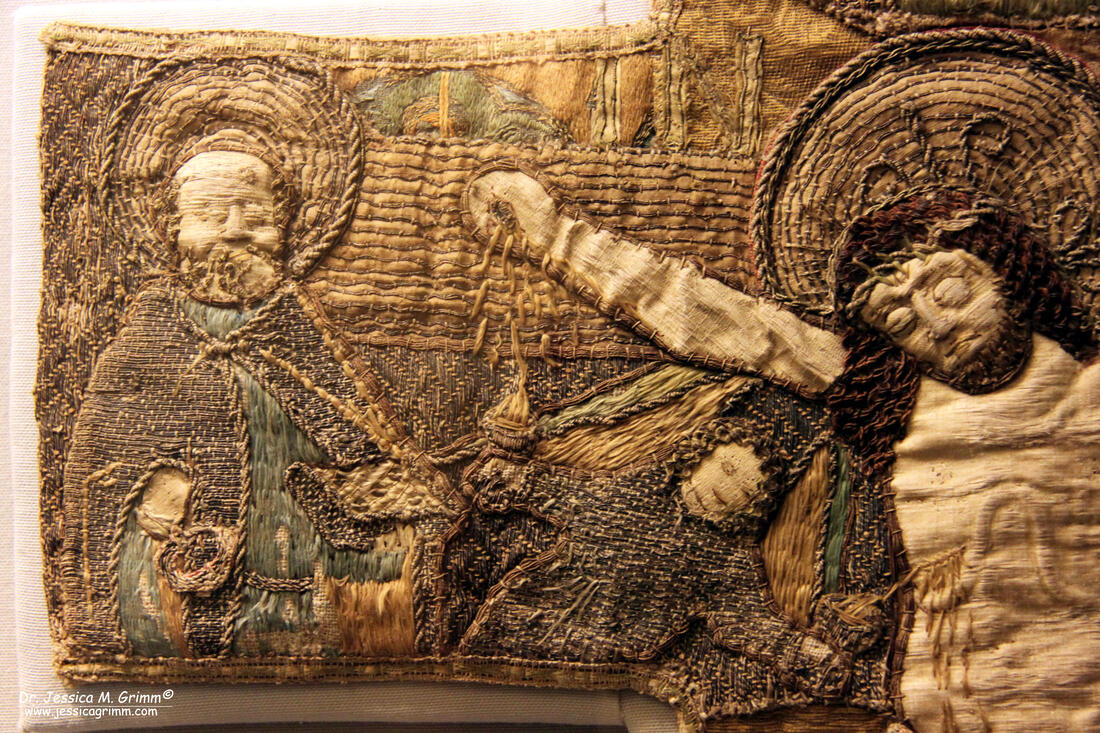 16th century stumpwork embroidery on a chsuble cross at the Dommuseum Fulda 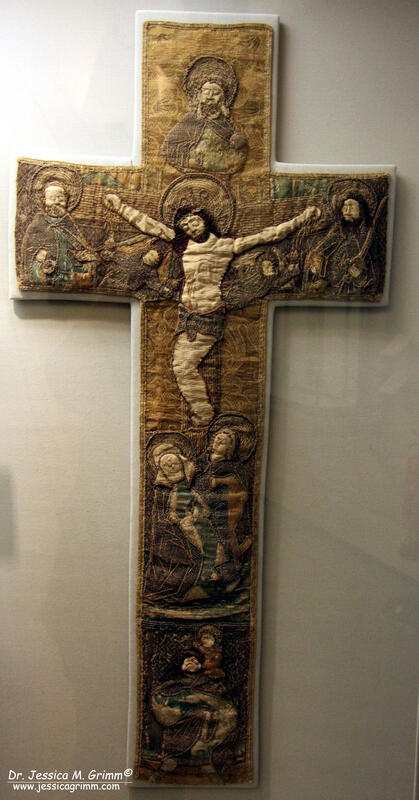 16th century stumpwork embroidery on a chsuble cross at the Dommuseum Fulda First up are two pictures of an embroidered cross which would have adorned a chasuble. These embroideries were so precious, that they were mostly re-used on a new vestment when the old one was worn. In this case, the embroidery is a little special: it is raised embroidery. We often associate stumpwork embroidery with 17th-century England. In this case, however, the embroidery was done around 1500. The exact provenance was not stated, but these stumpwork embroideries were all made in the German-speaking parts of Europe. The most exquisite examples can be found in Mariazell, Austria. Here the figures stand about 3 cm proud of the background fabric! In the detail picture above, one can clearly see that the faces of both Peter and Jesus are padded. Jesus's ribcage is defined with a piece of string padding. The whole figure of Jesus seems to be somewhat padded. And the flesh-coloured fabric looks quite stiff and a bit like paper or vellum.
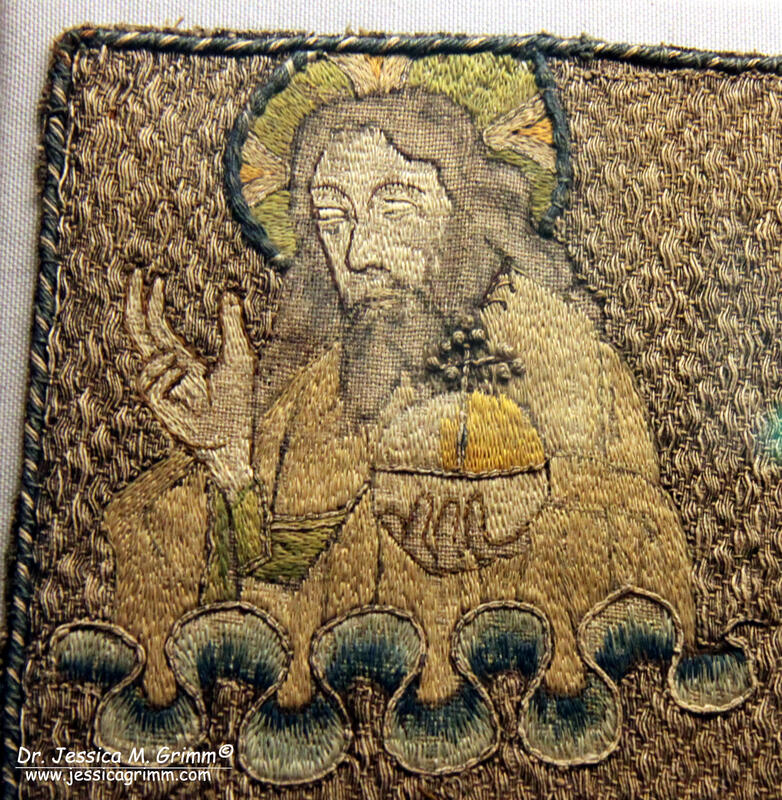
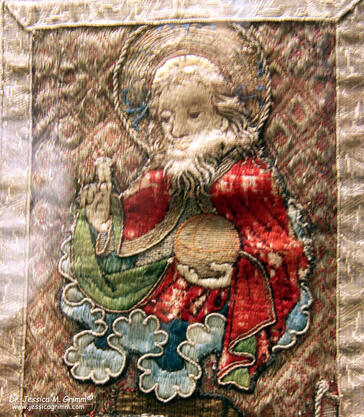
And here we have two depictures of God from two different late-medieval chasuble crosses. Unfortunately, no further information was displayed for these two. Or maybe I forgot to take a picture ... I quite like these two. The clouds remind me somewhat of Chinese embroidery on the imperial Dragon Robes.
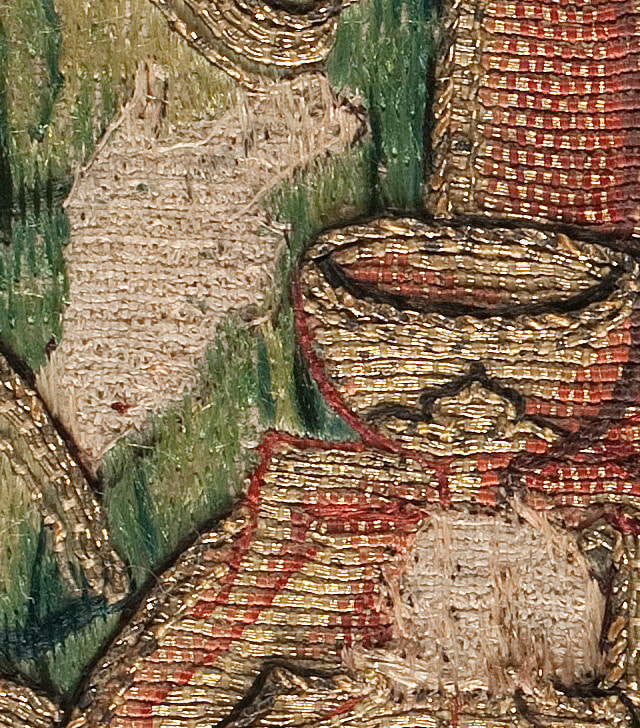
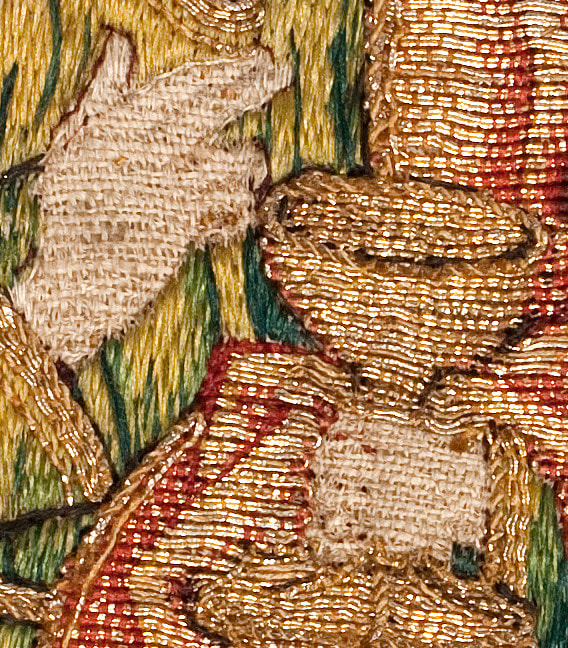
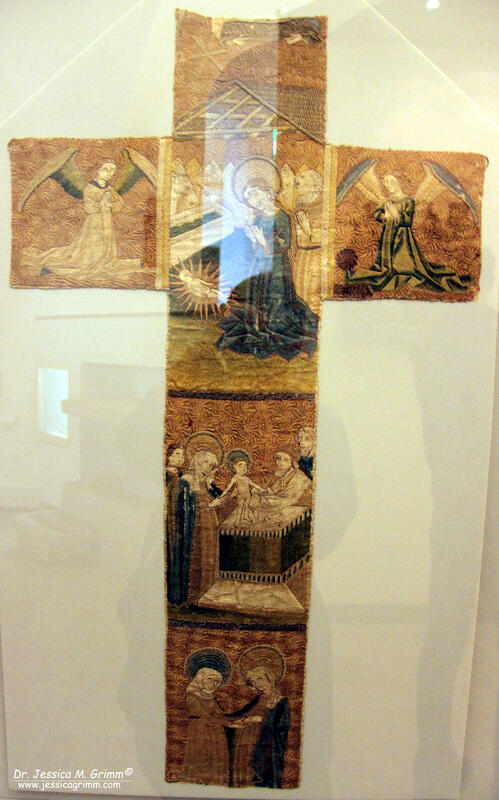
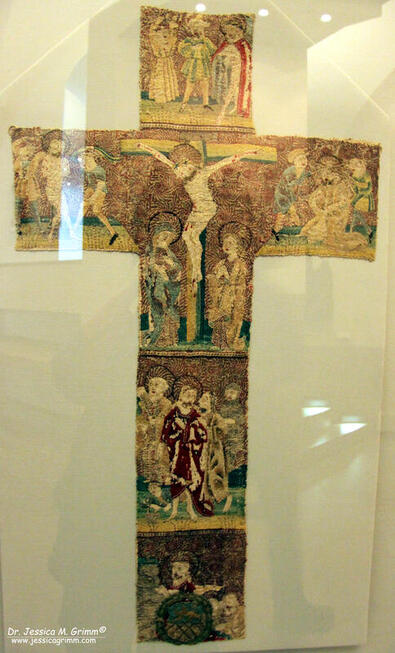
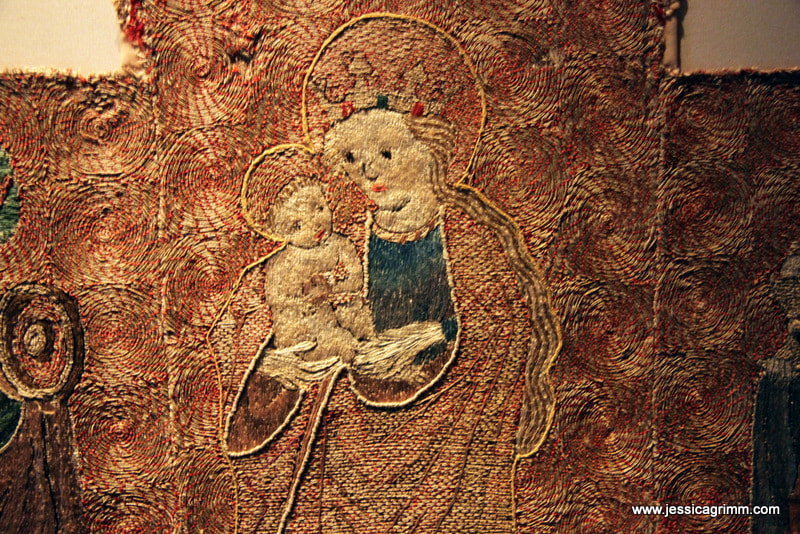
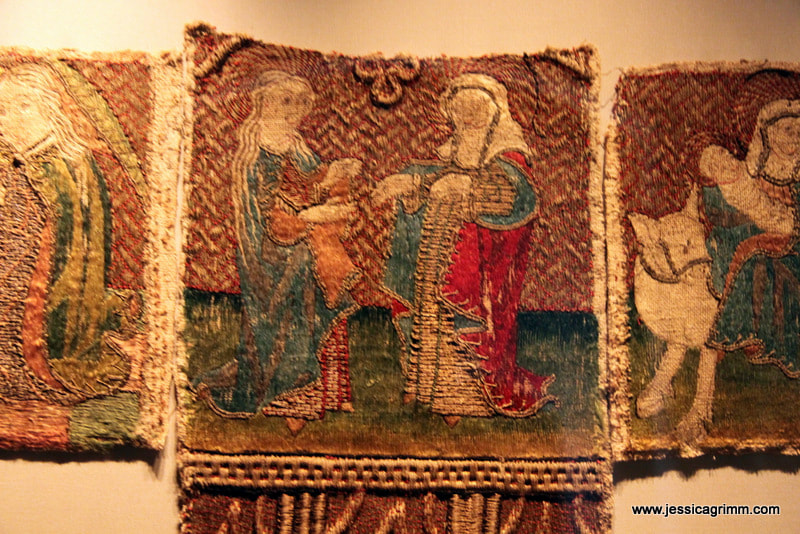
Last up are these two. They are chasuble crosses embroidered around 1480. No provenance is given. These two caught my eye as the embroidery techniques used are quite different from the other vestments on display. No or nue here; the figures are stitched in silk using long-and-short stitch. 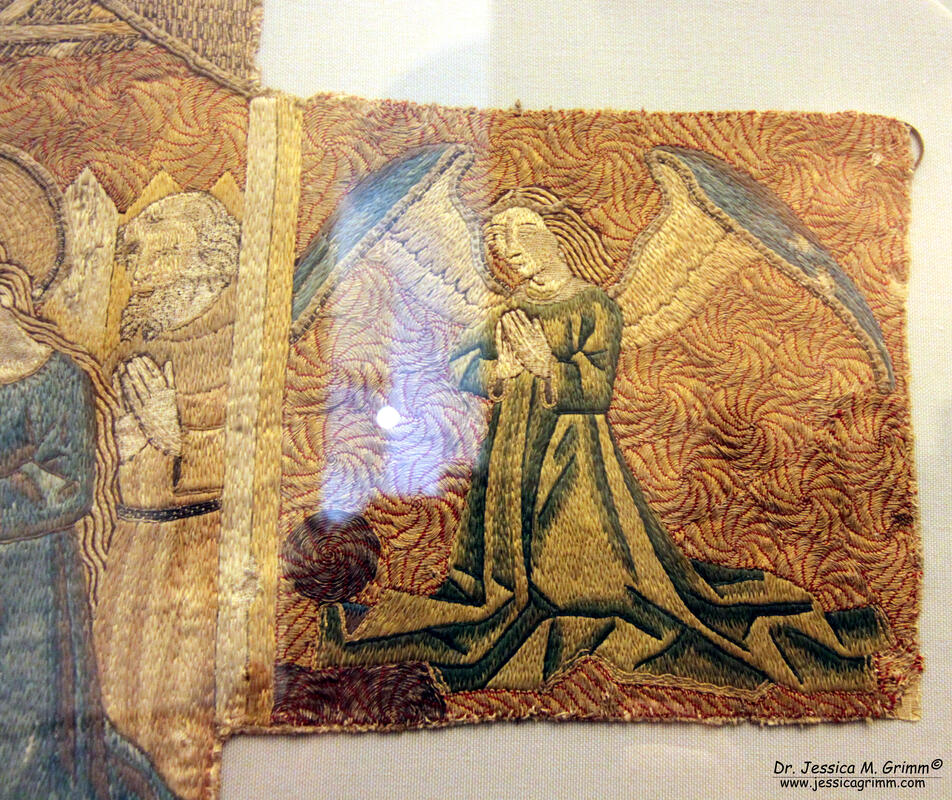 15th century embroidered chasuble cross at Dommuseum Fulda In this detail shot, you can see what I mean. No or nue for the figures here. Instead, there is meticulous tapestry shading on the clothing (i.e. silk shading strict vertically instead of naturally). And the couching patterns for the goldwork threads in the background are so full of movement and quite different from the strict geometrical patterns seen in the late-medieval vestments from the Low Countries. I had a strange feeling that I had seen this before. And luckily for me, my mind sometimes does a good job :). Instead of needing to go through my thousands of pictures taken at museums, I knew at which museum I had seen this: the Diözesanmuseum Brixen, Italy. 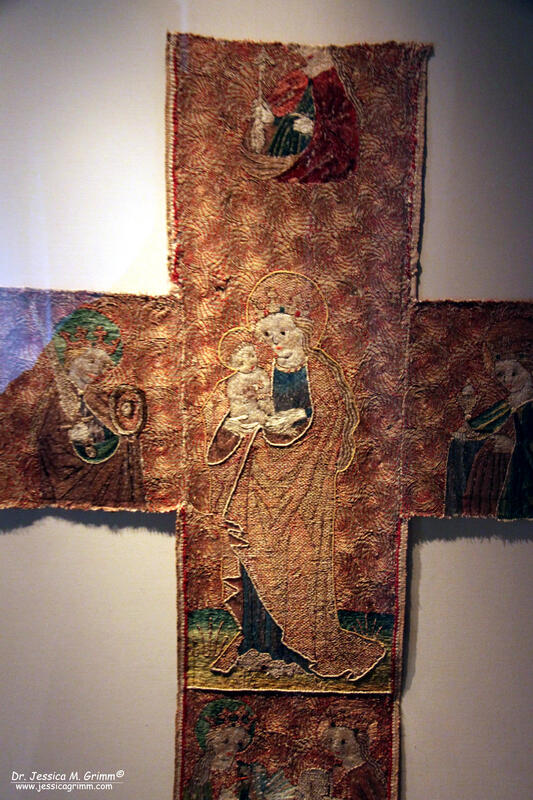 Late 15th century chasuble cross at the Diocesanmuseum Brixen 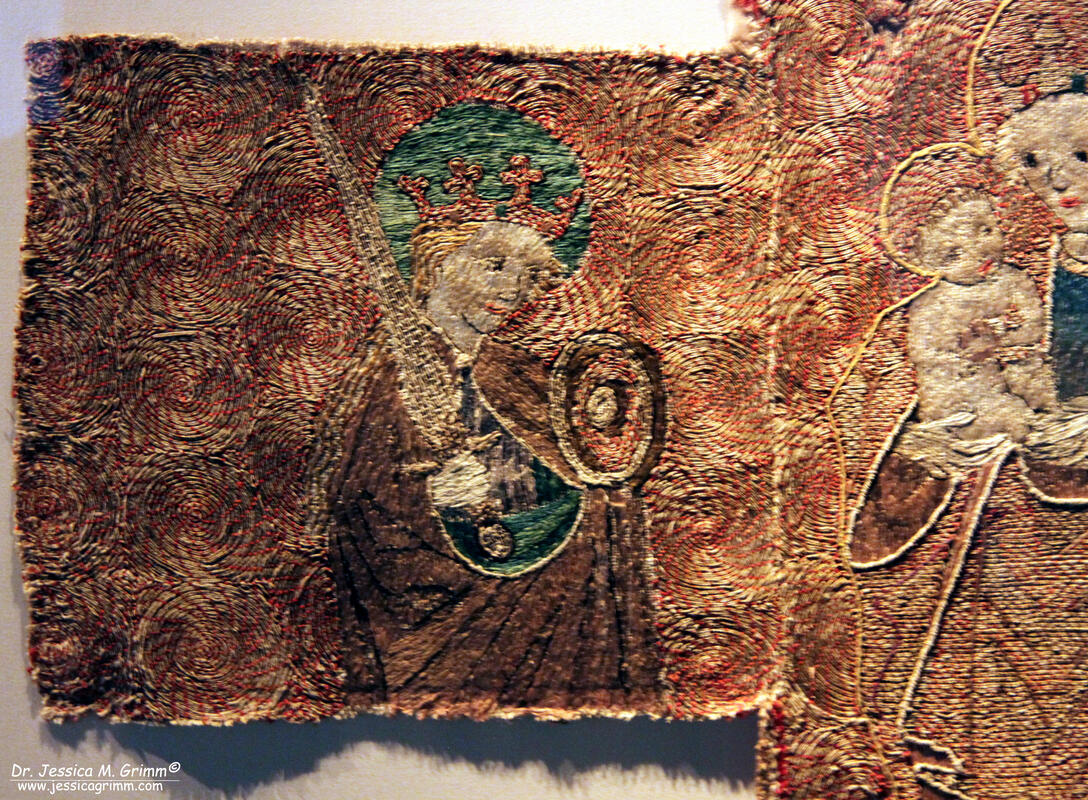 Late 15th century chasuble cross at the Diocesanmuseum Brixen This late-15th-century (same date as the one from Fulda!) chasuble cross has a similar couched background. And most of the figures are stitched in tapestry shading rather than or nue (Mary being a notable exemption). So maybe the chasuble cross held at the Dommuseum Fulda has a more southern origin?
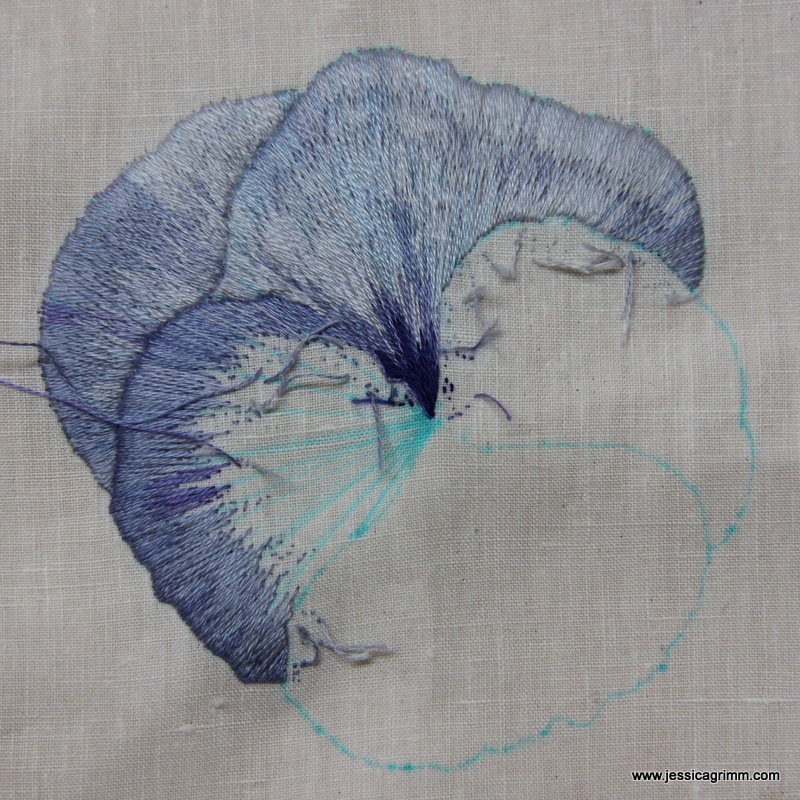
Being able to make these connections only works when I am allowed to take pictures. As lighting conditions or the way things are exhibited often do not permit studying the embroidery with the naked eye, my pictures are a great help. The camera is able to pick up details even when lighting is poor. I can zoom while taking a picture and again when looking at my pictures on the computer. Applying filters will tell me even more about the way things were made. It is therefore always very sad when the taking of pictures is not permitted. As long as you do not use flash (or use another source of light such as your phone!), you are not damaging the exhibits. And me taking pictures of the exhibits as is, has other benefits too. I don't need to make an official appointment for which museum staff needs to 'host' me (they have better things to do) and I don't need to handle the exhibits either. Some museums argue that by taking photographs and publishing them in a blog or on social media will mean fewer people will actually visit the museum. Really? I have the sneaking feeling that more people will visit a museum when they know what is on show. Especially museums with a wide range of exhibits of which textiles are only a small portion. The museum's website often does not specifically state that there are gorgeous embroideries on display (they are a somewhat neglected category, especially when in competition with bling made of precious metals) which might interest the curious embroiderer. And I know that several of my readers have visited museums which featured in my blogs. I have been guilty of doing the same. Maybe we should start mentioning these things to staff on duty when visiting a museum after reading a blog or seeing a picture on social media. What do you think? I signed up for a distance class in silk shading with Jen Goodwin. Why did I sign up for this particular class? Well, the design sports a feather with quite irregular edges AND has water droplets. As I have no idea how to stitch droplets, I really like to learn from a fellow pro. It is also another great opportunity for me to see how I could possibly run an online class in the future. The class runs for eight weeks and is, at GBP 195/$ 284/€ 229, not cheap. The class should have started on the 20th of January, but due to Jen not being very organised, I actually received my kit on the 23rd and the first instruction email on Sunday morning the 28th. This can happen to the best of us. 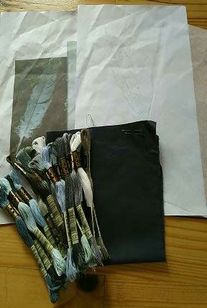 Jen Goodwin silk shaded feather online class My kit contained a colour photocopy/printout of the feather, an outline drawing of the pattern, a piece of tissue paper for the transfer, a piece of dark-navy cotton, 2 #10 sewing needles and 20 skeins of DMC stranded cotton in the most fabulous colours. However, due to the fact that it was shipped in a plastic seal bag, it arrived rather wrinkled and dishevelled. Oddly, there wasn't a note or compliment slip either. The dropbox Jen uses for her teaching videos also contained a high-resolution original picture of the feather. So before any stitching commenced, I ordered a proper photo printout of the feather. The printout in the kit is, in my eyes, just not very defined and has a green tinge to it. But above all, it is wrinkled. And I don't find it very practical to work from a dropbox/computer screen. Next thing I did was watching Jen's video's on binding a hoop and tissue transferring a design. I was hoping the videos would be of the same quality as Mary Corbet's 'How to' videos. Unfortunately, they are not. Important things and actions are frequently out of focus, text is sometimes blocking the action, important action is going on outside the video frame and action in the video contradicts the text in the video. I really hope that the actual stitching videos provide enough detail to be able to clearly see Jen's stitching. Before starting the tissue transfer method, I ironed the piece of fabric and ran the edges under my Babylock machine. I hate disintegrated fabric edges whilst stitching. 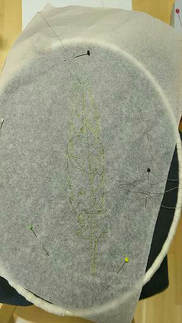 Jen Goodwin silk shaded feather online class I faithfully copied Jen's outline drawing onto the tissue paper and started tacking. About half-way through I came upon an uncertainty and wanted to check on the picture printout... SHIT!!! The outline drawing Jen provided in the kit is a mirror image of the picture we are supposed to stitch... I very carefully unstitched, flipped the tissue paper, traced the lines again and started tacking again. I also immediately warned Jen so she could warn the other students. I really hope they hadn't started. As there is no email-list, forum or group to 'meet' the other students. I have no means of getting into contact with them directly. This is my first ever online-class that does not provide for contact with my fellow students. It is a bit of a shame as I can't learn from their progress or get inspired by them either. 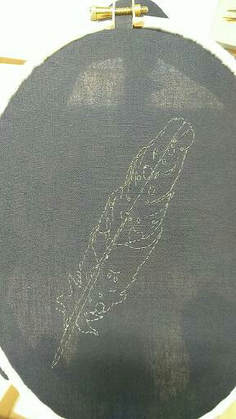 Jen Goodwin silk shaded feather online class Finally, I was able to remove the tissue paper and to have my feather all set up for my next lesson. I'll keep you posted on my progress. Rather than week-by-week, it will probably be a summary of several weeks in one post. After all, it is not my intention to spill the beans on Jen's project and provide very detailed information so my readers could just stitch the project too from reading my blog. However, if you were thinking of doing an online class with Jen, you will be able to make an informed decision based on the testimonials on her website and my blog posts.
As part of the 'Samt und Seide 1000-1914. Eine Reise durch das Historische Tirol' (Velvet and Silk 1000-1914. A trip through historical Tyrol) exhibitions organised by the European Textile Academy, I and my husband visited Brixen/Bressanone and Klausen/Chiusa. We were completely blown away with the high quality embroidered textiles we saw and are already planning two more trips. Unfortunately, for most of you, Northern Italy is a bit further away than our three-hour drive. However, if you are ever in the neighbourhood, do visit the two museums I am going to introduce you to further below! They are absolutely worth it. And do take a print-out of this blog with you if you are not proficient in either German or Italian, as English is not the lingua franca in Northern Italy... 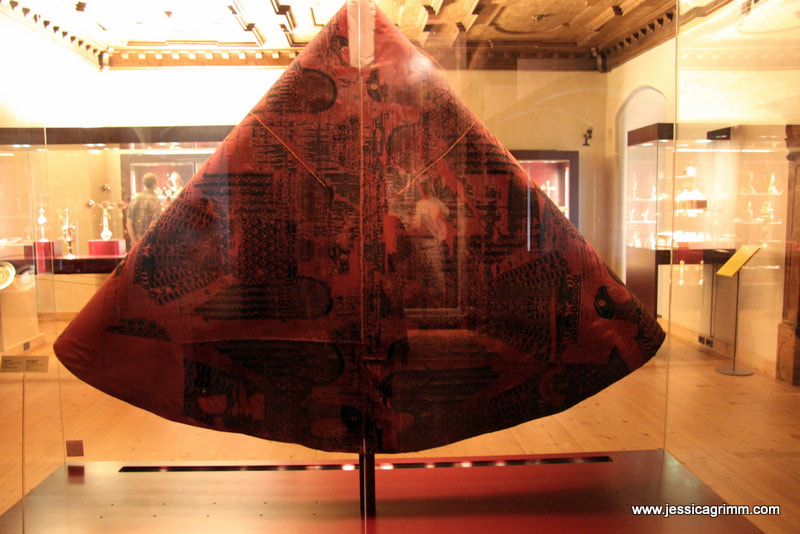 Adlerkasel Diözesanmuseum Brixen First up is the Diözesanmuseum in Brixen. It houses the cathedral treasure of the former Diocese of Brixen. A large part of their permanent exhibition is devoted to textiles. The oldest being from around 1000 AD! However, this museum follows the modern concept of presenting historical art as art. Descriptions of the individual objects are very meagre and only available in German and Italian. There is nothing wrong with appreciating pieces as they are and enjoying the display in front of you. However, I would have liked to have the option of getting more information. Preferably as laminated information available in the display room AND a decent catalogue to take home. After all, I like to go to museums to learn and broaden my knowledge. 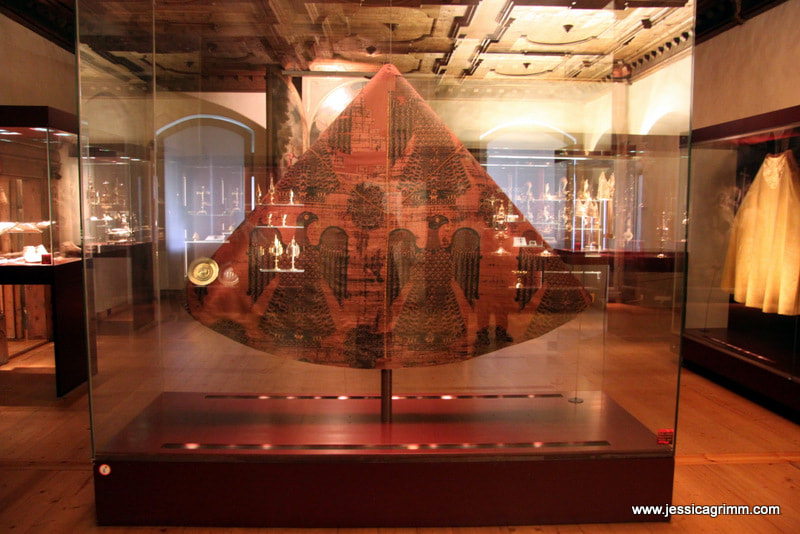 Adlerkasel Diözesanmuseum Brixen That said, the sheer amount of high-quality exhibition pieces gets you into textile heaven in no time. 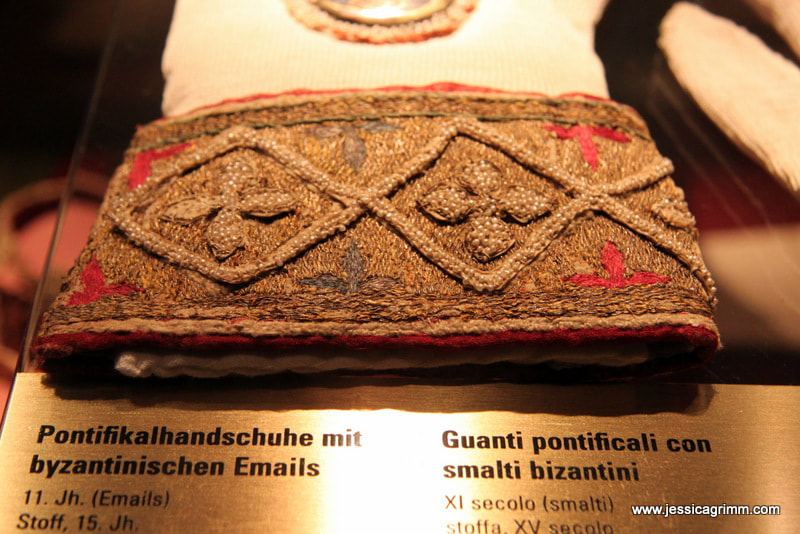 Pontifical gloves Diözesanmuseum Brixen My favourite pieces were the oldest pieces. Just the idea that the Eagle Chasuble (Adlerkasel) dates to 1000 AD. It was made at the court of the Emperor of Byzantium and given to Bishop Albuin of Brixen. It was probably one of the first silken vestments which arrived in this part of Europe. Due to its great antiquity and pretty good conservational status, it is one of the most important textiles of Europe. Another highlight were these pontifical gloves dating to the 15th century. They feature email medallions from 11th century Byzantium, showing again how important this imperial city once was in medieval Christian Europe. And aren't these tiny beads made of freshwater pearls to die for? I definitely want a pair!
The museum also has several 15th. century orphreys on display. These heavily embroidered gold- and silk pieces were once appliqued onto a chasuble. Look at those couched diaper patterns forming a pretty background for the holy figures. Just unbelievable that someone cut through them to make them fit onto a new vestment...
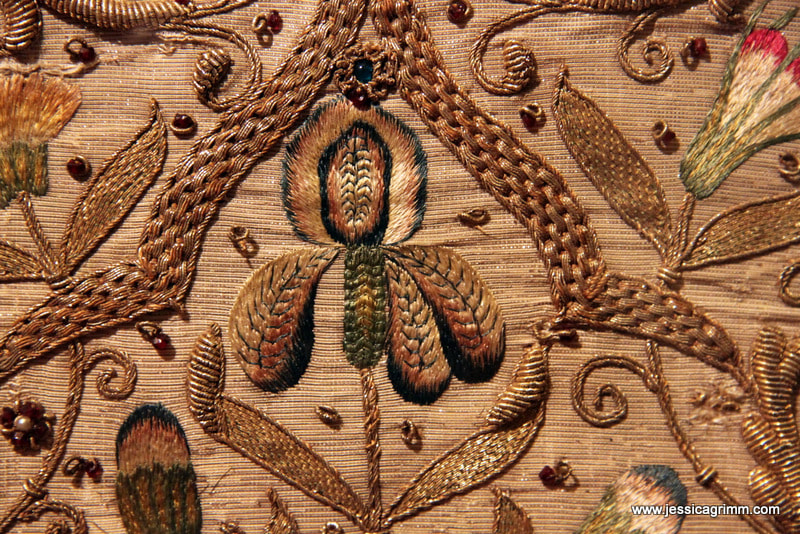
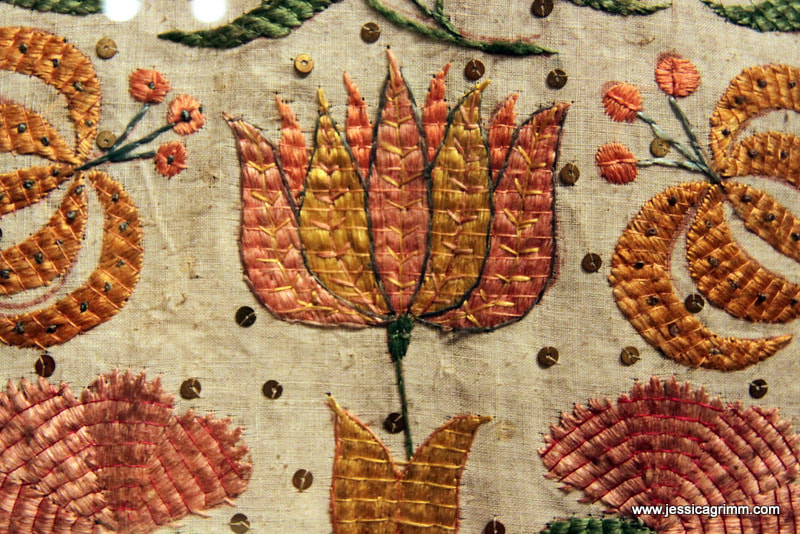
Then there were 17th. century chasubles with colourful silk and goldwork embroidery. I particularly liked the one with the small and detailed flowers. Look at the iris worked in long-and-short stitch and then further embellished with tiny fly-stitches to give the speckled impression often seen on an iris. The other chasuble shows a particular style of silken laid-work with couching stitches I first encountered on an Italian piece in the Wemyss School of Needlework Archive. I think it is very colourful and pretty. Great sources of inspiration! 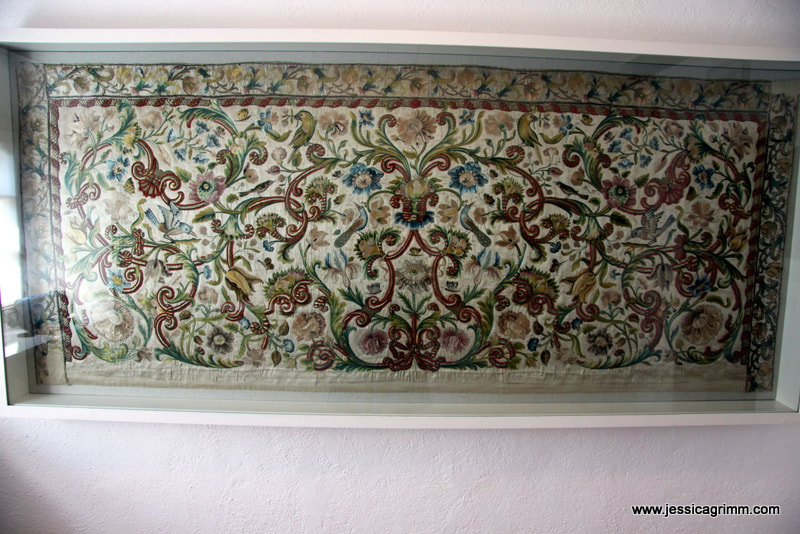 Loreto treasure at the Stadtmuseum Klausen The next museum we visited was the Stadtmuseum in Klausen/Chiusa. They have by far the better (=higher quality embroidery) textile collection and it is displayed in such a way that you can get very close to the pieces and the lighting is excellent. Unfortunately, I wasn't allowed to take pictures. I didn't know I wasn't allowed to take any, so I can at least show you an antependium, or altar cover, from the Loreto treasure. And I (and the very friendly museum wardens) hope that it will whet your appetite so that you plan a visit too. And that you will help spread the word that this museum has a textile collection of high importance. As they are a tiny museum with an equally tiny budget, they need our help. So please show them some love. 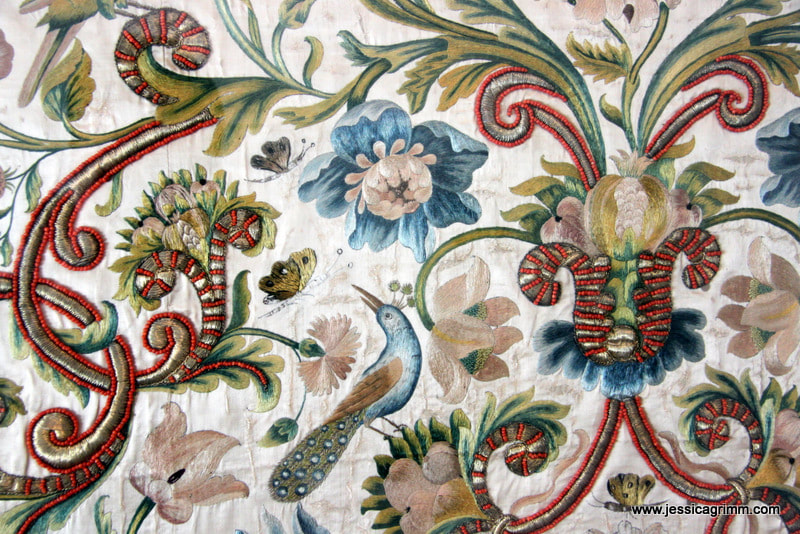 Loreto treasure at the Stadtmuseum Klausen But first, let me tell you a little bit more about what is called the Loreto Treasure. Maria Anna of Neuburg became queen of Spain, Sicily, Naples and Sardinia when she married king Charles II of Spain in 1690. She brought with her her confessor Pater Gabriel Pontifeser born in Klausen. He was a trusted and loyal advisor and she pledged to build him a monastery in his hometown of Klausen. The house he was born in was turned into a Loreto chapel. Queen Maria Anna, her husband and the Spanish nobility gave beautiful religious objects to the chapel. The Loreto treasure was born. 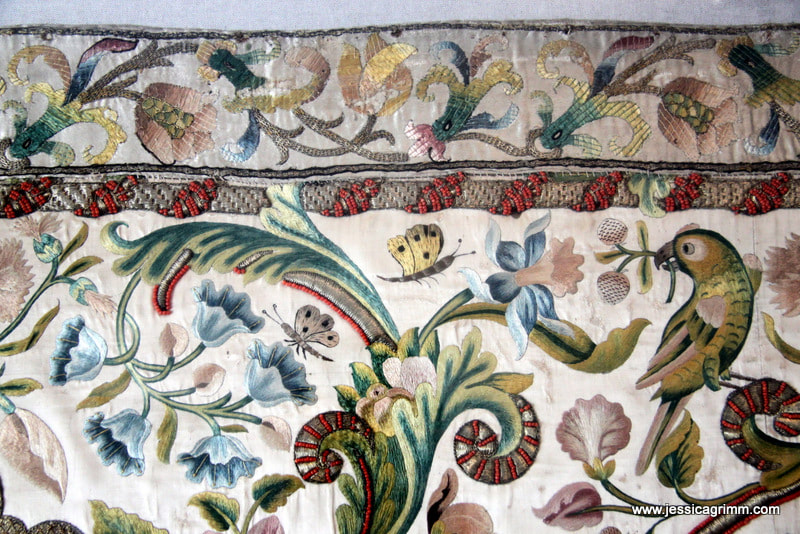 Loreto treasure at the Stadtmuseum Klausen Permanently on display in the museum are several highly decorated altar covers. Apart from the one displayed above, which was probably stitched in Sicily, there is a further piece stitched in wool on linen and a silk- and goldwork piece in the Ottoman-style. Interestingly with the piece I was able to photograph, the main part with its flowers, birds and butterflies is stitched with long-and-short stitch. However, the border shows the same laidwork technique as seen before on the chasuble in the Diözesanmuseum Brixen. Besides silk and gold threads, the piece is adorned with red coral beads. This piece is truly to die for! It is very seldom that you encounter embroidery of such high quality that has kept so well. Other spectacular pieces were several chasubles with the same high-quality silk and goldwork embroidery. If you are ever near, this is a museum not to be missed! I for my part, will be back to study these pieces in greater detail.
Some of you might have already read Mary Corbet's review of this stunning book on embroidering cat portraits. I did! And since I had seen pictures of Hiroko's work on Pinterest, I really (REALLY) wanted this book. Hiroko shipped it super-fast from Japan; so here is my review. 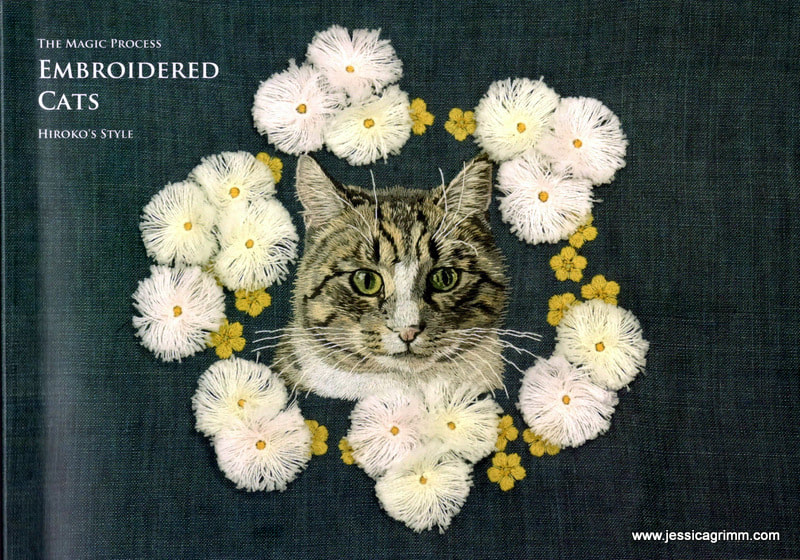 Book review: Embroidered Cats Hiroko's Style Hiroko's cat (and dog) portraits are mainly stitched on items of clothing. Cat pops out of shirt pocket is probably the image most of us have seen before. Besides good quality natural fibre clothing as her canvas, Hiroko uses one strand of good quality stranded cotton (DMC, Anchor or the Japanese Olympus/Cosmo). 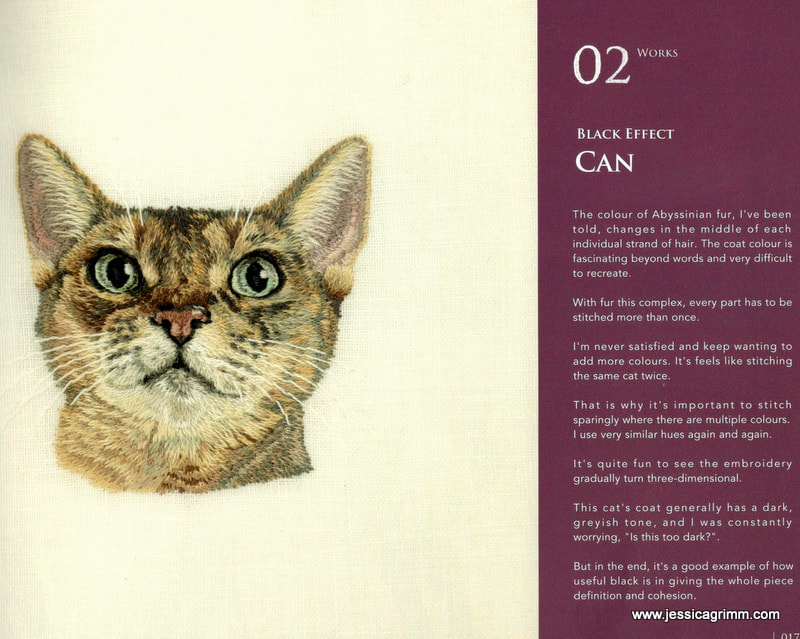 Book review: Embroidered Cats Hiroko's Style The stitching technique used by Hiroko is a form of thread painting. But it is not the same technique as is taught at the Royal School of Needlework and with which I am most familiar. The main difference? Hiroko does not use long stitches which she subsequently splits in order to get the required shading, instead she layers her stitches. And those of you who are familiar with the RSN-way of silk shading will have heard the phrase that it 'shouldn't be called long-and-short-stitch but long-and-longer-stitch'. Well, Hiroko uses tiny, tiny stitches to get the desired effect. Fascinating, I must say! 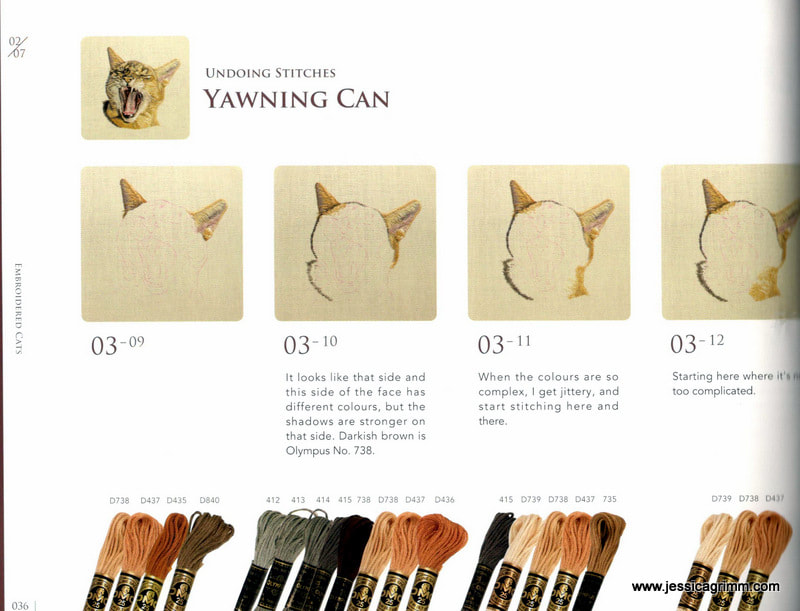 Book review: Embroidered Cats Hiroko's Style Hiroko's book is not a project book and it certainly isn't a book for silk shading virgins. Although Hiroko shows her order of work in step-by-step pictures for six cat portraits and one dog portrait, it isn't a step-by-step instruction book. This may sound a bit contradictory, so let me explain. The first cat up in the book is a black-and-white puss called Sora. According to Hiroko they are the easiest to do as they have a relatively simple fur pattern and a limited colour palette. The project is broken down in 40 pictures. Now, that sounds like a lot. But it really isn't if you think of the many different directions cat fur flows in. And then there are the tricky areas like nose, ears and eyes... 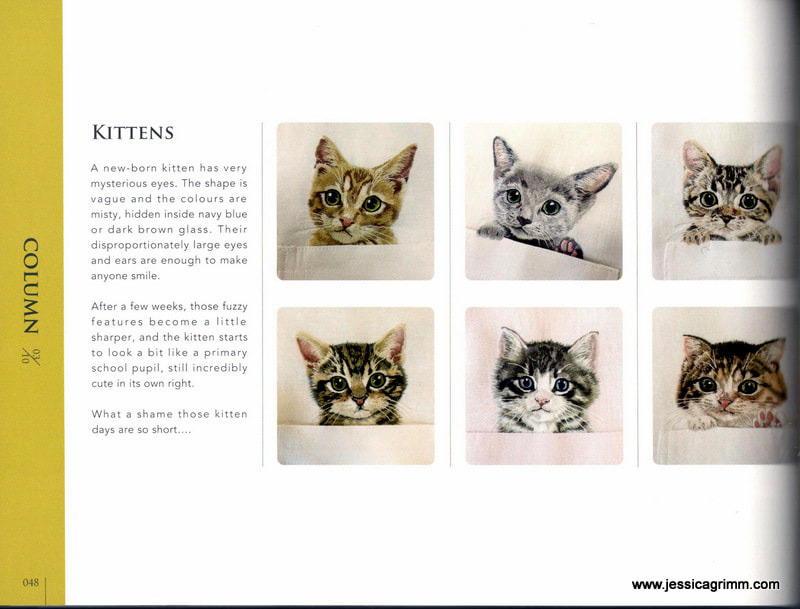 Book review: Embroidered Cats Hiroko's Style That said, if you are a regular silk-shader/thread painter, you will marvel at her technique! The step by step pictures with their explanatory texts are delightful. Hiroko has great wit and I laughed out loud several times. And I agree with Mary Corbet that although the pictures are too small to see each stitch clearly, a small magnifier solves this problem. I used my Mighty Bright Light and had no problem to follow Hiroko's projects. And at the back of her book there are the original cat pictures too. This enables you even better to understand how Hiroko tackles each cat. Throughout the book, Hiroko dispenses sound advice on how to become a good (cat portrait) embroiderer. It all boils down to observing the original thoroughly, diligence and self-critique in order to improve your work. And it becomes very clear from the book that these magnificently stitched cats do not appear as by magic; Hiroko works hard to make them happen. I think that's very honest and good to keep in mind.
So, where to get this latest addition to your ever-growing embroidery library? Straight from Hiroko through her Etsy store! The book is self-published and entirely written in English. A big round of applause for that! Including shipping (Japan-Germany took about a week) it cost me €37. In my opinion, very good value for your money! Let's start with a joyful 'Happy Easter' to you all! Then we talk a bit about embroidery. And at the bottom of this blog article there will be, very aptly, naked bottoms. I won't judge you if you scroll :). 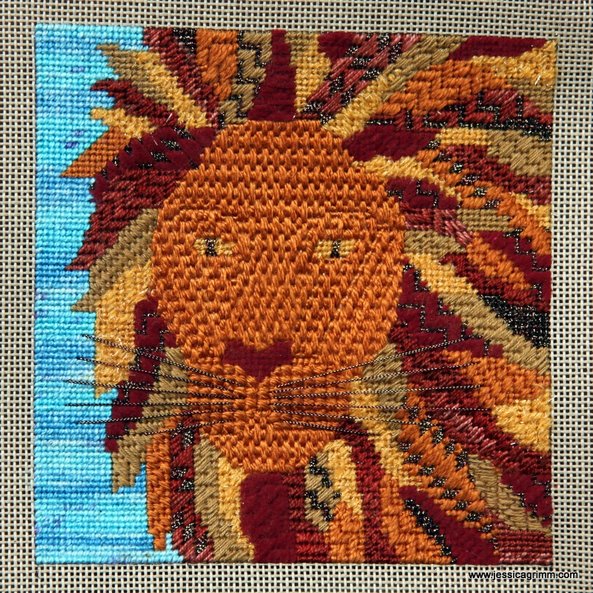 Let's kick-off with my canvas lion who somehow reminds me of Lenny Kravitz. So now the piece is referred to as Lenny the Lion :). Early April, I received another broderi box from Nordic Needle. This time filled with pretty golden, yellow and rustic red threads. When I saw the threads, I knew they would suit a lion well. Luckily for me, Millie Marotta has issued a new colouring book called: Wild Savannah. It took me quite a while to get Lenny's face right. I wanted to use a single colour and only generate some definition through the use of different stitches. I used an amber coloured 100% silk called Autumn Orange by Vineyardsilk. I so love this twisted spun silk with a pretty lustre! It is such a well-behaved thread. For Lenny's manes, I ran riot with stitches and threads. So much fun! I used a variegated rustic red cotton thread called Chili of the Wildflowers range by Caron. And a dark red velvet thread by Rainbow Gallery. Also from them is the yellow thread aptly called 'Fuzzy Stuff'. I feared the worst, but you can actually stitch with it :). Also in my broderibox and thus in Lenny's manes: Londonderry Linen thread 'Maple Sugar'. Quite nice to stitch with and a real 'calmer' in the manes-craze. But best of all, was a spool with a metallic thread called Bijoux 'Tiger Eye'. Since my family widely believes there are magpies in our ancestry, it is no wonder I like threads with a sparkle! I finished Lenny by filling in the African sky behind him with a thread from February's broderibox: Tropic Seas from the Watercolours range by Caron. As you can probably guess by now, I thoroughly enjoy my monthly broderiboxes. It is the perfect way to learn about new materials. And in order to prevent these lovely goodies from cluttering up my stash, I've set myself the challenge of using them straight away. So far, I stuck to my plan!
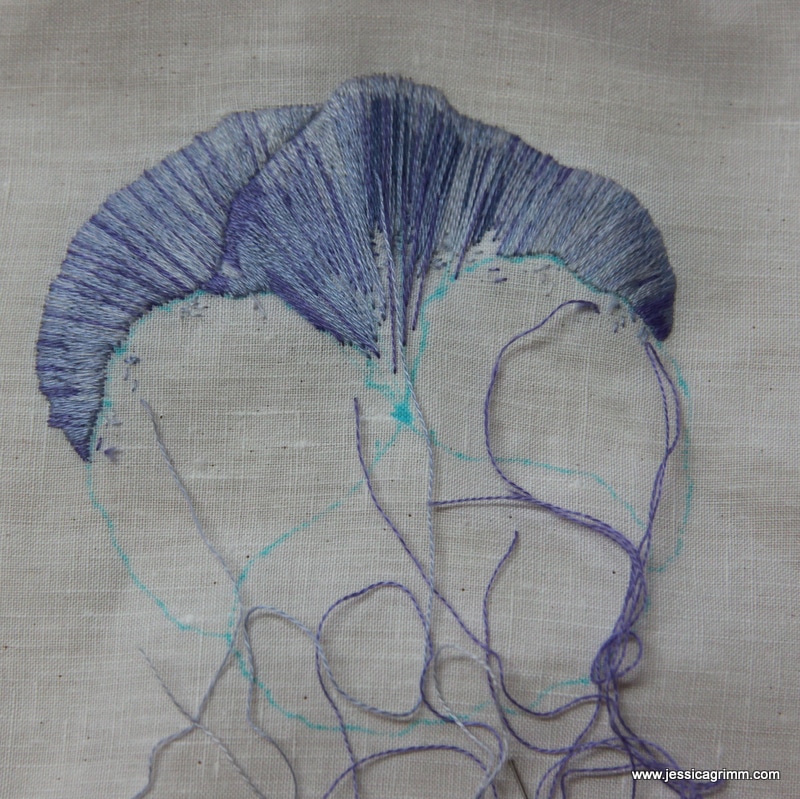
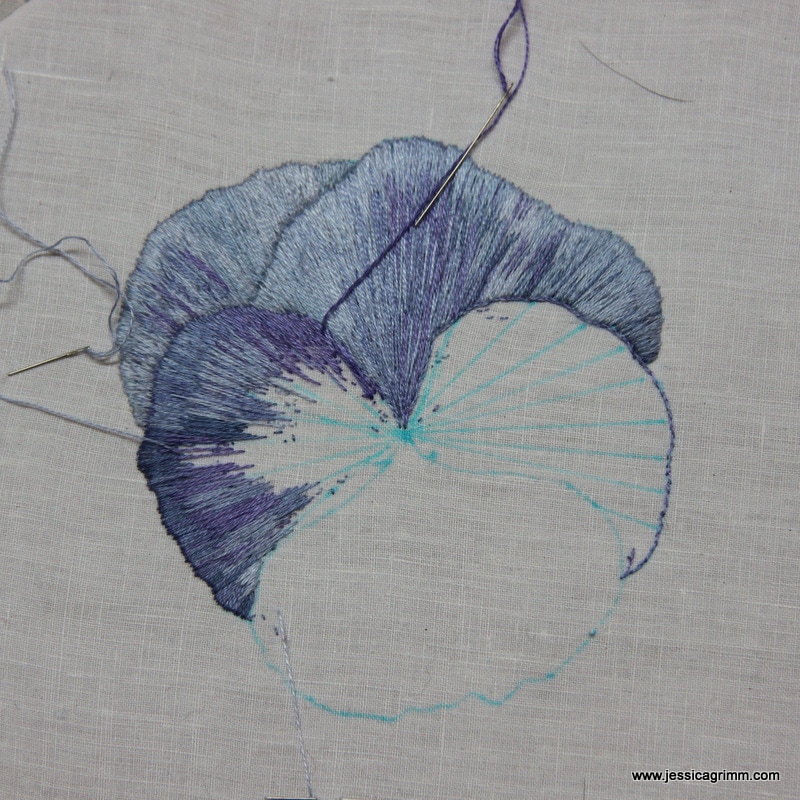
Let's move on to the pansies, shall we? Last week saw three women stitching away in my studio. They took part in my silk shading embroidery retreat. Personally, I think silk shading is an embroidery technique which you either love or hate, you can or you can't. It is deeply personal and progress is slow. My lovely ladies worked from a picture of a large blue-violet pansy. After five days of stitching diligently, eating lots of cake and laughing until our bellies hurt; you can see Elena's pansy on the left, Sabine's in the middle and Monika's on the right. I think they did a great job! Hopefully, I get to see the finished results upon their next visit. Now: THE naked bottoms! As probably many of you know, my husband is a Catholic and I am a Protestant. Since we live in a predominantly Catholic environment, I sing in a Catholic church choir and worship in the same church. Although both Christian denominations, there are some differences and I am not always getting it. I usually blame that on John Calvin :). However, this Easter Mass, I wasn't the only one who was confused... This is what happened:
Due to a severe lack of priests, we got the 'monk-who-never-smiles' on loan from the local abbey. So far so good. However, he compared integrating the Lord's resurrection into our everyday lives with an ad for the protection of the environment. And you guessed it: This ad featured naked bottoms on a bench. With his ever-straight-face he even described these naked bottoms as being: Greek, Roman or of such making that they 'needed a little more space'... This left us very, very confused! Autumn has truly arrived in this part of the world. No more summer dresses or breakfast on the balcony. Alas, the rainy weather is perfect for a little stitching. Or, for coming with me on a virtual trip. Pour yourself a cup of tea, raid the biscuit tin and enjoy! 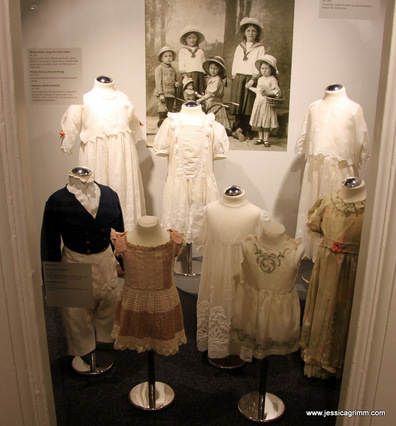 Display at Textile museum Mindelheim Since a couple of months, Mindelheim boosts a textile museum housed in the spectacular building of the Jesuit College. Being such a new museum, the whole collection is excellently lit by LED-technology. Not only can you actually see the individual stitches, you can even take decent pictures. And that's exactly what I did as the museum is so new, they don't sell a catalogue. 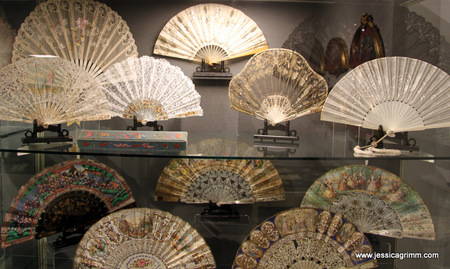 Display at Textile museum Mindelheim The textile museum starts with a nice timeline display of fashion. Then there is a room with fashion accessories like fans, bags and gloves. Many of which sport some form of embroidery. 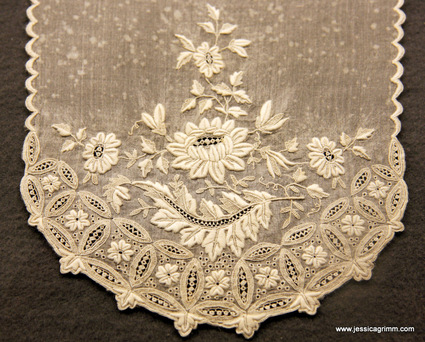 Display at Textile museum Mindelheim Past the fashion displays, you land in a set of small rooms filled with different types of embroidery and (needle)lace. The museum collection is tilted heavily in the direction of whitework and lace. Not a bad thing at all, just something to keep in mind. 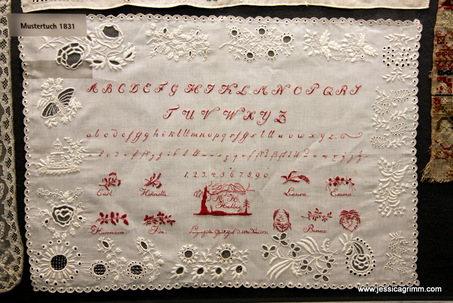 Display at Textile museum Mindelheim Another display has a number of exquisite samplers. 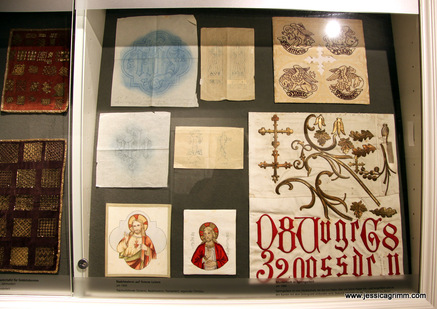 Display at Textile museum Mindelheim And then there is a nice little display filled with silk embroidery and goldwork. Especially the samplers and the unfinished work is really practical if you want to study this particular technique. Intersperced between the displays, are single works of embroidery. Some of really high quality, others more of the leisurely type. There are also a number of Chinese embroideries on display. 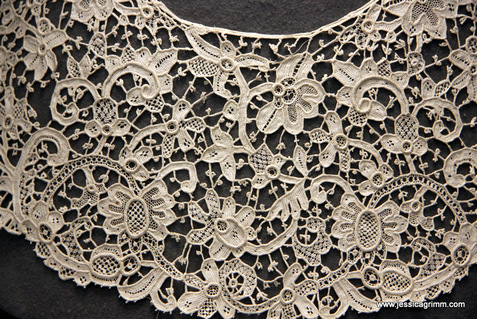 Display at Textile museum Mindelheim After the embroidery displays, you'll enter the lace rooms. There are fantastic (and huge!) examples of needlelace. They even have a large cupboard with drawers where smaller items are stored. Pulling out the different drawers is very rewarding. So many excellent pieces. And some of the pieces even have a royal connection!
If you are ever in the area, do visit this gem of a museum. You can even bring your menfolk as the archaeology museum and the art museum are housed in the same building. Still afraid that they might bore themselves? Store them at one of the many cake shops lining the streets of this medieval town! The most daunting task about the whole St. Laurence goldwork project, are his face and his hands. You don't want to end up with a deacon with an 'oh-no-it's-Sunday-again' look. Equally, you don't want him to have a size hands not matching up with the rest of his body. And then there is the whole technical side to the face and the hands, as well. Let's start with a detailed picture of his face and the 'problem' hand holding the book. 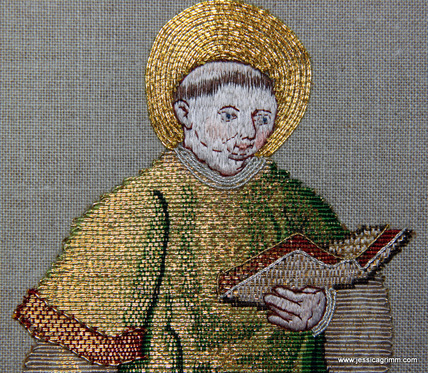 St Laurence recreated orphrey The hand holding the book is actually silk shading over and through the laid gold threads forming his or nue clothing. It soon turned out that just leaving them un-couched and then covering them with the silk shading, didn't work. The gold threads just started to roll away, gaping and even affecting the nice or nue of the book and the green dalmatic. Time for a 21st century trick: linen batiste, bondaweb and glue. Yes, you read that correctly, I used glue. Only a tiny amount :). I traced the hand onto the bondaweb, ironed it onto the linen batiste, peeled the paper off and glued it onto the gold threads. From there on, silk shading as usual. I used two shades of skin tone and a dark ox blood red for the detailing.
Faces. Probably the hardest thing in embroidery, or indeed any other art form. As you can see from the detailed pictures above, my face is totally different from the original one. For starters, I used a different technique: silk shading, as I am most familiar with this way of thread painting. The original piece uses encroaching satin stitch in horizontal rows. Both faces are similar in size and use the same amount of shades. The detailing in the original is absolutely breath taking. My eye-sight is still very good, but I am not able to stitch this amount of detail without magnification. I suspect, my medieval counterpart must have needed the same. That said, I was able to see the details when I removed my contact lenses. Just stitching with your nose almost touching the fabric, is not much fun. Next problem: my linen is too coarse. Adding so many tiny stitches in such cramped space, needs a tightly woven ground fabric. Also, the prick-and-pounce transfer system does not allow for such detailed facial features to be transferred accurately. That's why Laurence ended up with a completely different shaped head in the first place. How would I circumnavigate this problem in the future? I would use the same trick as I used for the hand holding the book. First carefully transfer the face onto the linen batiste and then glue in place. Add a few tiny tacking stitches to make it stay put and then start the silk shading. It would definitely improve the result. However, I get the suspicion that stitching the face was a specialised step in medieval times. Done by a professional 'face-only' stitcher. Research has found that the figure and the background were stitched by two different people. And I think we can add a third one: the face stitcher. 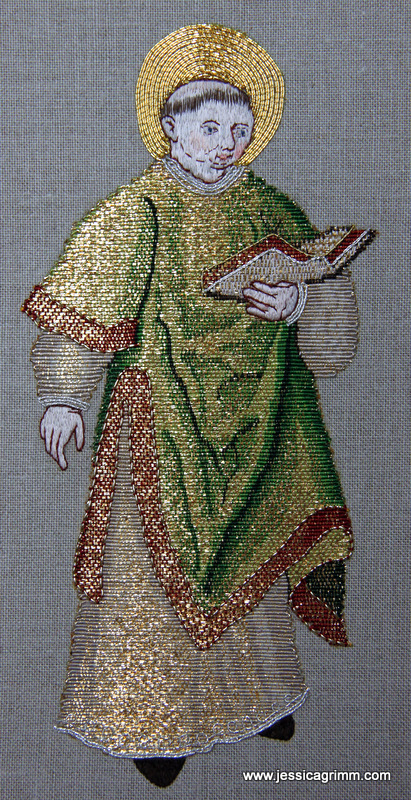 St Laurence recreated orphrey And this is what Laurence looks like now. It is impossible to capture the movement of the figure in a photograph. These or nue saints must have looked magical on the priest's chasuble in the candle light. Almost as if they were alive or floating on the background. Stitching the details with all sorts of gold and silver threads over the or nue, was a treat. This step was so much fun as it really put some dimensionality to his robes. And it wasn't hard at all to stitch through the dense or nue. And not having to plunge your threads, but simply tightly over sew them, is a real time saver too! A big thank-you to my medieval counterparts for pointing this out. 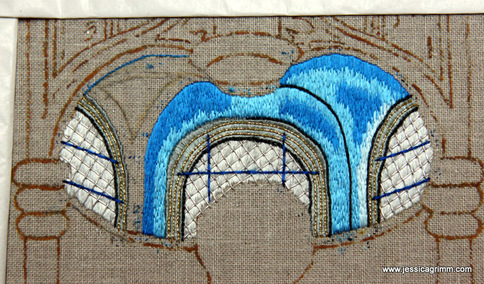 St Laurence recreated orphrey I have now moved on to stitching the background. These are the windows and dome above Laurence's head. I particularly like the layered way of working. Putting in the laid work (grey silk) for the windows first. Put the trellis on top using silver passing thread and anchoring the crossing points with silk. Then stitch the window's stone work in dark grey silk using satin stitch. Cover the line between glass and stone work with a tiny row of chain stitch in anthracite silk. Then add the gold check thread to the stone work and finally couch the dark blue silk bars in place. A similar thing will happen to the blue ceiling. It looks quite 'spotty' for now, but that will all be over in a couple more hours of stitching.
After the window area, I will continue with the tiled floor. Before tackling the cloth of gold covering most of the area behind Laurence. But that's stuff for a future blog post. |

Want to keep up with my embroidery adventures? Sign up for my weekly Newsletter to get notified of new blogs, courses and workshops!
Liked my blog? Please consider making a donation or becoming a Patron so that I can keep up the good work and my blog ad-free!

Categories
All
Archives
July 2024
|


 RSS Feed
Contact: info(at)jessicagrimm.com
Copyright Dr Jessica M. Grimm - Mandlweg 3, 82488 Ettal, Deutschland - +49(0)8822 2782219 (Monday, Tuesday, Friday & Saturday 9.00-17.00 CET)
Impressum - Legal Notice - Datenschutzerklärung - Privacy Policy - Webshop ABG - Widerrufsrecht - Disclaimer
Copyright Dr Jessica M. Grimm - Mandlweg 3, 82488 Ettal, Deutschland - +49(0)8822 2782219 (Monday, Tuesday, Friday & Saturday 9.00-17.00 CET)
Impressum - Legal Notice - Datenschutzerklärung - Privacy Policy - Webshop ABG - Widerrufsrecht - Disclaimer