|
Maybe this blog post should come with the warning that there is a severe chance that you will spend money after reading it ... The Abegg-Stiftung has published a new book. In English this time! Some years ago, they conserved the altarpiece from El Burgo de Osma and the new book describes in incredible detail what they have found out about the embroidery. From the materials used to the order of work. It is so detailed that a skilled embroiderer or group of embroiderers could make a copy. Now that's a book worth having on your shelf. Even if it means that you will have to eat dry bread for some time to be able to afford it. We are still in the season of Lent so you will fit right in :). Let's explore!  Book review: The embroidered altarpiece from El Burgo de Osma The embroidered altarpiece from El Burgo de Osma is the only one of its kind that has survived to the present day. It was made around AD 1460-1470 in Castille (Spain) for bishop Pedro the Montoya. The altarpiece is currently housed in the Art Institute of Chicago (Inv. no. 1927.1779a-b) and consists of two pieces. The top part shows four scenes: the Nativity on the left, Mary with baby Jesus in the middle with the Crucifixion above and the Adoration of the Magi on the right. The bottom piece shows the Resurrection in the middle flanked by three Apostles on each side. The top part measures 161,5 x 200,5 cm and the bottom part measures 89,5 x 202 cm. Both parts are all-over embroidered with gold and silver threads, coloured silks, spangles and seed pearls.  Book review: The embroidered altarpiece from El Burgo de Osma The main part of the book consists of a 100-page chapter on embroidery materials and techniques written by Bettina Niekamp. She has identified over 200 different combinations of threads and stitches/techniques on the altarpiece. And she describes them in great detail. Together with the many detailed pictures in the book, you are able to identify them all. It will take you a while but it can be done. Amongst the embroidery techniques is the over-twisted silk technique for rendering realistic tree tops, grassy areas and dirt. This technique is well-known from 17th century English stumpwork. The many padding techniques are also intriguing. There are tubes made of linen fabric and then stuffed with wool to turn them into the base layer of columns. String is then added for extra texture before the actual goldwork embroidery commences. The embroidery is mainly executed in very skilfully shaded split stitch. But there is a form of or nue too. And for a more realistic depiction of certain details, multi-coloured threads were used. They were made by blending different silk filaments in the needle. The embroidery is also embellished with twists made of different numbers and combinations of passing thread.  Book review: The embroidered altarpiece from El Burgo de Osma The book also has a whole section with full-page plates of the different parts of the embroidery. You can spend hours looking at the amazing detail. Further chapters describe the times and the life of bishop Montoya, its art historical context, the iconography in relation to the material and embroidery techniques used, late medieval embroidery in Aragon and a case study on vestments from Barcelona. With 427 pages, there is a lot to explore!
The book can be ordered directly from the Abegg-Stiftung in Switzerland. It costs CHF 85 + shipping. It does not seem to be available from the Art Institute of Chicago. The fact that this book was published in English instead of German is a real plus. Please let the Abegg-Stiftung know that we like more of that when you are ordering. They might end up translating some of their equally stunning older publications. My Journeyman Patrons can view a short video in which I flick through the book.
21 Comments
With me moving house last year, I just wasn't settled enough to start stitching on the orphrey background for the Alpine Experience any earlier. I knew what I wanted to stitch and knew which colours to use. Finding the right mindset to start stitching, took a little longer. But I finally bit the bullet! So, expect regular update posts on the orphrey in the coming months. Today we'll start with the design, frame setup and the first bit of stitching. My Journeyman Patrons can download PDF instructions for the stitching part. 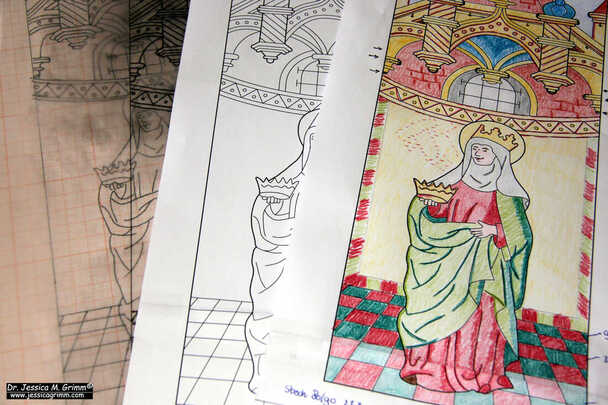 The design is a combination of elements found on a series of orphreys on a chasuble held at Museum Catharijne Convent in the Netherlands. Although this time, I will only teach the orphrey background, it can be combined with the or nue figure of Elisabeth of Thuringia which I taught last year. However, both projects can be stand-alone embroideries. To reflect this, my stitched version of the orphrey background will completely omit the space for a figure. 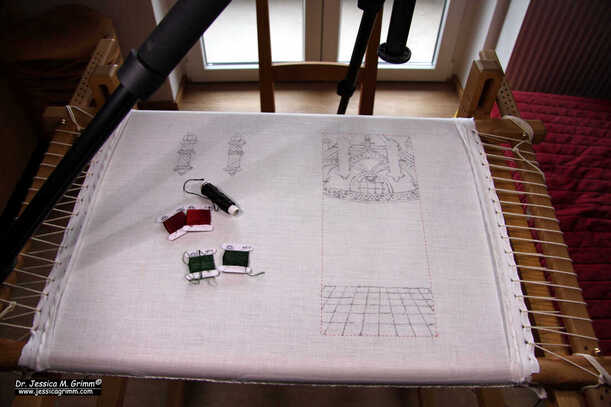 I've set up my slate frame with a piece of 46 ct even-weave linen. The design has been transferred using traditional prick and pounce. Instead of paint, I have used ink and a brush to connect the pounce dots. Although ink spreads a little, I prefer it above paint. In most cases, paint will flake off during stitching. Getting the consistency just right so it doesn't, is extremely difficult. Ink seeps into the fabric and thus cannot flake. The first element I have stitched is the famous tiled floor. It is easy embroidery and perfect for the start of such a large project! Medieval embroidery often consists of several layers of stitching worked on top of each other. The tiled floor is no exception. On the one hand, this helps with adding a sense of depth. The finished embroidery is less flat. On the other hand, it allows the embroiderer to hide the ends of his threads. Exposed thread-ends, however well secured, might with time unravel. 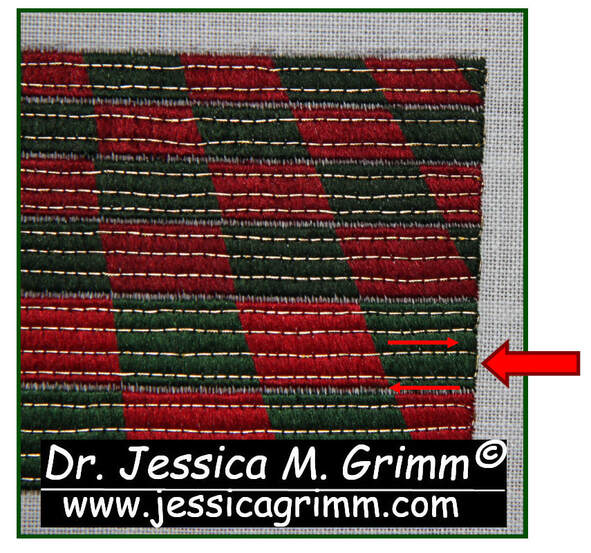 In the name of durability, having as few starts and stops of the gold threads as possible is also important. Our tiled floor is a prime example of how this was achieved. The rows of gold thread consist of a single thread of passing thread. There are only two tails or exposed thread-ends: one at the start and one at the end. The thread 'travels' on the front along the edge of the tiled floor. By making sure that you have this 'turn' laying nice and flat, you can hardly see it in the finished piece. In addition, this edge is covered with a red ribbon in the original medieval piece. Clever, isn't it?
Before we dive into the re-making of an 11th-century gold and silk embroidery, I would like to thank those lovely people who have already become a patron. Thank you so very much! Writing a weekly blog on medieval (goldwork) embroidery and related topics takes up a lot of my time. If you enjoy the blog please consider becoming a patron. You can choose between buying me a weekly coffee (Apprentice) or giving a bit more and getting a bonus with each blog post published (Journeyman). All patrons have access to regular 'behind the scenes' posts. Your monthly contribution makes a real difference! Now let us explore my re-creation of a golden bird from the so-called Wolfgangskasel kept at the Domschatz Regensburg. 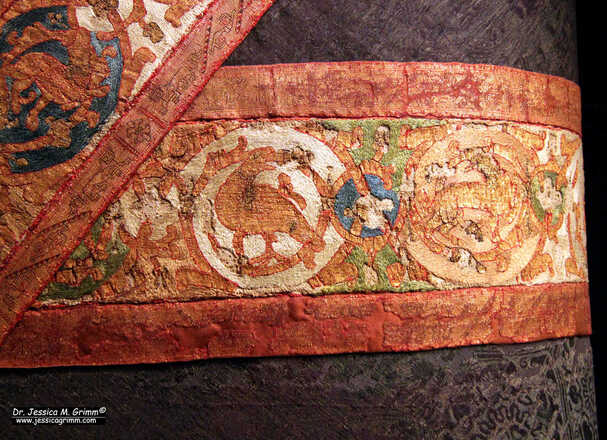 Detail of the embroidered chasuble cross featuring alternating birds and quadrupeds in foliage scrolls. Restauration work on the 11th-century Wolfgangskasel has shed light on the order of work for the embroidery. Firstly, the contours were stitched on a layer of silk twill backed with a layer of linen. The contours are stitched in red and dark-brown silk. Then the golden areas were filled with couched gold threads. Probably to stiffen the embroidery further, another layer of linen was added before the remaining areas were filled with coloured silk. We know that the embroidered orphreys were often stiffened by glueing paper on their backs in later times. The whole process of starting with red and dark-brown outlines and then filling in the other areas reminds me a lot of how illuminated manuscripts were made. The order of work and the colours used are very similar. As is the design. It is well possible that the design was drawn onto the silk by a person who also worked on illuminated manuscripts. 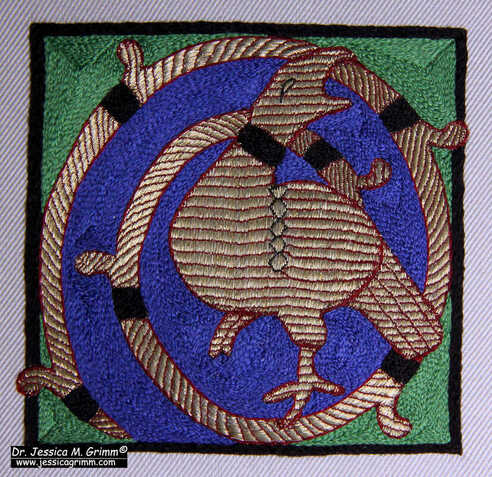 Avis area: my re-creation of an 11th-century original gold and silk embroidery. The course 'avis aurea' is available as a self-paced online course with video instrictions. You will learn to set up a professional slate frame and to transfer the design the medieval way: with pounce and ink. The actual embroidery stitches (stem stitch, split stitch and couching) are not very difficult to learn. Instead, the emphasis will be on executing them as regularly as possible. All stitches are in this case 'free-form' embroidery. There is no counting and you are not working on an even weave fabric. Instead, you determine stitch placement and stitch length. 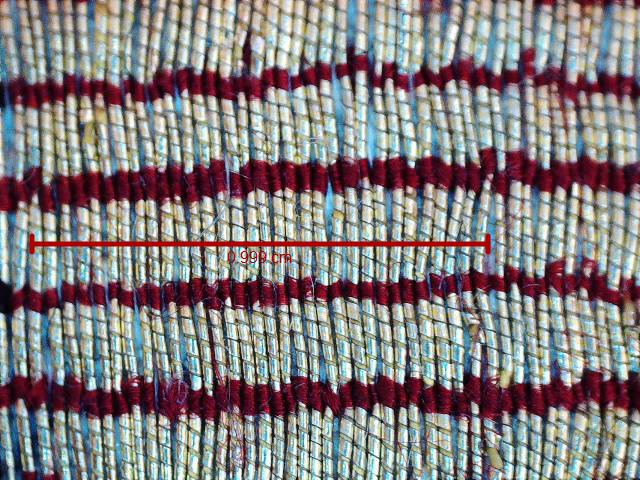 Macro picture of the couched gold threads on avis area. The original 11th-century embroidery on the Wolfgangskasel is very, very fine. It has about 40 parallel gold threads per centimeter. I was able to get to about 32. Not bad at all! As you can see from the picture above, there is certainly room to pack in more threads. But not with the thickness of the red silken couching thread used. Splitting Chinese flat silk isn't easy for students. And I did not want them to despair. That's why you will only split the flat silk twice. To pack in 40 threads per centimetre you will need to split the silk four times. You can read all about that experiment here.
For my Journeyman patrons: hop over to Patreon for a short video on suitable silken fabrics for medieval embroidery and where to buy them. Enjoy! Literature: Hubel, A. (Ed.), 1976. Der Regensburger Domschatz. Schnell & Steiner. |

Want to keep up with my embroidery adventures? Sign up for my weekly Newsletter to get notified of new blogs, courses and workshops!
Liked my blog? Please consider making a donation or becoming a Patron so that I can keep up the good work and my blog ad-free!

Categories
All
Archives
July 2024
|

 RSS Feed
Contact: info(at)jessicagrimm.com
Copyright Dr Jessica M. Grimm - Mandlweg 3, 82488 Ettal, Deutschland - +49(0)8822 2782219 (Monday, Tuesday, Friday & Saturday 9.00-17.00 CET)
Impressum - Legal Notice - Datenschutzerklärung - Privacy Policy - Webshop ABG - Widerrufsrecht - Disclaimer
Copyright Dr Jessica M. Grimm - Mandlweg 3, 82488 Ettal, Deutschland - +49(0)8822 2782219 (Monday, Tuesday, Friday & Saturday 9.00-17.00 CET)
Impressum - Legal Notice - Datenschutzerklärung - Privacy Policy - Webshop ABG - Widerrufsrecht - Disclaimer