|
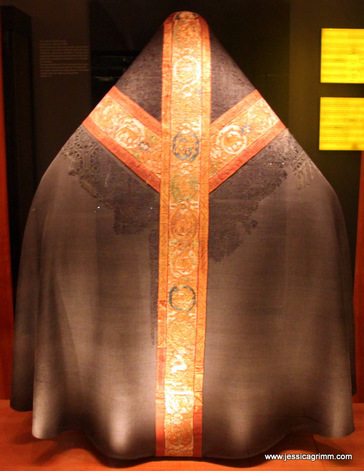
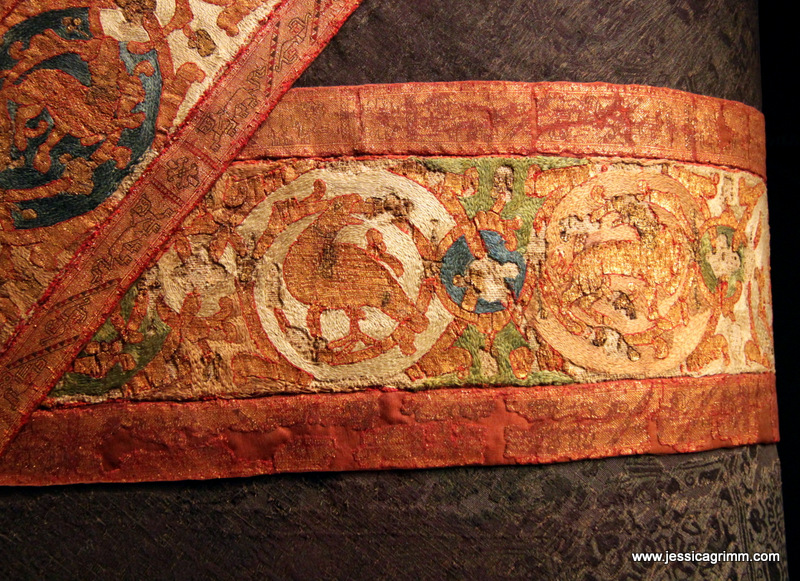
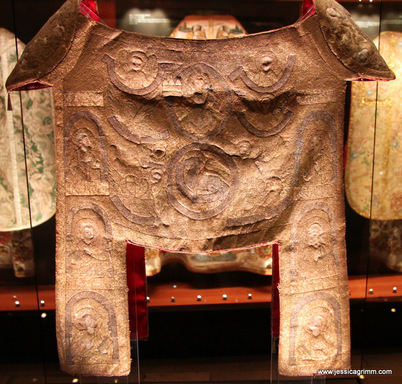
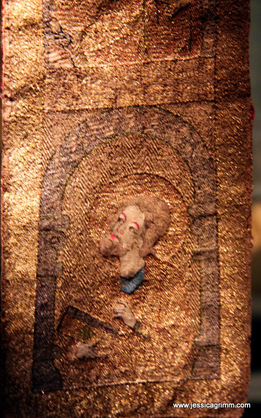
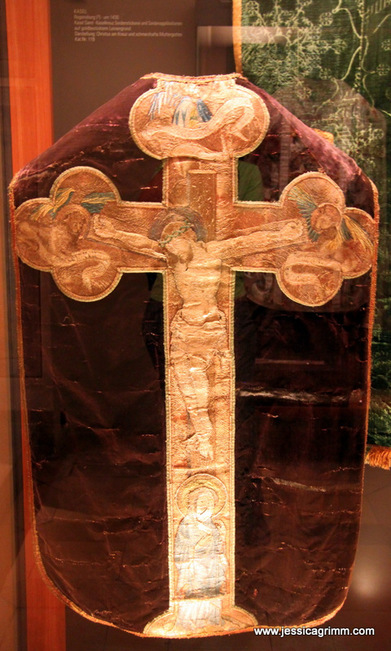
Last Thursday, I and my husband visited beautiful Regensburg, Upper Palatinate, Bavaria. As the skyline is dotted with spires, there's bound to be paraments. The Domschatz Museum sounded like a good hiding place. A small but very fine collection of exquisite paraments awaited us spanning the medieval to modern period. Although lighting was limited and sometimes really poor, I was able to take some good pictures. Too many to squeeze into one post. This post covers the medieval pieces and two future posts will deal with the post-medieval and modern paraments respectively. So do check back in the coming weeks if this is your cup of tea! The oldest piece on display is the so called Wolfgang Chasuble dating to the middle of the 11th century AD and made at Regensburg. Although this chasuble was never worn by St. Wolfgang of Regensburg (died 994 AD), the fact that it was attributed to him likely aided its survival. As you can see, only part of the original background fabric (a patterned blueish-purple silk) survives. However, the embroidery is in pretty good nick. Not bad for a piece of needlework that is nearly a 1000 years old! The embroidery depicts bands of alternating golden birds and quadrupeds biting into golden floral spirals. The background surrounding the animals and spirals is filled in with fine split stitches in silk thread. They used a bright blue, a grass green, white, grey and honey yellow. The split stitches surrounding the animals follow the circular flow of the spirals as well as the contours of the animal. The split stitches filling the areas between the spirals are worked more irregular. The animals are filled in by couching a single thread of very fine gold. Instead of the normal bricking pattern, horizontal lines are formed by the couching stitches. To enhance definition in the animals and spirals, a red silk thread is worked on the outlines. The embroidered bands are flanked by tablet woven bands depicting leopards and flowers. During my visit, I also came across a parament I had never seen before: a rationale from the first quarter of the 14th century made in Regensburg. It is given as a special papal distinction to bishops and was worn over the chasuble. This particular parament was inspired by the breast plates worn by the Jewish high priest. The use of the rationale mainly died out in the 13th century and today only a few bishops still wear one. This detail shows St. Jacob. His head and hands are stitched in fine split stitches with silk threads. The background consists of a myriad of geometric patterns using couching with fine gold threads of various sizes. The last piece dating to the late medieval period consists of a beautifully stitched crucifix re-used on a purple chasuble of later date. The embroidery dates to 1420 AD and was possibly made at Regensburg. It consists of gold embroidery and silk embroidery. Unfortunately, the light was so bad that detailed pictures were impossible to obtain.
The late medieval period marks a change in the liturgy and therefore in the shape and decoration of the chasuble. The Elevation of the Host before communion made it necessary to reduce the amount of fabric draped over the arms (compare the bell shape of the St. Wolfgang chasuble with the purple chasuble above). The priests also started to celebrate mass with their backs to the congregation. The back of his vestment became a large canvas for conveying the evangelion (again, compare both chasubles). The heavier embroidery called for lining. This in turn made the vestment much heavier and more solid, making it less suitable for raising the host as it trapped the arms. Born was the chasuble that leaves the arms largely free. More about that in my next post on the post-medieval paraments form the Regensburger Domschatz! Want to read more on German paraments? Karen Stolleis's book 'Messgewänder aus deutschen Kirchenschätzen vom Mittelalter bis zur Gegenwart' (2001, ISBN 9783795412548) is a real gem. Literature Hubel, A. (Ed.) (1976): Der Regensburger Domschatz. München: Schnell & Steiner.
0 Comments
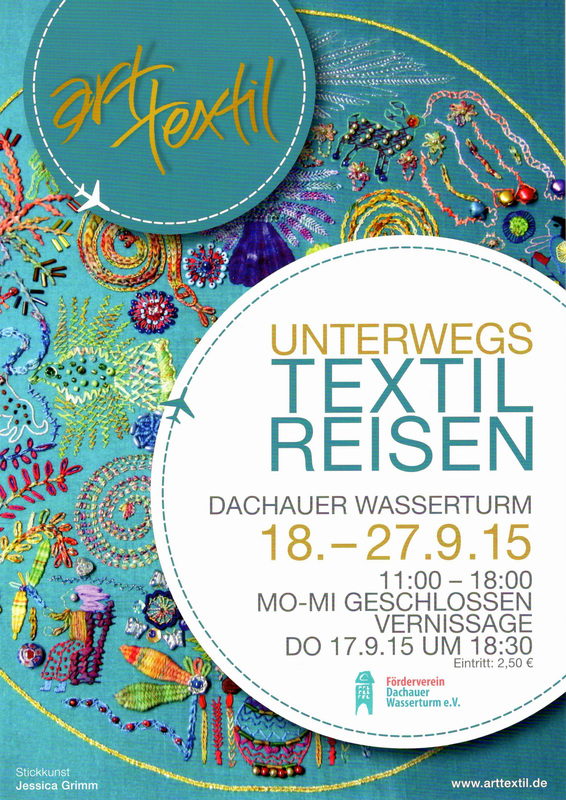
Save the date! In September, ArtTextil organizes an interesting exhibition in Dachau, Germany. Many different works of textile art, inspired by journeys and travels in different cultures and countries, will be on display. P.S. I am more than a little proud that they choose my piece as the background for their posters and flyers!
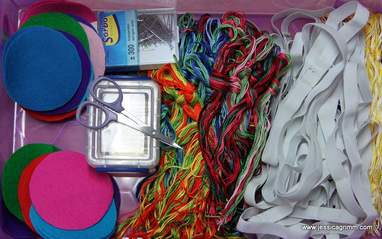
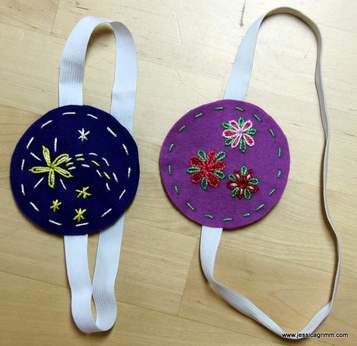
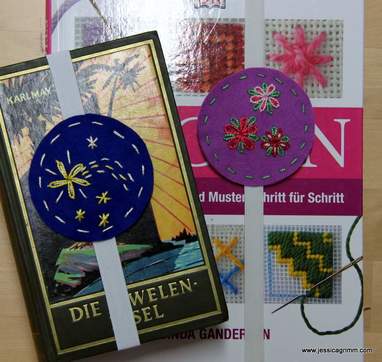
As promised in last week's post; here's the tutorial for easy peasy embroidered bookmarks. And don't be fooled. Although mine are aimed at children, grown up bookmarks are just as easy. When I let my imagination run wild, I can come up with elegant silk and goldwork bookmarks quite happily :). For the star bookmark (left) I started by stitching the large comet star. I knotted the end of a yellow perle thread and made five lazy daisy stitches to form the star. I left the knot at the back and just took care not to pierce it with my needle (children get that quite easily). Since my thread was long enough, I also stitched the central line of the tail in running stitch. Then I secured my thread by weaving it through the back of my stitching. Now I took a pale yellow thread and stitched back stitches inside my lazy daisies and between them. I also stitched both outer lines of the tail in running stitch and the little top star with three crossing straight stitches. The same for the three bottom stars, but now in bright yellow. Time to attach the felt to the elastics. Place both felt circles over the sewing spot of the elastics. Pin in place. Take a pale yellow perle thread and place the knot between the circles. Stitch the felt together with running stitch and make sure you pierce the elastic on both sides too. Hide your ending stitches on the backing felt circle only. And finished is your bookmark! For the flower power version: stitch lazy daisy flowers and fill them with backstitches in a contrasting colour. Place lazy daisy leaves in green between the petals. Need help with any of these stitches? Head over to Mary Corbet's fantastic site and have a look at her 'How to' video's! So what do we need? Scissors, pencil/pen, chenille needle #22, various colours of perle #5, broad (white) elastics, (wool) felt, pins and a sewing machine. Start by searching for your favourite book soon to be given its own glorious bookmark. Open it in the middle. Take the elastics and wrap it snug around the cover and half of the pages lengthwise. Head for the sewing machine. Overlap the ends of the elastics and sew together thoroughly. When you now place the bookmark lengthwise over the cover and the pages, you need to stretch it a bit. Cut two circles from the felt. I used my coffee cup as a guide and a sewline chalk pencil. Now you are ready to stitch! These bookmarks are really, really easy and perfect to introduce children to the magical world of embroidery. They don't need to worry about following a pattern closely, starting or ending threads in the 'right' way or fraying fabric. Just concentrate on the fun of stitching!
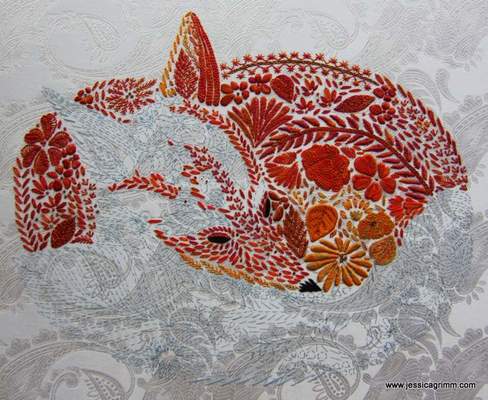
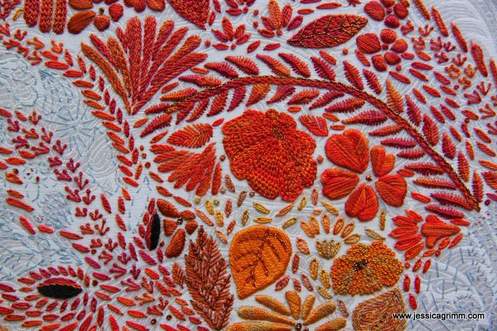
Do you know of other easy and cool looking embroidery projects for children? Do share your thoughts below! Due to the G7 meet-up at Elmau, about 20 km from the Pilatushaus in Oberammergau, we had a very quiet week. The legion of fearsome protesters apparently do not care for the arts :). However, four lovely young ladies, aged between 8 and 15, stitched their own lazy daisy book marks. Two older lovely ladies did the same :). I think I might have made some converts (sorry knitting and crochet community). Once I've figured out a 'boys-only' design, I'll publish a tutorial on this blog. And this is what THE fox looks like after 48 stitching hours. Isn't he cute? Even the equally bored police bore him a visit and was mightily impressed. Not even when I visited renowned police states such as Egypt have I seen so many police officers on duty in the past five weeks! And here is a close up of my stitching. So far, I've used Sri Lanka, Marigold, Brass, Berries, Maple and Wildlife perle #12 by House of Embroidery. Subtle highlights are stitched in DMC Diamant D301 and Madeira Metallic Col. 28. The piece includes lazy daisies stitched with a central back stitch for extra 'umpf', Vandyke, satin, fly, stem, berry, pistil, buttonhole needle lace, knots etc. I am also planning on working some of the leaves on the face and the tail in raised stumpwork. So stay tuned to see the fox grow! Want to read previous posts regarding this project? Simply click Millie Marotta in the categories' list on the right.
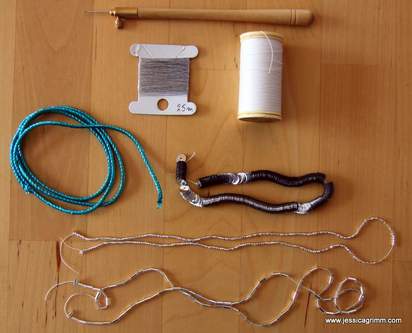
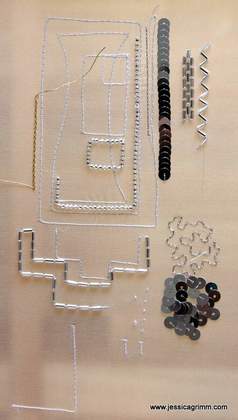
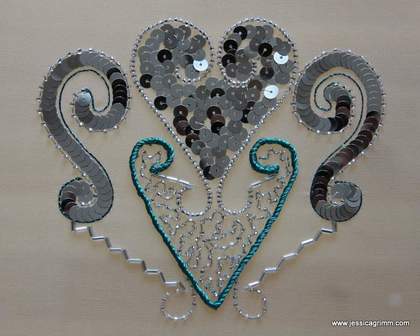
Last week, I attended a tambour embroidery course with Elisabeth Roulleau at ArtTextil in Dachau, Germany. Elisabeth has been trained as an Haute Couture and soft furnishings embroideress at the famous Lesage School of Embroidery in Paris. Do check out her website for inspiration and perhaps a chance to study this fascinating type of embroidery with her. So what do you need for tambour embroidery? Firstly, a frame. We used a cheap roller frame made by Elbesee in the UK. These frames are ok and in fact I use them for my Bavarian Hosenträger courses as they are really cheap and offer a decent solution. However, as always: if you intend to stitch a lot, do invest in a sturdier frame such as a traditional slate frame. Secondly, you will need a tambour hook or Luneville needle (pictured at the top). It consists of a wooden holder and insert needles available in different sizes. You can find them on this website. You will also need fabric, threads and of course pre-strung beads and sequins. As a complete beginner, it is easiest to start with a see through fabric such as silk organza. After all, you need to work with one hand under the frame. This hand slings the thread around the hook and feeds beads or sequins to the fabric and hook. The thread used was a complete surprise to me. And a major re-think. Confession time: it turns out I sometimes do like Sajou products. Not only to look at, but actually to work with as well. In this case: Fil a Gant Applications Au Chinois, coton glace. It is a coated cotton thread that smoothly glides through the fabric and is very strong. Pretty important as tambour embroidery gets completely undone when the thread breaks. For the record: all other Sajou products are still suspect until otherwise proven. The other thread we used was a fine metallic thread (probably from Sajou too, oh dear). And then the stitching. Not so easy with a hook. But just be patient and you will succeed. So did I. The hardest thing to remember is to push the fabric open with the smooth side of the hook before you try to retract the hook. Otherwise you get stuck and you'll lose the loop of your chain stitch in the making. My other major, and not yet fixed, problem is my high thread tension. It is perfect for all other types of embroidery, but completely doof if you do tambour embroidery. Elisabeth constantly had to take me hands and make them relax. If she ever gives up embroidery, she should definitely consider becoming a masseuse :)! And this is the end result after three days of hard graft. I might embellish it even more sometime in the future. However, at the moment I have more pressing things to stitch. We worked with sequins, beads, bugle beads and metallic cord during class. I added a blue line of chain stitches with a flat thin lurex ribbon thread at home to add a bit more colour. As you can see, the whole piece is rather bling. And it is rather different from my normal stitching style. Good to get me out of my comfort zone.
The next step will be to return to the basics for a while and get my thread tension sorted out. This will mean that I will do miles and miles of lines with the basic chain stitch without any beads or sequins. Once sorted, I will make another piece on silk organza. Once that's done, I will progress to using a non-transparent fabric. That will open a whole new can of worms, I am sure of it! Feeding beads to the fabric and hook whilst I cannot see them, must be a bit of a challenge. To sum it up: Elisabeth is a great teacher and I learned a lot. Although Haute Couture embroidery is not my cup of tea, I will perfect my technique so that I will be able to incorporate parts of it into future projects. I paid €325 course fee for 18 hours of tuition in an eight person group + €60 materials including hook and frame. A good Continued Professional Development investment, me thinks! If you would like to try your hand at tambour embroidery and you are not able to find a suitable course, have a look on Mary Corbet's fantastic site. What do you think of tambour embroidery? Would you like to give it a go? Or what else are you stitching right now? Do leave your comments below, I love to read them! |
Want to keep up with my embroidery adventures? Sign up for my weekly Newsletter to get notified of new blogs, courses and workshops!
Liked my blog? Please consider making a donation or becoming a Patron so that I can keep up the good work and my blog ad-free!
Categories
All
Archives
July 2024
|
Contact: info(at)jessicagrimm.com
Copyright Dr Jessica M. Grimm - Mandlweg 3, 82488 Ettal, Deutschland - +49(0)8822 2782219 (Monday, Tuesday, Friday & Saturday 9.00-17.00 CET)
Impressum - Legal Notice - Datenschutzerklärung - Privacy Policy - Webshop ABG - Widerrufsrecht - Disclaimer
Copyright Dr Jessica M. Grimm - Mandlweg 3, 82488 Ettal, Deutschland - +49(0)8822 2782219 (Monday, Tuesday, Friday & Saturday 9.00-17.00 CET)
Impressum - Legal Notice - Datenschutzerklärung - Privacy Policy - Webshop ABG - Widerrufsrecht - Disclaimer



 RSS Feed