|
Before we dive into this week's tutorial, I want to remind you to sign up for my upcoming in-person embroidery workshop at the Cathedral Treasury in Halberstadt. This is your unique opportunity to stitch in the grounds of a medieval Cathedral with its beautiful cloisters, a location steeped in history and beauty. Enjoy in-depth discussions of the embroidered pieces on display with the curator, myself, and your fellow students. Getting to the beautiful historic town of Halberstadt is easy as it has its own train station. Internet platforms such as Booking.com provide booking travel arrangements and lodging in your own language. The past 14 years have shown me that organizing financially successful embroidery workshops in Germany or the Netherlands is almost impossible. Yes, the Halberstadt workshop has four attendants, which means that it does not cost me anything to teach. However, I am not earning anything either. As I am a business and not a charity, I do need to draw an income from my work. Therefore, I will not organize further in-person workshops if the count remains at four. Instead, I will concentrate on my partnership with Creative Experiences and my own online classes. Now, on to this week's tutorial: beaded needle minders with historical motifs. I have always been fascinated by historical samplers! When I lived near Rotterdam many years ago, I became a textile volunteer at a local museum in Maasland. They had a stunning collection of beautiful historical samplers. I had permission to reproduce them when life took me in a different direction. Since then, I have been captivated by the beauty of these old samplers and often wondered how I could use those motifs that I liked without stitching a whole sampler. Two weeks ago, I had an idea. Why not use individual motifs to decorate a needle minder? This could all have gone by without you knowing about my now somewhat sizeable production of needle minders. Alas, I am Gary and Jennifer's trusted side-kick on the Tour de Broderie, and the needle minders have gained quite some traction. So, let me show you how to construct these beaded beauties!  Tutorial: Beaded needle minders with historical sampler motifs For my needle minders I used: 40ct natural linen by Zweigart, variegated silks by Caron, Glissen Gloss, Gloriana and Flower Silk, thick template plastic, thin wadding, double-sided tape, polyester sewing thread, round 2 cm nyodem magnet and beads 11/0 and 15/0. However, you can use whatever you like. Solid colours in stranded cotton on aida would work just as nice. As I don't have a stack of reproduction sampler patterns at home, I did the next best thing: visit the Antique Pattern Library. Scroll down a little for 'Kreuzstich und Filetmustern aus Graubünden'. This is a collection of Austrian folk patterns published in 1927. Square patterns of about 30 x 30 stitches seem to work best for a 4 x 4 cm needle minder. But again, anything goes! And, when you are not too precious about your finished masterpiece, you can also use the larger motifs to make coasters. Just saying :).  Tutorial: Beaded needle minders with historical sampler motifs Cut two identical squares of the thick template plastic. They should be a bit bigger than your sampler motif. Cover one with the thin wadding. Either glue it on or use a piece of double-sided tape. You are going to cover this piece with your finished embroidery.
Have your finished embroidery face down. Center the plastic+wadding on it. You can either lace it on or stick it on with double sided tape (my preferred method). Make sure you follow the grain of the fabric as best you can.
I then simply folded the corners over. However, you can also mitre the corners when you prefer. Personally, I don’t cut any of the ‘folding bulk’ away. I like my needle minders chunky and not too fiddly to make :). Cover the bare piece of thick template plastic with a piece of linen in the same manner. Stick a magnet on the back. You can either buy magnets with a sticky side or you can use a piece of double sided tape with a regular magnet. Put both halves of your needle minder together. Use your polyester sewing thread and hide your knot between the two halves. Now slip (ladder) stitch both halves together. As this is a rather three-dimensional step, I have made a short video for you. You can stop here. You have a perfectly working needle minder.  Tutorial: Beaded needle minders with historical sampler motifs If you want to bling up your needle minder, add a beaded edge. It is worked in two stages. The larger beads are sewn on in such a way that they lay flat with their holes facing up. During the second stage, you will add picots by weaving through the beaded edge created in the first stage. This very three-dimensional work is also best explained in a short video (I call beads pearls sometimes, sorry!). Enjoy your needle minders!
Downloadable PDF-Instructions are available to my Journeyman and Master Patrons.
1 Comment
Professional embroidery is very different from hobby embroidery. Sometimes, hobbyists remark that the back of my embroidery isn't very neat. For some, a neat back is the hallmark of excellent embroidery. It makes sense to have a neat back when the embroidery can be viewed from both sides. But when that's not the case, there is no need for an overly neat back. Medieval embroiderers knew that. As they were professional embroiderers trying to make a living, speed was of the essence. A neat back was not. And whilst there were different qualities of embroidery for different purses, cutting corners can be seen in many pieces. By no means only in lower quality embroidery. The grapes on the Anne Geddes chasuble from Mainz are a case in point. You will find a downloadable PDF of the below instructions on my Patreon site.  Embroidery tutorial padded silk shaded grapes with golden highlights You can make your grapes any size you like. Mine are 1,5 cm in diameter. You can also make as large a bundle as you want. Start by padding your grapes with three layers of satin stitches. I've used soft cotton for this. Make sure your last layer runs horizontally and just within the design line of the grapes.
Modern embroiderers would now probably proceed by shading each grape individually. Not so our medieval embroiderer: he did the whole lot in one go! Add shaded satin stitch or laid work on top of the padding. I've used a slightly twisted silk by DeVere Yarns (#60) in three shades of blue. Once all the silk is in, add a few highlights with your gold thread. I've used a #6 passing thread directly in the needle.  Embroidery tutorial padded silk shaded grapes with golden highlights Add the outline of the grapes with a dark blue silk in split stitch. Feel with your fingers where the padding is. You can also easily peek between the silken stitches to see where you will need to go. These split stitches couch the silk and the gold thread down and define the grapes.  And that's all there is to these super simple, yet highly effective padded grapes. As always, my Journeyman and Master Patrons find a downloadable PDF with the instructions on the Patreon website.
When I was in Uzbekistan, I bought a small piece of gold embroidery that is being produced for the tourist market. Nothing high-end, but fun nonetheless. Recreating the embroidery is a great way to learn about Uzbek gold embroidery and its main techniques and materials. Let's start stitching! As always, a PDF download is available for my Journeyman and Master Patreons.  Tutorial Uzbek Gold Embroidery Uzbek gold embroidery is traditionally worked on a piece of velvet backed with calico. One of the main techniques is called zardozi-guldozi and consists of gimped couching over cardboard padding. The gold threads used are far thinner and more flexible than what is usually used in the West. A good substitute would be metallic sewing thread. You will also need a passing thread or a thin Japanese thread for the outline.  Cardboard template should measure c. 13 cm wide Print the above template onto a piece of thin cardboard. Cut it out carefully. Glue a small piece of velvet (a different colour than your background) behind the central design element.  Tutorial Uzbek Gold Embroidery Tack the cardboard padding in place. Wear a thimble to protect your fingers.  Tutorial Uzbek Gold Embroidery You will couch down five strands of your thin metallic thread with each couching stitch. This embroidery was made for the tourist market, so speed is important. Using one or even two strands would take far too long. You lay your bundle of threads back and forth over the cardboard padding and you couch down alongside the cardboard. Tails are either hidden under the cardboard or plunged and tied back on the reverse.  Tutorial Uzbek Gold Embroidery You will sometimes need to fan your stitches to be able to follow the shape correctly and to completely fill it. An extreme case is the central element around the glued piece of velvet. At the bottom, you will need to stitch through the cardboard padding.  Tutorial Uzbek Gold Embroidery Fill the large leaf with a couching pattern of your choice. I have used a chevron pattern called mauji-duruya.  Tutorial Uzbek Gold Embroidery Finish the sample by couching an outline with passing or Japanese thread around the piece. Make small loops in the appropriate places and a tendril at the side. The row of loops/coils on the bottom part of the leaf is called kabuli. It hints at an Afghan origin of the technique.
Working over cardboard is very similar to working over parchment padding. This was a common technique in medieval goldwork embroidery. The small coils are also frequently seen. What is very different is the softness of the gold threads. The origianls are even finer and softer making for a smoother surface. If you would like a PDF download of the instructions including 21 step-by-step photographs, please consider becoming a Journeyman or Master Patron. When I started work on this week's stitch tutorial, I had the increasing feeling that things weren't quite what they seemed to be at first. That's the great thing about doing research. I usually have no idea where the medieval embroideries will lead me. Dead ends are common. But so are those 'aha' moments. In this case, it was the latter. Let's dive in!  Detail Dalmatic (Nativity) of the Schlosser Ornat, Inv. Nr. 124 I-III, Dommuseum Frankfurt. And here is the culprit. No, not Saint Andrew. It is the columns on either side of him. They are odd. The layering of goldwork is a common thing in late-medieval goldwork embroidery. But this is simply too OTT. It does not make sense. Let's start our tutorial proper and I'll point the oddness out to you. 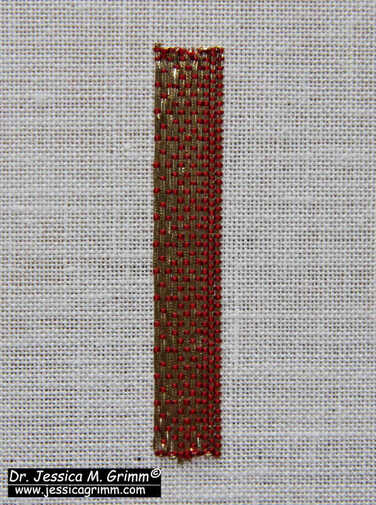 Start with a layer of shaded couched goldwork. For my sample (c. 0.8 x 5.0 cm), I used 46ct linen and passing thread #3 couched down with a single ply of red Chinese flat silk.
Next up, add the silver passing thread. You will be mainly stitching in between the rows of gold thread of the first layer. However, you will inevitably hit threads of the first layer. Make sure you use a fine needle. A new #12 would be perfect. You might also like to wax your silken couching thread (one ply of grey silk).  The "original" embroiderer then went on to add a layer of thicker red stitches along each side of the silver passing thread. I've used a full thread of red Chinese flat silk to do this for the inside of the right-hand side only. By now, I was pretty certain that this was not all done in the late Middle Ages ... So much additional stitching in such a relatively small space is nuts. It does not add anything to the design. On the contrary, you lose quite a bit of the original lovely shading of the first layer. When additional details are stitched in, they usually add to the design. They bling things up or they make the design easier to read by accentuating things. That does not seem to be the case here. So, what's going on? 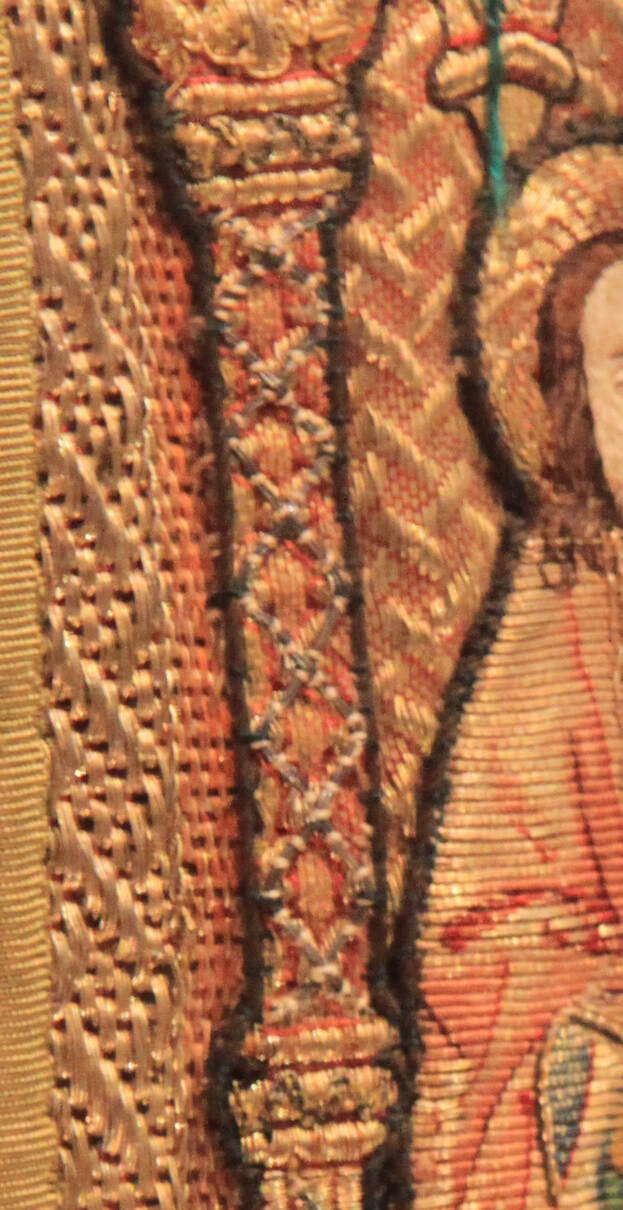 Detail Dalmatic (Nativity) of the Schlosser Ornat, Inv. Nr. 124 I-III, Dommuseum Frankfurt. Here's an extreme blown-up detail of that same column. Can you see the thick white/beige couching stitches used to couch down those silver threads? The silver threads themselves are also much thicker than all the other threads used in the embroidery. The added red stitches to the outside of the silver threads are also comparable in thickness to the white/beige stuff. It all looks so much cruder than the original very high-quality stitching done in the medieval period.
As I already told you in my earlier blog posts, these vestments saw extensive restoration in the 1840s. The addition of these silver passing threads on top of the columns was likely done then. It likely serves several purposes. Maybe some columns had so many damaged loose gold threads that this was a decorative way of cleaning things up. But it also does something else. This additional stitching likely goes through many of the layers that these vestments are made of. This stabilizes the whole construction. You often see horrible bulging on non-restored late-medieval vestments. By stitching through multiple layers, you have a chance to make things very stable and secure. It can't really bulge anymore. Is that was what attempted here? What do you think? Do you also feel that not all of the embroidery on these columns is original? My Journeyman and Master Patrons find a downloadable PDF of this tutorial on my Patreon page. After all, working layers of metal thread on top of each other is quite fun to do! Two weeks ago, we looked at a late 15th century embroidered chasuble kept in the Domschatz of Fritzlar. It had these lovely textured bands or borders between the individual orphreys. The border is made my couching gold threads and coloured silks over string padding. It seems to be a very 'Central European' thing to do. The technique is not difficult at all and would look great in a modern piece of goldwork embroidery or on a piece of needlepoint/canvaswork. So, let me show you how it is done. As always, my Journeyman and Master Patrons can download a practical PDF with all the instructions from my Patreon page. 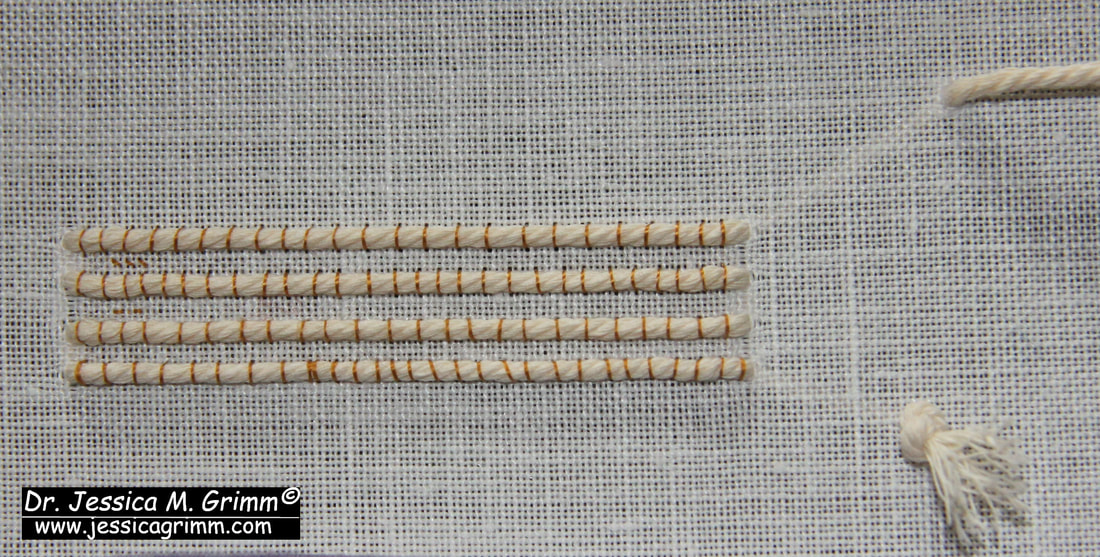 Tutorial for a padded goldwork border Start by couching down four parallel rows of padding thread or string on your embroidery linen. I am working on a 46ct evenweave. For my couching thread, I used DeVere yarns #6 silk in a gold colour. 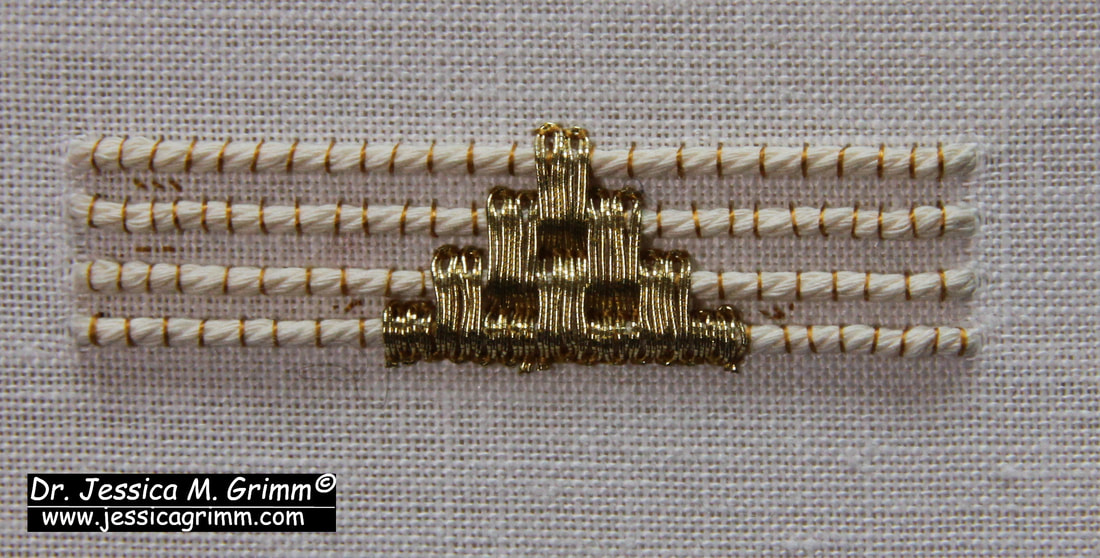 Tutorial for a padded goldwork border By looking closely at the original, I could see that the gold threads were applied first followed by the silk. The golden triangles consists of 7 blocks of 4 rows of gold thread. The gold threads are couched down in pairs. I've used a passing thread #3 and the same DeVere yarns gold-coloured silk. Start from the middle. As the border is quite narrow, your gold threads need a lot of manipulation at the turns. Tweezers might come in handy and you might need an extra couching stitch in the turn. As silk is very slippery, I like to go over my couching stitches twice (i.e. place two couching stitches on top of each other). Alternatively, you can wax your silk thread. Remove any exess wax crumbs before you start to stitch. 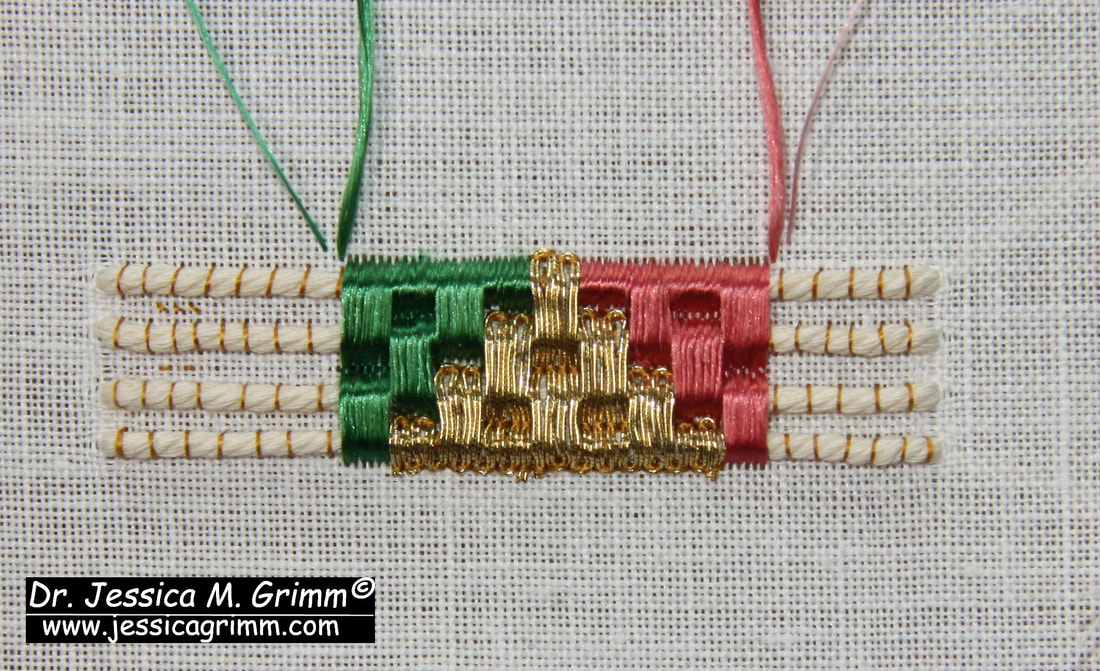 Tutorial for a padded goldwork border In the original, it becomes clear that the embroiderer went over the turns with their silks when they added the silken triangles. That's how I can see that the gold was stitched first. However, I don't like that as your silk snags so easily on the gold. Instead, I angled my needle under the turns. I've used Au ver a soie ovale with a matching colour DeVere yarns #6 for the couching. Start with only half a silken triangle. Measure the top of the golden triangle and match that for the silken triangles.  Tutorial for a padded goldwork border Add golden triangles before finishing the silken triangles. Your threads will have a tendency to roll off the end of your string padding. In the original, this was solved with a red binding. Very clever indeed.  Tutorial for a padded goldwork border And this is what my finished sample looks like. Wouldn't it be fun to figure out how to turn a 90 degree corner with this technique?
Have you seen my new blog index? So far, all blog posts have been neatly indexed. You'll find a list of book reviews, my projects listed according to embroidery techniques, historical embroideries listed according to century and a complete list of all tutorials. Today's tutorial is all about the white string we see in many medieval goldwork embroideries. This padding is often all that remains from the original bead embroidery worked with freshwater pearls. When we are really lucky, a few pearls still adhere. As is the case for the chasuble I showed you two weeks ago. In this tutorial, I will show you how the padding and the beading were worked. I was really surprised by how sturdy this technique actually is. The beaded edge is VERY firm. 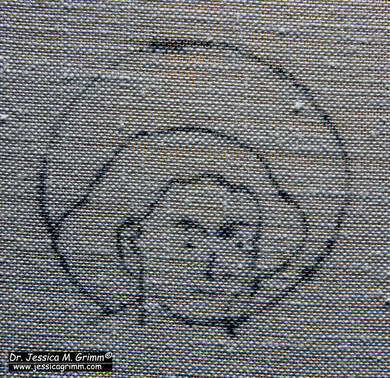 Inked design drawing on my linen embroidery fabric As always, I worked my sample on a piece of high-count (think 40ct and up) linen stretched on my slate frame. I determined the approximate size of St John's head with nimbus from the original embroidery. It is about 5.3 x 5.9 cm. I made a pricking on transparent paper and transferred the design with pounce powder and ink. 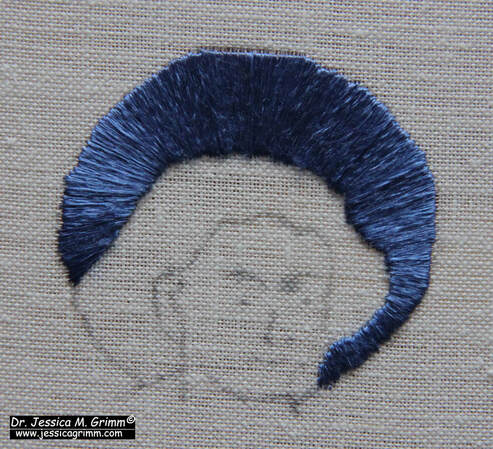 Adding a layer of satin stitches As is a favourite with medieval embroiderers, the simple nimbus is actually built up of several layers of embroidery. Start with a layer of radiating satin stitches in blue flat silk. The radiating does not need to be super precise. You can hardly spot the radiating stitches once the next layer of embroidery has been worked. 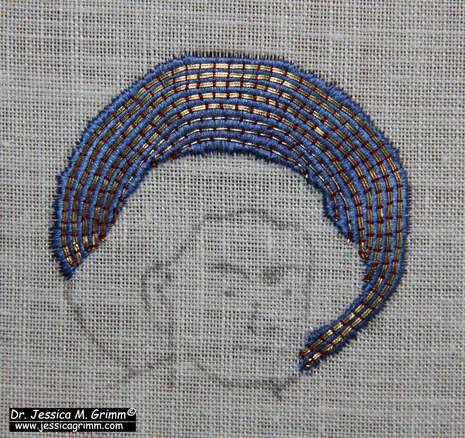 Adding the couched gold The next layer consists of couched gold thread. Use a fine red silken thread for the couching. Work from the outside in. The first few rows consist of a double gold thread, whilst the last couple of rows consist of a single thread. In the original, the embroiderer would have hidden de turns under the slip of the head of St John. I have turned my threads on the edge of the nimbus. 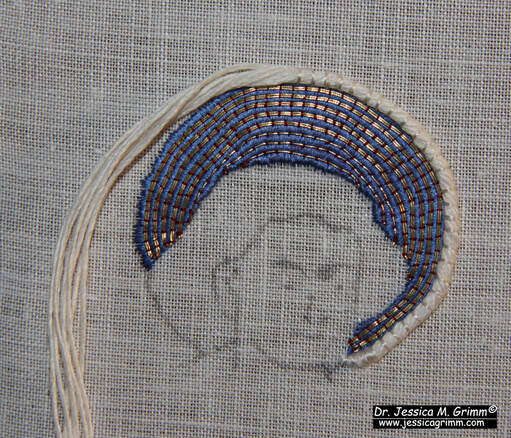 Adding the string padding for the beads It is now time to add the actual string padding. It is made up of a twisted-together bundle of linen threads. These are couched down with white silk. Start from the middle and retwist your bundle as you go. The ends seem to be tapered in the original. To achieve this, start to cut away pairs of threads from your bundle about a cm before the end. Keep couching and removing pairs of threads until you are left with a single pair on the design line. 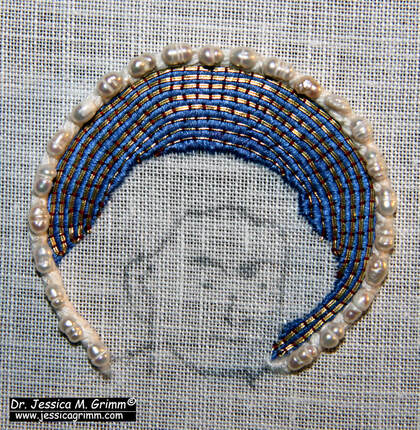 Adding the freshwater pearls onto the string padding Sew down the freshwater pearls (Etsy is a good source for these!) onto the string padding using white silk. You might want to wax your thread as the holes of the pearls can be quite rough. Go through each bead twice. In the original, the pearls are sewn down with a little bit of space between them. This was possibly done to save costs. 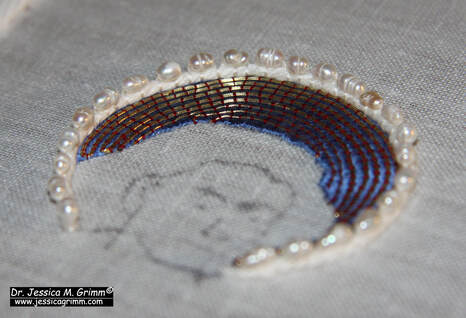 Finished pearl-edged nimbus It is said that the string padding was used to elevate the pearls away from the very shiny gold. It also provided a continuous white edging for when the pearls were slightly spaced apart to save on costs. The end result is very stunning!
As always, my Journeymen and Master Patrons find a downloadable PDF of this tutorial on my Patreon page. For as little as €5 per month, you can build your own library of medieval embroidery technique tutorials. Not a bad deal at all! Last week, we looked at a mid-15th century orphrey from Venice with an interesting goldwork background worked on silk. I've adapted the design slightly and turned it into a goldwork tutorial. The stitching is relatively simple but teaches you a few key things when it comes to medieval goldwork embroidery. Journeyman and Master Patrons find a downloadable PDF on my Patreon page. Becoming a Journeyman or Master Patron is an affordable way to obtain an archivable goldwork lesson each month. Let's dive in!  The design should measure c. 10 x 10 cm. This is approximately the size of the original. However, I've squared it off a little to make it look like a Moroccan tile. It is best to work a project like this, there is some heavy goldwork, on a professional slate frame. Dress it with a layer of high-count linen (40 ct or up would be good) and apply a piece of silk on top. You can find my free video tutorial on the process here. Transfer the design any way you prefer. I've used prick-and-pounce and watercolour paint. 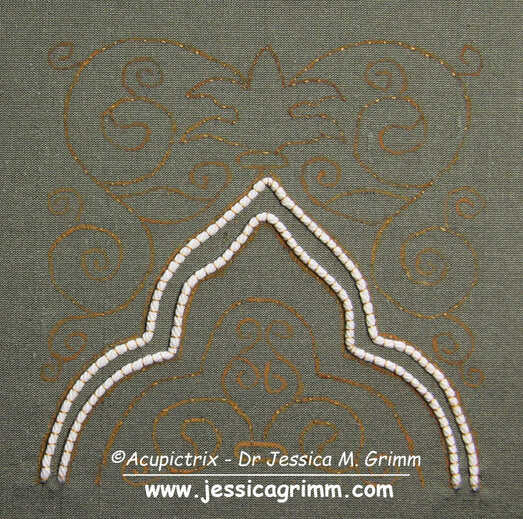 You will need to fuse your silk to the linen with tacking stitches on all the major design lines. This is basically a running stitch with a short stitch on the top and a long stitch on the back. Use a gold-coloured silk or sewing thread for this. Next, attach the white string padding by couching it down securely with the same gold-coloured thread. The padding threads need to lay well within the design lines. The design line is where your gold threads will turn. You do not want the padded area to encroach on the rest of the design. 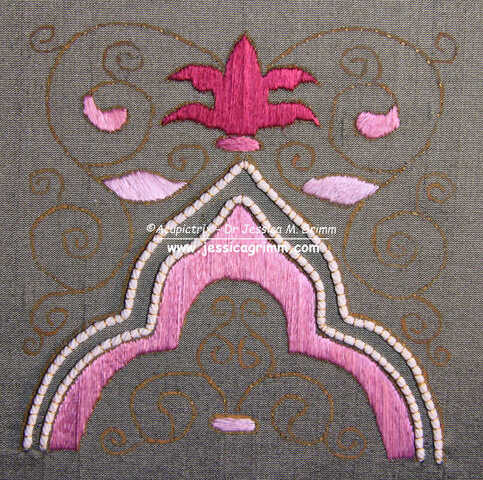 Time to fill the appropriate areas with silken satin stitches. The original shows quite stark shading and the silken areas have a very stripey appearance. The satin stitches are also worked a little 'open' with some background fabric showing. Instead, I've opted for solid fillings. There is no split stitch edge beneath the satin stitches as all the edges are going to be covered with gold. This will neaten them automatically. (Please note: I forgot to fill in the two small leaves at the bottom!). 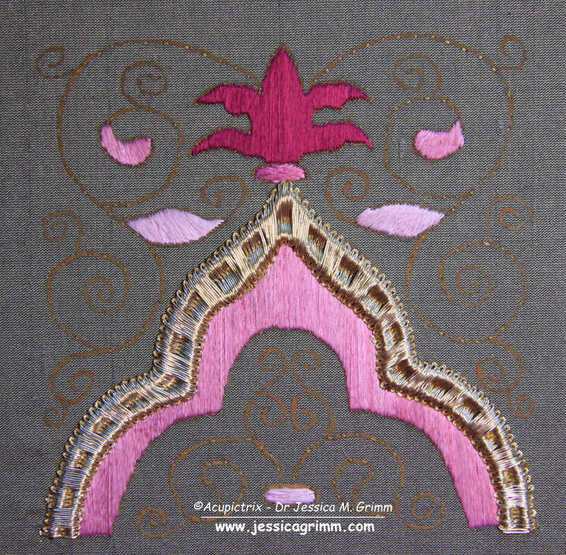 Couch down the gold threads over the padding. Gold threads are couched down in pairs. Start in the middle of the shape. I've used Stech 70/80 which is comparable to passing thread #3. The couching rhythm is as follows: 5x with an extra couching stitch in between the padding threads and 5x without this extra stitch. Alternate all the way down. You will need to fudge a little as you start vertical, but need to end horizontal. 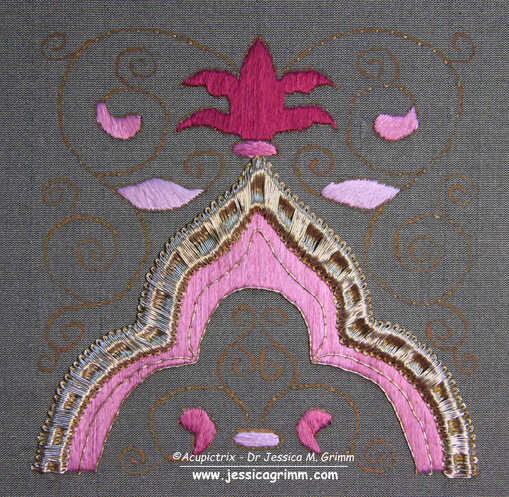 Couch two single lines of gold thread in place on the pink area underneath the padded gold. How you end your gold threads is up to you. You can either plunge and tie back on the back or you can oversew on the front and clip. 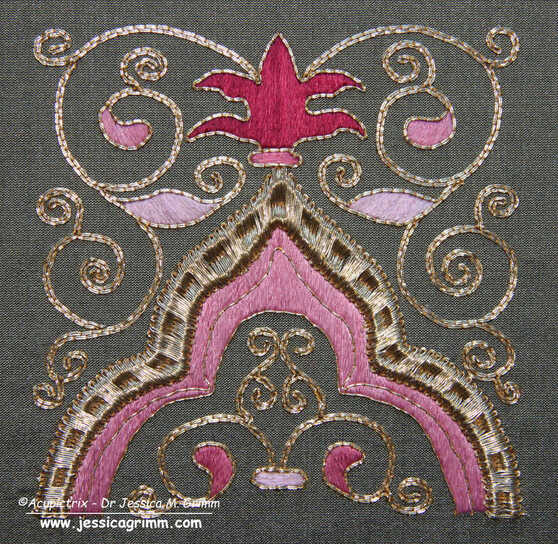 The 'only' thing left to do, is to cover the tendrils with couched gold. You aim for as few starting and stopping points as possible. And you try to hide starting and stopping under subsequent goldwork. This was common practice in medieval goldwork embroidery as it made the finished product more durable. And that's your goldwork project finished!
Wishing you all a lovely holiday season and all the best for 2024! Thank you for being such a loyal audience. In the past two weeks, we have explored the early 15th century gold embroidery from Venice, Italy. One of its characteristics is the ornate orphrey borders with the twisted columns. I've always been curious how they were made! So out came the cotton padding threads and the gold threads and off I went.  Orphrey with Saint Jerome kept at the Museo Diocesano Recanati, Italy. This kind of embroidery is best done on a slate frame. If you would like a reminder of what this is and how to set it up, please have a look at my instruction videos. Next, you will need to attach your string padding. The original uses two different kinds of padding. There seems to be something like soft cotton underneath the twisted columns. And a thinner string is used as padding on either side. I've used two thicknesses of the same cotton string for the padding. In order for the gold threads to be able to sit crisp on the padding, make sure that you couch down your padding well.  String padding couched down and ready for the gold threads. The gold thread used in the original embroidery is a passing thread. In my recreation, I've opted for Stech 70/80, which is comparable to passing #3. I was also curious to know what the difference would be between a gilt and a real gold thread. I worked the main part of the sample with the cheaper gilt and the bottom section with the real gold (more yellow). I prefer the real gold :). It is a tat better at going and staying where I want it to go and stay. The result is a bit crisper. Still not as crisp as the original, but closer. If you have the opportunity to try different brands of passing thread, please do and see how they behave.  The couching rythm alternates every 6th row. Working over this amount of padding will cause slight problems. Although you place a couching stitch over the gold and in the 'groove' of the twisted column, the gold is not very securely attached in this place. The twisted padding threads are also very round. Your gold thread wants to 'escape' and roll off. This is also visible in the original embroidery. And it comes as no surprise that the embroidery is most damaged in this area.
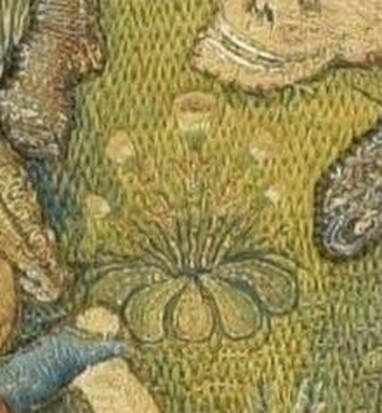
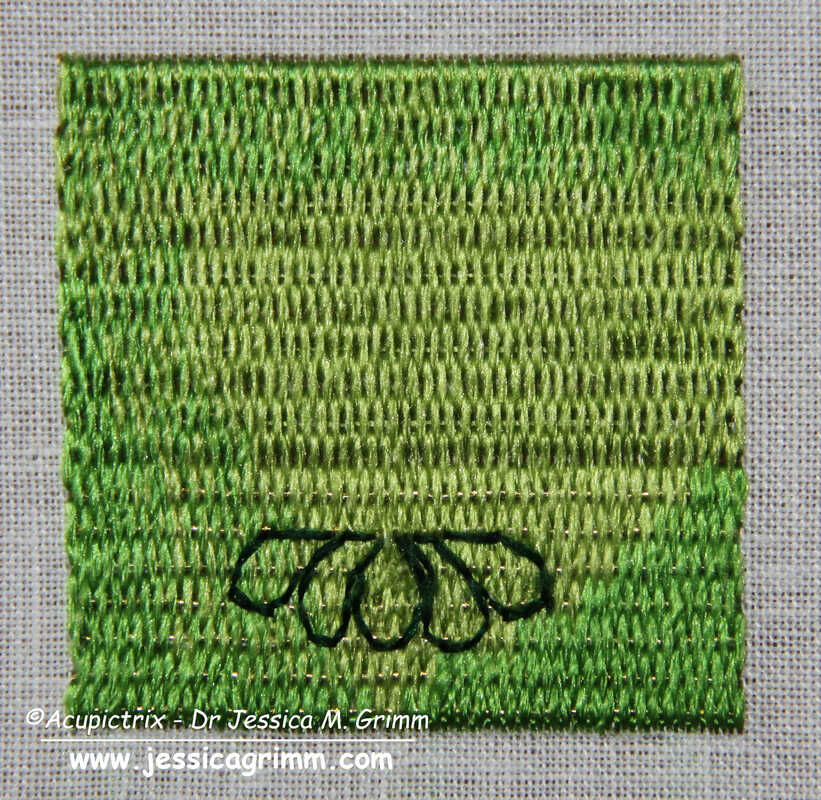
My Journeyman and Master Patrons will find a downloadable PDF with this stitch sample on my Patreon page. As I am travelling in the coming week, there will be no blog post next Monday. I will be visiting various Diocesan Museums in Germany and the Netherlands. All my Patrons will be able to virtually travel with me as I hope to be able to post some pictures along the way. There will also be a meeting of the Medieval Embroidery Study Group for my Master Patrons on Saturday the 2nd of December at 19h CET. Details can be found on my Patreon page. We have been exploring the embroidery and the iconography on the lone cope hood from the V&A (990-1888) in the past two weeks (part 1 & part 2). This week, I'll show you how to work a small embroidery sample based on one of the flowers seen on that cope hood. It is an exercise in both counted threadwork and free-hand embroidery. It also teaches you to work goldwork embroidery on top of a base layer of goldwork embroidery. This was common practice in late-medieval goldwork embroidery. It is often done to hide the ends/turns of gold threads and it adds some depth. Below is a summary of how the sample was probably originally stitched. Journeyman and Master Patrons can download a 9-page PDF with detailed instructions.
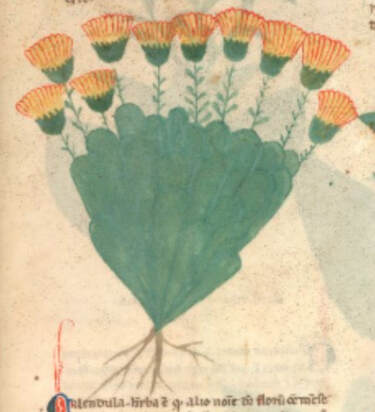
My clever husband happened to have a book on medieval flowers and was able to identify one of the flowers on the original cope hood as marigolds. The Egerton Manuscript from c. AD 1300 (MS 747, f. 30r) shows a drawing of the marigold that is quite comparable to the embroidered version. The embroidered version is about 3,5 cm high, and the detail is amazing. As you can see in the original, the marigolds are stitched on top of a layer of Brick Stitches (upper part) and Burden Stitch (lower part). These are both counted thread techniques. The foundation thread for the Burden Stitch (a passing thread) also runs under the Brick stitches. It is just being ignored. It is needed under the Brick stitches as padding. If you omit it, this section will be flatter compared to the Burden stitches. As the gold thread is (nearly) completely covered by the Brick stitches it shows that the price of gold thread had come down considerably by the end of the medieval period.
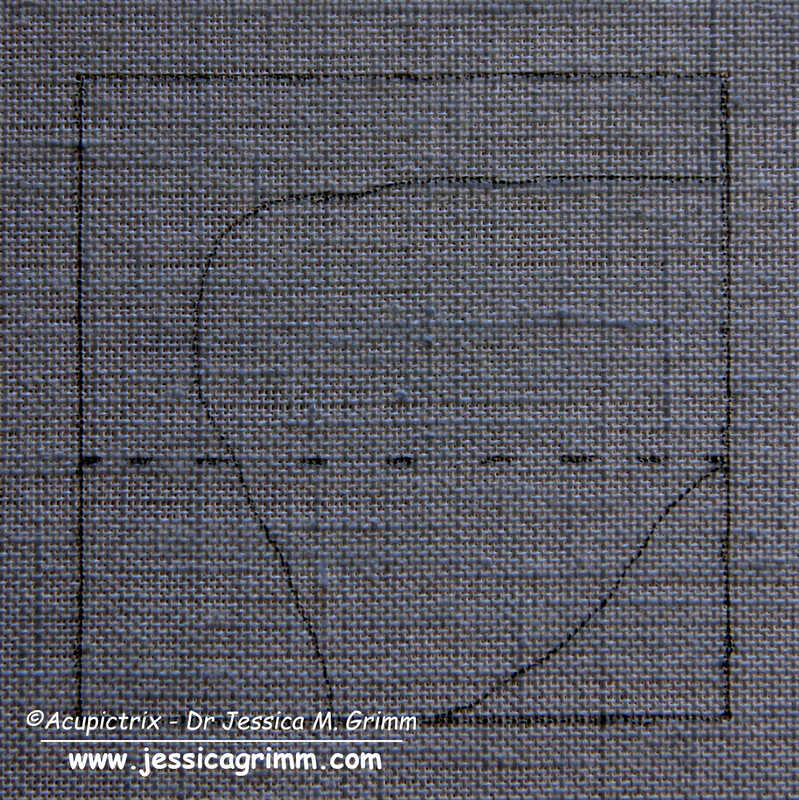
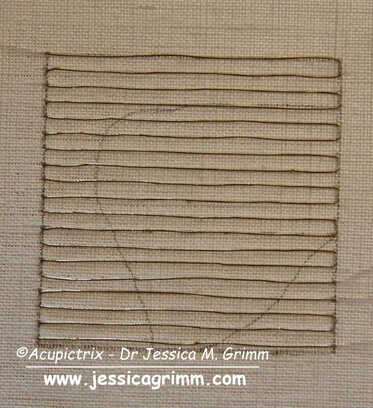
Start your sample by drawing a 5 x 5 cm square on the grain of the fabric. You can also add guidelines for the shading and for when you want to change from Brick to Burden stitch. I am using a 46 ct linen, Stech vergoldet 80/90 (comparable to passing thread #4) and Chinese flat silk from Oriental Cultures. Start by laying the passing thread foundation. My passing threads are spaced 5 fabric threads apart.
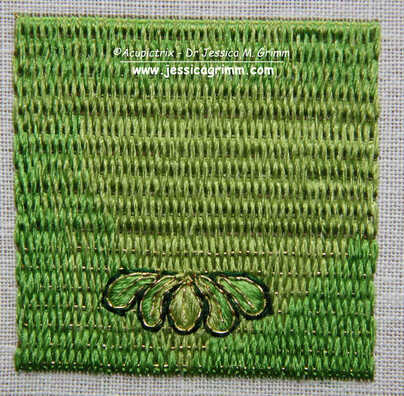
Once your base layer of Brick and Burden stitches is in, the fun free-hand part begins! And this is where each sample will become truly unique. Start with outlining the five green leaves. I've used a simple back stitch, but you can also use stem stitch. These are then filled with a few satin/straight stitches. On top comes an outline and vein (stitched in one go) in couched gold thread.
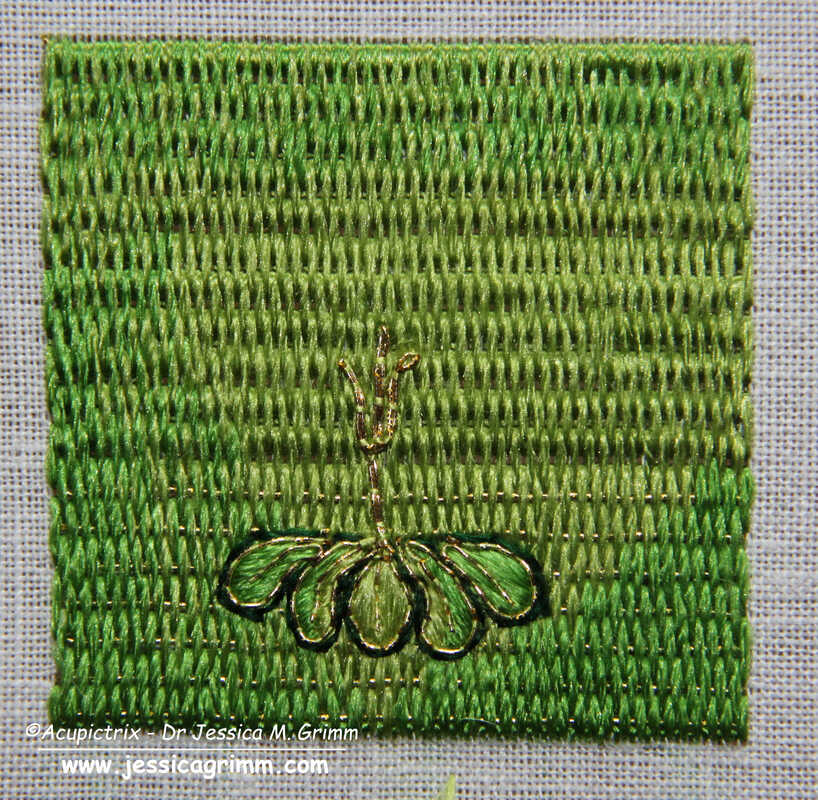
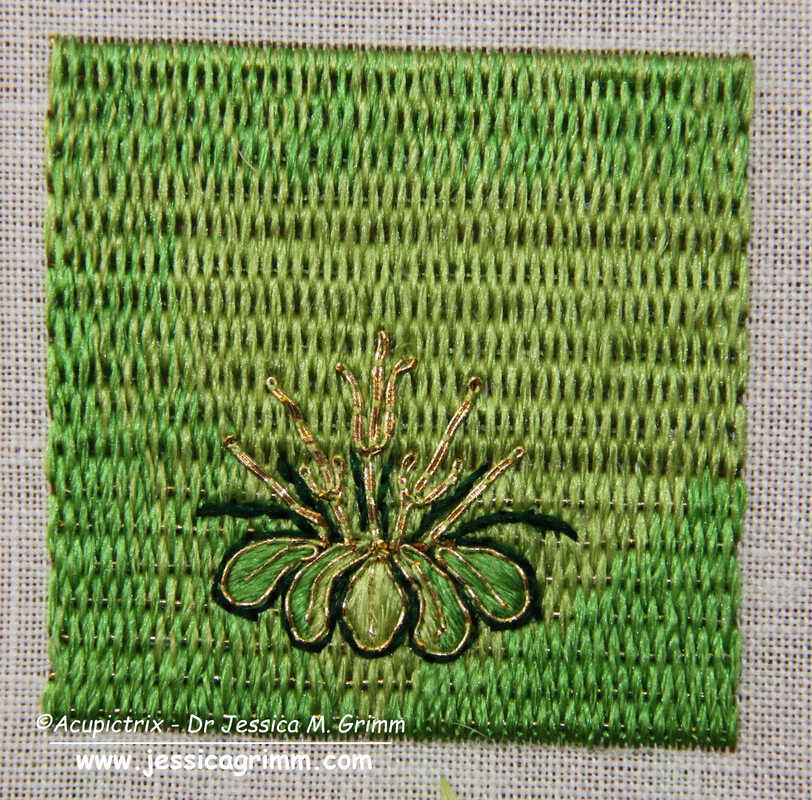
Next up are the stems. They are made of gold thread. Start at the top (where the flower attaches) and separate the two threads to form a leaf on either side of the stem. Re-unite the threads again to form the bottom of the stem. Add dark green stems for a bit more definition. I've used stem stitches. 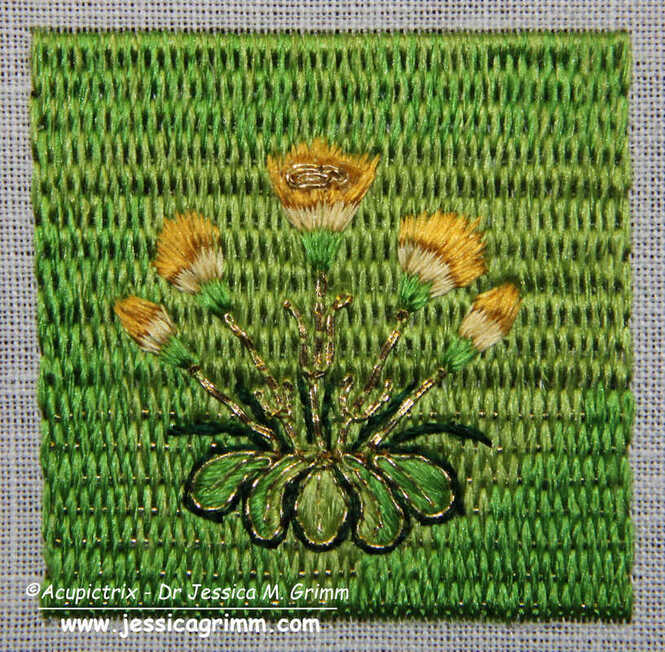 The flower heads are stitched in long-and-short stitches (i.e. split your stitches). Start with the green bits at the bottom. Then add the light-yellow bottoms of the petals and end with the dark yellow tops. The central flower gets a flower heart made of a couched piece of gold thread. And that's your marigolds finished! Mine turned out more like dandelions ...
One of the things that amazed me when I was whipping up this embroidery sample, is the fineness of the original embroidery. My rendition looks bulky in comparison. Another hint that the original cope hood was once part of a very high-end vestment intended for an important clergyman and/or church! Literature Fisher, C., 2007. The Medieval Flower Book. The British Library, London. Currently, I am mainly working on my orphrey background. I will be teaching this design at the Creative Experiences in June. For the past couple of years, I have always combined written instructions with video. This seems to work well for my students. However, as the apartment next door is being gutted and then put back together again, my stitching and recording are very dependent on when the workmen are quiet :). So, let's check in on my progress. 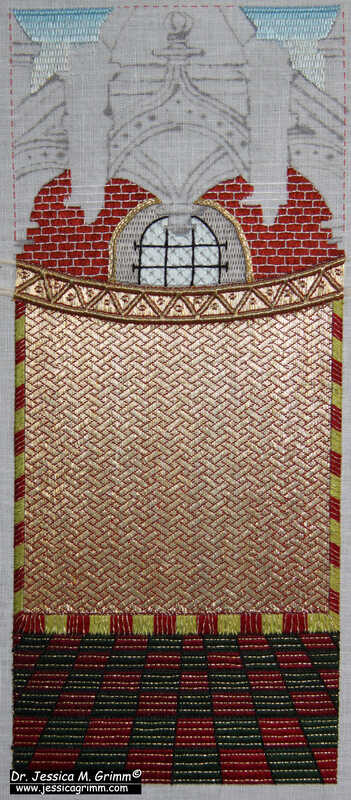 Recreated orphrey background in goldwork and silk embroidery As you can see, the tiled floor is in, the wall with the window has been completed, the sky was added and the basis of cloth of gold with the diaper pattern is in. The cloth of gold needs some minor further embellishment. I was going to do that today, but alas, the workmen are plastering, and it sounds like they are standing right next to me :(. Let's aim for tomorrow! The diaper pattern has been a terrific candidate for demonstrating goldwork embroidery at my local open-air museum Glentleiten. People were fascinated by the simplicity of it and the lovely effect achieved. I even managed to get people hands-on involved. Two young girls, aged 8 (!), plunged right in and happily stitched a row on my orphrey. In the beginning, they stabbed around a bit before they found the correct hole with their needle. But I kid you not, after about 5 stitches their hand-eye coordination caught up and it all went very smoothly. By the way, I am happy for interested people to work on my orphrey. They can't really break anything. And it is much more fun than when you stitch a mock-up row on the side somewhere. Equally, I don't believe in doodle cloths. But that's a different story :). Would you be happy for strangers to have a go at your embroidery project?  Burden Stitch using flat silk over a single passing thread My orphrey background also contains a technique I had not tried before: Burden stitch over gold thread. It is used in the sky. I was familiar with Burden stitch but was a bit sceptical about the gold thread. When you are working the stitch it almost completely disappears below the silk. So, my thought was: "at least the texture is pretty". However, when the Burden stitched area catches the light it really glows! It never ceases the amaze me how little light, natural or artificial, goldwork embroidery needs to reveal its full potential.
Have you ever worked Burden stitch over a gold thread in any of your projects? Would you like to have a go? My Journeyman and Master Patrons find handy PDF instructions on my Patreon page! |

Want to keep up with my embroidery adventures? Sign up for my weekly Newsletter to get notified of new blogs, courses and workshops!
Liked my blog? Please consider making a donation or becoming a Patron so that I can keep up the good work and my blog ad-free!

Categories
All
Archives
July 2024
|


 RSS Feed
Contact: info(at)jessicagrimm.com
Copyright Dr Jessica M. Grimm - Mandlweg 3, 82488 Ettal, Deutschland - +49(0)8822 2782219 (Monday, Tuesday, Friday & Saturday 9.00-17.00 CET)
Impressum - Legal Notice - Datenschutzerklärung - Privacy Policy - Webshop ABG - Widerrufsrecht - Disclaimer
Copyright Dr Jessica M. Grimm - Mandlweg 3, 82488 Ettal, Deutschland - +49(0)8822 2782219 (Monday, Tuesday, Friday & Saturday 9.00-17.00 CET)
Impressum - Legal Notice - Datenschutzerklärung - Privacy Policy - Webshop ABG - Widerrufsrecht - Disclaimer