|
With me moving house last year, I just wasn't settled enough to start stitching on the orphrey background for the Alpine Experience any earlier. I knew what I wanted to stitch and knew which colours to use. Finding the right mindset to start stitching, took a little longer. But I finally bit the bullet! So, expect regular update posts on the orphrey in the coming months. Today we'll start with the design, frame setup and the first bit of stitching. My Journeyman Patrons can download PDF instructions for the stitching part. 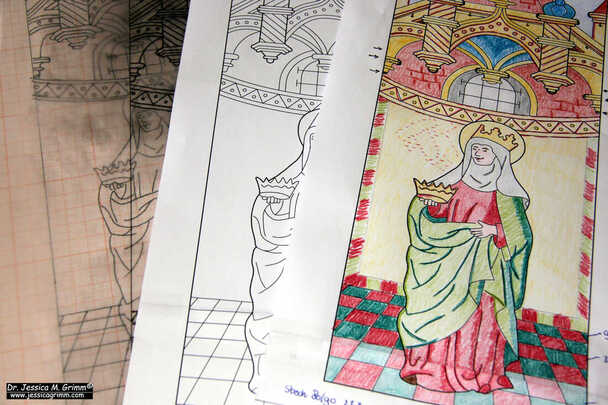 The design is a combination of elements found on a series of orphreys on a chasuble held at Museum Catharijne Convent in the Netherlands. Although this time, I will only teach the orphrey background, it can be combined with the or nue figure of Elisabeth of Thuringia which I taught last year. However, both projects can be stand-alone embroideries. To reflect this, my stitched version of the orphrey background will completely omit the space for a figure. 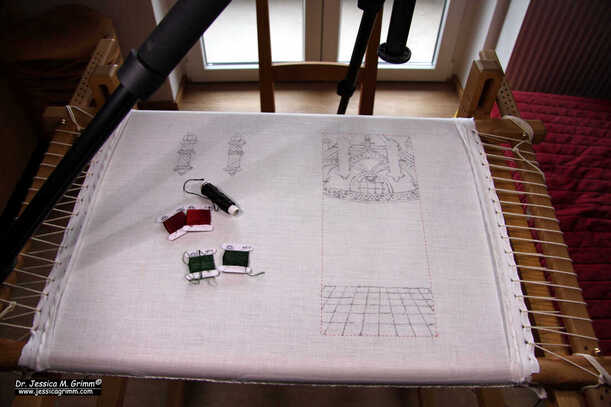 I've set up my slate frame with a piece of 46 ct even-weave linen. The design has been transferred using traditional prick and pounce. Instead of paint, I have used ink and a brush to connect the pounce dots. Although ink spreads a little, I prefer it above paint. In most cases, paint will flake off during stitching. Getting the consistency just right so it doesn't, is extremely difficult. Ink seeps into the fabric and thus cannot flake. The first element I have stitched is the famous tiled floor. It is easy embroidery and perfect for the start of such a large project! Medieval embroidery often consists of several layers of stitching worked on top of each other. The tiled floor is no exception. On the one hand, this helps with adding a sense of depth. The finished embroidery is less flat. On the other hand, it allows the embroiderer to hide the ends of his threads. Exposed thread-ends, however well secured, might with time unravel. 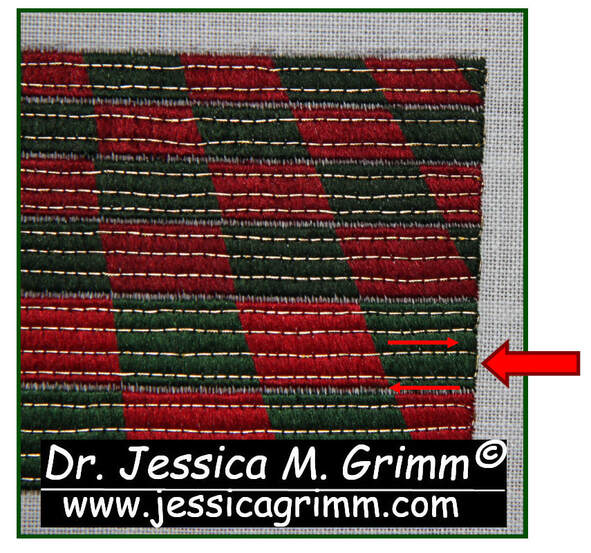 In the name of durability, having as few starts and stops of the gold threads as possible is also important. Our tiled floor is a prime example of how this was achieved. The rows of gold thread consist of a single thread of passing thread. There are only two tails or exposed thread-ends: one at the start and one at the end. The thread 'travels' on the front along the edge of the tiled floor. By making sure that you have this 'turn' laying nice and flat, you can hardly see it in the finished piece. In addition, this edge is covered with a red ribbon in the original medieval piece. Clever, isn't it?
8 Comments
A couple of years ago, I saw the so-called Wolfgang's chasuble at the Diocesan Museum Regensburg (you can read my blog about my 2015 visit). It had this lovely embroidered cross with birds and a four-legged animal amidst scrolling foliage. Although the goldwork embroidery is quite damaged, it is clear that it was once a very high-quality piece of medieval goldwork and silk embroidery. Its design would make for a lovely (online) embroidery class. I've asked my husband to clean up one of the bird designs and this is what he came up with.  Wolfgang's chasuble part of the Regensburg Domschatz (Inv. Nr. D 1974/101) made shortly after AD 1050 in Regensburg. The original embroidery was made shortly after AD 1050, probably in Regensburg. A royal residency at the time, Regensburg likely housed the royal workshops when the court was in residence. The way this embroidery, and indeed the whole garment, was made differs markedly from most contemporary pieces. Those pieces are usually all over embroidered and the embroidery is directly worked onto a precious silken fabric or a linen fabric. Good examples of these are the Imperial Vestments, the Uta chasuble and the vestments from Saint Blaise now held in St. Paul im Lavanttal. Many heyday Opus anglicanum vestments also fall into this category. Not so Wolfgang's chasuble. This one has a strip of separately worked embroidery adorning the precious silken vestment. This would become the way forward for the rest of the medieval period and beyond. It is essentially the birth of the orphrey. These smaller pieces of embroidery were far more manageable and could be prepared in advance. Goldwork embroidery could move out of the specially equipped royal workshops and into, probably smaller and simpler, commercial workshops in the emerging towns. 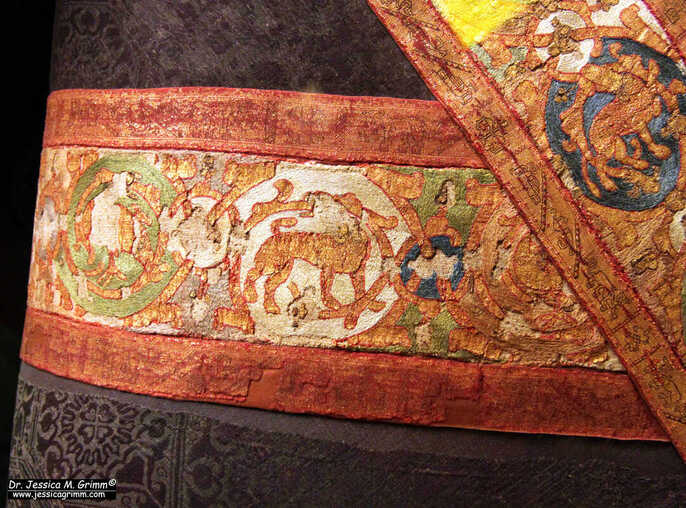 Detail of the goldwork and silk embroidery on the Wolfgang's chasuble (Domschatz Regensburg, Inv. Nr. D 1974/101). But we can clearly tell that the process of 'how to make an orphrey' was not yet set in stone. In this case, the embroidery seems awfully complex when it comes to its backing fabrics. What had the embroiderer done? It started with a piece of natural coloured silk twill/samite on top of a fine linen. All goldwork embroidery (and probably the stem stitch outlines) was worked that way. Then the piece was backed again with an extra layer of linen before the fine silken split stitches were worked. Curious don't you think? I was told that you back your embroidery when the stitching is particularly heavy. That would be the goldwork and not the silk. Just imagine the sore fingers from pushing a fine needle with silk through three layers of fabric... But I have an idea why the extra layer of linen was added: stiffness. Later, orphreys were routinely backed by gluing recycled paper on the back or simply stiffening the back with a layer of glue.  Design drawing for the goldwork and silk embroidery class. This design is now available as a self-paced online class. The class includes video instructions, a downloadable PDF with instructions and a full kit with authentic materials. You can order your class here.
Are you interested in medieval goldwork embroidery? If yes, you might be interested in two upcoming events I am co-hosting. On the 16th of May, I will be giving a one-hour workshop through Zoom for the Diözesan Museum of Bamberg as part of the Internationaler Museumstag. And on the 1st of December, I will be giving a lecture as part of the San Francisco School of Needlework and Design's lecture series. 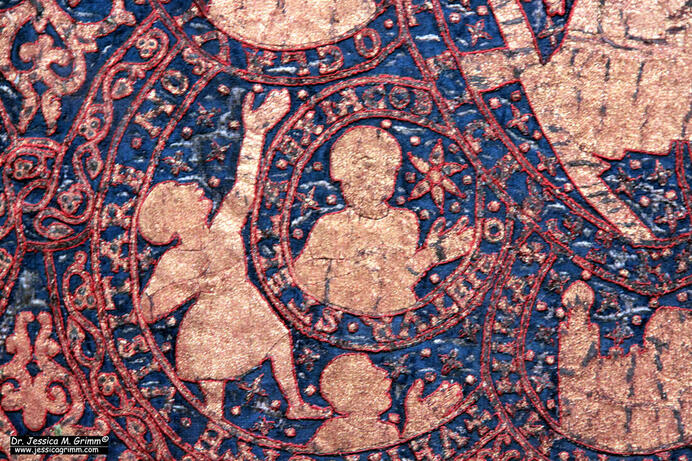 Detail of the goldwork embroidery on the blue Kunigunde mantle The Diözesanmuseum of Bamberg has asked me to create a beginner's goldwork workshop inspired by their Kaisergewänder. I've taken a small star from the blue Kunigunde Mantle (stitched around AD 1014). The little star is part of the central design in which the antiphons and responses of the Christmas liturgy are depicted. The text around the bust with the star reads: "orietur stella ex iacob" (a star out of Jacob). The little star will be stitched with gilt passing thread and silk onto a heavy silk twill backed with calico. The original star is about 3.3 cm high. The workshop version is about double that. 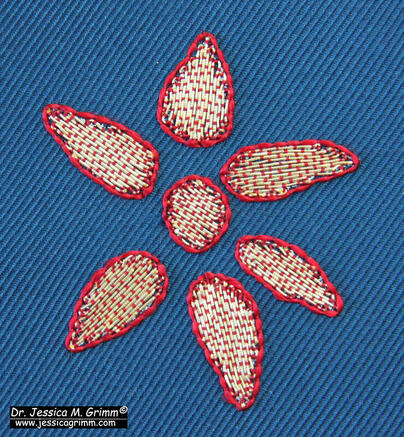 Attending the workshop is free and held in German. However, since the material pack needs to be mailed to you, only residents of Germany can attend. Sorry! That said, I am pondering the idea of turning this into a kit using the real goldthread with the silken core (that's what I actually used in the picture above). Just let me know if you would be interested by leaving a comment below!
My love for embroidery stems from the fact that I like to work creatively with my hands. But equally important, I love the fact that I am part of a very old tradition. And last but not least, I have a love for beautiful and elegant things. When I teach embroidery, I foremost want to transmit a technique. It is important to me that my students learn to execute the technical part of an embroidery technique well. That's the way I was trained at the Royal School of Needlework and it suits my personality. 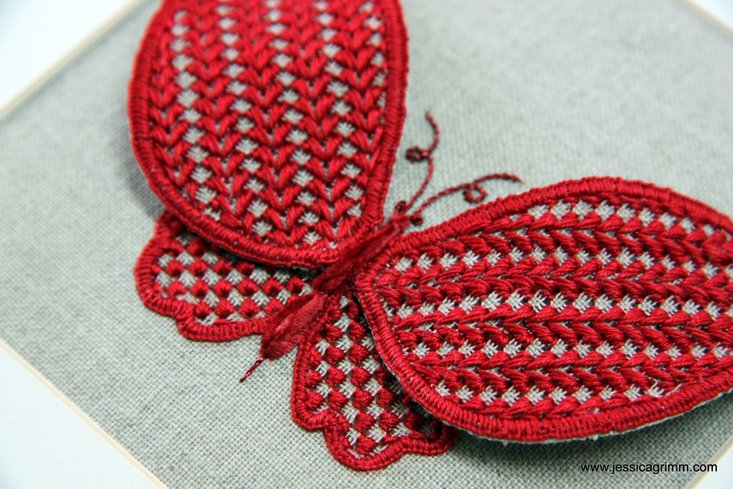 Schwalm embroidery meets stumpwork With my embroidery kits I try to think of an innovative way to use an ancient embroidery technique. I want you to be able to create a stunning piece of embroidery to go up on your wall. My beetle wing goldwork and stumpwork beetles are a good example of this concept. The latest addition to my series of embroidery kits is the 'Elegant Butterfly'. This kit has a modern take on Schwalm embroidery. Originally, Schwalm embroidery is a form of whitework from the Hessian region of Germany. You can read all about it on Luzine Happel's blog. She is a master craftswoman regarding this lovely technique. Don't be put off by the term whitework. It is nothing like the very fine embroidery seen on handkerchiefs or the like. Think more Hardanger embroidery. But then less geometrical in its shapes. Schwalm is usually floral, uses chain stitch, buttonhole stitch and coral stitch extensively. And, best off all in my opinion, comes with hundreds of different geometrical filling stitches! You won't be easily bored and it is relatively easy on your eyes. 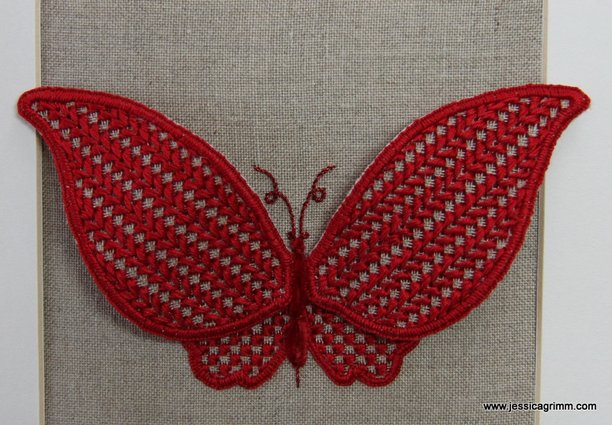 Schwalm embroidery meets stumpwork My elegant butterfly uses the traditional cotton a broder #25 used in Schwalm embroidery. You'll stitch on beautiful 40ct Zweigart Newcastle linen. That's the traditional part of my design. I've also added in DMC Diamant metallic thread and hand-dyed silken chenille by the Thread Gatherer. A perfect opportunity for you to play a little with these speciality threads. Furthermore, I've discovered that traditional Schwalm embroidery and the wired-shapes technique used in stumpwork embroidery are a match made in heaven. Pair your finished and mounted elegant butterfly embroidery with a Ribba frame from IKEA and you have stunning unique and hand-made home-decoration!
Today we are going to have a look at a few embroidery pieces my students work on. As I have only two hands and there are only so many hours in the day, tutoring others to embroider is THE solution. It is the perfect way to see some of my ideas put to work, without me actually stitching them :). First up is a crewel piece by Elisabeth Stix, which was started during one of my crewel embroidery courses. Please note: I no longer offer these courses. 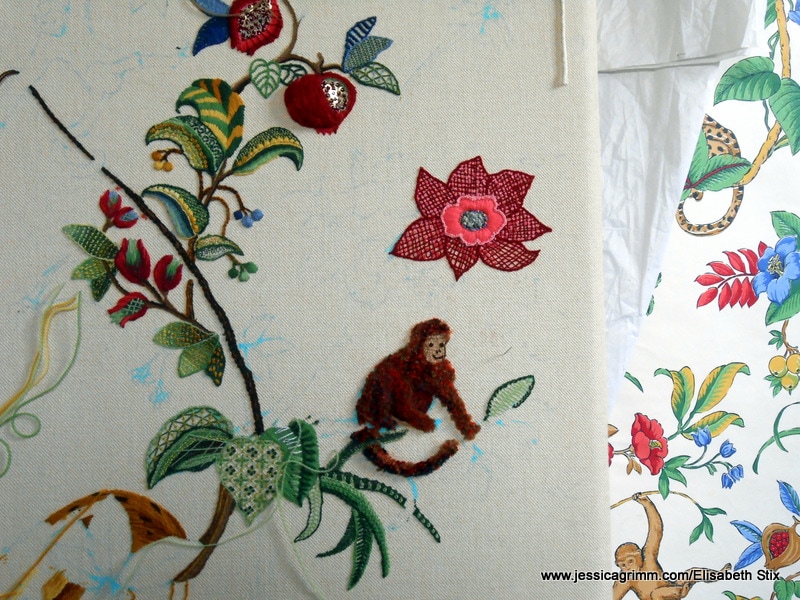 Elisabeth's piece is really big. It has been inspired by a beautiful piece of wall paper. You can see a glimpse of it on the right in the above picture. Elisabeth works on and off on this epic piece. Just stitching what takes her fancy. She mainly uses Heathway Milano crewel wool, but beads and other threads are also included. 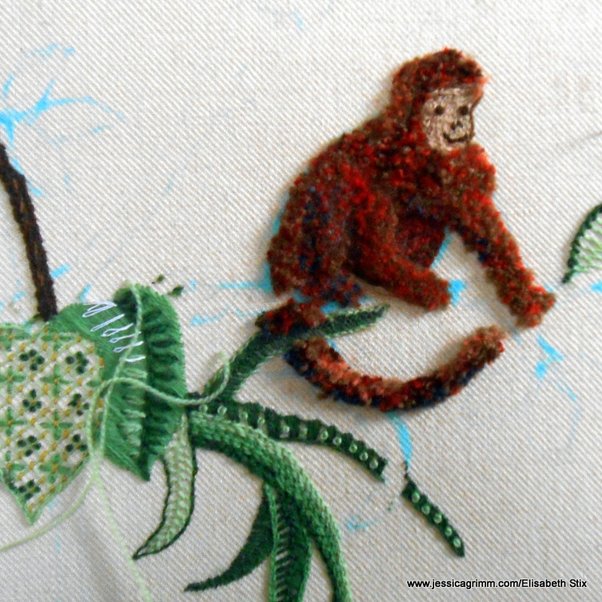 Latest addition to the piece is this adorable monkey in Turkey rug stitch. He is just such a lively chap amongst all the greenery! And I love the fact that his coat is so nicely mottled. Elisabeth must have had great patience whilst filling such a large area with Turkey rug stitch. And a lot of courage cutting it into shape :). 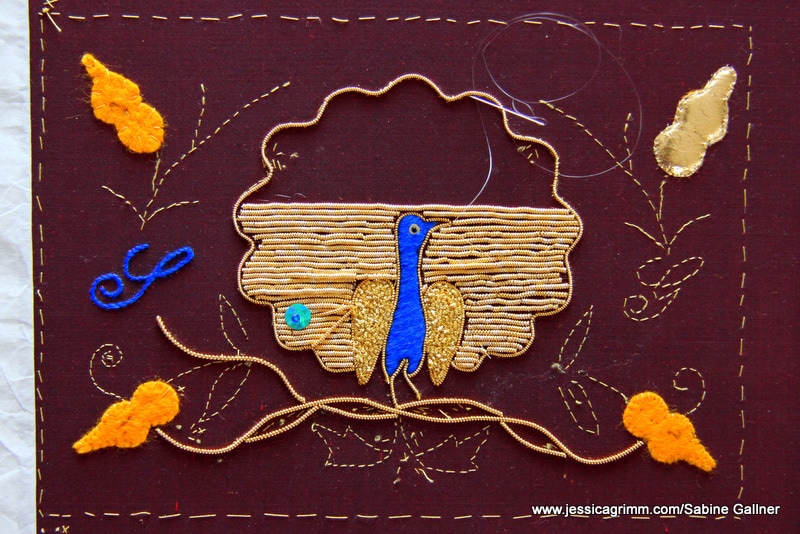 Next up is Sabine Gallner's peacock clutch bag in the making. This piece was started during my goldwork embroidery course a few weeks ago. Although it was originally inspired by an antique clutch bag, we have moved away form an exact copy. It is quite a challenge to use these long stretches of wire check to fill the peacock's tail. They later get secured with pearl purl and a blue spangle with a bead. You can get the idea from the one in the left-hand corner. This will be a real showstopper once finished!
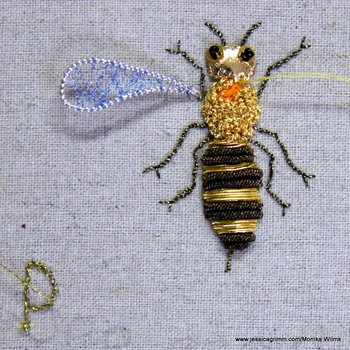
And last, but not least: two creative bees made during yesterday's goldwork embroidery workshop. The left bee was stitched by Monika Wilms. She is now planning to stitch a larger floral-with-creepy-crawlies-piece which will combine stumpwork embroidery and goldwork embroidery. So looking forward to mentor her on that one!
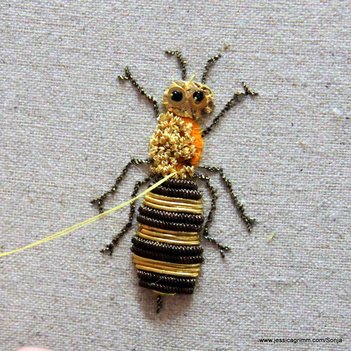
The bee on the left was started by Sonja, a lace-making friend of Monika and Sabine. Sonja had not embroidered in a long time and had never done any goldwork embroidery. I think she did a terrific job! |

Want to keep up with my embroidery adventures? Sign up for my weekly Newsletter to get notified of new blogs, courses and workshops!
Liked my blog? Please consider making a donation or becoming a Patron so that I can keep up the good work and my blog ad-free!

Categories
All
Archives
July 2024
|

 RSS Feed
Contact: info(at)jessicagrimm.com
Copyright Dr Jessica M. Grimm - Mandlweg 3, 82488 Ettal, Deutschland - +49(0)8822 2782219 (Monday, Tuesday, Friday & Saturday 9.00-17.00 CET)
Impressum - Legal Notice - Datenschutzerklärung - Privacy Policy - Webshop ABG - Widerrufsrecht - Disclaimer
Copyright Dr Jessica M. Grimm - Mandlweg 3, 82488 Ettal, Deutschland - +49(0)8822 2782219 (Monday, Tuesday, Friday & Saturday 9.00-17.00 CET)
Impressum - Legal Notice - Datenschutzerklärung - Privacy Policy - Webshop ABG - Widerrufsrecht - Disclaimer