|
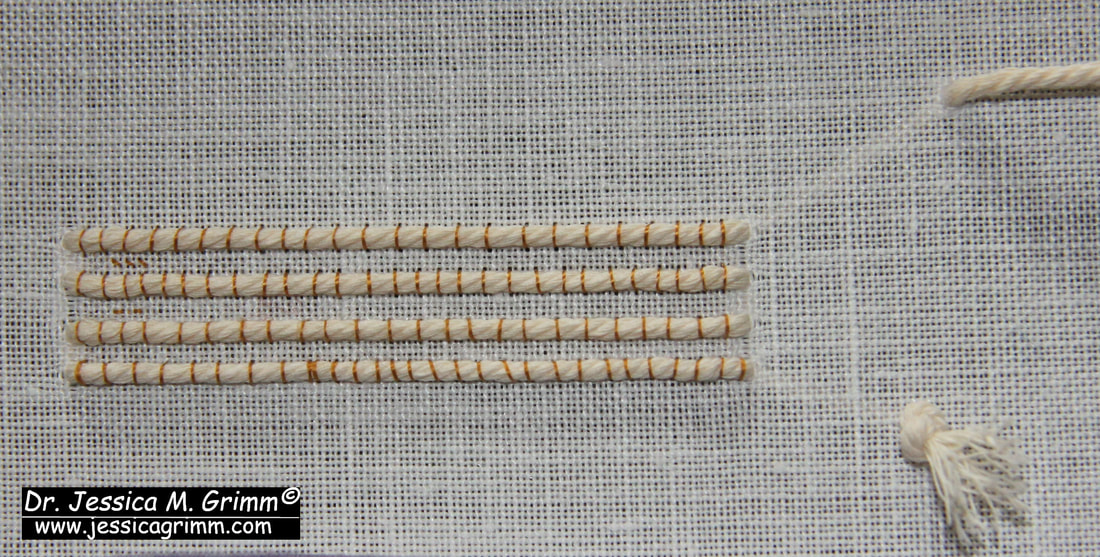
Before we dive into this week's tutorial, I want to remind you to sign up for my upcoming in-person embroidery workshop at the Cathedral Treasury in Halberstadt. This is your unique opportunity to stitch in the grounds of a medieval Cathedral with its beautiful cloisters, a location steeped in history and beauty. Enjoy in-depth discussions of the embroidered pieces on display with the curator, myself, and your fellow students. Getting to the beautiful historic town of Halberstadt is easy as it has its own train station. Internet platforms such as Booking.com provide booking travel arrangements and lodging in your own language. The past 14 years have shown me that organizing financially successful embroidery workshops in Germany or the Netherlands is almost impossible. Yes, the Halberstadt workshop has four attendants, which means that it does not cost me anything to teach. However, I am not earning anything either. As I am a business and not a charity, I do need to draw an income from my work. Therefore, I will not organize further in-person workshops if the count remains at four. Instead, I will concentrate on my partnership with Creative Experiences and my own online classes. Now, on to this week's tutorial: beaded needle minders with historical motifs. I have always been fascinated by historical samplers! When I lived near Rotterdam many years ago, I became a textile volunteer at a local museum in Maasland. They had a stunning collection of beautiful historical samplers. I had permission to reproduce them when life took me in a different direction. Since then, I have been captivated by the beauty of these old samplers and often wondered how I could use those motifs that I liked without stitching a whole sampler. Two weeks ago, I had an idea. Why not use individual motifs to decorate a needle minder? This could all have gone by without you knowing about my now somewhat sizeable production of needle minders. Alas, I am Gary and Jennifer's trusted side-kick on the Tour de Broderie, and the needle minders have gained quite some traction. So, let me show you how to construct these beaded beauties!  Tutorial: Beaded needle minders with historical sampler motifs For my needle minders I used: 40ct natural linen by Zweigart, variegated silks by Caron, Glissen Gloss, Gloriana and Flower Silk, thick template plastic, thin wadding, double-sided tape, polyester sewing thread, round 2 cm nyodem magnet and beads 11/0 and 15/0. However, you can use whatever you like. Solid colours in stranded cotton on aida would work just as nice. As I don't have a stack of reproduction sampler patterns at home, I did the next best thing: visit the Antique Pattern Library. Scroll down a little for 'Kreuzstich und Filetmustern aus Graubünden'. This is a collection of Austrian folk patterns published in 1927. Square patterns of about 30 x 30 stitches seem to work best for a 4 x 4 cm needle minder. But again, anything goes! And, when you are not too precious about your finished masterpiece, you can also use the larger motifs to make coasters. Just saying :).  Tutorial: Beaded needle minders with historical sampler motifs Cut two identical squares of the thick template plastic. They should be a bit bigger than your sampler motif. Cover one with the thin wadding. Either glue it on or use a piece of double-sided tape. You are going to cover this piece with your finished embroidery.
Have your finished embroidery face down. Center the plastic+wadding on it. You can either lace it on or stick it on with double sided tape (my preferred method). Make sure you follow the grain of the fabric as best you can.
I then simply folded the corners over. However, you can also mitre the corners when you prefer. Personally, I don’t cut any of the ‘folding bulk’ away. I like my needle minders chunky and not too fiddly to make :). Cover the bare piece of thick template plastic with a piece of linen in the same manner. Stick a magnet on the back. You can either buy magnets with a sticky side or you can use a piece of double sided tape with a regular magnet. Put both halves of your needle minder together. Use your polyester sewing thread and hide your knot between the two halves. Now slip (ladder) stitch both halves together. As this is a rather three-dimensional step, I have made a short video for you. You can stop here. You have a perfectly working needle minder.  Tutorial: Beaded needle minders with historical sampler motifs If you want to bling up your needle minder, add a beaded edge. It is worked in two stages. The larger beads are sewn on in such a way that they lay flat with their holes facing up. During the second stage, you will add picots by weaving through the beaded edge created in the first stage. This very three-dimensional work is also best explained in a short video (I call beads pearls sometimes, sorry!). Enjoy your needle minders!
Downloadable PDF-Instructions are available to my Journeyman and Master Patrons.
1 Comment
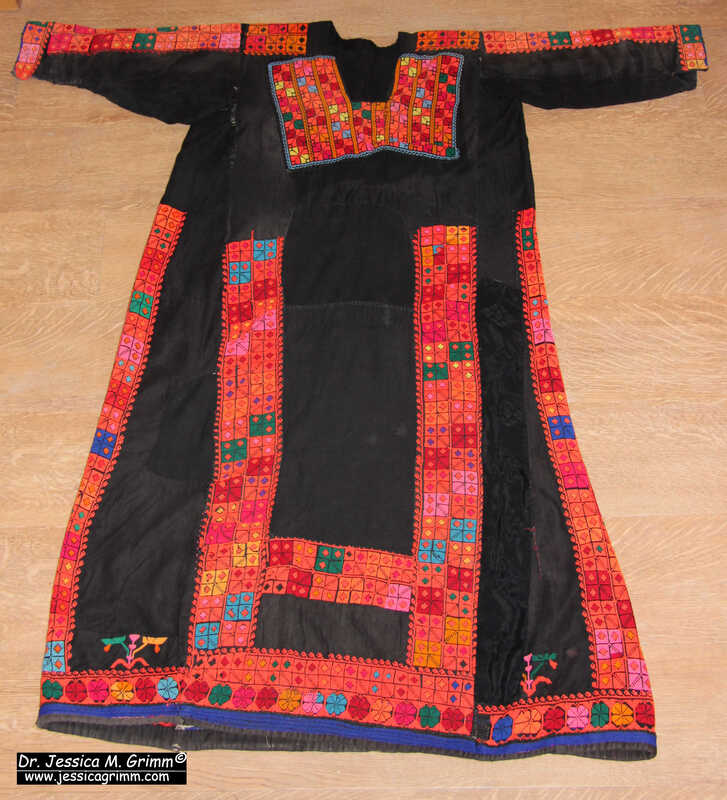
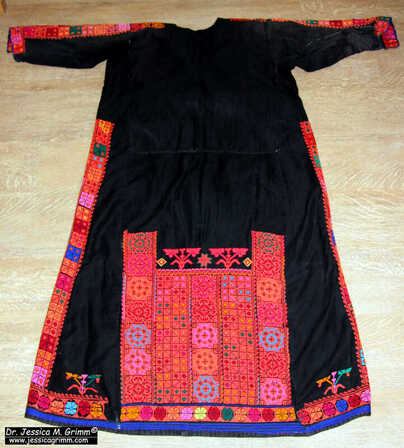
Apart from my passion for medieval goldwork embroidery, I am also interested in all kinds of folk embroidery. I particularly like the geometric cross-stitch patterns of Fallahi embroidery found in Egypt, Jordan, Syria and Palestine. A couple of years ago, I bought my first vintage Bedouin dress from Egypt and last year, I bought a second one from the same source:). I love dissecting these dresses and their very colourful patterns! And since I was without a proper internet connection for so long after we moved house in November, transcribing the cross-stitch patterns was one of the few things I could do as the software does not require an internet connection. So, let's unravel the mystery of another vintage Bedouin dress!
The dress, or thob, is 130 cm long and measures 125 cm across the arms. The dress originates in the Sinai (Egypt) and was once worn by an adult Bedouin woman. The satin stitched dark-blue hem differentiates the dress from Palestinian village dresses that do not sport such a hem. The Bedouin travelling lifestyle and the fact that this geographical area has seen a lot of political upheavals makes attributing precise provenance to the dress impossible. Over time, too much mixing has happened. However, certain characteristics do point to the Western part of the Northern Sinai, possibly Al-Qantara: wide neck opening, the use of many bright colours in simple geometric patterns of which some are based on the carnation. 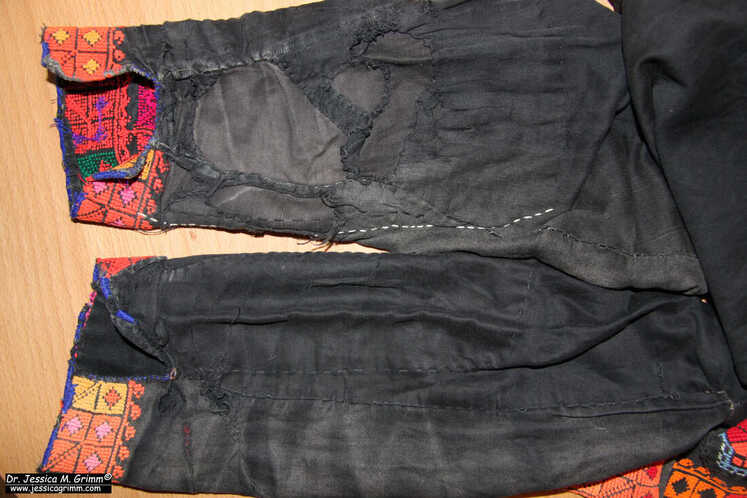 Worn cuff area of the vintage Bedouin dress. The dress has been patched many times. Especially in the cuff area. These dresses took a long time to decorate and were thus highly valued. Instead of throwing them away when they were worn, they were repeatedly patched. Recycling, upcycling and mending are usually the norm in pre-industrial societies. 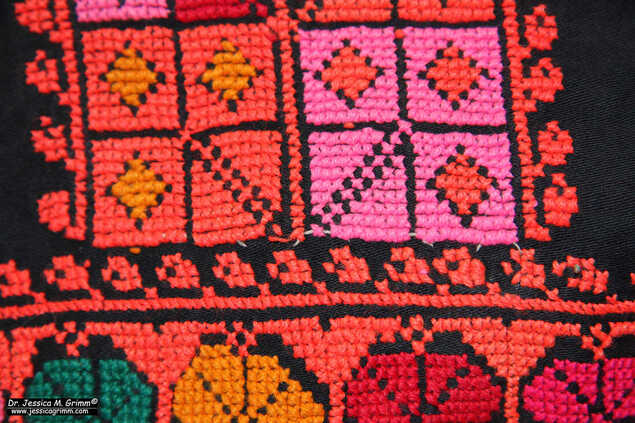 Remains of the white waste canvas used to do counted cross-stitch on a non-counted fabric. As most of you know, embroidering on black fabric is really hard. Especially for older eyes :). Therefore, the Bedouin women tacked a piece of waste canvas onto the black cotton satin or polyester fabric. In the picture above, you can see a few white canvas threads left in the embroidery.
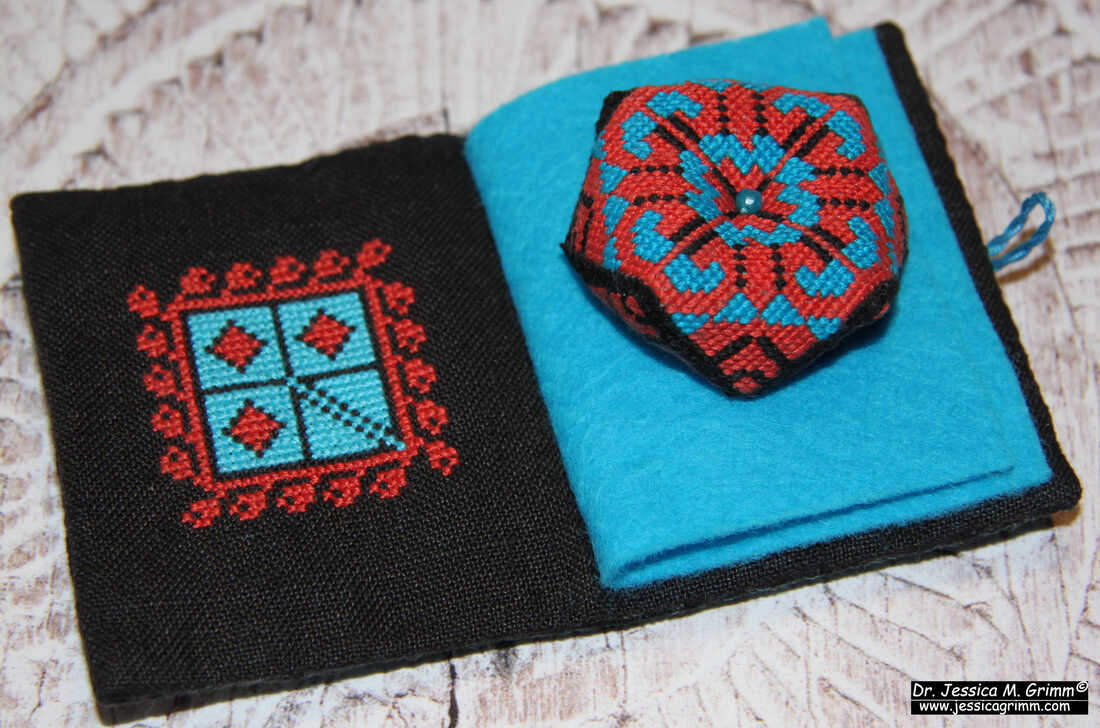
The cross-stitch patterns and bright colour combinations found on the vintage Bedouin dress are perfect for decorating needle booklets, pincushions and the like. I used three of the five patterns found on the dress to make a small needle booklet and a cute biscornu. For the stitching, I matched the original floss colours to the closest DMC stranded cotton equivalent. My fabric is a piece of 40 ct natural coloured Zweigart linen (I dyed some black in my washing machine).
You can find a 39-page eBook for direct download with more pictures and all embroidery charts of the five geometric patterns, three loose elements and a decorative border in my webshop. As most of you know, I do love cross-stitch. For me, it is the perfect antidote to working goldwork replicas of medieval pieces. Especially when that cross-stitch comes in the form of a kit. After all: somebody else has done all the thinking for me. I just need to follow the instructions. So when I saw the gingerbread mice by 'Just Nan' on Janet Granger's blog, I knew this was going to be the beginning of a new collection :). For those interested: I also collect the Mill Hill Santas. Since Janet showed off the gingerbread mice, I am going to show you the snow mice. Not care for snow nor gingerbread? Do not worry! 'Just Nan' has birthday mice and Halloween mice too. And a whole lot of other beautiful cross-stitch designs that are quite unusual. My mice came from 'Create Nostalgia' in the UK. Owner Mary Gittins provides a terrific and speedy service. 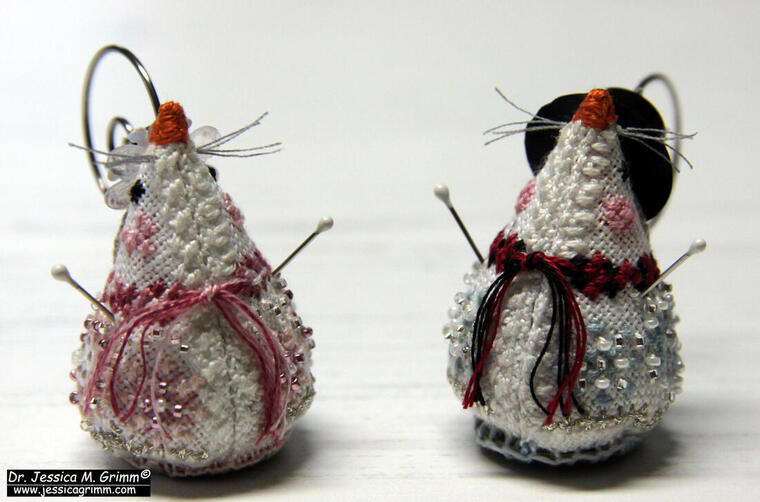 Mice designed by 'Just Nan' These are Mr and Mrs snow mouse. However, they have posher names too: Crystal Snowlady Mouse and Frosty Chillingsworth Mouse. Mrs mouse is the more intricate one to stitch and takes a bit longer. If you set your hands to it, you can stitch and finish a mouse a day. The finishing is easy, but a bit fiddly. After all, the mice are only 4,5 cm tall. Apart from cross-stitching (over two and over one!) on 32 ct linen, you will do some beading too. I think these designs are pretty genius and intricate.  Mice designed by 'Just Nan' Now, these mice are not sold as complete kits. And to me, that's a bit of a downside. For starters, my stash does not include a range of white and coloured 32 ct linen. That's too coarse for medieval goldwork embroidery. So I started by ordering pre-cuts for all my mice. After all, this is going to be a collection :). I did not bother with ordering the correct numbers of DMC stranded cotton or Kreinik metallic threads. I happen to have quite a few of them. Seldomly the correct numbers. However, I had a pretty clever stitching grandma who once told me that since Santa is primarily red, white and black, it does not matter if you use 321 or 666. Very good stitching advice indeed and works well for mice too. 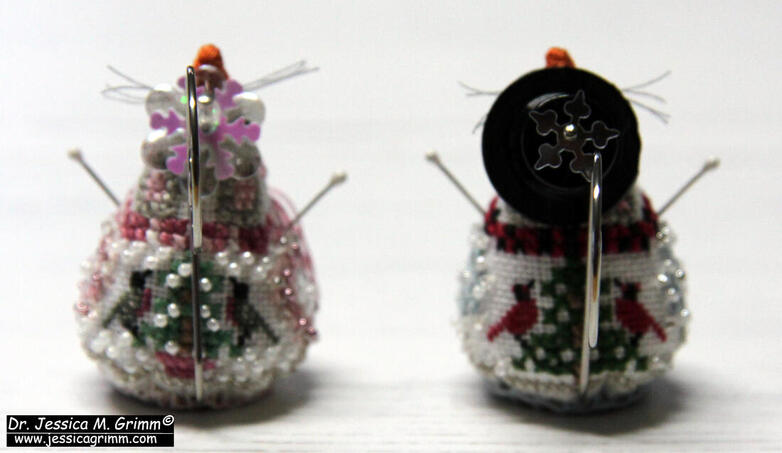 Mice designed by 'Just Nan' The patterns do include the beads, sequins, tails, stick arms, button and hats. Whilst there are enough beads in the package, the other elements only make you one mouse. And these are potentially parts that are not so easy to source. But I am pretty sure that there will be people in my inner circle who see my mice and start begging for one too. Since I am not going to give my prized collection away, I will have to come up with some clever substitutes. My husband will probably transform from head graphics to head mice tail maker :).
Whilst I really think these mice are pretty cleverly designed, there is one part on them that I am not too sure about: the mouse's bottom. It consists of a decorated metal button. You are supposed to attach it over the stuffing opening (this is getting hilarious!) with whipping stitches. As the button is shaped irregularly, your stitches cannot be regular. That bugs me. Buttonhole stitches with a thicker thread such as perle #12 or #8 look a bit better. However, it is still not the prettiest part of the mouse. I have had mice butts on my mind for days by now, but have not found a better solution yet. Any advice? Autumn is my favourite season. My husband does not get it. After all, it is cooler and it gets dark earlier. He is a typical summer person. Not me. Far too hot. Instead, I enjoy the bright orange, yellow and red colours of autumn. We have discovered a lovely hike up the Rohrkopf (1361 m). It is short but rather steep. And best of all: it offers lovely views over the castles of Neuschwanstein and Hohenschwangau. Many of you will have seen those famous postcards of Neuschwanstein surrounded by autumnal trees. The spot from which this picture was taken comes halfway up this hike. And when you arrive super-sweaty at the Rohrkopfhütte, they have the best Kaiserschmarrn (Emperor's Mess) ever! And when I return home after such a lovely hike, I like to cosy up with a piece of cross stitch embroidery. Lately, I have been embroidering pumpkins for my cupboard. 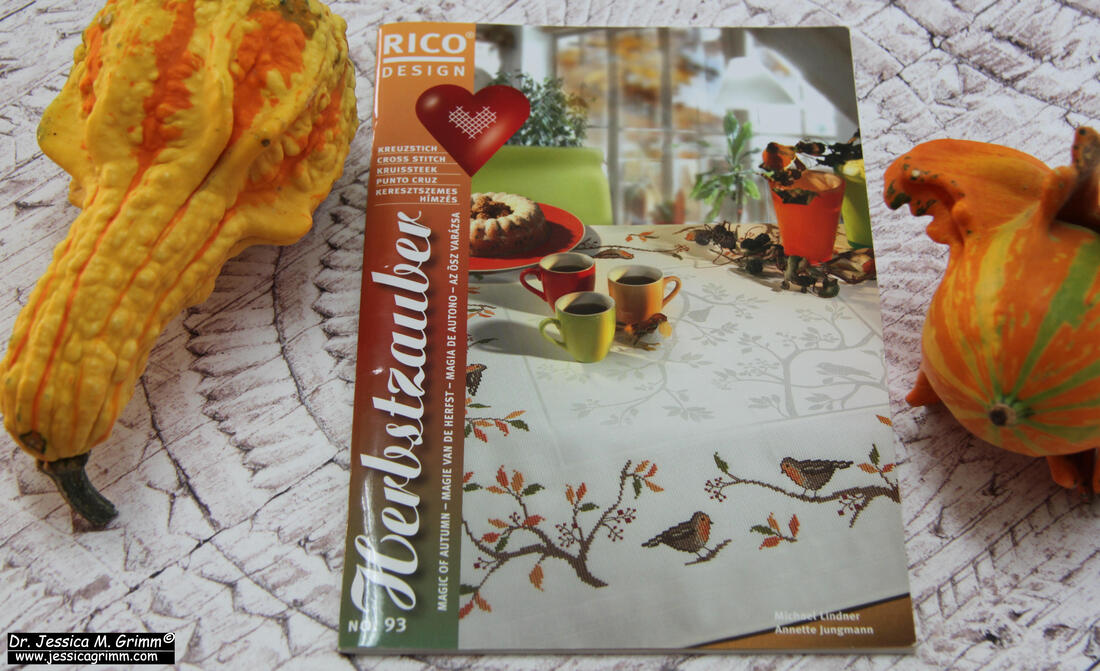 Rico pumpkin cross-stitch pattern The original pattern comes from a small Rico booklet with pretty seasonal cross stitch patterns. I have previously made a tablecloth with sheep and heather for my landlady's birthday. There are also lovely patterns of robins, a pattern of two adorable squirrels and patterns of autumn foliage and berries. The booklet arrived at my home about two years ago (complete with the appropriate prefab tablecloth for the sheep and the heather!) from a German lady who had heard through the grapevine that I am an embroiderer. She couldn't stitch anymore due to health reasons and she decided to make me a parcel with some of her stash. How sweet is that? Although the booklet was first published in 2006, you can still order it online. Search for 'Rico design Herbstzauber'. 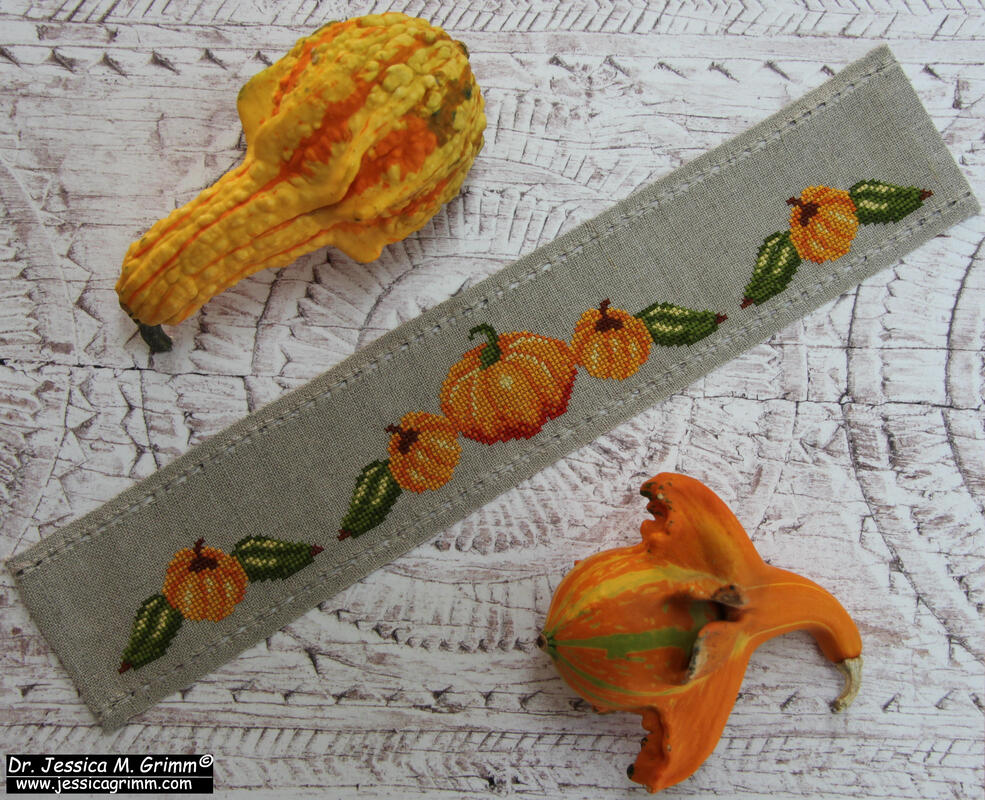 Rico pumpkin cross-stitch pattern As I needed quite specific sizes for to linen bands that were going to adore the planks in my cupboard, I redraw the original pumpkin design slightly. I also swapped the original Anchor stranded cotton colours for DMC. These are the DMC colour numbers I used: 744, 742, 740, 900, 581, 580 and 975. The linen banding is from Vaupel and Heilenbeck. Its height is 8 cm and it has 28 ct. 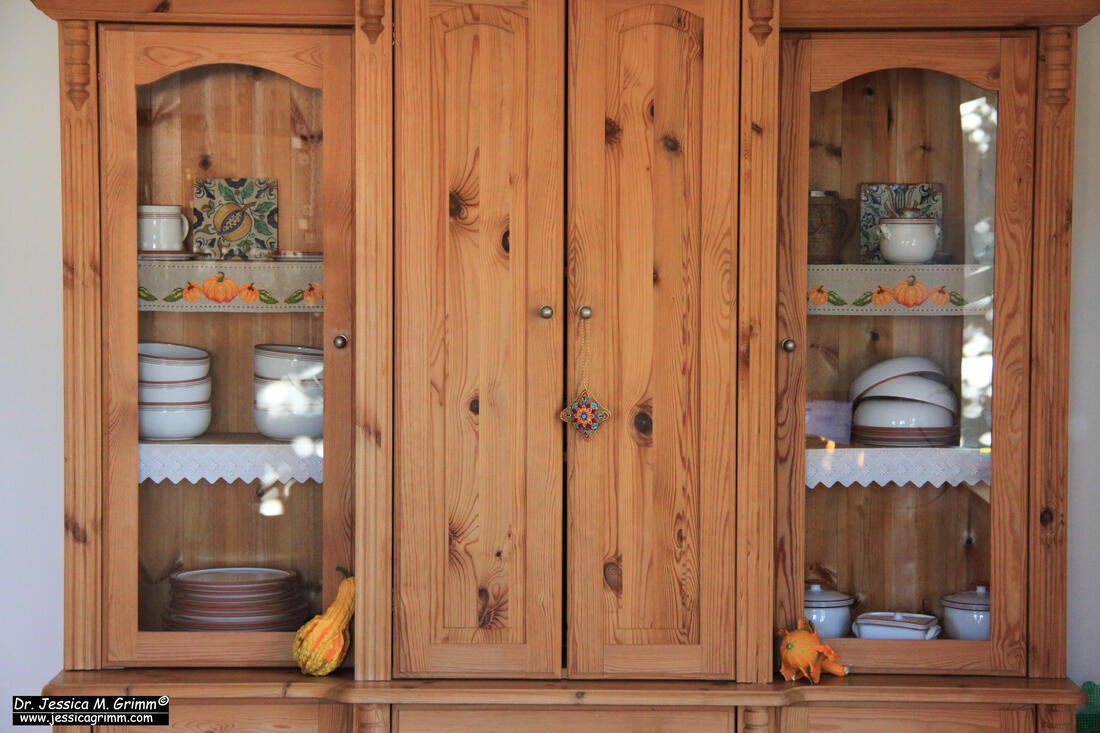 Rico pumpkin cross-stitch pattern And this is the result. As you can see, I still need to stitch two more bands to go onto the lower two planks of the cupboard. Since we will be hiking every week, weather permitting, I will certainly get them done soon :). Enjoy your stitching!
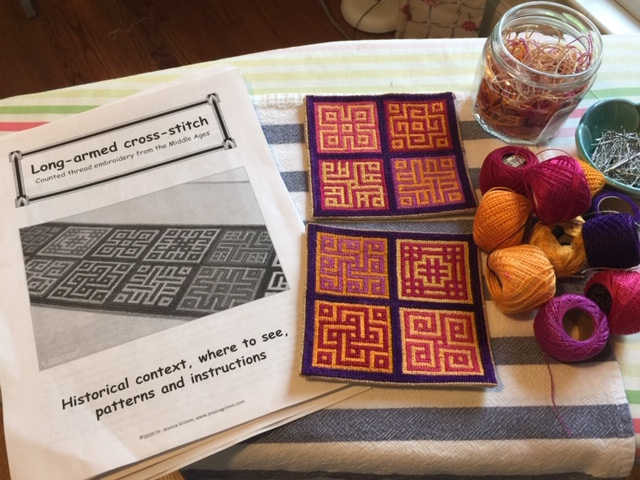
I was delighted when Gina sent me pictures of her biscornu showing some of the long-armed cross-stitch patterns from my latest eBook. Gina filled her biscornu with dried lavender. This is an excellent way of using these beautiful medieval patterns and stitch!
When I saw a picture of the beaded easter egg on the Fire Poppies website, I was immediately charmed by the pretty design. I had never seen anything like it. When my kit arrived, I found out that the company who makes them is called Riolis from Russia. The actual designer is called Anna Petrosyan. Pardon my ignorance, but I had never heard of either. I do however know that embroidery is huge in Russia and that there are many talented designers living there. I just wished there wasn't such a language barrier! 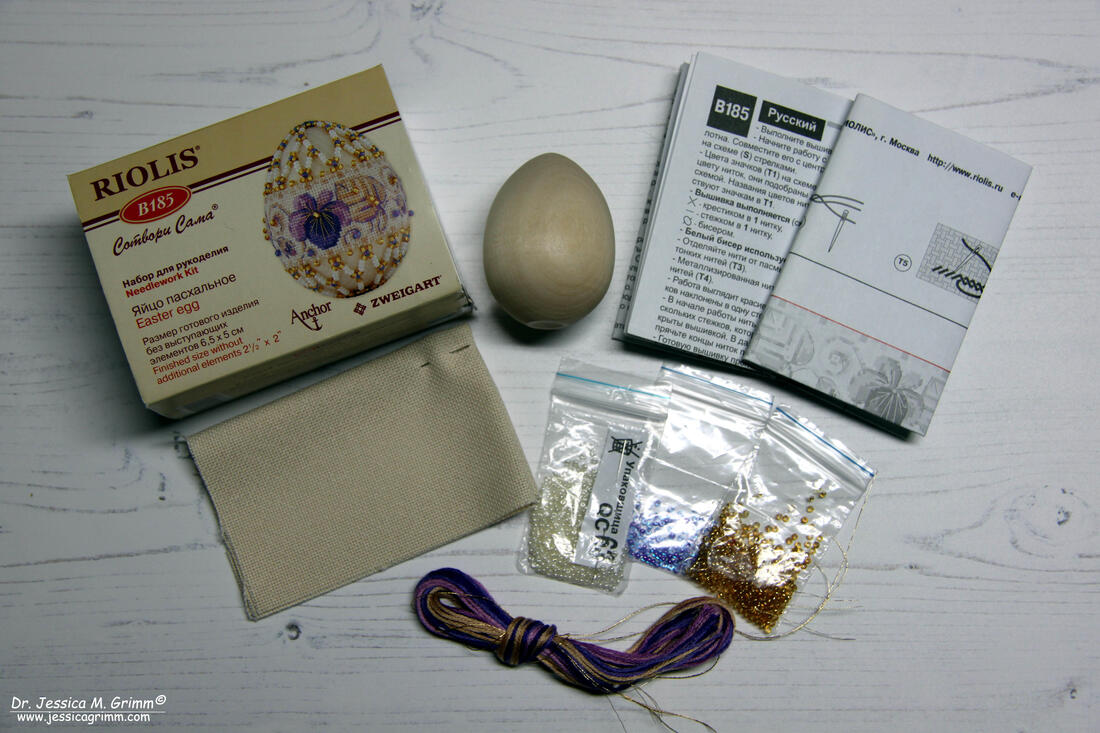 Easter egg kit by Riolis embroidery My easter egg kit came with most of the materials needed to finish the design. I just needed to add sewing thread and beading thread. Fabric, floss, beads, needles and wooden egg were all included. And everything was very good quality too. Fabric came from Zweigart and Anchor supplied the floss. The instructions were very good too. With clear diagrams and an adequate translation into English. Not perfect, but very doable if you are anything other than an absolute beginner. 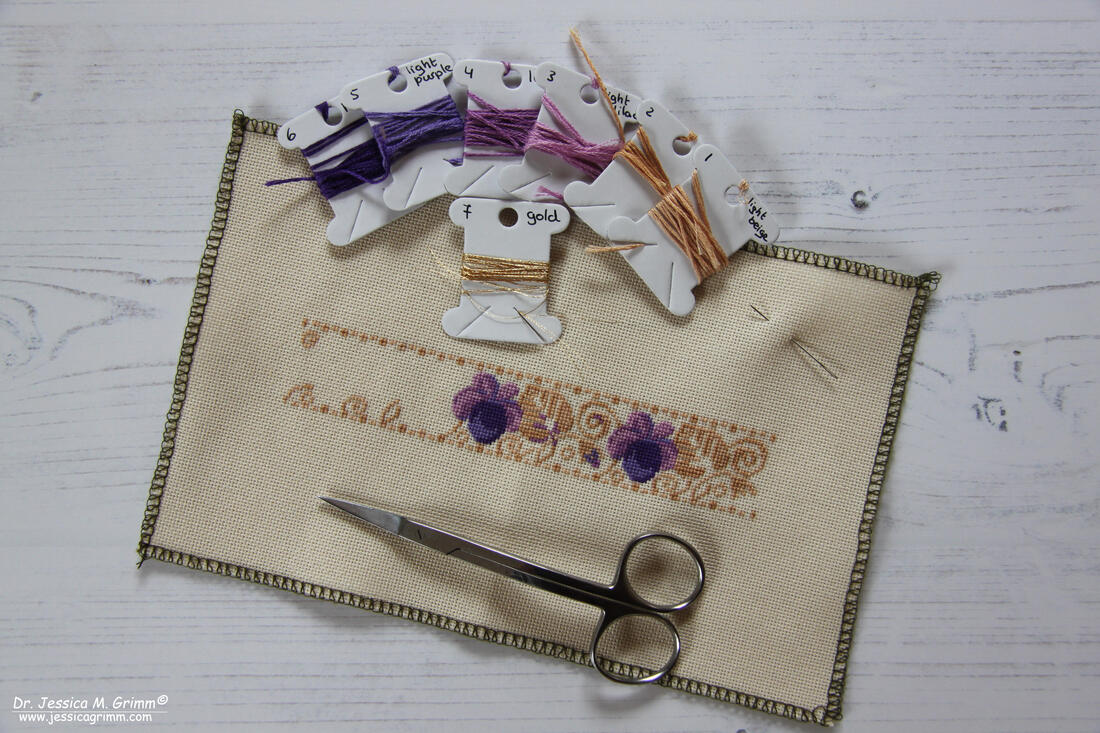 Easter egg kit by Riolis embroidery As always, I started by locking my fabric to prevent fraying. I also wrapped my floss onto some paper bobbins. The actual embroidery was very straight forward working with one strand of floss over one fabric thread (Zweigart Lugana). This explains why the finished embroidery looks so very refined. 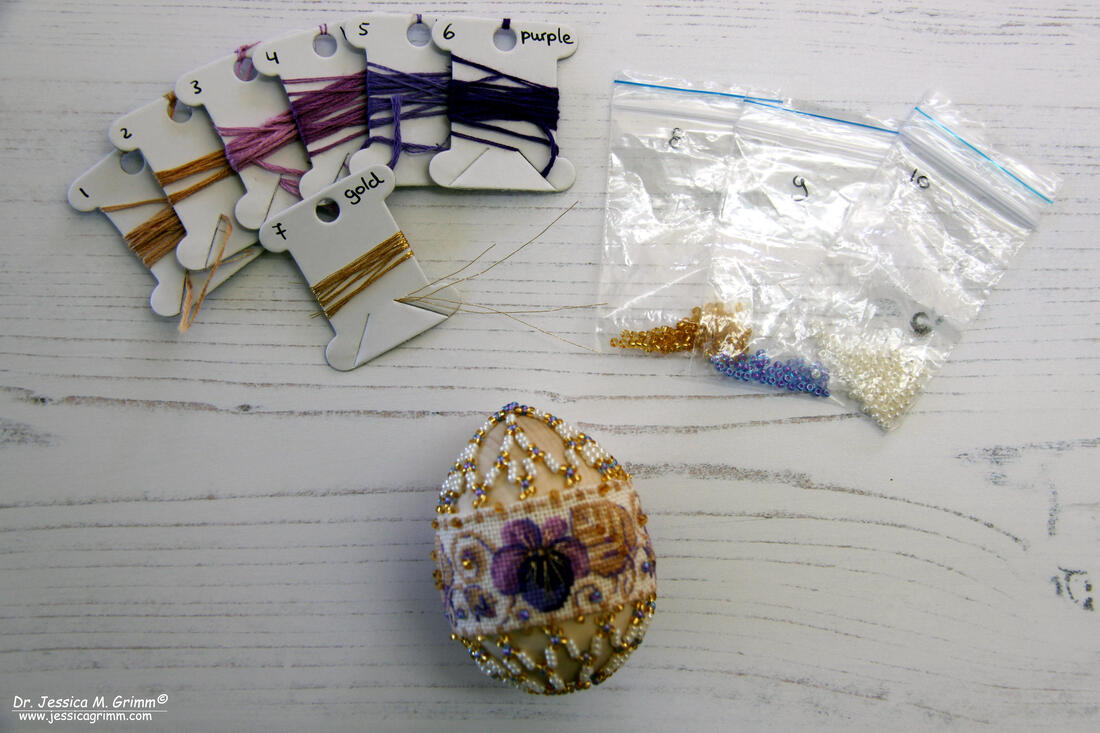 Easter egg kit by Riolis embroidery When it came to the construction of the actual egg, I had some minor difficulties. The translation isn't very good here. When you follow it to the letter, you will find that one of your seams shifts when you pull your finished embroidery over the wooden egg. The upper and lower seams are only fastened at the central seam at the back. If I were to stitch another one of these eggs, I would prevent this by sticking the seams to the back of my embroidery with the help of some Vlisofix/Bondaweb. Or, more likely, I would only stitch half cross-stitches for the border. When turning the seams, I would fasten them by finishing the border cross-stitches (i.e. put the other half cross-stitch in). This would secure the seams perfectly and would prevent shifting. The actual beading was great fun! I certainly learned a new skill. And I am very pleased with the result. Not as perfect as the pictures shown in the kit, but pretty good for a first attempt. And being an embroidery designer, I am already thinking of improving the finishing on these eggs (or Christmas baubles?). How about using linen banding? That would eliminate the whole drama with the seams :). If you would like to stitch your own Riolis easter egg, then please ask Google. The kit was released in 2014 and has sold out on the Fire Poppies' website. The design number is 'B185'. However, I hope my review has shown that embroidery kits from Riolis are high-quality, contain plenty of materials and are well worth a try! But beware: I have now stitched another egg in this series (the one with the red flowers) and here the measurements are all wrong. The design is not long enough to wrap around the egg. DO NOT follow the size recommendations for the seam allowence as you will end up with a piece of cloth that is too short. Instead place your finished embroidery on the egg and take your seam allowance from there. P.S. Did you like this blog article? Did you learn something new? When yes, then please consider making a small donation. Visiting museums and doing research inevitably costs money. Supporting me and my research is much appreciated ❤!
Nope, I had not retired for Christmas. I am very busy stitching a new goldwork teaching sample for one of next year's teaching jobs. The first version was unfortunately rejected. And whilst my whole body is aching from sitting behind my slate frame and computer for too long, I did learn a lot from the experience. In the new year, I will put together a document with lots of questions and options for needlework business owners who approach me with a teaching request. It will hopefully ensure that they know exactly what I can and can not offer. And I will have a far better idea of what it is they are looking for. In the meantime, I have stumbled upon a lovely small needlework and hand-dye business from Hungary: Barbaral Creations. 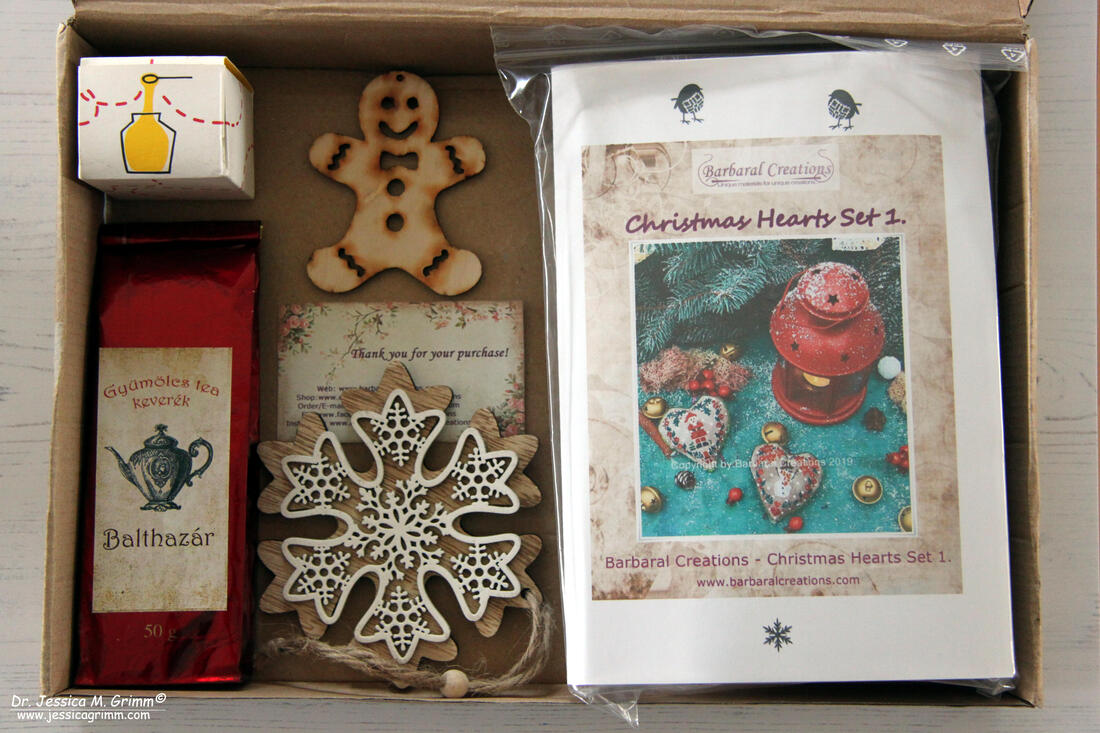 Barbaral Creations stitching box Many of you know that I am a huge fan of the FiberTalk podcasts and video shows. Being a one-woman-show, it can often feel a bit lonely. Gary, Vonna, Debby and Arlene are my overseas stitching buddies. Listening to them chatting away on needlework topics and the occassional Big Foot story, makes for good working vibes. Lately, they are sponsored by Stitchy Box. This is a thread and needlework goodies subscription service in the US. Some of you might remember that I took out such a subscription two years ago with Nordic Needle. I loved it! And I was totally bummed when they went out of business. I have been on the lookout for a replacement ever since. However, ordering these things from outside the EU comes with a lot of customs-hassle when you live in Germany. So I started searching for an alternative from the EU. I found Barbaral Creations on Etsy. Barbara lives in Hungary near the Rumanian border. She dyes threads, ribbons and embroidery fabrics by hand. Now that has my full attention. I am a self- diagnosed thread-addict :). I bought her Stitchers Subscription Box Winter/Christmas edition. Be sure to check out here lovely hand-dyed ribbons, silk threads, perle, stranded cotton, trims and fabrics too! 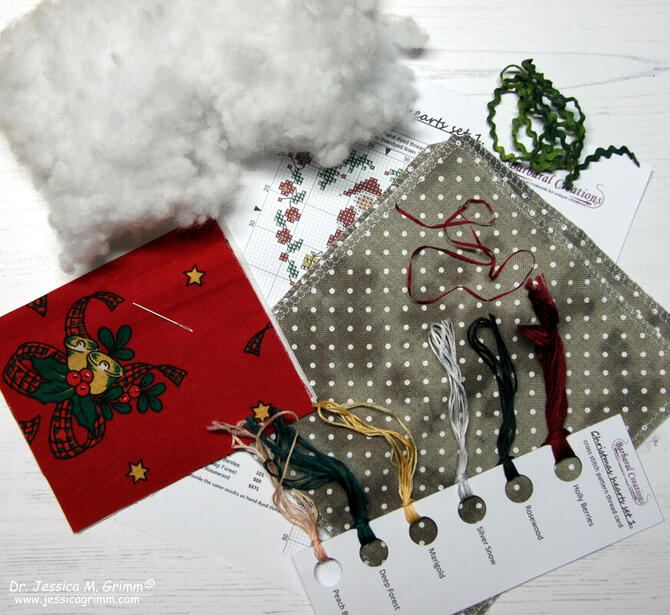 Barbaral Creations stitching box This Stitchers Box contained a cross-stitch embroidery kit for two heart-shaped ornaments. The fabric, stranded cotton and ribbons in the kit were hand-dyed by Barbara. They are slightly variegated and have a lovely vintage feel to them. The embroidery chart was very straight-forward and even comes with thread conversions for DMC. So when the supplies from the kit are finished (which were plenty, by the way), you can still use the patterns using regular DMC stranded cotton. The kit also contained: a needle, backing fabric, fusible interfacing and toy stuffing. I ended up swapping out the backing fabric for a piece from my stash which was of the exact same colour as Barbara's red-dyed thread :). And I did not stitch the hand-dyed green rick-rack over the seams of my ornaments. They simply didn't need it and I'd rather save the pretty rick-rack for another project. The pattern and instructions were straight-forward but do assume that you know your cross-stitch, French knots and basic finishing/sewing skills. It took me about two days to stitch both patterns, haul my sewing machine out and finish them into ornaments just in time for Christmas. 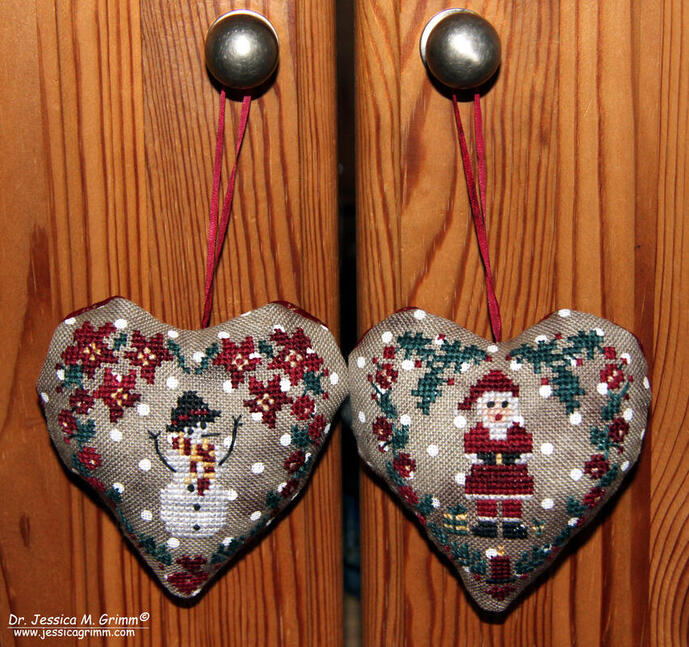 Barbaral Creations stitching box What is rather unique about Barbara's Stitchers Boxes, they contain lovely additions besides the needlework. In this case, the box contained a very fine fruit tea called Balthasar. A small jar of honey to sweeten it. And two wooden decorations: a snowflake and a gingerbread man. I've asked Barbara if she is going to release more Stitchers Boxes and she has confirmed that she will be doing boxes themed: Christmas, Easter, Summer and Halloween next year. This edition was priced at €21 and postage to Germany was an additional €10,90 (this totals at 35 US Dollars or 27 Pound Sterling). In order to be notified in time when a new box is released, be sure to make her Etsy shop one of your favourites! Merry Christmas!
I turned 40 recently. And as it goes: birthdays and presents go hand in hand. So when I visited Munich with my parents, we found an unusual embroidery book for my library. Before I'll show you what it is, let me tell you briefly where we found it. Personally, up to that recent visit, I didn't like Munich one bit. As it is a very wealthy city, I always felt out of place. Although I do like shopping, I avoid big fashion names as I have found my style long ago and want to stick to it; not change every 3 months :). Anyway. This time we ended up in a whole different part of Munich as I wanted to visit a Zero Waste shop aptly named 'Ohne' (without) and my father wanted to visit some antiquaries in search of Feldpost from WWI. Both, and much more, concentrate around the Schellingstraße in the Maxvorstadt. The name Schellingstraße might ring a bell with art, literature and/or history buffs: apart from being Hitler's home turf, Bertold Brecht, Wassily Kandinsky, Rainer Maria Rilke, Lenin, Thomas Mann, Frank Wedekind, Joachim Ringelnatz, Stefan George, Franz Marc and Paul Klee frequented the establishments here in their time. Nowadays, the area is characterised by cosy and hip eateries catering for the whole world, antiquarians and unusual little shops well worth exploring. So, if you ever visit Munich and you are not much impressed by its main shopping streets, head out to the Schellingstraße! 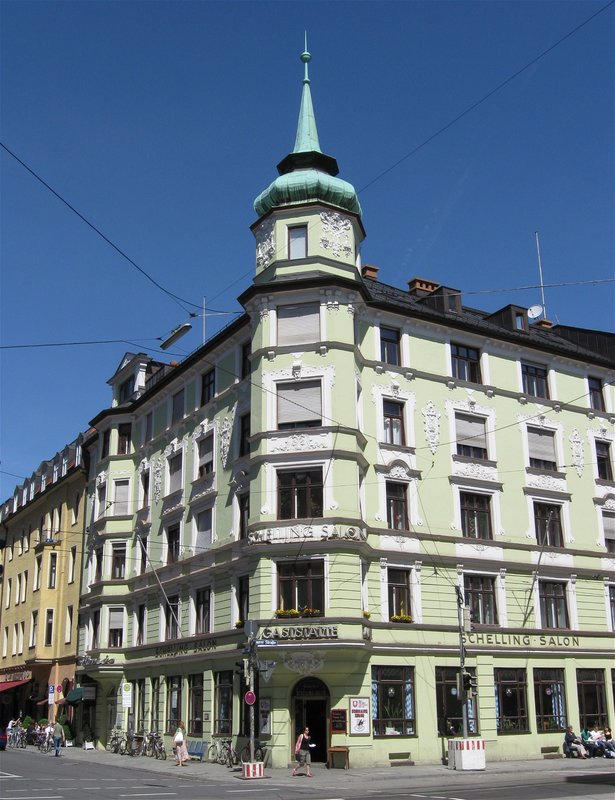 By Rufus46 - Own work, CC BY-SA 3.0, https://commons.wikimedia.org/w/index.php?curid=6979565 At one of the antiquaries, I found a book named: Stickerei aus Palästina, traditioneller 'Fallahi' Kreuzstich written by Widad Kamel Kawar and Tania Tamari Nasir in 1992. The ISBN of the German version is: 3-927270-03-2 and that of the English version: 3-927270-04-0 (Palestinian embroidery, traditional 'Fallahi' cross-stitch). Unfortunately, the book is now only available second-hand and prices asked for it range between €75 and €281 !!! My mum paid €22 :). A pretty good deal indeed. 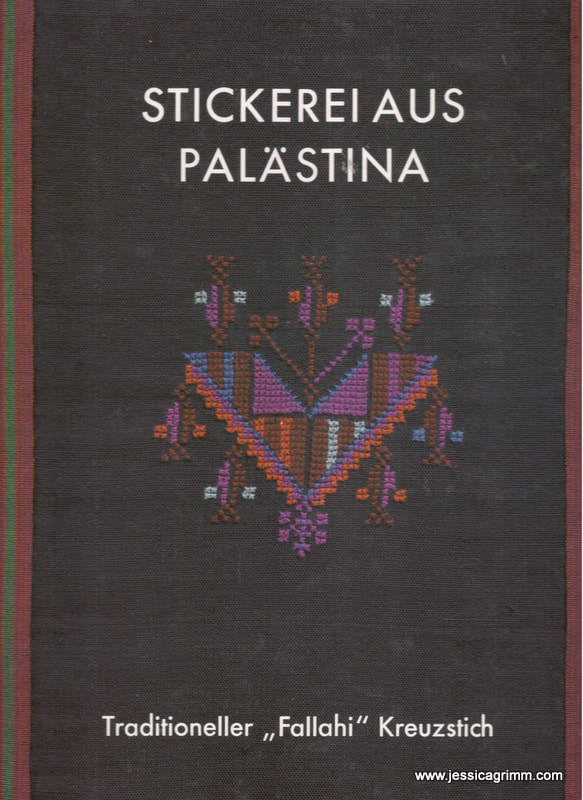 Palestinian embroidery, traditional 'Fallahi' cross-stitch So what's this book all about? Fallahi embroidery is a form of cross-stitch embroidery traditionally practiced by Palestinian peasant women (Fallaha) in their villages. The book shows a collection of traditional patterns from the 19th and early 20th century not yet influenced by later Western styles. The collection is subdivided into Palestinian regions: Ramallah, Jaffa, Hebron, Gaza, Beersheba and the Sinai. At first glance, you might think that these are 'just' geometric motives with no further meaning. The book shows you that not only are certain motives characteristic of a particular region, it also tells you their name. For instance, there are date palms from Ramallah, amulets from Jaffa, the Pasha's tent from Hebron, pendants from Gaza and different forms of cypresses can be found in embroidery patterns from all the regions. Once your eye has been sharpened for this, they are no longer 'just' geometric patterns. 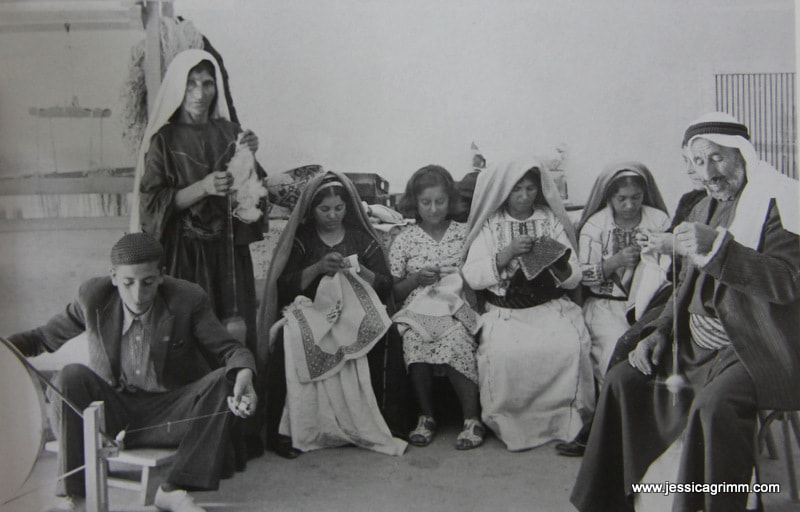 One of the first embroidery centres in Ramallah What items were decorated with this type of traditional embroidery? The embroidery can be found on the traditional Palestinian female dress: the thob. Depending on the region and the status of the wearer, parts of the front, parts of the back, the sides and the sleeves are covered with embroidery. Furthermore, the bridal trousseau would sport the same kind of embroidery. 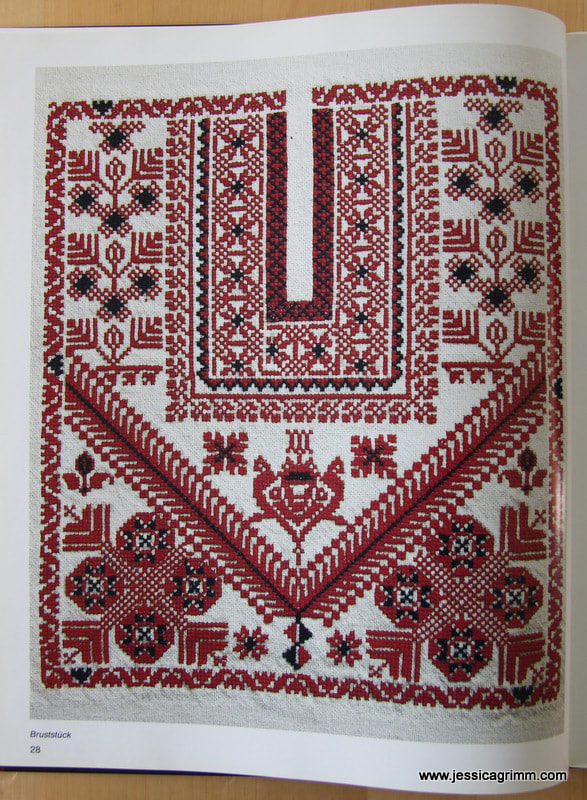 Pattern for the front of the traditional Thob from Ramallah What materials do the Palestinian embroiderers use? Traditionally, the embroidery was executed on local hand-woven linen (actually a mix of linen and cotton) or a form of loosely woven cotton. Famous weaving regions were: Majdal, Gaza, Ramallah, Nazareth, Hebron and Nablus. Until around 1930, they would use plant-dyed silk thread for the embroidery made in Syria. Traditional colours would be indigo blue, reds made from roots or insects and ochre for yellow. By far the most popular colour would have been red. Even the shade of red used would point to the origin of the wearer with wine red being from Ramallah and Jaffa, burnt Sienna from Hebron, magenta from Gaza and scarlet- and fuchsia red from Beersheba. 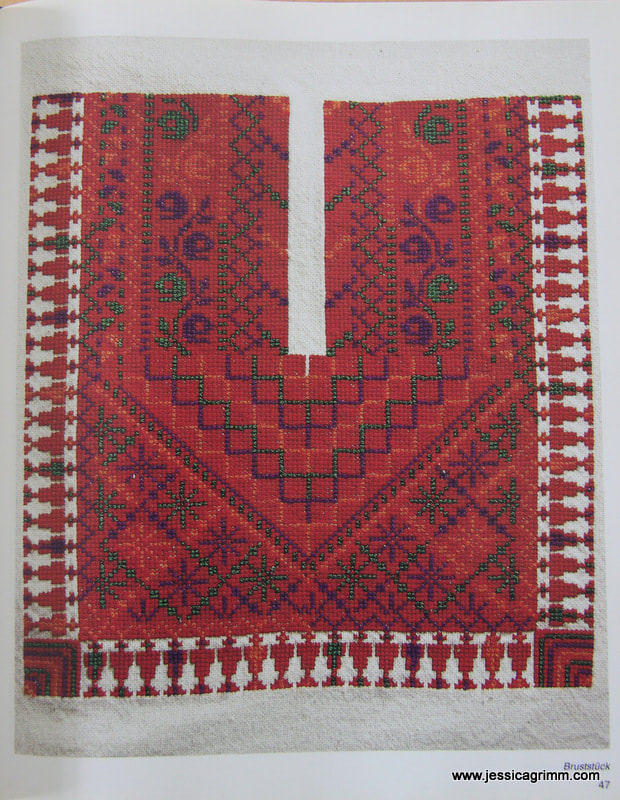 Pattern for the front of the traditional Thob from Jaffa The main part of the book consists of full-page pictures of the stitched patterns (78 in total!). Each pattern has been stitched with European yarn (both DMC stranded cotton and perle were used after the 1930s) onto traditional Ramallah linen. I find this a very nice way of presenting the different patterns. So much more 'lively' than our traditional grid diagrams. And a much more original way of transferring pattern knowledge. Besides the beautiful pattern pictures there are also pictures of women wearing the traditional garments. This part of the book is a real feast for the eyes and your hands start to twitch as you probably can't wait to dive into reproducing a pattern yourself! I've written to the Palestinian Heritage Fund to ask if they know of an online source selling the traditional Ramallah linen (UPDATE: The Palestinian cultural centre wrote to me that they don't think there is anybody still weaving this type of linen. Women now use commercially produced brands such as Zweigart). If anyone knows of such a source, please leave a comment!  Pattern for a traditional cushion from Hebron The book was originally written to present and preserve the original Palestinian village patterns. Due to the Palestinian Diaspora after 1948, traditional village life changed dramatically. And so did the traditional patterns. Thus, in a way, the book also documents the influences world politics has on a traditional form of embroidery. If you love cross-stitch and traditional forms of embroidery than this book should go onto your watch-list. With its hard-cover, detailed and clear pictures and 144 pages, it might not quite be worth €225, but around €50 would still be a good buy.  Pattern for the front of the traditional Thob from Jaffa In a couple of weeks, a major event is going to happen. Christmas? Yes, that too. But before that, we will finally open our cooperative village store. Hallelujah! It has taken up far too much of my time and most of my stitching projects were orphaned for too long. I so hope this improves in the new year. In the meantime, meet my Holiday Stitching project:  These are the Santa's of prevention. They are keeping me sane whilst I don't have the calm and quiet to work on any 'big girl' embroidery projects. And they PREVENT me from killing any villagers who are foolish enough to position themselves between me and our village store...
But what will I do with all these charming Santa's? In comes our village Advent Windows Calendar. Our decorated window will open on the 16th of December. Want to stitch some of these charming Mill Hill Santa kits too? They are distributed by Wichelt in the US. You can order them in Europe from Casa Cenina and in Germany from CreativHorst and Stickteufelchen. Apart from frantically stitching Santa's, I've also purchased my tickets for the Opus Anglicanum exhibition in London! And I am having fun this week with Elizabeth stitching an illustration from a fairytale book. I'll show you the pretty results next week. |

Want to keep up with my embroidery adventures? Sign up for my weekly Newsletter to get notified of new blogs, courses and workshops!
Liked my blog? Please consider making a donation or becoming a Patron so that I can keep up the good work and my blog ad-free!

Categories
All
Archives
July 2024
|


 RSS Feed
Contact: info(at)jessicagrimm.com
Copyright Dr Jessica M. Grimm - Mandlweg 3, 82488 Ettal, Deutschland - +49(0)8822 2782219 (Monday, Tuesday, Friday & Saturday 9.00-17.00 CET)
Impressum - Legal Notice - Datenschutzerklärung - Privacy Policy - Webshop ABG - Widerrufsrecht - Disclaimer
Copyright Dr Jessica M. Grimm - Mandlweg 3, 82488 Ettal, Deutschland - +49(0)8822 2782219 (Monday, Tuesday, Friday & Saturday 9.00-17.00 CET)
Impressum - Legal Notice - Datenschutzerklärung - Privacy Policy - Webshop ABG - Widerrufsrecht - Disclaimer