|
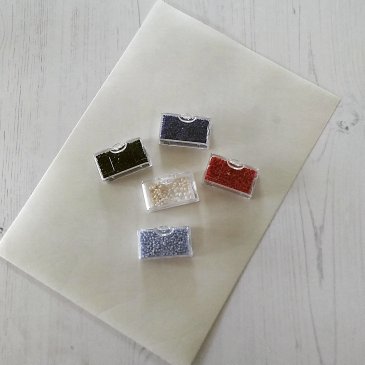
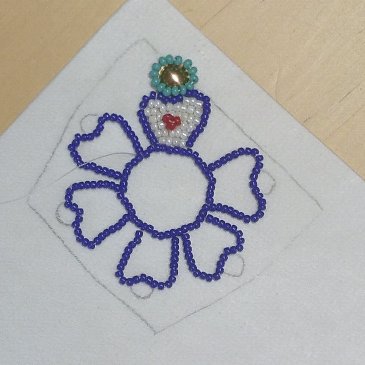
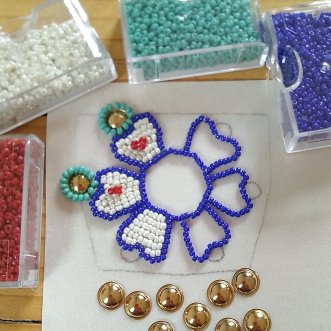
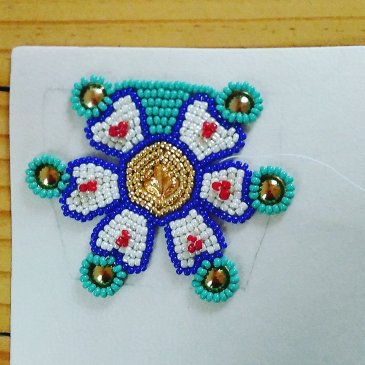
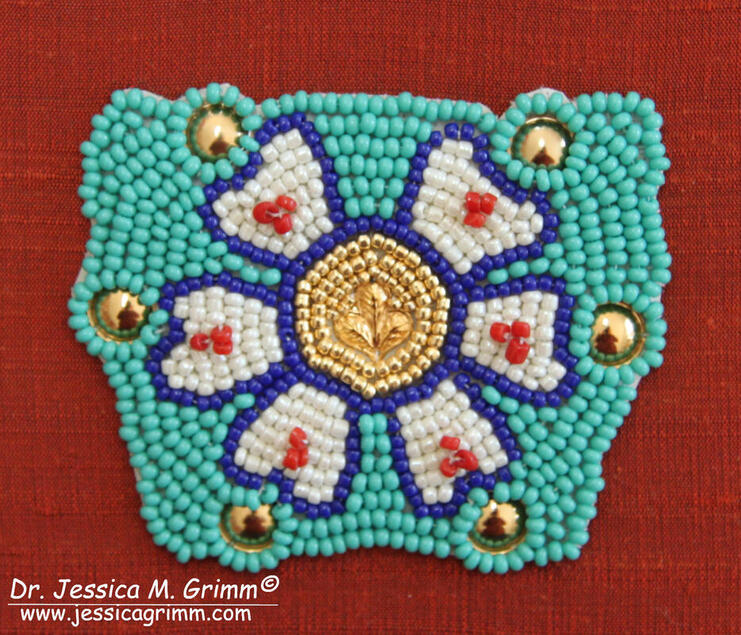
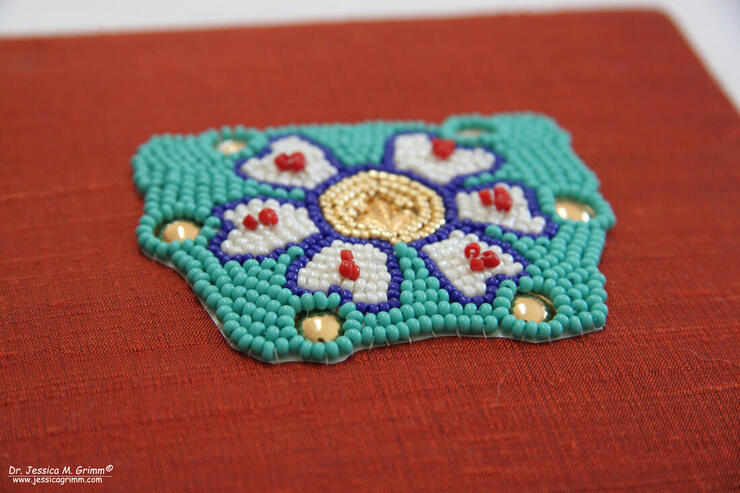
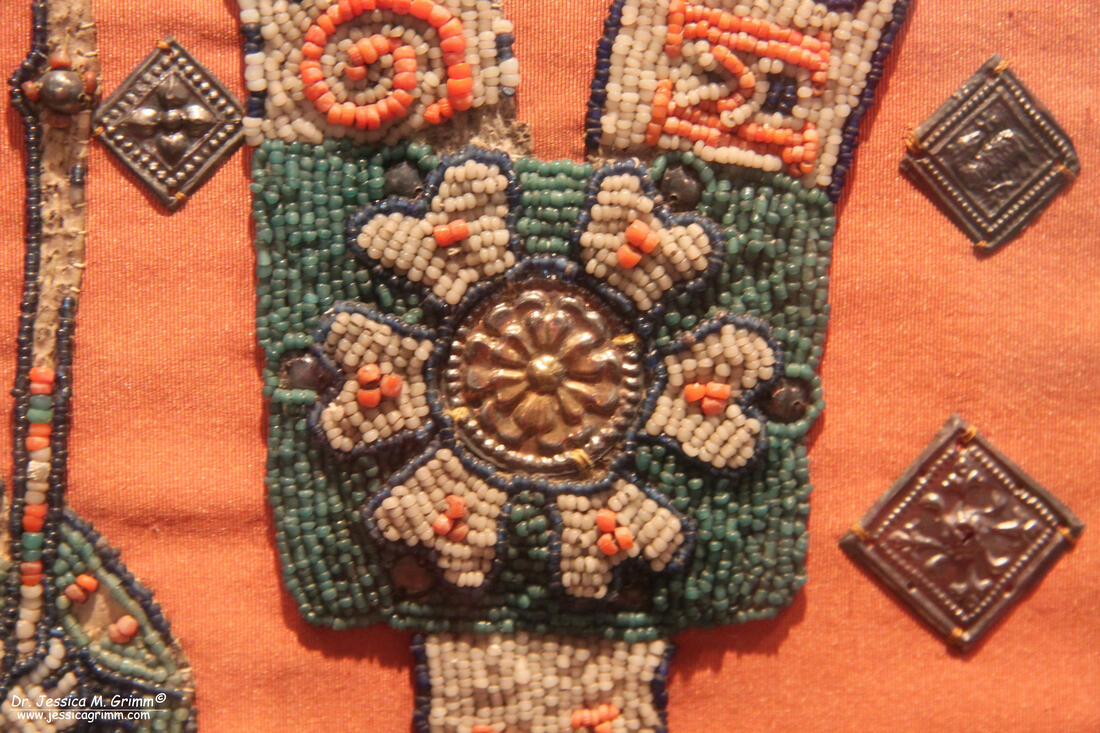
Ever since my visit to Cheb in the Czech Republic earlier this year, when we went to see the Egerer antependium, I wanted to try my hand at a small replica. Since the beading on the antependium is done on parchment/vellum, that was easier said than done! However, I finally managed to recreate a small portion of this stunning medieval beadwork. And I am going to share my journey with you in this blog post. The first thing I needed for my efforts was a piece of parchment/vellum. Luckily there is a German online-shop (run by archaeologists!) who sell all sorts of re-enactment stuff. And they do parchment/vellum too. I ended up buying good quality parchment rather than vellum, I think. They are in essence the same material: thinly scraped animal skin. Vellum is the absolute premium version made of the skins of young animals. For months I was actually afraid to start the stitching. On the one hand my fingers were itching to start, but on the other hand I did not quite know where to begin. So my sheet of parchment sat on the shelves, patiently waiting. The main question I needed to get answered was how to work with the parchment. Does one hold it in hand and stitch or does one put it in some sort of embroidery frame? Searching the internet, I came across a blog entry of a re-enactment lady. She just stitched a small motive in the hand and was successful. I decided to do the same and worry about the framing of a larger piece of parchment later :). The parchment is actually so stiff that you can hold it comfortably in hand whilst stitching. The second main component would be the beads. On the original, the beads are quite small but irregular. Using some of my collection of perfectly formed Japanese high-quality beads would just not be the same. Luckily, I hade some, otherwise crappy, cheap hobby beads in about a size 9 and a size 10. Perfectly irregular :). The original beads are more like a size 11. I even had these in roughly the right colours: sea-green, dark blue, pearly white and coral red. The third component proved to be quite difficult and partly impossible to get. In amongst the beadwork on the original are stamped metal decorations. The closest I could get were those gilt 'folien' used to make a bundle of grapes in goldwork embroidery. Whilst they worked fine for some parts of the capital motive I had chosen to replicate, it did not work for the centre. I ended up using a fancy 'folie' and filled in the empty space with small golden-coloured beads. On to the stitching! But first, I transferred my chosen motive onto the parchment using a pencil. From my pictures and the written information I had on the antependium, I was able to deduce that the capitals of the columns between the saints were about 5.4 cm in height. That's what I based my pattern on. I then started by stitching the design lines of the petals first using my blue beads, a number 10 needle and Coats Dual Duty glaced hand-quilting thread made of polyester and cotton. In the original piece they probably used a linen thread. According to the written sources and from what I could see in my pictures, the appropriate number of beads were strung first and then couched down with a separate thread and needle every two beads or so. At first, this felt as if I needed an extra pair of hands! Holding the parchment in one and manipulating two working threads with the other wasn't easy. Especially not as the needle only pierces the parchment when a certain amount of force is applied. However, after struggling for a while, I changed my method slightly. Firstly, I did away with the couching thread. Instead, I laid out the strung beads carefully on the design-line, go down with my needle in the appropriate spot, and then couched between the beads using the same thread. In this way I could eliminate the extra pair of hands :). As it proved very hard to hit the exact spot from the back of the parchment (parchment is surprisingly slippery stuff), I ended up making holes from the front and subsequently finding them from the back. Much, much easier! To attach my 'folien', I carefully punched two small holes in the rim using a larger needle and a normal hammer. Usually only one hole turned out successfully, but that proved to be enough to hold the piece in place long enough until I had couched the beads around it. As the folien have a small flat rim or lip, the couched ring of beads keeps it in place. Once all the beading was done, I cut out the beaded element as close to the beads as I dared. In my embroidery hoop, I stretched a piece of terracotta dupion silk over 36ct even-weave linen (the original has a linen support too) and appliqued the beaded element in place using the Coats Dual Duty thread. Last but not least, I mounted my small replica onto acid-free cardboard and added a linen backing. I am planning on sending it to the museum so they can use it for educational purposes. As I used slightly larger beads than were used in the original, my motive measures 6.2 cm in height.
I hope you liked my foray into medieval bead embroidery. At some point I would like to attempt one of the saints. However, I will need to find a solution for framing the parchment as that will be too large to hold in hand. I would also like to find a source for larger stamped metal decorations such as were used in the original. If you know of a source, please let me know!
10 Comments
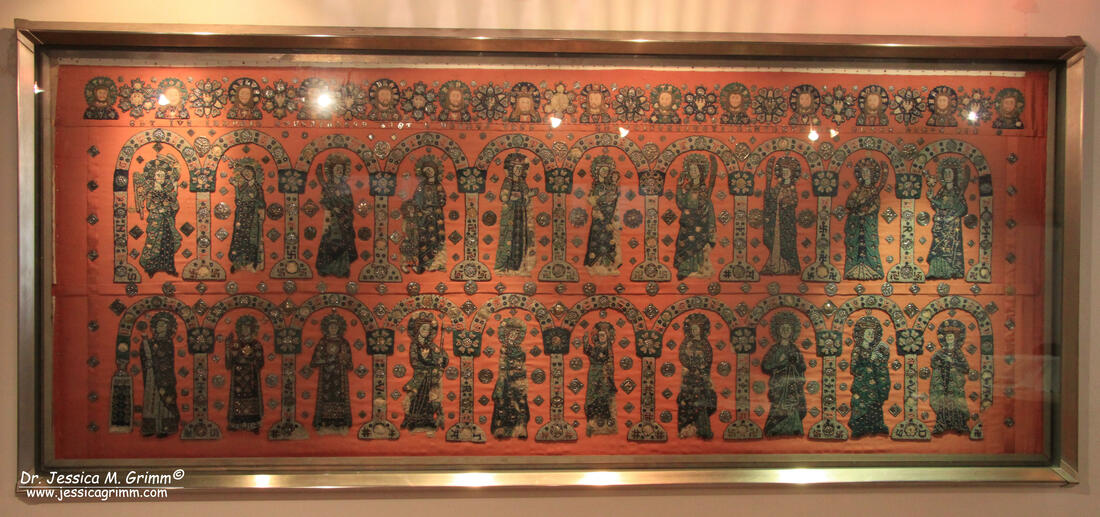
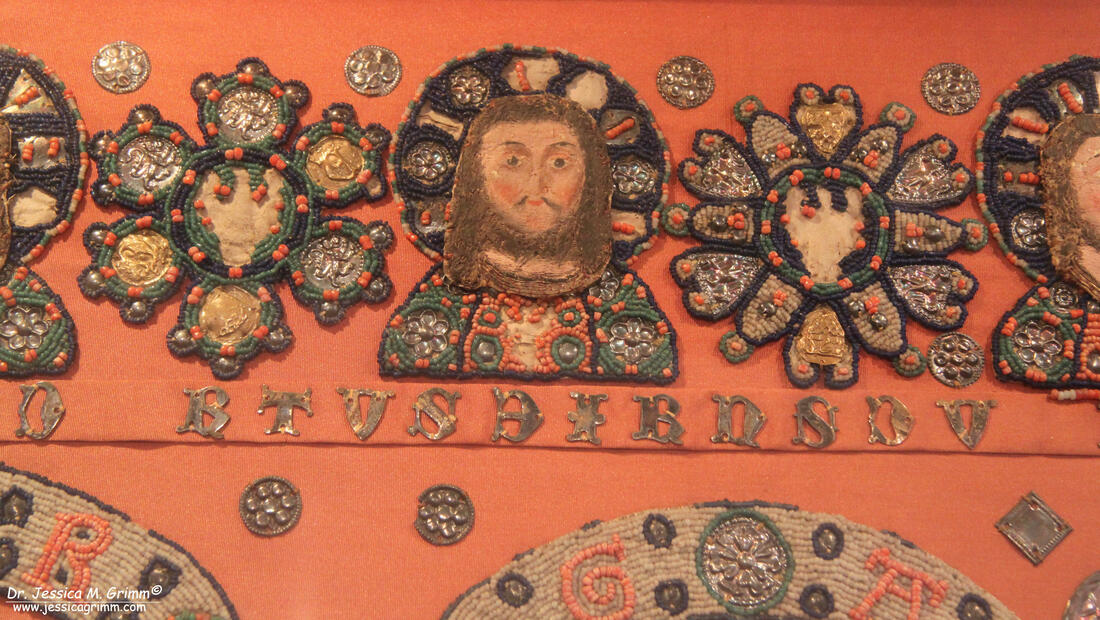
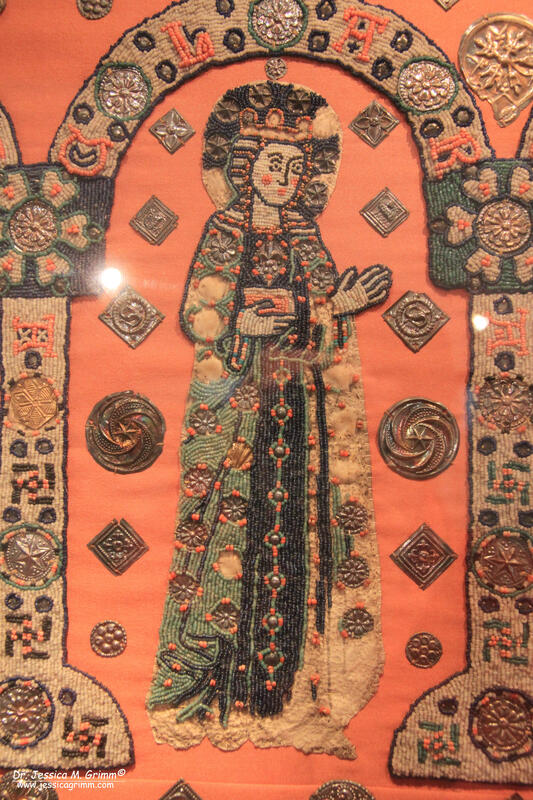
I and my husband had a most lovely trip to Cheb (German: Eger) in the Czech Republic. The local museum houses a spectacular medieval bead embroidery: the Egerer Antependium. Although the museum is closed to the general public due to renovations, Alena Koudelkova kindly agreed to show us around. Check my previous blog post if you want to read the story on how I discovered this gem of a medieval embroidery. The Egerer Antependium measures 2,18 m by 90 cm and was probably made by the Poor Clares of Cheb in the early 14th century (it is a staggering 700 years old!). There are two identical rows with ten saints. Each saint is framed by two columns topped by an arcade. For easy identification, the name of the saint is stitched into the column and the arcade. The bottom row shows (from left): John the Evangelist, James son of Zebedee, James son of Alphaeus, Margaret the Virgin, Mary of Intercession, Jesus (who blesses Mary to his left), Agnes of Rome, Saint Cecilia, Cunigunde of Luxembourg and Saint Ursula. The row above shows: the Archangel Gabriel visiting the Virgin Mary, Agatha of Sicily, Mary with the six-year-old Jesus, Clare of Assisi, Mary Queen of Heaven with baby Jesus, Catherine of Alexandria, Saint Lucy, Saint Barbara and Saint Bibiana. The columns-arcade-frames measure 35 cms in height. The figures themselves are about 28 cms in height. The iconography of this piece supports the thesis that the Poor Clares of Cheb were the embroiderers of this Antependium. For starters: it is very female heavy :). The Virgin Mary is represented four times. She is accompanied by other holy virgins (Margaret, Barbara & Catherine as well as Agnes, Lucy & Cecilia). Clare of Assisi is the founder of the Poor Clares and therefore prominently displayed in the middle of the Antependium. Agatha and Ursula often accompany Clare of Assisi. Cunigunde of Luxembourg is especially venerated in the diocese of Bamberg to which Eger belonged. Bibiana possibly refers to a local veneration or to the sponsor of this piece. Furthermore, in the lower left corner, we see John the Evangelist celebrating mass with the two Jameses as supporting diacons. Especially John the Evangelist was widely venerated by nuns in the High Middle Ages. There is a third row sitting above the previous two rows. This smaller row, a mere 16 cms in height, comprises of the busts of Mary and Jesus flanked by the twelve Apostles. It is quite possible that this row is of a later date. The busts were probably originally silk and goldwork embroideries on linen. The embroidered parts were then covered with paint (I've seen another medieval example in Vilnius, Lithuania). The busts were then cut out and placed on top of the beaded halos. Each bust is alternated with beaded floral motives. A possible later date is supported by the fact that the beads in this row a slightly darker and the metal decorations of a different type. As there are no contemporary written sources, the dating of the piece is mainly based on stylistic grounds. Several of the iconographic scenes are first seen during the mid- to late 13th century. But also the style of the figures themselves discloses the period this piece was likely made. Some of the figures are somewhat stiff and depicted frontally (the Jameses and Clare) whereas most others are depicted more life-like with garments full of movement as was the norm in the later Gothic period. The piece as a whole breathes the strict order of the older Romanesque style. Probably originally made for the chapel of the Poor Clares of Cheb, situated in the Franciscan Church of the Ascension, the Antependium did not stay there. When the Poor Clares got their own church in 1465, they probably gifted the Antependium to the St. Jodok church in Cheb where it stayed until it was transferred to the newly opened museum of Cheb in 1874. Major restorations have transformed the Antependium somewhat. The last one took place in 1928 by Sr. Virginia Erhart of the Congregation of the Holy Cross in Cheb. She worked under close supervision of the County Conservator. It took her over a year to take the beaded applications off the red silk backing from the Baroque period. All beads were cleaned and re-strung when necessary. Then the beaded applications were re-applied to a red silk backing re-enforced by linen. During an earlier restoration, the writing between the first and the second row had already been muddled up and so doesn't make sense anymore. The beaded applications consist of strung beads couched onto vellum. This is clearly seen in those places where the beads are now missing. Sometimes even glimpses of the blue design lines can be seen. The order of work likely has been that firstly those contours were couched. Then the metal decorations were applied before the whole design element was filled with more couched beads. The colour palette is quite restricted with blue, green and white beads being the main colours. Black beads are used sparingly as are the red coral beads and the real gold beads. The size of the beads is remarkably uniform and mainly seems to correspond to a modern bead-size 11. The beads of the face of the Virgin Mary with baby Jesus are real freshwater pearls. These kinds of bead embroideries are very rare. This is due to the fact that their raw material was precious and could easily be recycled. Their origin lies in the pearl embroideries from Byzantium which were made since the 6th century. The idea came to Central Europe in the 9th century through Charlemagne with his contacts to the court of Byzantium. Glass beads were produced in Venice since 1200 AD and they started to supersede the real pearls from the 13th century onwards. These beads had to be imported from Venice well into the 14th century when local production took over (especially in Bohemia, now the Czech Republic). In turn, bead embroidery was superseded by silk embroidery in the 15th century. On the one hand, while beaded embroideries where quite heavy and impractical (in effect, the Egerer Antependium consists of many small embroideries forming a larger piece) and on the other hand while the Renaissance demanded ever more realistic and life-like depictions which couldn't easily be achieved with beads. Sources:
Siegl, K. (1929): Das Egerer Antependium, Unser Egerland, pp. 80-81. Tietz- Strödel, M. (1992): Das Egerer Antependium. In: L. Schreiner (ed.), Kunst in Eger, pp. 248-258. P.S.: This research was partly sponsored by a most generous PayPal-donation of one of my dear readers. If you like what you read on this blog and you can spare some small change, please consider making a donation via the PayPal button at the top of this page! |
Want to keep up with my embroidery adventures? Sign up for my weekly Newsletter to get notified of new blogs, courses and workshops!
Liked my blog? Please consider making a donation or becoming a Patron so that I can keep up the good work and my blog ad-free!
Categories
All
Archives
July 2024
|
Contact: info(at)jessicagrimm.com
Copyright Dr Jessica M. Grimm - Mandlweg 3, 82488 Ettal, Deutschland - +49(0)8822 2782219 (Monday, Tuesday, Friday & Saturday 9.00-17.00 CET)
Impressum - Legal Notice - Datenschutzerklärung - Privacy Policy - Webshop ABG - Widerrufsrecht - Disclaimer
Copyright Dr Jessica M. Grimm - Mandlweg 3, 82488 Ettal, Deutschland - +49(0)8822 2782219 (Monday, Tuesday, Friday & Saturday 9.00-17.00 CET)
Impressum - Legal Notice - Datenschutzerklärung - Privacy Policy - Webshop ABG - Widerrufsrecht - Disclaimer



 RSS Feed