|
A couple of weeks ago I saw a sign in a shop in Oberammergau and it nearly made me wet my pants. I just couldn't stop chuckling. That's sad, I know. But it sometimes just happens. I immediately knew that I wanted to make a stitched version in 'black board style' to go onto my front door. After all: forewarned is forearmed.  I also decided to turn my 'warning in the making' into a tutorial for my faithful blog readers. After all, I could see some difficulties pop up with this whole black board thing-y. So where did I start? Well, by writing out this quote and searching Google Images and Pinterest for examples of ornate black board script. Then I typed the hilarious quote into a Word Document and started to play with layout, fonts and size. Once I was happy, I printed it off. Added swirls, tendrils, lines and other ornaments in pencil. After a few tries, I copied the final version with pencil onto transparent drawing paper. And then I met the first ugly stone on my path... Black board style means I will be stitching with a white thread onto a black fabric. Obvious. Now the looming sword of less than easy-peasy pattern transfer methods hung over my head. I had chosen a woollen cloth as my black board and wanted to use white cotton a broder as my chalk. Woollen cloth and light box don't scream perfect match. Instead, I opted for the tacking method. Especially as any type of painting or drawing on woollen cloth is difficult too, due to the fluffiness of the surface. I didn't want to copy my pattern onto pattern paper by hand. Too much hand-copying going on to my taste and too little stitching. This is where my scanner/printer comes in. I scanned the image and printed it onto a fresh piece of transparent paper. Just to be on the safe side, I changed the settings to light weight paper. It came out beautifully! 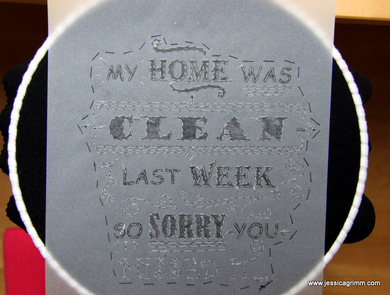 As you can see, I tacked the sheet in place with black sewing thread. After all, you don't want any obtrusive fibres on your sparkly clean black board after you've ripped the paper off. Contrary, I did use white sewing thread for tacking the lettering. No matter how carefully you tack and subsequently rip the paper, some stitches will come out. Any 'fibre shadows' left can only help. Start tacking from the middle outwards. It helps keeping the paper nice and flat. 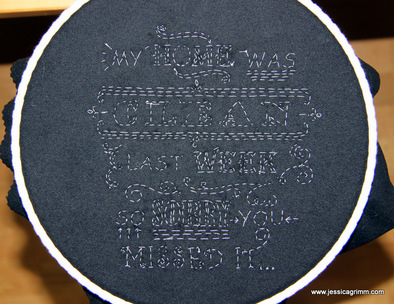 Tacking hours later, I ended up with this. I pulled some loose stitches from the back so that the image became clear again. Then I started to play with DMC cotton a broder #12 for the thicker lines and a #30 (I think, it lurked in one of the boxes and had lost its label) for the finer lines. No complicated stitches, just a lot of fun. Try experimenting with straight stitch, chain stitch, fly stitch and running stitch. 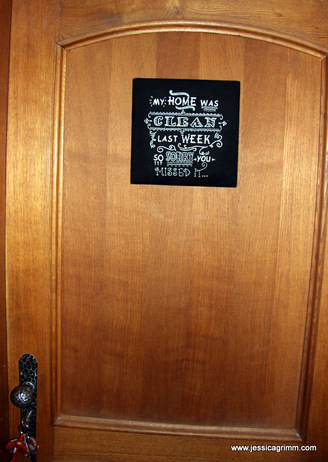 So, dear visitors, from now on don't blame it on my cleaning regime. It is all down to bad timing.
10 Comments
This weekend, I had another day of tuition in Appenzell, Switzerland, with wonderful Verena Schiegg. I stayed at the convent Maria der Engel and submerged myself in the clear age-old rhythm of divine office. A protestant joining a Cistercian nun and her catholic guest; how fitting during the week of ecumenism. Now what did I stitch?  Appenzell whitework sampler I had finished this delicate area on my sampler (that's a Eurocent to give you an idea of size) at home and noticed that the large flower had a little cross in the middle. This means that in this area I had to execute a bit of drawn thread work or Höhlen. Although I am familiar with drawn thread work in the less fine Schwalm white work, I wanted to see how Verena goes about the job. Much the same as I would with Schwalm, it turned out. However, she hides her stitches differently as I would. Since the thread used in the drawn thread work is about half the thickness of the thread used in the satin stitches (Blatten), casting on stitches can be hidden among the satin stitches. Clever, clever!  Appenzell whitework sampler The above was the other area on my sampler I worked on at home. Although not perfect, I can see myself improve as I repeat the same forms over and over again. It really is a very good sampler for practicing. However, I wasn't getting a good result with the slender tendrils. Some parts where acceptable, and other bits turned out so poorly that they had to come out again. In short: I really struggled. That's when Verena walked by for inspection and saw me working my padding. She suggested a different way of executing the padding and presto, the next tendril turned out much smoother! 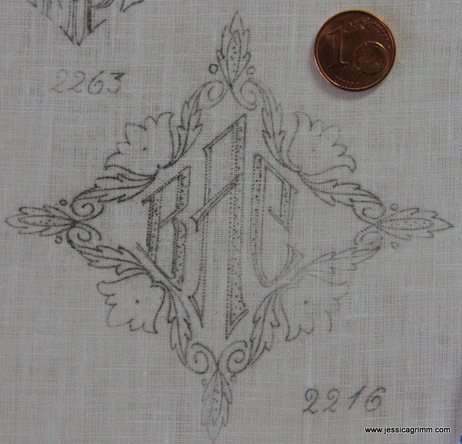 Appenzell whitework sampler In four weeks' time, I will return to Appenzell to practice a bit more drawn thread work. There are about 20 different filling patterns which can be used. The above part of my sampler has four areas which should be filled with drawn thread work. Due to their small size and irregular shape, I can't do anything too fancy. And as drawn thread work can only be executed after all the closely surrounded parts have been stitched, I have quite a bit of home work on my hands!
For those of you wanting to know more about Appenzell embroidery, simply click on 'Appenzell' in the category list to the right of this post. Today I am going to show you a stitch my Ukrainian friend Tetiana showed me last week. I showed her and Rushda from Pakistan how to make beautiful bullion roses and spider web silk ribbon roses. In return, I learned of a new stitch which Tetiana calls figure-of-8-stitch. The difference with the stitches I usually use, is that you start with a double thread:
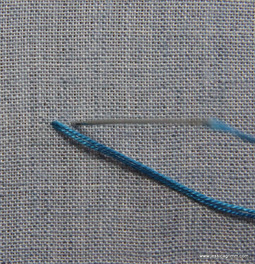
You make a stitch, but don't pull the thread all the way through!
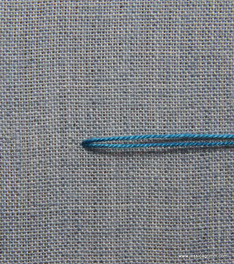
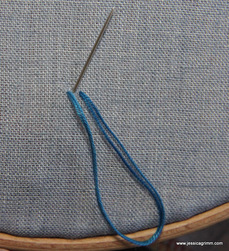
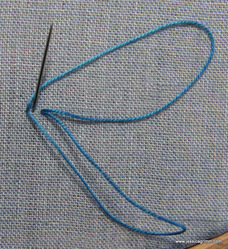
Come up with the needle close to where you started. Now split the two threads and lay one above the needle. 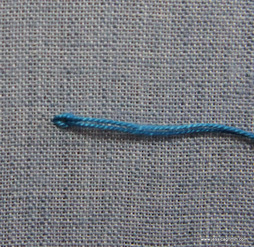 Pull through gently and this is what your first stitch should look like. Now does that remind you of something? A bit chain stitchy, isn't it? 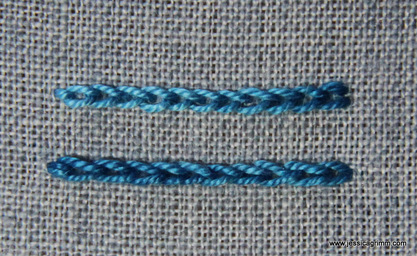 Here are both stitches side by side. I started on the right with both stitches. The new stitch below and ordinary chain stitch above (for which I used a single thread, as you would). I can't really tell the difference. Can you? 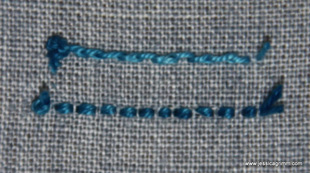 However, the difference becomes apparent on the reverse. Above the continuous line of an ordinary chain stitch and below a running stitch. So there really is a difference. And I can see that the cleaner back of the new stitch has its merits for some projects. 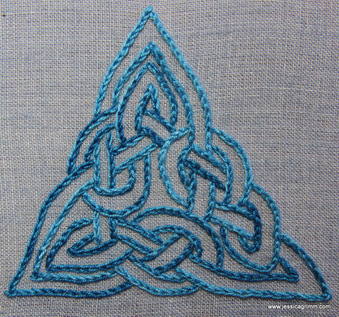 I decided to stitch a quick sampler to see how the Ukrainian stitch behaves in curves and points. It follows curves really well. But the real advantage compared to chain stitch is that it can do sharp points easily. You just follow the same trick as when you would make a sharp point with stem stitch (that is; you reverse stitch direction for the first stitch past the point). And it works similarly quick as chain stitch, once you have the hang of it.
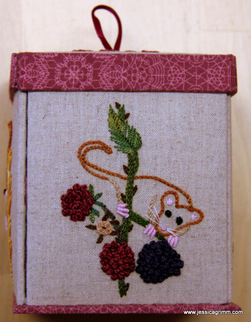
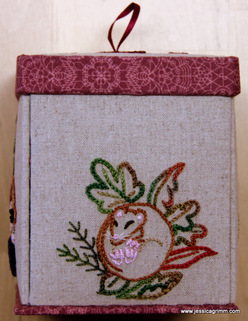
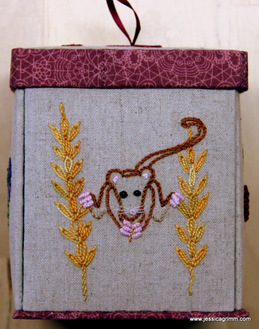
So now it is over to you. Have you encountered this stitch before? And if so: where? And what was it called? This type of box is a Victorian Needlework Etui. You probably have encountered the type before: lift the lid and the goodies spill out in an orderly manner. Or so you hope :). 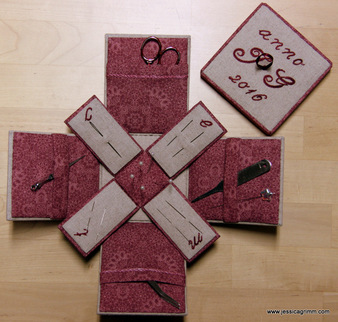 I have a confession to make: I LOVE mice! Yeah, I really do. I used to have mice as a teenager. Much to my father's distress as he claims that he can still smell them 20-years on... They are such happy fellows. Very easy to share a home with. And I am always delighted to spot them on my walks through the woods. The mice probably know me as the weird lady who opens her rucksack to dig for an apple to share. Any ways, I decided to decorate the outside of my needlework box with, you guessed it: MICE!
Here we have blackberry mouse and sleepy mouse...
....as well as wheat mouse and cornflower mice. All drawn by my husband and inspired by the beautiful pictures featured in National Geographic and Land Love. I decided to use quite basic stitches like chain, stem and straight stitches. Bullion knots were perfect for mice's hands and feet. All stitched with the beautifully hand-dyed perle #8 by House of Embroidery. 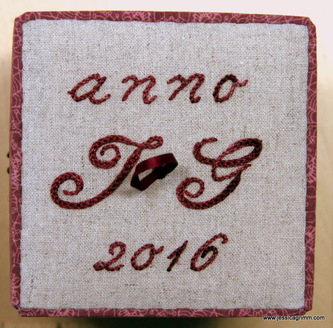 The lid has been decorated with my initials in Hungarian braided chain stitch combined with stem stitch. Easy to do and it produces beautiful monograms, don't you think? The insides of the box feature two pockets and two elastic bands to hold your tools, as well as four needle cards and a small pincushion. Who says beauty and practicality don't go together?
Want to try your hand at box making? Try to find a teacher near you to explain you the basics. It is paramount to be very (yes, VERY) precise and a bit neurotic in checking your measurements over and over again. There are also several good books on box making out there of which Carolyn Pearce's book Home Sweet Home is probably the most well-known. |

Want to keep up with my embroidery adventures? Sign up for my weekly Newsletter to get notified of new blogs, courses and workshops!
Liked my blog? Please consider making a donation or becoming a Patron so that I can keep up the good work and my blog ad-free!

Categories
All
Archives
July 2024
|


 RSS Feed
Contact: info(at)jessicagrimm.com
Copyright Dr Jessica M. Grimm - Mandlweg 3, 82488 Ettal, Deutschland - +49(0)8822 2782219 (Monday, Tuesday, Friday & Saturday 9.00-17.00 CET)
Impressum - Legal Notice - Datenschutzerklärung - Privacy Policy - Webshop ABG - Widerrufsrecht - Disclaimer
Copyright Dr Jessica M. Grimm - Mandlweg 3, 82488 Ettal, Deutschland - +49(0)8822 2782219 (Monday, Tuesday, Friday & Saturday 9.00-17.00 CET)
Impressum - Legal Notice - Datenschutzerklärung - Privacy Policy - Webshop ABG - Widerrufsrecht - Disclaimer