|
A couple of weeks ago I saw a sign in a shop in Oberammergau and it nearly made me wet my pants. I just couldn't stop chuckling. That's sad, I know. But it sometimes just happens. I immediately knew that I wanted to make a stitched version in 'black board style' to go onto my front door. After all: forewarned is forearmed.  I also decided to turn my 'warning in the making' into a tutorial for my faithful blog readers. After all, I could see some difficulties pop up with this whole black board thing-y. So where did I start? Well, by writing out this quote and searching Google Images and Pinterest for examples of ornate black board script. Then I typed the hilarious quote into a Word Document and started to play with layout, fonts and size. Once I was happy, I printed it off. Added swirls, tendrils, lines and other ornaments in pencil. After a few tries, I copied the final version with pencil onto transparent drawing paper. And then I met the first ugly stone on my path... Black board style means I will be stitching with a white thread onto a black fabric. Obvious. Now the looming sword of less than easy-peasy pattern transfer methods hung over my head. I had chosen a woollen cloth as my black board and wanted to use white cotton a broder as my chalk. Woollen cloth and light box don't scream perfect match. Instead, I opted for the tacking method. Especially as any type of painting or drawing on woollen cloth is difficult too, due to the fluffiness of the surface. I didn't want to copy my pattern onto pattern paper by hand. Too much hand-copying going on to my taste and too little stitching. This is where my scanner/printer comes in. I scanned the image and printed it onto a fresh piece of transparent paper. Just to be on the safe side, I changed the settings to light weight paper. It came out beautifully! 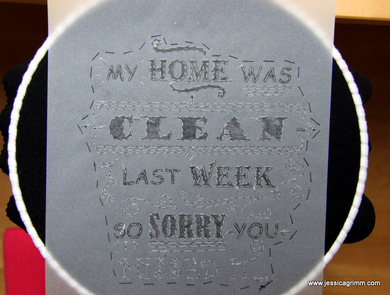 As you can see, I tacked the sheet in place with black sewing thread. After all, you don't want any obtrusive fibres on your sparkly clean black board after you've ripped the paper off. Contrary, I did use white sewing thread for tacking the lettering. No matter how carefully you tack and subsequently rip the paper, some stitches will come out. Any 'fibre shadows' left can only help. Start tacking from the middle outwards. It helps keeping the paper nice and flat. 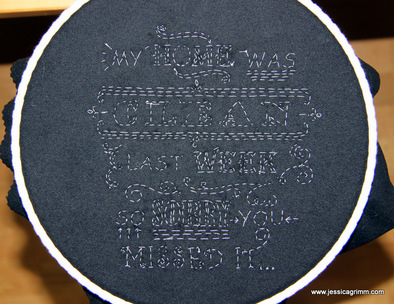 Tacking hours later, I ended up with this. I pulled some loose stitches from the back so that the image became clear again. Then I started to play with DMC cotton a broder #12 for the thicker lines and a #30 (I think, it lurked in one of the boxes and had lost its label) for the finer lines. No complicated stitches, just a lot of fun. Try experimenting with straight stitch, chain stitch, fly stitch and running stitch. 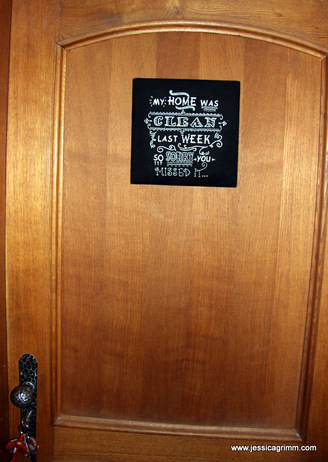 So, dear visitors, from now on don't blame it on my cleaning regime. It is all down to bad timing.
10 Comments
velia
31/1/2016 17:15:23
I love your embroidered poster. Thanks for sharing.
liz n.
31/1/2016 17:17:59
That is so clever!! I thought it was actually written in chalk, then zoomed in on the photo and saw the variety of stitches...Well done!
Catherine Kyngdon
1/2/2016 04:20:24
Love it!! 1/2/2016 15:26:53
That was the nasty part of the otherwise fun exercise. I am looking for an easier transfer method and might have found something. Must test first.
Sue Knight
2/2/2016 18:21:27
I think it is just wonderful. I definitely need one of these signs. Thanks for sharing. Your comment will be posted after it is approved.
Leave a Reply. |

Want to keep up with my embroidery adventures? Sign up for my weekly Newsletter to get notified of new blogs, courses and workshops!
Liked my blog? Please consider making a donation or becoming a Patron so that I can keep up the good work and my blog ad-free!

Categories
All
Archives
July 2024
|

 RSS Feed
Contact: info(at)jessicagrimm.com
Copyright Dr Jessica M. Grimm - Mandlweg 3, 82488 Ettal, Deutschland - +49(0)8822 2782219 (Monday, Tuesday, Friday & Saturday 9.00-17.00 CET)
Impressum - Legal Notice - Datenschutzerklärung - Privacy Policy - Webshop ABG - Widerrufsrecht - Disclaimer
Copyright Dr Jessica M. Grimm - Mandlweg 3, 82488 Ettal, Deutschland - +49(0)8822 2782219 (Monday, Tuesday, Friday & Saturday 9.00-17.00 CET)
Impressum - Legal Notice - Datenschutzerklärung - Privacy Policy - Webshop ABG - Widerrufsrecht - Disclaimer