|
The lovely Sarah from LoveCrafts sent me some embroidery threads to play with. And since I am a self-proclaimed thread-addict, I was up for the challenge. Browsing the LoveCafts website, I came across the beautiful hand-dyed stranded cotton by the Roumanian brand Valdani. Now I had heard that name before but never seen these threads, let alone played with them. So I picked some reds and pinks as I already had a design in mind: a Millie Marotta crab. You see, not only do I love her designs, but I and my husband happen to be Cancerians. 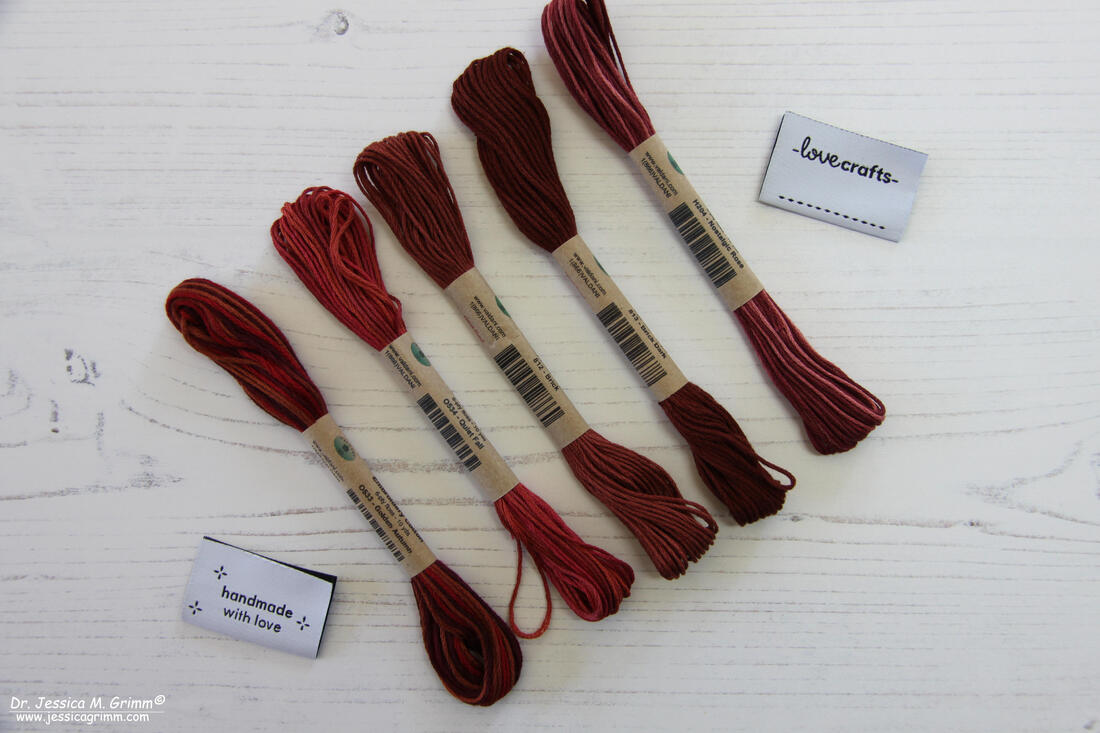 Valdani stranded cotton These are the lovely variegated threads I picked: 0533 Golden Autumn, 0534 Quiet Fall, 812 Brick, 813 Brick Dark and H204 Nostalgic Rose. Even the two 'bricks' are ever so subtly variegated. These would be perfect for those of you who recreate historical samplers. And what I really like about theses skeins? The wrapper is made of recycled paper. Not those horrible plastic wrappers the more modern DMC skeins have. We all need to do our bit to preserve our planet and I am glad Valdani does their bit. 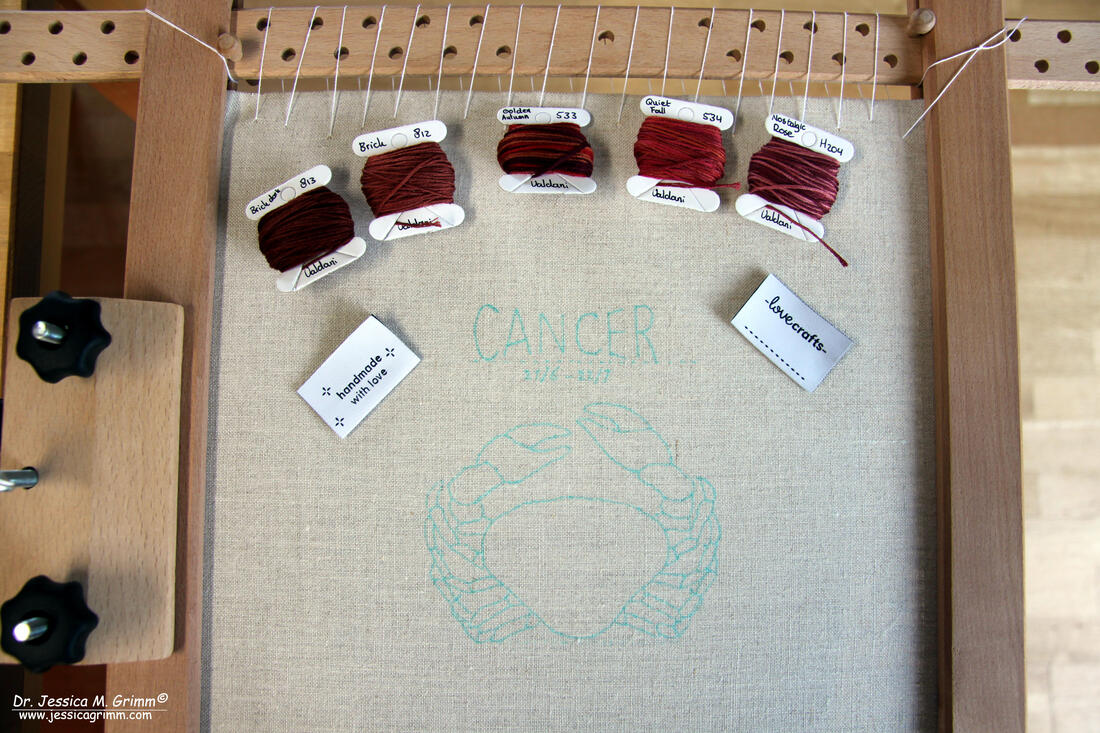 Valdani stranded cotton So how does one go from the intricate Millie Marotta drawing to a stitch-able pattern? In this case, as I approach the whole project as a doodle rather than a thoroughly pre-planned affair, I simply copied the outlines of the crab. I decided upon the size of the project (I like to use a particular brand of frames, so I decided on 14 x 14 cm) and I added some lettering. Apart from wanting to use some Schwalm embroidery on the main body of the crab and simple surface embroidery for all the other parts, nothing was planned. The combination of Schwalm and surface embroidery determined the fabric I was going to use: not too fine, as that would make the cutting of threads for the Schwalm too much of a challenge, but not too coarse either so as not to hamper the surface embroidery. I settled for 40 ct (16 threads/centimetre) Zweigart Newcastle natural coloured linen. As the label says that the Valdani threads are colourfast, I used an aqua-trick marker for the pattern transfer. And here are my stitching steps: - lettering 'Cancer' chain stitch with three strands Brick Dark - lettering dates simple backstitch with two strands Brick - outline body of the crab in the classic Schwalm way of doing things: chain stitch with three strands of Quiet Fall followed by coral stitch with three strands of Quiet Fall - preparing the grid for the Schwalm filling pattern by cutting out every fourth fabric thread in both directions - filling the grid with the Schwalm filling pattern 'Pfauenauge' (from Limetrosen I by Luzine Happel) using two strands of Quiet Fall. I've picked this particular pattern as it mimics the shape of the crab's body - filling the first segment of the legs with satin stitch using two strands of Brick - the second segment is filled with fly stitch using two strands of Quiet Fall - the third segment is filled with Cretan stitch using two strands of Golden Autumn - the fourth segment on the lower legs is filled with Van Dyke stitch using two strands of Quiet Fall - the claws were filled with chain stitch using two strands of Nostalgic Rose - at this point, I realised that the bottom parts of the upper claws would lend itself well to being filled with Schwalm embroidery too - again I made sure that the Schwalm filling pattern resembled the shape I was filling: 'Rippen nach links' and 'Rippen nach rechts'. I used two strands of Nostalgic Rose 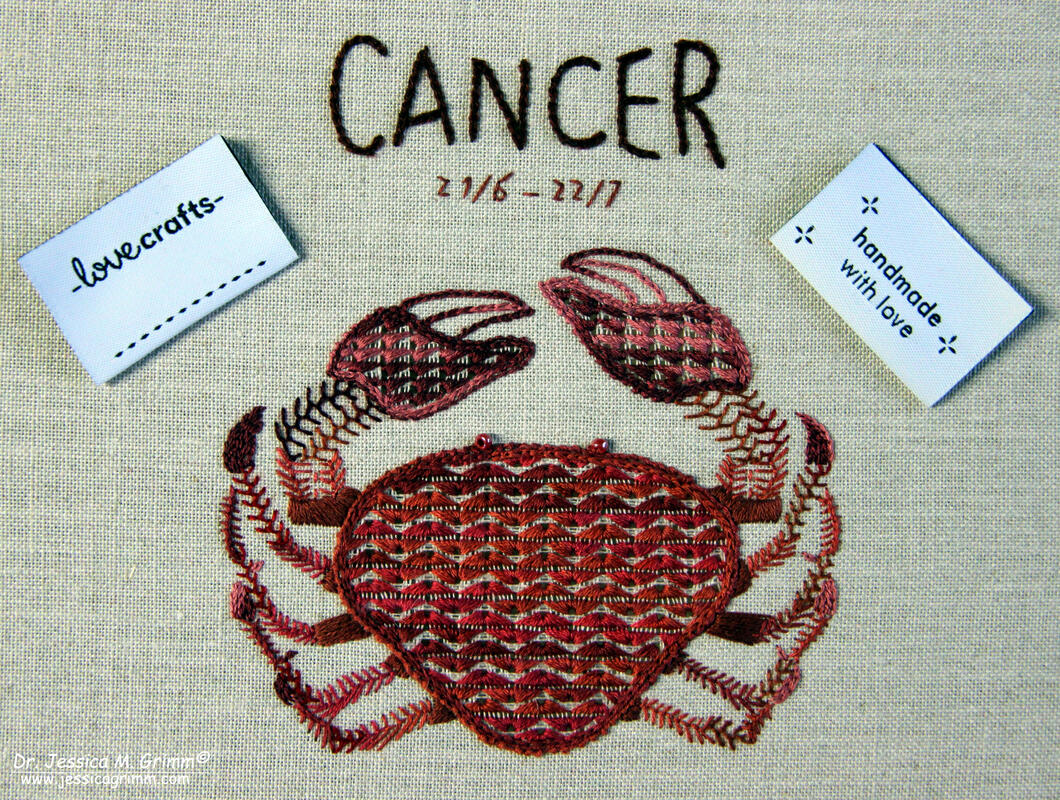 Schwalm embroidery made with Valdani stranded cotton Behold the result: I added two matching beads for the crab's eyes. So what do I think of Valdani stranded cotton? Firstly, I really like the colours of these hand-dyed variegated threads. Nostalgic Rose and Quiet Fall were my favourites. Secondly, I love the more environmentally friendly packaging compared with other brands. Thirdly, each skein holds 10 yards consisting of six strands. That's over a meter more than DMC or Anchor :).
Any disadvantages? Unfortunately, yes. I have found that the single strands of the stranded cotton are a bit more irregular and a bit fuzzier than those of either DMC or Anchor. This was especially noticeable with the darker colours: Brick Dark and Golden Autumn. Although I switched to a bigger needle, the appearance of my stitching is slightly fuzzy. This becomes especially noticeable when you compare the chain stitch + coral stitch edge around the Schwalm filling of the crab's main body. The stitches look dull on the edge, but there is a nice sheen on the filling stitch. As the filling stitch is worked in a grid, friction is much less and the thread keeps its sheen. Furthermore, you definitely can't re-use a thread when you made a mistake and stitches needed to come out. The thread will shred. What are your experiences with Valdani stranded cotton? Have you used other Valdani threads? I've seen that they do perle and silks as well. How do they compare to the leading brands? Do let me know in the comments below! Once again a huge thank-you to the lovely people of LoveCrafts.com who were kind enough to let me play with the Valdani stranded cotton! Be sure to check out their website for lots of embroidery threads, embroidery kits and amazing free inspiration.
7 Comments
As I am working really hard to finish my upcoming ebook on the linen vestments from Tyrol, it's just a short post today. But a rather nice one! First up is a beautiful blackwork tiger by Olga Tempel. She attended my five-day blackwork course earlier this year and recently finished this epic piece. I think she did a terrific job with the shading, don't you agree? 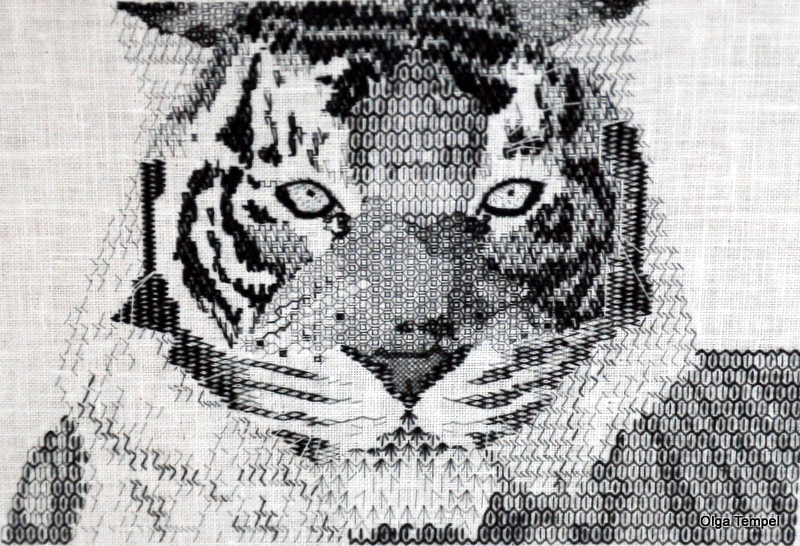 Remember my Millie Marotta fox? He won me first prize in the 'Stitch your Heart out' competition organised by Inspirations Magazine. Fox had been down-under for more than a year as Inspirations promised me to make him into an article. Alas, they finally decided they weren't going to do that after all and I got fox back after a nasty and expensive battle with German customs. During transit the frame got badly damaged. Luckily, I've found a really good framer in nearby Murnau: Galerie Gewehr. I think they did a great job on my fox! It now hangs in my kitchen for all to enjoy. 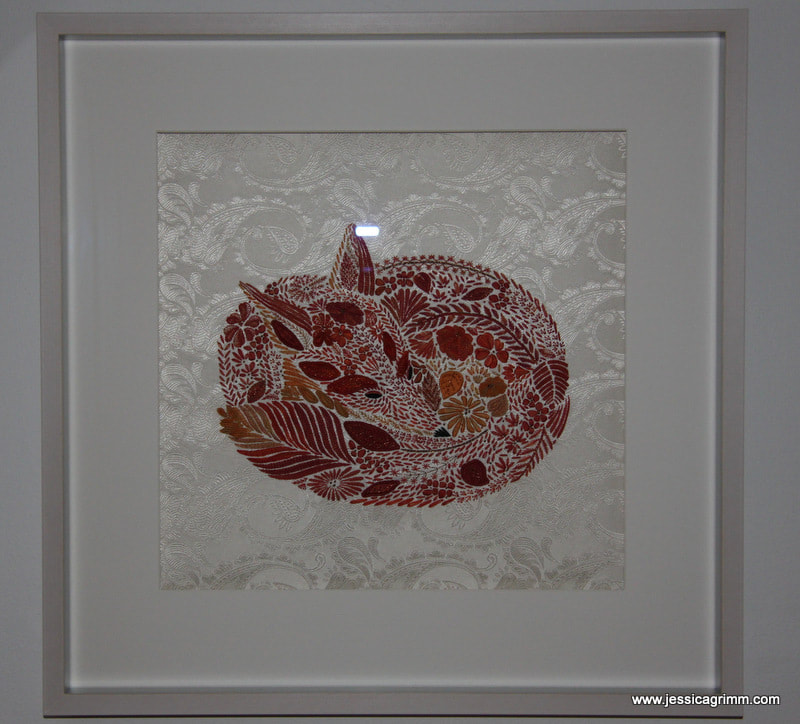 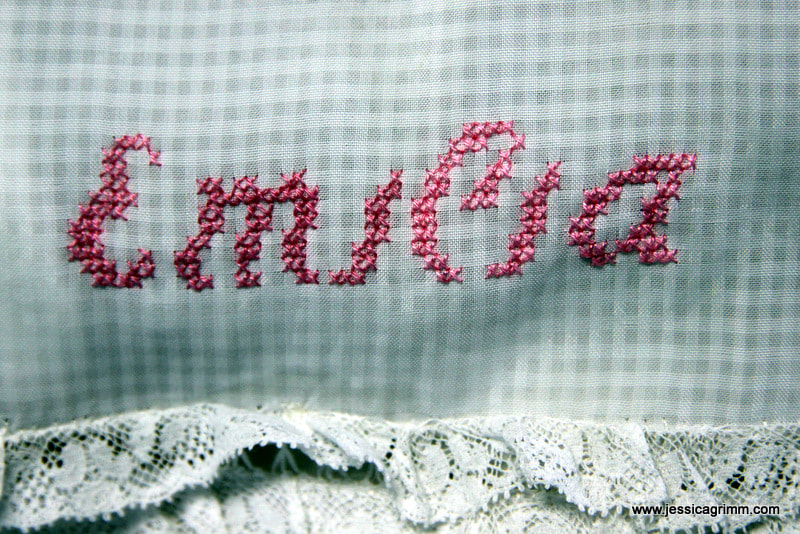 And last but not least, I managed to finish a commission today: Emilia's baptism gown. I am sure the little baby-girl will look adorable in it!
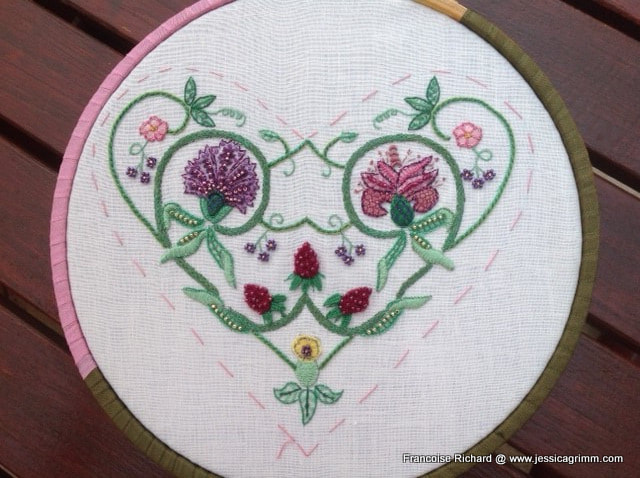
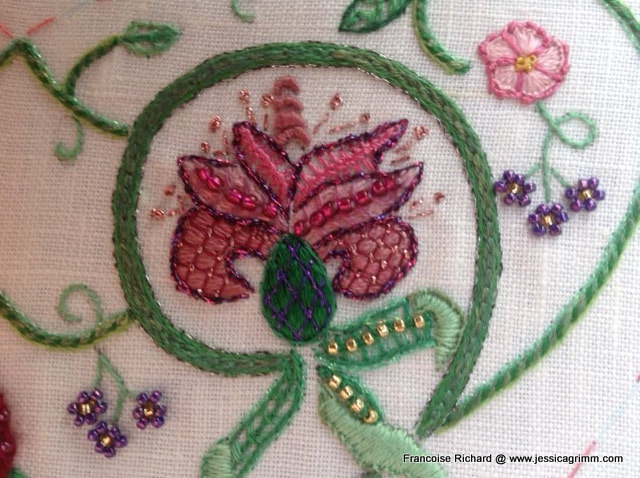
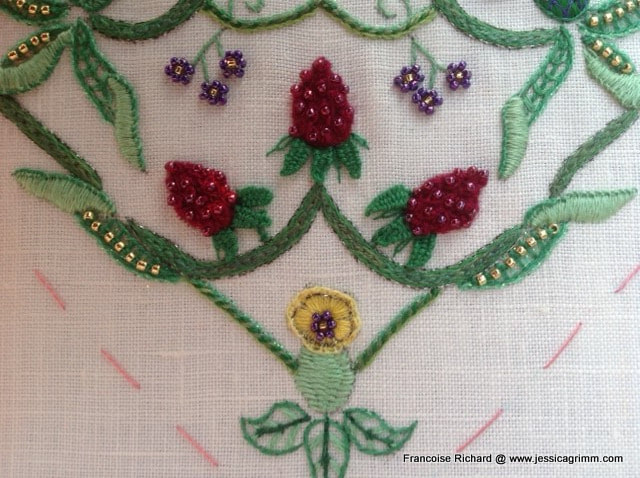
Two weeks ago I found, in between all the spam on easy loans, Viagra and what not, a most impressive surprise in my mailbox. Ginette Marcoux, one of the readers of this blog, wrote the following: "Today I want to share with you a special thanks for the prize winning beautiful embroidery of the fox from Millie Marotta colouring book. Because I came across a post on Mary Corbet's site talking about it I got curious and went on your site. And then.....then..... I fell in love with it! I am what Mary calls a very determined beginner embroider and I decided that if I bought the book, and follow your instructions I could do this, I simply had to work on something inspiring. So here is a picture I took when I was done (it took me nearly a whole year of trial and errors). Although I tried and tried again the stumpwork it was over my competencies, so I decided to add some bead leaves to compensate." And when I asked her if I could share her beautiful embroidered fox, this is what she wrote: "Thank you for your kind words, without your inspiring modern approach to embroidery design I think that I would have dismissed this art altogether (I thought that embroidery was for older people!). If you believe it could be of interest for others to see what a new embroiderer can do with a bit of determination and a lot of discovery learnings, then yes it will be my pleasure to share this project with them. Thank you for sharing all your work as well!" I am still blushing about Ginette's lovely comments! It makes my heart swell as this is exactly why I do what I do. So without further delay, here is her great rendition of the Millie Marotta fox: 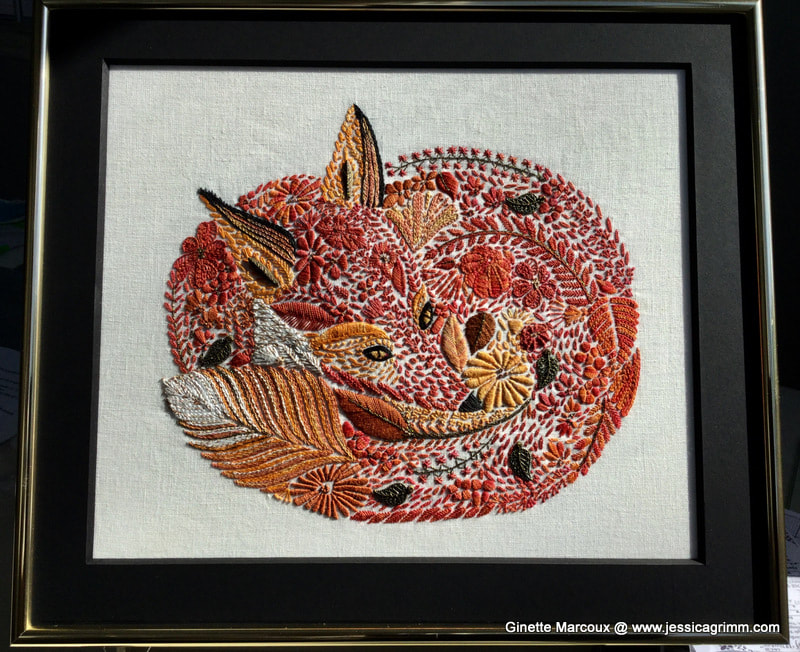 I think Ginette's work is stunning! The idea to use beaded elements instead of stumpwork wired elements works so well. Her fox has so much definition! It makes me want to make another one... And lucky as I am, I had further incredible mail a couple of days later. Francoise Richard, a reader from France, send me an email regarding last week's post on the project Strawberry Fayre. It turns out she has already stitched the project using her own stash. She kindly let me share with you her list of used supplies and some pictures. How cool is that?! This is what she wrote: "Bonsoir, I am Françoise from Françe and embroiderer for my pleasure. First, I would tell you that I follow your blog every time because you are a great embroiderer, I love all what you do! I made this fabulous kit of Carolyn Pearce this September but I don't purchase the kit because it is too expensive and I have a lot of threads and beads. You will see the photo above and this are the supplies I have used: Dmc stranded Cotton art 117: 727,210,208,915,911,913,954,910,3818,912 Dmc satin: 552,700 Caron collection Silk waterlily cardinal Gloriana silk 106 , 061 Ver à soie , soie d'Alger 2941, soie surfine 223, soie Metallic au sextant 122440, soie de Paris 3023 Guterman sulky ca02776 Madeira Metallic 12 et 305 Beads mill Hill petites 40332, 40557, 42101, 42012, 40553 42011 Mill Hill glass seed beads 02077, 02011" Now that made me blush again! I am blessed with great readers indeed. So here are Francoise's pictures of Strawberry Fayre: To all others who follow along with the Strawberry Fayre project: do read the great comments on last week's blog post (and probably future ones as well :)!). You are such a helpful bunch and this project is so popular, that great comments came in on possible substitutes. Someone even came up with the brand name of a possible substitute for the fabric! You will be able to find all blog posts regarding the project by clicking on either 'Carolyn Pearce' or 'Strawberry Fayre' in the right-hand categories column.
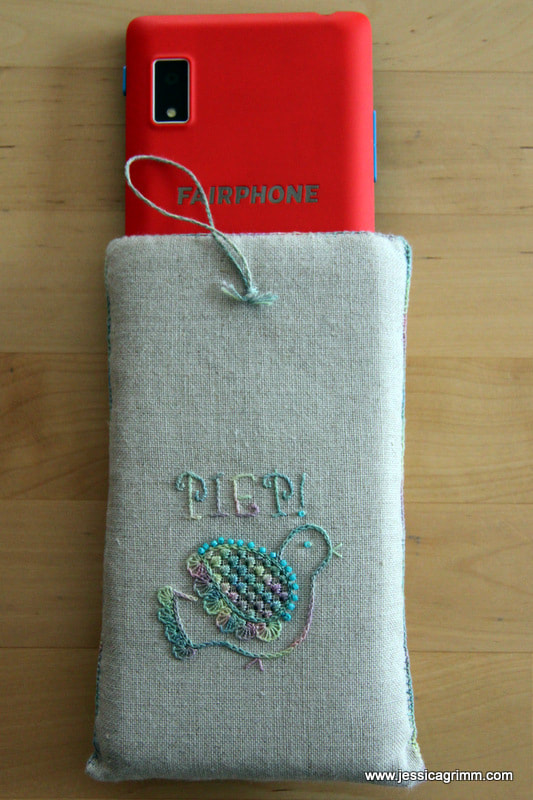
Yup, it is true: I have arrived in the modern area too. It took me years. But when I heard that Fairphone makes smart phones that last, are repairable and don't use blood minerals; I ordered one. So far, I have used it to download (and use!) a 5K running app, WhatsApp with my family, use Google for directions and information AND made the very occasional phone call :). Still much prefer my Ipad and Laptop... Maybe I should seek professional help? Pondering this option, I did make my Fairphone a cozy home to live in.
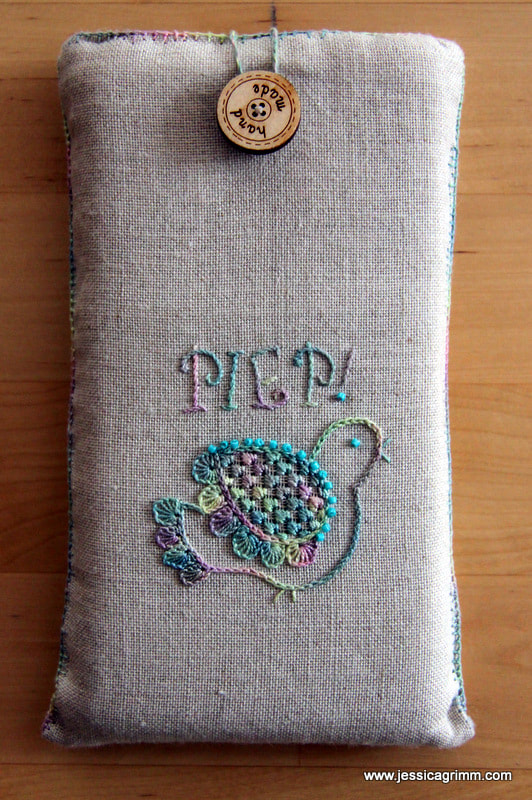
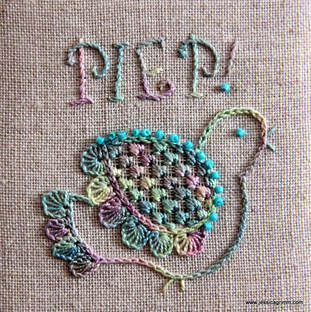
On Zweigart Newcastle natural coloured 40ct linen, I outlined the bird with chainstitch using a #12 variegated House of Embroidery perle colour Grapes C. Then I stitched partial buttonhole wheels for the feathers on the tail and the wing. I added straight stitches for the feet and the beak and attached some blue beads along the upper-edge of the wing. From the back, I withdrew every fourth thread in both directions and then added a Schwalm filling stitch called 'Gefieder'. The lettering was stitched using stem stitch. To make my 'phone home' a bit sturdier, I added wadding and a sheet of template plastic. The seams were then pimped with knotted pearl stitch. So far, my phone seems to be pretty comfy in her new home! I've asked my very talented husband to make a nice clean digital drawing of my scribbled birdy pattern. You can download it at the end of this article. Apart from using it as I did in a Schwalm embroidery way (finished design including lettering H 55mm), there is tons of other possibilities. How about stitching it monochrome on a piece of felt? Or applique with a few simple stitches for embellishment? Surprise me! 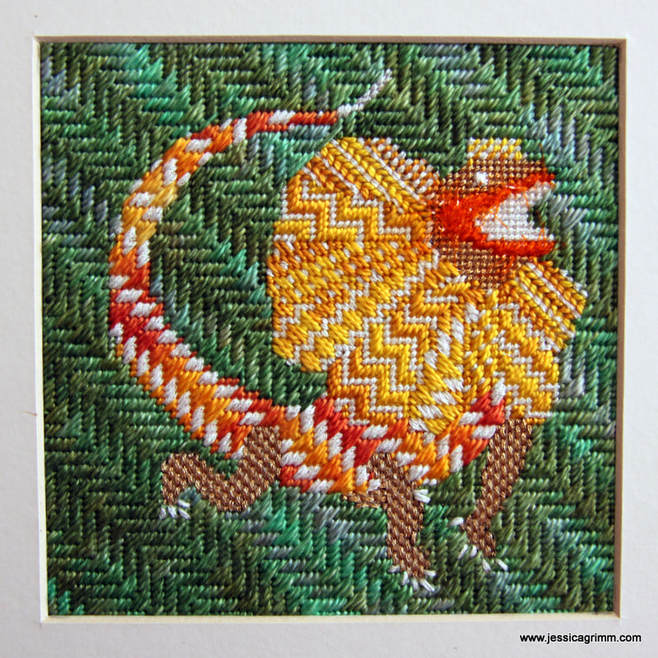 Canvaswork or Needlepoint Next up is another broderibox project using a design of a Chlamydosaurus by Millie Marotta. This amazing creature can impress by unfolding his neck frill. However, it can only do so in opening its mouth widely. The bones in the frill are extensions of the hyoid or tongue bone. Isn't nature amazing?! The lovely people of Nordic Needle had put in a glow-in-the-dark thread made by Rainbow Gallery. I made sure to add it to every canvas stitch I used on the chlamydosaurus (it is the white thread you see). And it glows beautifully at night! Unfortunately, it doesn't translate well in a picture. You have to take my word for it.
Last finish for today: the Floral Pomander by Hazel Blomkamp. I really enjoyed this project with all the little flowery scenes using simple embroidery stitches and tiny beads. However, the instructions were a bit messy with tiny pictures of the finished panels. And piecing the pomander together was a little fiddley. That said, it makes a great project if you like miniature embroidery, beads and a different way of finishing your embroidery. Oh, and thanks to the dried lavender mixed in with the toy stuffing, it is my best smelling project ever :)!
But before I'll address my latest stitched beetle, a bit of new additional information regarding Hiroko's cat embroidery book featured in my last blog post. Remember from last week's post that I recommended looking at the pictures in the book through a magnifier? Well, not only Mary Corbet and I remarked upon the small size of the pictures, more people did. To overcome this, Hiroko opened a password protected website for those who purchased the book. She will upload key pictures from the cat embroidery projects featured in her book onto that website. These pictures can then be downloaded onto your computer and zoomed in on as much as you like. I downloaded the first project and it works a treat! Unfortunately, for security reasons, Hiroko can't upload all the pictures. But this is a very good compromise! Hiroko has also let me know that she will not re-print the book once it sells out. So, if you want one, visit Hiroko's shop and order!  Canvaswork or Needlepoint Let's now move on to the beetle. I picked a line drawing from one of Millie Marotta's genius colouring books and transferred it onto 18 TPI Antique brown canvas with a black permanent marker. Why a permanent marker? Well if you'll need to block your embroidery afterwards, you don't want the black ink to run and ruin it :). I then started to play with the contents of my June broderibox by Nordic Needle based in the US. First up was a lovely blue metallic braid called Variegated GoldRush by Rainbow Gallery. It is a mixture of 20% metalized polyester and 80% viscose and it comes in 10 yards on a card. I decided to stitch long stitches to cover various parts of the beetle's body. The thread is just a little bit too meagre to fill out the canvas completely. However, it is not so sparse that I could have used a double thread. Instead, I just added a second stitch here and there on top of the first until I was happy with the coverage. For the neck, I used Byzantine stitch and since the single stitches making up the pattern are shorter here, I had no problems with coverage. Last but not least, I used tent stitches to stitch the mouth pieces and French knots for the eyes. This particular soft metallic braid is a joy to work with and doesn't snag or become worn. Will certainly keep it in mind for future uses! 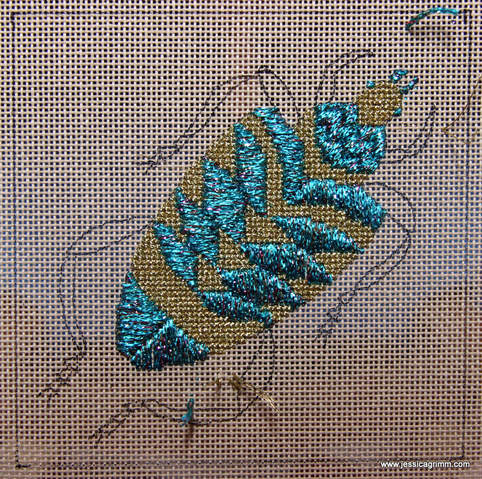 Canvaswork or Needlepoint Next up was another metallic thread: DMC Diamant colour D3852, a three-ply metallic. I filled the blanks on the body and the head with cross-stitches. In order to get good coverage, I doubled my thread. I like DMC Diamant as it is much better than many metallic threads out there. However, it isn't perfect. It unravels, wears and snags. That said, it is manageable as long as you use short lengths and watch your thread tension. 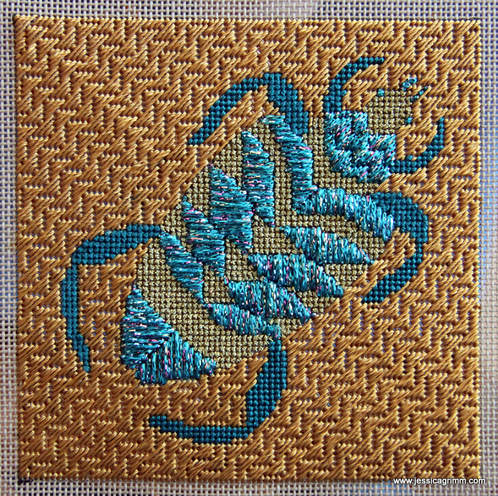 Canvaswork or Needlepoint Up next were the beetle's legs. I used Soie Cristale by Caron to stitch them. In order to get a subtle difference between the meatier upper legs and the thinner lower legs, I stitched the upper legs with a cross-stitch and the lower legs with a tent stitch. This particular silk thread is a dream to work with and the colour is just gorgeous. It is nicely behaving silk thread and thus particularly suitable for silk embroidery virgins! And now it is time for a serious confession: I do love Rayon. Or at least the type sold as Panache by Rainbow Gallery. The shine is unbelievable and gives the Byzantine stitch pattern a whole different quality. Hard to describe, but it shows a little in the above photograph. It adds movement to the background as the light comes off differently on different parts of the embroidery. And you can actually stitch quite nicely with this particular rayon! Yup, I am not lying. Yes, this three-ply thread unravels a bit, but nothing really serious. Yes, it is a bit slippery, but as long as you maintain good thread tension, it is a dream to stitch with. Conclusion: I do like at least some rayon threads. Still not sure if I should seek out professional help, though... 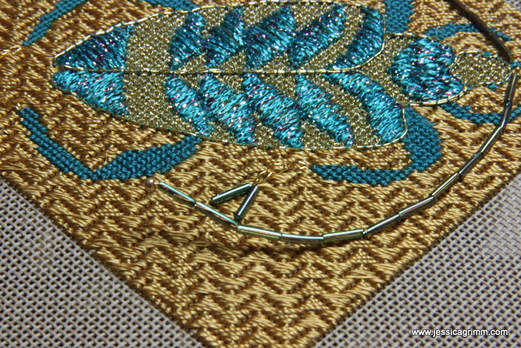 Canvaswork or Needlepoint Now it was time for the really fun part: embellishment. I started by couching a Japan Thread #7 by Kreinik around the edge of the beetle's body. I used one strand of the Soie Cristale for the couching stitches. Then I decided to stitch three chain stitches at the end of each leg with the Japan Thread. Quite heavy duty for the Japan Thread, but it worked perfectly. It didn't even harm the rayon stitches in the slightest. At the end of the Japan Thread chain stitches, I stitched down two Mill Hill medium bugle beads #82045 using Soie Cristale again. And then it was time for the really, really fun part: the feelers. I used brass wire to string up the bugle beads and placed a golden bead at the end before stringing back through the bugle beads. I plunged the ends of the wire through the canvas and secured them on the back. As the feelers are quite long and therefore had a will of their own, I partly couched them down with the DMC Diamant. And here is the finished beetle:  Canvaswork or Needlepoint I hope you had fun reading about another one of my broderibox projects! On a personal note, my husband started his new job today! After officially being laid-off in April when his employer filed for insolvency, he initially looked for a new job as an archaeologist. It quickly became clear that nobody really wanted a 50-year old digger. My husband realized that he didn't want to start at the bottom of the career ladder again. And we both realized that we didn't want to spend the next 17 years living the crazy living-apart life we had lived the previous 17 years. It was high-time to find an alternative. And luckily we found one! My husband now works part-time in a bookstore and part-time as a self-employed archaeometallurgist. Onwards and upwards from here :).
A couple of days ago, I received my July broderibox from Nordic Needle. It contained grey and silver metallic threads, silver beads, beading thread and a bead nabber (more on the tool, further down). Flicking through my Millie Marotta colouring books, I came across Euchoreutes naso or long-eared Jerboa. A kind of mouse with large ears, a tuff on its tail and the ability to jump high, living in China and Mongolia. Although the creature is light reddish-brown with a white underside, I decided to make mine grey. As usual, I worked my embroidery doodle on 18 TPI Antique canvas. The pattern was transferred using a fine black permanent marker.  Canvaswork or Needlepoint First thread to play with: Nordic Gold by Rainbow Gallery. The bobbin it comes on advertises it as 'Very fine, easy-to-use metallic stronger than blending filament'. It is a blend of metallized polyester and nylon. The thread is not stranded, but knitted. Using long cross-stitches and normal cross-stitches, I filled the Jerboa's tail, right foot and paw. To create the illusion of the left foot being further to the back, I used the smaller tent stitch. The Jerboa's nose was also stitched in tent stitch. This metallic thread works well indeed and stitches went in quickly. Just take care not to pull too much as the knitted structure might unravel. 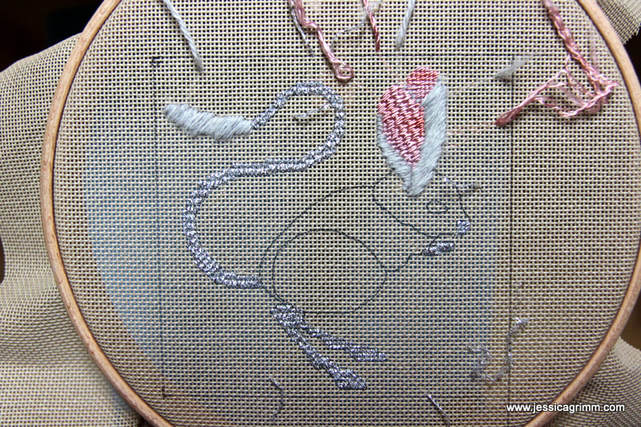 Canvaswork or Needlepoint Next up were the ears and the tuff on the tail. My broderibox contained another Rainbow Gallery thread: Alpaca 18. This is a 100% fluffy Alpaca thread; perfect for recreating the illusion of hair. After all, it IS hair :). To let the thread express its fluffiness, I decided to use simple straight stitches to fill the fluffy bit on the tail and the rims of the ears. I LOVE this thread. It is so soft and has such a perfect structure. Certainly a thread to remember for future projects! By the way, the pink inside of the Jerboa's ears was stitched with a three-ply rayon thread from my stash. I think it might have been an Oliver Twist thread. This thread unravelled itself faster than I could stitch. So glad the Jerboa comes with tiny ears... Again, I used a slightly larger stitch (condensed cashmere stitch) for the ear closest to the viewer and the smaller tent stitch on the ear further to the back. This approach creates the illusion of depth. 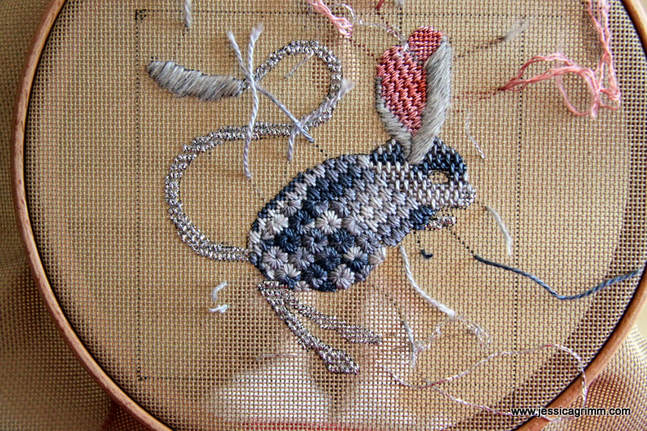 Canvaswork or Needlepoint Next up was one of my favourite threads: Vineyard Silk. A two-ply non-strandable spun silk. Before the whole broderibox adventure, I had never heard of this brand of silk thread. What a shame! It is a really good thread for Silk Virgins as it is so well behaved. It doesn't snatch; just a dream to stitch with! I started by stitching the curved thigh with circular eyelet stitch. I don't think I ever used this particular stitch before. It is quite a textured stitch and it screams 'floral'. However, I think it works well for this particular area. Following the thigh, I filled the main body with condensed scotch stitch. This diagonal stitch fits the elongated curved back of my mouse perfectly. Last, I filled the head with Parisian stitch. This straight stitch contrasts very nicely with the diagonal stitch of the main body. 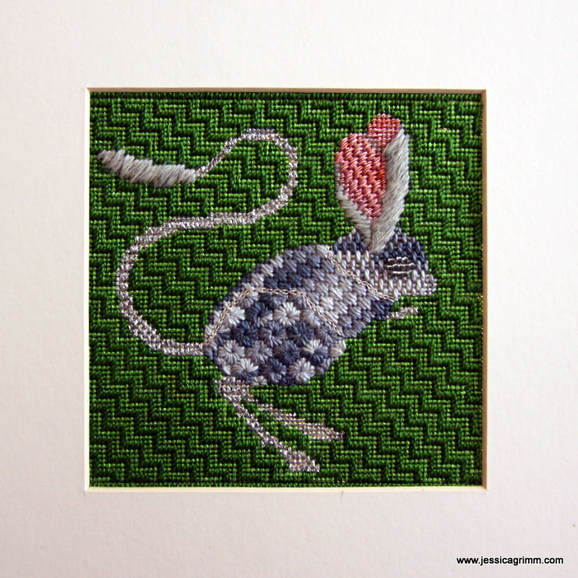 Canvaswork or Needlepoint I could have left it at that. The different areas of the body of my Jerboa are distinct enough through the use of different stitches (diagonal, straight and composite). However, my broderibox contained one more embroidery thread: Kreinik Metallics very fine (#4) braid. A great test to see how a particular metallic thread holds up, is to use it on top of already embroidered areas. I decided to stitch a chain stitch edge between the different areas of my mouse's body. The thread holds up well and didn't snatch on the previous stitches. However, compared to the Nordic Gold thread, this one unravels far quicker.
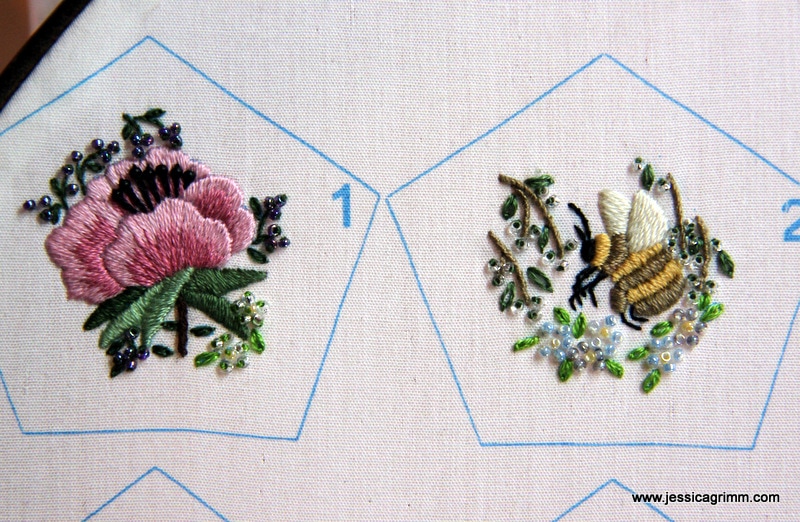
The Jerboa's eye is made up of a base layer of tent stitches using the Kreinik braid. Then I used the YLI Silamide beading thread to stitch down the silver Mill Hill glass sees beads; both part of the broderibox. I planned to try the bead nabber tool on this part of the project, but I forgot... I will keep the tool in mind for my next beading job. Since it looks like a thimble with a sticky tip, I am particularly interested to find out if the stickiness affects the beads. For the background of my Jerboa doodle, I used two shades of green Anchor perle #5 thread from my stash. The stitch used is Jaquard stitch and in real life, it creates such depth and movement! That's another broderibox doodle finished. I hope to have inspired you to try your own doodles. Using colouring book graphics as a base, you can easily create fun embroideries. Look at your subject carefully to decide which stitch fits best where. Remember to use smaller stitches towards the back and more bold stitches towards the front. It is easier than you think! And great fun too :). Today I am going to share some lovely embroidery pieces with you. We'll start off with the work of one of my students, then we'll have a look at some new pieces I made and we'll finish with a new initiative to bring Mastercrafts People together. Let's start with a stunning blackwork piece: 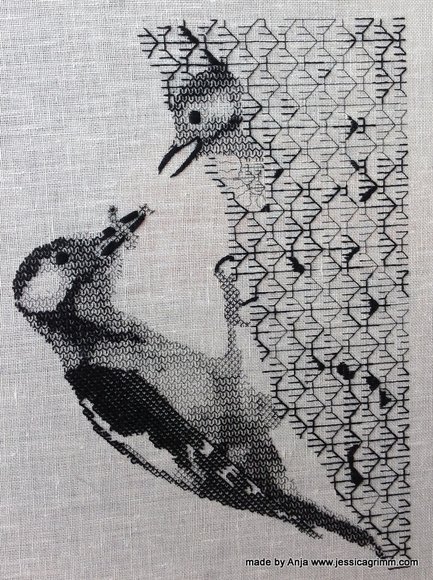 Blackwork embroidery by Anja This piece has been embroidered by Anja from the Netherlands. She started it last year during one of my week-long embroidery retreats. Anja worked from a picture and translated the different textures and shades beautifully into blackwork's geometric patterns. Anja will add some white highlights to the eyes to make the birds even more life-like. I so enjoy seeing a finished piece which started under my tuition!
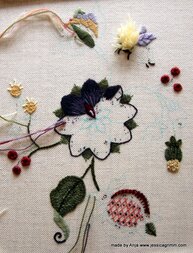
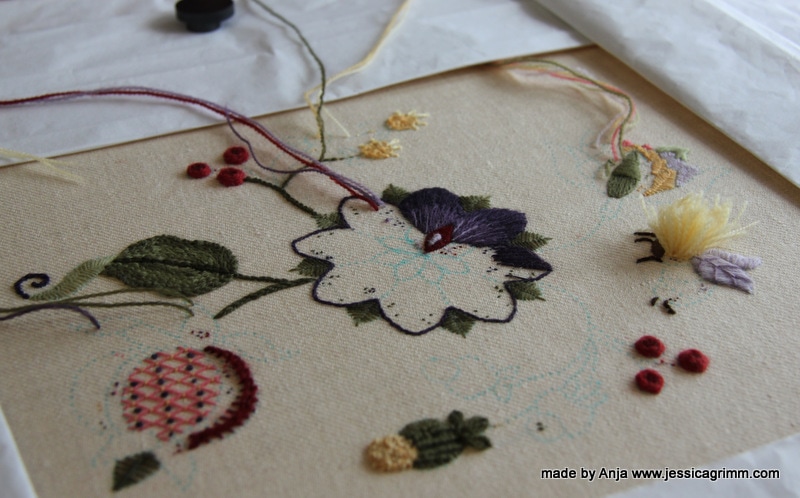
Next up is another piece by Anja. She started it last week during another one of my embroidery retreats. We had great fun designing this piece by using a piece by Hazel Blomkamp as the base. Then we added two flowers from a colouring book by Millie Marotta and a pomegranate from an older embroidery book. Just to illustrate that you don't need to be able to draw your own design from scratch. Mix and match often produces a stunning new design. I have a feeling this piece will turn out great as well!
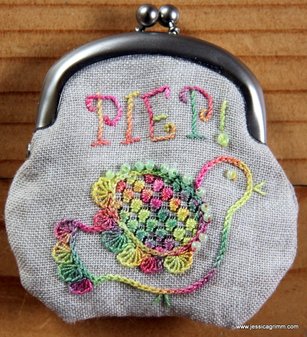
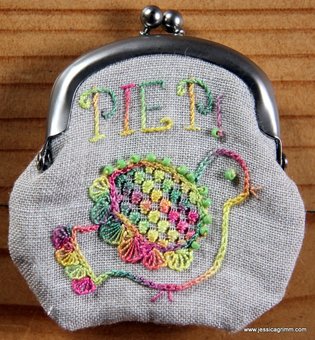
As most of you know by now, I have a subscription to the Broderibox by Nordic Needle. Although I used all threads present in the May box, I wasn't sure what to do with the purse clasp. I am an embroideress and I can mount a finished piece satisfactorily. However, I am not good at finishing. Mainly because I do it so rarely. Time to change that! There are so many lovely products out there to turn your embroidery into something other than a framed picture. Time to become acquainted with the clasp. Luckily for me, there was a website listed on the back of the clasp's packaging: Zakka Workshop. Do visit their website as they have some adorable stuff on there. And best of all, they have a really good Youtube video on how to install the clasp. As I wasn't confident that I could come up with the right size embroidered purse, I ordered their instructions for the simple patchwork pouch. It provided me with a template for the purse and then it was just a matter of adding a cute bird, do some Schwalm embroidery, add some beads and best of all: use a House of Embroidery hand-dyed perle #12 in a colour combination that's totally out of your comfort zone :). Worked a treat so far. Installing the clasp wasn't as easy as the video makes you believe. Especially not as I've probably used the wrong interfacing between the embroidery and the lining of the purse. Mine is probably too thick/stiff. That's the challenge when using instructions from another country. However, I am quite pleased with the result! 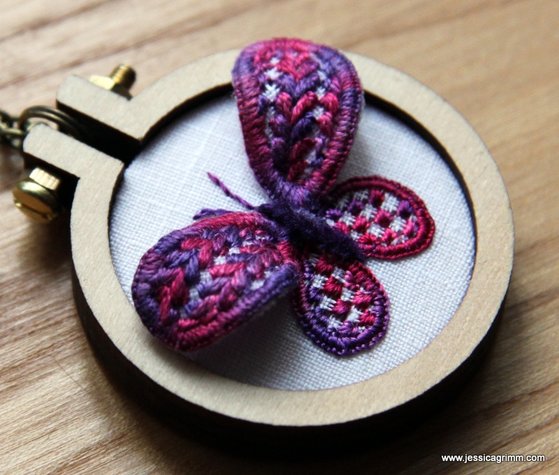 Schwalm whitework embroidery and stumpwork embroidery Another great way to finish your embroidery is to use a tiny wooden hoop by Dandelyne. Since I really like my Schwalm butterfly, I wondered if I could shrink the piece enough to go into a 4cm hoop. Guess what? I could! I used a combination of House of Embroidery hand-dyed fine silk and raw silk as well as paper covered wire to stiffen the upper-wings. I've now worn the piece around my neck for two days straight (I did put it down for sleeping...) and it holds up beautifully. By the way, you can get your Dandelyne hoops here in Germany from the lovely Nadine from Zur lila Pampelmuse. That's where I got mine :).
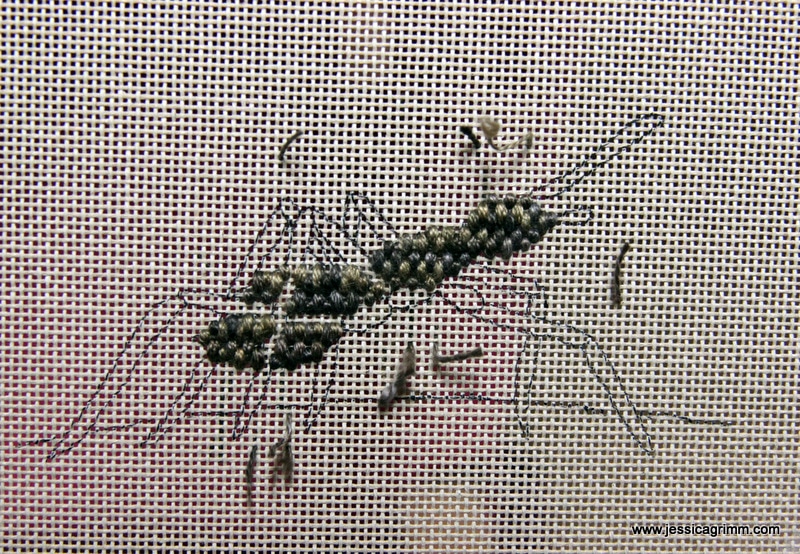
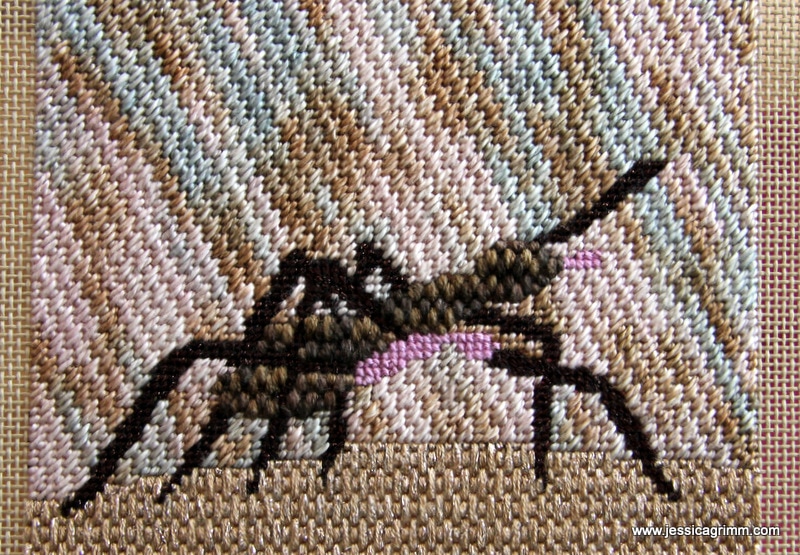
Happy start of the week dear reader! I am back from a week full of wonderful sight-seeing with my family. And one of the sites we visited was the Bauernhofmuseum in Illerbeuren. A pretty open air museum showcasing farm life from the Swabia area of Germany. And of course, there was some lovely embroidery on display as well. Mostly on household linens and mainly involving monogramming and whitework embroidery. How about these gorgeous Richelieu embroidered curtains featured in an inn? 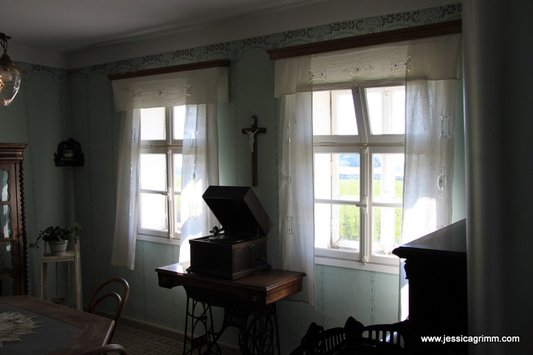 Embroidery at Bauernhofmuseum Illerbeuren In between family commitments, I sneaked in enough embroidery moments to complete my next broderibox project. The broderibox is a monthly embroidery threads subscription put together by the lovely people of Nordic Needle. This month's box contained: five embroidery threads, beads and a purse clasp. Since the threads had a lot of browns in them; an ant sprang to my mind. Lucky for me, the amazing Millie Marotta has drawings of ants included in her colouring-in book 'Wild Savannah'.
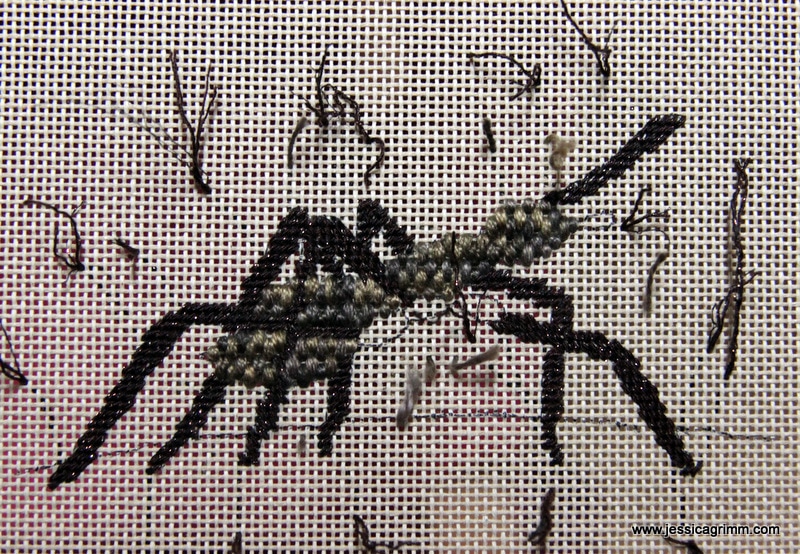
As many of you probably know, canvaswork or needlepoint embroidery is stitched front to back. Or: object first, background later. Now be good and do not ever do that with your silk shading ;)! So, in this case, I started with my ant. She is called Truus de Mier, by the way. A favourite ant from a children's tv-show in the Netherlands. For Truus' body, I used a variegated perle #8 by Valdani. I really wanted to try this brand of embroidery threads. It worked a treat! No 'typical-low-grade-Eastern-European-Quality' here. As I wanted Truus to have a little 'body' to her body, I used the raised spot to fill it. As this stitch required me to pass 8-times through the same hole, I expected the thread to wear beyond pretty. But it didn't. They surely do know how to produce a fine perle in Romania! Next up were Truus' legs. I stitched them in tent stitch and used both directions for different legs. This made the whole thing a little less tangled-up when legs crossed. The legs were stitched using Vineyard Silk shimmer. It is a silk thread with a shimmering filament added. It does not have a nice feel and it unfortunately stitched accordingly. A bit disappointing as I really liked the previous 100% silk threads by Vineyard Silk!
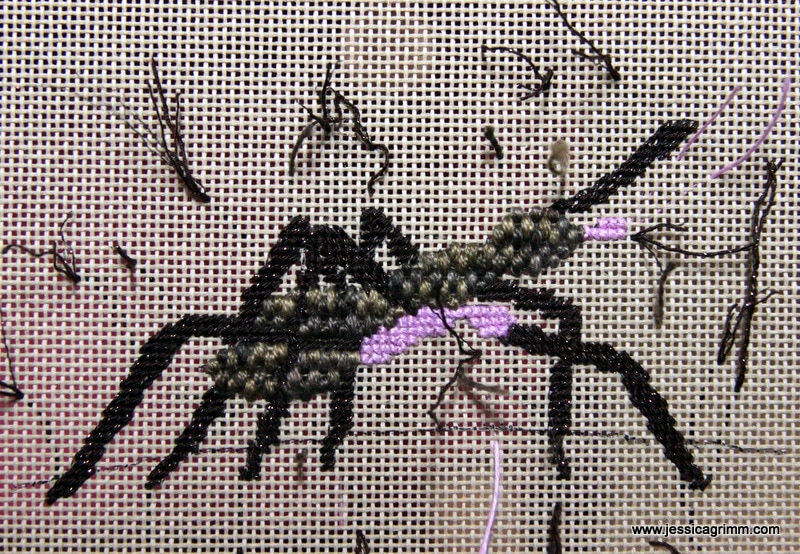
Apparently, ants have segmented legs that start with a bit of a bulky part. And ants have a mouth piece with which they cut leaves in handy transportable portions. Since this month's broderibox had a violet Londonderry linen thread in it, I decided to use it to stitch these parts in cross-stitch. Lovely thread! I do stitch some whitework embroidery with linen threads and really love it. That's Ms Truus de Mier sorted. On to the background. I decided to stitch the earth on witch Truus walks with Silk Lame Braid by Rainbow Gallery. Despite it being a silk thread mixed with metalized polyester and some rayon, it felt and stitched fantastically. Very well suited for the vertical Parisian stitch.
As the variegated cotton thread Watercolours by Caron had some blue in it, that was going to be turned into the sky. I separated the three plies and stitched the diagonal Cashmere stitch with one ply. I really love these cotton threads by Caron! They are so soft and hold up so well whilst stitching on canvas.
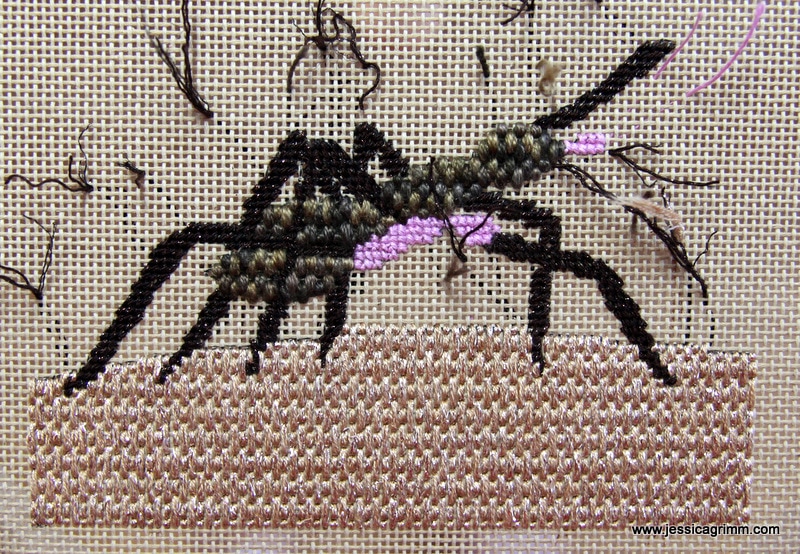
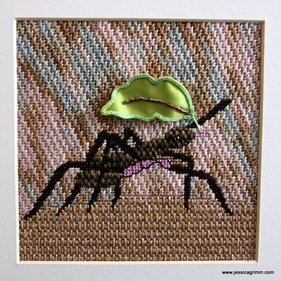
To finish my Truus de Mier, I decided that she needed a bright green stumpwork leaf. I wired a piece of dupion silk backed with calico. The buttonhole edging was stitched using a #12 House of Embroidery perle from my stash. I added the Mill Hill magnifica beads provided in the broderibox to my leaf. Subsequently, I stitched a few beads onto Truus for an eye. And that's another broderibox project finished satisfactorily! P.S.: Us dummies did take the camera with us to the Bunter Markt craft fair in Wessobrunn on Sunday, however, we forgot to take a picture of our stand... On the up-side, we did manage to sell two pendants and shed a few flyers and business cards! As a teenager, I loved Bob Ross' television painting classes. Not only do I really like his painting style, but I also like his way of performing on screen. Especially those episodes in which he brought an animal, are my favourites! And all things he painted were always 'happy' by his own words. So today, I am introducing to you: a happy blue snail, a happy honey bee and a happy pink flower :). Feel the happy vibes dear reader (epecially the newly-signed-up readers from Belgium!).
Let's start with the bee and the flower. As most of you know, I have a rather large commission on my hands with another pair of traditional Bavarian suspenders. Canvaswork is tough on your hands, so a little gently stitching in between sessions is a good thing. When I saw a picture of the Floral Pomander by Hazel Blomkamp on Pinterest, I so wanted to stitch this project. Not only is the stitching and beading adorable, but I really like this finishing technique. I've never used it before, but I can see great potential for it with a different design and embroidery style... It is a rather 'old' kit by Hazel Blomkamp and the instructions are not as perfect as I know they are today. Personally, I can live with the fact that she calls the same colour thread by more than one name. And, since I can stitch, I do not need a step by step instruction on how to embroider the little scenes. However, if you are a newbie, maybe not the best kit to start with. When my kit arrived, I was positively surprised by the fact that German customs had missed it :). Vielen, vielen dank ! Hazel has not only packaged the kit supplies beautifully; there seems to be plenty of them. Especially of the beads. As you might remember, I'd run out of threads when stitching a kit by Pascal Jaouen. Although I contacted him in several ways, I haven't heard back from him ever since. Interestingly, Mary Corbet is addressing the issue on her blog today.
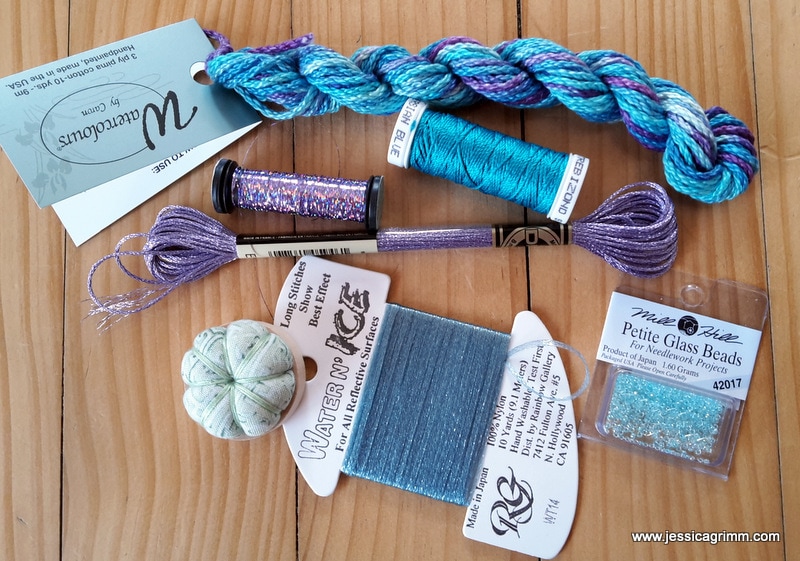
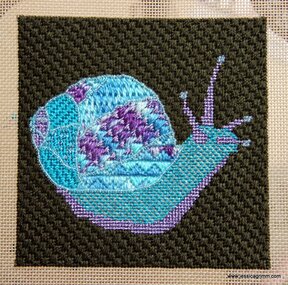
On to the happy blue snail. Every now and then, I just need to play. That's why I like Nordic Needle's broderibox subscription plan so much! My February box was released by customs on Saturday, so I had some quality playtime over the weekend. I decided to stitch up a happy blue snail on 18 TPI antique canvas. I found this particularly adorable snail in one of Millie Marotta's colouring-in books. Great resources for instant embroidery designs.
Again, this month's broderibox contained a few threads I had never encountered before. Yummy! New to me was the trebizond silk (the blue spool in the picture above). I had come across it on Mary Corbet's blog, but I had never seen it in person, let alone stitched with it. It is a really nice twisted silk thread similar to a #8 perle. It does not cover a 18 TPI canvas completely, however. Using two threads wasn't an option as that was too bulky and thread fatigue was horrendous after only a few stitches. So I decided to use it only for relatively small diagonal stitches and live with the fact that the canvas shimmers through. The thread reminds me a lot of a silk perle and it indeed comes with the same disadvantage: the plies untwist faster than you and I can stitch :)! Also new to me was the Water 'n Ice yarn. It is a flat translucent braid said perfect for long stitches. I decided to weave it through pre-stitched trebizond tent stitches on the body of the snail. It gives a really lovely, yet subtle 'wet' impression. I can see this work well for watery scenes in canvaswork. Or maybe even couched down in regular surface stitching. Other nice goodies in February's broderibox were a skein of DMC metallics, a spool of Kreinik blending filament and a gorgeous skein of Watercolours by Caron. The lovely people at Nordic Needle also included some petite Mill Hill beads and a really handy pincushion with a magnet on the bottom. To finish the background on my happy blue snail, I used a dark green Vineyard silk from January's broderibox. I have really fallen in love with this lovely silk thread. It is so soft and hardly wears when stitching on canvas. Can't wait for my next broderibox to arrive! Until then, it is back to my beautiful Bavarian suspenders. When I asked my lovely blog-readers last week to send me a picture of my embroidered fox attending Beating around the Bush in Adelaide, I just wanted to know if foxy was having fun down-under. Was he not too home-sick? Had he made friends with other embroideries? Did he behave himself? On the first picture I kindly received from Gayle, he seemed to be having a blast! 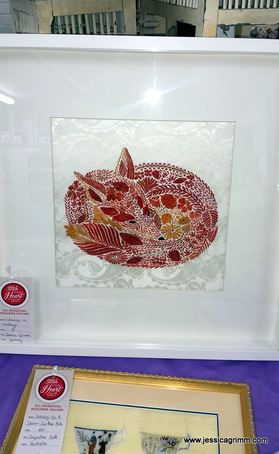 Attending 'Beating around the Bush' my embroidered version of Millie Marotta's fox And then a second picture came, kindly taken by Denise. And it made me scream like a little girl. My poor husband almost freaked out. 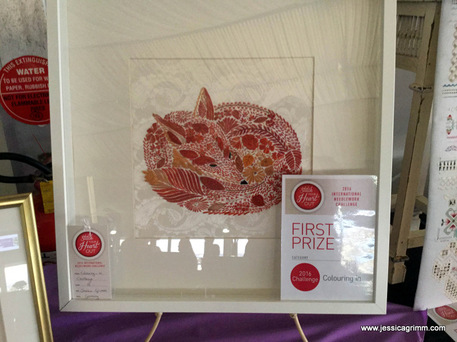 Attending 'Beating around the Bush' my embroidered version of Millie Marotta's fox My embroidered fox, after Millie Marotta's wonderful drawing, won me first prize in the coulouring-in category of the Inspiration's 'Stitch your Heart out' competition. I still have a broad smile on my face. This is what the lovely people of Inspiration's had to say about my entry:
'We loved your superbly embroidered fox based on the fox from Animal Kingdom by Millie Marotta, your fabulous combination of surface and raised embroidery techniques, the placement of the colours and the subtle use of metallic thread. The background fabric, the patterned silk damask, is so complimentary to your fox – a thoughtful choice which was much commented on during the display of competition entries at our international needlework convention, Beating Around the Bush.' It is with much gratitude that I challenge you all to participate in the next competition in two years' time. And by the way: Denise won the counted/cut/drawn category with her clever three-dimensional strawberries! |

Want to keep up with my embroidery adventures? Sign up for my weekly Newsletter to get notified of new blogs, courses and workshops!
Liked my blog? Please consider making a donation or becoming a Patron so that I can keep up the good work and my blog ad-free!

Categories
All
Archives
July 2024
|
||||||||||||||||||||||


 RSS Feed
Contact: info(at)jessicagrimm.com
Copyright Dr Jessica M. Grimm - Mandlweg 3, 82488 Ettal, Deutschland - +49(0)8822 2782219 (Monday, Tuesday, Friday & Saturday 9.00-17.00 CET)
Impressum - Legal Notice - Datenschutzerklärung - Privacy Policy - Webshop ABG - Widerrufsrecht - Disclaimer
Copyright Dr Jessica M. Grimm - Mandlweg 3, 82488 Ettal, Deutschland - +49(0)8822 2782219 (Monday, Tuesday, Friday & Saturday 9.00-17.00 CET)
Impressum - Legal Notice - Datenschutzerklärung - Privacy Policy - Webshop ABG - Widerrufsrecht - Disclaimer