|
When I saw a picture of the beaded easter egg on the Fire Poppies website, I was immediately charmed by the pretty design. I had never seen anything like it. When my kit arrived, I found out that the company who makes them is called Riolis from Russia. The actual designer is called Anna Petrosyan. Pardon my ignorance, but I had never heard of either. I do however know that embroidery is huge in Russia and that there are many talented designers living there. I just wished there wasn't such a language barrier! 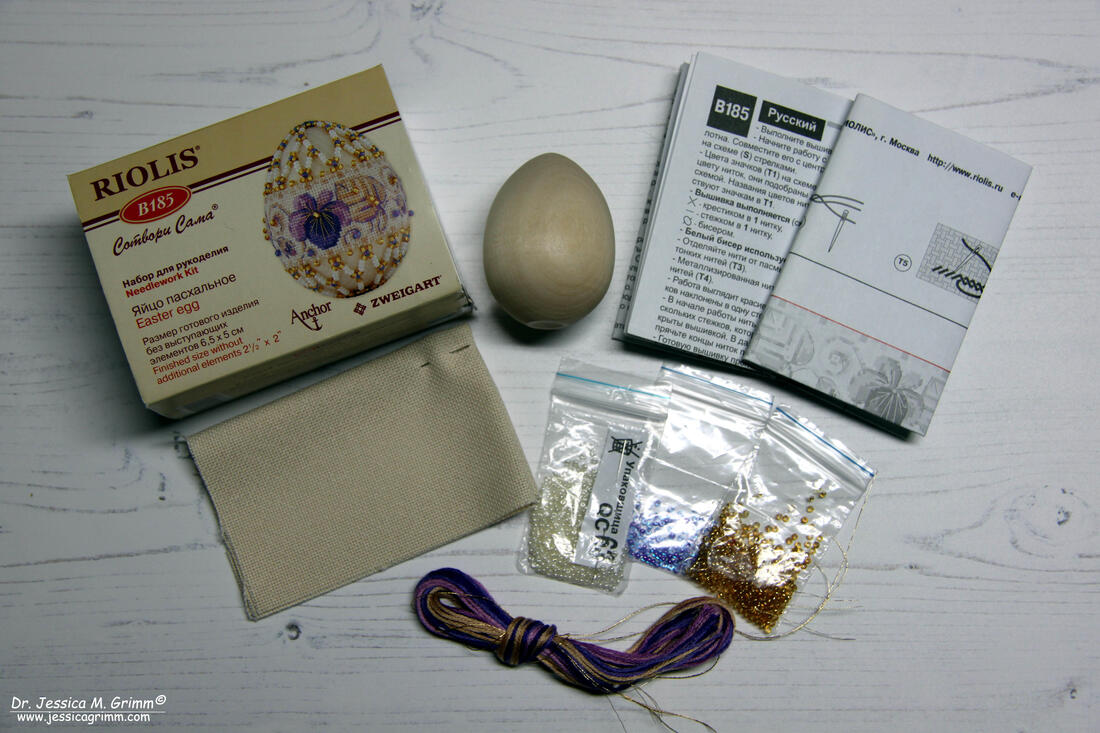 Easter egg kit by Riolis embroidery My easter egg kit came with most of the materials needed to finish the design. I just needed to add sewing thread and beading thread. Fabric, floss, beads, needles and wooden egg were all included. And everything was very good quality too. Fabric came from Zweigart and Anchor supplied the floss. The instructions were very good too. With clear diagrams and an adequate translation into English. Not perfect, but very doable if you are anything other than an absolute beginner. 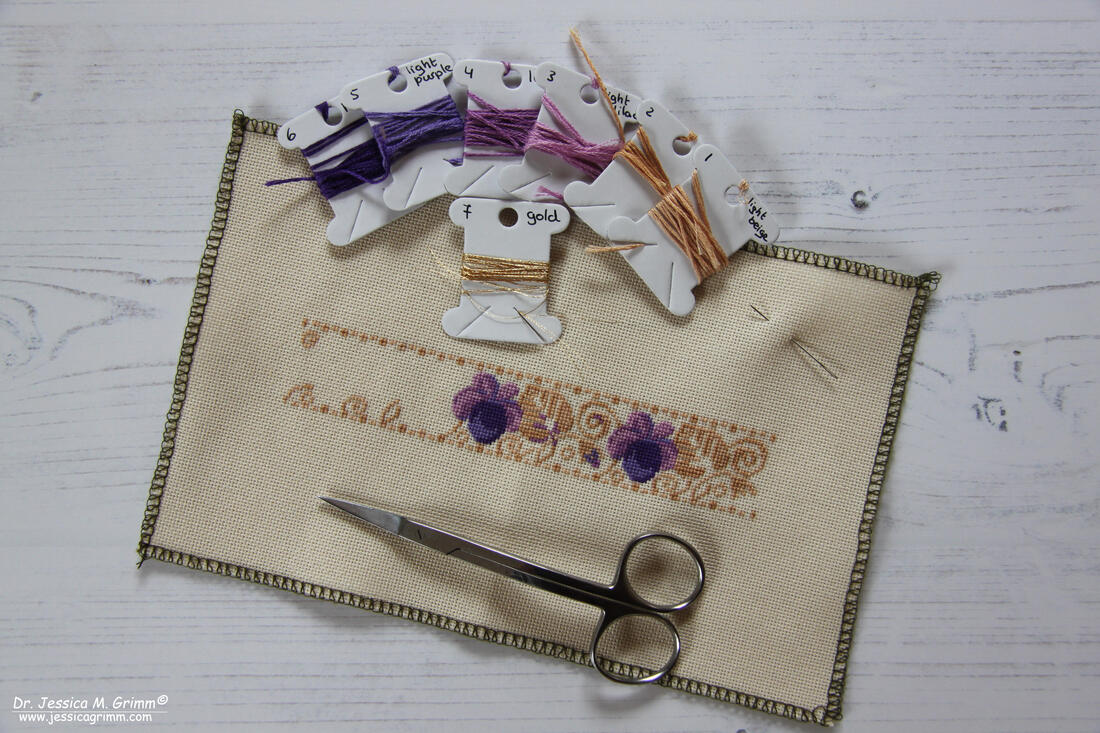 Easter egg kit by Riolis embroidery As always, I started by locking my fabric to prevent fraying. I also wrapped my floss onto some paper bobbins. The actual embroidery was very straight forward working with one strand of floss over one fabric thread (Zweigart Lugana). This explains why the finished embroidery looks so very refined. 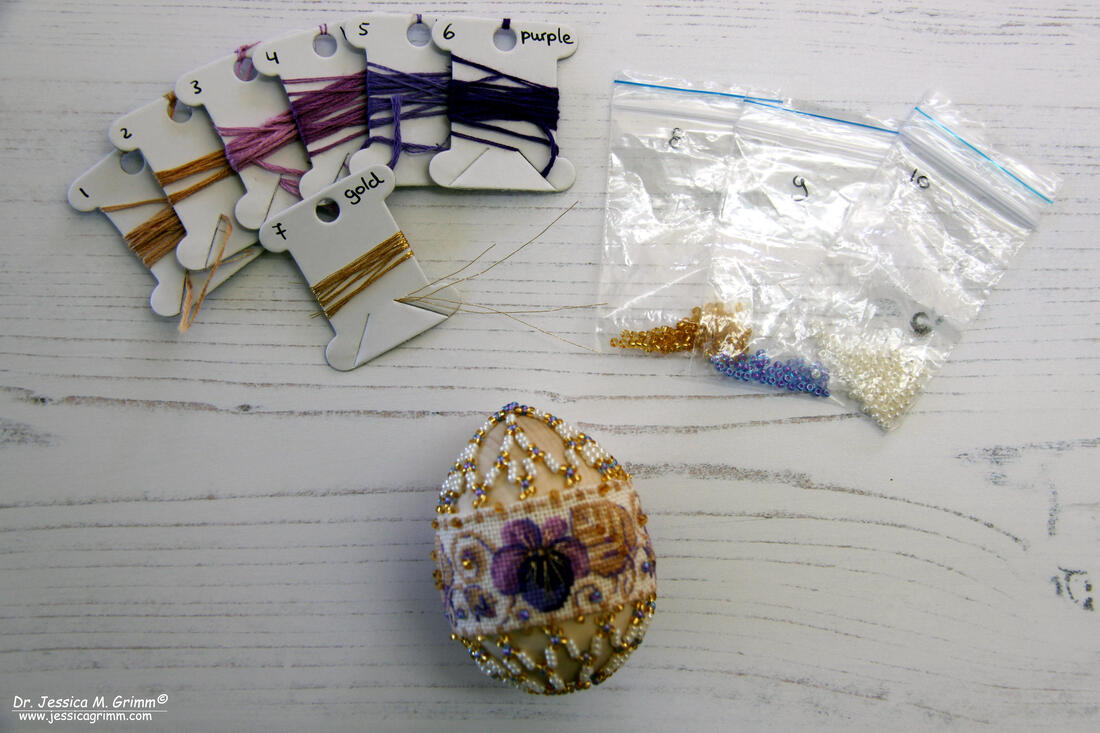 Easter egg kit by Riolis embroidery When it came to the construction of the actual egg, I had some minor difficulties. The translation isn't very good here. When you follow it to the letter, you will find that one of your seams shifts when you pull your finished embroidery over the wooden egg. The upper and lower seams are only fastened at the central seam at the back. If I were to stitch another one of these eggs, I would prevent this by sticking the seams to the back of my embroidery with the help of some Vlisofix/Bondaweb. Or, more likely, I would only stitch half cross-stitches for the border. When turning the seams, I would fasten them by finishing the border cross-stitches (i.e. put the other half cross-stitch in). This would secure the seams perfectly and would prevent shifting. The actual beading was great fun! I certainly learned a new skill. And I am very pleased with the result. Not as perfect as the pictures shown in the kit, but pretty good for a first attempt. And being an embroidery designer, I am already thinking of improving the finishing on these eggs (or Christmas baubles?). How about using linen banding? That would eliminate the whole drama with the seams :). If you would like to stitch your own Riolis easter egg, then please ask Google. The kit was released in 2014 and has sold out on the Fire Poppies' website. The design number is 'B185'. However, I hope my review has shown that embroidery kits from Riolis are high-quality, contain plenty of materials and are well worth a try! But beware: I have now stitched another egg in this series (the one with the red flowers) and here the measurements are all wrong. The design is not long enough to wrap around the egg. DO NOT follow the size recommendations for the seam allowence as you will end up with a piece of cloth that is too short. Instead place your finished embroidery on the egg and take your seam allowance from there. P.S. Did you like this blog article? Did you learn something new? When yes, then please consider making a small donation. Visiting museums and doing research inevitably costs money. Supporting me and my research is much appreciated ❤!
12 Comments
Nope, I had not retired for Christmas. I am very busy stitching a new goldwork teaching sample for one of next year's teaching jobs. The first version was unfortunately rejected. And whilst my whole body is aching from sitting behind my slate frame and computer for too long, I did learn a lot from the experience. In the new year, I will put together a document with lots of questions and options for needlework business owners who approach me with a teaching request. It will hopefully ensure that they know exactly what I can and can not offer. And I will have a far better idea of what it is they are looking for. In the meantime, I have stumbled upon a lovely small needlework and hand-dye business from Hungary: Barbaral Creations. 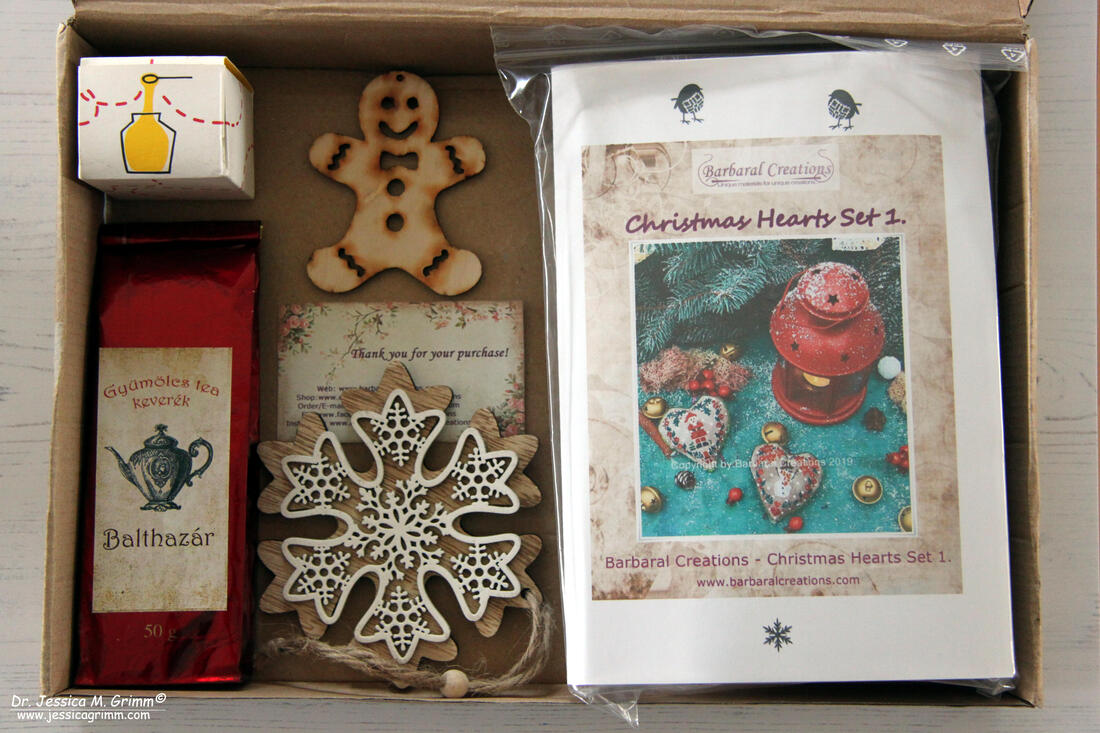 Barbaral Creations stitching box Many of you know that I am a huge fan of the FiberTalk podcasts and video shows. Being a one-woman-show, it can often feel a bit lonely. Gary, Vonna, Debby and Arlene are my overseas stitching buddies. Listening to them chatting away on needlework topics and the occassional Big Foot story, makes for good working vibes. Lately, they are sponsored by Stitchy Box. This is a thread and needlework goodies subscription service in the US. Some of you might remember that I took out such a subscription two years ago with Nordic Needle. I loved it! And I was totally bummed when they went out of business. I have been on the lookout for a replacement ever since. However, ordering these things from outside the EU comes with a lot of customs-hassle when you live in Germany. So I started searching for an alternative from the EU. I found Barbaral Creations on Etsy. Barbara lives in Hungary near the Rumanian border. She dyes threads, ribbons and embroidery fabrics by hand. Now that has my full attention. I am a self- diagnosed thread-addict :). I bought her Stitchers Subscription Box Winter/Christmas edition. Be sure to check out here lovely hand-dyed ribbons, silk threads, perle, stranded cotton, trims and fabrics too! 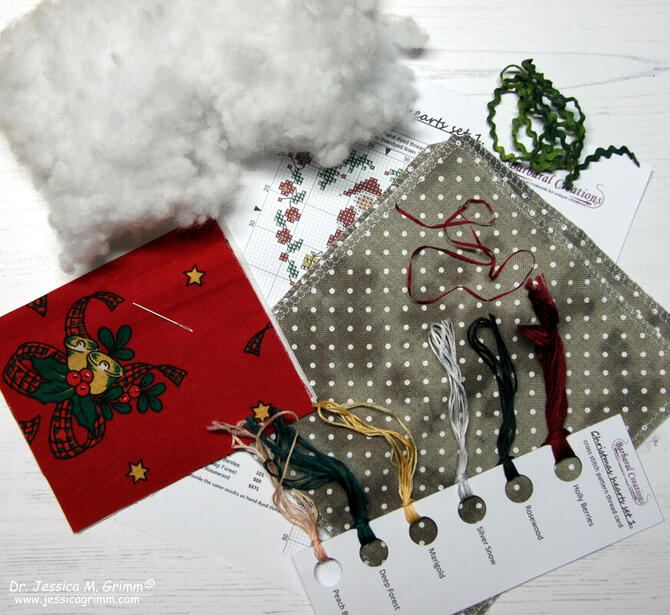 Barbaral Creations stitching box This Stitchers Box contained a cross-stitch embroidery kit for two heart-shaped ornaments. The fabric, stranded cotton and ribbons in the kit were hand-dyed by Barbara. They are slightly variegated and have a lovely vintage feel to them. The embroidery chart was very straight-forward and even comes with thread conversions for DMC. So when the supplies from the kit are finished (which were plenty, by the way), you can still use the patterns using regular DMC stranded cotton. The kit also contained: a needle, backing fabric, fusible interfacing and toy stuffing. I ended up swapping out the backing fabric for a piece from my stash which was of the exact same colour as Barbara's red-dyed thread :). And I did not stitch the hand-dyed green rick-rack over the seams of my ornaments. They simply didn't need it and I'd rather save the pretty rick-rack for another project. The pattern and instructions were straight-forward but do assume that you know your cross-stitch, French knots and basic finishing/sewing skills. It took me about two days to stitch both patterns, haul my sewing machine out and finish them into ornaments just in time for Christmas. 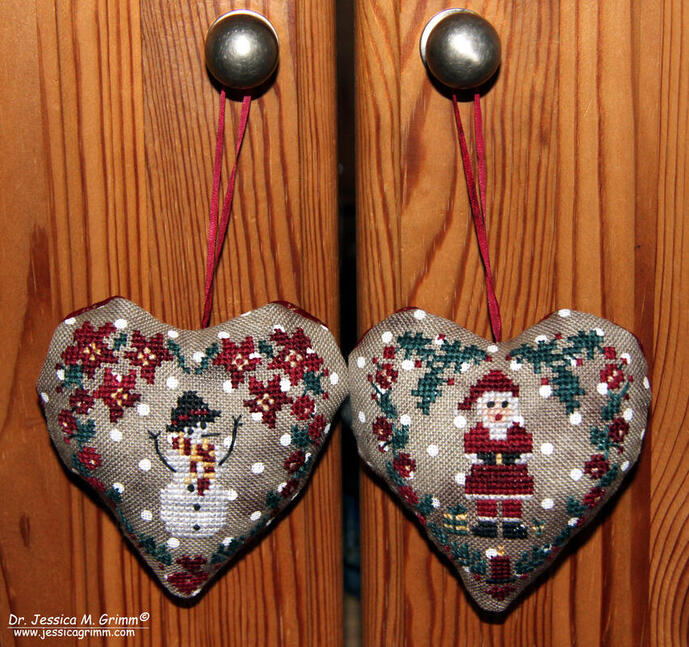 Barbaral Creations stitching box What is rather unique about Barbara's Stitchers Boxes, they contain lovely additions besides the needlework. In this case, the box contained a very fine fruit tea called Balthasar. A small jar of honey to sweeten it. And two wooden decorations: a snowflake and a gingerbread man. I've asked Barbara if she is going to release more Stitchers Boxes and she has confirmed that she will be doing boxes themed: Christmas, Easter, Summer and Halloween next year. This edition was priced at €21 and postage to Germany was an additional €10,90 (this totals at 35 US Dollars or 27 Pound Sterling). In order to be notified in time when a new box is released, be sure to make her Etsy shop one of your favourites! Merry Christmas!
Months ago, I saw a post on Facebook in which Yvette Stanton worked a bead embroidery kit by Merrilyn Whittle. The design was so lovely, that I ordered the same kit :). This weekend, I had finally time to dabble with it and write this review. If you are thinking of trying bead embroidery yourself, do visit the blogs of Dima Santina and Margaret Cobleigh. Both ladies are beading away on two very different projects: Hanabatake by Margaret Lee and Wild Child by Mary Alice Sinton. 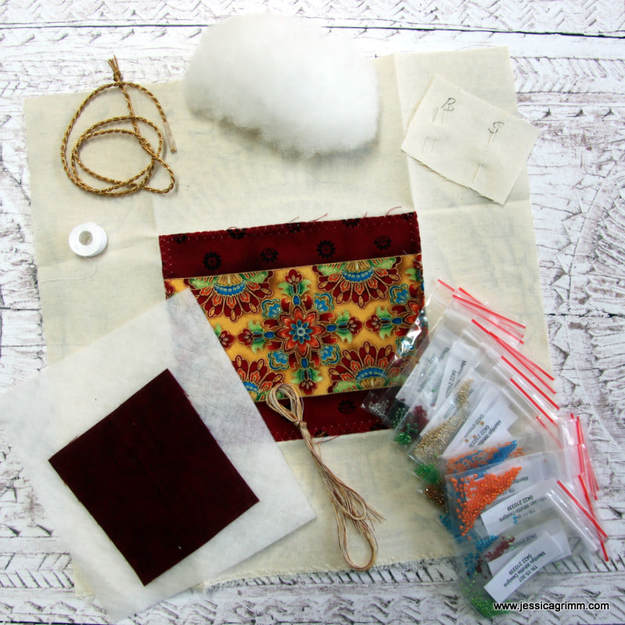 Japanese Bead Embroidery kit by Merrilyn Whittle Designs Besides well-written instructions with many clear pictures, the photograph above shows you the other contents of the kit. As you can see everything is clearly labelled. And the quantities of the beads and threads are very generous. Apart from the kit, I had also bought a bead shoe and a wooden koma. Me and koma never became friends, but having a bead shoe is definitely a plus. Regarding the koma, I feel that you can stitch this design without one. However, bead purists might disagree :). I will definitely give the koma another try in the future and will probably watch some footage on Youtube to get an idea how to hold this piece of equipment when beading. 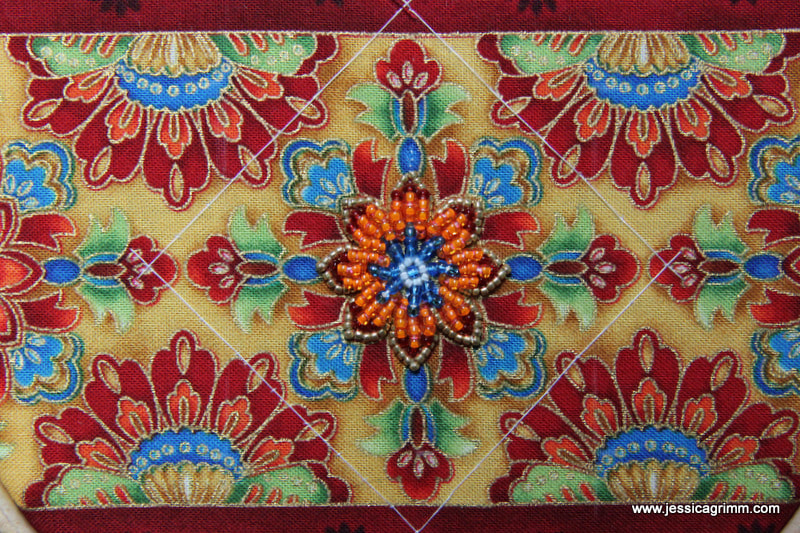 Japanese Bead Embroidery kit by Merrilyn Whittle Designs And off I went: beading away on the central flower. With hindsight, this was probably the most enjoyable part of the whole design. It makes use of two different padding techniques and they were techniques I had never used before. I learned a lot and I will certainly incorporate both techniques in future embroidery pieces. And this is how the piece progressed. I wasn't going for perfection and only took things out when they were really disrupting the piece. I just wanted to have a nice embroidery experience. And that's what this excellent kit certainly delivers. The finished design is only 6x6cms and can be stitched as a weekend project. I am unsure if this project would suit an absolute embroidery beginner; I am afraid that I take too many things for granted after about 34 years of stitching :). 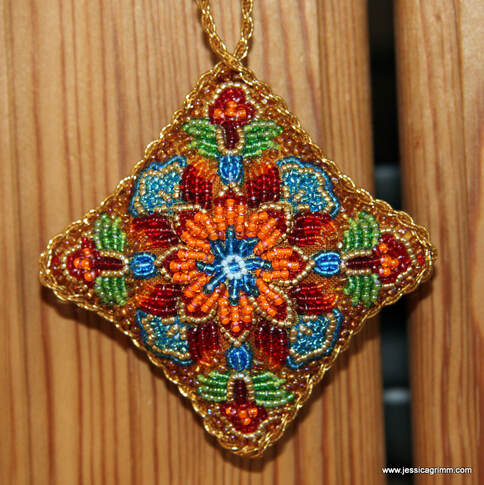 Japanese Bead Embroidery kit by Merrilyn Whittle Designs And this is what the finished piece looks like. It is intended to be a Christmas decoration. In lieu of a tree, it now happily hangs on the knob of my kitchen cupboard. I've thoroughly enjoyed stitching this little gem and I've learned a few new things. As Merrilyn Whittle is based in Australia, you might need to pay custom duties when ordering this kit. I had to, and all in all I paid a total of €72,73 or $83,89 (kit+shipping+tax). I think, as there are so many talented embroidery designers in Australia, it is high time Australia applies for EU-membership :).
With a bit of luck I will get my passport back this week stamped with a shiny visa for China! Getting one was my first encounter with Chinese bureaucracy :). I will also see my doctor tomorrow for a refresher jab to protect me against nasty diseases. We embroidery artists lead exciting lives! Although I am not sure if I am an artist. I have been denied this title by the German authorities. They basically say that embroidery is not an art form, but firmly belongs in the realm of craftsmanship. At first I was knocked off my feet by this, but now I am preparing to defend my case. Getting recognition as an artist means that I am able to afford social security fees again and that my health insurance bills are almost cut in half. This would mean that my business could finally make a modest plus instead of a monthly loss... 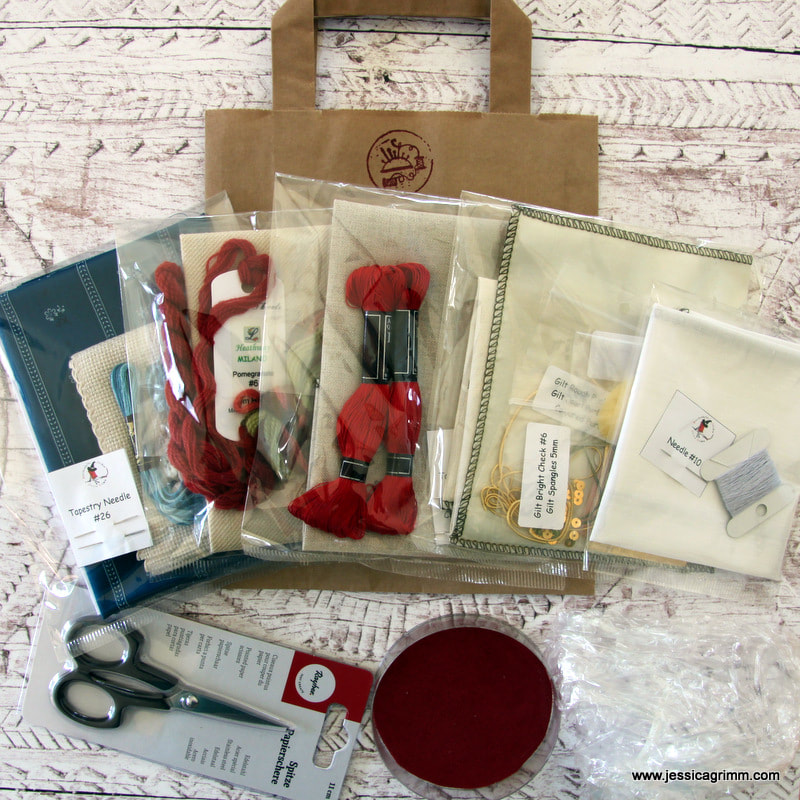 What you see here is the kit for my week-long series of workshops at the National Silk Museum in Hangzhou, China later this year. As the workshop-series is open to anyone, it is highly likely that I will have a wide variety of abilities in my class. Apart from the four techniques (Appenzeller whitework, crewel, goldwork and Schwalm), they will have four pieces of Aida band on which they can cross-stitch the names of the techniques. The bands are later used in construction to hide the seams between the different fabrics. Although it is highly likely that there are people in my class who have never done cross-stitching, explaining is easy and people can soon work on their own. With 15 people in class, I won't always be immediately on hand. Having something easy on the side you can always return too whilst waiting will probably come in handy. One thing I have learned over the years is that people mean wildly different things when you ask them to bring fine-tipped embroidery or craft scissors. Especially beginners manage to bring whopping big blunt paper scissors for goldwork classes. I have therefore included a pair of decent craft scissors in my kit. It is exactly the same pair of scissors I bought all those years ago when starting the RSN Certificate as an absolute beginner. And they are still my favourite goldwork scissors! Thanks to Google Images, I found my non-name scissors and was able to buy them for my Chinese students. 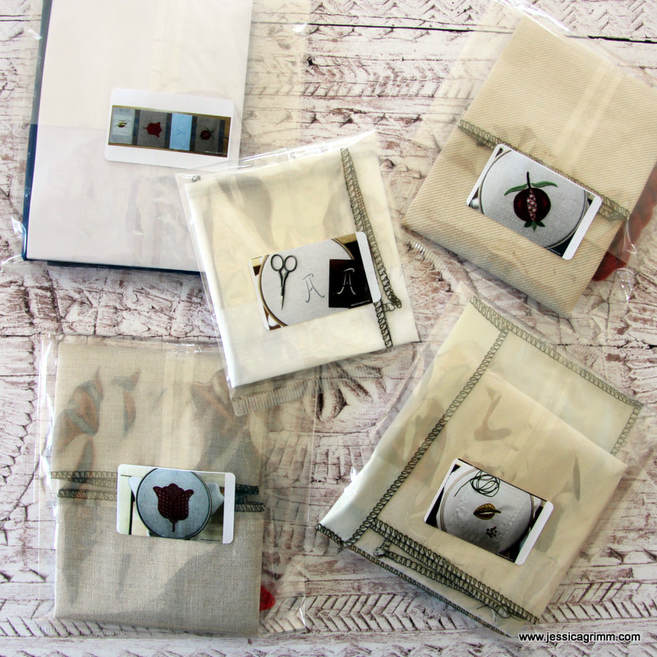 As the kit includes many different materials, I packed each project separately. I printed a picture of the finished project onto re-usable labels. This makes them easily identifiable for non-English speakers and people can re-seal the bag and so keep supplies together. All kit materials will be packed together into a paper bag. I will urge each student to write her/his name onto the bag to avoid misunderstandings.
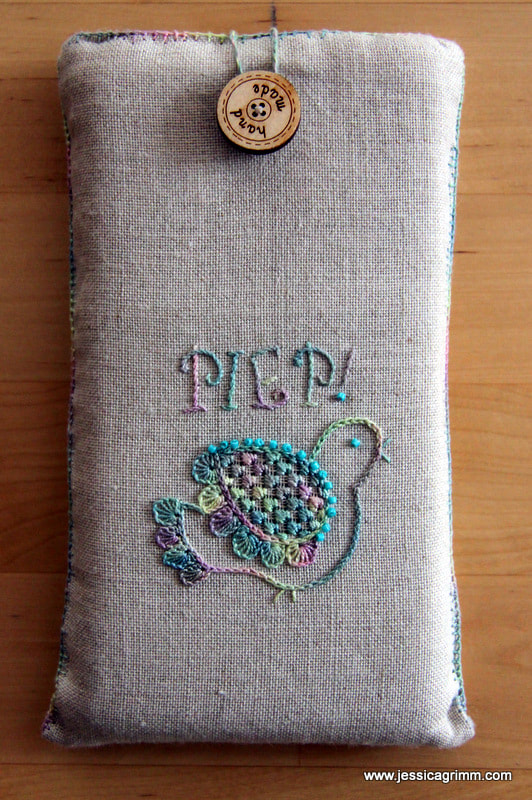
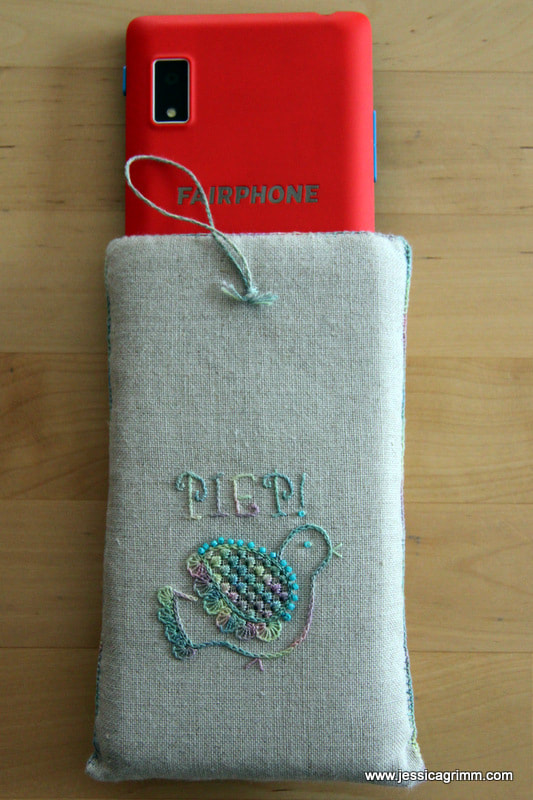
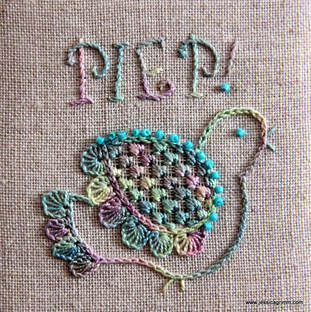
I've also included a shower-cap into the kit. The museum will provide embroidery hoops with seat frames for each student. The free shower-caps you often get in hotels are perfect to protect your work when you are not actively stitching. The other thing I have included is a simple goldwork cutting board. It is one half of a round plastic containers my dad used to house his screws, bolts and whatnots in. I lined the base with a piece of red velour and presto you have a cutting board. If I had more space in my suitcase, I would prefer to give each student a small round tin (I always upcycle my hair-clay tins this way!). Being able to cut your threads and then screw the tin close is even better. What else will I have at my disposal in the classroom? I've asked for an iron an ironing board. After all, I had to fold the fabrics to be able to get them into my suitcase. In preparation, I have already drawn all (bar one) patterns onto the fabric using a normal lead pencil. Unfortunately, the lines of aqua trick markers might not be stable when flying. I landed in America once with very faint lines... The only pattern I will have to draw before class, is the Appenzeller monogram. I'll use a trick marker and a copper stencil. It just doesn't work well with a lead pencil. And last but not least, I will have a sewing machine in my classroom. Although I am not sure any of my students will be able to finish all four projects in time to start the construction of the pronkrol, when some so, they can use the sewing machine for quicker construction. I am getting so excited! P.S. I've been interviewed for an article by Crafts Industry Alliance on the 'Benefits of limiting your time on Social Media'. Unfortunately, they left out my remark on the dangers of particularly Facebook using our data for commercial gain and the undermining of democracy. This was an important reason why I deleted my accounts after being hacked. Yup, it is true: I have arrived in the modern area too. It took me years. But when I heard that Fairphone makes smart phones that last, are repairable and don't use blood minerals; I ordered one. So far, I have used it to download (and use!) a 5K running app, WhatsApp with my family, use Google for directions and information AND made the very occasional phone call :). Still much prefer my Ipad and Laptop... Maybe I should seek professional help? Pondering this option, I did make my Fairphone a cozy home to live in.
On Zweigart Newcastle natural coloured 40ct linen, I outlined the bird with chainstitch using a #12 variegated House of Embroidery perle colour Grapes C. Then I stitched partial buttonhole wheels for the feathers on the tail and the wing. I added straight stitches for the feet and the beak and attached some blue beads along the upper-edge of the wing. From the back, I withdrew every fourth thread in both directions and then added a Schwalm filling stitch called 'Gefieder'. The lettering was stitched using stem stitch. To make my 'phone home' a bit sturdier, I added wadding and a sheet of template plastic. The seams were then pimped with knotted pearl stitch. So far, my phone seems to be pretty comfy in her new home! I've asked my very talented husband to make a nice clean digital drawing of my scribbled birdy pattern. You can download it at the end of this article. Apart from using it as I did in a Schwalm embroidery way (finished design including lettering H 55mm), there is tons of other possibilities. How about stitching it monochrome on a piece of felt? Or applique with a few simple stitches for embellishment? Surprise me! 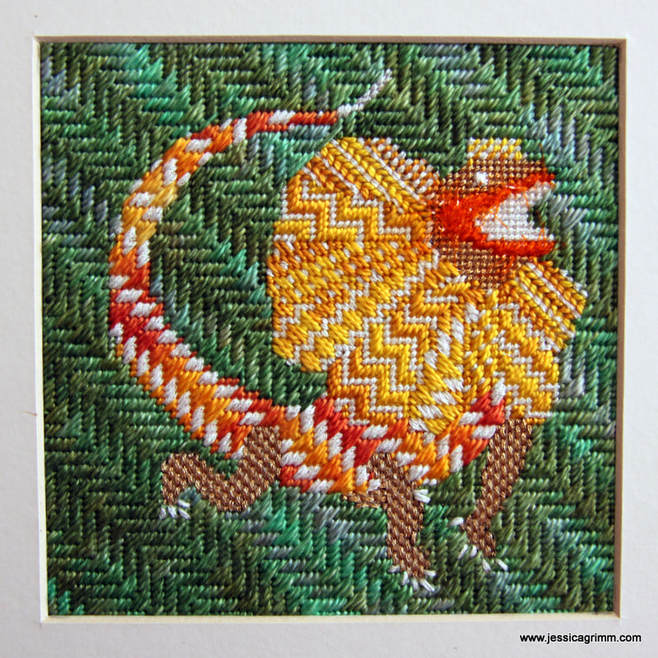 Canvaswork or Needlepoint Next up is another broderibox project using a design of a Chlamydosaurus by Millie Marotta. This amazing creature can impress by unfolding his neck frill. However, it can only do so in opening its mouth widely. The bones in the frill are extensions of the hyoid or tongue bone. Isn't nature amazing?! The lovely people of Nordic Needle had put in a glow-in-the-dark thread made by Rainbow Gallery. I made sure to add it to every canvas stitch I used on the chlamydosaurus (it is the white thread you see). And it glows beautifully at night! Unfortunately, it doesn't translate well in a picture. You have to take my word for it.
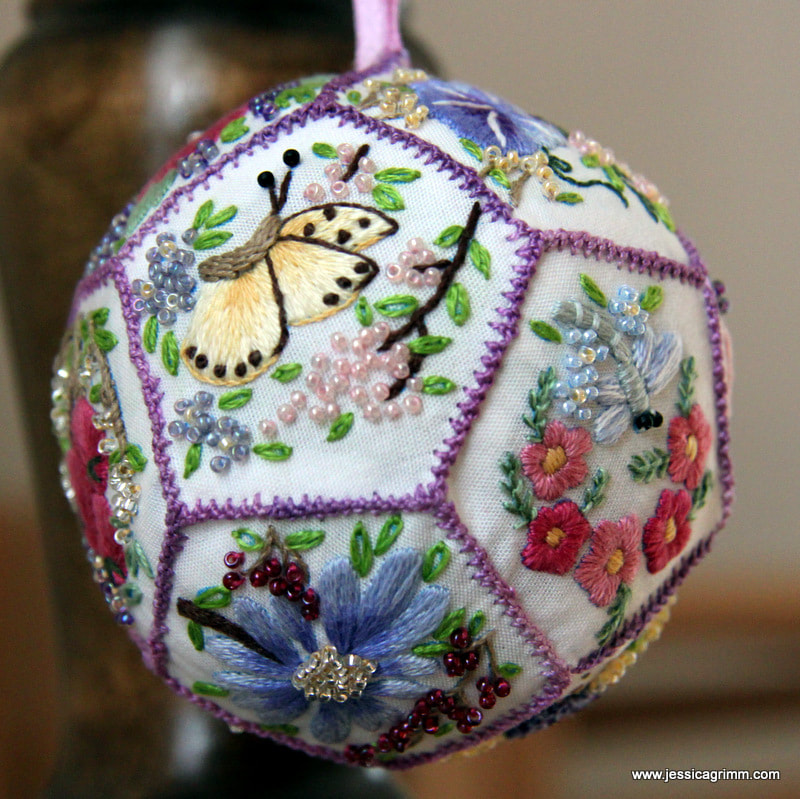
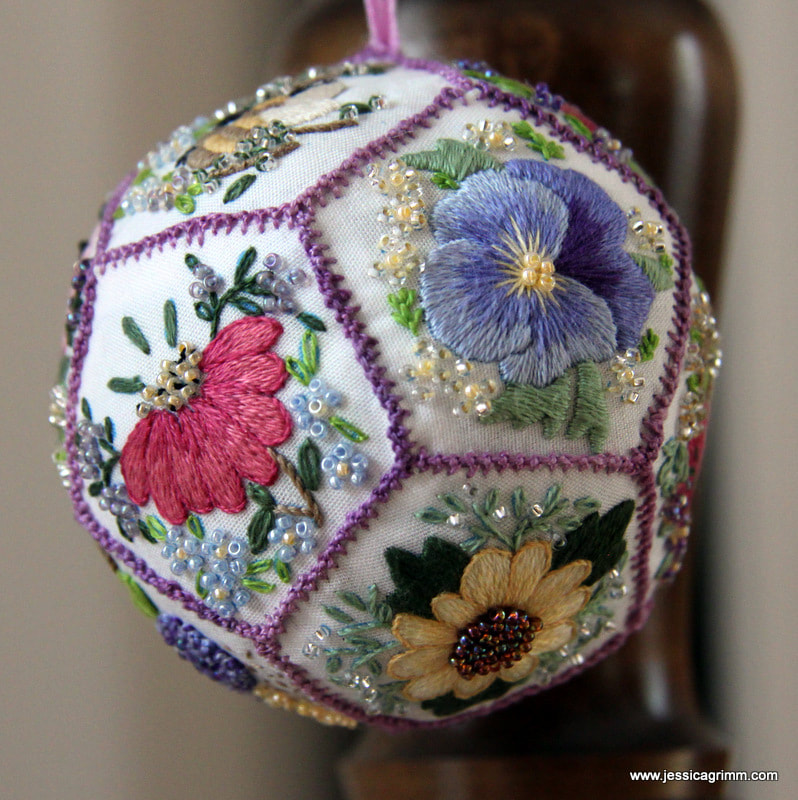
Last finish for today: the Floral Pomander by Hazel Blomkamp. I really enjoyed this project with all the little flowery scenes using simple embroidery stitches and tiny beads. However, the instructions were a bit messy with tiny pictures of the finished panels. And piecing the pomander together was a little fiddley. That said, it makes a great project if you like miniature embroidery, beads and a different way of finishing your embroidery. Oh, and thanks to the dried lavender mixed in with the toy stuffing, it is my best smelling project ever :)!
Today I am going to write a bit about my love affair with Schwalm embroidery. You see, I can pinpoint exactly where I encountered this pretty whitework embroidery technique for the first time. Not in its native Hessia, one of the federal states of Germany. Nope. It was Inspirations issue 69 in the spring of 2011. The beautiful 'Sense of Place' by Luzine Happel featured hearts, sunflowers and tulips filled with pretty patterns. I so wanted to learn this embroidery technique! But, I had never done any whitework embroidery other than a huge Richelieu window pane featured in an embroidery special of the Dutch Libelle. Luckily, I had just started my Royal School of Needlework Diploma course. And it happened to include a whitework module. Little did I know that they had never heard of this type of embroidery. And my tutors weren't thrilled at the prospect of teaching me something they were not familiar with. So I ended up with a whitework sampler featuring only a little bit of true Schwalm embroidery. And yes, I didn't like the prospect of an all-white piece either :).  Royal School of Needlework Diploma whitework sampler Now most of you will by now know that I don't like table cloths. Although, to be honest, there is nothing wrong with these pieces of textile. It is just that when I tell people that I embroider for a living, THEY picture me amidst heaps of neatly stacked embroidered table cloths. Now that gives me goose bumps. But for the wrong reasons. It truly freaks me out. Embroidery is so much more than just a means to adore a table cloth! Instead, one of the Schwalm-things I made was a nativity scene to be hung in front of my kitchen window. It is an ongoing process and I hope to add camels, a donkey and an ox this year.  Schwalm embroidery nativity And although I like white, I like colour better. White reminds me of those pretty shoes I once had as a girl. They were lovely, but not so white for long. The same with those pretty lacily white stockings me and my younger sister wore under our Sunday dresses as girls. They attracted dirt like nobody's business. So in came the use of colour in my Schwalm embroidery projects. 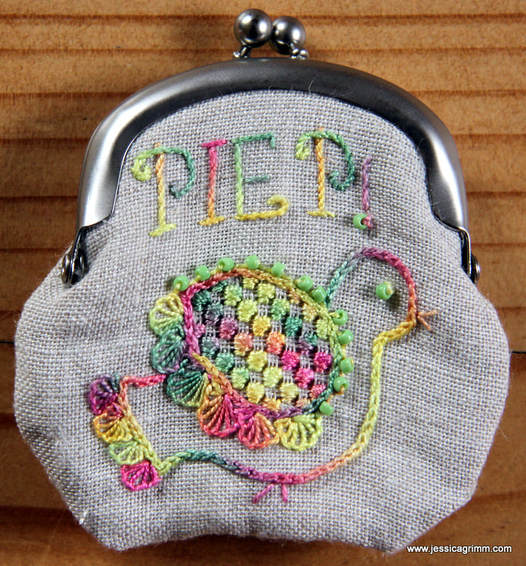 Schwalm embroidery purse Now, traditional Schwalm embroidery is done with cotton a broder. A not so shiny non-strandable cotton thread. It is nice, but cotton perle and silk threads are nicer. Or at least in my opinion they are. I especially like to use variegated threads as they form pretty colour patterns when used with the many different Schwalm filling stitches. 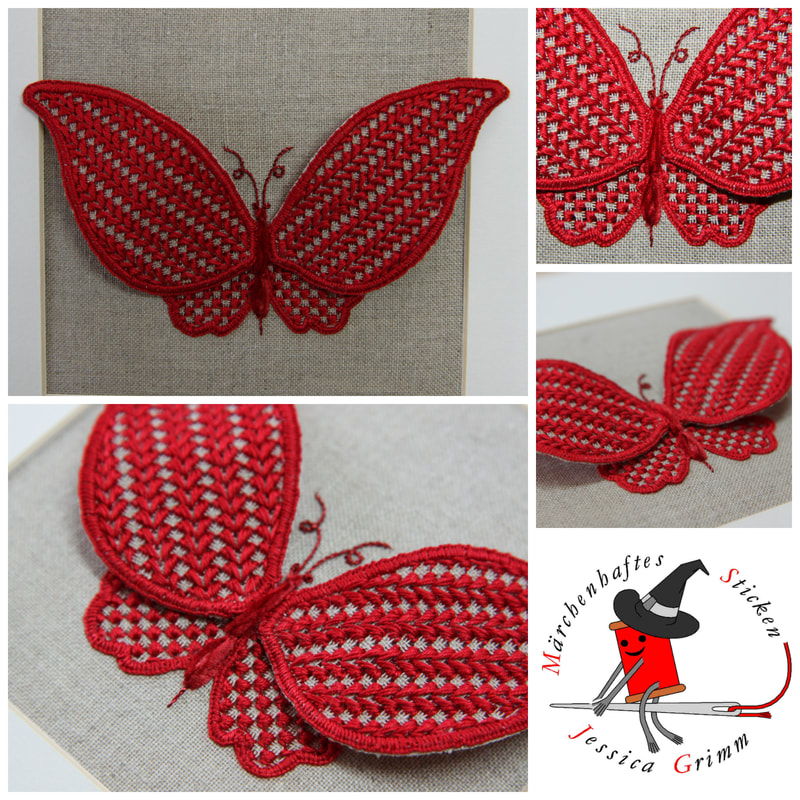 Schwalm embroidery meets stumpwork So, by now, I had changed the colour of things, the materials and the stitching topic. What's next? How about adding a stumpwork technique to the mix? Using wired elements with Schwalm embroidery really tickled my fancy! It looks so elegant and yet isn't too hard to create at all. 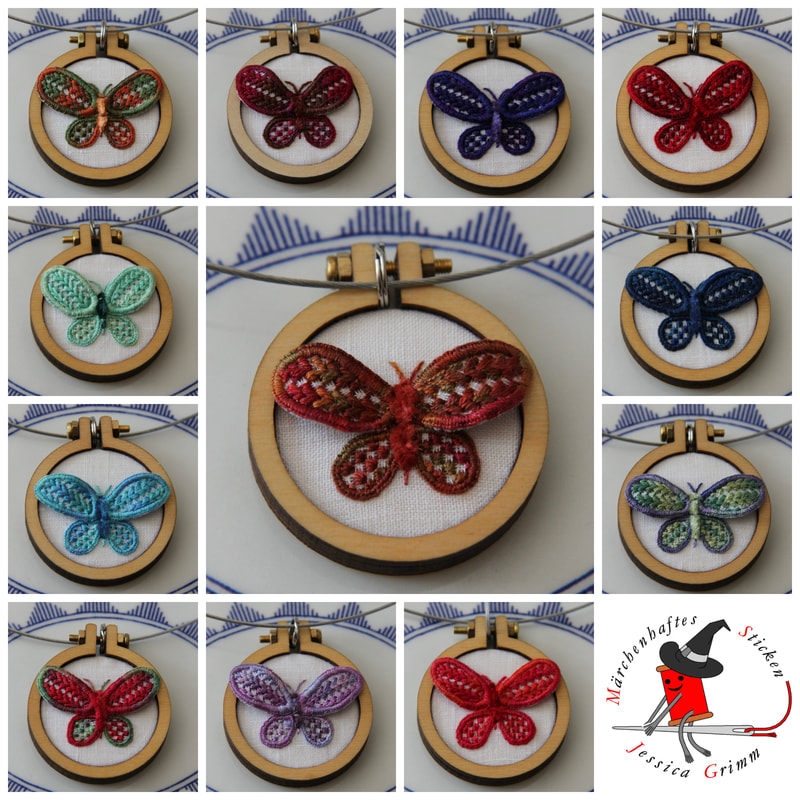 Schwalm embroidery meets stumpwork But I wasn't quite finished yet! How about one shrinks the butterfly? For instance, until it fits a tiny 4cm Dandelyne wooden hoop. Thanks to my training in Appenzeller whitework embroidery, I knew that you can add tiny filling stitches (some the same as in Schwalm embroidery; after all there is only so much you can do with a blank grid) into a tiny grid of withdrawn threads. Born where the elegant butterfly pendants! Still using original heritage skills, but sans the table cloth. After weeks of stitching (one butterfly takes about six hours to create), I now have a colourful bunch of lovely butterfly pendants.
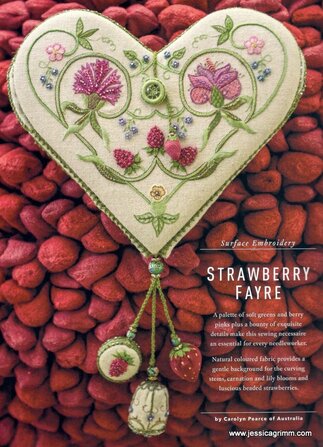
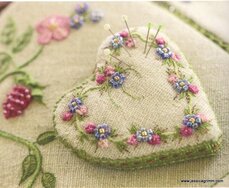
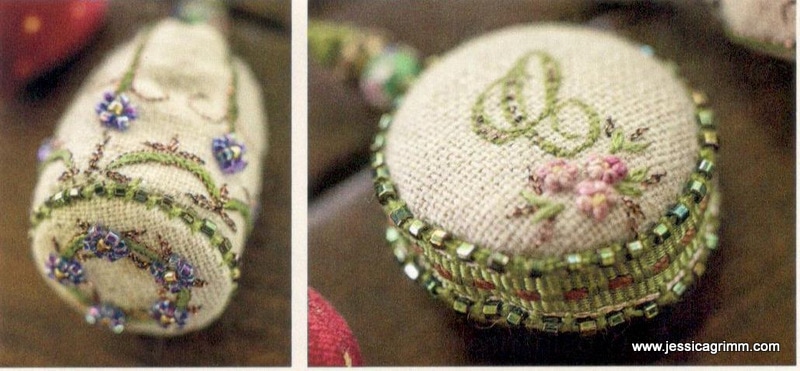
If you would like to know more about the traditional form of Schwalm embroidery (including its use on folk costumes), check out Luzine Happel's website and blog. Also available in English. Luzine self-published a whole library on Schwalm embroidery. These are very good books if you want to learn this pretty whitework technique. I highly recommend them! The books are available in German, English and even French. Happy stitching! Last week, I received my copy of Inspirations Magazine #95. And wow what a beautiful issue it is! Packed with great embroidery projects exploring a wide range of embroidery techniques. Clear favourite for me: Strawberry Fayre, a heart-shaped sewing necessaire designed by Carolyn Pearce. Carolyn is one of my favourite embroidery designers. A couple of years ago, I stitched her famous Home Sweet Home needlework box. 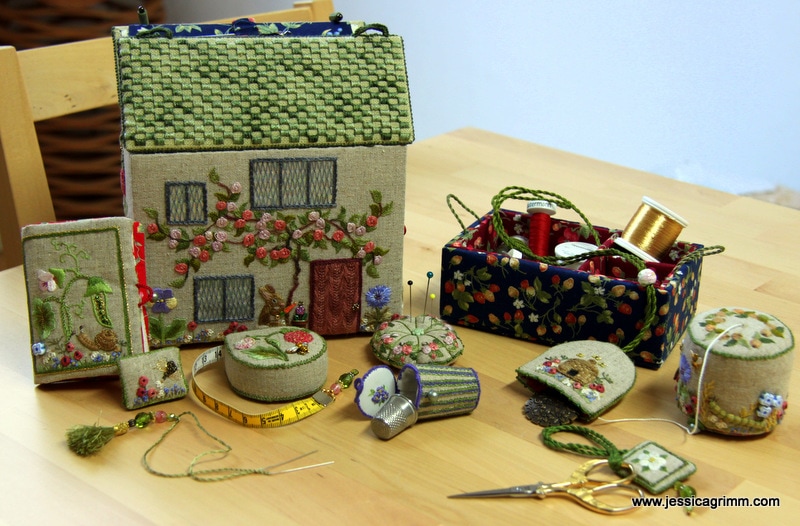 Home Sweet Home needlework box The sewing necessaire is packed full of lovely stitched details in green, pink and blue. This projects uses 40 embroidery stitches ranging from the well-known French knot to the more exotic cable plait stitch. Equally, it uses a whole array of yummy embroidery threads in cotton, silk, rayon and metallic. And the design uses beads as well! A perfect project to learn new embroidery skills. Not unlike a sampler, but then way more useful.
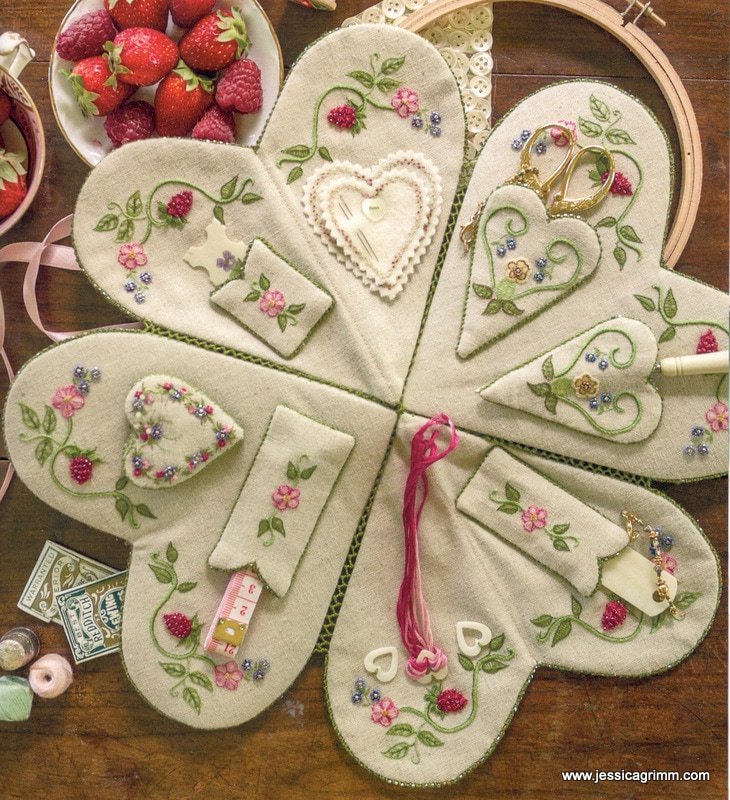
Inside the sewing necessaire there is ample room for your scissors, stiletto, tape measure, needle pages, pincushion and thread rings. The heart-shaped necessaire closes with a pretty Dorset button. Another pretty technique you will learn from this project!
Dangling from the necessaire are exquisite little needlework essentials: a pinwheel, an emery strawberry and a thimble holder.
I so love this new Carolyn Pearce design, that I ordered the kit as my birthday present (I'll turn 39 on Friday!) from Inspirations. As an Inspirations subscriber, I paid €146 + €26 shipping. Yup, that isn't cheap. However, Carolyn Pearce is known for using many different components in her designs. Trying to gather them yourself from suppliers all over the world isn't necessary any cheaper. That said, if you have a large stash and you don't mind swapping things out, you will be perfectly fine stitching this necessaire with your own supplies! As the kit is on pre-order at the moment (it will probably ship at the end of July) and will take 3-4 weeks to arrive in Germany, enough time to see if there are others who plan on stitching this project. Wouldn't it be great to hook up online and stitch this project together? Like a Stitch Along (SAL)! Please leave your comment below if you are up for the game. Looking forward to start... Note: I have never finished this project as the instructions turned out to be faulty and the materials in the kit were not sufficient. My love for embroidery stems from the fact that I like to work creatively with my hands. But equally important, I love the fact that I am part of a very old tradition. And last but not least, I have a love for beautiful and elegant things. When I teach embroidery, I foremost want to transmit a technique. It is important to me that my students learn to execute the technical part of an embroidery technique well. That's the way I was trained at the Royal School of Needlework and it suits my personality. 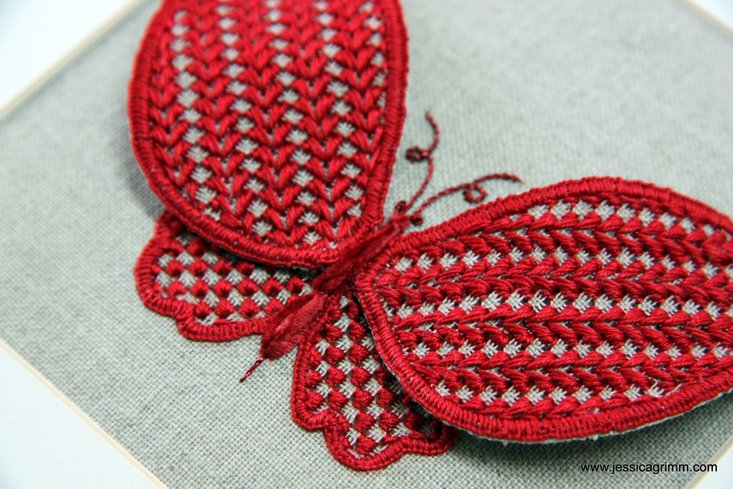 Schwalm embroidery meets stumpwork With my embroidery kits I try to think of an innovative way to use an ancient embroidery technique. I want you to be able to create a stunning piece of embroidery to go up on your wall. My beetle wing goldwork and stumpwork beetles are a good example of this concept. The latest addition to my series of embroidery kits is the 'Elegant Butterfly'. This kit has a modern take on Schwalm embroidery. Originally, Schwalm embroidery is a form of whitework from the Hessian region of Germany. You can read all about it on Luzine Happel's blog. She is a master craftswoman regarding this lovely technique. Don't be put off by the term whitework. It is nothing like the very fine embroidery seen on handkerchiefs or the like. Think more Hardanger embroidery. But then less geometrical in its shapes. Schwalm is usually floral, uses chain stitch, buttonhole stitch and coral stitch extensively. And, best off all in my opinion, comes with hundreds of different geometrical filling stitches! You won't be easily bored and it is relatively easy on your eyes. 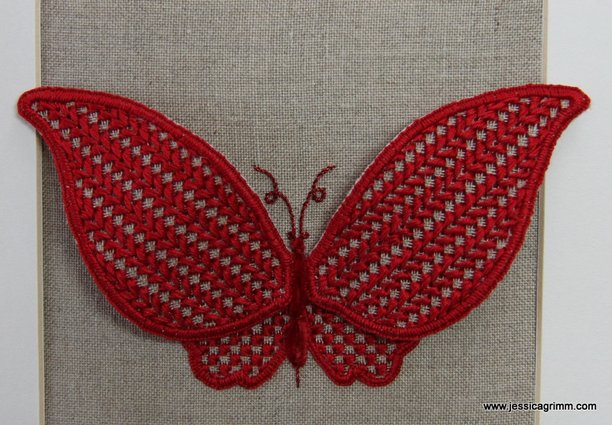 Schwalm embroidery meets stumpwork My elegant butterfly uses the traditional cotton a broder #25 used in Schwalm embroidery. You'll stitch on beautiful 40ct Zweigart Newcastle linen. That's the traditional part of my design. I've also added in DMC Diamant metallic thread and hand-dyed silken chenille by the Thread Gatherer. A perfect opportunity for you to play a little with these speciality threads. Furthermore, I've discovered that traditional Schwalm embroidery and the wired-shapes technique used in stumpwork embroidery are a match made in heaven. Pair your finished and mounted elegant butterfly embroidery with a Ribba frame from IKEA and you have stunning unique and hand-made home-decoration!
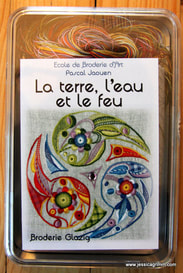
First of all, thanks to you all for the many supportive comments regarding my husband's job hunt! So very kind of you. We'll keep working on it and I am sure somewhere a door will open again. And secondly: I received my prize today from the Stitch your heart out competition of Inspirations Magazine. The lovingly wrapped parcel contained a copy of the book 'The redwork circus' by Jenny McWhinney, one of my favourite embroidery designers and the ONLY book I didn't already have by her on my shelves :). Furthermore, the parcel contained the 'Robin' embroidery kit by the very talented Nicola Jarvis. And to top it off, I also received a packet of postcards and a tea towel with the 'Frosty Garden' design by Nicola Jarvis. It really felt like Christmas. The fox itself is still down-under enjoying the warm sunshine. Inspirations is planning a really wonderful thing for you all; fingers crossed it will come to fruition! So, let's now explore the main objective of this blog post, shall we? 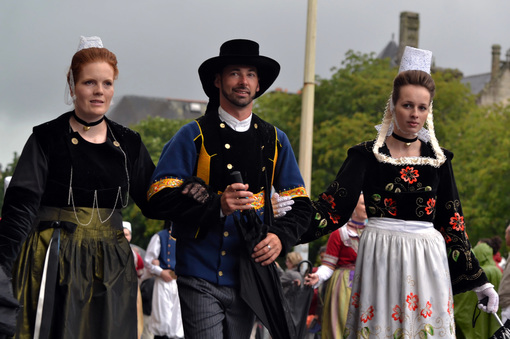 Brittany folk costumes with colourful Glazig embroidery As many of you know, I love exploring different embroidery techniques. A couple of weeks ago, I wrote about French boutis embroidery and my good friend and fellow embroidery tutor Marina Berts from Switzerland suggested that I'll give Glazig embroidery a go. When you say Glazig you say Pascal Jaouen. He is a designer and embroiderer from France who developed historical Glazig surface embroidery from Brittany into a vibrant modern art form. Do explore his website as the beautiful pictures of his haute-couture creations are stunning! So, as I really liked his designs and was up for a new challenge, I ordered one of his kits. Thanks to Google translate and my very rusty school French, I managed the ordering process just fine. A couple of days later, my shiny kit arrived. Now I had to tackle even more French :).
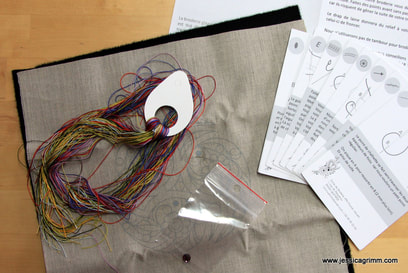
The kit contains a piece of linen with the design screen-printed on. I am not a huge fan of this as it means that I'll need to cover all the lines and can't adapt the design much (in fact, when I started stitching I soon noticed that there are design lines on my fabric, that are not to be found on the photograph of the design...). It further contained a piece of thick woollen cloth, a needle, a crystal cabochon, pre-cut silk #12 perle threads and instructions. All prettily packed in a super handy tin. I started by translating the instructions. There isn't much there. Apart from a short note on Pascal and Glazig embroidery, it only tells you that you shouldn't use a hoop, you should baste the two layers of fabric together, keep your threads short, start with the chain stitches and don't wash afterwards as the wool will shrink. And that's it. On the back of the instructions is a clear picture of the finished design (the one that doesn't exactly exactly match the lines on my pre-printed fabric) and a working sketch detailing which stitches go where. The instructions to the 10 different stitches used in the design can be found on separate cards also packed into the kit. This is of course a clever solution to keep your kits, and especially your instructions, economical. 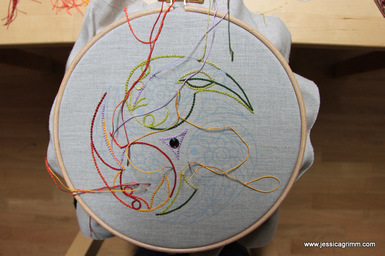 Glazig embroidery kit by Pascal Jaouen And this is how far I've come after I sorted the threads and cut them to the recommended length. And yes, I do use a hoop :). The fact that I can't wash the piece after I've embroidered it, made me decide to use a hoop. This will mean that I am not exactly following Pascal's instructions as apparently you stitch the chain stitches only through the linen and not through the wool. I can't quite envisage this, not even when I would hold the piece in my hands. I suspect that you do scoop up some wool every now and then.
The wool is a mystery to me, to be honest. In the instructions it says that the wool prevents puckering and gives a dimensional effect to the embroidery. Hmmm, actually, the non-puckering and the dimensional effect exclude each other, in my opinion. And looking at the picture of the finished design, it doesn't quite work. What I suspect is that using the linen onto the wool recreates the original feeling of stitching on traditional clothing. Glazig embroidery was used to adorn the men's clothes of the Quimper region in Brittany. And see all the thread tails hanging on my piece? Although the instructions say that you should start with the chain stitches and then commence into the more complicated stitches, I could tell from the picture that one and the same thread was used in going from one type of stitch to the next. So, I will finish all my chain stitches first, but will still be able to continue into the next type of stitch with the same thread. And I do like the stitching! The colours are so vibrant and the design is so much fun. I can't wait to start some of the stitches specific to this type of embroidery! I'll keep you posted on my progress in a further post. Meanwhile, would this kit be for you? Not being fluent in French isn't a problem as Google translate provides you with a decent enough translation. However, if you are used to step-by-step instructions, this kit doesn't provide that. You have to figure out a lot for yourself and fix a few flaws here and there. So, if you like Pascal's vibrant designs as much as I do, you love an interpretational challenge and you are prepared to fork out between €35 and €75 plus pricey shipping, then go for it! In the meantime, I would love to hear if you know of other embroidery designers offering kits in a special 'old' embroidery technique. Please do leave a comment below! After a nice long walk through the beautiful Bavarian landscape on Thursday, me and my husband came home to an overflowing mail box. What had happened? Mary Corbet of Needle 'n Thread reviewed my crewelwork kit 'Carol's Rose'. I have been over the moon ever since. But it had some unexpected consequences... 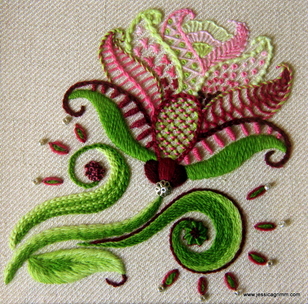 Due to Mary's lovely review, I sold more Roses in a couple of hours than I did in the past 18 months :). No complaining here. It just meant that I ran out of kits. No problem, or so I thought. Printing new instructions in large quantities upset the printer. It wanted a new image drum. Never heard of the part, but a new one was delivered to my home. Then it was time to overlock the edges of the fabric to go into the kits. My overlock machine thought NOW would be a fine moment to stop working. Yes, you read that correctly. She STOPPED. How dare she.
Me and my handy husband took the whole machine apart. They look pretty archaic on the inside, by the way. Cleaned her and oiled her and put her back together again. We were pretty good as she does work again and we were only left with one extra washer.... :). And then all Rose kit making had to grind to a halt. Even though I have a rather large stash to make new kits from, by now I had run out of the correct shades of wool. So a HUGE THANK YOU to all the lovely patient people who have pre-ordered the kit. As soon as the wool arrives, I'll start making kits again and mail them out. Oh, yes, and I will start regular blogging again early September. See you then! Want to keep up with my embroidery adventures? Sign up to my weekly Newsletter! |

Want to keep up with my embroidery adventures? Sign up for my weekly Newsletter to get notified of new blogs, courses and workshops!
Liked my blog? Please consider making a donation or becoming a Patron so that I can keep up the good work and my blog ad-free!

Categories
All
Archives
July 2024
|
||||||||||||||

 RSS Feed
Contact: info(at)jessicagrimm.com
Copyright Dr Jessica M. Grimm - Mandlweg 3, 82488 Ettal, Deutschland - +49(0)8822 2782219 (Monday, Tuesday, Friday & Saturday 9.00-17.00 CET)
Impressum - Legal Notice - Datenschutzerklärung - Privacy Policy - Webshop ABG - Widerrufsrecht - Disclaimer
Copyright Dr Jessica M. Grimm - Mandlweg 3, 82488 Ettal, Deutschland - +49(0)8822 2782219 (Monday, Tuesday, Friday & Saturday 9.00-17.00 CET)
Impressum - Legal Notice - Datenschutzerklärung - Privacy Policy - Webshop ABG - Widerrufsrecht - Disclaimer