|
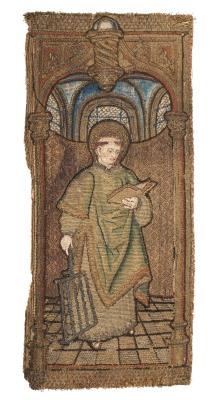
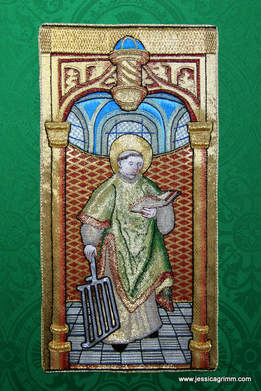
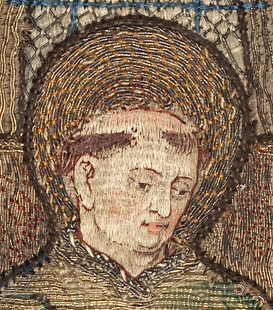
Since St. Laurence was grilled to death, I thought the above a fitting blog post title. After almost two years of on and of working on this goldwork piece, St. Laurence can finally be revealed in all his glory. The piece is a near perfect copy of the orphrey held under catalogue number ABM t2107h at the Museum Catharijneconvent, Utrecht in the Netherlands. The original orphrey was made between AD 1520-1525 and measures c. 28.5 x 17 cm. I have covered this project in earlier blog posts too, in case you'll want to read the whole story.
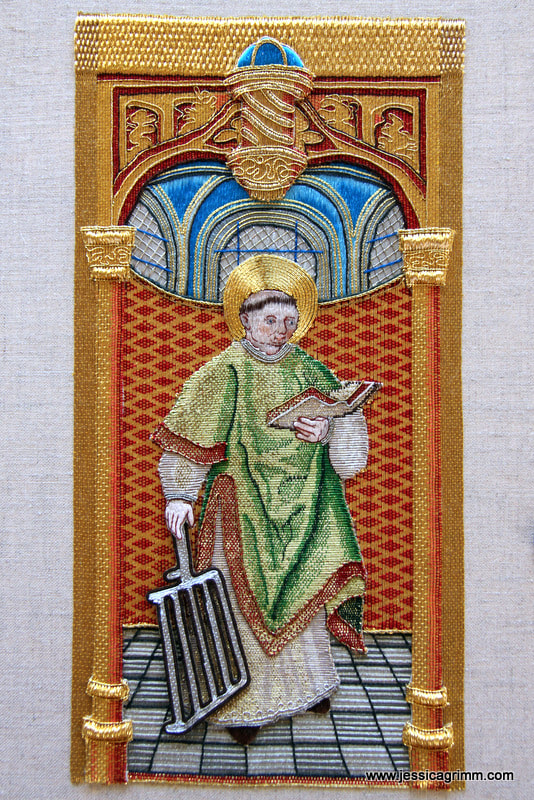
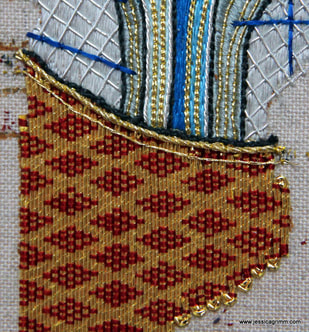
Above on the left the original museum piece and on the right my version. However, last time you saw the piece, I was still working on the background. So let's explore how I assembled all the different pieces. 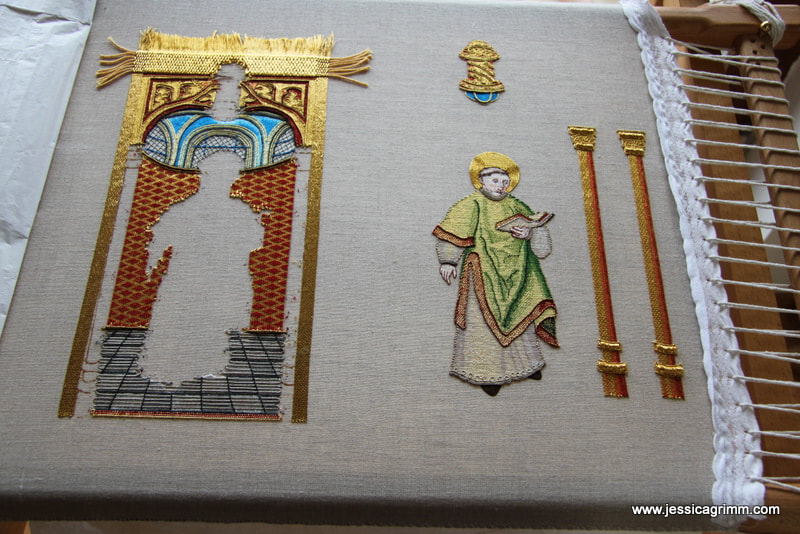 Recreated orphrey of St Laurence Apart from the background and St. Laurence, I also worked both columns and the ceiling keystone on the same Zweigart 40ct natural linen. I worked his bbq separately in a small embroidery hoop on a piece of calico. It is in essence a wired slip filled with silver plated Japanese Thread #8. Cutting away the calico between the bars, was challenging! So I used a dark brown textile paint marker to stain the remaining calico fibres. 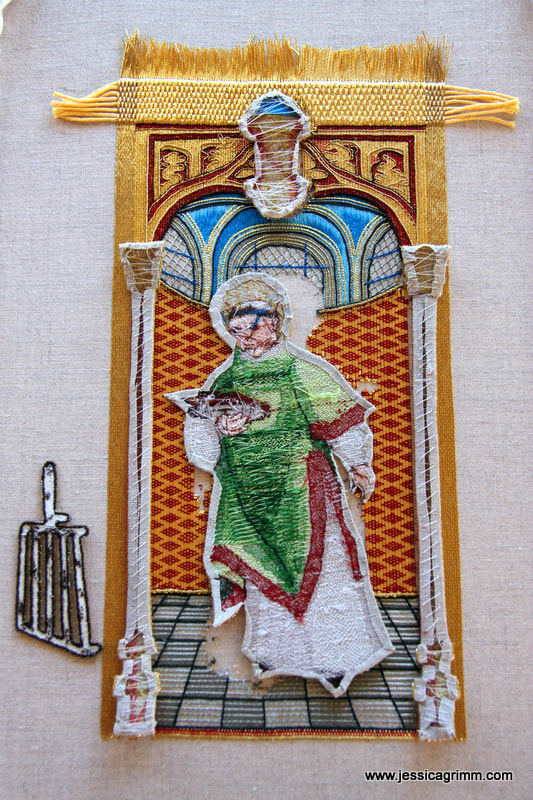 Recreated orphrey of St Laurence Then it was time to cut out St. Laurence, the keystone and both columns. I took the whole piece of the slate frame and redressed it only with the background. As you can see in the picture above, I cut the other items out with a bit of a seam allowance. I folded the seam under and laced the back. This worked particularly well for the straight columns. It was less successful for the keystone and proved impossible for St. Laurence himself. So...., I used conservation glue. And it worked a treat! Since you only want the seam to stay put as long as you are appliqueing, you don't need huge amounts of glue, i.e. you are not soaking your embroidered fabric. 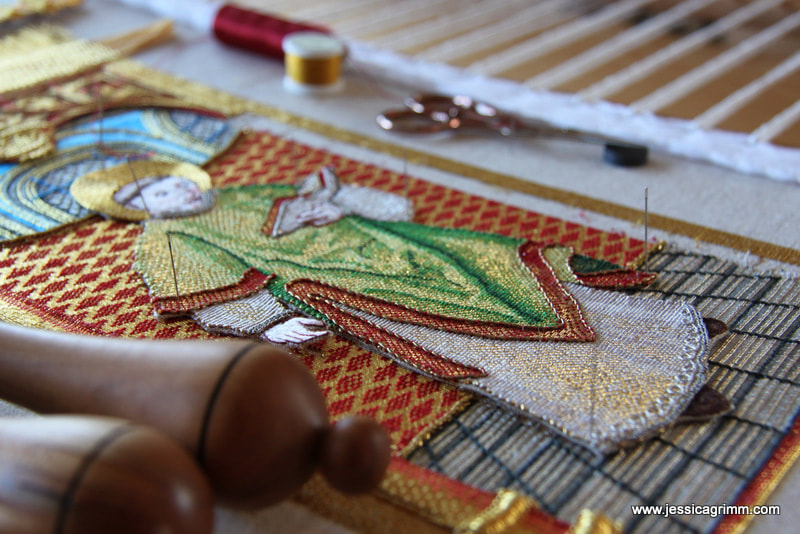 Recreated orphrey of St Laurence Before I attached any of the elements, I made sure my fabric wasn't drum taut. I started with the keystone, then did the left-hand column, then St. Laurence and then the right-hand column. Although I worked my background a little further than needed so it would go under St. Laurence, the fit wasn't perfect on all sides. I figure this is due to the whole piece being worked on a drum taut slate frame and once you release this tension completely, your elements shrink a bit. Note to self: work the background more generously on the next piece! Appliqueing the elements onto the background was rather straight forward. As you can see in the above picture, I pinned the element in place and then couched around the edge with matching silks. Only for the columns, I used a different method. I noted that my long vertical rows of tightly packed Japanese thread gaped when couched down at the edges. Instead, I sew in a straight line between the last and the before last row of Japanese thread.
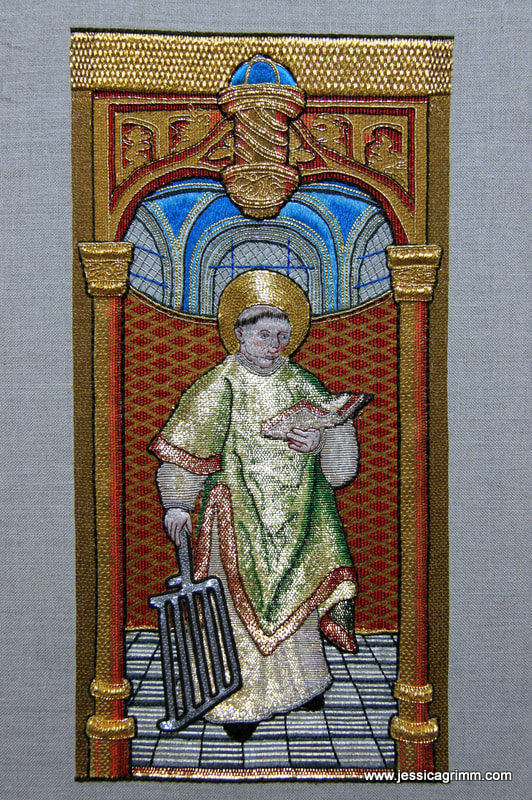
With all elements couched down, it was time to add the dark brown edging around all the elements. It adds a sense of depth to an otherwise near flat piece of embroidery. I used four to six strands of a dark brown silk perle. They were offcuts from a weaving project by a fellow local artisan. Don't you love it when you can recycle things?! 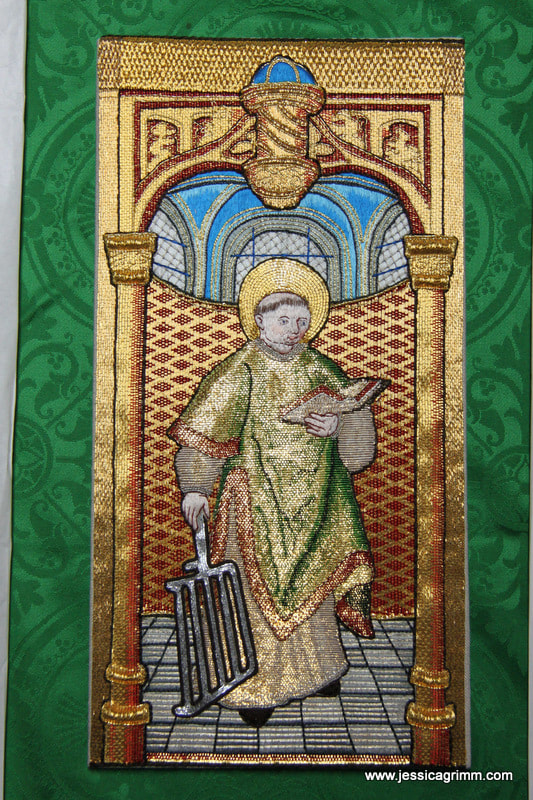 Recreated orphrey of St Laurence My original plan was to mount the goldwork first and then applique it onto the green chasuble fabric. This would support the heavy gold embroidery better. However, I didn't like it one bit. The embroidery was too high up from the fabric for my taste. As I have worked this piece mainly during demonstrations, it did mean that I hadn't been as accurate as I would have wished. The piece is 1,5 linen threads too high on the top left and 1,5 threads too short on the lower right side. This happens when you chat to people and/or work in improper light. No worries, I can perfectly live with these minor discrepancies! However, it did mean that my initial mounting had to go. 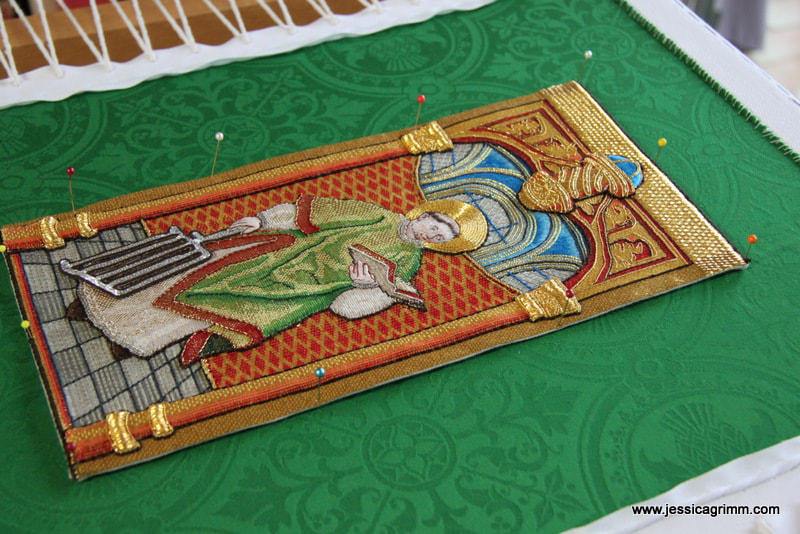 Recreated orphrey of St Laurence I ended up cutting out the whole orphrey with a seam allowance and couching it in place directly onto the green chasuble fabric. It worked a treat! As it should have done, since my medieval counterparts did it the same way. With the orphrey in place, I couched a gilt Twist #3 and a large gilt Roccoco around the edge to hide most of the linen background fabric. Today I mounted the whole piece and weather permitting, will bring it to the framer's tomorrow.
Working on this project certainly had its challenges, but I loved it immensely! During demonstrations and through this blog people from all over the world were able to follow the process. I will certainly make another one in the future! But for now, I can't stop looking at my achievement and enjoy this splendid piece :).
34 Comments
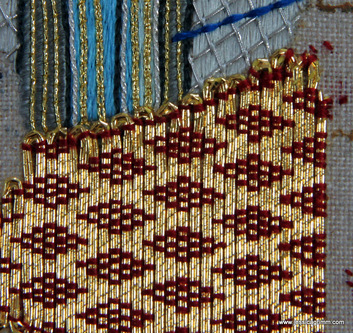
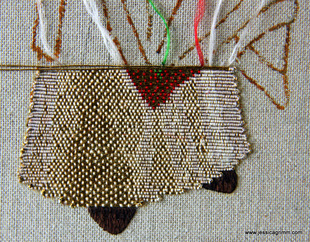
As promised last week, this week we check in with my goldwork project St. Laurence. If you are relatively new to this blog, do check out earlier posts on the project. 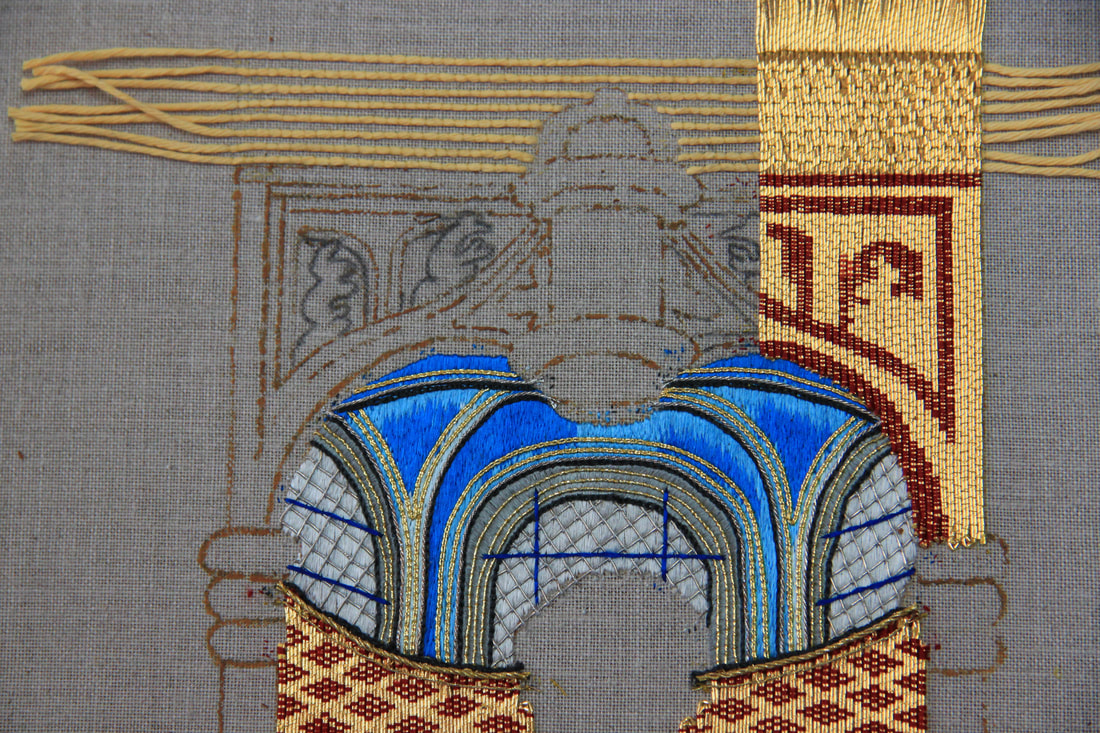 Background recreated orphrey of St. Laurence I've done a bit more work on the background, as you can see in the picture above. More or nue and a bit of basket weave at the top. I am still using Japanese Thread #8 and Chinese flat silk for the coloured couching and Pearsalls filoselle silk for the 'gold-coloured' couching. Once all the or nue is finished, I will apply more and different goldwork threads on top to create the details in the canopy screen (sorry, can't find a better description for it). I hope to be able to show you that in my next progress report in about a month's time. 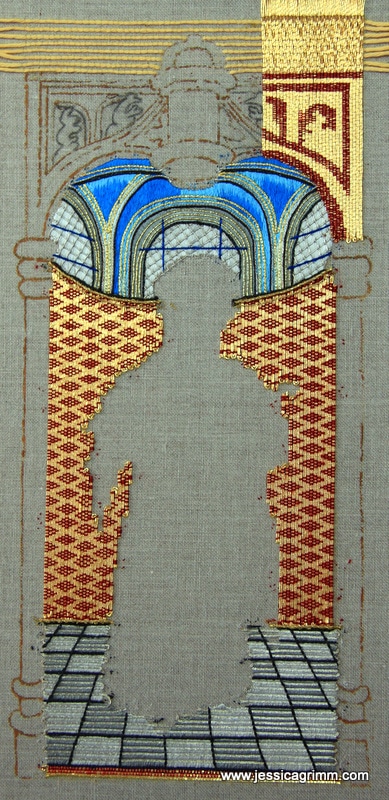 Background recreated orphrey of St. Laurence Oh, how I wish to be able to attend Beating around the Bush in Adelaide! That really is high on my wish list. And probably this holds true for many of you :). However, my fox after Millie Marotta's brilliant drawing, is there! So, if you are one of these very lucky people walking around the needlework convention in Adelaide, do take a picture of my fox and email it to me. Thank you very much in advance! 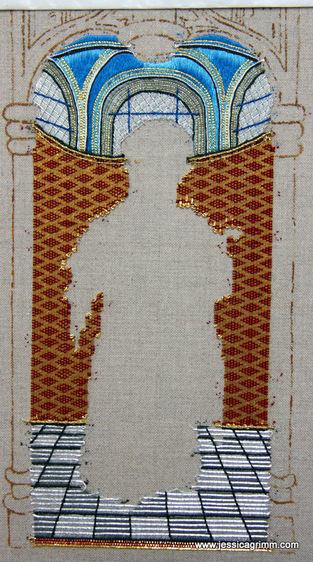 Recreated background of St Laurence orphrey This is what the project currently looks like (if you are new to this project, please click on St Laurence under categories on your right for previous posts). I learn so much by recreating this late medieval masterpiece! I really loved stitching the damask drapery in the background. It actually is a counted thread technique with Japanese Thread and red silk. And it is important to COUNT. How hard can it be to count to five? Well, judging from the left hand side in the picture, not as easy as you might think. So, I've learned not to eyeball this particular technique. For the right hand side, I decided to be a good good girl. And for once, it paid off.
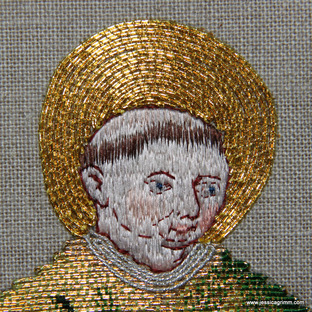
Getting a neat edge on the damask drapery, was a bit tricky. The original piece clearly used a much finer gold thread than my Japanese #12. On closer inspection it looks more like a passing thread. However, I had this really high quality Japanese Thread and decided to use that instead. But it did mean that my turns are far bulkier and thus more difficult to cover. I started by making a fine silk braid and couched it in place against the turns. This dark line gives the piece a hint of depth. Then I couched a gilt Twist #3 on the turns. And below, at a short distance, I couched a very fine gilt twist. Not bad at all. And using a thicker gold thread for the damask had an advantage too. The thinner thread in the original piece gapes a lot as it is clearly less stiff and would have needed many more couching stitches to stay put. 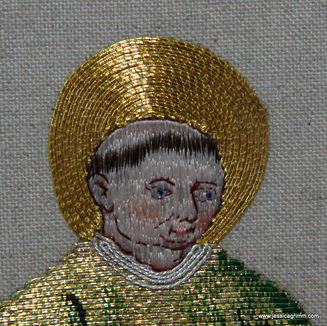 Recreated orphrey of St Laurence After my previous post on St. Laurence, Mabel send me an email with a suggestion on how to improve his face. I took out the left hand side of his jaw line and moved it down a tiny bit. That was all it needed to make him even more handsome. Thank you so much Mabel! This is what I really like about my blog-followers, you are so inspirational. Working on your own can make you feel a bit isolated. However, once a week we have a kind of a meet-up with all these wonderful stitchers all over the world. Thank you all so much!
The most daunting task about the whole St. Laurence goldwork project, are his face and his hands. You don't want to end up with a deacon with an 'oh-no-it's-Sunday-again' look. Equally, you don't want him to have a size hands not matching up with the rest of his body. And then there is the whole technical side to the face and the hands, as well. Let's start with a detailed picture of his face and the 'problem' hand holding the book. 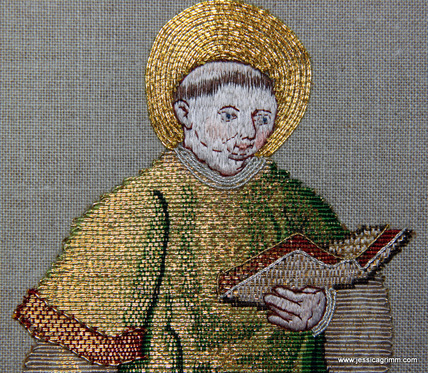 St Laurence recreated orphrey The hand holding the book is actually silk shading over and through the laid gold threads forming his or nue clothing. It soon turned out that just leaving them un-couched and then covering them with the silk shading, didn't work. The gold threads just started to roll away, gaping and even affecting the nice or nue of the book and the green dalmatic. Time for a 21st century trick: linen batiste, bondaweb and glue. Yes, you read that correctly, I used glue. Only a tiny amount :). I traced the hand onto the bondaweb, ironed it onto the linen batiste, peeled the paper off and glued it onto the gold threads. From there on, silk shading as usual. I used two shades of skin tone and a dark ox blood red for the detailing.
Faces. Probably the hardest thing in embroidery, or indeed any other art form. As you can see from the detailed pictures above, my face is totally different from the original one. For starters, I used a different technique: silk shading, as I am most familiar with this way of thread painting. The original piece uses encroaching satin stitch in horizontal rows. Both faces are similar in size and use the same amount of shades. The detailing in the original is absolutely breath taking. My eye-sight is still very good, but I am not able to stitch this amount of detail without magnification. I suspect, my medieval counterpart must have needed the same. That said, I was able to see the details when I removed my contact lenses. Just stitching with your nose almost touching the fabric, is not much fun. Next problem: my linen is too coarse. Adding so many tiny stitches in such cramped space, needs a tightly woven ground fabric. Also, the prick-and-pounce transfer system does not allow for such detailed facial features to be transferred accurately. That's why Laurence ended up with a completely different shaped head in the first place. How would I circumnavigate this problem in the future? I would use the same trick as I used for the hand holding the book. First carefully transfer the face onto the linen batiste and then glue in place. Add a few tiny tacking stitches to make it stay put and then start the silk shading. It would definitely improve the result. However, I get the suspicion that stitching the face was a specialised step in medieval times. Done by a professional 'face-only' stitcher. Research has found that the figure and the background were stitched by two different people. And I think we can add a third one: the face stitcher. 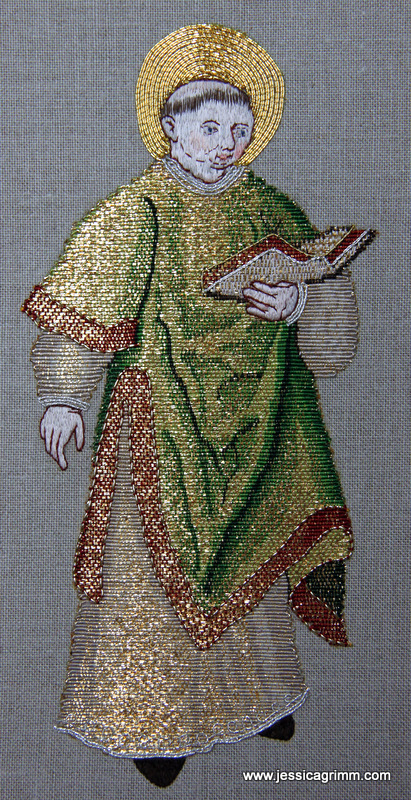 St Laurence recreated orphrey And this is what Laurence looks like now. It is impossible to capture the movement of the figure in a photograph. These or nue saints must have looked magical on the priest's chasuble in the candle light. Almost as if they were alive or floating on the background. Stitching the details with all sorts of gold and silver threads over the or nue, was a treat. This step was so much fun as it really put some dimensionality to his robes. And it wasn't hard at all to stitch through the dense or nue. And not having to plunge your threads, but simply tightly over sew them, is a real time saver too! A big thank-you to my medieval counterparts for pointing this out. 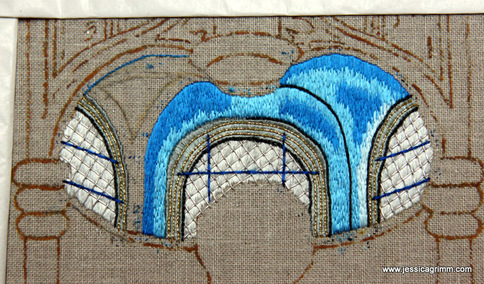 St Laurence recreated orphrey I have now moved on to stitching the background. These are the windows and dome above Laurence's head. I particularly like the layered way of working. Putting in the laid work (grey silk) for the windows first. Put the trellis on top using silver passing thread and anchoring the crossing points with silk. Then stitch the window's stone work in dark grey silk using satin stitch. Cover the line between glass and stone work with a tiny row of chain stitch in anthracite silk. Then add the gold check thread to the stone work and finally couch the dark blue silk bars in place. A similar thing will happen to the blue ceiling. It looks quite 'spotty' for now, but that will all be over in a couple more hours of stitching.
After the window area, I will continue with the tiled floor. Before tackling the cloth of gold covering most of the area behind Laurence. But that's stuff for a future blog post. As promised in last week's post, here's an update on St. Laurence. As we did not have many visitors due to the lovely sunny weather, I was able to put in quite a few stitches. This is what he looks like after 42 hours of stitching: 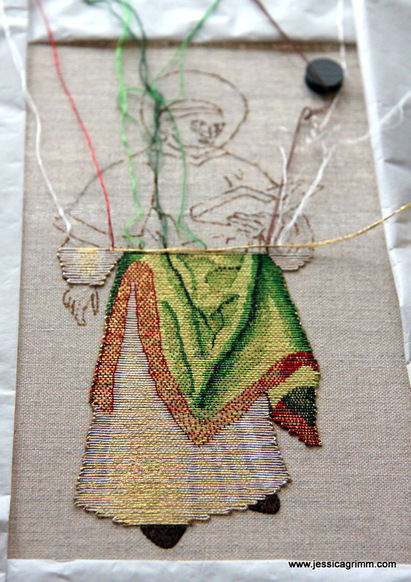 Or nue on the recreation of St. Laurence orphrey I've taken the picture at an angle as this conveys the shimmering of the gold threads best. Below is a picture of my work station with a printed copy of the medieval original. 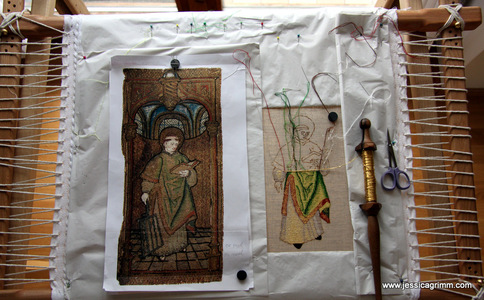 Or nue on the recreation of St. Laurence orphrey I am not trying to make an exact copy of the original medieval piece. One of the things I didn't like for instance, was this blotched up area under his right arm: 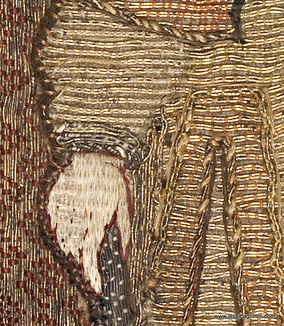 It just doesn't seem right to me. And since I am in charge; I've changed it. (To not hurt Laurence's feelings, I consulted with him first. He's a big boy and quite alright). As you can see comparing the original picture above and the picture at the top of this post, I've decided to separate the lower arm/hand from the body. This not only eliminates the ugly triangular area (I'll work a continuation of the background there), but it also means that I can work the hand directly onto the linen. Laurence's other hand (holding the book) is worked over the gold threads. Quasi ignoring them. That's a daunting task coming up much too soon...
As several people have enquired after Laurence, I figured that I should make him the star of this week's blog post. Do you think a saint from the Roman period should get media training first before he makes an online appearance? 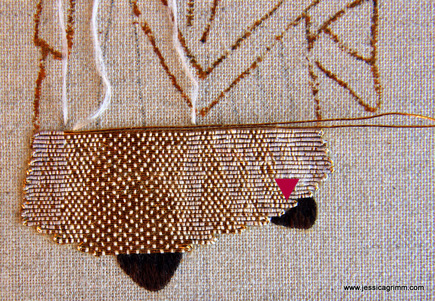 Start of the or nue on Saint Laurence After previously stitching his feet with Chinese flat silk, I've now made a start on his alb. An alb is worn by clergy under other garments such as the dalmatic or chasuble. As the Christian faith developed during the Roman Empire, many of its organisational structure and costumes are Roman. The alb, from the latin albus, meaning white, is a Roman tunica. Laurence's alb is stitched in or nue technique. Which means that, in this case, Japanese Thread #8 is covered by couching stitches of Chinese flat silk in two off-white tones. To give the impression of folds, the couching stitches are placed closer together or spaced out. It is not unlike silk shading or black work as taught at the Royal School or Needlework. As you can see, I have several needles on the go at the same time. Not bad for a first attempt. See the pink arrow in the picture above? There is a little bit of fabric showing between the alb en Laurence's left shoe. I'll mend that with a few extra stitches. And make a mental note to self that in the future I should go over the design line when working such areas. 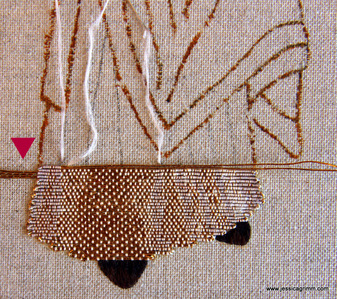 Oversewing the ends of gold threads instead of plunging Oh, and just as modern gold embroiderers, our medieval counterparts didn't like plunging. So they just didn't. Really, they didn't! They just couched the thread till the desired design line and then snipped it off. As a good Royal School of Needlework girl, I was a little sceptical at that. However, no guts no glory. Below the pink arrow in the above picture, you see the tails of my old threads and the tails of my new threads. I ignored the fact that they are tails and just couched over them as my design required. I took the picture just before I snipped the tails off. Laurence has been brave too; after snipping he was still fine...
And this is what Laurence looks like after 16 hours of stitching. I made a start on his green cloth of gold dalmatic with the red trim. Past and future blog posts on this project can be easily found by selecting 'St Laurence' in the category list to the right of this post.
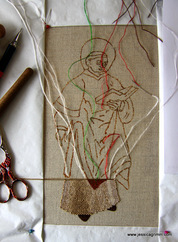
As a form of continued professional development, I'd like to complete at least one larger embroidery project a year. This year's CPD is going to be inspired by a medieval orphrey kept at the Museum Catharijneconvent in Utrecht, the Netherlands. I wrote a blog entry on an exhibition of medieval goldwork embroidery from the Netherlands held at the museum last year. You can find a picture and details of the orphrey of St. Laurence patron saint of Rotterdam, and indeed many excellent pictures of embroidery, in their online catalogue. I contacted the museum for a high resolution digital picture of the piece. They were very helpful and within days I had the information I wanted. 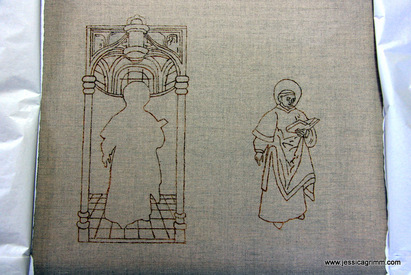 St Laurence painted onto the linen fabric Firstly, I spend several hours on redrawing the image from the picture. Older textiles have a tendency to distort. After I was happy with the result, I made a pricking and pounced it. Painting with water colour on c. 40 ct. natural coloured linen wasn't easy. So far, I only had experience with nice smooth silk. My lines are a little thick and my paint didn't stay at the right fluidity for long. However, since the whole picture will be solidly packed with either gold threads or silk, it is not a problem. As you can see, the saint will be stitched separately from the background. He will be later appliqued to the background. I will also work some of the background ornaments separately. I intend to applique the whole piece on a scrap of red chasuble fabric.  Slate frame set up with Saint Laurence I've decided to start work on the saint. He will be stitched in Chinese flat silk and fine Japanese thread. Chinese flat silk has the advantage that I can split it to very fine strands of fibres. This will be especially important for my tapestry shading of the detailed face. 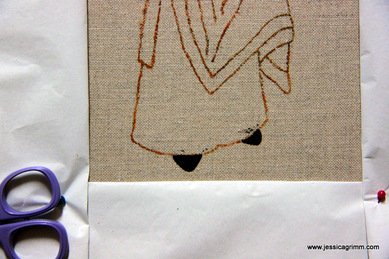 First stitches in on Saint Laurence As we attended Easter mass at 5:00h this morning, you will appreciate that I started with the least intricate part of Laurence: his shoes. They are worked in tapestry shading using two shades of a lovely dark chocolate. I split the flat silk in two. My tapestry shading is worked over a split stitch edge. That's all I managed today :).
Tomorrow, two ladies from Switzerland and two from Germany will join me for a five-day course on Goldwork embroidery. I am looking forward to meet them and spent a week sharing my knowledge with them. More on their results in next week's blog. After that, I'll regularly keep you update on St Laurence. |

Want to keep up with my embroidery adventures? Sign up for my weekly Newsletter to get notified of new blogs, courses and workshops!
Liked my blog? Please consider making a donation or becoming a Patron so that I can keep up the good work and my blog ad-free!

Categories
All
Archives
July 2024
|

 RSS Feed
Contact: info(at)jessicagrimm.com
Copyright Dr Jessica M. Grimm - Mandlweg 3, 82488 Ettal, Deutschland - +49(0)8822 2782219 (Monday, Tuesday, Friday & Saturday 9.00-17.00 CET)
Impressum - Legal Notice - Datenschutzerklärung - Privacy Policy - Webshop ABG - Widerrufsrecht - Disclaimer
Copyright Dr Jessica M. Grimm - Mandlweg 3, 82488 Ettal, Deutschland - +49(0)8822 2782219 (Monday, Tuesday, Friday & Saturday 9.00-17.00 CET)
Impressum - Legal Notice - Datenschutzerklärung - Privacy Policy - Webshop ABG - Widerrufsrecht - Disclaimer