|
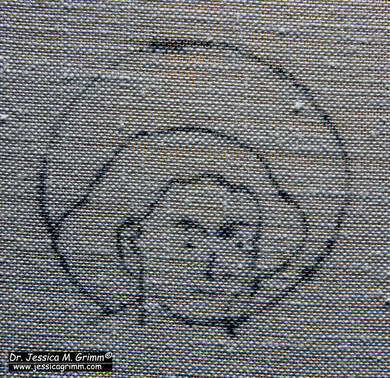
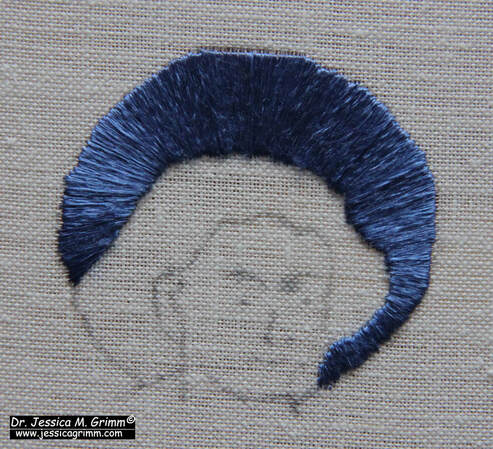
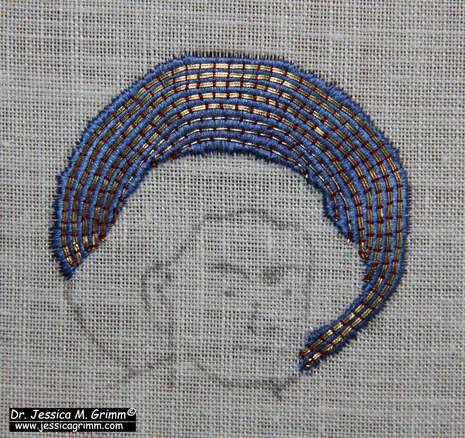
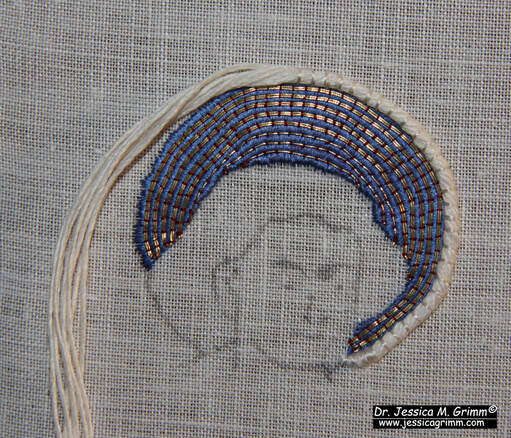
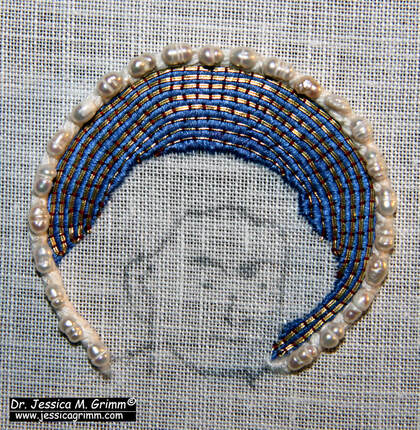
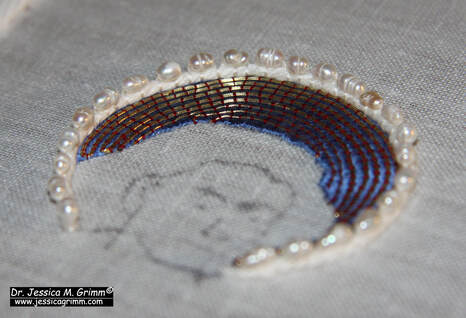
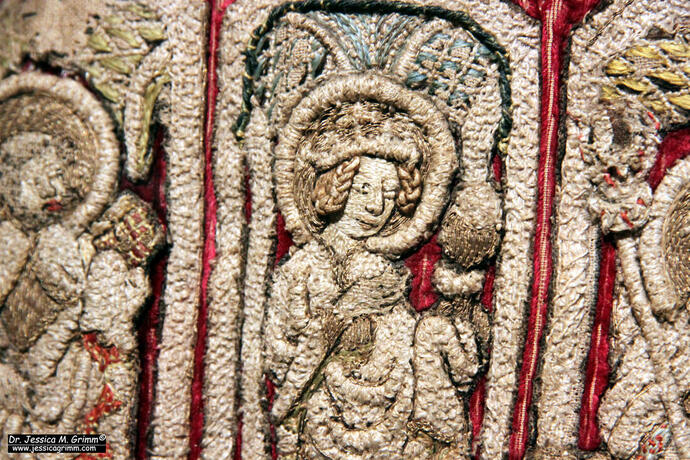
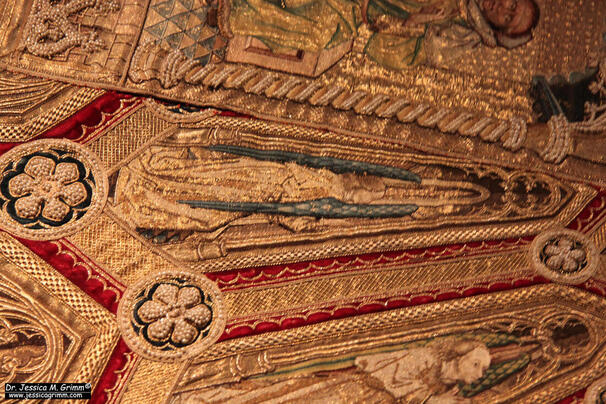
Have you seen my new blog index? So far, all blog posts have been neatly indexed. You'll find a list of book reviews, my projects listed according to embroidery techniques, historical embroideries listed according to century and a complete list of all tutorials. Today's tutorial is all about the white string we see in many medieval goldwork embroideries. This padding is often all that remains from the original bead embroidery worked with freshwater pearls. When we are really lucky, a few pearls still adhere. As is the case for the chasuble I showed you two weeks ago. In this tutorial, I will show you how the padding and the beading were worked. I was really surprised by how sturdy this technique actually is. The beaded edge is VERY firm. As always, I worked my sample on a piece of high-count (think 40ct and up) linen stretched on my slate frame. I determined the approximate size of St John's head with nimbus from the original embroidery. It is about 5.3 x 5.9 cm. I made a pricking on transparent paper and transferred the design with pounce powder and ink. As is a favourite with medieval embroiderers, the simple nimbus is actually built up of several layers of embroidery. Start with a layer of radiating satin stitches in blue flat silk. The radiating does not need to be super precise. You can hardly spot the radiating stitches once the next layer of embroidery has been worked. The next layer consists of couched gold thread. Use a fine red silken thread for the couching. Work from the outside in. The first few rows consist of a double gold thread, whilst the last couple of rows consist of a single thread. In the original, the embroiderer would have hidden de turns under the slip of the head of St John. I have turned my threads on the edge of the nimbus. It is now time to add the actual string padding. It is made up of a twisted-together bundle of linen threads. These are couched down with white silk. Start from the middle and retwist your bundle as you go. The ends seem to be tapered in the original. To achieve this, start to cut away pairs of threads from your bundle about a cm before the end. Keep couching and removing pairs of threads until you are left with a single pair on the design line. Sew down the freshwater pearls (Etsy is a good source for these!) onto the string padding using white silk. You might want to wax your thread as the holes of the pearls can be quite rough. Go through each bead twice. In the original, the pearls are sewn down with a little bit of space between them. This was possibly done to save costs. It is said that the string padding was used to elevate the pearls away from the very shiny gold. It also provided a continuous white edging for when the pearls were slightly spaced apart to save on costs. The end result is very stunning!
As always, my Journeymen and Master Patrons find a downloadable PDF of this tutorial on my Patreon page. For as little as €5 per month, you can build your own library of medieval embroidery technique tutorials. Not a bad deal at all!
2 Comments
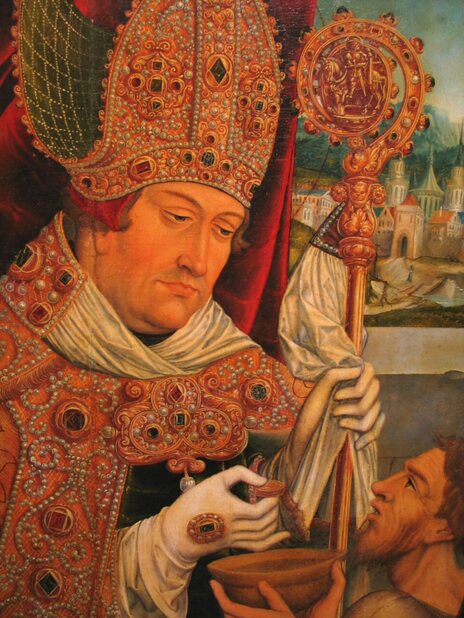
If you like to embellish your embroidery with beads you are a part of a very old tradition. Especially goldwork embroideries have been made even more exquisite by adding fresh-water pearls, beads made of precious stones, coral or metal. Those of you who use beads in your embroidery will know that you need to secure them well or else you run the risk of them coming off. Small wonder that many beads have now vanished from medieval embroideries. However, they have left traces on the original pieces and in contemporary sources. Let's explore! On the medieval embroideries themselves, you often see these areas of thick white string padding. Sometimes identified in the literature as silk, cotton or linen. Especially fresh-water pearls would have been attached on top of this white string padding. Not only does this mean that texture is added to the embroidery but it also ensures that the light catches the pearls first and makes them stand out even more. After all, when you are spending a lot of money on these extra embellishments you want the onlookers to take note of your generosity. Another source of medieval bead embroidery forms the many paintings which depict clergy in their finery. Some painters were specialised in faithfully rendering the costly embroideries on vestments. Possibly because they were also the ones who made the design drawings for these embroideries. For instance, painter Mathias Grünewald faithfully painted the pearl embroidered mitre his friend the silk embroiderer Pflock made (Halm 1957). And our third source is a collection of books written by the monk Theophilus in the 12th-century on a range of crafts: Schedula diversarum artium. You can find a collection of all the known versions of this manuscript together with three translations (Dodwell for English, Ilg for German and Ecalopier for French) on the website of the University of Cologne. The English translation of the passage on the use of fresh-water pearls reads as follows: "Pearls are found in shells of the sea and other waters. They are pierced through with a fine steel drill, which is fixed in a wooden shaft and a block of wood [at the top]. On the shaft is a small lead wheel and, attached to it is a bow by which it is rotated. If it is necessary for the hole of any pearl to be made larger, a wire is inserted in it together with a little fine sand. One end of the wire is held in the teeth, the other in the left hand, the pearl is moved up and down with the right, and sand is meanwhile applied so that the hole becomes wider. Mother of pearl is also cut up into pieces. These are shaped into pearls with the file they are most useful on gold and are polished as above." The pearls are so small (1-1.5 mm ), and their holes thus even smaller, that loose pearls can only be reattached during restoration with the help of fine surgical needles (Herrmann 1975).
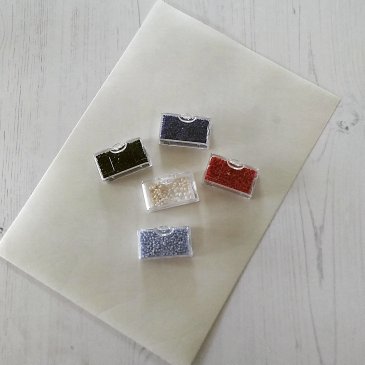
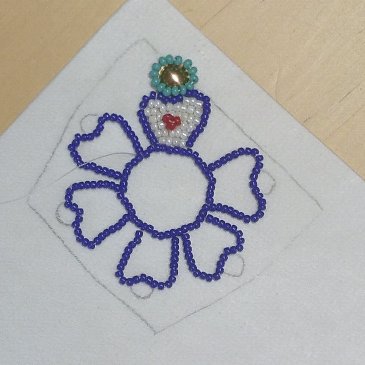
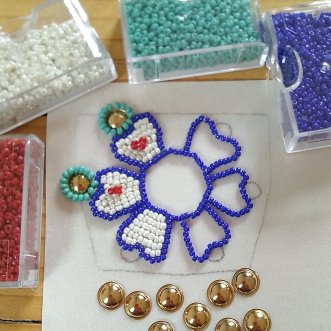
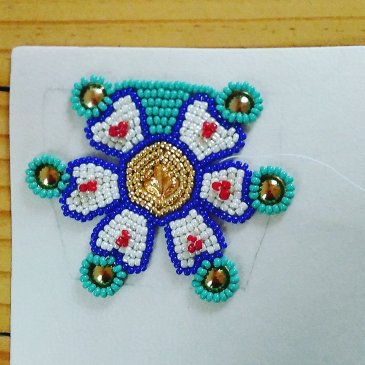
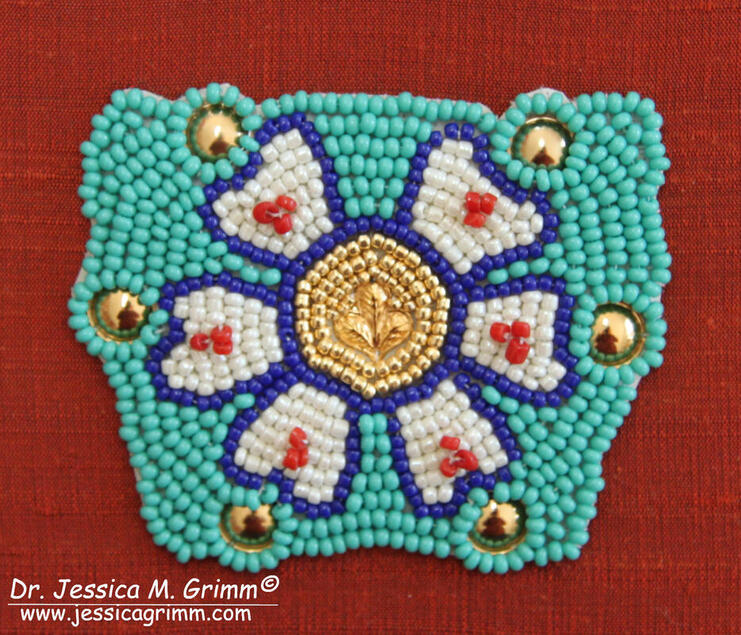
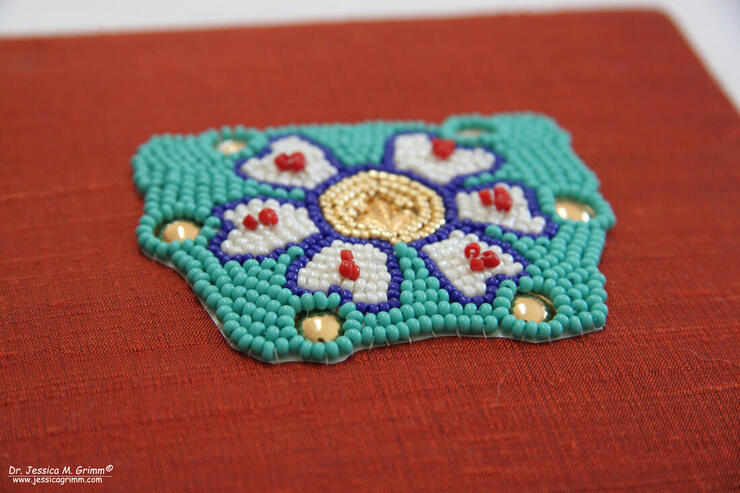
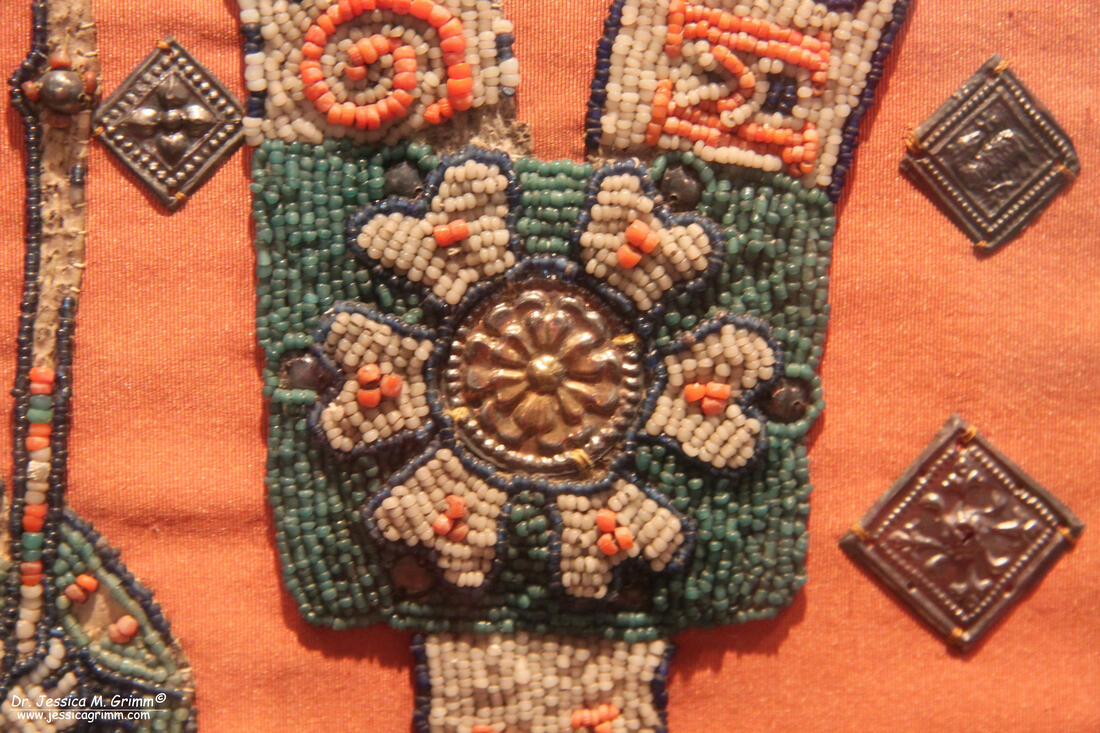
You can get a better idea of how beads were being made by looking at the drawings of the Hausbücher of the Nürnberg Zwölfbrüderstiftungen. There are three depictions of brethren working a lathe borer to drill beads for a rosary. The oldest one dates from before AD 1414. From the same Hausbücher, we have a depiction of brother Alexander Hohlfelder. He was taken into the almshouse on the 3rd of April AD 1626 when he was 80-years old. Alexander had lost his speech and likely had dementia when they took him in. He died after two more years in the almshouse. Alexander had been a Seidensticker (silk embroiderer) and is depicted with a bead dish filled with what looks like fresh-water pearls. Literature Halm, P., 1957. Matthias Grünewald: Die Erasmus-Mauritius-Tafel. Reclam, Stuttgart. Hermann, H., 1975. Die Restaurierung einer spätmittelalterlichen Perlenstickerei, Maltechnik restauro 81 (3), p. 113-115. Ever since my visit to Cheb in the Czech Republic earlier this year, when we went to see the Egerer antependium, I wanted to try my hand at a small replica. Since the beading on the antependium is done on parchment/vellum, that was easier said than done! However, I finally managed to recreate a small portion of this stunning medieval beadwork. And I am going to share my journey with you in this blog post. The first thing I needed for my efforts was a piece of parchment/vellum. Luckily there is a German online-shop (run by archaeologists!) who sell all sorts of re-enactment stuff. And they do parchment/vellum too. I ended up buying good quality parchment rather than vellum, I think. They are in essence the same material: thinly scraped animal skin. Vellum is the absolute premium version made of the skins of young animals. For months I was actually afraid to start the stitching. On the one hand my fingers were itching to start, but on the other hand I did not quite know where to begin. So my sheet of parchment sat on the shelves, patiently waiting. The main question I needed to get answered was how to work with the parchment. Does one hold it in hand and stitch or does one put it in some sort of embroidery frame? Searching the internet, I came across a blog entry of a re-enactment lady. She just stitched a small motive in the hand and was successful. I decided to do the same and worry about the framing of a larger piece of parchment later :). The parchment is actually so stiff that you can hold it comfortably in hand whilst stitching. The second main component would be the beads. On the original, the beads are quite small but irregular. Using some of my collection of perfectly formed Japanese high-quality beads would just not be the same. Luckily, I hade some, otherwise crappy, cheap hobby beads in about a size 9 and a size 10. Perfectly irregular :). The original beads are more like a size 11. I even had these in roughly the right colours: sea-green, dark blue, pearly white and coral red. The third component proved to be quite difficult and partly impossible to get. In amongst the beadwork on the original are stamped metal decorations. The closest I could get were those gilt 'folien' used to make a bundle of grapes in goldwork embroidery. Whilst they worked fine for some parts of the capital motive I had chosen to replicate, it did not work for the centre. I ended up using a fancy 'folie' and filled in the empty space with small golden-coloured beads. On to the stitching! But first, I transferred my chosen motive onto the parchment using a pencil. From my pictures and the written information I had on the antependium, I was able to deduce that the capitals of the columns between the saints were about 5.4 cm in height. That's what I based my pattern on. I then started by stitching the design lines of the petals first using my blue beads, a number 10 needle and Coats Dual Duty glaced hand-quilting thread made of polyester and cotton. In the original piece they probably used a linen thread. According to the written sources and from what I could see in my pictures, the appropriate number of beads were strung first and then couched down with a separate thread and needle every two beads or so. At first, this felt as if I needed an extra pair of hands! Holding the parchment in one and manipulating two working threads with the other wasn't easy. Especially not as the needle only pierces the parchment when a certain amount of force is applied. However, after struggling for a while, I changed my method slightly. Firstly, I did away with the couching thread. Instead, I laid out the strung beads carefully on the design-line, go down with my needle in the appropriate spot, and then couched between the beads using the same thread. In this way I could eliminate the extra pair of hands :). As it proved very hard to hit the exact spot from the back of the parchment (parchment is surprisingly slippery stuff), I ended up making holes from the front and subsequently finding them from the back. Much, much easier! To attach my 'folien', I carefully punched two small holes in the rim using a larger needle and a normal hammer. Usually only one hole turned out successfully, but that proved to be enough to hold the piece in place long enough until I had couched the beads around it. As the folien have a small flat rim or lip, the couched ring of beads keeps it in place. Once all the beading was done, I cut out the beaded element as close to the beads as I dared. In my embroidery hoop, I stretched a piece of terracotta dupion silk over 36ct even-weave linen (the original has a linen support too) and appliqued the beaded element in place using the Coats Dual Duty thread. Last but not least, I mounted my small replica onto acid-free cardboard and added a linen backing. I am planning on sending it to the museum so they can use it for educational purposes. As I used slightly larger beads than were used in the original, my motive measures 6.2 cm in height.
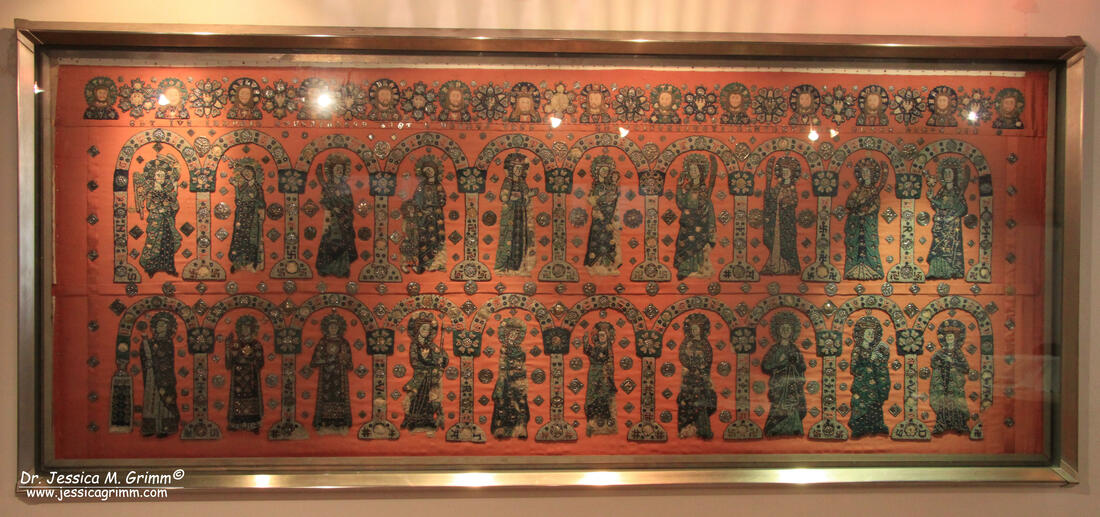
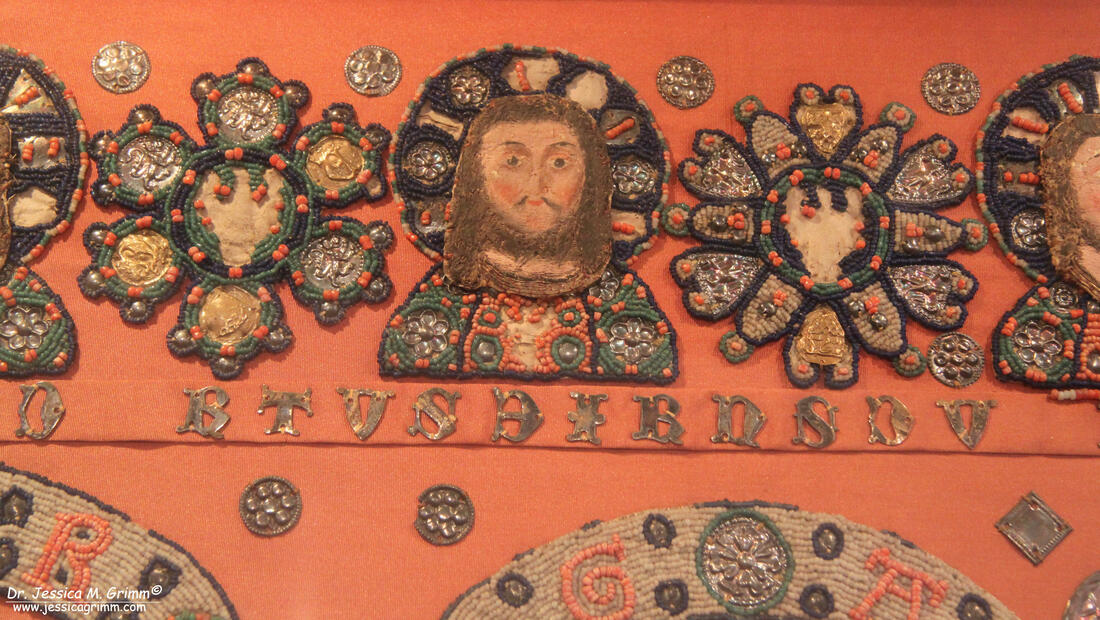
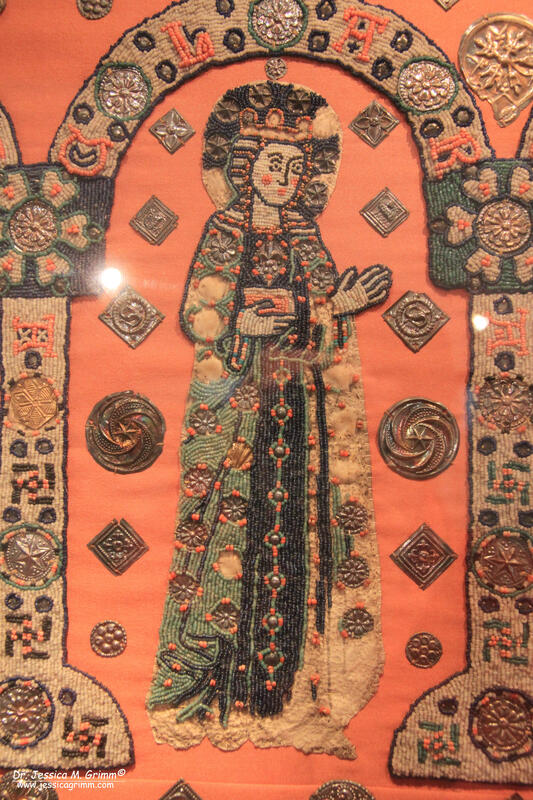
I hope you liked my foray into medieval bead embroidery. At some point I would like to attempt one of the saints. However, I will need to find a solution for framing the parchment as that will be too large to hold in hand. I would also like to find a source for larger stamped metal decorations such as were used in the original. If you know of a source, please let me know! I and my husband had a most lovely trip to Cheb (German: Eger) in the Czech Republic. The local museum houses a spectacular medieval bead embroidery: the Egerer Antependium. Although the museum is closed to the general public due to renovations, Alena Koudelkova kindly agreed to show us around. Check my previous blog post if you want to read the story on how I discovered this gem of a medieval embroidery. The Egerer Antependium measures 2,18 m by 90 cm and was probably made by the Poor Clares of Cheb in the early 14th century (it is a staggering 700 years old!). There are two identical rows with ten saints. Each saint is framed by two columns topped by an arcade. For easy identification, the name of the saint is stitched into the column and the arcade. The bottom row shows (from left): John the Evangelist, James son of Zebedee, James son of Alphaeus, Margaret the Virgin, Mary of Intercession, Jesus (who blesses Mary to his left), Agnes of Rome, Saint Cecilia, Cunigunde of Luxembourg and Saint Ursula. The row above shows: the Archangel Gabriel visiting the Virgin Mary, Agatha of Sicily, Mary with the six-year-old Jesus, Clare of Assisi, Mary Queen of Heaven with baby Jesus, Catherine of Alexandria, Saint Lucy, Saint Barbara and Saint Bibiana. The columns-arcade-frames measure 35 cms in height. The figures themselves are about 28 cms in height. The iconography of this piece supports the thesis that the Poor Clares of Cheb were the embroiderers of this Antependium. For starters: it is very female heavy :). The Virgin Mary is represented four times. She is accompanied by other holy virgins (Margaret, Barbara & Catherine as well as Agnes, Lucy & Cecilia). Clare of Assisi is the founder of the Poor Clares and therefore prominently displayed in the middle of the Antependium. Agatha and Ursula often accompany Clare of Assisi. Cunigunde of Luxembourg is especially venerated in the diocese of Bamberg to which Eger belonged. Bibiana possibly refers to a local veneration or to the sponsor of this piece. Furthermore, in the lower left corner, we see John the Evangelist celebrating mass with the two Jameses as supporting diacons. Especially John the Evangelist was widely venerated by nuns in the High Middle Ages. There is a third row sitting above the previous two rows. This smaller row, a mere 16 cms in height, comprises of the busts of Mary and Jesus flanked by the twelve Apostles. It is quite possible that this row is of a later date. The busts were probably originally silk and goldwork embroideries on linen. The embroidered parts were then covered with paint (I've seen another medieval example in Vilnius, Lithuania). The busts were then cut out and placed on top of the beaded halos. Each bust is alternated with beaded floral motives. A possible later date is supported by the fact that the beads in this row a slightly darker and the metal decorations of a different type. As there are no contemporary written sources, the dating of the piece is mainly based on stylistic grounds. Several of the iconographic scenes are first seen during the mid- to late 13th century. But also the style of the figures themselves discloses the period this piece was likely made. Some of the figures are somewhat stiff and depicted frontally (the Jameses and Clare) whereas most others are depicted more life-like with garments full of movement as was the norm in the later Gothic period. The piece as a whole breathes the strict order of the older Romanesque style. Probably originally made for the chapel of the Poor Clares of Cheb, situated in the Franciscan Church of the Ascension, the Antependium did not stay there. When the Poor Clares got their own church in 1465, they probably gifted the Antependium to the St. Jodok church in Cheb where it stayed until it was transferred to the newly opened museum of Cheb in 1874. Major restorations have transformed the Antependium somewhat. The last one took place in 1928 by Sr. Virginia Erhart of the Congregation of the Holy Cross in Cheb. She worked under close supervision of the County Conservator. It took her over a year to take the beaded applications off the red silk backing from the Baroque period. All beads were cleaned and re-strung when necessary. Then the beaded applications were re-applied to a red silk backing re-enforced by linen. During an earlier restoration, the writing between the first and the second row had already been muddled up and so doesn't make sense anymore. The beaded applications consist of strung beads couched onto vellum. This is clearly seen in those places where the beads are now missing. Sometimes even glimpses of the blue design lines can be seen. The order of work likely has been that firstly those contours were couched. Then the metal decorations were applied before the whole design element was filled with more couched beads. The colour palette is quite restricted with blue, green and white beads being the main colours. Black beads are used sparingly as are the red coral beads and the real gold beads. The size of the beads is remarkably uniform and mainly seems to correspond to a modern bead-size 11. The beads of the face of the Virgin Mary with baby Jesus are real freshwater pearls. These kinds of bead embroideries are very rare. This is due to the fact that their raw material was precious and could easily be recycled. Their origin lies in the pearl embroideries from Byzantium which were made since the 6th century. The idea came to Central Europe in the 9th century through Charlemagne with his contacts to the court of Byzantium. Glass beads were produced in Venice since 1200 AD and they started to supersede the real pearls from the 13th century onwards. These beads had to be imported from Venice well into the 14th century when local production took over (especially in Bohemia, now the Czech Republic). In turn, bead embroidery was superseded by silk embroidery in the 15th century. On the one hand, while beaded embroideries where quite heavy and impractical (in effect, the Egerer Antependium consists of many small embroideries forming a larger piece) and on the other hand while the Renaissance demanded ever more realistic and life-like depictions which couldn't easily be achieved with beads. Sources:
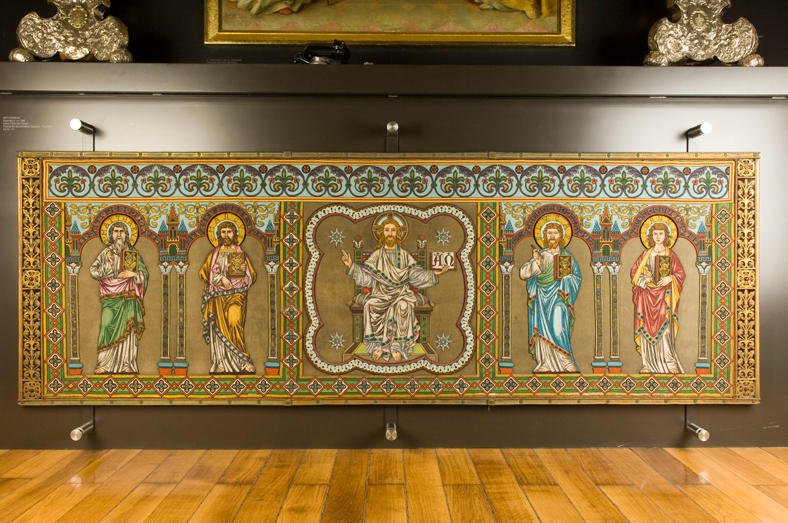
Siegl, K. (1929): Das Egerer Antependium, Unser Egerland, pp. 80-81. Tietz- Strödel, M. (1992): Das Egerer Antependium. In: L. Schreiner (ed.), Kunst in Eger, pp. 248-258. P.S.: This research was partly sponsored by a most generous PayPal-donation of one of my dear readers. If you like what you read on this blog and you can spare some small change, please consider making a donation via the PayPal button at the top of this page! A couple of weeks ago I was contacted by Mary Gobet, President of the Portland Bead Society, about the beaded antependium (altar cloth) in the Regensburger Domschatz. We had both visited the Regensburger Domschatz a couple of years ago and were intrigued by the piece. However, as it is located behind glass at the top of a flight of stairs, it was impossible to shoot good pictures. And the information only read: Antependium, Regensburg, um 1890, design Vicar Dengler, embroidery with strung pearls, vellum, catalogue number 114. Alles klar? Nope, not really. Together we started to look for literature on the piece and we also contacted the museum for more information. And then it became really interesting! As far as we now understand it, the piece consists of strung pearls couched down on vellum for support. The vellum pieces are then cut out and sewn onto the background fabric. In this case, gold brocade backed by a double layer of linen. The detail and shading of the beads are absolutely exquisite! The piece was originally made in several monasteries of the diocese of Regensburg for the private chapel of the Bishop of Regensburg. It shows Christ Pantocrator flanked by the four evangelists. The two smaller pieces which would have covered the sides of the altar are also held at the museum but are not on display. Mary and I did not know of any other beaded Antependiums. But when we researched the history of this piece, it became clear there are more! Vicar Georg Dengler was the editor of the Magazin Kirchenschmuck (you can browse the magazine by clicking the link; beautiful drawings!) which was printed by Josef Habbel in Regensburg between 1888 and 1895. In the article on the Regensburg Antependium, Dengler states that the antependium was stitched in several monasteries in the diocese of Regensburg. A certain Prof. Klein from Vienna (who had already died before the magazine was printed between 1888 and 1895) had made cardboard templates for the figures. These templates (made of cardboard and in use for embroidery transfers since the Middle Ages) were partly copied by Dengler for his design.
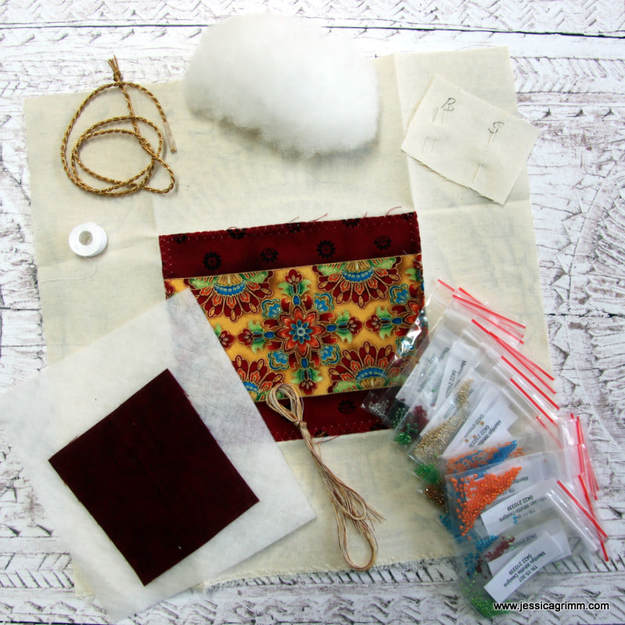
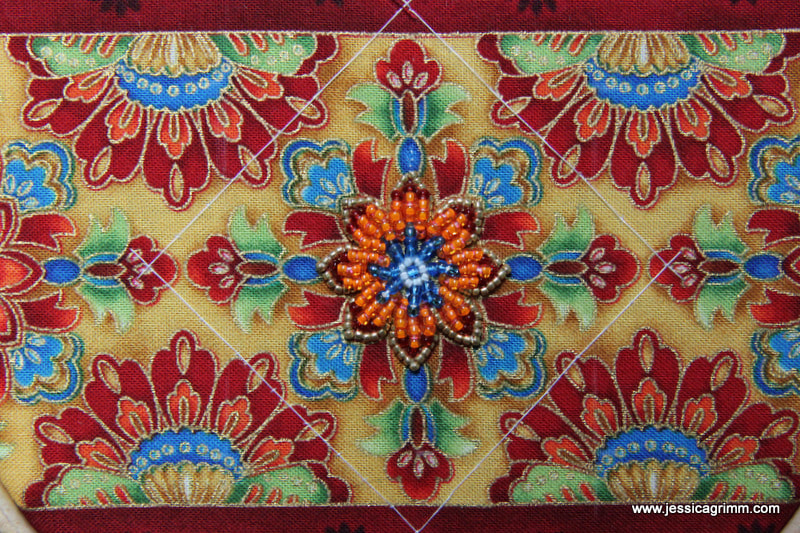
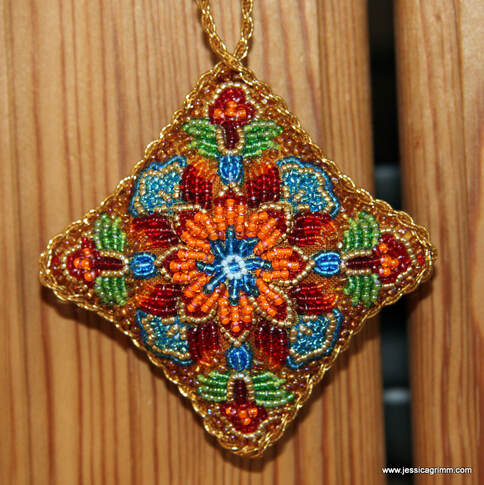
But Dengler got his initial idea from somewhere else. And that somewhere else is modern-day Cheb in the Czech Republic. In Dengler's time better known by its German name of Eger. The museum there houses a medieval beaded Antependium. So I contacted the museum in Cheb and asked if the Antependium is on display. Initially, they told me that the Antependium is on display, but the museum is currently closed for renovations. Bummer! But then I got a second email asking if I would be able to get to Cheb within two to three weeks as renovations on the room with the Antependium had not yet started. Yeah! I am going on a field trip next week :). And I will tell you all about it in my next blog post! Months ago, I saw a post on Facebook in which Yvette Stanton worked a bead embroidery kit by Merrilyn Whittle. The design was so lovely, that I ordered the same kit :). This weekend, I had finally time to dabble with it and write this review. If you are thinking of trying bead embroidery yourself, do visit the blogs of Dima Santina and Margaret Cobleigh. Both ladies are beading away on two very different projects: Hanabatake by Margaret Lee and Wild Child by Mary Alice Sinton. Besides well-written instructions with many clear pictures, the photograph above shows you the other contents of the kit. As you can see everything is clearly labelled. And the quantities of the beads and threads are very generous. Apart from the kit, I had also bought a bead shoe and a wooden koma. Me and koma never became friends, but having a bead shoe is definitely a plus. Regarding the koma, I feel that you can stitch this design without one. However, bead purists might disagree :). I will definitely give the koma another try in the future and will probably watch some footage on Youtube to get an idea how to hold this piece of equipment when beading. And off I went: beading away on the central flower. With hindsight, this was probably the most enjoyable part of the whole design. It makes use of two different padding techniques and they were techniques I had never used before. I learned a lot and I will certainly incorporate both techniques in future embroidery pieces. And this is how the piece progressed. I wasn't going for perfection and only took things out when they were really disrupting the piece. I just wanted to have a nice embroidery experience. And that's what this excellent kit certainly delivers. The finished design is only 6x6cms and can be stitched as a weekend project. I am unsure if this project would suit an absolute embroidery beginner; I am afraid that I take too many things for granted after about 34 years of stitching :). And this is what the finished piece looks like. It is intended to be a Christmas decoration. In lieu of a tree, it now happily hangs on the knob of my kitchen cupboard. I've thoroughly enjoyed stitching this little gem and I've learned a few new things. As Merrilyn Whittle is based in Australia, you might need to pay custom duties when ordering this kit. I had to, and all in all I paid a total of €72,73 or $83,89 (kit+shipping+tax). I think, as there are so many talented embroidery designers in Australia, it is high time Australia applies for EU-membership :).
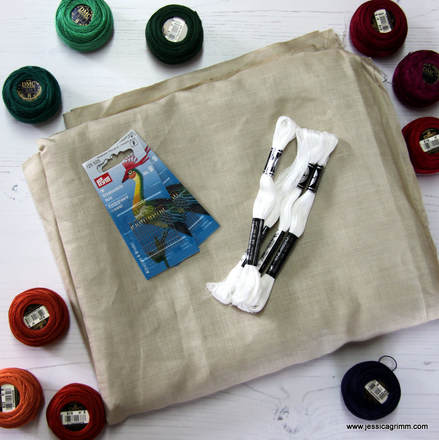
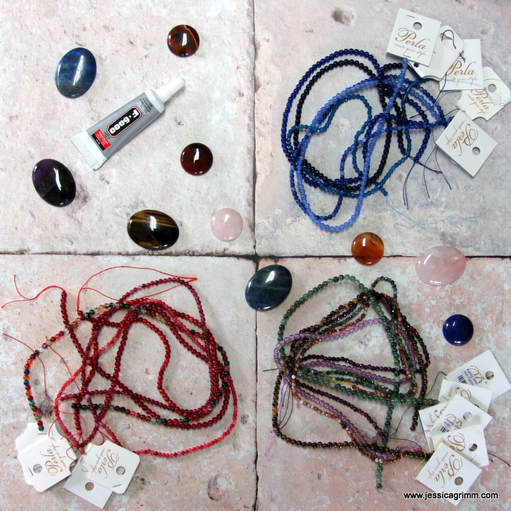
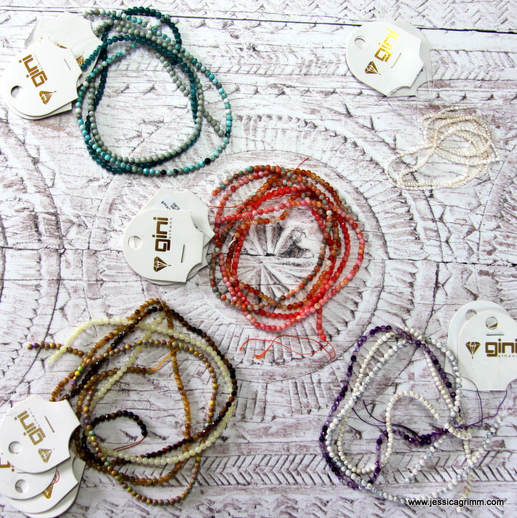
I am back from a lovely holiday to beautiful Crete! Apart from incredibly hospitable people, fascinating archaeological sites, good food and wild landscapes, Crete is an island full of embroidery. You'll encounter beautifully embroidered household linens in homes, hotels, restaurants and churches. It consists mainly of whitework, cross stitch and bright folklore embroidery. Goldwork embroidery is the almost exclusive domain of the Greek Orthodox Church. Apart from seeing beautiful embroidery, I love meeting fellow embroidery enthusiasts and buying local embroidery supplies. So this first blog post on Crete is on embroidery shops. Where does one buy embroidery supplies? At the local mini-market for instance. We stayed in Enagron ecovillage near Axos and the mini-market in Axos sported a decent supply of DMC stranded cotton, perle and crochet yarns. As I did not see any fabric, I enquired at our accommodation to find out about any other shops in the vicinity. Our hosts turned out to be avid embroiderers themselves, so we had a pleasant conversation on embroidery. I even taught them how to do a bullion knot as they were mesmerized by the bullion roses on my needlecase. Armed with an embroidery shop address in Perama, me and my husband hunted it down. Not so easy. Shops have a very different look on Crete compared to over-orderly Western Europe :)! The Cretan version of an embroidery shop is a long and narrow dark room stuffed with supplies. You can hardly walk in there. And it is interesting to see what other items are on sale: towels, bed linens, socks and nylons, etc. Explaining what you want is difficult too. The ladies in the shops are elderly and very helpful, but only speak Greek. As they also sell finished embroideries (watch out: not necessarily made in Greece!, more likely cheap and cheerful China and Tunisia), they assume you come for that. It helped that I carried some finished embroidery myself to show them. The embroidery shops in Perama mainly sold DMC stranded cotton, perle and cotton a broder. Fabric-wise, they have aida, coarse linen, sparkly canvasses, pre-printed canvasses and simple embroidery kits. They also have books full of embroidery designs (cross stitch, richelieu and folklore) of which they can make a copy for you. You can also find needles, sewing thread, crochet yarn, wool, etc. It is best to carefully browse the heaps of supplies. I was lucky and found a piece of sand-coloured 100% fine linen from France. I also bought some perle yarn. After all, these ladies can really use the money as the consequences of the austerity measures are clearly visible. You can find one shop on the Palea EO Rethimnou Irakliou next to the National Bank and the other one almost opposite on Epar. Od. Peramatos-Exantis. Apparently, beading and making jewellery is incredibly hot among young people in Greece! The shops where you can find beading supplies are bright and organised with a hip and urban feel. My favourite was Perla in Rethymno. I was especially taken with the wide selection of beads and cabochons made of semi-precious stones. The young woman running the store is a maker herself and speaks excellent English. She told me that she will soon open a webshop. If you'd like to stay in the loop on that, why not visit her facebook page? I also located an embroidery shop on Eth. Antistaseos, also located in the old town centre. Two young women ran the store when I visited and they were very helpful. They had a heap of old DMC pattern leaflets in Greek. They weren't selling them, but I was allowed to take photographs. In return, I bought some #9 needles and some cotton a broder #30. They also sold linen fabric for richelieu embroidery. I saw the traced patterns behind the counter. Apparently, you buy the fabric and threads and have the pattern of your choice transferred onto the linen using blue carbon paper. The ladies told me that cotton a broder #30 is the finest thread they stock nowadays as this type of embroidery is not so popular anymore. The last shop I visited was Gini in Heraklion on Kalokairinou Avenue. For me personally, this shop was a little too loud! The girls behind the counter where of the giggling type. Nevertheless, I managed to buy some more beads made of semi-precious stones and some fresh-water pearls. Gini has several shops throughout Greece and sells online too.
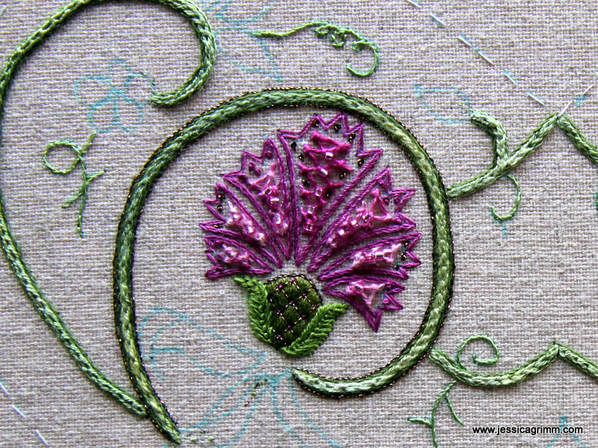
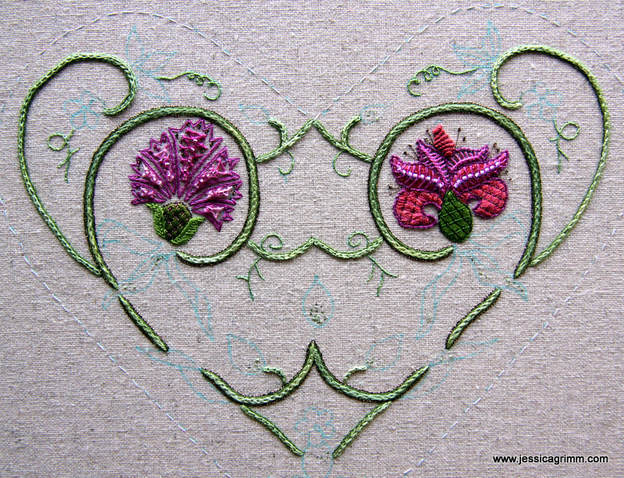
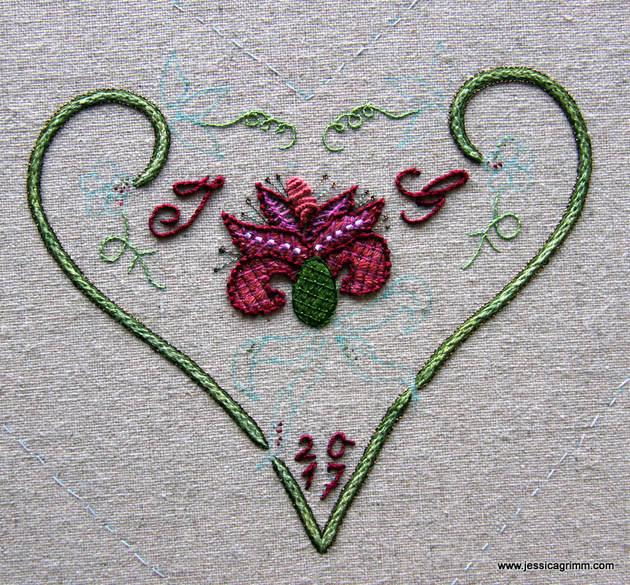
If you know of any other embroidery shops on Crete, please leave your recommendation in a comment below. It would be lovely if this blog post becomes a reference for all who plan a holiday on Crete! Next week, we'll have a look at some of the beautiful embroideries I encountered. This time we are going to talk about the two big pink flowers in the big hearts. Now, since Janet Granger has published two excellent thread substitution lists on her blog, I'll concentrate on the actual stitching. Do visit Janet's blog as it is a really good read and personally I can't wait for her to start the actual stitching! First up was the carnation. And the first stitch called for was the beaded diamond stitch. Never heard of it. But the step-by-step photographs provided in Inspirations were excellent and I soon mastered this stitch. It is quite pretty with the beading. However, as the space is limited in the lower petals, it all becomes a little crammed. I am especially proud of my padded satin stitch calyx covered with a tiny trellis. I love this stitch combination and the threads used (silk and metallics). As I am severely allergic to fishbone stitch, I swapped it for fly stitch on the flanking petals. You see, it is ok to push yourself to learn new things. But, you'll find that there are certain stitches that give you the creeps. In my case: fishbone stitch. And it is perfectly ok to swap stitches in a design devised by somebody else! Oh, and once I completed the carnation and compared it with Carolyn's original, I spotted a further difference. My petals do not touch the calyx. Then I checked the line drawing of the pattern and saw that this is indeed different from Carolyn's piece. Personally, I quite like the separation and will leave it. However, if you don't like it: pay heed before you start stitching. Next up is the lily. Quite straight forward stitching with Vandyke stitch (one of my favourites!), satin stitch and fly stitch. The largest lower petals were covered with satin stitch using two strands of silk. The instructions advice you to follow the petal-curve with your stitches. However, as this is a rather small area and you are working with a double strand, it is a bit hairy. Therefore, I stitched the second lily on the back heart with a single strand and the result is a lot smoother. Note to self: only ever execute satin stitch with a single strand :). And then I hit a block. Oh dear. I ran into cable plait stitch. Another unknown stitch to me and this time I could not make heads or tails from the step-by-step instructions. So what does an embroidering damsel in distress do? Well, certainly not call for a handsome, but rather big-boned knight with zero-knowledge of embroidery stitches. Instead one consults Mary Corbet's excellent how-to-video on cable plait stitch. Then one grabs a thicker thread and a spare piece of cloth and practices. Then one finally returns to Strawberry Fayre and continues to stitch. Do I like cable plait stitch? Yes!, or at least when I stitched it with perle #8 on 40ct linen. Even when closely spaced. Do I like it as an outline on the lily petals stitched with Gütermann silk? Not so much. The thread is so thin and the subsequent stitches so tiny, that the braid-like appearance is lost to the naked eye. Another annoyance was the thread itself. Gütermann silk breaks a lot with this stitch. Instead, I have opted for coral stitch with a slightly thicker thread (Soie Perlee #384 by Au ver a soie) on the other lily. I liked this thread and its colour so much, that I also embroidered my initials and the year with it. I think my overall impression so far with Strawberry Fayre is that it is basically crewel embroidery on the scale of fine whitework. This is by no means a mistake or displeasing, but it does mean that most of my young-at-heart-but-with-older-eyes readers will need to use a magnifier for the whole project. In comparison, I liked the Home Sweet Home project better as, at least for me, thread choice and stitches were better. I would love to hear your thoughts on this! Please do leave a comment below. Next time we are going to check in with this project, the leaves and the beaded flowers will make an appearance.
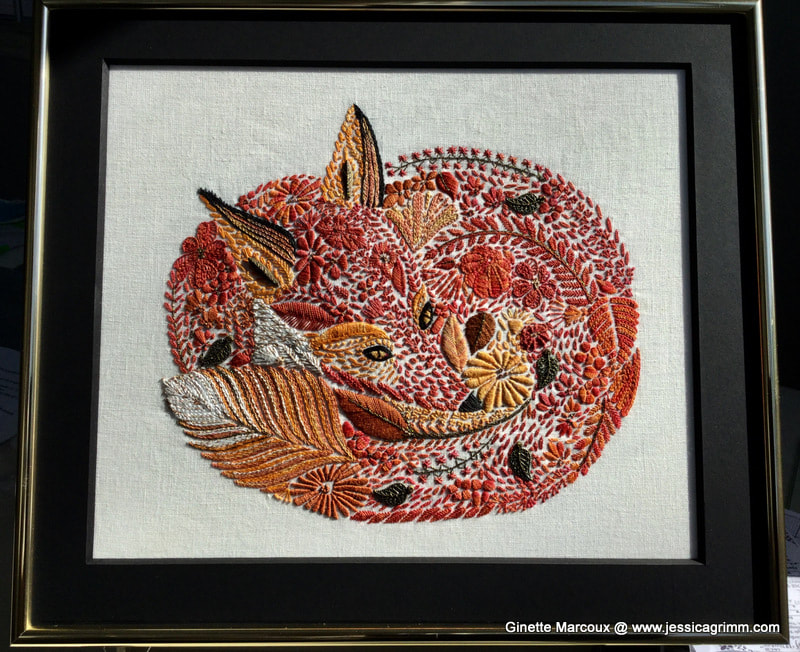
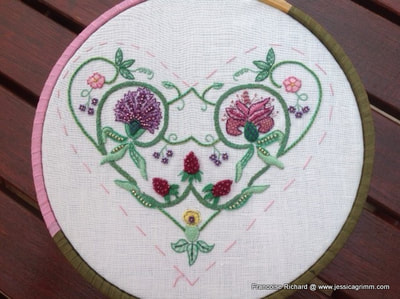
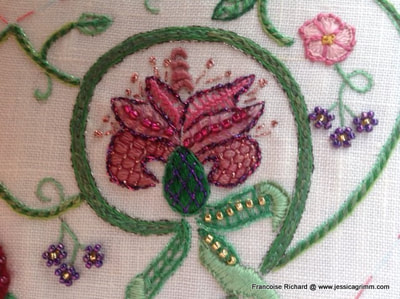
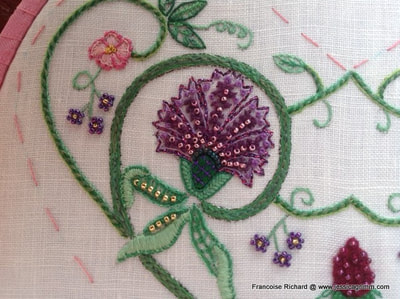
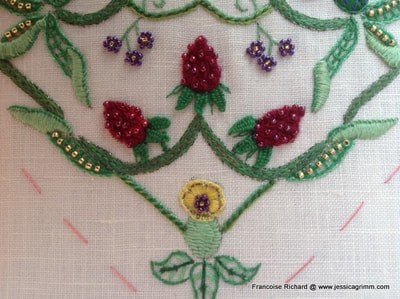
Note: I have not finished this project as the instructions were faulty and the kit did not contain enough materials. Two weeks ago I found, in between all the spam on easy loans, Viagra and what not, a most impressive surprise in my mailbox. Ginette Marcoux, one of the readers of this blog, wrote the following: "Today I want to share with you a special thanks for the prize winning beautiful embroidery of the fox from Millie Marotta colouring book. Because I came across a post on Mary Corbet's site talking about it I got curious and went on your site. And then.....then..... I fell in love with it! I am what Mary calls a very determined beginner embroider and I decided that if I bought the book, and follow your instructions I could do this, I simply had to work on something inspiring. So here is a picture I took when I was done (it took me nearly a whole year of trial and errors). Although I tried and tried again the stumpwork it was over my competencies, so I decided to add some bead leaves to compensate." And when I asked her if I could share her beautiful embroidered fox, this is what she wrote: "Thank you for your kind words, without your inspiring modern approach to embroidery design I think that I would have dismissed this art altogether (I thought that embroidery was for older people!). If you believe it could be of interest for others to see what a new embroiderer can do with a bit of determination and a lot of discovery learnings, then yes it will be my pleasure to share this project with them. Thank you for sharing all your work as well!" I am still blushing about Ginette's lovely comments! It makes my heart swell as this is exactly why I do what I do. So without further delay, here is her great rendition of the Millie Marotta fox: I think Ginette's work is stunning! The idea to use beaded elements instead of stumpwork wired elements works so well. Her fox has so much definition! It makes me want to make another one... And lucky as I am, I had further incredible mail a couple of days later. Francoise Richard, a reader from France, send me an email regarding last week's post on the project Strawberry Fayre. It turns out she has already stitched the project using her own stash. She kindly let me share with you her list of used supplies and some pictures. How cool is that?! This is what she wrote: "Bonsoir, I am Françoise from Françe and embroiderer for my pleasure. First, I would tell you that I follow your blog every time because you are a great embroiderer, I love all what you do! I made this fabulous kit of Carolyn Pearce this September but I don't purchase the kit because it is too expensive and I have a lot of threads and beads. You will see the photo above and this are the supplies I have used: Dmc stranded Cotton art 117: 727,210,208,915,911,913,954,910,3818,912 Dmc satin: 552,700 Caron collection Silk waterlily cardinal Gloriana silk 106 , 061 Ver à soie , soie d'Alger 2941, soie surfine 223, soie Metallic au sextant 122440, soie de Paris 3023 Guterman sulky ca02776 Madeira Metallic 12 et 305 Beads mill Hill petites 40332, 40557, 42101, 42012, 40553 42011 Mill Hill glass seed beads 02077, 02011" Now that made me blush again! I am blessed with great readers indeed. So here are Francoise's pictures of Strawberry Fayre: To all others who follow along with the Strawberry Fayre project: do read the great comments on last week's blog post (and probably future ones as well :)!). You are such a helpful bunch and this project is so popular, that great comments came in on possible substitutes. Someone even came up with the brand name of a possible substitute for the fabric! You will be able to find all blog posts regarding the project by clicking on either 'Carolyn Pearce' or 'Strawberry Fayre' in the right-hand categories column.
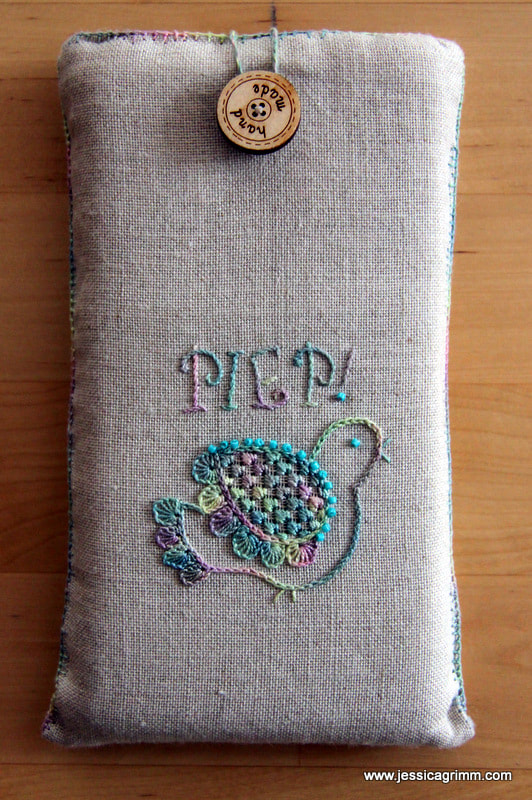
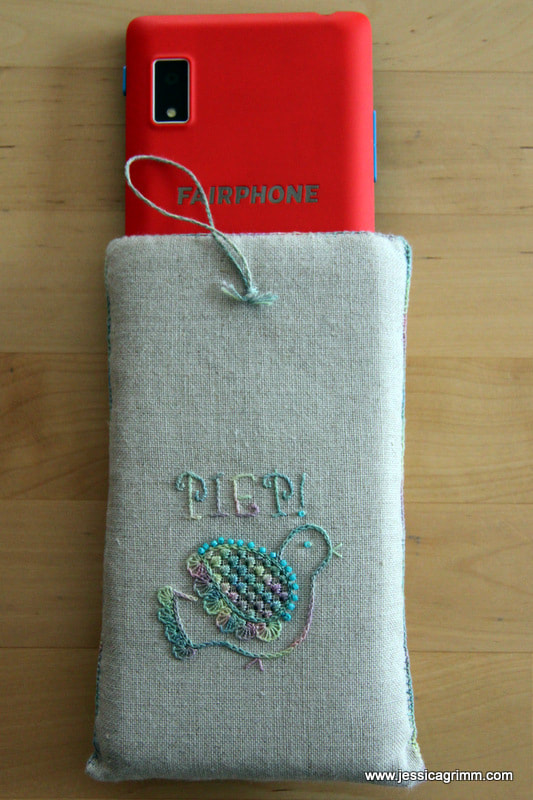
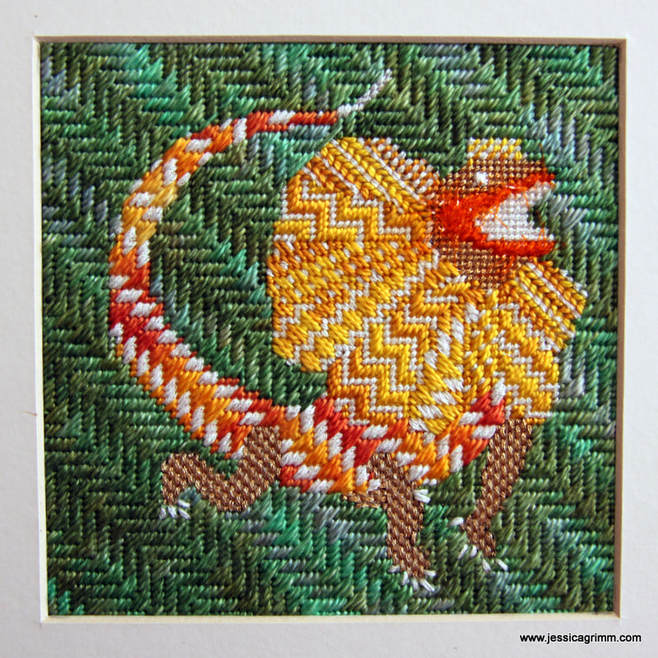
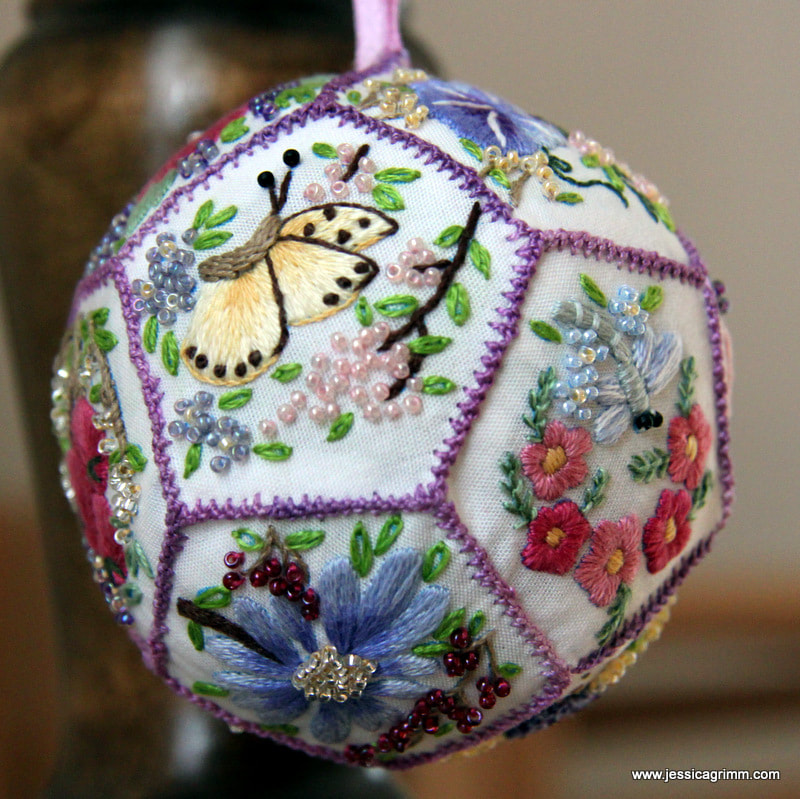
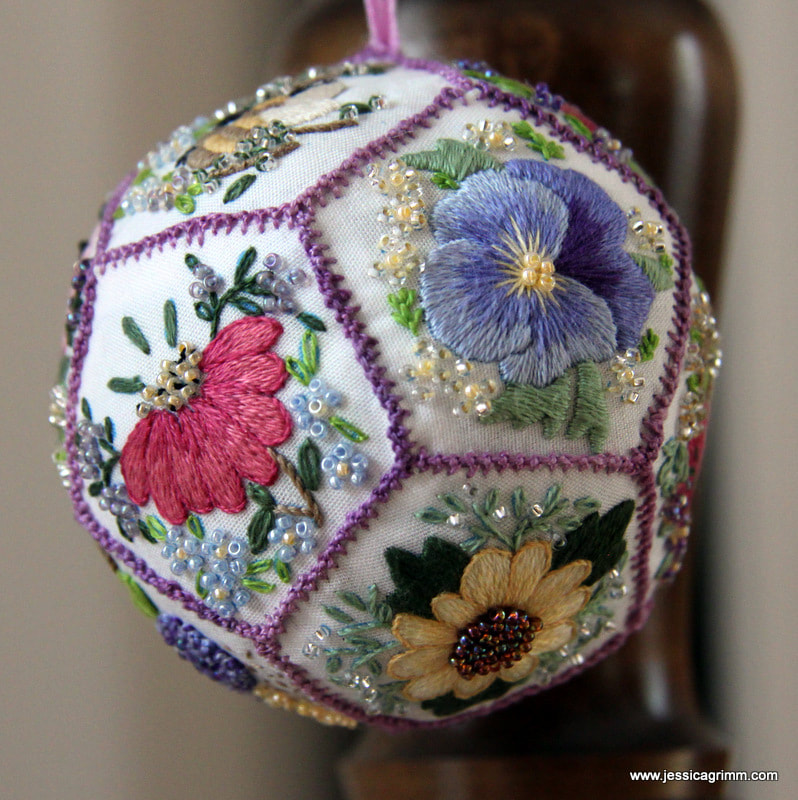
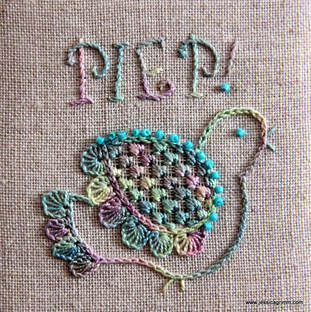
Yup, it is true: I have arrived in the modern area too. It took me years. But when I heard that Fairphone makes smart phones that last, are repairable and don't use blood minerals; I ordered one. So far, I have used it to download (and use!) a 5K running app, WhatsApp with my family, use Google for directions and information AND made the very occasional phone call :). Still much prefer my Ipad and Laptop... Maybe I should seek professional help? Pondering this option, I did make my Fairphone a cozy home to live in. On Zweigart Newcastle natural coloured 40ct linen, I outlined the bird with chainstitch using a #12 variegated House of Embroidery perle colour Grapes C. Then I stitched partial buttonhole wheels for the feathers on the tail and the wing. I added straight stitches for the feet and the beak and attached some blue beads along the upper-edge of the wing. From the back, I withdrew every fourth thread in both directions and then added a Schwalm filling stitch called 'Gefieder'. The lettering was stitched using stem stitch. To make my 'phone home' a bit sturdier, I added wadding and a sheet of template plastic. The seams were then pimped with knotted pearl stitch. So far, my phone seems to be pretty comfy in her new home! I've asked my very talented husband to make a nice clean digital drawing of my scribbled birdy pattern. You can download it at the end of this article. Apart from using it as I did in a Schwalm embroidery way (finished design including lettering H 55mm), there is tons of other possibilities. How about stitching it monochrome on a piece of felt? Or applique with a few simple stitches for embellishment? Surprise me! Next up is another broderibox project using a design of a Chlamydosaurus by Millie Marotta. This amazing creature can impress by unfolding his neck frill. However, it can only do so in opening its mouth widely. The bones in the frill are extensions of the hyoid or tongue bone. Isn't nature amazing?! The lovely people of Nordic Needle had put in a glow-in-the-dark thread made by Rainbow Gallery. I made sure to add it to every canvas stitch I used on the chlamydosaurus (it is the white thread you see). And it glows beautifully at night! Unfortunately, it doesn't translate well in a picture. You have to take my word for it. Last finish for today: the Floral Pomander by Hazel Blomkamp. I really enjoyed this project with all the little flowery scenes using simple embroidery stitches and tiny beads. However, the instructions were a bit messy with tiny pictures of the finished panels. And piecing the pomander together was a little fiddley. That said, it makes a great project if you like miniature embroidery, beads and a different way of finishing your embroidery. Oh, and thanks to the dried lavender mixed in with the toy stuffing, it is my best smelling project ever :)!
|
Want to keep up with my embroidery adventures? Sign up for my weekly Newsletter to get notified of new blogs, courses and workshops!
Liked my blog? Please consider making a donation or becoming a Patron so that I can keep up the good work and my blog ad-free!
Categories
All
Archives
July 2024
|
||||||||
Contact: info(at)jessicagrimm.com
Copyright Dr Jessica M. Grimm - Mandlweg 3, 82488 Ettal, Deutschland - +49(0)8822 2782219 (Monday, Tuesday, Friday & Saturday 9.00-17.00 CET)
Impressum - Legal Notice - Datenschutzerklärung - Privacy Policy - Webshop ABG - Widerrufsrecht - Disclaimer
Copyright Dr Jessica M. Grimm - Mandlweg 3, 82488 Ettal, Deutschland - +49(0)8822 2782219 (Monday, Tuesday, Friday & Saturday 9.00-17.00 CET)
Impressum - Legal Notice - Datenschutzerklärung - Privacy Policy - Webshop ABG - Widerrufsrecht - Disclaimer



 RSS Feed