|
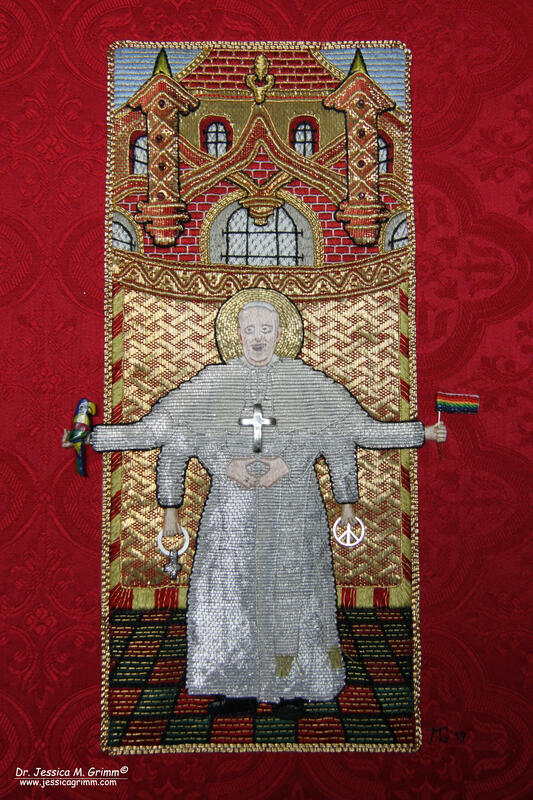
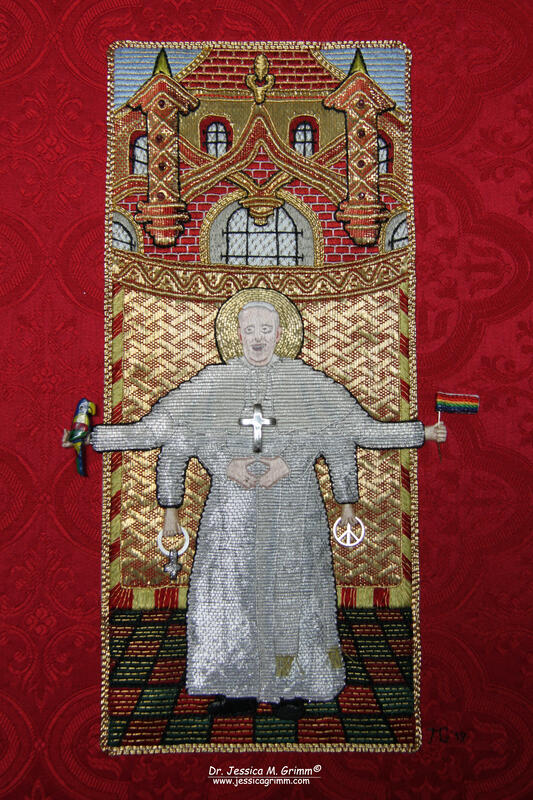
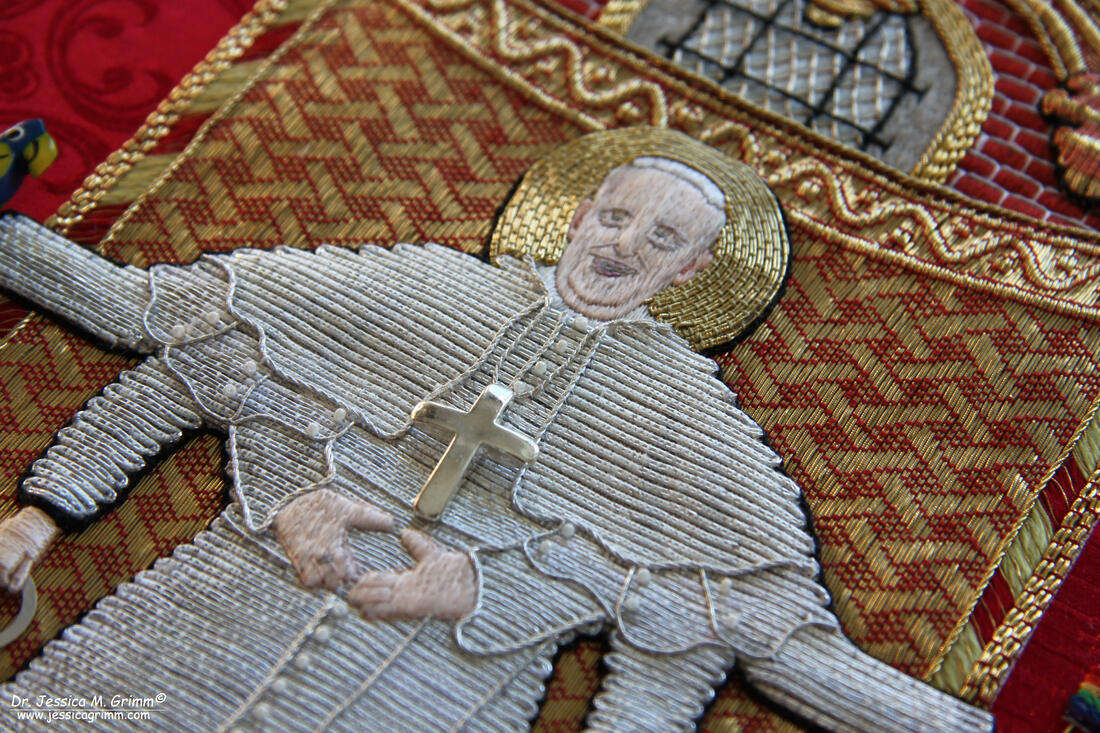
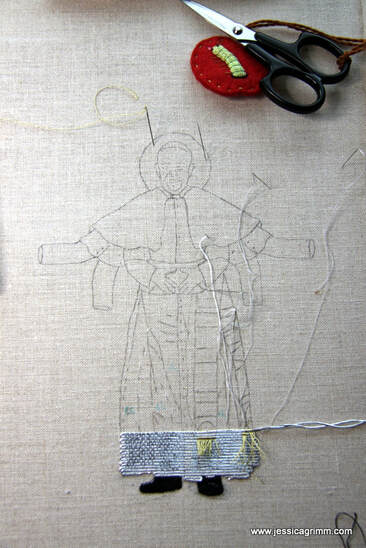
Before we finish the pope (hmm, for some reason this sounds very wrong), I'd like to tell you about a special place I visited this weekend: the Abbey of Niederaltaich. Here, Benedictine monks live according to the Roman Catholic rite (West) and the Byzantine rite (East). They celebrate divine office parallel in two churches: a Catholic church and a Russian Orthodox church. As, during the Russian revolution, the Russian Orthodox church was suppressed, the pope asked several Benedictine monasteries to study and celebrate the Byzantine rite (and possibly take in refugee monks from Russia) in order to preserve this branch of Christianity. Niederaltaich is such an 'Ark' and continues to function in this unique way. And as a visitor, you are more than welcome to join them and ask lots of questions. I and my husband were fortunate enough to be invited to the Easter service at a small monastery on Crete last year, but couldn't understand much due to the language barrier. At Niederaltaich however, the Russian and Greek have been completely translated into German. And the signing of the monks is just divine. And so are the beautiful icons. If you are interested in such things, this is definitely a place you should visit! In last week's blog post you could read how I finished the background. This week you'll see how I finished the figure of the pope and how I put the whole picture together. Firstly, I had to build up the rest of the figure with or nue. As the pope is always mainly dressed in white, this isn't an easy task. I've used two shades of white and two shades of grey silk to work the or nue over silver-coloured Japanese thread. Contrasts are rather subtle and the next time, I will probably opt for stronger contrast. You can see in the picture how I use my pencil to add remarks on shading and colour placement. The hands and faces are always very finely silk shaded. When I worked St. Laurence, I learned that simply silk shading over the Japanese thread doesn't work. Instead, I use Bondaweb and a small piece of very fine linen. The Bondaweb prevents the linen from frying. I've cut out the hands and glued them in place. I then carefully silk shaded the hands and outlined them. Silk shading the face posed a problem when stitching St. Laurence. The 40ct Zweigart linen was just too coarse to get a fine enough result. I remedied that this time by glueing a small piece of the very fine linen in place using Bondaweb again. It worked really well! I did not attempt to get a life-like image of the face of the pope from the photo I had. In that picture, he has very dark bags under his eyes and quite red ears... Instead, I opted for a more cartoon-style face. Just so people recognise him as Pope Francis. Last but not least, I defined the figure further by couching down fine silver plated Twist on the pope's clothing. I also added small beads for the buttons. Years ago, I found a small silver-coloured cross and it happened to be perfect for this piece! With the background and the figure finished, it is time for the scary bit: putting the two together. First comes the cutting-out of the figure. The small seam is turned under and secured with a little dab of glue. The background gets re-framed onto my slate frame. I keep the tension just below drum-taut, this time. I then pin the figure into place and applique him to the background with a matching thread. In this case, I also needed to insert the stumpwork hands I had made from wrapping paper covered wire with a single strand of stranded silk. One of the hands holds a wooden parrot that came off a pair of earrings I had saved from the bin at a charity shop. The same holds true for the peace-symbol. The venus or female symbol is made of a metal washer. The "plus" part is stitched with metallic thread by Kreinik. By placing a black outline around it, the different parts form a single symbol. The rainbow flag was made by stitching single rows of chain stitch in the appropriate colours using DeVere yarns silks. The stick is a piece of gold-coloured paper covered wire. For maximum contrast and in keeping with late-medieval traditions, I outlined the pope with black silk. I then cut out the whole orphrey and turned under the seam. I framed a piece of red patterned cotton damask onto my slate frame and appliqued the orphrey onto the new backing. Currently, the piece is at the framers to get the same hand-gilded frame as St. Laurence has. Can't wait for the piece to return to me!
In the mean-time, I have started the drawing for the next piece. Not an orphrey, but the hood of a cope this time. I need a bit more space to tell the story of illegal immigration across the Mediterranian Sea. More on that in a future blog post. You can find the other blog posts on Pope Francis by clicking the category on the right side.
6 Comments
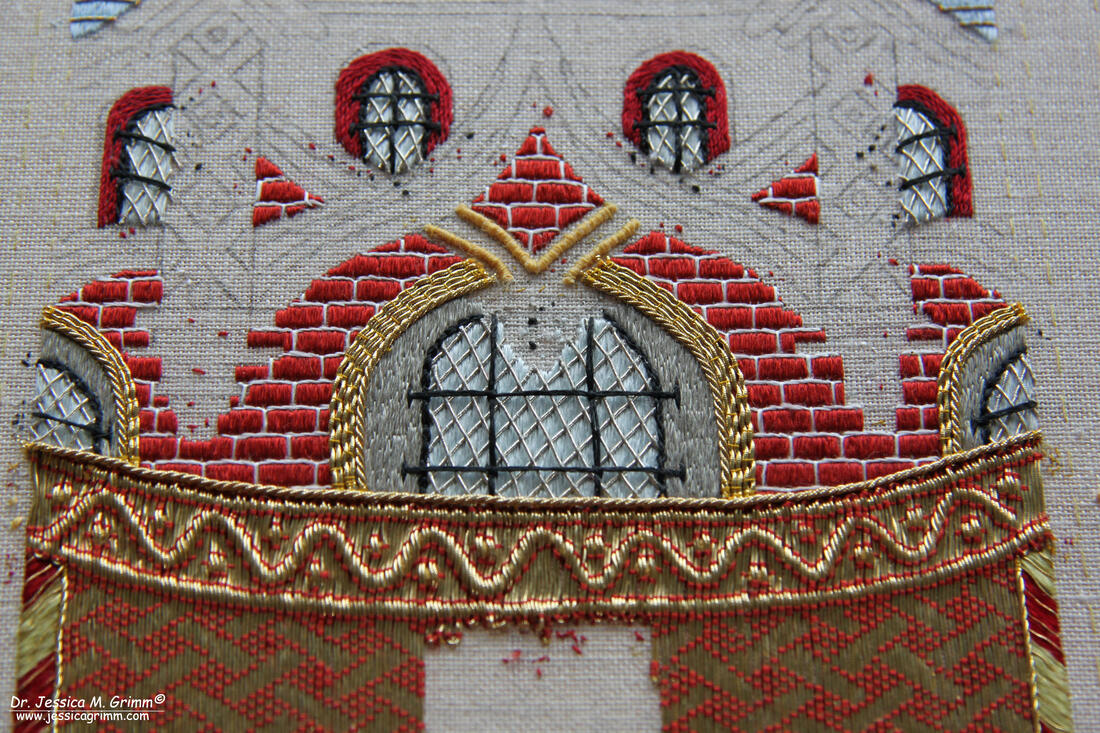
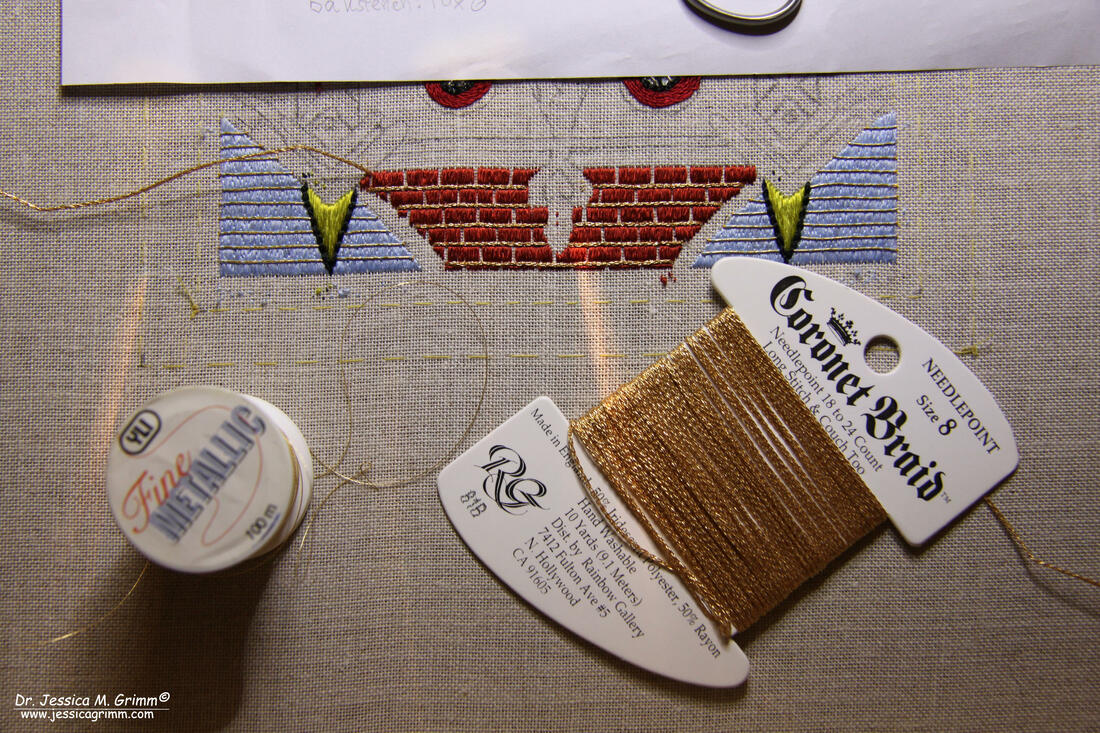
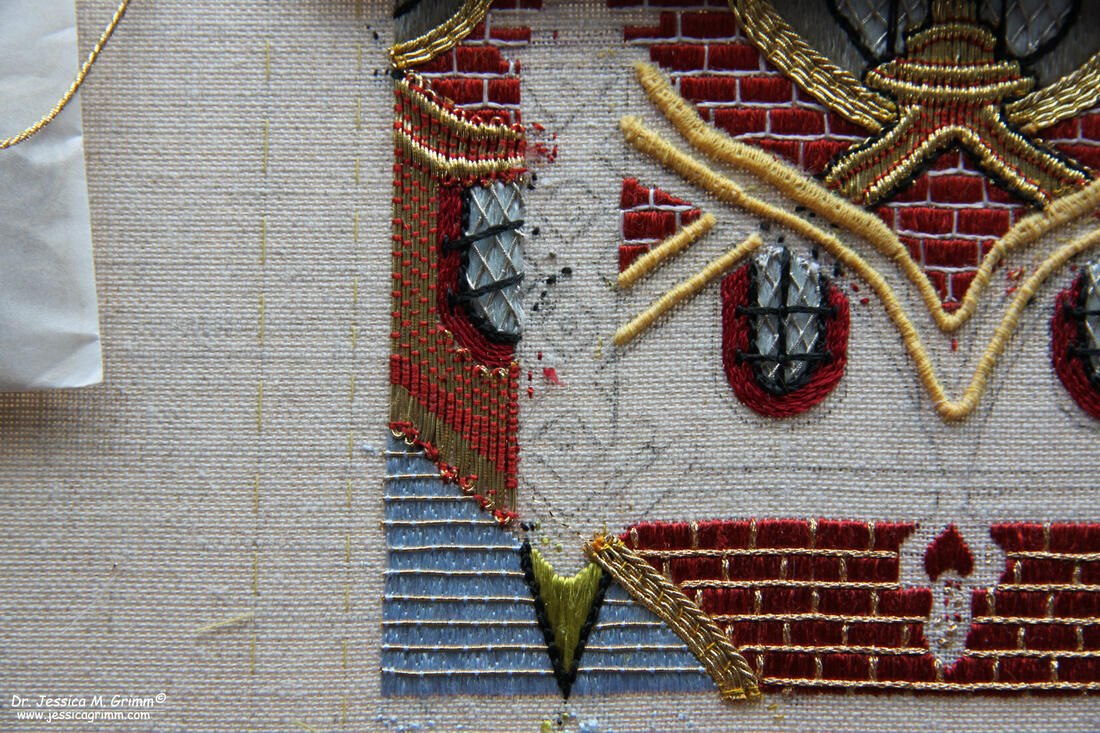
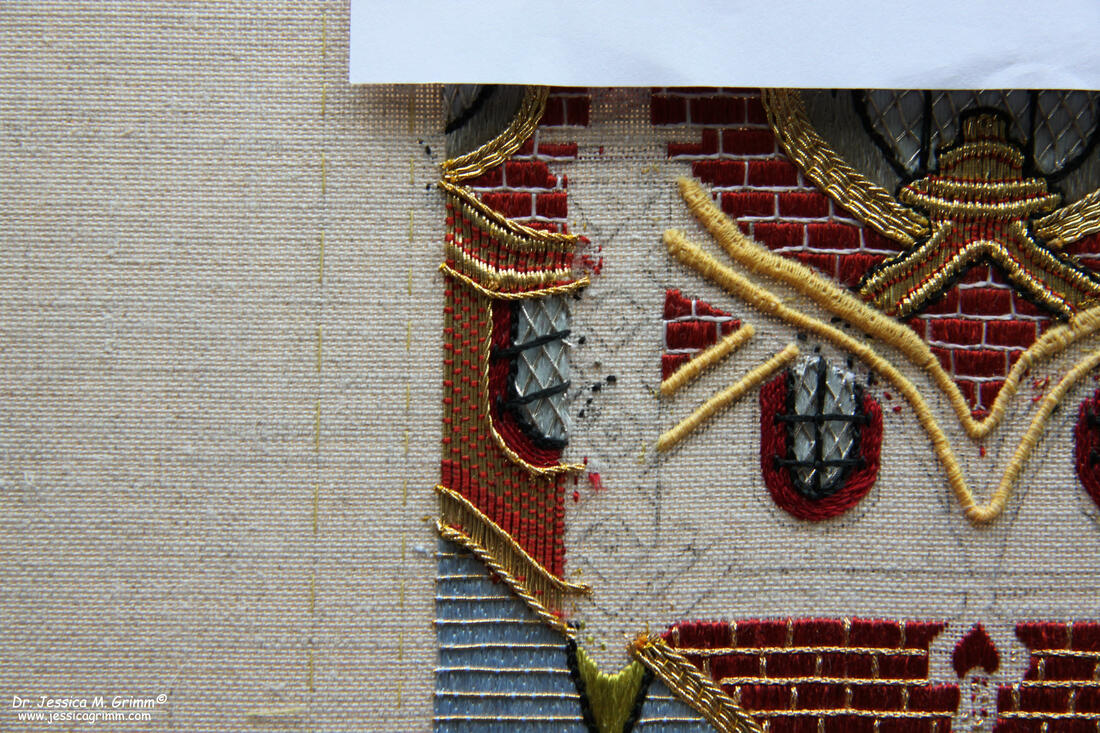
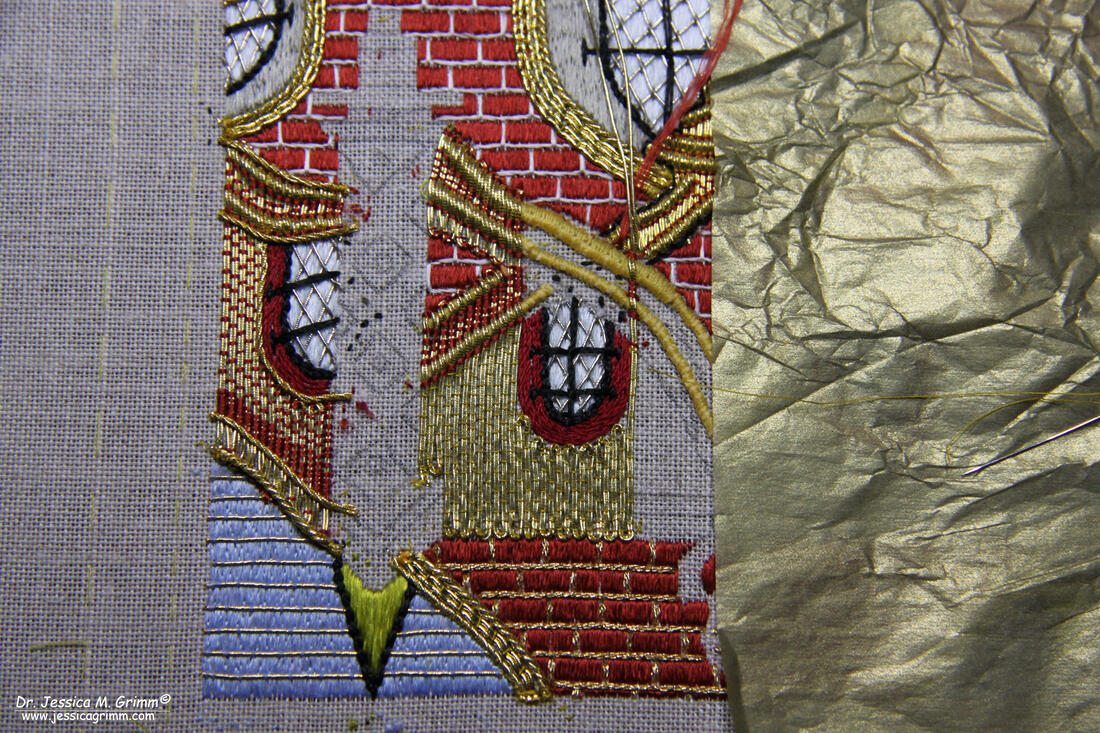
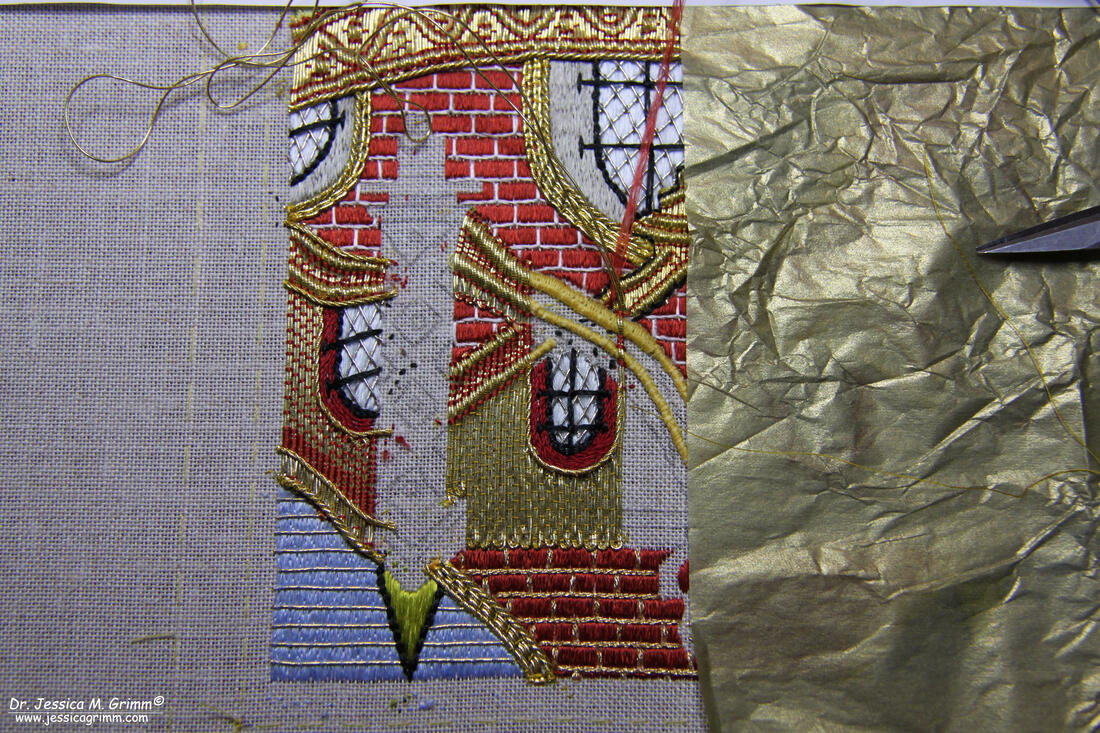
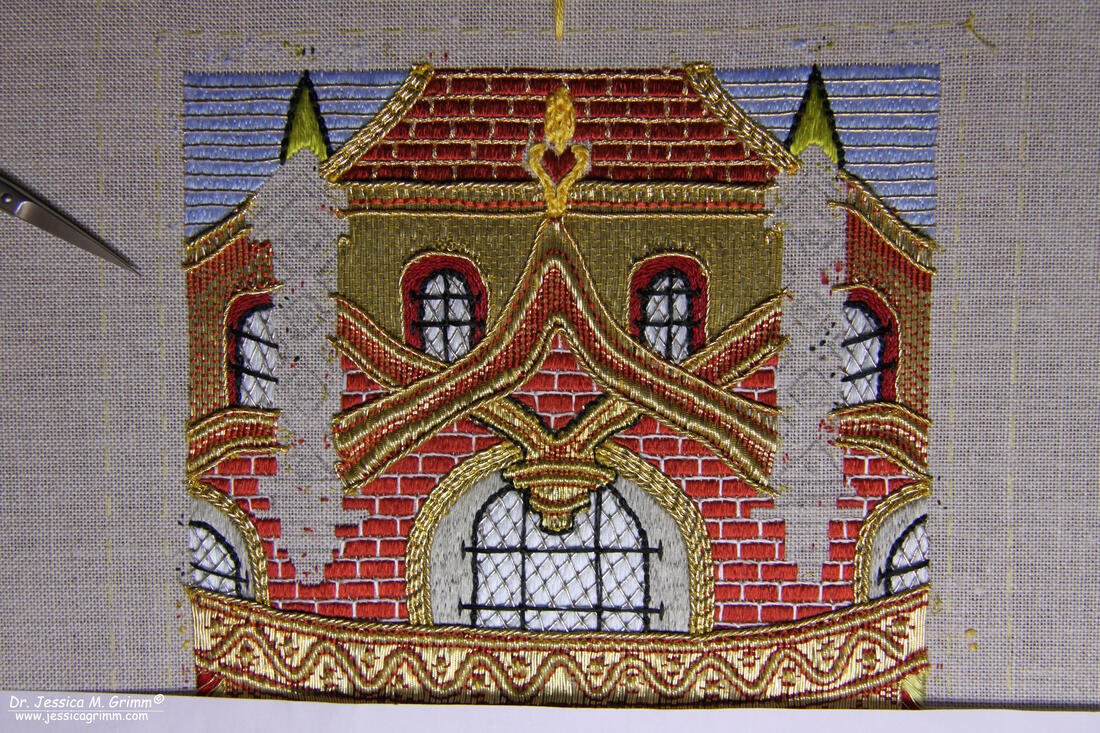
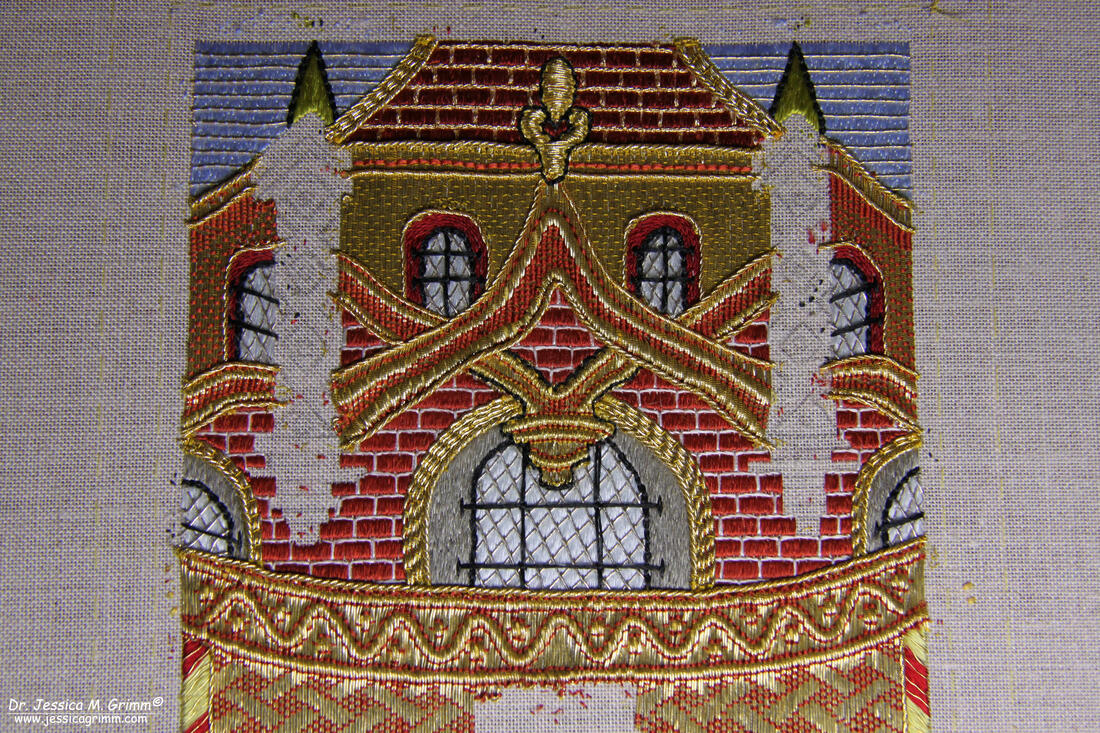
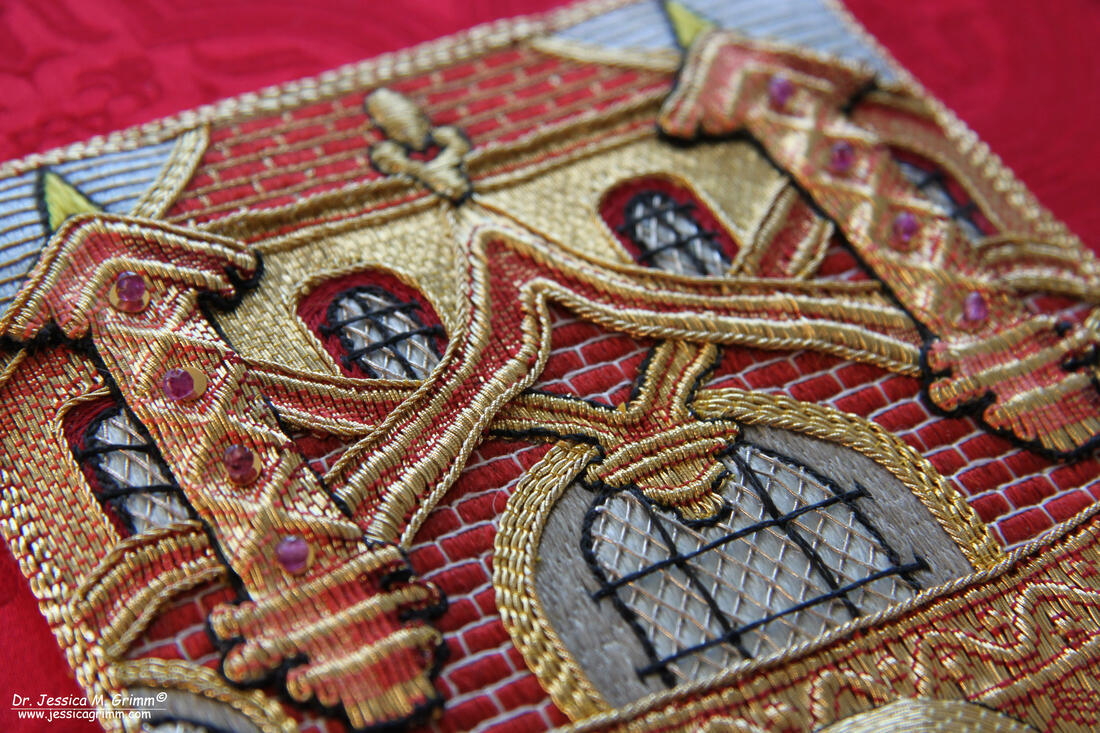
A few days after I had submitted my goldwork piece for the 'Emerging Fiber Artist' print exhibition by the Fiber Art Network, I received an email. Pope Francis had not made it into the exhibition due to the high volume of extraordinary work submitted this year. I did ask if they could be a little more specific, but I did not receive an answer. My guess is that, due to its religious content, my piece might be uncomfortable. Or maybe it is because I am not an emerging, but an established textile artist? Or were they looking for more abstract pieces? Or more mixed-media? We will only know when the print exhibition comes out. In the meantime, let's continue exploring how I made Francis shine! One of the main differences between modern goldwork techniques and the way Late-Medieval embroiderers used their gold threads, is that they don't often plunge. You can see that clearly in the picture above. The ends of the threads forming the lentil around the window are just cut to size and then secured with a few extra stitches. Another difference: gold threads are happily layered. This is often done to accentuate parts of the design. Or to hide an ugly edge as in the picture above. The gilt Twist covers the ends and turns at the top of the gold screen behind the figure. At first, it is really weird to lay a goldthread over other goldthreads and stitching it in place. Yes, you might stitch through the threads, but that's okay! And this layering of threads opens up so many nice possibilities. As I am not doing a historical reconstruction, I was able to use 'modern' threads. Originally, the separations between the roofing tiles were stitched with passing thread. Due to the pattern, they had to start and stop the thread many times. Far too time-consuming! I decided to use the Coronet Braid #8 by Rainbow Gallery. I couched my long stitches down with a fine metallic threads by YLI. I struggled a bit with the keystone. The padding was a straightforward yellow cotton string. But then I used the same thread as I had used for the gold screen: gilt passing thread #6. However, I wasn't pleased with the result. The thread was just too stiff to sit smoothly atop the padding. So, out it came... That's not a nice job and it probably took twice as long as putting it in. Due to the fact that some of it went on top of previous stitching, that had to be repaired too. Luckily, my second attempt with a finer passing thread looks very pleasing. Next up were the city or castle walls. Firstly, I put in all the string padding. When the padding was wider, I simply couched down an additional piece of waxed yellow string. The construction of the city walls is very straight forward: couching down gilt passing thread #6 with red Chinese flat silk. Again, the edges are covered with two thicknesses of gilt Twist. This defines the shapes and hides the rough edges underneath. Next up is the construction of the middle section of the city walls. Due to the nature of goldwork, you are often left with gaps between previous stitching and the next. In this case, there is a gap between the passing thread and the red silken lentil of the window. However, this gap nearly disappears when the Twist is couched over the top. This is what the finished city walls look like. Next up was the 'keystone' on the roof. I padded it with stranded cotton using chain stitches. This is an ideal way to pad irregular shapes as it is very flexible. I then used gimped couching with the thinner passing thread to fill the shape. To let it stand out some more, I added an edge of couched black stranded silk. I drew the two towers on a separate piece of linen. Making separate pieces and then applique-ing them onto the piece gives the whole embroidery a better sense of depth. This stumpwork is a key characteristic of these Late-Medieval embroideries. After the string padding and the or nue couching, I cut out the pieces. I turned the small seam under and secured it with a dap of white glue. I pinned the towers in place and couched them down. I added a spangle with a 3mm amethyst bead (bought when I visited Crete) to the diamond shapes. And last, but not least, I couched down a black stranded silk edge around the tower shapes for maximum contrast. To finish the background, I couched down two double rows of Rococo thread with red Chinese flat silk.
As this blog post is already rather lengthy, I'll save the finishing of the figure and the putting together of figure and background for a future blog post. You can find all blog posts related to this project by clicking Pope Francis in the categories menu on the right. Only about eight months ago, I would have staged my finished goldwork piece the minute I had put the last stitch in. I would have opened Instagram and take the perfect picture. I would have spent some thought on the right description to go with the picture. Which hashtags would generate the most traffic? And then I would have stayed awake for at least another 30 minutes to be able to answer to the first reactions coming in. All in the name of generating more traffic to my Instagram account and ultimately to my website and my webshop. BUT, it was already far past midnight when I finished Francis. AND I had worked my body to the brink of collapse over the past few weeks in order to make the deadline. So instead, I wished Francis goodnight, turned off the lights in my studio, brushed my teeth in the dark so as not to wake my dear husband and then slipped carefully between the covers for a well-deserved rest. And after a good night's sleep, I didn't immediately write a blog post about the piece either. Francis has been mine alone for a whole other week! That's bliss in a society where we increasingly share our whole life the minute it happens. Hoping to generate as many likes as possible. One must be mad to step away from all the instant digital love :). Enough musings: here he is! Isn't he gorgeous? I love the over-the-top bling. It satisfies my inner magpie. For those of you who are interested in the technical aspects of the piece: no worries. I will write at least another blog post detailing how I came to this rather stunning end-result. But for now: enjoy the bling!
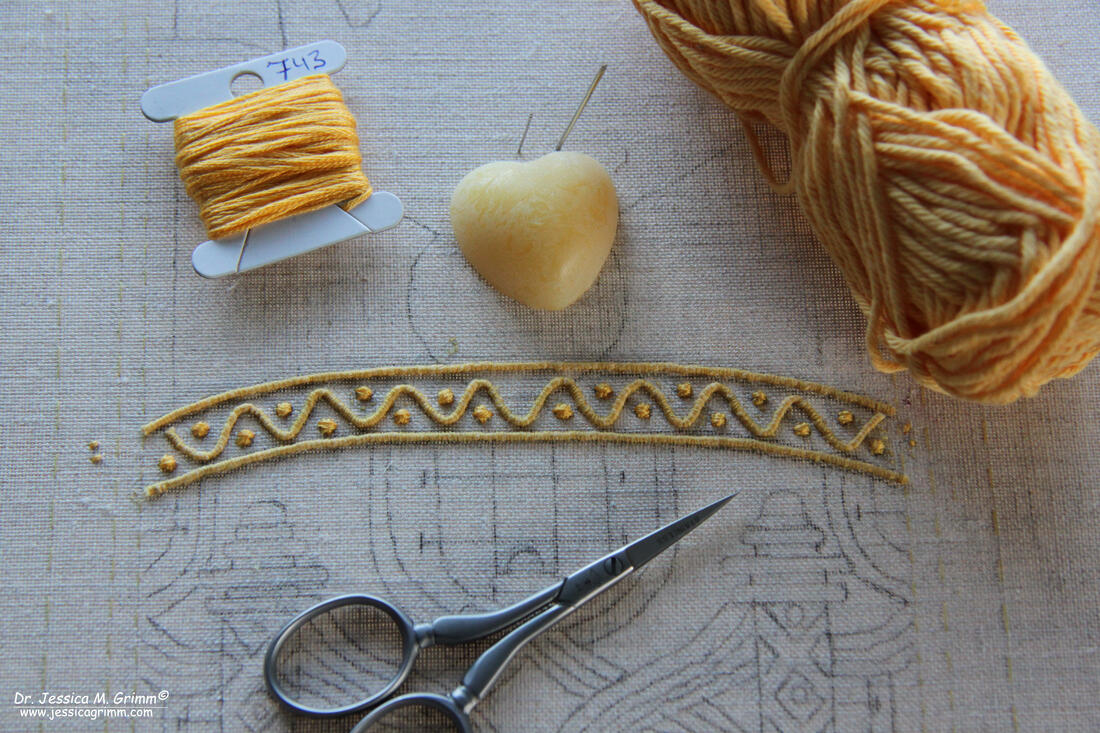
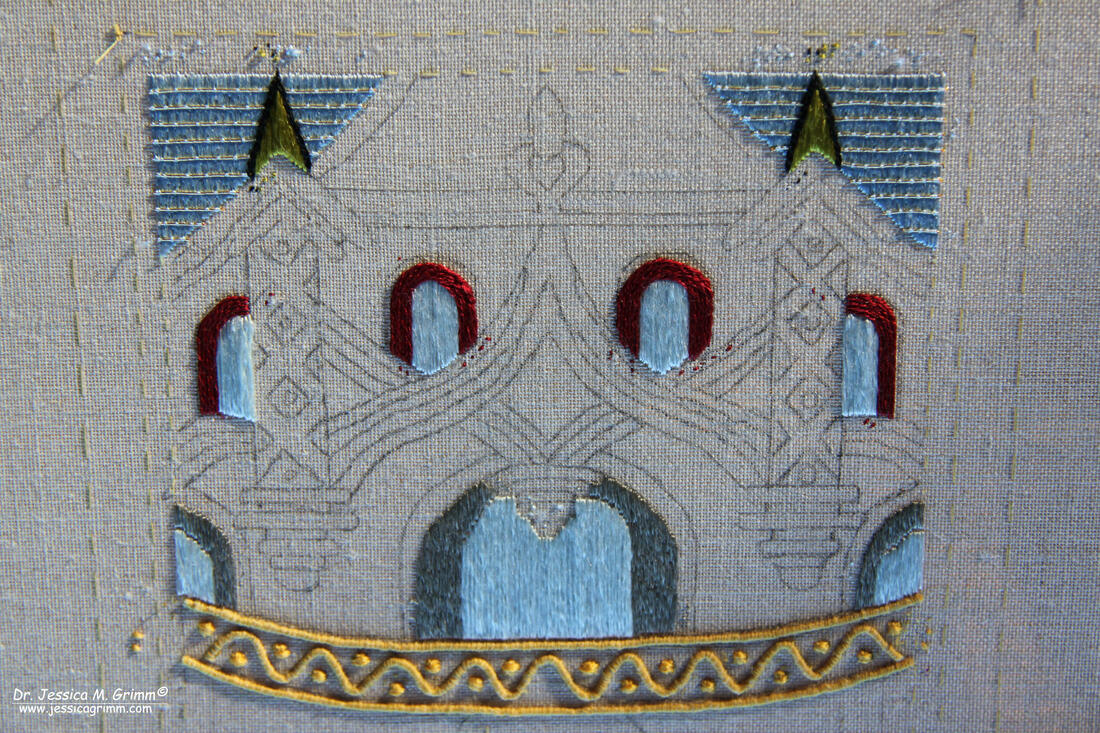
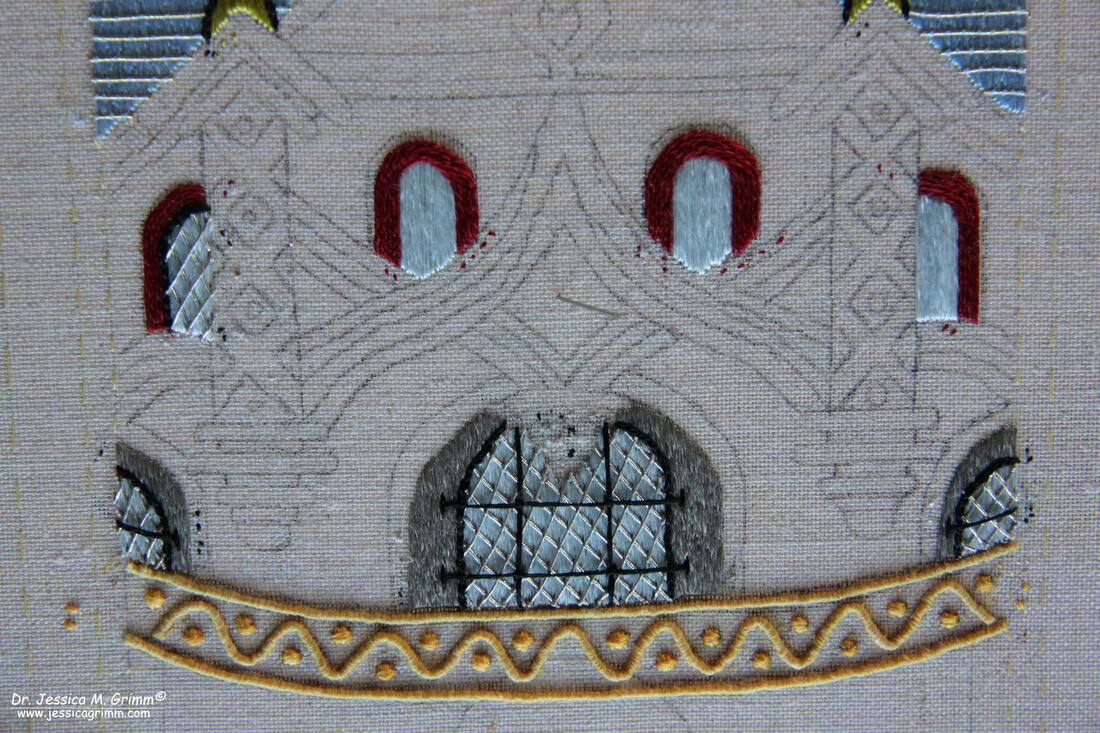
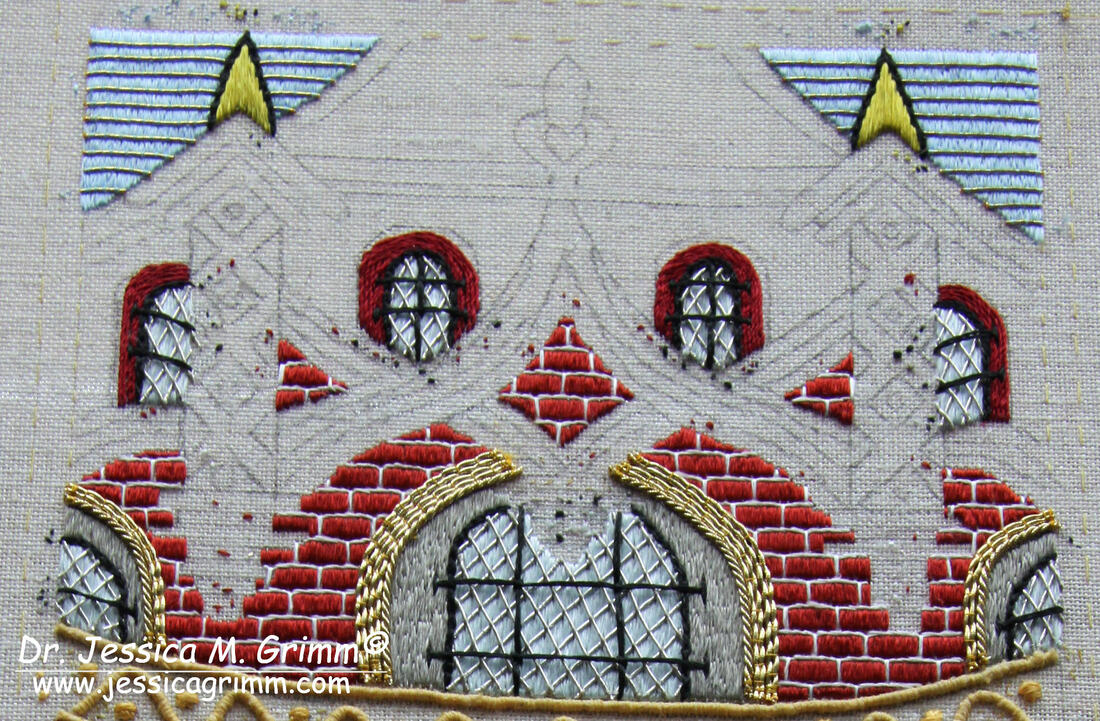
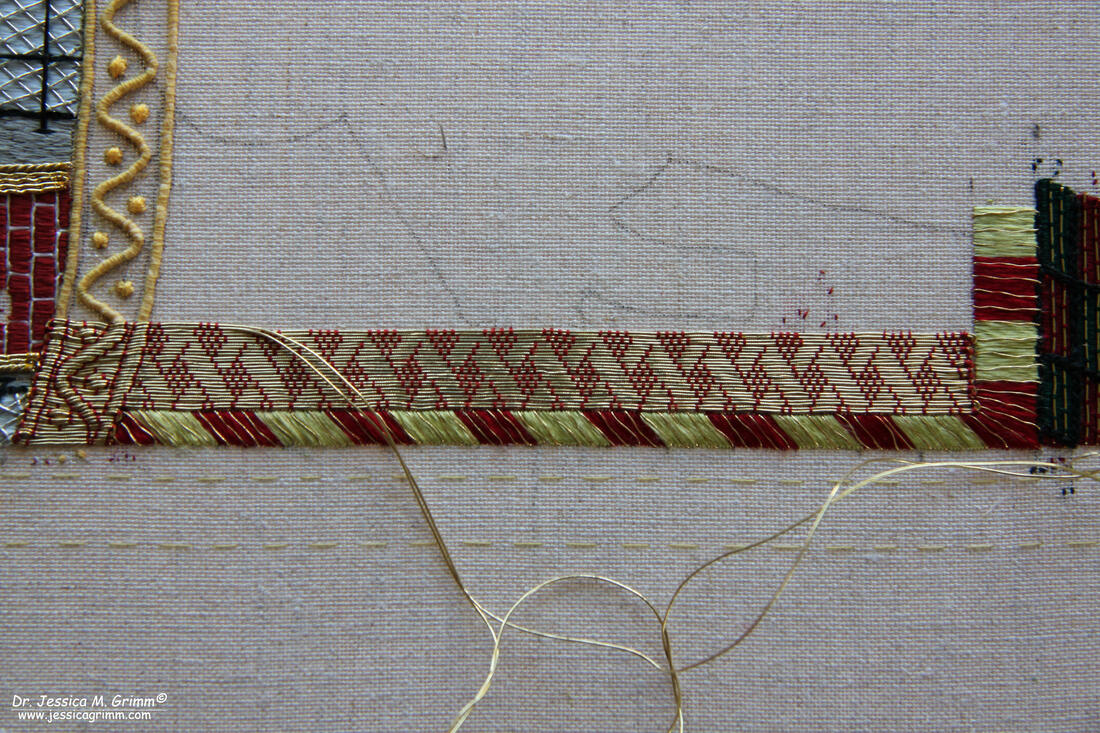
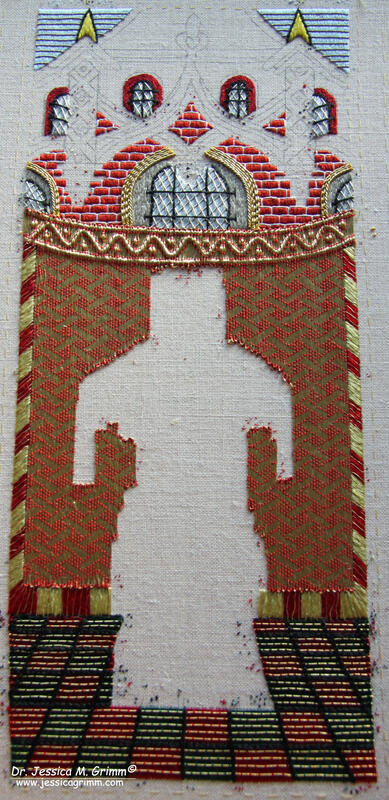
P.S. You can find the first three blog posts on this project by clicking the "Pope Francis" category on the right. Let's check in with my goldwork project to see what progress I made. First I put the string padding in for the goldwork that sits at the top of the tapestry behind Pope Francis. I used yellow cotton yarn and a matching yellow stranded cotton. I waxed the cotton yarn with pure beeswax to make it firm. I then couched the waxed yarn into the desired position. For the little dots, I made a double cross (at angles) with a full strand of stranded cotton. In the picture below, you also see my favourite embroidery scissors made by Dovo, a German company. Whilst I don't use them to cut my goldwork threads, I do use them for all the silks I am working with. They are super sharp and cut very clean and precise. Next up were the windows. I started by satin stitching the glass using a light blue Chinese flat silk. The grey lintels are stitched in long-and-short stitch using a grey Chinese flat silk. The red lentils are made of rows of stem stitches using stranded silk (#3093 Campari Soda) by the Silk Mill. Next, I put in the "lead" for the leaded windows. I used silver plated smooth passing #5. The first layer I couched in place with a grey (LT1322) superfine silk made by Langley Threads. The second layer was then couched in place at the intersections using the same grey Chinese flat silk as was used in the grey lentils. Since you just cut off the passing thread at the border between lentil and glass (i.e. no threads are plunged), you need to hide the ends under a layer of chain stitch using Silk Mill stranded silk. I used the same (near) black silk thread to stitch the dividers between the window panes. I really loved putting in the red bricks! I just happened to have the ideal colour of Chinese flat silk to do the counted satin stitch with. The white grout is made with stem and straight stitches using a white Chinese flat silk. The lentils were finished by couching Gilt Twist #3 and Gilt Rococo in place. Note how I left a tiny gap between the window/bricks at the bottom and my yellow string padding. I will need this gap later when putting in the passing thread to form the top decorative border of the tapestry hanging behind the pope. You can also see that the gold threads are just cut off and not plunged as we tend to do in modern goldwork. One of the challenges of recreating these Late-Medieval orphreys is finding out what threads were used. In the original piece, the fringe of the ceremonial tapestry hanging behind the figure has wavy streaks of very fine gold thread. No idea what it is! However, I have noticed that when the ends of Gilt Twist unwind, they look wavy. What would happen when you intentionally unwind a length of twist? Yup, you end up with three strands of very fine wavy gold thread :). So, over my base layer of green and red satin stitches made with Chinese flat silk, I carefully stitched with my "home-made" gold thread. The trick is to use a big needle and not pull to hard as otherwise the waves come out. And yes, I did stitch through the fabric with my gold thread using the same motion as with laid stitch. Next up was the tapestry itself. For the St. Laurence project I used Japanese thread for this part. However, this would not work well with the intricate padding of the decorative top border. I decided to use Gilt passing thread #6/Stech vergoldet 140/150 CS instead. It is a stiffer and thicker thread than what was used originally. However, I am trying to finish this piece quickly so that I can start the next one for my upcoming exhibition in August. Using a finer thread would mean hours of extra work! And this already took 20 hours... The good news is, it works much better for the red diaper pattern than the original thinner thread works in the original piece. There is a lot of gaping in the original piece. The downside? It doesn't flow well over my padding; here I have gaping. Especially over the little dots. And I learned something else: framing up both the figure and the background on one frame, make stitching difficult. My arms are too short sometimes. I noticed that I was able to stick to the counted diaper pattern best when turning my frame in such a way that I worked horizontally (as you see in the picture). I couldn't do this for the other half of the background. Instead, I worked vertically. The diaper pattern is not nearly as crisp. However, the couching over the padding is much nicer when I am working vertically. Lesson learned. Next time I will make sure that I can reach my embroidery equally well from all FOUR sides of my slate frame. For the moment, the blank that will eventually be filled with the figure of Pope Francis looks more like a zombie...
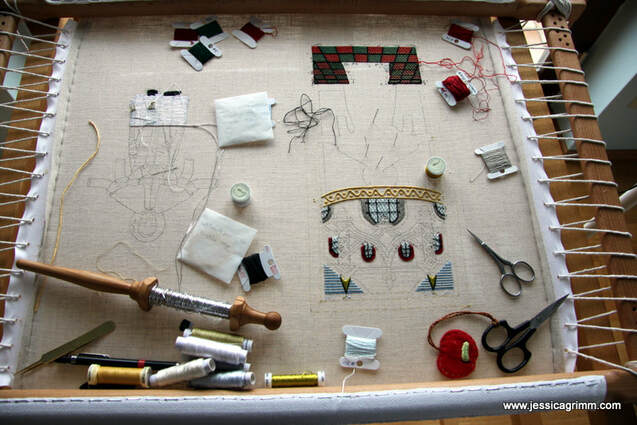
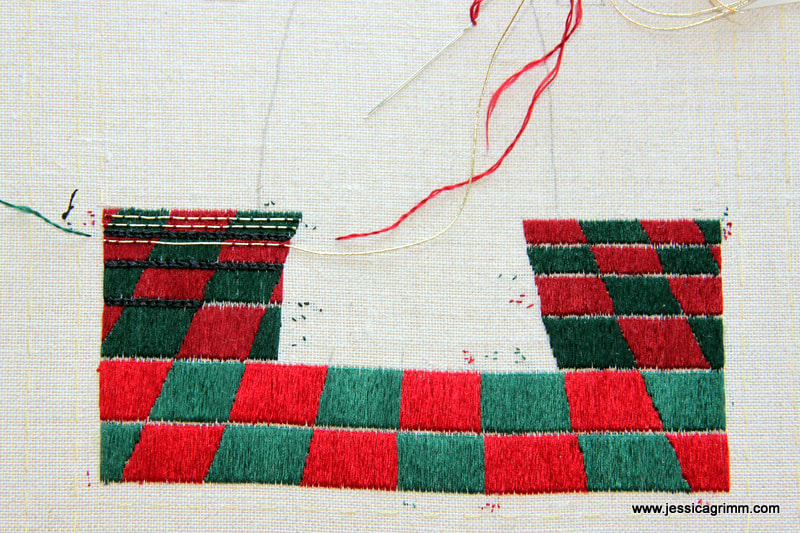
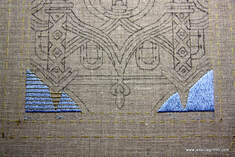
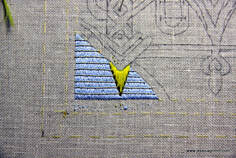
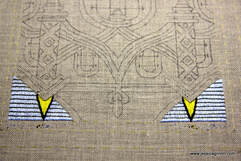
P.S. You can find the first two blog posts on this project by clicking the "Pope Francis" category on the right. I originally made the drawings for this new goldwork project at the end of September last year. But with the China teaching trip and the holiday season, I hadn't really started in earnest. As I want to include this piece in my first solo-exhibition in August, it became about time to seriously make a start. My first attempt was so 'enthusiastically', that I decided to pull it all out, flip my slate frame and start again. What had happened? My design transfer was just rubbish. As I have only a small light-box, transferring larger designs demands attention. The kind of attention to detail you don't have when you really, really want to start :). The good thing about starting again: the flipped slate frame! Most people probably don't know that you can use a slate frame upside-down; just like the Chinese embroiderers do. It comes with two big advantages. First: your arm rests on the horizontal bar of your slate frame rather than on your embroidery. Secondly: the horizontal bars of your slate frame prevent spools of thread from rolling off your frame. But beware: the second point might tempt you into putting much more onto the frame than is beneficial for the tension of your embroidered piece... This is what Pope Francis currently looks like. As we have had so much snow with the accompanying dark skies, couching silver coloured Japanese threads with two shades of white and two shades of grey is very hard on your eyes. That's why I decided to work the figure of Pope Francis and the background simultaneously. What materials and techniques have I used so far? The figure of Pope Francis is created with or nue. This means that I am using pairs of silver coloured Japanese Thread #8 and couch them down with a single thread of DeVere Yarns six-fold (120 denier) silk. I am using Crystal, Lily, Cloud and Foil. His shoes were stitched with satin stitch using a single strand of a stranded silk by the Silk Mill colour Black Alder. I embroidered the fringes on the fascia with Turkey rug stitch using DeVere Yarns 18-fold (360 denier) tightly twisted silk colour Hessian. After all the or nue has been done, I will add pearls for the buttons and I will define some folds by couching a separate metal thread on top. Much as I did with St. Laurence. As mentioned in my first blog post on this new goldwork project, I am modelling the background on an existing late-Medieval orphrey from the Netherlands. I started by putting in the tiled floor. For the tiles I used four colours of Chinese flat silk: two greens and two reds. Using the darker shades in the back creates a sense of depth. The tiles are stitched with a simple satin stitch following the grain of the fabric. Then I couched a single strand of Gilt smooth passing #5 on top using the matching colour of silk. Last but not least, I embroidered the grout with small chain stitches using two strands of the Silk Mill Black Alder. I had learned from St. Laurence to don't leave too big a space for the figure, that's why bits of the tiling will be covered by the figure. The small areas of blue sky at the top of the orphrey were embroidered using light-blue Chinese flat silk and long-and-short stitch. Evenly spaced single threads of Gilt smooth passing #5 were couched down on top using the same silk. Since late-Medieval embroiderers mainly worked in commercial workrooms, efficiency was important. Plunging threads? Far too time consuming! Just add a few more anchoring stitches at the end and just snip off the metal thread. In addition, metal threads would frequently continue to run underneath silk embroidery. Securing and snipping off takes more time than just stitch over them. I wondered how far you can take this approach :). The small bright-green turrets were just perfect candidates to try this out. I satin stitched the turrets with Soie Ovale by Au ver a Soie #0199. Then I added an outline of chain stitches using the Silk Mill Black Alder. You wouldn't know that there is passing thread running beneath them!
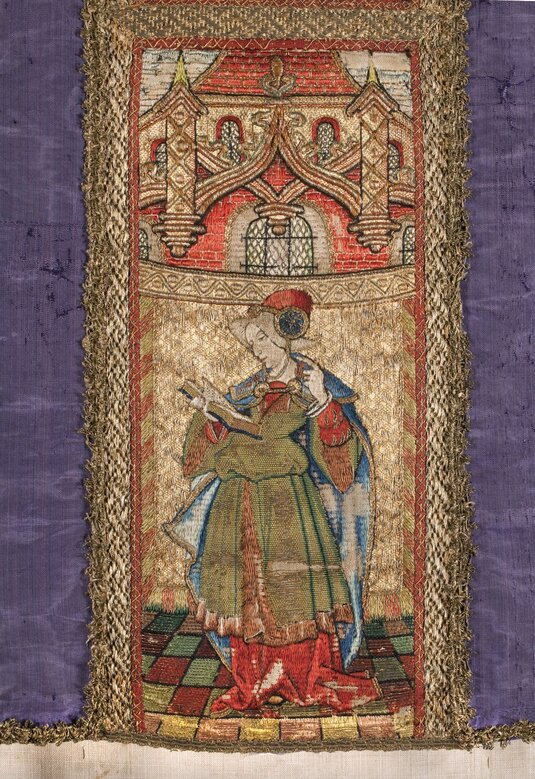
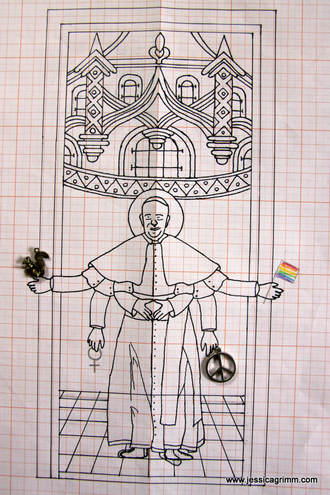
As this blog post is getting rather long, we will talk about the windows and the padding for the screen behind the figure in a future blog post. I will group all blog posts concerning this goldwork project under the category 'Pope Francis' for quick future reference. Wow, where did the summer go? We had a lovely 26 degrees yesterday and only 6 this morning... We will even see the first night frost this week! Time to re-home my lovely flowering tropical plants from the balcony to the windowsill :). The cooler temperatures are also a perfect excuse to stay indoors and start a new embroidery project. As I really want to be recognised as an artist instead of a crafter, I need to start making original artwork again. For the past months, I have been thinking about a theme for my upcoming solo-exhibition in August 2019. I seem to be rather good at getting brilliant ideas in the middle of the night :). Luckily for me, I am pretty good at getting back to sleep after these nightly strokes of genius. My husband has a far harder time. After all, I have to tell someone, right? I am planning to make a few embroidery pieces in the style of St. Laurence. Using 16th century goldwork embroidery techniques and artistic language. But addressing modern-day issues like immigration, climate change and consumerism. All unmistakably linked, by the way. First up is Pope Francis. Ever since his disarming 'Buona Sera', I have been fascinated by this man. But what probably fascinates me even more, is how we all seem to project our hopes and dreams on this one man. Francis should address climate change, the role of women, homosexuality, world peace etc. And 'pronto', please! The inconvenient truth however is, that one man, even when he is the pope, cannot accomplish this on his own. Are we willing to help him? To show how our projections tend to make Pope Francis larger than life, I've given him a few extra arms. Like many Hindu Gods have. Two arms and hands form what is called the 'Kanzlerraute', the typical 'everything will be all right' posture Angela Merkel often shows. The background will be closely modelled after an orphrey from a chasuble made between AD 1520-1525 in the Northern Netherlands and now held at the Catharijne Convent under inventory number BMH t2911. I am very grateful for this museum to have given me free access to several high-resolution images of this magnificent piece.
That's all for now. I will spend the rest of the afternoon transferring the design onto 40ct natural linen by Zweigart using a normal lead pencil. |
Want to keep up with my embroidery adventures? Sign up for my weekly Newsletter to get notified of new blogs, courses and workshops!
Liked my blog? Please consider making a donation or becoming a Patron so that I can keep up the good work and my blog ad-free!
Categories
All
Archives
July 2024
|
Contact: info(at)jessicagrimm.com
Copyright Dr Jessica M. Grimm - Mandlweg 3, 82488 Ettal, Deutschland - +49(0)8822 2782219 (Monday, Tuesday, Friday & Saturday 9.00-17.00 CET)
Impressum - Legal Notice - Datenschutzerklärung - Privacy Policy - Webshop ABG - Widerrufsrecht - Disclaimer
Copyright Dr Jessica M. Grimm - Mandlweg 3, 82488 Ettal, Deutschland - +49(0)8822 2782219 (Monday, Tuesday, Friday & Saturday 9.00-17.00 CET)
Impressum - Legal Notice - Datenschutzerklärung - Privacy Policy - Webshop ABG - Widerrufsrecht - Disclaimer



 RSS Feed