|
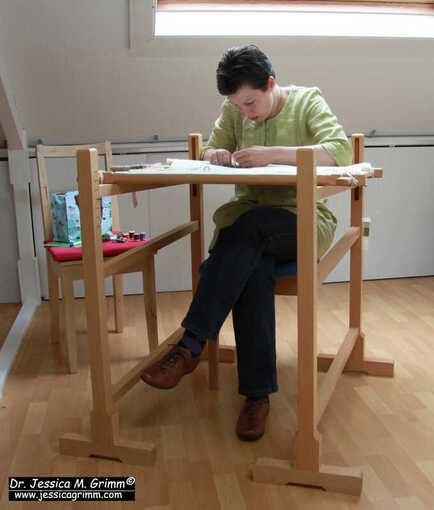
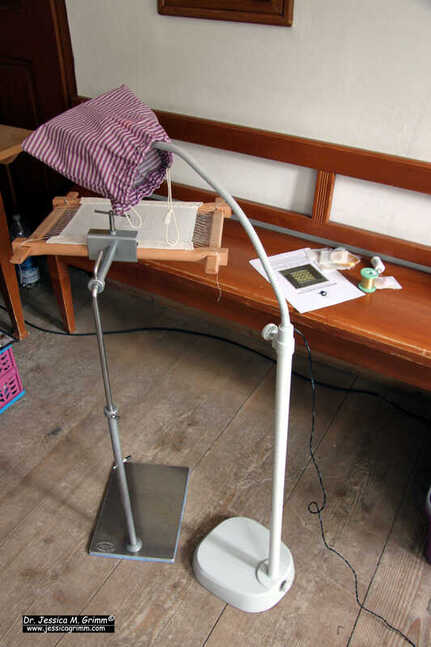
When I write my course descriptions, I usually include the size of the design. Most prospective students would then know which size hoop to bring. And it had not occurred to me that this is not necessarily the case when students are required to bring a traditional slate frame. As the number of 'please help me' emails soared the past couple of weeks, I thought it best to explain the process in a blog post. So here we go! When people already own a slate frame, it usually is the 24-inch/61 cm variety (this refers to the length of the cotton webbing attached). Not only is this the size used at the Royal School of Needlework, it also makes for a perfect combination with a pair of trestles. The frame is wide enough so that you can place a normal chair between the trestles and under your frame. The trestles and frame form a nice working table. The 24-inch slate frame is also large enough for most embroidery projects. However, if you need to travel by air, this frame is too big for your suitcase. Airlines mostly charge exorbitantly to transport your odd-sized frame (even when rolled together). So, what do you do? Buy a smaller slate frame especially for when you are travelling to courses and classes. Or when you do not want to invest in trestles. According to Jenny Adin-Christie, her slate frames up to the 15-inch variety can be used with a Lowery Workstand. I have been successfully using her 12-inch frame with Lowery Workstands in my travelling classroom (for instance at Glentleiten) and at home. Especially when you clamp the 'arms' (the part with the many holes) instead of the bars with the cotton webbing, the whole set-up becomes extremely stable. But what when they happen to have trestles at your class? Not a problem. They then usually also have some spare pieces of wood which can be temporarily attached to your slate frame. You basically elongate the two bars with the cotton webbing so that it then fits perfectly on top of a pair of trestles. Okay. That probably made sense. But now you still don't know how to go from the size of the design to the size of the slate frame required. It is basically the same as with a hoop. First question: size of the design. In the case of my class at the Alpine Experience in June, the design will be c. 30 x 13 cm. Next question: what are you planning to do with the finished piece? Do you want to frame it in a particular way which needs more or maybe less extra fabric around the edges. Add this to the size of the design. This is going to be the minimum size of the fabric that you are going to need to attach to your slate frame. In the case of the design for the Alpine Experience, you would probably not go any smaller than a 15-inch slate frame.
I hope you found this explanation useful!
7 Comments
Quite a while ago, I filmed myself setting up a small slate frame. When I started filming the instructional videos for the 2023 Glentleiten workshop, I finally came around to editing the old video and uploading it. The older video is in English and shows you how to apply a piece of linen to your slate frame. The newer video is in German and goes a step beyond the linen. It shows you how to sew a piece of silk onto your linen. Even if your German isn't very good or non-existent, you will probably still understand the procedure when you first watch the English video. I hope these videos give you a good impression of my teaching style and the teaching materials I provide for embroidery courses and workshops. Please enjoy!
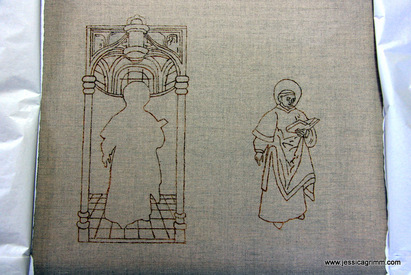
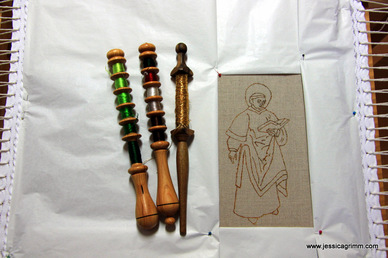
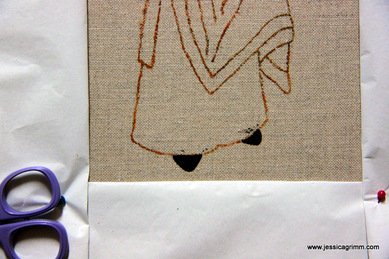
As a form of continued professional development, I'd like to complete at least one larger embroidery project a year. This year's CPD is going to be inspired by a medieval orphrey kept at the Museum Catharijneconvent in Utrecht, the Netherlands. I wrote a blog entry on an exhibition of medieval goldwork embroidery from the Netherlands held at the museum last year. You can find a picture and details of the orphrey of St. Laurence patron saint of Rotterdam, and indeed many excellent pictures of embroidery, in their online catalogue. I contacted the museum for a high resolution digital picture of the piece. They were very helpful and within days I had the information I wanted. Firstly, I spend several hours on redrawing the image from the picture. Older textiles have a tendency to distort. After I was happy with the result, I made a pricking and pounced it. Painting with water colour on c. 40 ct. natural coloured linen wasn't easy. So far, I only had experience with nice smooth silk. My lines are a little thick and my paint didn't stay at the right fluidity for long. However, since the whole picture will be solidly packed with either gold threads or silk, it is not a problem. As you can see, the saint will be stitched separately from the background. He will be later appliqued to the background. I will also work some of the background ornaments separately. I intend to applique the whole piece on a scrap of red chasuble fabric. I've decided to start work on the saint. He will be stitched in Chinese flat silk and fine Japanese thread. Chinese flat silk has the advantage that I can split it to very fine strands of fibres. This will be especially important for my tapestry shading of the detailed face. As we attended Easter mass at 5:00h this morning, you will appreciate that I started with the least intricate part of Laurence: his shoes. They are worked in tapestry shading using two shades of a lovely dark chocolate. I split the flat silk in two. My tapestry shading is worked over a split stitch edge. That's all I managed today :).
Tomorrow, two ladies from Switzerland and two from Germany will join me for a five-day course on Goldwork embroidery. I am looking forward to meet them and spent a week sharing my knowledge with them. More on their results in next week's blog. After that, I'll regularly keep you update on St Laurence. |
Want to keep up with my embroidery adventures? Sign up for my weekly Newsletter to get notified of new blogs, courses and workshops!
Liked my blog? Please consider making a donation or becoming a Patron so that I can keep up the good work and my blog ad-free!
Categories
All
Archives
July 2024
|
Contact: info(at)jessicagrimm.com
Copyright Dr Jessica M. Grimm - Mandlweg 3, 82488 Ettal, Deutschland - +49(0)8822 2782219 (Monday, Tuesday, Friday & Saturday 9.00-17.00 CET)
Impressum - Legal Notice - Datenschutzerklärung - Privacy Policy - Webshop ABG - Widerrufsrecht - Disclaimer
Copyright Dr Jessica M. Grimm - Mandlweg 3, 82488 Ettal, Deutschland - +49(0)8822 2782219 (Monday, Tuesday, Friday & Saturday 9.00-17.00 CET)
Impressum - Legal Notice - Datenschutzerklärung - Privacy Policy - Webshop ABG - Widerrufsrecht - Disclaimer



 RSS Feed