|
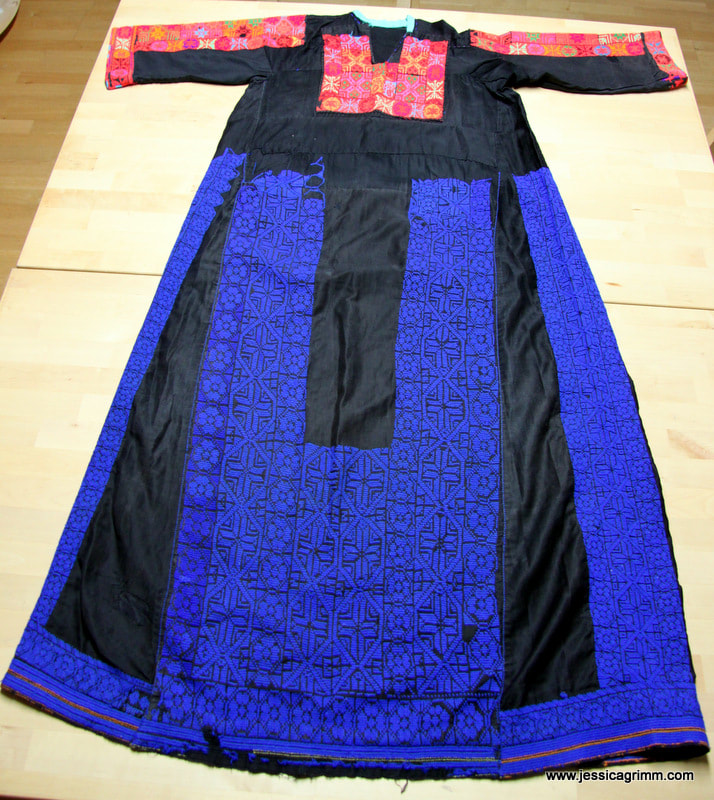
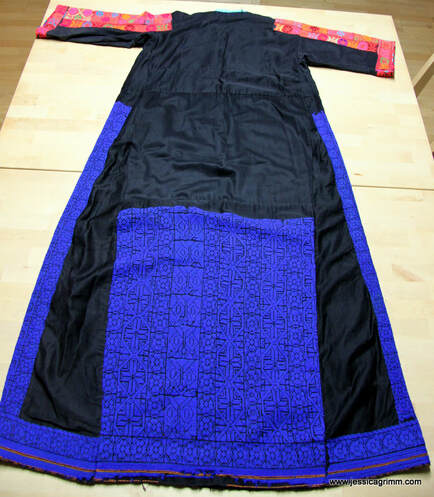
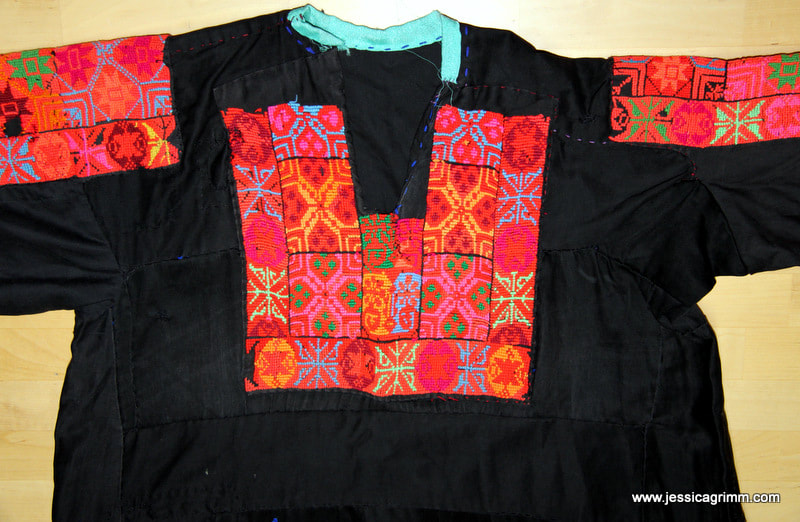
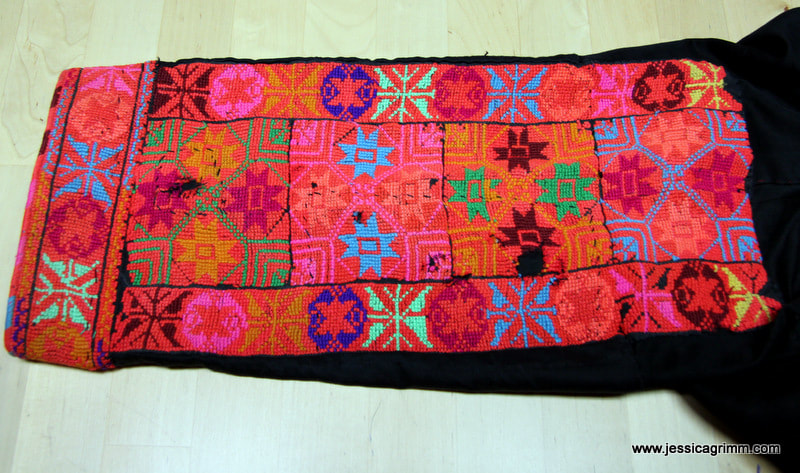
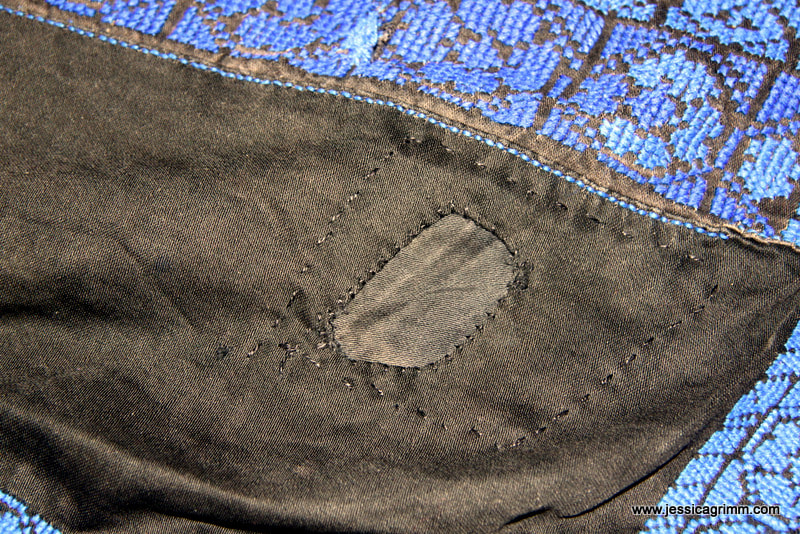
When I was in the Netherlands shortly before Christmas, I and my parents stumbled upon a lovely Middle Eastern shop in Utrecht. They mainly sell ceramics, but they also have a rather large collection of textiles. Among the latter; several embroidered items of clothing and cushion covers. I bought a dress showing Fallahi or Palestinian embroidery. For those of you living in the Netherlands: the name of the shop is 'Samira' and you'll find them at Oude Gracht 209. The friendly Egyptian man running the store is happy for you to come in to see the textiles on display. They also have a website with many pictures of old Bedouin dresses. Here you see the front and the back of the dress. According to the seller, this dress comes from the Bedouin living in the Sinai dessert. This is confirmed by the seam sporting bands of slanted tent stitches. Dresses like these always tell a story... Firstly, the dress has been patched together from many pieces. Sometimes embroidered pieces have been sewn onto the background cloth (as is the case for the collar you see pictured above) or... ...embroidered pattern pieces have been sewn into the dress (as is the case for the sleeves you see pictured above). Furthermore, the dress has been patched up in many, many places. You can also see in the picture above that the cross stitches are worked on a good quality cotton satin. Not at all easy to count! And consequently the embroiderer made many mistakes in the geometric patterns. There is always a marked mistake in these embroideries as only God is faultless. Why is this dress patched together the way it is? Firstly, it would take a Bedouin woman about three years to embroider a festive dress like this. Her days are filled with many household tasks and thus she would only have limited time to embroider. Consequently, it is normal that wear and tear would be repaired as best as possible. But what could she do when her life changed dramatically? Brides and married women would wear dresses embroidered with shades of red. Widowed women would use dark blue. And widows who would like to marry again would use a red collar. Once re-married, she would stitch reddish accents on top of the blue. Here we thus have the dress of a widowed woman seeking to re-marry. A very similar dress is depicted on page 40 of the book: 'Stickereien für 1001 Nacht' (Embroideries for 1001 nights) by Anna Dolanyi from 1989, ISBN 3-473-42427-7. What else can we learn from this lovely piece of old embroidery? Well, the wearer was probably right-handed as the right sleeve shows much more wear and tear than the left one. Furthermore, I think the woman had a baby or small child on her hip. The collar has been torn and this would typically happen when a child grasps the collar when it does not want to be put down :).
10 Comments
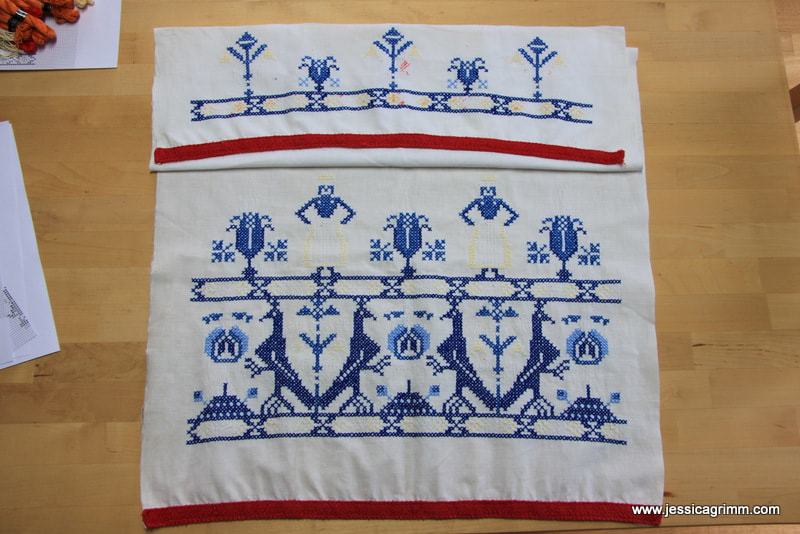
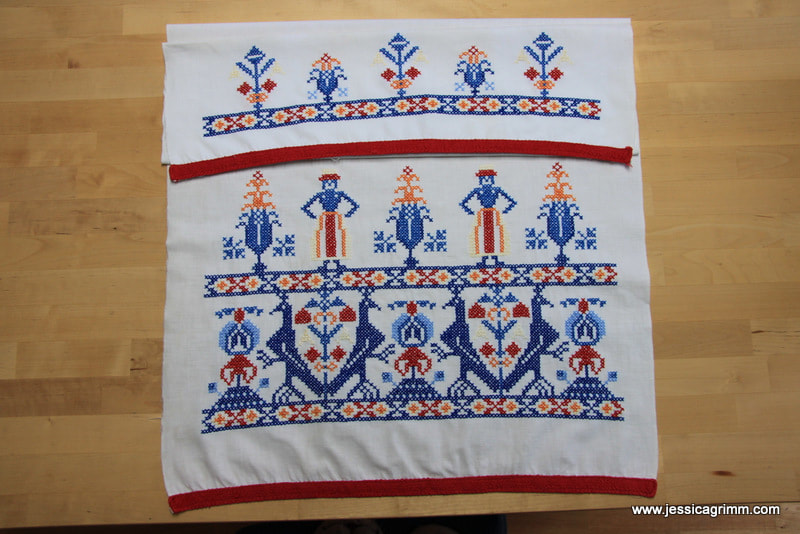
Last week, I worked on a fun commission: restoring an antique towel cover. This particular piece is over a hundred years old and has been in the owner's family from the beginning. The cover sports typical symbols known from Dutch and German cross stitch samplers: vases with flowers, pomegranates, peacocks and women in folk costume. The embroidery was executed with cotton perle #5 in only six colours: pale yellow, orange, red, light blue, medium blue and dark blue. Whilst the blue threads are still in perfect condition, the red and orange have completely gone and the yellow has gone in some places too. A stark example of the influence of a particular dye on thread survival! The fabric is a fine closely woven linen measuring 59 cm from selvedge to selvedge. Peculiarly, the selvedge is still perfect on the right, but starts to fray on the left. Any thoughts on this? Since the pattern is quite fun and I know that there a cross stitch and sampler fans among my readers, I've transcribed the pattern and offer it as a free download here. Note: the colours stated in the pattern are not exactly the original colours. Rather they are a red, orange, yellow and three blues in Anchor stranded cotton. I mended this sampler using antique threads made by DMC and Schürer. The exact colours were not or no longer available from either DMC or Anchor.
P.S. just to add to the 'leaving a knot on the back' debate: the knots were the only things remaining when it came to the red and orange threads :)
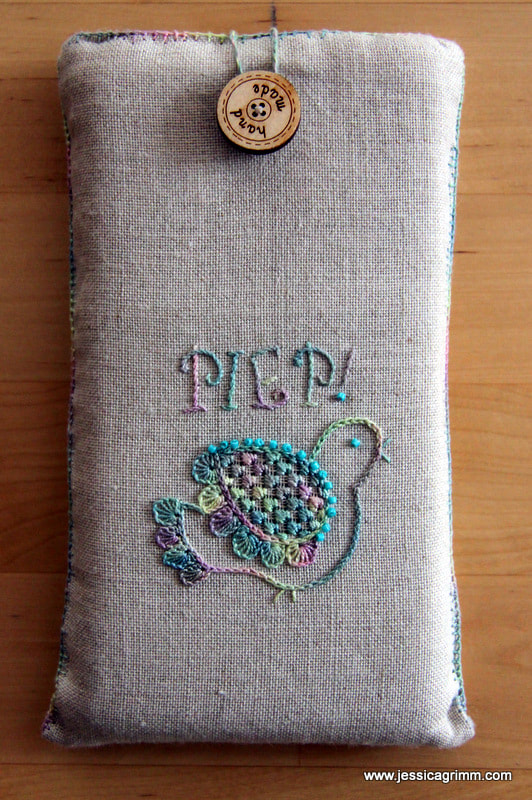
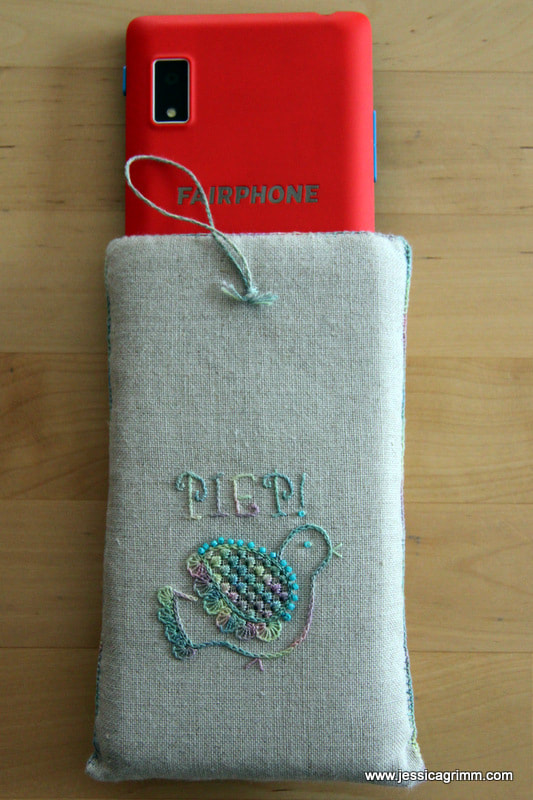
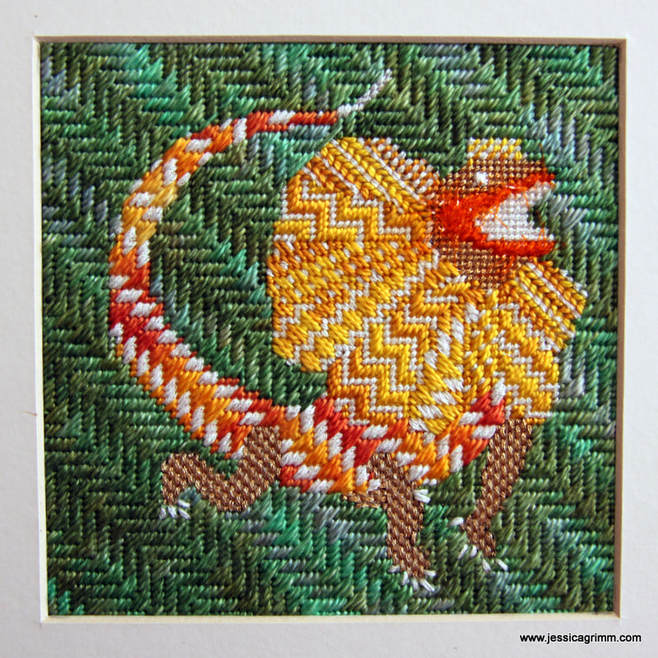
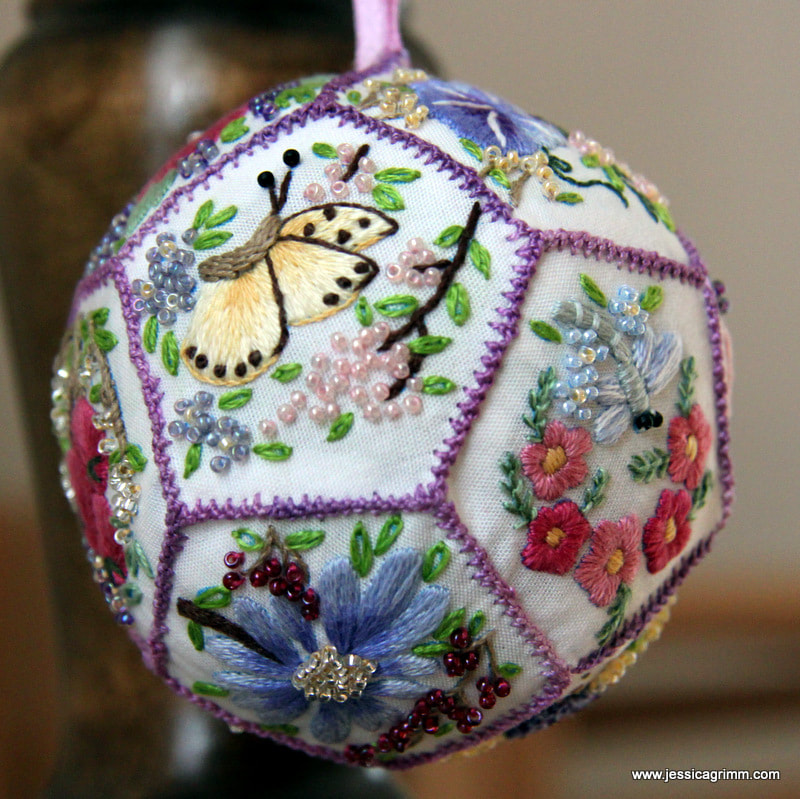
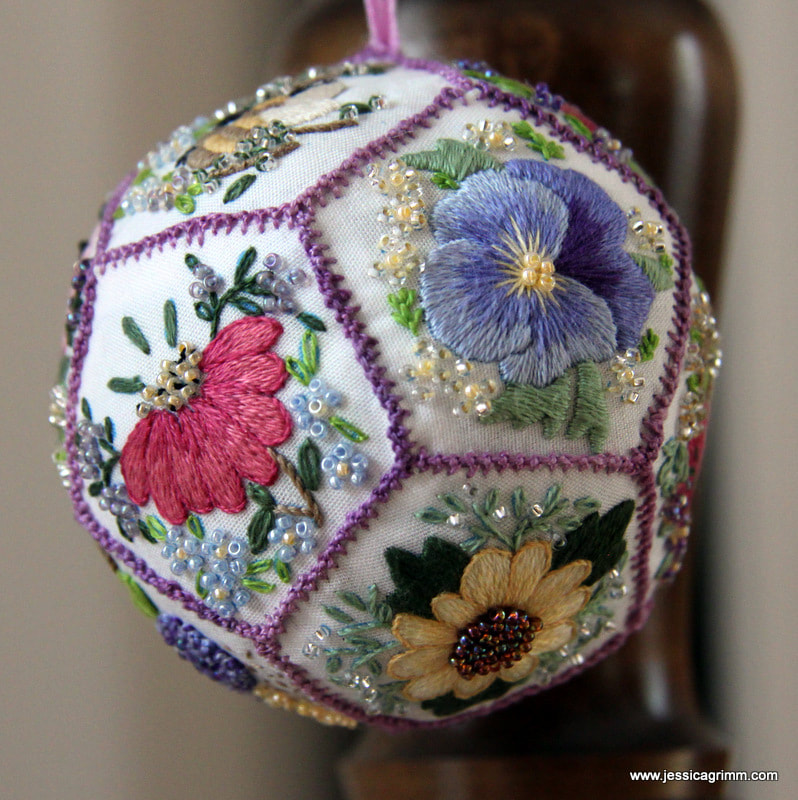
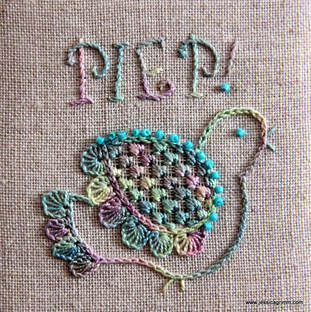
Yup, it is true: I have arrived in the modern area too. It took me years. But when I heard that Fairphone makes smart phones that last, are repairable and don't use blood minerals; I ordered one. So far, I have used it to download (and use!) a 5K running app, WhatsApp with my family, use Google for directions and information AND made the very occasional phone call :). Still much prefer my Ipad and Laptop... Maybe I should seek professional help? Pondering this option, I did make my Fairphone a cozy home to live in. On Zweigart Newcastle natural coloured 40ct linen, I outlined the bird with chainstitch using a #12 variegated House of Embroidery perle colour Grapes C. Then I stitched partial buttonhole wheels for the feathers on the tail and the wing. I added straight stitches for the feet and the beak and attached some blue beads along the upper-edge of the wing. From the back, I withdrew every fourth thread in both directions and then added a Schwalm filling stitch called 'Gefieder'. The lettering was stitched using stem stitch. To make my 'phone home' a bit sturdier, I added wadding and a sheet of template plastic. The seams were then pimped with knotted pearl stitch. So far, my phone seems to be pretty comfy in her new home! I've asked my very talented husband to make a nice clean digital drawing of my scribbled birdy pattern. You can download it at the end of this article. Apart from using it as I did in a Schwalm embroidery way (finished design including lettering H 55mm), there is tons of other possibilities. How about stitching it monochrome on a piece of felt? Or applique with a few simple stitches for embellishment? Surprise me! Next up is another broderibox project using a design of a Chlamydosaurus by Millie Marotta. This amazing creature can impress by unfolding his neck frill. However, it can only do so in opening its mouth widely. The bones in the frill are extensions of the hyoid or tongue bone. Isn't nature amazing?! The lovely people of Nordic Needle had put in a glow-in-the-dark thread made by Rainbow Gallery. I made sure to add it to every canvas stitch I used on the chlamydosaurus (it is the white thread you see). And it glows beautifully at night! Unfortunately, it doesn't translate well in a picture. You have to take my word for it. Last finish for today: the Floral Pomander by Hazel Blomkamp. I really enjoyed this project with all the little flowery scenes using simple embroidery stitches and tiny beads. However, the instructions were a bit messy with tiny pictures of the finished panels. And piecing the pomander together was a little fiddley. That said, it makes a great project if you like miniature embroidery, beads and a different way of finishing your embroidery. Oh, and thanks to the dried lavender mixed in with the toy stuffing, it is my best smelling project ever :)!
|
Want to keep up with my embroidery adventures? Sign up for my weekly Newsletter to get notified of new blogs, courses and workshops!
Liked my blog? Please consider making a donation or becoming a Patron so that I can keep up the good work and my blog ad-free!
Categories
All
Archives
July 2024
|
||||||||||||||
Contact: info(at)jessicagrimm.com
Copyright Dr Jessica M. Grimm - Mandlweg 3, 82488 Ettal, Deutschland - +49(0)8822 2782219 (Monday, Tuesday, Friday & Saturday 9.00-17.00 CET)
Impressum - Legal Notice - Datenschutzerklärung - Privacy Policy - Webshop ABG - Widerrufsrecht - Disclaimer
Copyright Dr Jessica M. Grimm - Mandlweg 3, 82488 Ettal, Deutschland - +49(0)8822 2782219 (Monday, Tuesday, Friday & Saturday 9.00-17.00 CET)
Impressum - Legal Notice - Datenschutzerklärung - Privacy Policy - Webshop ABG - Widerrufsrecht - Disclaimer



 RSS Feed