|
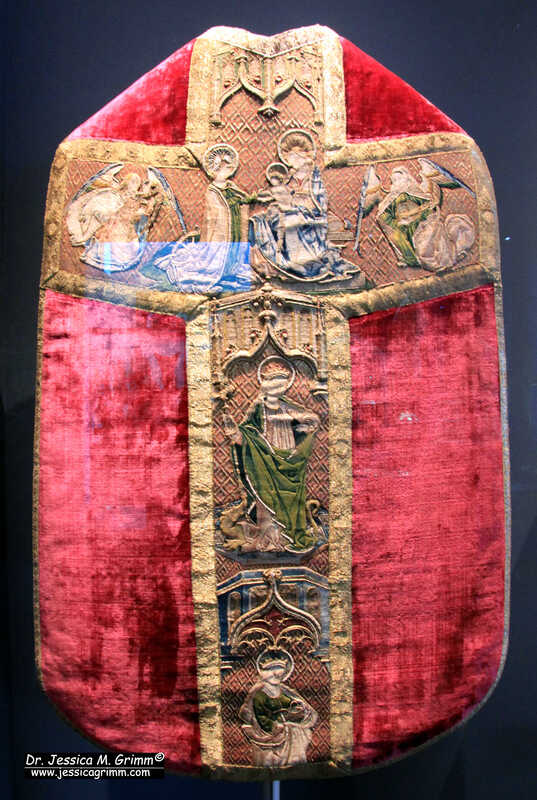
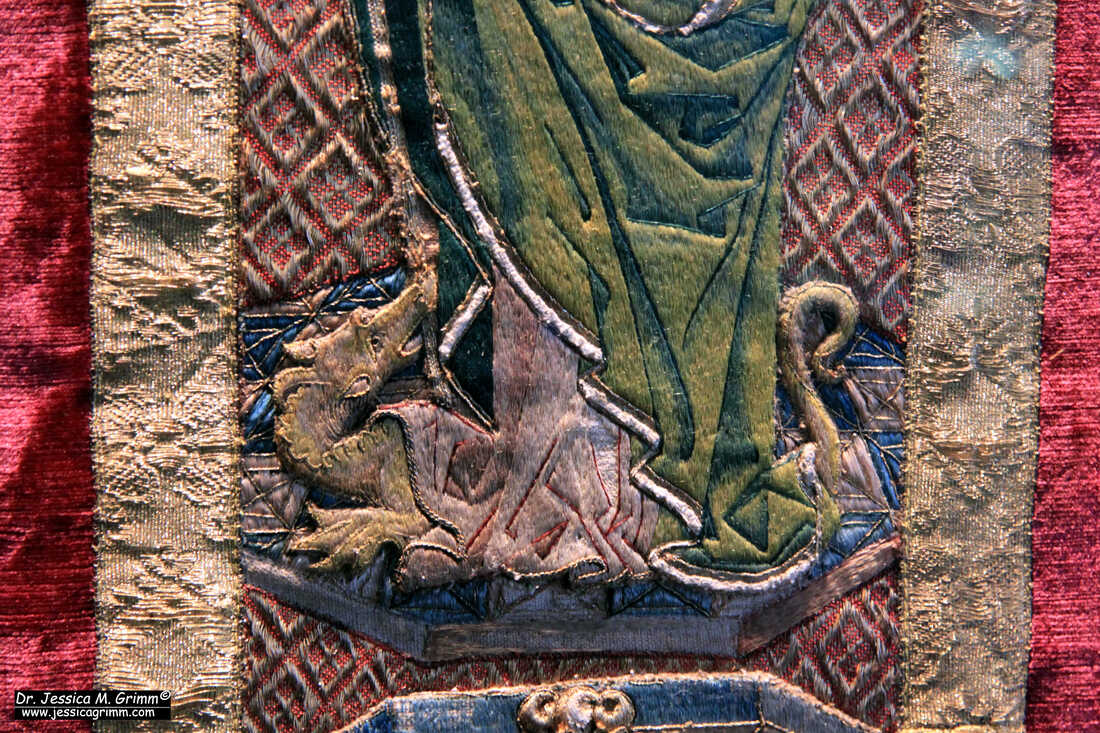
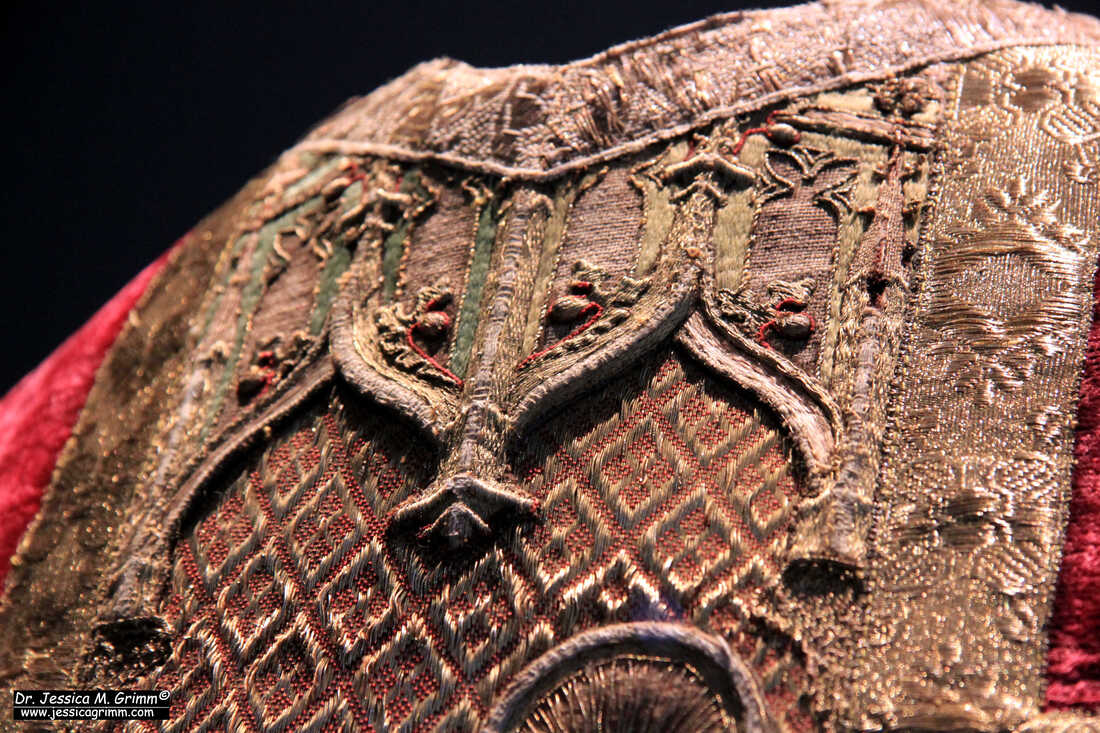
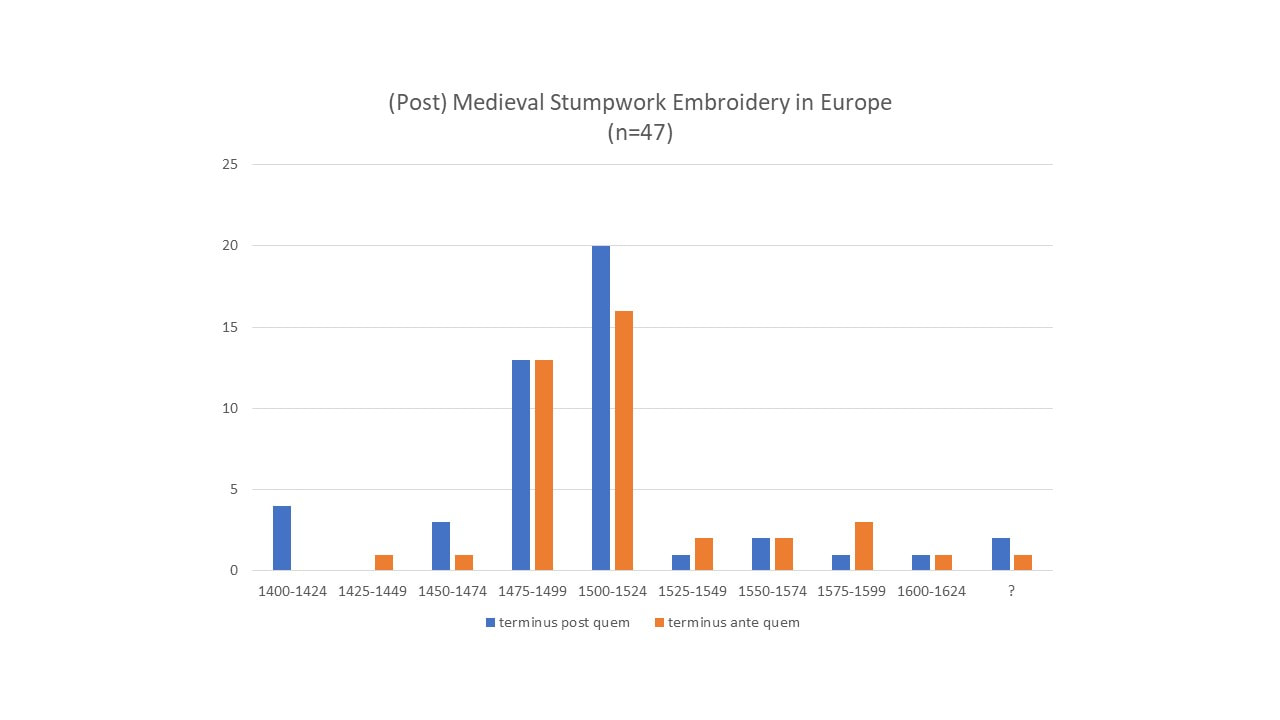
Earlier this year, the Diocesan Museum Freising opened its doors again after extensive remodelling. As it is not too far from where I live, I decided to check it out in case any medieval embroidery was on display. It turned out that they have a stunning chasuble with very high-end embroidery on it. Unfortunately, there were no captions in the museum. I emailed them and wrote an official letter. To no avail. They never answered. Frustrating as this is, it is unfortunately, a reality when it comes to European museums. Museums in the UK or the USA are usually very helpful. Museums in Europe usually do not even bother to answer, let alone host me for a research visit. This undoubtedly is the result of how museums were and are financed in the respective countries. And with the 'distance' between lay people and experts. Despite having a doctorate in archaeology, being a professional embroiderer and having studied medieval goldwork embroidery for a number of years, this does not always make me an expert :). So, let's see what we can find out on our own about this stunning piece of embroidery! The chasuble cross on the back shows an interesting scene at the top: the mystical marriage of Saint Catherine. As far as I am aware, this is the only embroidered version of this particular episode. There are more embroidered scenes of the life of Catherine, but this one seems unique. The scene is flanked by two angles. One playing the harp and the other a lute. Below the central scene, Saint Margaret is depicted with the dragon. The beast playfully bites into her standard. The Saint at the bottom is Dorothea with her basket of flowers. Catherine, Margaret and Dorothea are known as the virgines capitales. As you can see, the orphrey has been cut at the top and at the bottom. Furthermore, we cannot see the front of the chasuble which might also have an orphrey. But the fact that the virgines capitales are usually four saints gives us an idea of what is missing: Saint Barbara with the tower. A further likely candidate is Mary Magdalene. As said, the embroidery is very high-end. The silk-shading is very finely executed. Both in the actual shading and in the regularity of the stitches. There's no or nue, which gives us our first hint of where the orphrey was made. Or nue is typically something of northwestern Europe (the Low Countries and Northern France) and Southern Europe. It was not really used in England or in Central Europe. As the stitching is very high-end and England does not seem to produce outstanding medieval embroideries after the heyday of Opus anglicanum, we can rule out England as the place of origin. This leaves Central Europe as the most likely candidate. The diaper pattern used in the background of all three sections of the orphrey is unusual too. I know of only one other instance where this pattern has been used: on an Italian orphrey with Bartholomew the Apostle in the Indianapolis Museum of Arts. Those orphreys are clearly Italian and date to AD 1500-1550. The orphreys on the chasuble from Freising are clearly not Italian. And the strong red couching stitches also support this (yellow is preferred in Italy). Another important characteristic of the embroidery on this orphrey is the padding. Especially the arches above the central scene and above Saint Margaret are very highly padded. It would not surprise me if a little bit of wood is hiding in the most-padded parts. In contrast, the figures and the rest of the scenes show very little padding. There's a relatively short period in the history of Central European goldwork when voluminous padding techniques (think stumpwork) really take off. Pieces belonging to this form of embroidery date from about AD 1400 until 1600 (some have a really wide date range assigned to them). However, when the dates are plotted for the 47 pieces in my database, we see that they cluster on either side of AD 1500. I, therefore, think that the orphreys on the Freising chasuble probably date between AD 1475 and AD 1525.
It is thus probably safe to say that the beautiful orphrey on the Freising chasuble was made somewhere in Central Europe around the turn of the 16th century. If you would like to see more pictures of this piece, please consider becoming a Journeyman or Master Patron. As a Journeyman or Master Patron you'll have instant access to a further 12 pictures of this piece. The monthly support of my Patrons enables me to keep this website running!
5 Comments
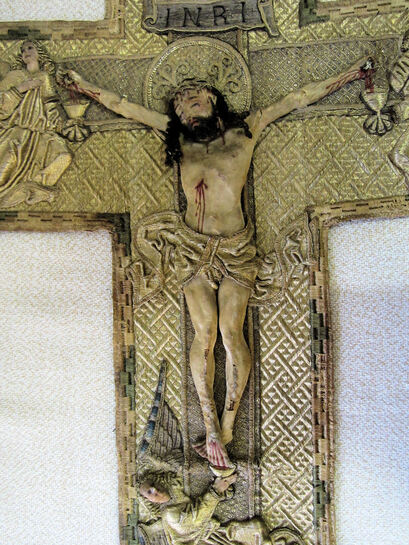
Before I'll provide you with some incredible eye candy, let us return to last week's blog post. Some of you wrote to tell that they were sorry to see another embroidery shop close. A few were even dismayed as it now meant that it was even harder for them to source materials. Please know that it wasn't an easy choice for me to start selling off my stock. Precisely because high-end embroidery materials are harder and harder to find, I had always hoped that I could make a success of my webshop/brick-and-mortar shop. Alas, it never happened. Before the pandemic, I had about five visitors a year. I never managed to become a needlework destination where you could both buy gorgeous threads and feast your eyes on pretty spectacular embroideries. Being located in a National Park with many places to visit, one would think that my shop and atelier had everything going for it. But it didn't. And even now, with a 50% discount on most goods things aren't exactly flying off the shelves. This has proven to me, that although a bit painful, closing my shop is the right thing to do. Onto greener pastures! At the beginning of the month, my husband and I made a day trip to Salzburg in Austria. We visited the various church museums and saw many spectacular pieces of ecclesiastical art. And although hardly any embroidery was on display, the Museum St. Peter had an amazing chasuble cross on display. As you are not allowed to take pictures of it, I was lucky to find a couple of detailed pictures on a website for tenders.
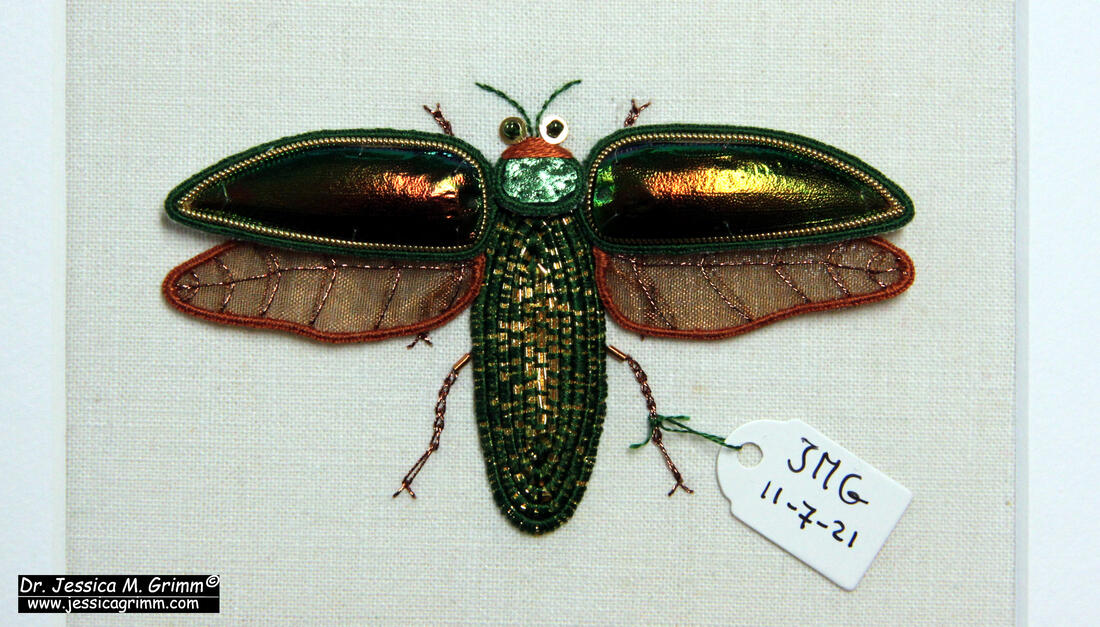
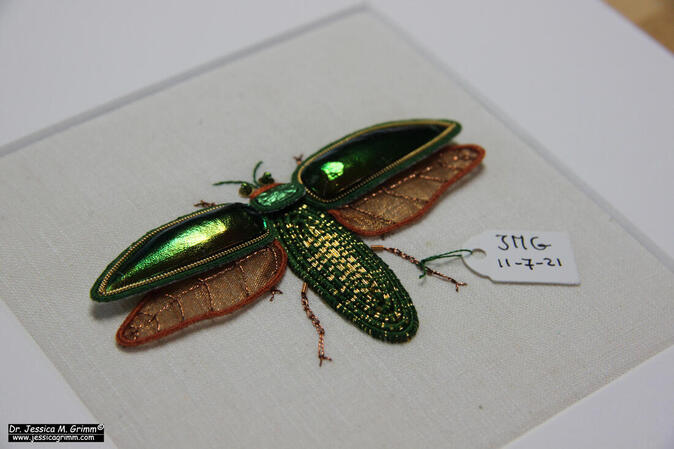
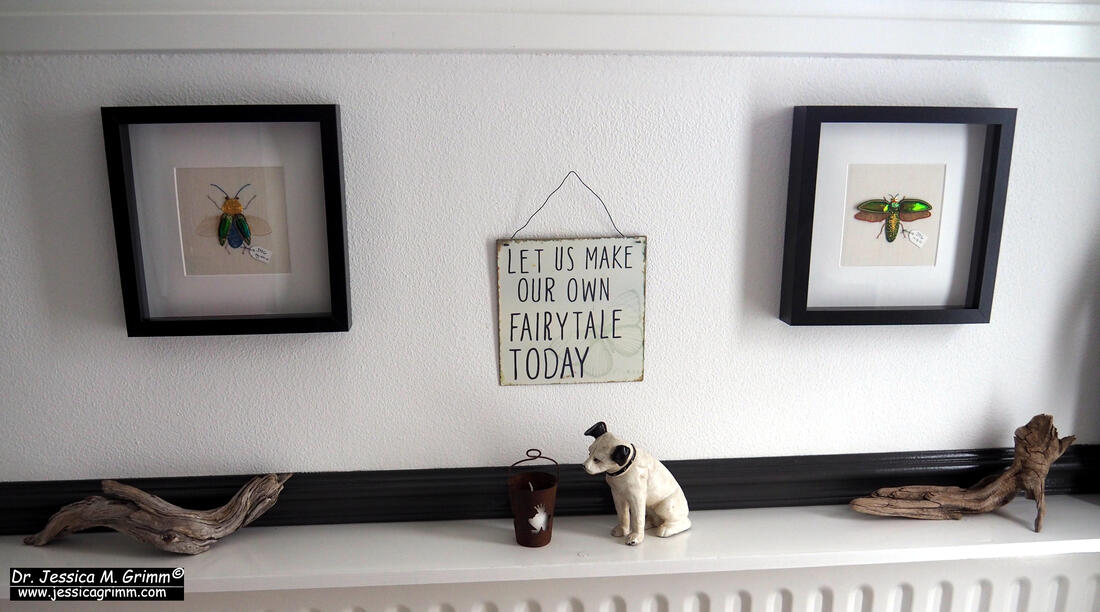
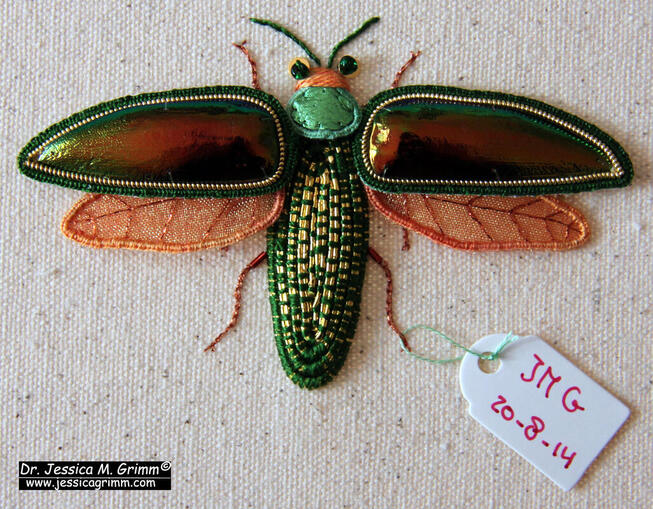
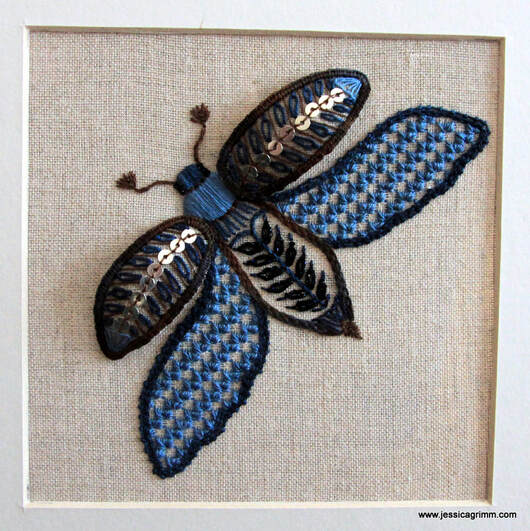
As you can see from the above picture, this is not your average piece of stumpwork or raised embroidery! The figure of Christ is nearly fully three-dimensional. He really is a textile sculpture. And although those of you familiar with 17th-century stumpwork from England will see some similar techniques and threads, the main figure of Christ was made in a technique not seen in these 17th-century pieces. He was made in a mould. Built-up with linen scraps soaked in glue and stuffed with pieces crafted from wood and leather. Although "minor" padding can be seen in medieval goldwork embroidery from quite early on, these very three-dimensional pieces were made in the South of Germany, Austria and Hungary during a short period of time. As a group, they are so far not really systematically studied and the academic literature is older and patchy. This seems to be due to the fact that they are an 'in-between': not seen as sculpture, but not quite normal embroidery either. And some people have an aversion to these pieces as they look a bit like the priest has a dolls house on his back ... (just like with those elaborately decorated skeletons of saints, these textile pieces end up in the attic and are forgotten about!). Wouldn't it be cool to gather a group of interdisciplinary academic researchers and start a research project? Have each piece go through a scanner to see which materials are hiding beneath the outer layers of silk and embroidery? Just like those Egyptian mummies projects! So far, there does not seem to be much interest from those who research the later 17th-century stumpwork embroidery from England. This is likely due to the language barrier. Equally, those 17th-century pieces are not mentioned in the literature on these 15th- and 16th-century pieces. Are both traditions independent of each other or can we find a continuous line of development? By publishing this short introduction on my blog, I hope to alert people to the existence of these amazing textile sculptures! A couple of months ago, I made the first embroidered beetle for my mum. Now that I am fully vaccinated (and they too), I could finally visit them after 21 months. That did however mean, that I needed to embroider the second beetle as well :). But after so many years, I did not have all the original ingredients to make an exact copy of the original beetle. So the new version is a little more bronze instead of orange. And since my mum is not a huge fan of bright orange, she likes the bronze version even more! This was the first recreated beetle: Wilhelmina. Incidentally, the completion date on the label is my parents' wedding day. The orange original on the left and the bronze version of Adriana beetle on the right. And here is a glamorous picture of Adriana. And this is how my father hung Wilhelmina and Adriana on the wall at the Grimm's residency :).
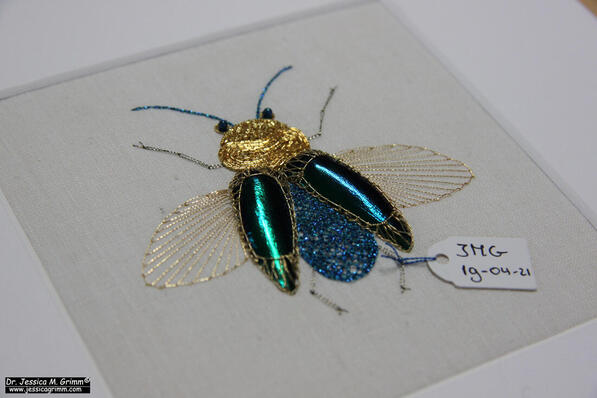
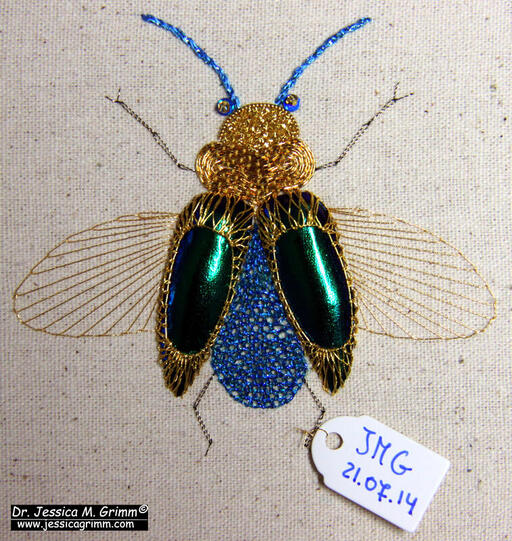
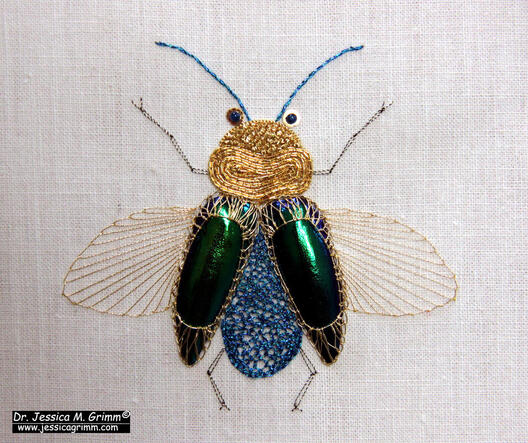
In 2014, I embroidered a couple of beetles with real beetle wings. The blue one was named Wilhelmina and I taught her successfully to students in Germany. A couple of days before I opened my first solo exhibition in 2019, I sold my beetles. I was happy as pie! However, earlier this year, my mum confessed that she would have bought the beetles off me had she known that I was selling them. OOPS! Time to get my old instructions out and make a new Wilhelmina beetle :). The original beetles were worked on a piece of heavy calico. Unfortunately, I did not have enough left to work Wilhelmina II on it as well. Instead, I opted for a piece of antique linen. It is a lovely, large piece of hand-woven linen. Unfortunately, it has quite a few nasty spots, especially along the folds. I always knew that I would have to cut out the good bits and use the rest as backing fabric. Using it on a beetle for my mum sounds like a worthy cause! It is so no longer 2014! Back then, I was able to stitch all of Wilhelmina without magnification. That is no longer the case. Bummer. However, I do love my TriSpektrum LED-magnifier from Cross-Stitch Corner! For years, I only used the extra light (both daylight and warm), but now I had to peek through the magnifier regularly too. Interestingly, I am still fine with working my medieval goldwork on 40ct linen. Although thinking of it, I am probably so adept at those stitches that I do not notice that I do not see as well anymore ...
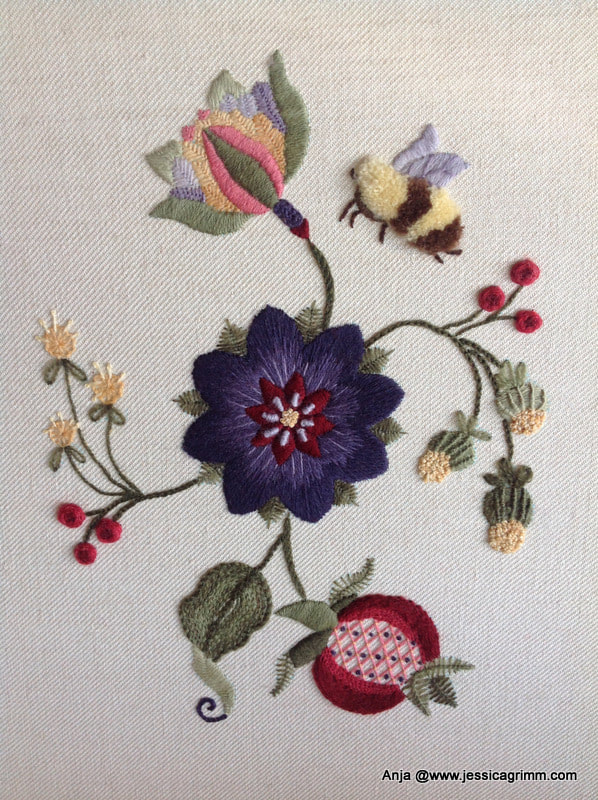
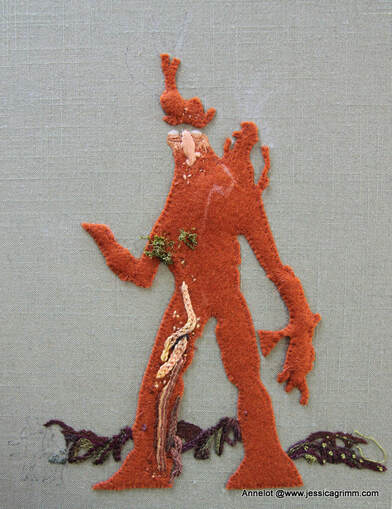
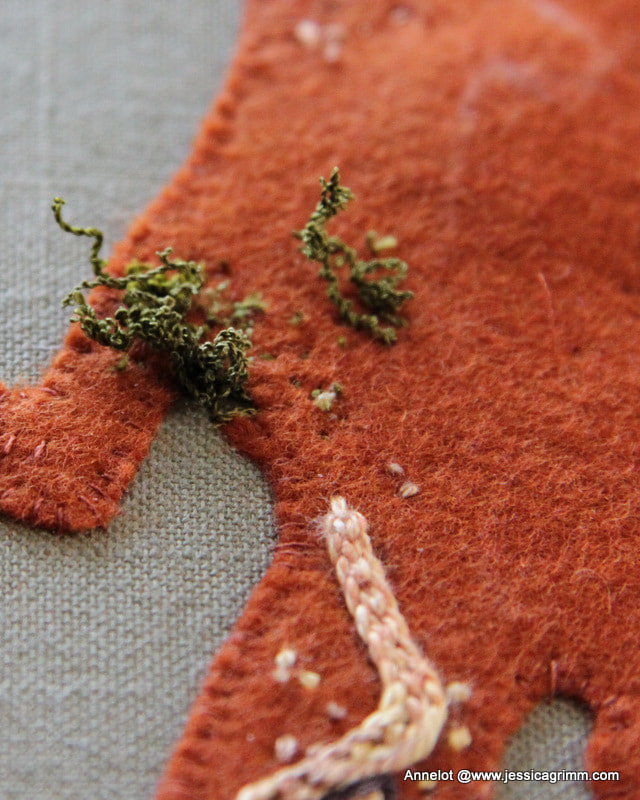
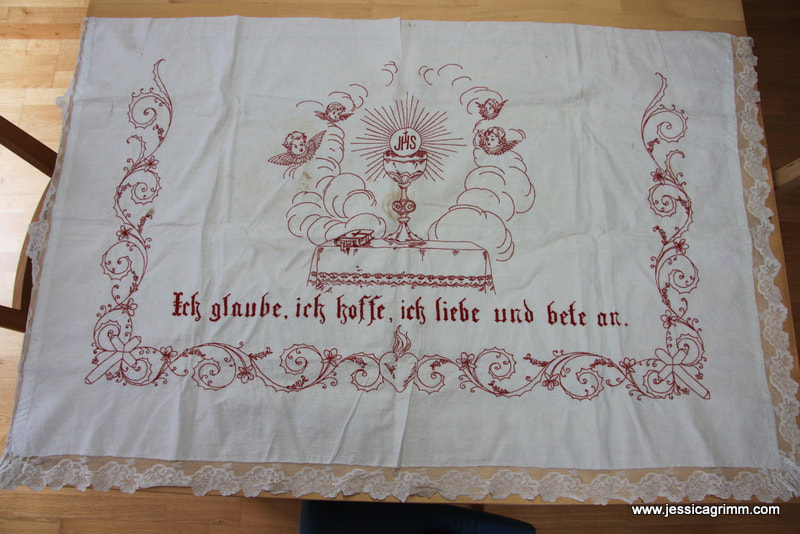
Before I open the candy tin, I would like to voice a big thank you to all who left comments of encouragement on last week's blogpost. I also received many personal emails. Thank you very much! What will happen next? The farm building is beyond help and will be demolished. The cattle will be sold over the next weeks. The Lötschmüllerhof will no longer be a farm. That's a strange idea. As reference to 'the farm' in my family was always to this particular place. However, we are all settling in to our new lives and the help from others is balsam to our souls. On to the eye candy! Remember this piece by Anja from the Netherlands? She started it earlier this year during one of my stitching retreats. I think she did a terrific job! The piece is balanced and the purple flower is such a beautiful centre piece. So proud of her :). Note: I no longer run this course. Next up is a stumpwork piece by Annelot from the Netherlands. She started it last week during my stumpwork stitching retreat. Annelot is creating a stitched version of Treebeard, the oldest Ent from the tales of J.R.R. Tolkien. For his mossy beard we tried the overtwisting method as described by Alison Cole in her great book on stumpwork (you can read my review here). This is a fun method with great texture. Can't wait for the piece to be finished. Over the years, I have learned that embroidery calms and sooths my soul. So I was particularly happy to find the September broderibox by Nordic Needle in my mail last week. With this month's threads I worked a moth from one of Millie Marotta's books. I used Snow by Caron, Watercolours by Caron, Kreinik Silk, Colour variations by DMC, Londonderry linen thread and silver plated spangles. The moth is stitched using a combination of Schwalm drawn-thread work, surface embroidery and stumpwork. And last but not least, this altar frontal or antependium was saved from the fire. It used to adorn the Corpus Christi altar put up in front of the farm every other year. It is a little dirty, so I will try to gently clean it. Since the altar did burn, we need to construct a new one. But the antependium will still adorn it!
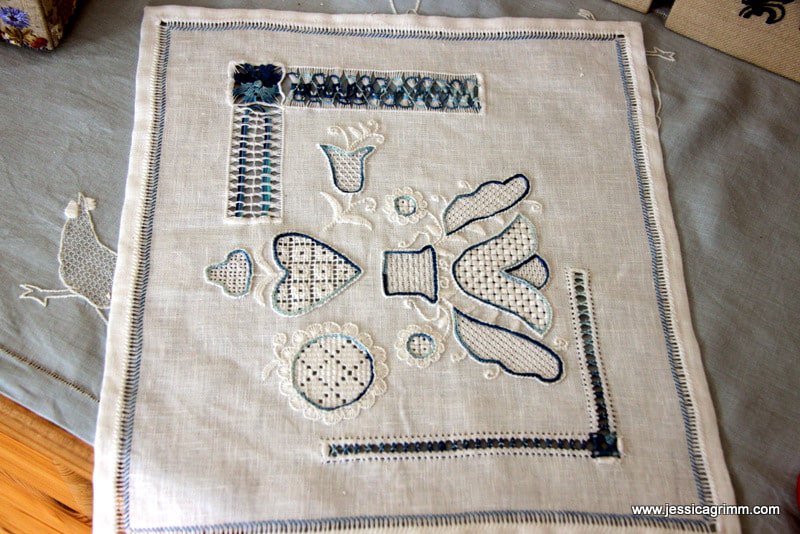
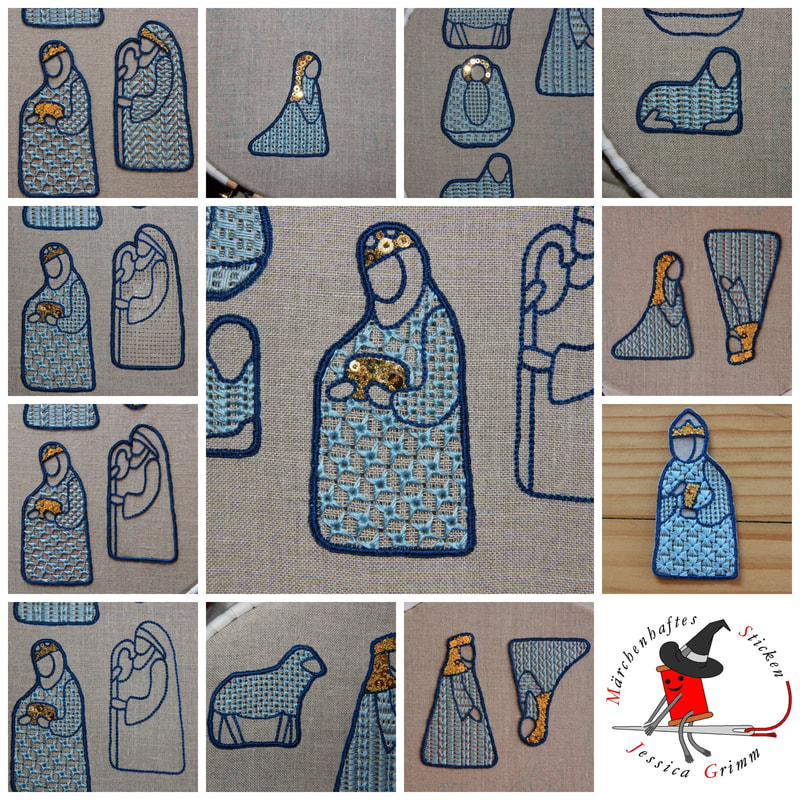
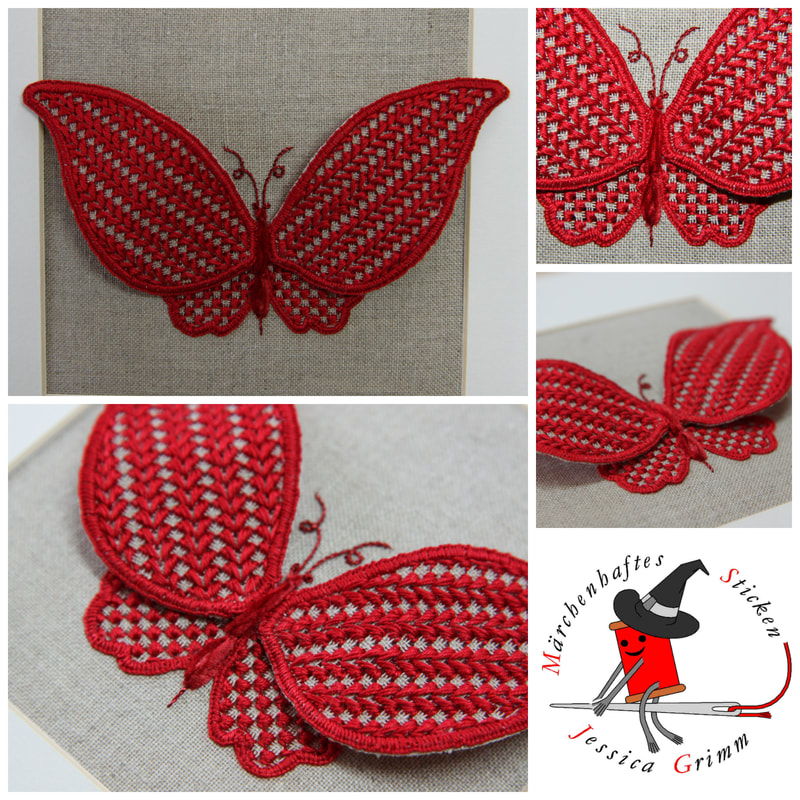
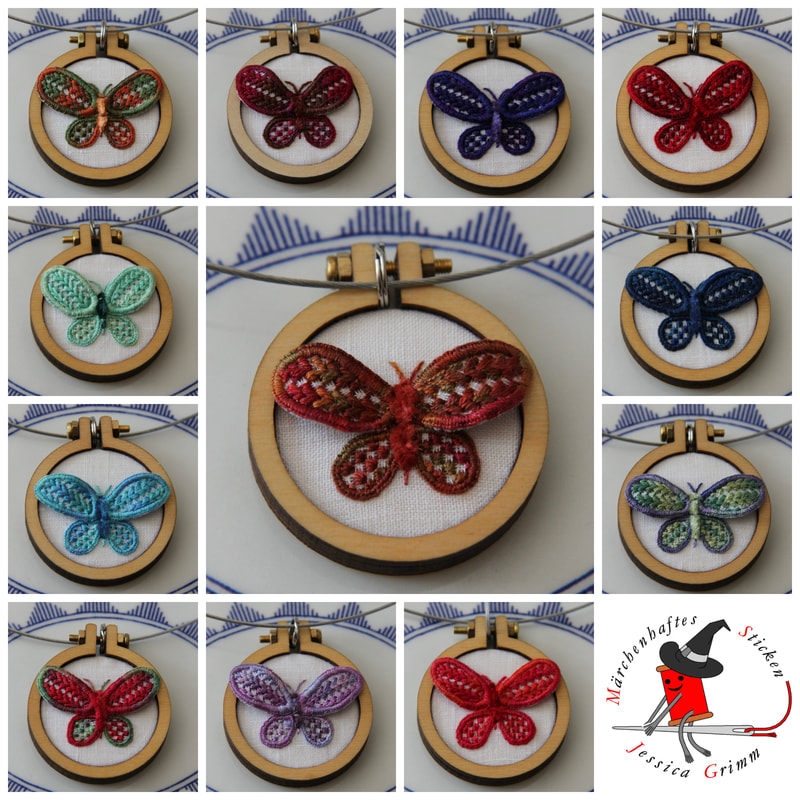
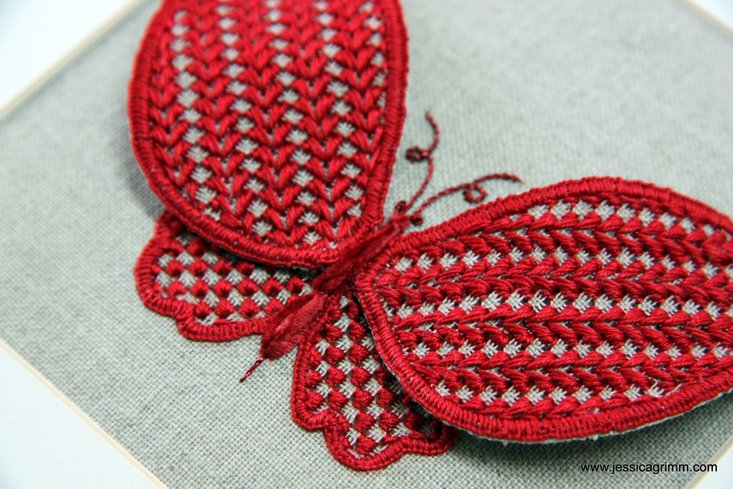
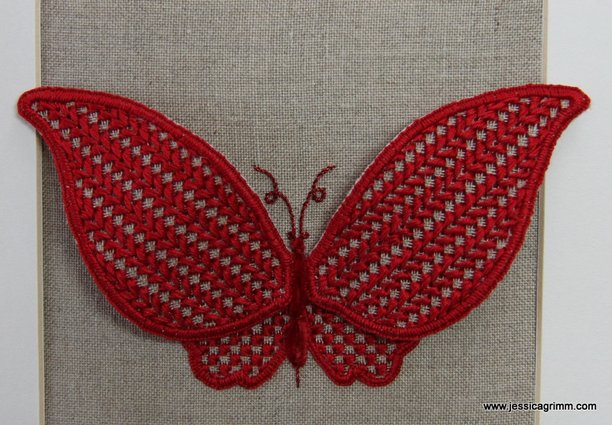
And that's it. All candy distributed :). See you next week! Today I am going to write a bit about my love affair with Schwalm embroidery. You see, I can pinpoint exactly where I encountered this pretty whitework embroidery technique for the first time. Not in its native Hessia, one of the federal states of Germany. Nope. It was Inspirations issue 69 in the spring of 2011. The beautiful 'Sense of Place' by Luzine Happel featured hearts, sunflowers and tulips filled with pretty patterns. I so wanted to learn this embroidery technique! But, I had never done any whitework embroidery other than a huge Richelieu window pane featured in an embroidery special of the Dutch Libelle. Luckily, I had just started my Royal School of Needlework Diploma course. And it happened to include a whitework module. Little did I know that they had never heard of this type of embroidery. And my tutors weren't thrilled at the prospect of teaching me something they were not familiar with. So I ended up with a whitework sampler featuring only a little bit of true Schwalm embroidery. And yes, I didn't like the prospect of an all-white piece either :). Now most of you will by now know that I don't like table cloths. Although, to be honest, there is nothing wrong with these pieces of textile. It is just that when I tell people that I embroider for a living, THEY picture me amidst heaps of neatly stacked embroidered table cloths. Now that gives me goose bumps. But for the wrong reasons. It truly freaks me out. Embroidery is so much more than just a means to adore a table cloth! Instead, one of the Schwalm-things I made was a nativity scene to be hung in front of my kitchen window. It is an ongoing process and I hope to add camels, a donkey and an ox this year. And although I like white, I like colour better. White reminds me of those pretty shoes I once had as a girl. They were lovely, but not so white for long. The same with those pretty lacily white stockings me and my younger sister wore under our Sunday dresses as girls. They attracted dirt like nobody's business. So in came the use of colour in my Schwalm embroidery projects. Now, traditional Schwalm embroidery is done with cotton a broder. A not so shiny non-strandable cotton thread. It is nice, but cotton perle and silk threads are nicer. Or at least in my opinion they are. I especially like to use variegated threads as they form pretty colour patterns when used with the many different Schwalm filling stitches. So, by now, I had changed the colour of things, the materials and the stitching topic. What's next? How about adding a stumpwork technique to the mix? Using wired elements with Schwalm embroidery really tickled my fancy! It looks so elegant and yet isn't too hard to create at all. But I wasn't quite finished yet! How about one shrinks the butterfly? For instance, until it fits a tiny 4cm Dandelyne wooden hoop. Thanks to my training in Appenzeller whitework embroidery, I knew that you can add tiny filling stitches (some the same as in Schwalm embroidery; after all there is only so much you can do with a blank grid) into a tiny grid of withdrawn threads. Born where the elegant butterfly pendants! Still using original heritage skills, but sans the table cloth. After weeks of stitching (one butterfly takes about six hours to create), I now have a colourful bunch of lovely butterfly pendants.
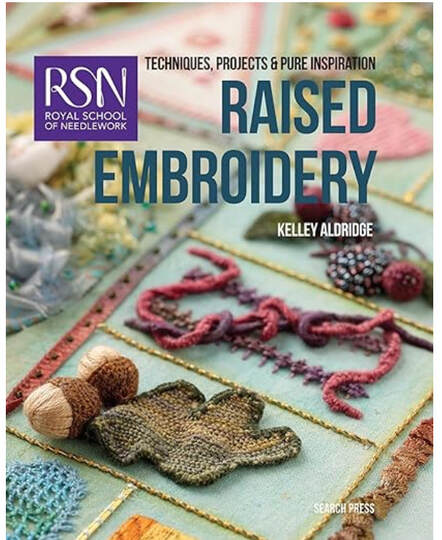
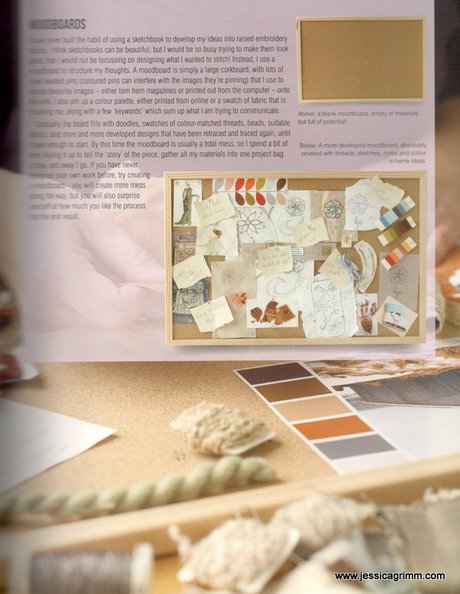
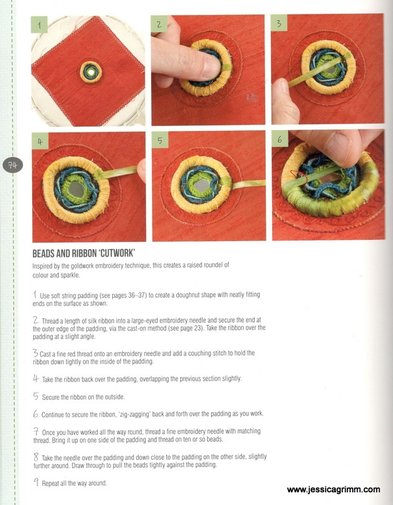
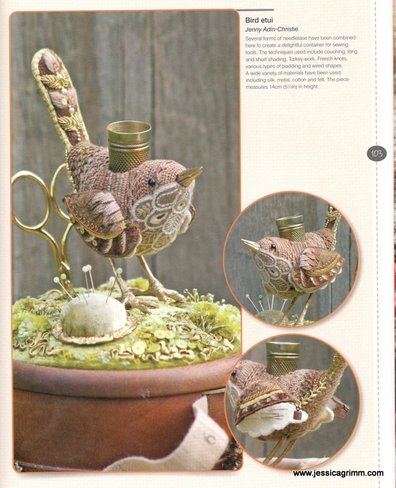
If you would like to know more about the traditional form of Schwalm embroidery (including its use on folk costumes), check out Luzine Happel's website and blog. Also available in English. Luzine self-published a whole library on Schwalm embroidery. These are very good books if you want to learn this pretty whitework technique. I highly recommend them! The books are available in German, English and even French. Happy stitching! Last week, I was finally able to pick up my copy of 'Raised Embroidery: Techniques, projects and pure inspiration' from the bookstore! It is the latest addition to the highly successful Search Press series of embroidery books from the Royal School of Needlework. And this one was written by Kelley Aldridge: my first tutor at the Royal School of Needlework. My embroidery life evolving thereafter is in a way all her fault :). Let's have an in depth look at this latest addition to my ever expanding embroidery book collection! What I really like about this book, even before opening it, it has the new larger format. The first eight books in the series were rather small (c. A5). At around 100 pages they were perfect for beginners, but had little to offer for more experienced embroiderers. This book has 144 pages and is about A4 in size. And Kelley makes excellent use of this larger canvas! As with all books in this series, the book starts with a short promotional story on the RSN. Then it carries on with an explanation of what raised embroidery is. It immediately clarifies that it is not only about 17th century stumpwork techniques modified for the 21st century stitcher. The book also looks at textured embroidery stitches known from for instance Brazilian embroidery. Having clarified the scope of the book, Kelley carries on with a short historical overview. As the aim of the book is to have you stitching, the part on choosing the right materials, from needles, to fabric, threads, frames and other tools, is much more elaborate. And explores some fun stuff you might not have thought to incorporate into your next masterpiece. What I find absoluteley fantastic about this particular book: it has a whole section devoted to 'Inspiration and Design'. Here you can look Kelley over her shoulder to see how she comes up with her raised embroidery designs. It starts very basic with choosing the size and shape of your future piece, its function and selecting the materials you want to incorporate. However, Kelley also reveals that she is a great fan of using mood boards to come up with embroidery design ideas. This section is absolutely perfect for those stitchers who find it hard to find the confidence to create their own pieces. Kelley clearly demonstrates a quite structured way of creating and subsequently stitching your own design. This can, of course, be applied to all forms of needlework! And, true to her training at the Royal School of Needlework, she strongly advocates that you think the piece over carefully before you start. Think about the order of work before you start. It greatly increases your stitching pleasure as you probably do not have to deal with 'road blocks' which often lead to another AMP (abandoned masterpiece). However, thinking it over does not mean that the process is now set in stone! Oh no, you can still tinker and tweak. It just reduces the risk of producing a roof without supporting walls :). As already seen in the other books in this series, this one also contains a whole section on how to dress your hoop or slate frame, transfer your design onto fabric and starting and ending threads. Followed by sections on commonly used padding techniques, attaching stitches (think couching and Sisha), raised stitches, needle lace and creating wired shapes. This section provides a beginner to intermediate stitcher with enough tools to start stitching. The 'second part' of the book is devoted to easy to follow step-by-step embroidery projects and pure inspiration from contemporary embroiderers. It kicks off with wearable raised embroidery and a project to make a lovely colourful brooch. I really love this piece as it shows you different ways of using common materials and stitches. It provided me with a real 'oh, I never thought of that (but from now on I will!)'. The following pages are filled with brooches, cuffs, necklaces and fascinators made by such talented people like: Lisa Bilby, Helen Richman & Jen Goodwin. Next up are the 'useable raised embroideries' with a project to make a sleeve for your phone. You are walked through this project from the start of the design stage right up to finished product. This is what makes this book so good! And the project pages are again followed by pages full of pure eye-candy featuring outstanding embroidered boxes to store needlework supplies, an embroidered book cover and a stunning fully three-dimensional embroidered bird etui by Jenny Adin-Christie. So proud that my, simple in comparison, RSN-Diploma box 'Hansel & Gretel' is on the mirroring page! And last but not least, are the 'collectible raised embroideries' with a funny biscornu as the step-by-step project. The last pages of the book are filled with stunning embroidered objects by such talented people as Angela Bishop, Kate Barlow, Victoria Laine, Holly Coleman, Hattie McGill, Elena Thornton, Laura Baverstock, Stella Davies and Kelley Aldridge herself.
This book is a real treat! And equally so for beginners right up to very experienced stitchers. The large number of embroidered pieces by artists trained to a very high standard at the Royal School of Needlework makes this book to a must-have addition for your embroidery library. As always, please support your local bookstore if you can. Mine here in Germany was able to order the book for me within days for as little as €18,99. I consider this a bargain and am sure that I will treasure this gem for years to come. Thank you Kelley for writing such an inspiring embroidery book! P.S. I wasn't able to find personal websites for all the above mentioned artists. If you know of one, please leave a comment below and I will update this post accordingly! My love for embroidery stems from the fact that I like to work creatively with my hands. But equally important, I love the fact that I am part of a very old tradition. And last but not least, I have a love for beautiful and elegant things. When I teach embroidery, I foremost want to transmit a technique. It is important to me that my students learn to execute the technical part of an embroidery technique well. That's the way I was trained at the Royal School of Needlework and it suits my personality. With my embroidery kits I try to think of an innovative way to use an ancient embroidery technique. I want you to be able to create a stunning piece of embroidery to go up on your wall. My beetle wing goldwork and stumpwork beetles are a good example of this concept. The latest addition to my series of embroidery kits is the 'Elegant Butterfly'. This kit has a modern take on Schwalm embroidery. Originally, Schwalm embroidery is a form of whitework from the Hessian region of Germany. You can read all about it on Luzine Happel's blog. She is a master craftswoman regarding this lovely technique. Don't be put off by the term whitework. It is nothing like the very fine embroidery seen on handkerchiefs or the like. Think more Hardanger embroidery. But then less geometrical in its shapes. Schwalm is usually floral, uses chain stitch, buttonhole stitch and coral stitch extensively. And, best off all in my opinion, comes with hundreds of different geometrical filling stitches! You won't be easily bored and it is relatively easy on your eyes. My elegant butterfly uses the traditional cotton a broder #25 used in Schwalm embroidery. You'll stitch on beautiful 40ct Zweigart Newcastle linen. That's the traditional part of my design. I've also added in DMC Diamant metallic thread and hand-dyed silken chenille by the Thread Gatherer. A perfect opportunity for you to play a little with these speciality threads. Furthermore, I've discovered that traditional Schwalm embroidery and the wired-shapes technique used in stumpwork embroidery are a match made in heaven. Pair your finished and mounted elegant butterfly embroidery with a Ribba frame from IKEA and you have stunning unique and hand-made home-decoration!
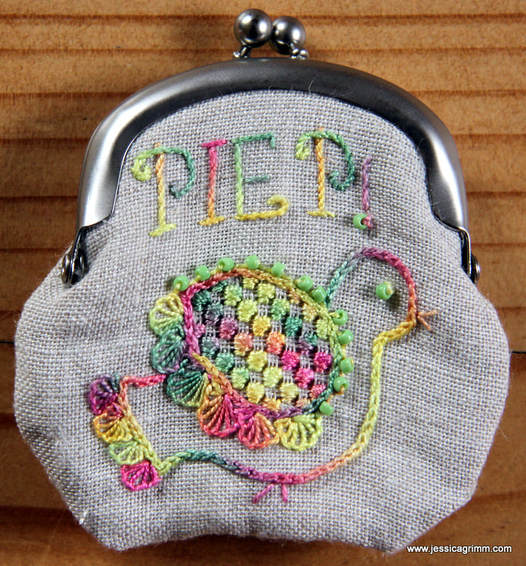
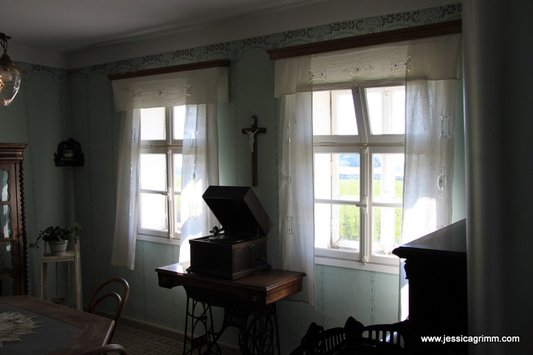
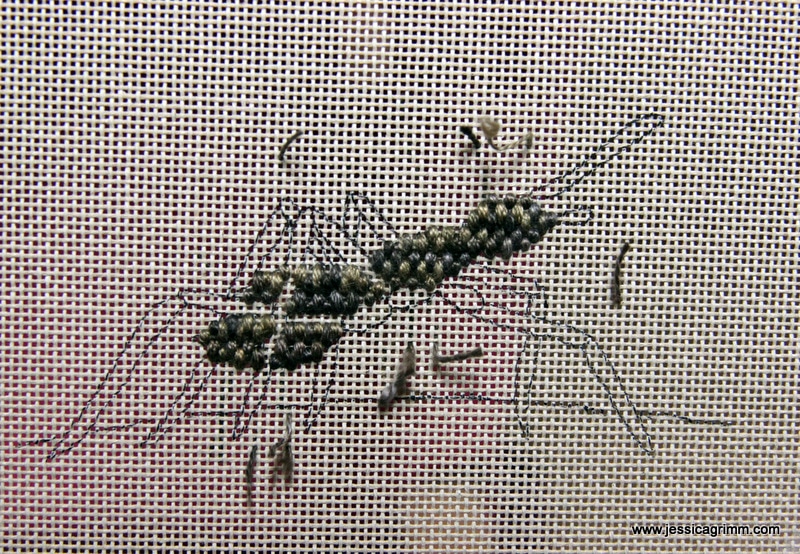
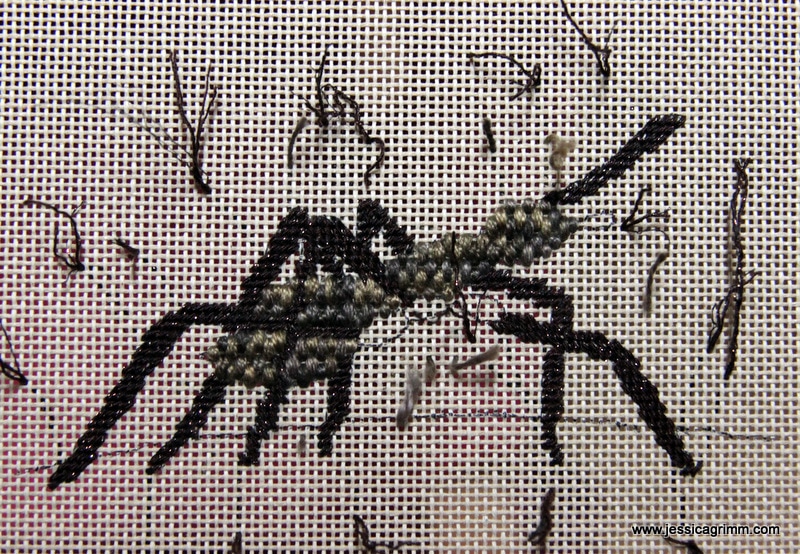
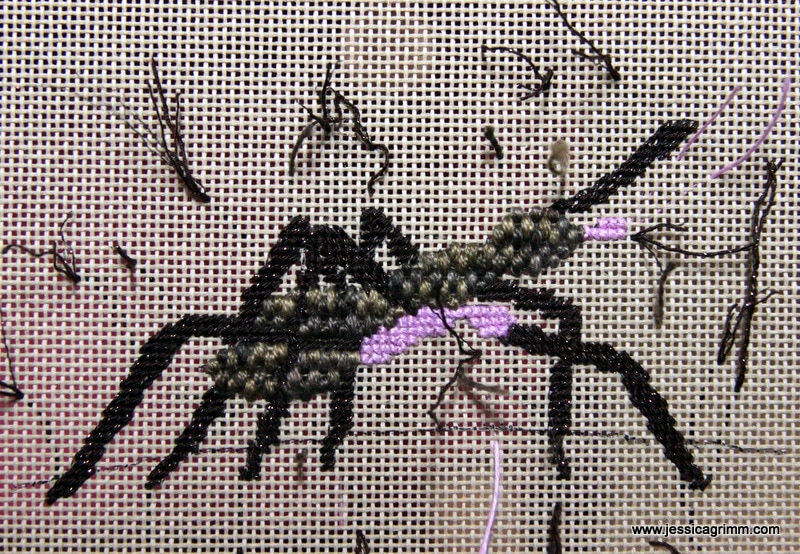
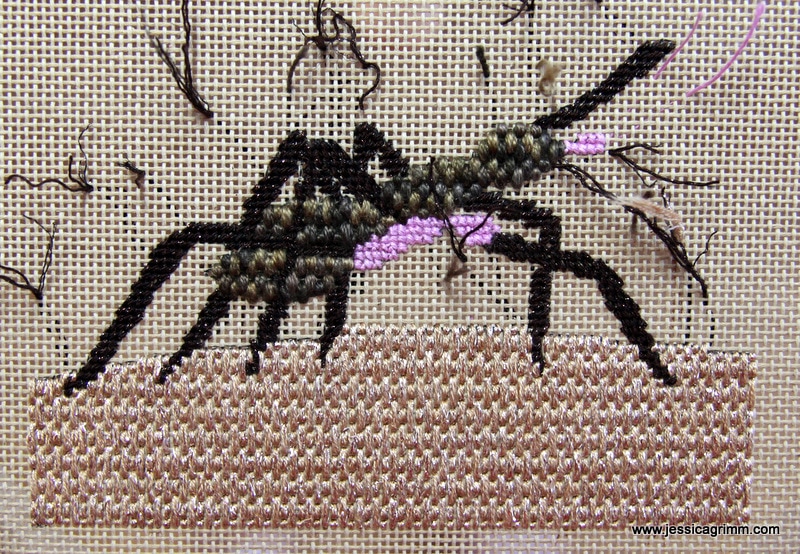
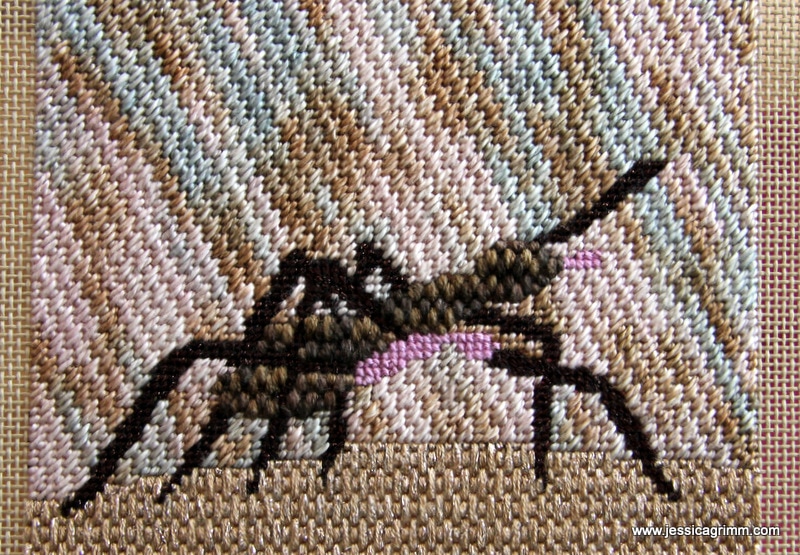
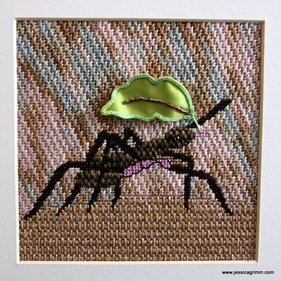
Happy start of the week dear reader! I am back from a week full of wonderful sight-seeing with my family. And one of the sites we visited was the Bauernhofmuseum in Illerbeuren. A pretty open air museum showcasing farm life from the Swabia area of Germany. And of course, there was some lovely embroidery on display as well. Mostly on household linens and mainly involving monogramming and whitework embroidery. How about these gorgeous Richelieu embroidered curtains featured in an inn? In between family commitments, I sneaked in enough embroidery moments to complete my next broderibox project. The broderibox is a monthly embroidery threads subscription put together by the lovely people of Nordic Needle. This month's box contained: five embroidery threads, beads and a purse clasp. Since the threads had a lot of browns in them; an ant sprang to my mind. Lucky for me, the amazing Millie Marotta has drawings of ants included in her colouring-in book 'Wild Savannah'. As many of you probably know, canvaswork or needlepoint embroidery is stitched front to back. Or: object first, background later. Now be good and do not ever do that with your silk shading ;)! So, in this case, I started with my ant. She is called Truus de Mier, by the way. A favourite ant from a children's tv-show in the Netherlands. For Truus' body, I used a variegated perle #8 by Valdani. I really wanted to try this brand of embroidery threads. It worked a treat! No 'typical-low-grade-Eastern-European-Quality' here. As I wanted Truus to have a little 'body' to her body, I used the raised spot to fill it. As this stitch required me to pass 8-times through the same hole, I expected the thread to wear beyond pretty. But it didn't. They surely do know how to produce a fine perle in Romania! Next up were Truus' legs. I stitched them in tent stitch and used both directions for different legs. This made the whole thing a little less tangled-up when legs crossed. The legs were stitched using Vineyard Silk shimmer. It is a silk thread with a shimmering filament added. It does not have a nice feel and it unfortunately stitched accordingly. A bit disappointing as I really liked the previous 100% silk threads by Vineyard Silk! Apparently, ants have segmented legs that start with a bit of a bulky part. And ants have a mouth piece with which they cut leaves in handy transportable portions. Since this month's broderibox had a violet Londonderry linen thread in it, I decided to use it to stitch these parts in cross-stitch. Lovely thread! I do stitch some whitework embroidery with linen threads and really love it. That's Ms Truus de Mier sorted. On to the background. I decided to stitch the earth on witch Truus walks with Silk Lame Braid by Rainbow Gallery. Despite it being a silk thread mixed with metalized polyester and some rayon, it felt and stitched fantastically. Very well suited for the vertical Parisian stitch. As the variegated cotton thread Watercolours by Caron had some blue in it, that was going to be turned into the sky. I separated the three plies and stitched the diagonal Cashmere stitch with one ply. I really love these cotton threads by Caron! They are so soft and hold up so well whilst stitching on canvas.
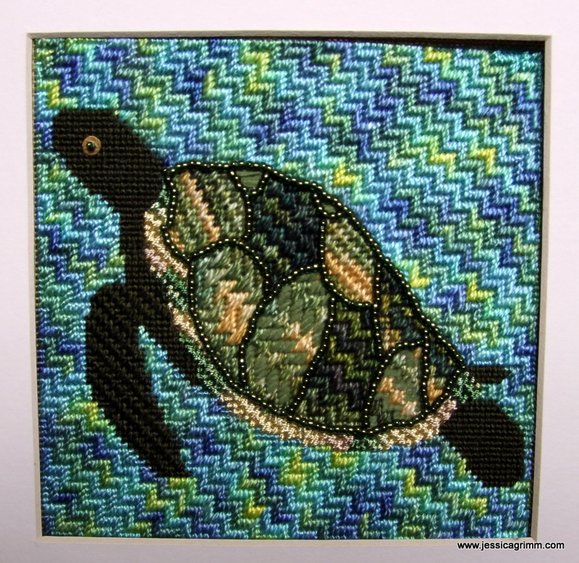
To finish my Truus de Mier, I decided that she needed a bright green stumpwork leaf. I wired a piece of dupion silk backed with calico. The buttonhole edging was stitched using a #12 House of Embroidery perle from my stash. I added the Mill Hill magnifica beads provided in the broderibox to my leaf. Subsequently, I stitched a few beads onto Truus for an eye. And that's another broderibox project finished satisfactorily! P.S.: Us dummies did take the camera with us to the Bunter Markt craft fair in Wessobrunn on Sunday, however, we forgot to take a picture of our stand... On the up-side, we did manage to sell two pendants and shed a few flyers and business cards! Like most of my dear readers, I love thread! The ordinary everyday threads and the speciality threads, monocolour, over-dyed, variegated. You name it; I'll drool. So, when Mary Corbet talked about the BroderiBox 2017 by Nordic Needle, I signed up. Full well knowing that this would mean a monthly trip to the customs office in Weilheim. Ah, what one does for a good thread! So when, early February, I was finally 'invited' to pick up (and pay for!) my January box, I was ecstatic. Quite to the bemusement of the customs officer... Back home, I gleefully inspected my threads and was delighted to find a few I had never encountered before. Since they were all green, I decided to stitch a quick turtle on canvas. I think canvas (also known as needlepoint) is a great embroidery technique to experiment with speciality threads. Anything goes! Just the green turtle on bare canvas was a bit..., well, bare! So I decided to give turtle swimming lessons. The background was stitched using a House of Embroidery perle #5. A single thread has exactly the right thickness to cover 18 TPI canvas. How clever is that?! |
Want to keep up with my embroidery adventures? Sign up for my weekly Newsletter to get notified of new blogs, courses and workshops!
Liked my blog? Please consider making a donation or becoming a Patron so that I can keep up the good work and my blog ad-free!
Categories
All
Archives
July 2024
|
Contact: info(at)jessicagrimm.com
Copyright Dr Jessica M. Grimm - Mandlweg 3, 82488 Ettal, Deutschland - +49(0)8822 2782219 (Monday, Tuesday, Friday & Saturday 9.00-17.00 CET)
Impressum - Legal Notice - Datenschutzerklärung - Privacy Policy - Webshop ABG - Widerrufsrecht - Disclaimer
Copyright Dr Jessica M. Grimm - Mandlweg 3, 82488 Ettal, Deutschland - +49(0)8822 2782219 (Monday, Tuesday, Friday & Saturday 9.00-17.00 CET)
Impressum - Legal Notice - Datenschutzerklärung - Privacy Policy - Webshop ABG - Widerrufsrecht - Disclaimer



 RSS Feed