|
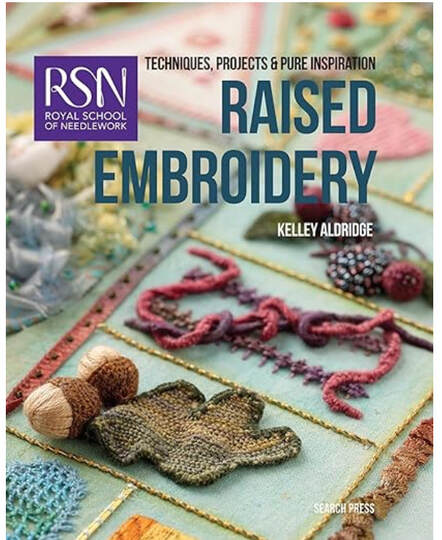
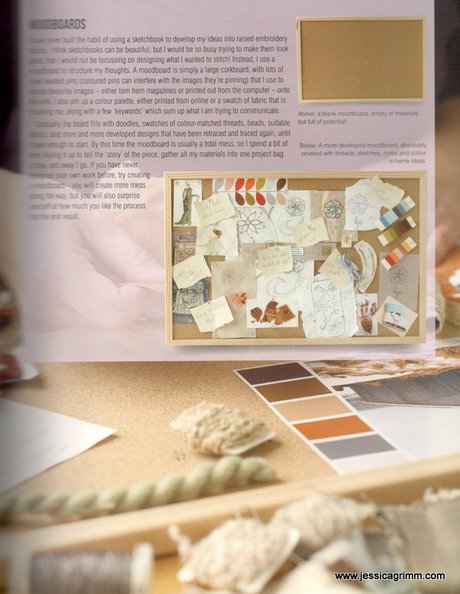
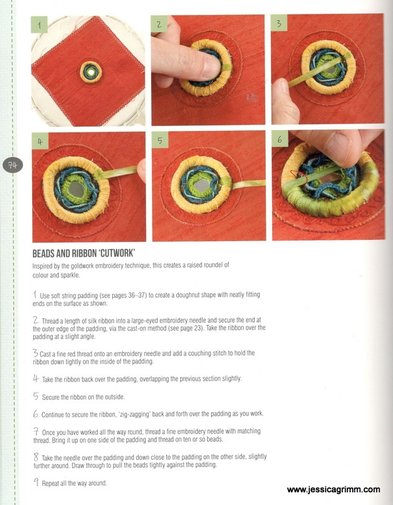
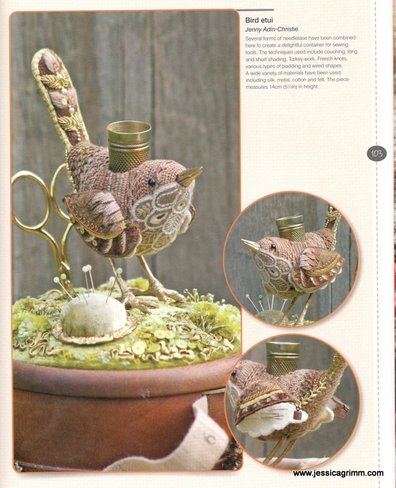
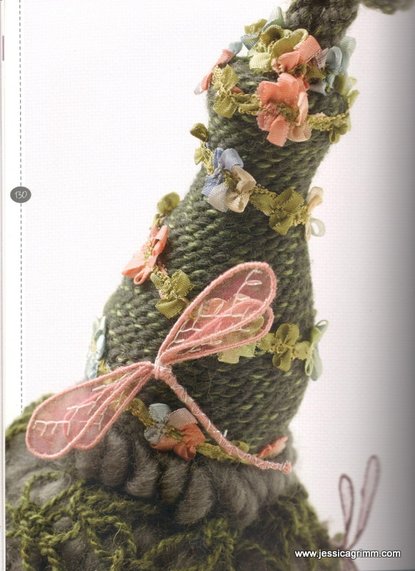
Last week, I was finally able to pick up my copy of 'Raised Embroidery: Techniques, projects and pure inspiration' from the bookstore! It is the latest addition to the highly successful Search Press series of embroidery books from the Royal School of Needlework. And this one was written by Kelley Aldridge: my first tutor at the Royal School of Needlework. My embroidery life evolving thereafter is in a way all her fault :). Let's have an in depth look at this latest addition to my ever expanding embroidery book collection! What I really like about this book, even before opening it, it has the new larger format. The first eight books in the series were rather small (c. A5). At around 100 pages they were perfect for beginners, but had little to offer for more experienced embroiderers. This book has 144 pages and is about A4 in size. And Kelley makes excellent use of this larger canvas! As with all books in this series, the book starts with a short promotional story on the RSN. Then it carries on with an explanation of what raised embroidery is. It immediately clarifies that it is not only about 17th century stumpwork techniques modified for the 21st century stitcher. The book also looks at textured embroidery stitches known from for instance Brazilian embroidery. Having clarified the scope of the book, Kelley carries on with a short historical overview. As the aim of the book is to have you stitching, the part on choosing the right materials, from needles, to fabric, threads, frames and other tools, is much more elaborate. And explores some fun stuff you might not have thought to incorporate into your next masterpiece. What I find absoluteley fantastic about this particular book: it has a whole section devoted to 'Inspiration and Design'. Here you can look Kelley over her shoulder to see how she comes up with her raised embroidery designs. It starts very basic with choosing the size and shape of your future piece, its function and selecting the materials you want to incorporate. However, Kelley also reveals that she is a great fan of using mood boards to come up with embroidery design ideas. This section is absolutely perfect for those stitchers who find it hard to find the confidence to create their own pieces. Kelley clearly demonstrates a quite structured way of creating and subsequently stitching your own design. This can, of course, be applied to all forms of needlework! And, true to her training at the Royal School of Needlework, she strongly advocates that you think the piece over carefully before you start. Think about the order of work before you start. It greatly increases your stitching pleasure as you probably do not have to deal with 'road blocks' which often lead to another AMP (abandoned masterpiece). However, thinking it over does not mean that the process is now set in stone! Oh no, you can still tinker and tweak. It just reduces the risk of producing a roof without supporting walls :). As already seen in the other books in this series, this one also contains a whole section on how to dress your hoop or slate frame, transfer your design onto fabric and starting and ending threads. Followed by sections on commonly used padding techniques, attaching stitches (think couching and Sisha), raised stitches, needle lace and creating wired shapes. This section provides a beginner to intermediate stitcher with enough tools to start stitching. The 'second part' of the book is devoted to easy to follow step-by-step embroidery projects and pure inspiration from contemporary embroiderers. It kicks off with wearable raised embroidery and a project to make a lovely colourful brooch. I really love this piece as it shows you different ways of using common materials and stitches. It provided me with a real 'oh, I never thought of that (but from now on I will!)'. The following pages are filled with brooches, cuffs, necklaces and fascinators made by such talented people like: Lisa Bilby, Helen Richman & Jen Goodwin. Next up are the 'useable raised embroideries' with a project to make a sleeve for your phone. You are walked through this project from the start of the design stage right up to finished product. This is what makes this book so good! And the project pages are again followed by pages full of pure eye-candy featuring outstanding embroidered boxes to store needlework supplies, an embroidered book cover and a stunning fully three-dimensional embroidered bird etui by Jenny Adin-Christie. So proud that my, simple in comparison, RSN-Diploma box 'Hansel & Gretel' is on the mirroring page! And last but not least, are the 'collectible raised embroideries' with a funny biscornu as the step-by-step project. The last pages of the book are filled with stunning embroidered objects by such talented people as Angela Bishop, Kate Barlow, Victoria Laine, Holly Coleman, Hattie McGill, Elena Thornton, Laura Baverstock, Stella Davies and Kelley Aldridge herself.
This book is a real treat! And equally so for beginners right up to very experienced stitchers. The large number of embroidered pieces by artists trained to a very high standard at the Royal School of Needlework makes this book to a must-have addition for your embroidery library. As always, please support your local bookstore if you can. Mine here in Germany was able to order the book for me within days for as little as €18,99. I consider this a bargain and am sure that I will treasure this gem for years to come. Thank you Kelley for writing such an inspiring embroidery book! P.S. I wasn't able to find personal websites for all the above mentioned artists. If you know of one, please leave a comment below and I will update this post accordingly!
8 Comments
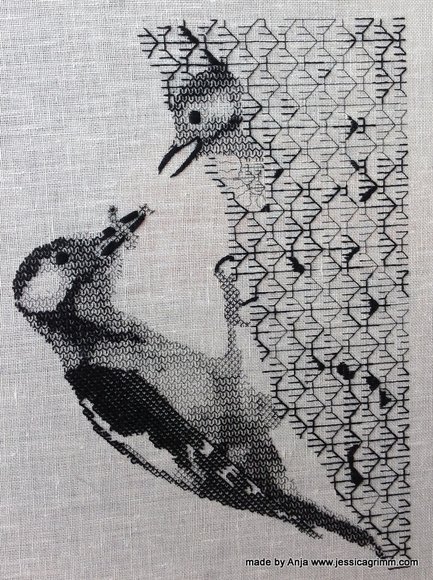
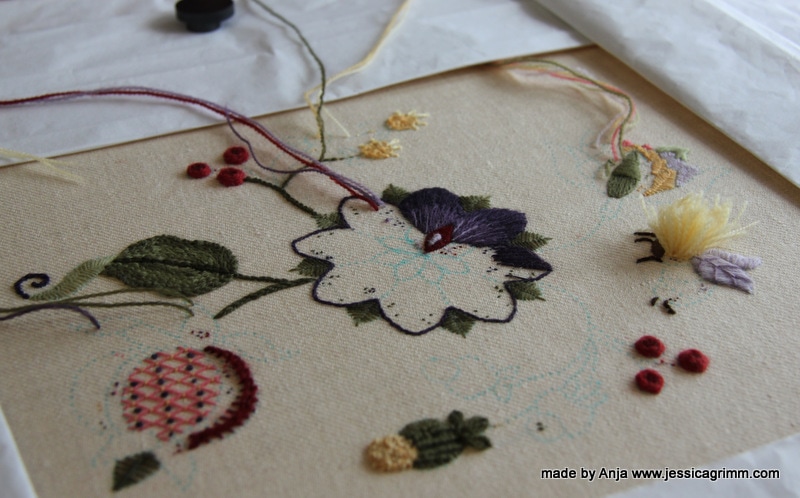
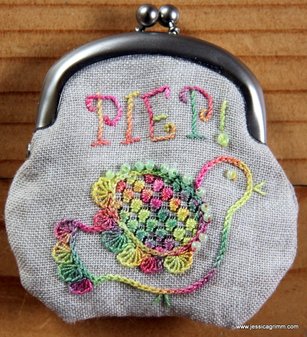
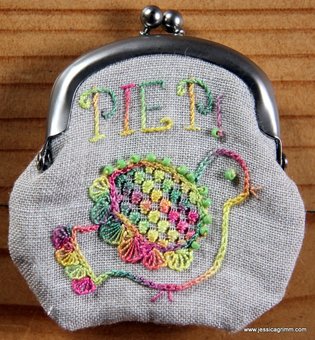
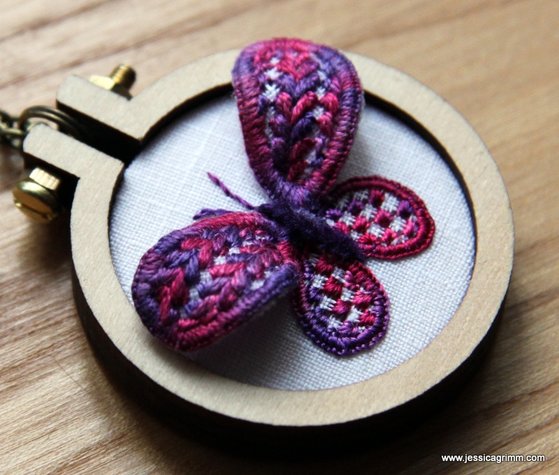
Today I am going to share some lovely embroidery pieces with you. We'll start off with the work of one of my students, then we'll have a look at some new pieces I made and we'll finish with a new initiative to bring Mastercrafts People together. Let's start with a stunning blackwork piece: This piece has been embroidered by Anja from the Netherlands. She started it last year during one of my week-long embroidery retreats. Anja worked from a picture and translated the different textures and shades beautifully into blackwork's geometric patterns. Anja will add some white highlights to the eyes to make the birds even more life-like. I so enjoy seeing a finished piece which started under my tuition! Next up is another piece by Anja. She started it last week during another one of my embroidery retreats. We had great fun designing this piece by using a piece by Hazel Blomkamp as the base. Then we added two flowers from a colouring book by Millie Marotta and a pomegranate from an older embroidery book. Just to illustrate that you don't need to be able to draw your own design from scratch. Mix and match often produces a stunning new design. I have a feeling this piece will turn out great as well! As most of you know by now, I have a subscription to the Broderibox by Nordic Needle. Although I used all threads present in the May box, I wasn't sure what to do with the purse clasp. I am an embroideress and I can mount a finished piece satisfactorily. However, I am not good at finishing. Mainly because I do it so rarely. Time to change that! There are so many lovely products out there to turn your embroidery into something other than a framed picture. Time to become acquainted with the clasp. Luckily for me, there was a website listed on the back of the clasp's packaging: Zakka Workshop. Do visit their website as they have some adorable stuff on there. And best of all, they have a really good Youtube video on how to install the clasp. As I wasn't confident that I could come up with the right size embroidered purse, I ordered their instructions for the simple patchwork pouch. It provided me with a template for the purse and then it was just a matter of adding a cute bird, do some Schwalm embroidery, add some beads and best of all: use a House of Embroidery hand-dyed perle #12 in a colour combination that's totally out of your comfort zone :). Worked a treat so far. Installing the clasp wasn't as easy as the video makes you believe. Especially not as I've probably used the wrong interfacing between the embroidery and the lining of the purse. Mine is probably too thick/stiff. That's the challenge when using instructions from another country. However, I am quite pleased with the result! Another great way to finish your embroidery is to use a tiny wooden hoop by Dandelyne. Since I really like my Schwalm butterfly, I wondered if I could shrink the piece enough to go into a 4cm hoop. Guess what? I could! I used a combination of House of Embroidery hand-dyed fine silk and raw silk as well as paper covered wire to stiffen the upper-wings. I've now worn the piece around my neck for two days straight (I did put it down for sleeping...) and it holds up beautifully. By the way, you can get your Dandelyne hoops here in Germany from the lovely Nadine from Zur lila Pampelmuse. That's where I got mine :).
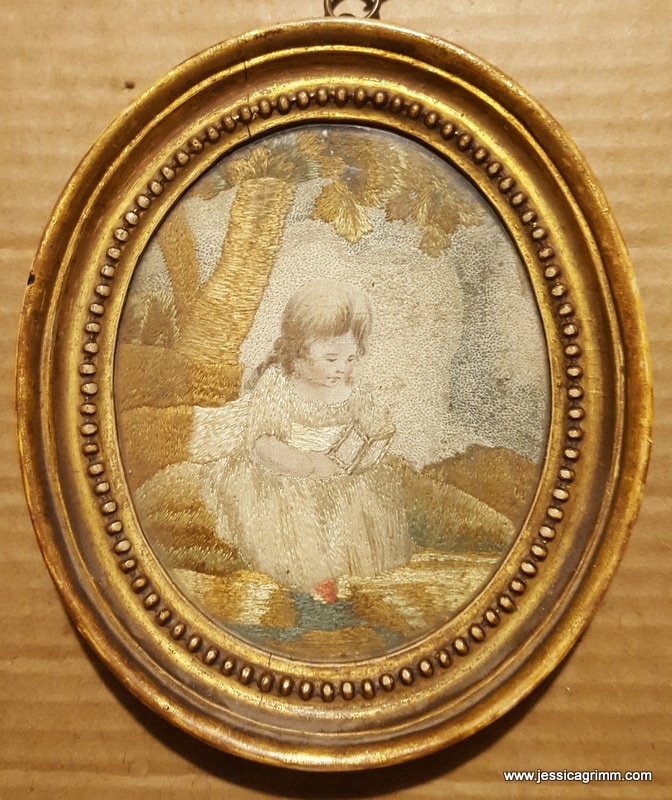
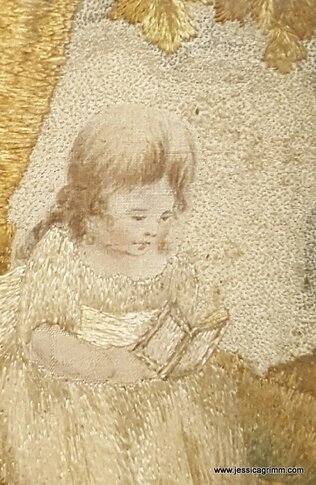
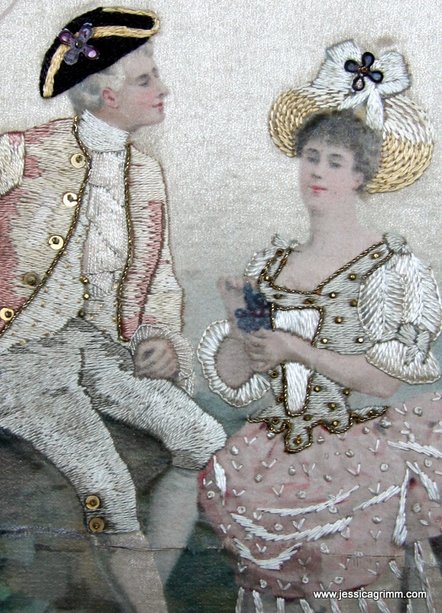
Remember the mystery flea market find from the Netherlands I showed you two weeks ago? Elaine Cochrane wrote me an email to tell me that she had a similar piece from England. Hand-painted details with silk embroidery on a silk background. This is Elaine's piece: By now, Google was finally producing some useful results too! Auction websites list several pieces called 'silk embroidery sampler or tapestry' which look very similar to Elaine's piece. The very fine seeding stitches covering the background are called stipple work by the antique dealers. Pieces are either listed as of French or English origin. Some pieces are rather large and others are of the oval type seen above. The quality of the stitching differs widely, as do the materials used. Some use only silk threads, others add gold threads and chenille. If you would like to explore these auction listings for yourself, ask Google for 'Georgian silk embroidery'. Now what are these pieces and who made them? Well, thanks to the fabulous blog Austenonly I learned that they were made by women in the late 18th and early 19th centuries. It was a time when women did mostly not receive a sound academic education and were instead send to a ladies' academy. Here, the young daughters of the upper-class were taught ladies accomplishments such as etiquette, music and needlework. A famous woman who hated this type of education was Dr. Aletta Jacobs, the first Dutch woman to be enrolled at a university.
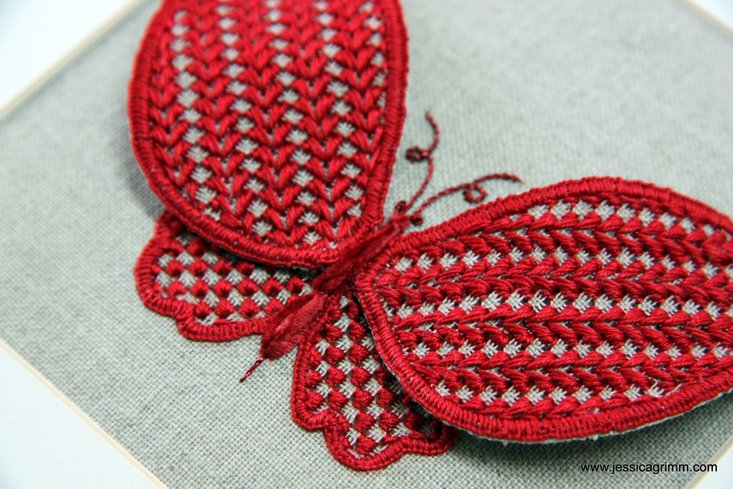
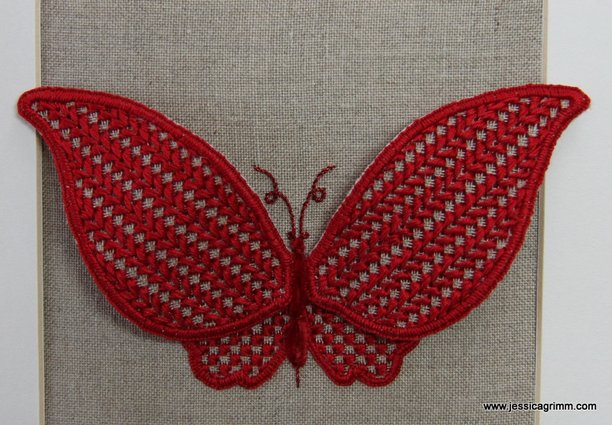
I am wondering if these fine ladies painted the background of these silks themselves. Or were they supplied with painted silks and then embellished them with stitches? In that case: who were the painters? It seems to me that it is quite a niche market and thus more likely that these painted silks were a side-kick of another industry. Your thoughts on that are greatly appreciated! With regard to the scene depicted on my flea market piece, Rachel from VirtuoSew Adventures had an interesting thought: what if it depicts gentry playing countryside? It was a fashionable past-time at the end of the 18th century. Most famous for the Hameau de la Reine; a peasant village built near Versailles for Queen Marie-Antoinette. She and her court could live the simple life there. Quite a possibility. Comparing Elaine's piece and the pieces on the auction sites on the one hand and my piece on the other, does show that the style is quite different. The general idea is the same: silk embroidery on a painted silk background. An explanation for the difference in style could be its Dutch origin or my piece could be of a different (probably younger) date. Unfortunately, I am not able to find any Dutch finds on the internet. So if there is anybody out there with a suggestion where I could go and ask for information, please leave a comment! My love for embroidery stems from the fact that I like to work creatively with my hands. But equally important, I love the fact that I am part of a very old tradition. And last but not least, I have a love for beautiful and elegant things. When I teach embroidery, I foremost want to transmit a technique. It is important to me that my students learn to execute the technical part of an embroidery technique well. That's the way I was trained at the Royal School of Needlework and it suits my personality. With my embroidery kits I try to think of an innovative way to use an ancient embroidery technique. I want you to be able to create a stunning piece of embroidery to go up on your wall. My beetle wing goldwork and stumpwork beetles are a good example of this concept. The latest addition to my series of embroidery kits is the 'Elegant Butterfly'. This kit has a modern take on Schwalm embroidery. Originally, Schwalm embroidery is a form of whitework from the Hessian region of Germany. You can read all about it on Luzine Happel's blog. She is a master craftswoman regarding this lovely technique. Don't be put off by the term whitework. It is nothing like the very fine embroidery seen on handkerchiefs or the like. Think more Hardanger embroidery. But then less geometrical in its shapes. Schwalm is usually floral, uses chain stitch, buttonhole stitch and coral stitch extensively. And, best off all in my opinion, comes with hundreds of different geometrical filling stitches! You won't be easily bored and it is relatively easy on your eyes. My elegant butterfly uses the traditional cotton a broder #25 used in Schwalm embroidery. You'll stitch on beautiful 40ct Zweigart Newcastle linen. That's the traditional part of my design. I've also added in DMC Diamant metallic thread and hand-dyed silken chenille by the Thread Gatherer. A perfect opportunity for you to play a little with these speciality threads. Furthermore, I've discovered that traditional Schwalm embroidery and the wired-shapes technique used in stumpwork embroidery are a match made in heaven. Pair your finished and mounted elegant butterfly embroidery with a Ribba frame from IKEA and you have stunning unique and hand-made home-decoration!
|
Want to keep up with my embroidery adventures? Sign up for my weekly Newsletter to get notified of new blogs, courses and workshops!
Liked my blog? Please consider making a donation or becoming a Patron so that I can keep up the good work and my blog ad-free!
Categories
All
Archives
July 2024
|
Contact: info(at)jessicagrimm.com
Copyright Dr Jessica M. Grimm - Mandlweg 3, 82488 Ettal, Deutschland - +49(0)8822 2782219 (Monday, Tuesday, Friday & Saturday 9.00-17.00 CET)
Impressum - Legal Notice - Datenschutzerklärung - Privacy Policy - Webshop ABG - Widerrufsrecht - Disclaimer
Copyright Dr Jessica M. Grimm - Mandlweg 3, 82488 Ettal, Deutschland - +49(0)8822 2782219 (Monday, Tuesday, Friday & Saturday 9.00-17.00 CET)
Impressum - Legal Notice - Datenschutzerklärung - Privacy Policy - Webshop ABG - Widerrufsrecht - Disclaimer



 RSS Feed