|
Last year, I visited the CIETA conference in Switzerland and we made a field trip to the Bernisches Historisches Museum. It has a large permanent display of medieval textiles well worth a visit. One of the many beautiful pieces is a large two-part antependium made in Vienna around AD 1340-1350. It was gifted by Albert II, Duke of Austria (AD 1298-1358) to the abbey of Königsfelden (now in Switzerland) where his sister, Agnes of Austria (AD 1281-1364) resided. Very kind of him, indeed. It is a stunning piece of embroidery and very well preserved. Let's explore! 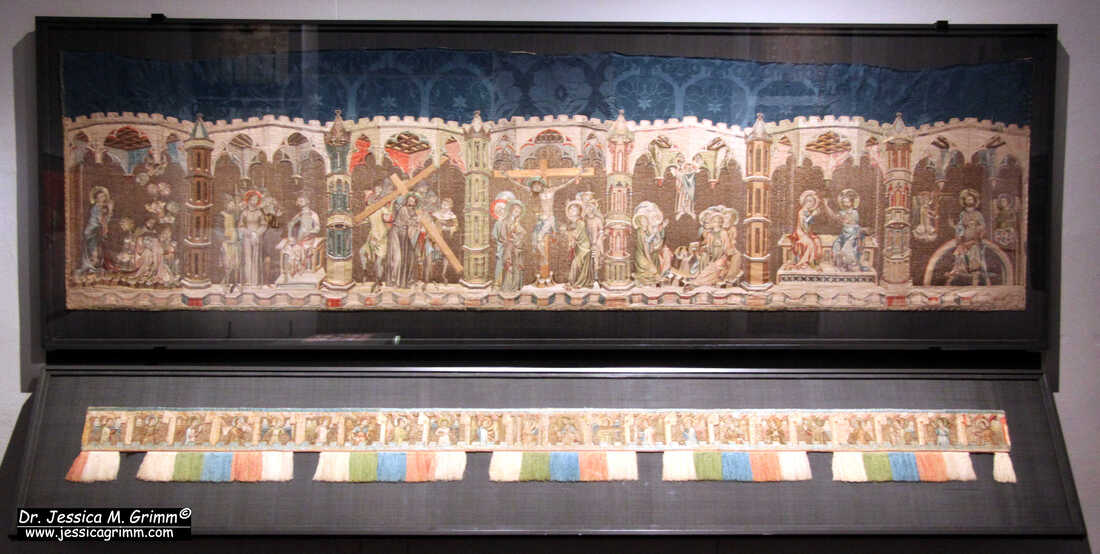 Königsfelden Antependium (c. AD 1340-1350), Bernisches Historisches Museum Inv. 27 & 51. The antependium consists of a larger part (90 x 318 cm) with seven scenes from the life of Jesus. From left to right we see: Gethsemane, Christ in front of Pilate, Christ carrying the cross, Crucifixion, Ascension, Crowning of the Virgin and Christ in Majesty. And a smaller band (18 x 292 cm (cut)) with angels surrounding Mary and Jesus in the middle. 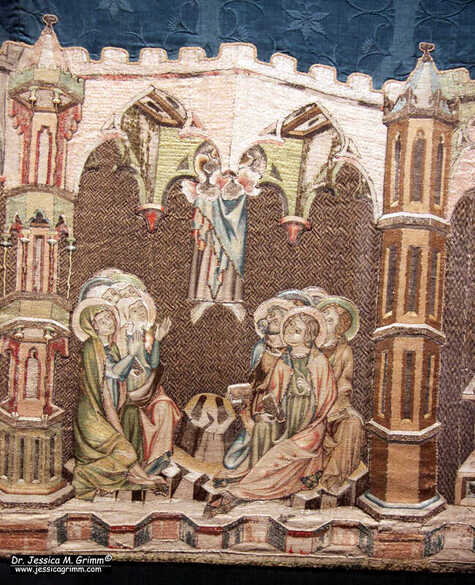 Ascension scene, Königsfelden Antependium (c. AD 1340-1350), Bernisches Historisches Museum Inv. 27 & 51. My personal favourite is this Ascension scene. I just love the naive way this is depicted in medieval art. And this is a particularly detailed depiction. We even have the footprints :).  Angel clapping its hands, Königsfelden Antependium (c. AD 1340-1350), Bernisches Historisches Museum Inv. 27 & 51. The smaller band with the angels is really lovely. Two of the angels are playing string instruments. Two others are carrying what looks like a tall white candle. The rest is having a blast. They seem to dance and clap their hands to the music. They form a rich resource for anyone looking to work a medieval musical angel.
The embroidery itself is very fine. The under drawing on the linen is of high quality. The faces of the angels are worked in very fine directional split stitch in untwisted silk. The same technique is used in Opus anglicanum. The other parts of the angels are worked in slightly longer split stitches. Probably because they don't need to be as detailed as the faces. The noses seem to be a little bit padded. And I think they used a knotted stitch for the hair. And it seems that the silk in the halos is laid flat and then couched down. A few additional embellishments on the clothing are stitched in couched gold thread on top of the silk. The background is formed by couching down parallel rows of gold thread with a light-coloured silk. The diaper patterns are relatively simple for the angels but more elaborate for the scenes of the life of Jesus. All in all, the embroidery reminds me a lot of the embroidery made in Bohemia at the same time. This isn't too surprising as Vienna and Prague are relatively close. The Habsburg rulers and the Bohemian kings were also related by marriage and fighting for supremacy in the region. If you ever have the chance, do visit the Bernisches Historischen Museum in Bern, Switzerland. My Journeyman and Master Patrons will have access to many more pictures of this gorgeous embroidery. Literature Schuette, M., Müller-Christensen, S., 1963. Das Stickereiwerk. Wasmmuth, Tübingen. Stammler, J., 1891. Königsfelder Kirchenparamente im historischen Museum zu Bern, Berner Taschenbuch 40, p. 26-54.
3 Comments
Those of you who listen to the FiberTalk podcast will probably know that Gary and Beth have this thing going whereby they are not adding to their stash until June next year. Some (most?) of their listeners are predicting that their resolve will crumble very soon. I am of a different opinion. I think that they will last. They will just add another exception to their already very long list of exceptions:). And as always, they have no problem coming up with ways in which we, their loyal listeners, can spend our money. In my case, on a membership of the EGA. I was a Member at Large many years ago, but this wasn't really what I was looking for. I was missing out on connecting with a local chapter. Thanks to the pandemic and some promotion on FiberTalk, I am now a happy virtual member of the Day Lilies chapter in Medina, Ohio. I think this might be a solution for others too, so let me explain how it works.  Hybrid EGA chapter meeting on Zoom. For years, I have tried to set up stitching groups both in my native Netherlands and, once I moved, here in Germany. To no avail. Some ran for a while and then faltered as the commitment to travel, make time or spent a little bit of money was just not there. At other times, people just did not get along with each other and I had to dissolve the group. However, I very much like to stitch and chat! So, when Beth mentioned that some EGA chapters now offer Zoom meetings, I wondered if that could be the solution for me. After all, the EGA has been going for a while and has a strong structure in place. No inventing the wheel here. I contacted EGA and they were very helpful in helping me find a chapter with hybrid meetings at a time that's compatible with my time zone. I also preferred a small town/rural chapter as that would match better with where I live (a small village with 725 inhabitants). Last Thursday, I attended my very first 'local' chapter meeting. About 18 members live in the Medina library, two members Zooming in from Georgia and me Zooming in from Germany. Chapter President Angelia moderated us through the meeting and carried us through the room so that it really felt like we were there too. I did a quick screenshot to show you what that looked like. I made sure that Marie from Georgia ducked, and all others are only recognisable when you know them. It is just me staring into the camera like a deer into the headlights :). It turns out that another relatively new member has better cameras which we can use next time to make the experience even better. We are going to try that out on Thursday 13th of July during our Stitch in Public Day at the Medina Library. I will be there too; on a screen. 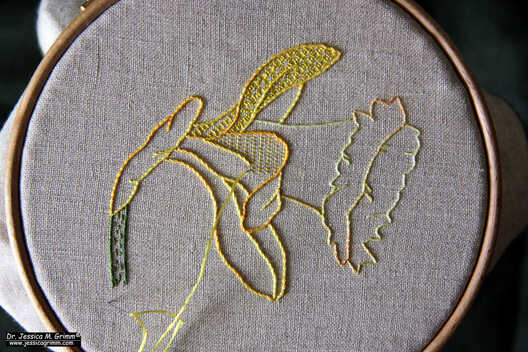 Blackwork Daffodil pattern by Bonnie Rhodes. Apart from meeting so many other stitchers, I also got to participate in a blackwork project. Bonnie, a Master Craftsman and member of my chapter, taught her blackwork daffodil design. This was the perfect opportunity for me to try my hand at something new. Yes, I had done blackwork before for my RSN Certificate and I have taught it many times for the RSN, but that's different. This time, I could play.
First of all, I changed the colours. I had never tried blackwork in colour and was wondering what that would look like. Furthermore, the way blackwork is taught at the RSN is very specific and not historically correct. Bonnie's approach is much more in line with historical blackwork. At first, this new approach was very hard for me to get my head around! In the instructions, Bonnie provides a sequence of diagrams that would make up a single blackwork filling pattern. You work layers of darning patterns on top of each other and that makes the pattern. At the RSN, you get a diagram of the complete pattern, and you are told to stitch that as economically as you can with as few 'wandering' threads on the back as you can. Not having a 'complete' diagram to work off was very hard for me at first. But it provided me with an alternative way of how to teach somebody how to 'read' these patterns. Not all students see the best stitching paths when confronted with a traditional diagram. And this is exactly why I still take classes and work kits. There is always something new to discover! |

Want to keep up with my embroidery adventures? Sign up for my weekly Newsletter to get notified of new blogs, courses and workshops!
Liked my blog? Please consider making a donation or becoming a Patron so that I can keep up the good work and my blog ad-free!

Categories
All
Archives
July 2024
|

 RSS Feed
Contact: info(at)jessicagrimm.com
Copyright Dr Jessica M. Grimm - Mandlweg 3, 82488 Ettal, Deutschland - +49(0)8822 2782219 (Monday, Tuesday, Friday & Saturday 9.00-17.00 CET)
Impressum - Legal Notice - Datenschutzerklärung - Privacy Policy - Webshop ABG - Widerrufsrecht - Disclaimer
Copyright Dr Jessica M. Grimm - Mandlweg 3, 82488 Ettal, Deutschland - +49(0)8822 2782219 (Monday, Tuesday, Friday & Saturday 9.00-17.00 CET)
Impressum - Legal Notice - Datenschutzerklärung - Privacy Policy - Webshop ABG - Widerrufsrecht - Disclaimer