|
This blog post is taking way longer to write than I intended. Sorry, I fell down a rabbit hole. And then another one :). I will find myself in both holes in the state library in Munich on Friday. What happened? As always, I think I have seen the same embroidery before, but when I look into it more deeply, things turn out not to be as similar as I thought. When we looked at the chasuble with embroidered scenes of the Life of Mary in the Kulturhistorisches Museum Magdeburg last week, I knew it belonged to a group of similar pieces. Were they all made around the same time in the same place? Or do subtle differences hint at multiple workshops in a much wider production area? Let's have a look.
Vestments with embroidered scenes from the Life of Mary contain different combinations of well-known events in Mary's life. These are usually: Annunciation, Visitation, Nativity, Adoration of the Magi and Circumcision. Other scenes might be the Presentation at the Temple, the Flight into Egypt, or the Dormition. To aid recognition, the scenes have been standardised. These embroideries were made in the 15th century and the early 16th century. Some embroideries are so similar that they hint at the use of block printing to transfer the design onto the embroidery linen. But how similar is similar? Above, you see three renditions of the Annunciation. In all three cases, Mary is standing behind a reading desk. However, the designs are so different that they do not stem from the same pricking or printing block. Interestingly, the majority of these embroideries omit the reading desk. This means that these three embroideries were using a similar model book that differed from the model book all the other producers of these embroideries used. Desk or no desk is thus probably a characteristic of a particular production area.  Diocesan Museum Brixen But now look more closely. Let's explore the embroidery techniques used. The background consists of a diaper pattern. In all three cases: an open basket weave in red silk (faded to pink in Görlitz). The background pattern also seems to be a defining criterion. Most pieces have these sunny spirals in the background. The difference between stitching a sunny spiral (no counting) and a diaper pattern (counting) is a fundamental one and results in a very different product (taste). Therefore, I think this is region-specific and not workshop-specific (i.e. I don't believe there were 'diapers' and 'spirals' in the same region).  Görlitzer Sammlungen 61-03b (Leihgabe der Ev. Innenstadtgemeinde im Kulturhistorischen Museum Görlitz) The embroidery materials used are pretty similar for all three pieces: linen fabric, gold threads and untwisted coloured silks. However, there is also gold gimp in two pieces. This is the composite thread that goes around the nimbus and along the edges of the clothing in the above picture. The embroidery from Brixen does not have this particular thread. I think that this was a thread that embroiderers made themselves. The edges in the Brixen piece are marked with embroidery. Maybe this specific workshop did not know how to make the thread or was just not keen on working with it.  Chasuble cross Te 154, Kulturhistorisches Museum Magdeburg. Now look at the filling of the nimbus. The pieces from Magdeburg and Görlitz show Italian couching (laid silk with a gold thread on top). A couple of months ago, I wrote a tutorial on this technique. The piece from Brixen shows a very different filling: a sunny spiral. Is this workshop specific due to the preference of the embroiderer, or is this due to local taste?
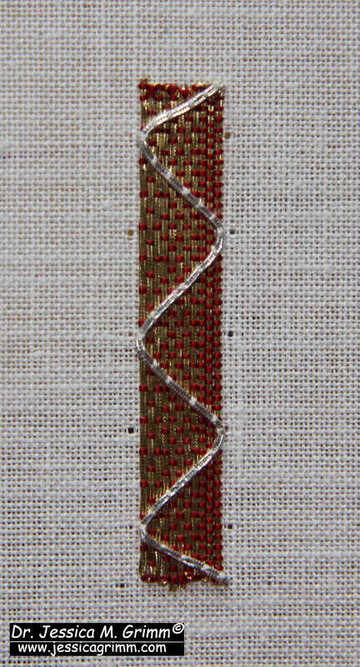
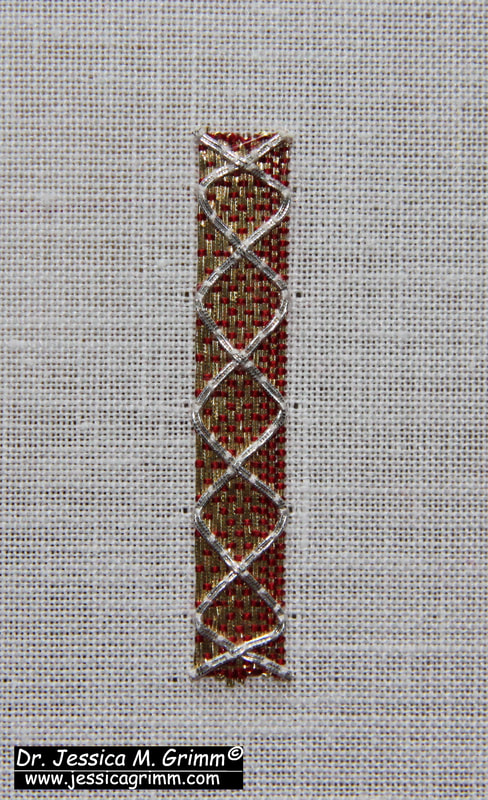
One thing that I think is workshop-specific is the border between the orphreys. This would be a perfect way for an embroiderer or an embroidery workshop to put their stamp onto their work. The borders consist of simple basket weave over string padding in all three cases. The border from Görlitz shows these very fancy triangles in silk and gold thread. If you would like to recreate it, have a look at the tutorial I made. I am collating all related pieces on a Padlet. With a bit of luck, groups will begin to form, and two or more pieces might come from the same workshop. In the future, art historians might be able to locate these groups in a specific region. My Journeyman and Master Patrons have access to this fascinating ongoing research.
1 Comment
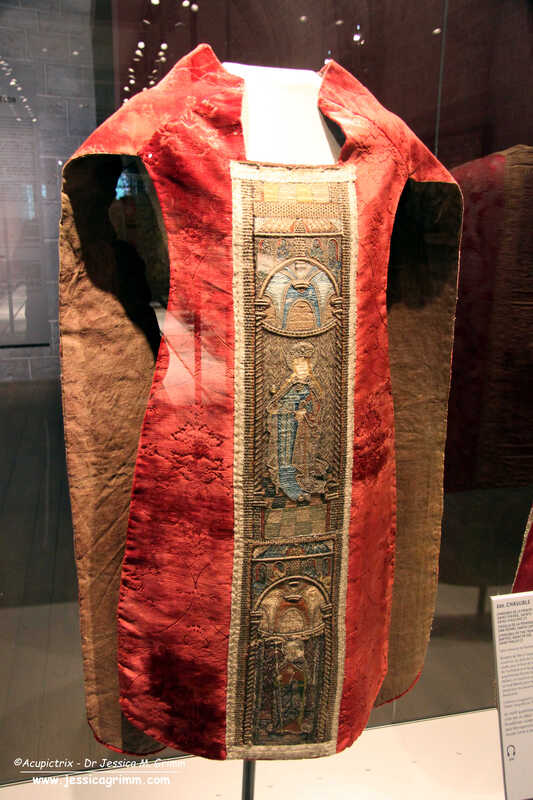
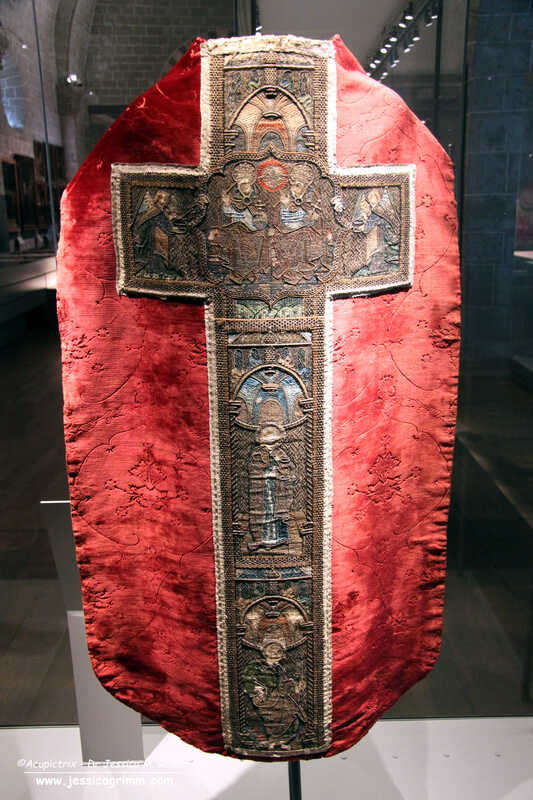
Before we dive into a new medieval embroidery topic, I must let you know that I had to postpone the sign-up date for the Medieval Goldwork Course. The production of the real gold threads has been delayed, and they won't be here on time. Due to various teaching commitments and the required travelling, the new sign-up date will be September 3rd 2024. I apologise for the delay! In the meantime, I am updating the course contents with lots of additional pieces, pictures, downloadable literature, and whatnot. This version will be the most comprehensive so far, offering even more in-depth knowledge. And as always, past students will have access to the updated course contents! Last week, Sabine Ullrich, curator of the Kulturhistorisches Museum Magdeburg, invited me to view a chasuble cross in storage. To my delight, Sabine came up with a few additional pieces for me to study. While there are currently no medieval embroideries on display in the museum, textile enthusiasts should visit as there are beautiful late-medieval and 16th-century tapestries on permanent display. The original chasuble cross I came for belongs to a group of German goldwork embroideries that depict the life of Mary. The scenes are standardised, not unlike the Virgo inter Virgines embroideries I told you about in an earlier blog post. The chasuble cross was made somewhere in the middle of the 15th century. Let's explore!  Chasuble cross Te 154, Kulturhistorisches Museum Magdeburg. Here you see the chasuble cross in question. It is kept under glass in a frame and thus difficult to photograph. Getting it out there requires a textile conservator and might damage the embroidery. It is not worth the risk and is unnecessary for my research. From the top, the cross shows the Nativity in the centre (according to the Revelation of St Bridget), with the Adoration of the Magi on the left and the donkey and the oxen on the right. Below is the Annunciation, followed by the Visitation at the bottom. The chasuble cross had been mounted onto a chasuble (also kept in the museum), and there is no corresponding column for the front with possible additional scenes.  Detail of the Visitation, Chasuble cross Te 154, Kulturhistorisches Museum Magdeburg. When you look at the damaged areas in the faces and the mantles of Mary and Elisabeth, you see that the whole embroidery is executed on two layers of linen. A course linen on the back and a fine linen on which the design was drawn or block printed. The gold threads are of the membrane type (probably with a linen core) and have completely oxidised to black. This embroidery once looked very different! Whilst the blues and the greens are still quite vivid, the orange has probably faded a lot. The silk embroidery on the clothing is of the very regular encroaching gobelin stitch type. The faces were originally stitched in tiny split stitches that followed the flow of the facial features. Just like in Opus anglicanum. Mary's long, flowing hair is a much messier affair. I think these are longer split stitches mixed with straight stitches.  Visitation, Chasuble cross Te 154, Kulturhistorisches Museum Magdeburg. Parts of the clothing of Mary and Elisabeth are worked in pairs of couched gold thread. The couching pattern is a simple bricking pattern with a light-coloured silken thread. The folds are accentuated by string padding. The string padding is made of linen threads twisted together. The edges are embellished with a gold gimp. A gold gimp is in this case a linen thread wrapped with a thin gold thread (membrane gold). This gold thread is thinner than the gold thread used for the rest of the gold embroidery. To create the edge of the halos, two gold gimps have been twisted together and couched in place.
The filling of the halos, the bit of blue sky and the grassy area the women are standing on have been embroidered in a technique that's often called Italian couching. The area is first filled with laidwork in coloured silk. The silk is further fixated by couching down a single (or double) gold thread on top. The gold threads are spaced so that the silken laidwork is visible. In order to minimise waste, the gold threads are not ended/plunged at the end of a row. They are just hidden close to the edge of the design element. I have written a tutorial about this trick. The architectural background is rather sparse. There's a simple vault over the women with keystones shaped like flowers. Again, padding has been achieved with those linen strings. The diaper pattern in the background is an open basket weave made with red silk. It is one of the most popular diaper patterns ever used. The borders between the different orphreys have been embellished with simple basket weave over string padding. Either with gold threads only or with a combination of gold threads and coloured silks. Next week, I will show you further examples of this iconography. Let's see if we can find clusters within the larger group. Further down the road, we will also see if the gold gimp can be recreated with modern materials. My Journeyman and Master Patreons can find more detailed pictures of the chasuble cross on my Patreon page. Their generous monthly contributions made my travels to Magdeburg possible. Thank you very much! Professional embroidery is very different from hobby embroidery. Sometimes, hobbyists remark that the back of my embroidery isn't very neat. For some, a neat back is the hallmark of excellent embroidery. It makes sense to have a neat back when the embroidery can be viewed from both sides. But when that's not the case, there is no need for an overly neat back. Medieval embroiderers knew that. As they were professional embroiderers trying to make a living, speed was of the essence. A neat back was not. And whilst there were different qualities of embroidery for different purses, cutting corners can be seen in many pieces. By no means only in lower quality embroidery. The grapes on the Anne Geddes chasuble from Mainz are a case in point. You will find a downloadable PDF of the below instructions on my Patreon site.  Embroidery tutorial padded silk shaded grapes with golden highlights You can make your grapes any size you like. Mine are 1,5 cm in diameter. You can also make as large a bundle as you want. Start by padding your grapes with three layers of satin stitches. I've used soft cotton for this. Make sure your last layer runs horizontally and just within the design line of the grapes.
Modern embroiderers would now probably proceed by shading each grape individually. Not so our medieval embroiderer: he did the whole lot in one go! Add shaded satin stitch or laid work on top of the padding. I've used a slightly twisted silk by DeVere Yarns (#60) in three shades of blue. Once all the silk is in, add a few highlights with your gold thread. I've used a #6 passing thread directly in the needle.  Embroidery tutorial padded silk shaded grapes with golden highlights Add the outline of the grapes with a dark blue silk in split stitch. Feel with your fingers where the padding is. You can also easily peek between the silken stitches to see where you will need to go. These split stitches couch the silk and the gold thread down and define the grapes.  And that's all there is to these super simple, yet highly effective padded grapes. As always, my Journeyman and Master Patrons find a downloadable PDF with the instructions on the Patreon website.
When I reviewed the 'Art of Gold Embroidery' a few weeks ago, the book's biggest drawback is that it is mainly written in Uzbek and Russian, languages most of us are unfamiliar with. It also seems to be impossible to get hold of. Several people asked me if 'The art of gold embroidery in Uzbekistan' by Suzanne Pennell would be a good alternative. As this was also the primary source used by Dr Gillian Vogelsang-Eastwood in her chapter on Uzbek gold embroidery in the 'Encyclopedia of Embroidery from Central Asia, the Iranian Plateau and the Indian Subcontinent', I decided to order a copy and review it for you.  Book review: The Art of Gold Embroidery in Uzbekistan by Suzanne Pennell Suzanne Pennell wrote the book almost 25 years ago. It is her master's thesis submitted to the James Cook University in Australia. Various online bookstores offer the book as 'print on demand'. This means that the book looks like you have printed it on your home office printer. The many pictures in the book are of sufficient quality to accompany the text. However, you would be disappointed if you hoped to drool over detailed images of the beautiful goldwork embroidery. Also, keep in mind that this is a MA thesis. It was written by someone who relied entirely on translators to do her field research in Uzbekistan, as she could not speak Uzbek or Russian. That being said, it is the only book available in English which summarises the extant Russian literature on the topic.  Book review: The Art of Gold Embroidery in Uzbekistan by Suzanne Pennell, typical image page from the book. The book starts with a short introduction and the research methods employed. Pennell interviewed the embroidery master Bakshillo Jumeyev (writer of the 'Art of Gold Embroidery', a mother and daughter preparing a trousseau, visited museums in Tashkent and Bukhara and ploughed through the literature. The first chapter gives a broad overview of the history of the area of Uzbekistan and the archaeological and historical evidence for gold embroidery. As noted before, the evidence is scant, primary literature resources are absent, and references in classical Greek literature are not critically reviewed. This would be an excellent research topic for an embroiderer fluent in Uzbek, Russian and preferably Chinese.  Book review: The Art of Gold Embroidery in Uzbekistan by Suzanne Pennell The second chapter I liked best. It talks about the materials and tools used and the organisation of the embroidery guild. To me, this is an ethnographical study that compliments my research on medieval goldwork embroiderers. It fleshes out the scant information I have and paints a picture of how the lives of medieval gold embroiderers might have been. It also makes you realise how little we know. For instance, every diaper pattern likely had a name. It makes communication within the embroidery workshop and between the workshop and the client a lot easier when techniques and textures have names.
I found the rest of the book also extremely interesting! Pennell aimed to document and explain the changes goldwork embroidery in Uzbekistan had undergone when regimes changed from Emir to Russian Tsar to Communist Russia to independence in 1991. A whole chapter is dedicated to detailing the practice at the last courts of the emirs. Opulence and self-indulgence led to a Golden Age for Bukhara's gold embroidery. At first, not much changed when Tsarist Russia colonised the area. However, everything changed after the October Revolution in 1917, especially as Bolshevik ideology required women to emancipate and join the workforce. Gold embroidery changed from a predominantly male occupation into a female occupation under state control. After Independence in 1991, the Uzbek government actively promotes goldwork embroidery to forge a new national identity. Reading Pennell's MA thesis, I better understood why the Uzbek government pours so many resources into organising a biannual International Gold Embroidery Festival. Such festivals hail back to the days of the emirs when fairs like these were held several times a year to display the products and skills of all the master embroiderers and their workshops. And remember the gold embroidered coat every participant got? That's an ancient custom, too. Gifting 'robes of honour' to important guests was quite the norm. All in all, I really liked the book, especially because I can use its contents to help me understand the pictures and texts in the 'Art of Gold Embroidery'. Getting hold of the original Russian literature in the West would be very time-consuming. This is a much cheaper alternative and will do for most of us. This book is for you when you are interested in national dress and ethnography! You can order your print-on-demand or second-hand copy through the AbeBooks website. Let's delve into the fascinating world of a unique embroidery crafted around AD 1500 in the Middle Rhine Area. This masterpiece, housed at the Dommuseum Mainz, is a testament to local artistry. Its iconography, a departure from the norm in medieval goldwork embroidery from Europe, is truly one-of-a-kind. It's reminiscent of the whimsical art photographs by Anne Geddes, but instead of babies nestled in foliage, we have the figures of the Crucifixion and an Apostle. Allow me to unveil this intriguing piece.  Embroidered chasuble made around AD 1500, Middle Rhine Area, Inv. Nr. T00358, Dommuseum Mainz As you can see from the above picture, the embroidered chasuble cross has been cut on all sides. Two patches and an extra piece of grapes have been added on each side of the cross beam of the cross. Those two patches were originally the bottom of one of these foliage cups the figures stand in. It isn't the bottom part of the cup Bartholomew the Apostle stands in (the colours are wrong). This means there either was a further figure below Bartholomew or a column with the same embroidery on the front of the chasuble. I have contacted the museum to see what the front looks like. What is represented here? We see the crucified Christ standing in a foliage cup with two angels catching his blood in chalices. Above Christ, God father is depicted standing in a smaller foliage cup. Below Christ are Saint John and Mary. The crucified Christ, God father, Saint John, Mary and the angels are all familiar figures in a standard Crucifixion scene. Apostle Bartholomew at the bottom is also regularly seen below a Crucifixion scene. What is, however, very unusual is that the Crucifixion scene is embedded in this glorious vine with the beautiful foliage cups and bundles of shaded padded grapes.  Christ in the Winepress, c. AD 1370, Nuremberg, Germanisches Nationalmuseum, Inv. Nr. Gew. 2464. As far as I know, this particular combination of the vine and the Crucifixion cannot be found on any other piece of medieval goldwork embroidery. It is a unique way of depicting the eucharist. Normally, this is done by showing Jesus working in a wine press. A good example is this silk and metal thread embroidery on linen kept at the Germanisches Nationalmuseum in Nuremberg. You see Christ in the Winepress on the left—a very different depiction indeed.  Angelos Akotantos, CC BY-SA 4.0 But I did find something comparable. Here, you see an icon painted by Angelos Akotantos between AD 1425-1457. It is known as 'Christ the Vine' based on John 15:1–17. We see busts of Christ, the Evangelists and some of the Apostles sitting on the branches of a vine. Could it be that the artists responsible for the chasuble design from Mainz saw an Eastern Orthodox icon of 'Christ the Vine' and combined the idea with the Crucifixion? People, objects and ideas travelled much farther in the Middle Ages than we often think.  Detail embroidered chasuble made around AD 1500, Middle Rhine Area, Inv. Nr. T00358, Dommuseum Mainz The actual embroidery is also a bit unusual. The background consists of miles of laid red silk couched with metal threads. The figures and the vine are stitched on linen and then applied to the red and golden background. The vine, and especially the grapes, are heavily padded. The figures are mainly stitched in that typical medieval encroaching satin stitch. And I like the angel's hair. It is probably made of overtwisted silk rather than knots. And in this case, the angel is a partly blonde redhead :).
I hope you liked this unusual piece of medieval goldwork and silk embroidery. The foliage cups are superb design elements one could use in, for instance, a modern crewelwork embroidery. When I was in Uzbekistan, I bought a small piece of gold embroidery that is being produced for the tourist market. Nothing high-end, but fun nonetheless. Recreating the embroidery is a great way to learn about Uzbek gold embroidery and its main techniques and materials. Let's start stitching! As always, a PDF download is available for my Journeyman and Master Patreons.  Tutorial Uzbek Gold Embroidery Uzbek gold embroidery is traditionally worked on a piece of velvet backed with calico. One of the main techniques is called zardozi-guldozi and consists of gimped couching over cardboard padding. The gold threads used are far thinner and more flexible than what is usually used in the West. A good substitute would be metallic sewing thread. You will also need a passing thread or a thin Japanese thread for the outline.  Cardboard template should measure c. 13 cm wide Print the above template onto a piece of thin cardboard. Cut it out carefully. Glue a small piece of velvet (a different colour than your background) behind the central design element.  Tutorial Uzbek Gold Embroidery Tack the cardboard padding in place. Wear a thimble to protect your fingers.  Tutorial Uzbek Gold Embroidery You will couch down five strands of your thin metallic thread with each couching stitch. This embroidery was made for the tourist market, so speed is important. Using one or even two strands would take far too long. You lay your bundle of threads back and forth over the cardboard padding and you couch down alongside the cardboard. Tails are either hidden under the cardboard or plunged and tied back on the reverse.  Tutorial Uzbek Gold Embroidery You will sometimes need to fan your stitches to be able to follow the shape correctly and to completely fill it. An extreme case is the central element around the glued piece of velvet. At the bottom, you will need to stitch through the cardboard padding.  Tutorial Uzbek Gold Embroidery Fill the large leaf with a couching pattern of your choice. I have used a chevron pattern called mauji-duruya.  Tutorial Uzbek Gold Embroidery Finish the sample by couching an outline with passing or Japanese thread around the piece. Make small loops in the appropriate places and a tendril at the side. The row of loops/coils on the bottom part of the leaf is called kabuli. It hints at an Afghan origin of the technique.
Working over cardboard is very similar to working over parchment padding. This was a common technique in medieval goldwork embroidery. The small coils are also frequently seen. What is very different is the softness of the gold threads. The origianls are even finer and softer making for a smoother surface. If you would like a PDF download of the instructions including 21 step-by-step photographs, please consider becoming a Journeyman or Master Patron. We were presented with a captivating book on Uzbek Gold Embroidery at the start of the International Festival of Gold Embroidery in Bukhara, Uzbekistan. This exquisite book, adorned with chapters on the rich history of gold embroidery, the vibrant community of gold embroiderers in Bukhara, materials, tools, techniques, and a catalogue of both historic and contemporary masterpieces, is a treasure trove for any embroidery enthusiast. Approximately half of the book is dedicated to stunning pictures of gold embroidery. Regrettably, only the chapters on the history of gold embroidery, the organisation of the gold embroiderers in Bukhara, and the catalogue are translated into English. Despite this, it is a book that undoubtedly deserves a place on your shelves!  Art of Gold Embroidery by Bakhshillo Dzhumaev published in 2022 The book is authored by Bakhshillo Dzhumaev (or Jumayev), a seventh-generation gold embroiderer in Bukhara who has successfully passed on the craft to his son. Although I did not have the opportunity to meet him, I did meet his son and was graciously given a tour of the family business. However, the most significant encounter was with his mother, Muqaddas Jumayeva. She patiently demonstrated some typical Bukhara techniques of gimped couching. I also had the privilege of exchanging my broche for hers, a precious memento from my journey. The Jumayev family are the epitome of gold embroidery royalty, and I am deeply honoured that they shared their knowledge and craft with me.  Typical catalogue page from 'Art of Gold Embroidery' The chapter on the ancient history of gold embroidery mainly contains quotes from classical sources. Unfortunately, recent research has shown that we should be very careful with their interpretation. They are more likely to talk about woven textiles and not gold-embroidered textiles. However, archaeological finds from Central Asia and Uzbekistan, in particular, show that gold embroidery was known as early as the first or second century AD. Unfortunately, no reference is stated for these archaeological finds from a female grave in the Tashkent region made by M.E. Voronts. If you know of a publication, please let me know. More secure historical sources date back to the 15th century.  The book 'Art of Gold Embroidery' contains many pages with historical photographs of Bukhara gold embroiderers The chapter on the art of gold embroidery of Bukhara is a real gem. From at least the 16th century onwards, Bukhara was the region's gold embroidery centre. There were two categories of gold embroiderers (again, a male profession with related females only acting as assistants when the workload required it): one group worked directly for the ruler in the palace workshops, and the other group worked in small family businesses located in town. In order to be able to quickly deliver larger orders, there was a labour division with many embroiderers working on the same piece. And just as is the case with medieval goldwork from Europe, pieces were not signed and almost never dated. The embroiderers were organised in a guild with a single guild master and his assistant overlooking production. This person was called an Aksakal. He was responsible for the fair distribution of the orders amongst the guild members and acted as a mediator between the palace workshops and the many private workshops. The guild also marked births, weddings and funerals of its members. Every year in the spring, there was a kind of a trade fair or festival called Guli Surkh. The embroidery masters would present their products there. Gold embroidery was inherited from father to son (and, in more recent times, also to daughters). If you learned from your father, you were considered a master. Sometimes, more distant relatives or the children of neighbours were also allowed to become apprentices. These apprentices went through a long training period before becoming a master. Similar to apprentices in Western Europe, they did not receive a wage but were given board and bed instead. Apprentices started with cleaning the workshop, then they were allowed to wind the broches (called patella), set up the slate frames (koruna) and finally were allowed to embroider flowers before being shown the more complicated techniques and patterns. Interestingly, storytellers would visit the embroidery workshops once or twice a week to read the guild regulations whilst the embroiderers were working. These regulations contained a history of the craft, rules on how the embroiderers were to behave towards their customers and their apprentices, the quality of the work and materials used, the cleanliness of the embroiderer and his workshop and the prayers that needed to be said before, during and after the work. The gold embroiderers also venerate a patron saint, Hazrat Yusuf. As we know, medieval guilds also had their patron saints; one wonders if there were 'work' prayers said also.  A page with padded diaper patterns from 'Art of Gold Embroidery' Unfortunately, the materials, tools and techniques chapters do not come with an English translation. Neither do the many biographies of past and present gold embroiderers featured in the book. It has proven rather difficult to translate these parts from Uzbek into English. My normal method does not seem to work as Uzbek is too obscure a language. Nevertheless, I will try to find out what is written here as I have a feeling that it is quite important.
The second very important thing that eludes me at the moment is where to get the book. It has an ISBN number (978-9943-8192-9-0) but a search on the web does not return anything. A google image search of the cover did not return anything either. The publisher is Sahhof in Tashkent. And again, a search does not return anything. If you can offer any help here, please let me know so that I can share it with the wider embroidery community. Your assistance in this matter would be greatly appreciated! Literature Dzhumaev, B., 2022. Art of Gold Embroidery. Sahhof, Tashkent. Gleba, M., 2008. Auratae vestes: Gold textiles in the ancient Mediterranean, in: Alfaro, C., Karali, L. (Eds.), Purpureae Vestes II, Vestidos, Textiles y Tintes: Estudios sober la produccion de bienes de consumo en la antiguidad. University of València, València, pp. 61–77. After a successful week of teaching for Creative Experiences in Les Carroz, France, I decided to drive a further 330 km to visit Le-Puy-en-Velay. The Cathedral Treasury houses the Cougard-Fruman textile collection. Judging from the catalogue, the collection comprises of c. 180 pieces. Most of it is liturgical textiles. And a few pieces are medieval goldwork embroidery. The museum is well worth a visit. And even a repeat visit as the pieces on display rotate. The town itself is beautiful too with a medieval 'haute-ville'. It is also one of the main places in France from which to start the Camino pilgrimage to Santiago de Compostela in Spain. But let's have a closer look at one of the embroidered chasubles in the museum. It turned out that I was already somewhat familiar with it ...
This is the said chasuble. It was made in Flanders (Brussels?) in the 15th-century according to the museum caption. On the front, we see Catherine of Alexandria above Philip the Apostle (identification uncertain). The cross on the back shows the Trinity at the top flanked by two angels. Below are Saint John and Saint Peter. 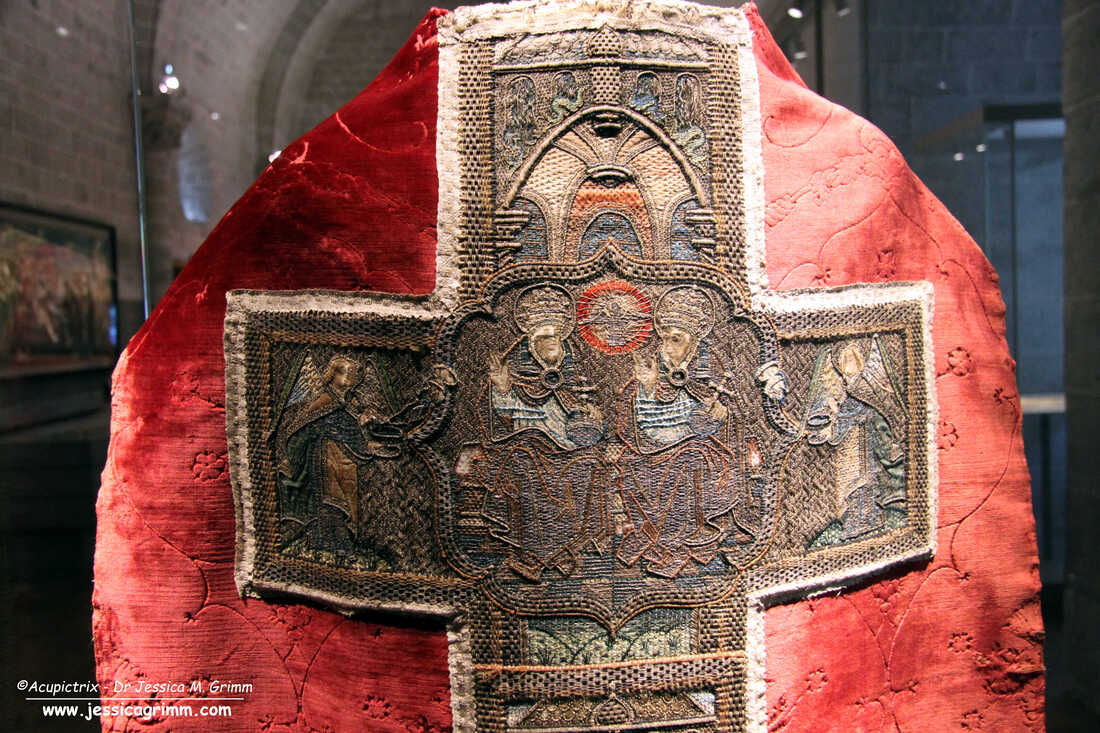 Trinity on the back of chasuble 1212.BL115 Cathedral Traesury Le-Puy-en-Velay, France Although the embroidery does not sport high-quality silk shading or brilliant or nue, the chasuble is a high-end piece. The composition of the Trinity with the two censer swinging angels on either side is balanced and full of movement. The string-padded frame within a string-padded frame for the central depiction of the Trinity also adds extra texture. 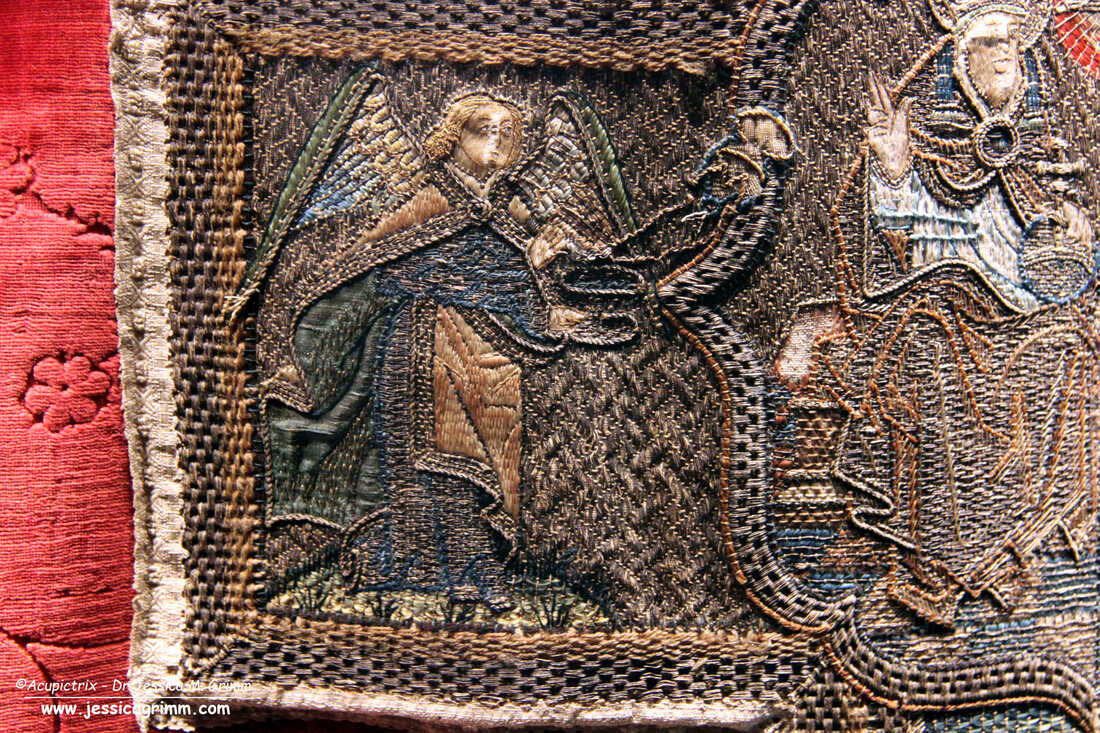 Censer swinging angel on the back of chasuble 1212.BL115 Cathedral Traesury Le-Puy-en-Velay, France The lining of the cloaks of the angels is made by couching a piece of blue-green heavy silk in place. The goldwork embroidery is executed with membrane threads. The membrane threads are now badly oxidised and dull. When the embroidery was originally made the threads would have looked golden and shiny. The silk embroidery is done with untwisted silk. I am a bit puzzled by the twisted textile thread used in the padded basket-weave border around the orphrey. It is reddish-brown and much duller than the silks. To me, it looks like wool. However, it might be a thick spun silk. 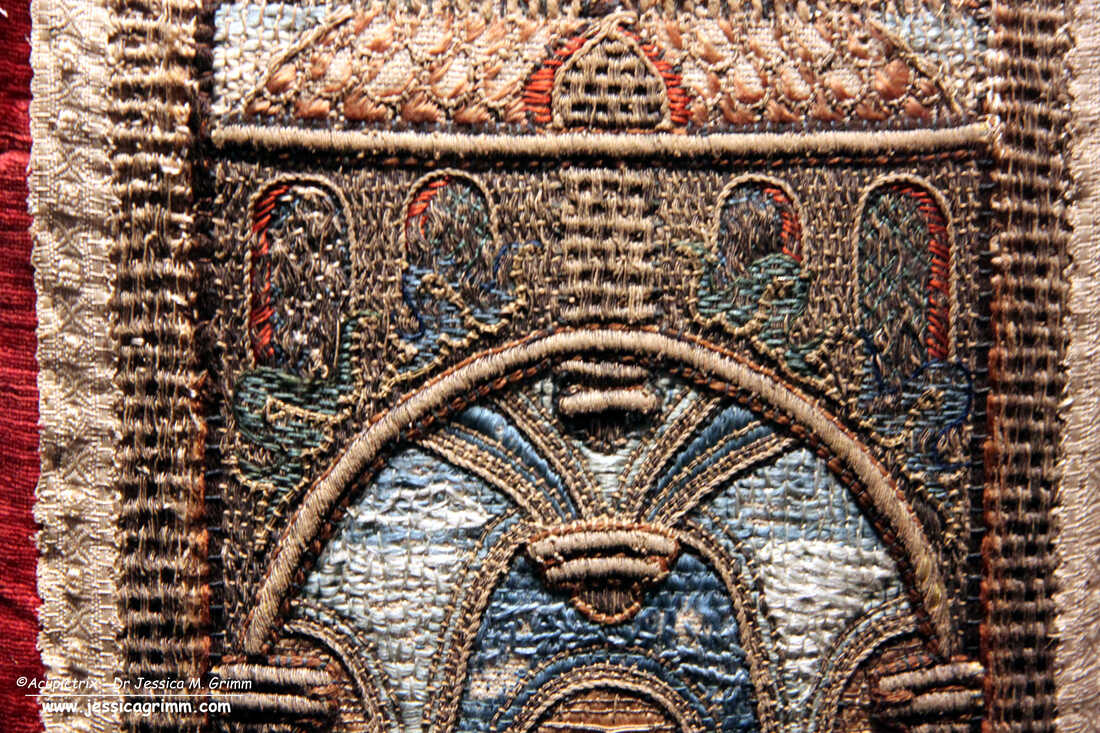 Detail of the orphrey with Catherine of Alexandria on the front of chasuble 1212.BL115 Cathedral Traesury Le-Puy-en-Velay, France From the pictures in the catalogue, I had not realised that one of the orphreys I bought at an auction is related to the orphreys on this chasuble. When I stood in front of the display case in the museum, it suddenly dawned on me that I had something similar. Luck will have it that I brought the orphrey with me for my students at Les Carroz to study. The museum personnel was very nice and helpful and they allowed me to fetch the orphrey from my car and bring it into the museum for comparison. How cool is that?!  Medieval orphrey with Bartholomew. As you can see from the above picture of my orphrey, the materials, colours, style of the figure and embroidery techniques are quite similar to that seen on the chasuble in Le Puy. My orphrey is just very dirty and will need some TLC. It was glued onto velvet which was glued onto plywood. As the wood was mouldy, I had to remove the orphrey by cutting through the velvet and glue with a surgical knife. Not a delicate task. But it worked. I will write more on the orphrey and what I did to it in a future blog post.
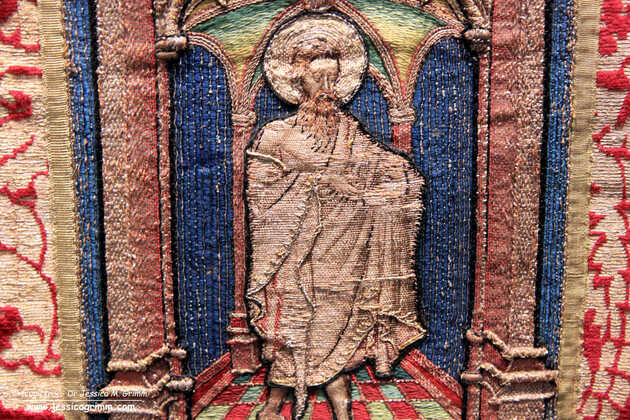
But first, I am off to the International Festival of Gold Embroidery and Jewelery in Bukhara, Uzbekistan. Got my flight tickets yesterday and will leave on Wednesday. As I will still be in Uzbekistan next Monday there will be no blog post. As always, my Patrons will be able to follow me on my travels. Literature Cougard-Fruman, J. & D.H. Fruman (2010). Le trésor brodé de la cathédrale du Puy-en-Velay. Centre des Monuments Nationaux. When I started work on this week's stitch tutorial, I had the increasing feeling that things weren't quite what they seemed to be at first. That's the great thing about doing research. I usually have no idea where the medieval embroideries will lead me. Dead ends are common. But so are those 'aha' moments. In this case, it was the latter. Let's dive in!  Detail Dalmatic (Nativity) of the Schlosser Ornat, Inv. Nr. 124 I-III, Dommuseum Frankfurt. And here is the culprit. No, not Saint Andrew. It is the columns on either side of him. They are odd. The layering of goldwork is a common thing in late-medieval goldwork embroidery. But this is simply too OTT. It does not make sense. Let's start our tutorial proper and I'll point the oddness out to you.  Start with a layer of shaded couched goldwork. For my sample (c. 0.8 x 5.0 cm), I used 46ct linen and passing thread #3 couched down with a single ply of red Chinese flat silk.
Next up, add the silver passing thread. You will be mainly stitching in between the rows of gold thread of the first layer. However, you will inevitably hit threads of the first layer. Make sure you use a fine needle. A new #12 would be perfect. You might also like to wax your silken couching thread (one ply of grey silk).  The "original" embroiderer then went on to add a layer of thicker red stitches along each side of the silver passing thread. I've used a full thread of red Chinese flat silk to do this for the inside of the right-hand side only. By now, I was pretty certain that this was not all done in the late Middle Ages ... So much additional stitching in such a relatively small space is nuts. It does not add anything to the design. On the contrary, you lose quite a bit of the original lovely shading of the first layer. When additional details are stitched in, they usually add to the design. They bling things up or they make the design easier to read by accentuating things. That does not seem to be the case here. So, what's going on? 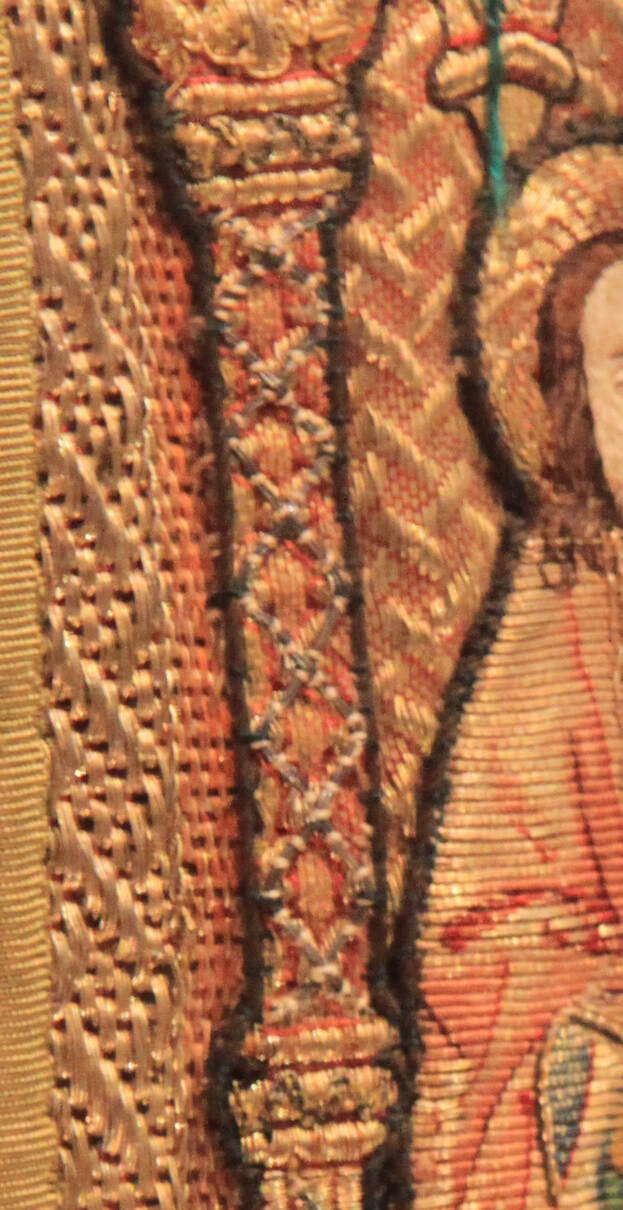 Detail Dalmatic (Nativity) of the Schlosser Ornat, Inv. Nr. 124 I-III, Dommuseum Frankfurt. Here's an extreme blown-up detail of that same column. Can you see the thick white/beige couching stitches used to couch down those silver threads? The silver threads themselves are also much thicker than all the other threads used in the embroidery. The added red stitches to the outside of the silver threads are also comparable in thickness to the white/beige stuff. It all looks so much cruder than the original very high-quality stitching done in the medieval period.
As I already told you in my earlier blog posts, these vestments saw extensive restoration in the 1840s. The addition of these silver passing threads on top of the columns was likely done then. It likely serves several purposes. Maybe some columns had so many damaged loose gold threads that this was a decorative way of cleaning things up. But it also does something else. This additional stitching likely goes through many of the layers that these vestments are made of. This stabilizes the whole construction. You often see horrible bulging on non-restored late-medieval vestments. By stitching through multiple layers, you have a chance to make things very stable and secure. It can't really bulge anymore. Is that was what attempted here? What do you think? Do you also feel that not all of the embroidery on these columns is original? My Journeyman and Master Patrons find a downloadable PDF of this tutorial on my Patreon page. After all, working layers of metal thread on top of each other is quite fun to do! Not sure how many of you studied last week's pictures of the Schlosser set of vestments in great detail. If you did, you might have spotted the same oddities as I did. For starters, there's the 'enhancement' of the faces with oil paint. Not an unusual practice. The skill needed to work these super fine silken stitches to render the faces was something that the restorers of these late-medieval embroideries could no longer do from about the 17th century onwards. Another thing which you might have spotted was the cutting up of orphreys. Some were made less wide (breast pieces of the dalmatics) and others were turned into real patchwork pieces to cover the ends of the sleeves of the dalmatics. But there is something else. And it reminded me of a 2021 French article on or nué that I had read a while ago. 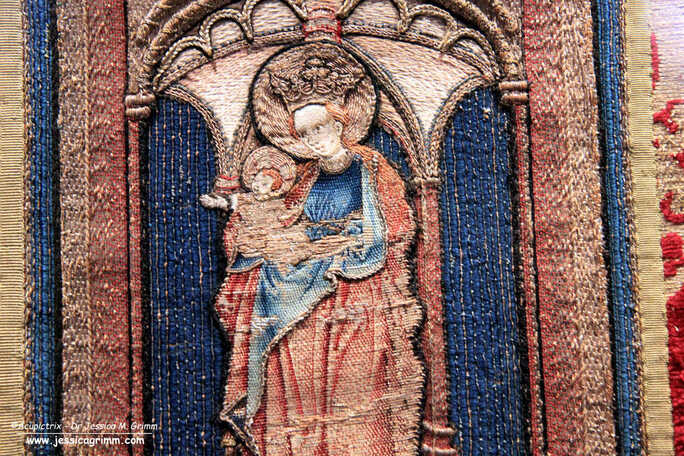 Mary with Child on the chasuble of the Schlosser Ornat, Inv. Nr. 124 I-III, Dommuseum Frankfurt. Do you notice something odd about the embroidery techniques used for Mary's clothing? The 'red' is clearly or nué. But what about the 'blue'? Let's zoom in a bit! 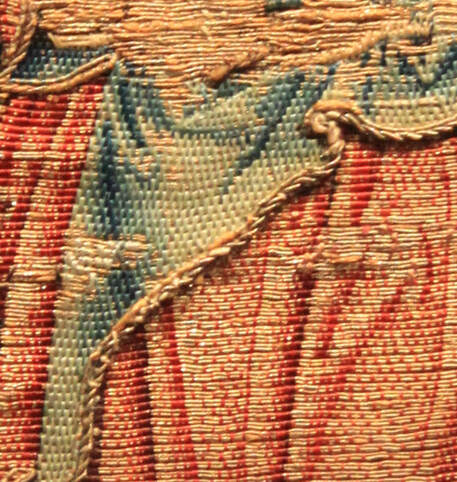 Detail of Mary with Child on the chasuble of the Schlosser Ornat, Inv. Nr. 124 I-III, Dommuseum Frankfurt. See?! The red is or nué. But the blue isn't. It is shaded brick stitching over pairs of gold threads. You could call this Burden Stitch. However, this stitch is commonly executed over a single gold thread. Odd. Since all of Mary's 'blue bits' are worked in this stitch you are forgiven for thinking that this is original. Luckily, John the Baptist can help us out here.
And here is John the Baptist. His outer garment is almost completely executed in beautifully shaded or nué. But look at his left shoulder. There's a patch of this other stitch again. Executed in colours that come close to the original, but that are not the same. This 'bastard' Burden stitch is thus clearly not original. It was likely used to repair the original or nué in the mid-19th century. Probably executed by the Cologne vestment maker and his two daughters. Why did they not simply repair the area with true or nué?
To me, or nué is a relatively simple embroidery technique. It has absolutely never intimidated me. Neither does silk shading or shaded art blackwork. There's a common theme here: I can shade. It does not matter to me if I have to do the shading as part of blackwork, with long-and-short stitch or over pairs of gold threads. Neither does it bother me that or nué and blackwork are counted thread techniques and silk shading is not. It is all just shading to me. However, being in the embroidery teaching business, I soon learned that there are roughly two types of embroiderers: those that can shade and those that can't. Embroiderers who can shade a little, do not seem to exist :). Embroiderers who are, at first, intimidated by or nué often quickly get comfortable with the technique when they realise that it is just counted silk shading over a pair of gold threads. That is: embroiderers who can shade. Those that can't shade, cannot work or nué. These modern observations make the embroidery on the chasuble of the Schlosser vestment set all the more intriguing. The 'bastard' Burden stitch on Mary is very well shaded. The embroiderer could shade! Why then did he or she not work true or nué? Was it a time issue? Or did he or she not recognise the or nué technique in the first place? The latter could really have been the case. According to a comprehensive study by Astrid Castres published in 2021, the technique of or nué might have been completely lost for a couple of hundred years. It was then likely re-discovered in the second half of the 19th century. Just slightly after the restauration of the Schlosser vestments. Fascinating, don't you think? Literature Castres, A. (2021): Des premiers témoins médiévaux aux broderies des Clarisses de Mazamet : une petite histoire de l’or nué (XIVe-XXe siècle), Patrimoines du Sud 14, pp. 1–27. |

Want to keep up with my embroidery adventures? Sign up for my weekly Newsletter to get notified of new blogs, courses and workshops!
Liked my blog? Please consider making a donation or becoming a Patron so that I can keep up the good work and my blog ad-free!

Categories
All
Archives
July 2024
|


 RSS Feed
Contact: info(at)jessicagrimm.com
Copyright Dr Jessica M. Grimm - Mandlweg 3, 82488 Ettal, Deutschland - +49(0)8822 2782219 (Monday, Tuesday, Friday & Saturday 9.00-17.00 CET)
Impressum - Legal Notice - Datenschutzerklärung - Privacy Policy - Webshop ABG - Widerrufsrecht - Disclaimer
Copyright Dr Jessica M. Grimm - Mandlweg 3, 82488 Ettal, Deutschland - +49(0)8822 2782219 (Monday, Tuesday, Friday & Saturday 9.00-17.00 CET)
Impressum - Legal Notice - Datenschutzerklärung - Privacy Policy - Webshop ABG - Widerrufsrecht - Disclaimer