|
Those of you who listen to the FiberTalk podcast will probably know that Gary and Beth have this thing going whereby they are not adding to their stash until June next year. Some (most?) of their listeners are predicting that their resolve will crumble very soon. I am of a different opinion. I think that they will last. They will just add another exception to their already very long list of exceptions:). And as always, they have no problem coming up with ways in which we, their loyal listeners, can spend our money. In my case, on a membership of the EGA. I was a Member at Large many years ago, but this wasn't really what I was looking for. I was missing out on connecting with a local chapter. Thanks to the pandemic and some promotion on FiberTalk, I am now a happy virtual member of the Day Lilies chapter in Medina, Ohio. I think this might be a solution for others too, so let me explain how it works.  Hybrid EGA chapter meeting on Zoom. For years, I have tried to set up stitching groups both in my native Netherlands and, once I moved, here in Germany. To no avail. Some ran for a while and then faltered as the commitment to travel, make time or spent a little bit of money was just not there. At other times, people just did not get along with each other and I had to dissolve the group. However, I very much like to stitch and chat! So, when Beth mentioned that some EGA chapters now offer Zoom meetings, I wondered if that could be the solution for me. After all, the EGA has been going for a while and has a strong structure in place. No inventing the wheel here. I contacted EGA and they were very helpful in helping me find a chapter with hybrid meetings at a time that's compatible with my time zone. I also preferred a small town/rural chapter as that would match better with where I live (a small village with 725 inhabitants). Last Thursday, I attended my very first 'local' chapter meeting. About 18 members live in the Medina library, two members Zooming in from Georgia and me Zooming in from Germany. Chapter President Angelia moderated us through the meeting and carried us through the room so that it really felt like we were there too. I did a quick screenshot to show you what that looked like. I made sure that Marie from Georgia ducked, and all others are only recognisable when you know them. It is just me staring into the camera like a deer into the headlights :). It turns out that another relatively new member has better cameras which we can use next time to make the experience even better. We are going to try that out on Thursday 13th of July during our Stitch in Public Day at the Medina Library. I will be there too; on a screen. 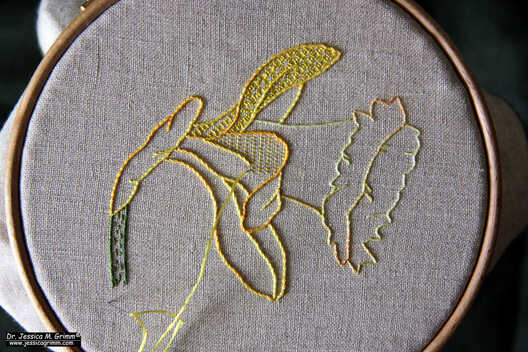 Blackwork Daffodil pattern by Bonnie Rhodes. Apart from meeting so many other stitchers, I also got to participate in a blackwork project. Bonnie, a Master Craftsman and member of my chapter, taught her blackwork daffodil design. This was the perfect opportunity for me to try my hand at something new. Yes, I had done blackwork before for my RSN Certificate and I have taught it many times for the RSN, but that's different. This time, I could play.
First of all, I changed the colours. I had never tried blackwork in colour and was wondering what that would look like. Furthermore, the way blackwork is taught at the RSN is very specific and not historically correct. Bonnie's approach is much more in line with historical blackwork. At first, this new approach was very hard for me to get my head around! In the instructions, Bonnie provides a sequence of diagrams that would make up a single blackwork filling pattern. You work layers of darning patterns on top of each other and that makes the pattern. At the RSN, you get a diagram of the complete pattern, and you are told to stitch that as economically as you can with as few 'wandering' threads on the back as you can. Not having a 'complete' diagram to work off was very hard for me at first. But it provided me with an alternative way of how to teach somebody how to 'read' these patterns. Not all students see the best stitching paths when confronted with a traditional diagram. And this is exactly why I still take classes and work kits. There is always something new to discover!
10 Comments
As I am working really hard to finish my upcoming ebook on the linen vestments from Tyrol, it's just a short post today. But a rather nice one! First up is a beautiful blackwork tiger by Olga Tempel. She attended my five-day blackwork course earlier this year and recently finished this epic piece. I think she did a terrific job with the shading, don't you agree? 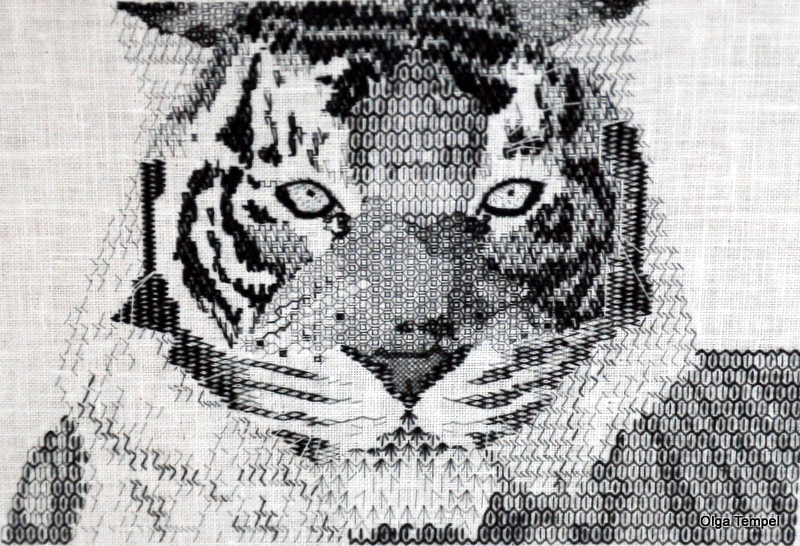 Remember my Millie Marotta fox? He won me first prize in the 'Stitch your Heart out' competition organised by Inspirations Magazine. Fox had been down-under for more than a year as Inspirations promised me to make him into an article. Alas, they finally decided they weren't going to do that after all and I got fox back after a nasty and expensive battle with German customs. During transit the frame got badly damaged. Luckily, I've found a really good framer in nearby Murnau: Galerie Gewehr. I think they did a great job on my fox! It now hangs in my kitchen for all to enjoy. 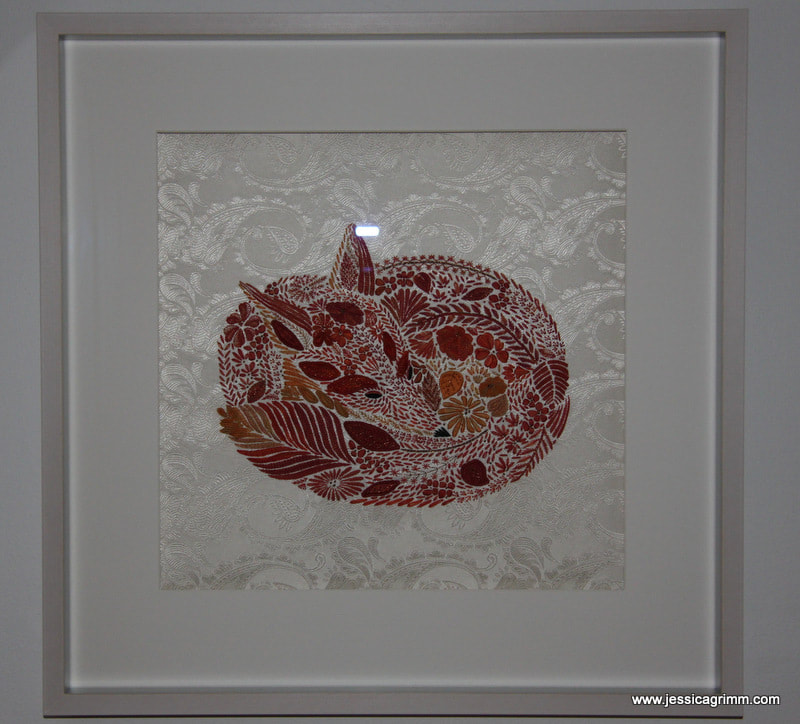 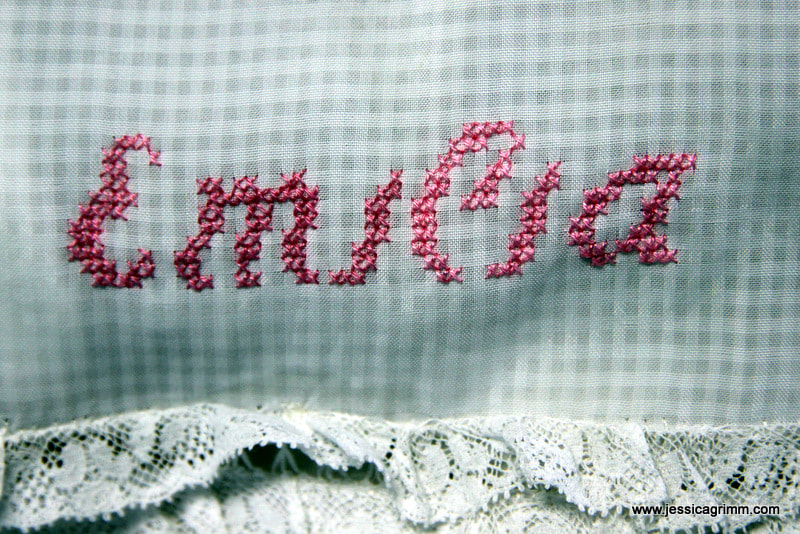 And last but not least, I managed to finish a commission today: Emilia's baptism gown. I am sure the little baby-girl will look adorable in it!
Today I am going to share some lovely embroidery pieces with you. We'll start off with the work of one of my students, then we'll have a look at some new pieces I made and we'll finish with a new initiative to bring Mastercrafts People together. Let's start with a stunning blackwork piece: 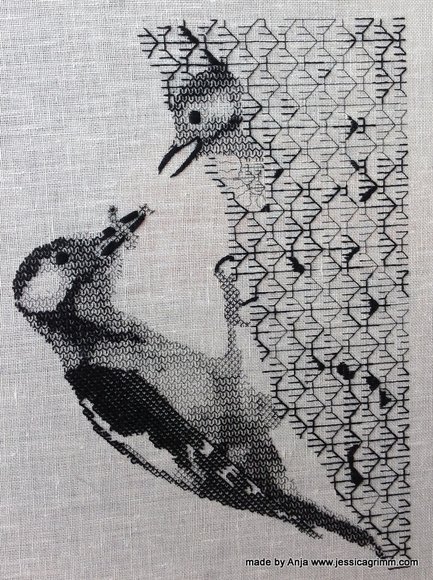 Blackwork embroidery by Anja This piece has been embroidered by Anja from the Netherlands. She started it last year during one of my week-long embroidery retreats. Anja worked from a picture and translated the different textures and shades beautifully into blackwork's geometric patterns. Anja will add some white highlights to the eyes to make the birds even more life-like. I so enjoy seeing a finished piece which started under my tuition!
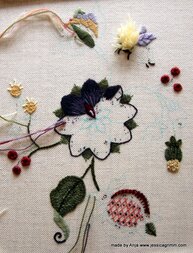
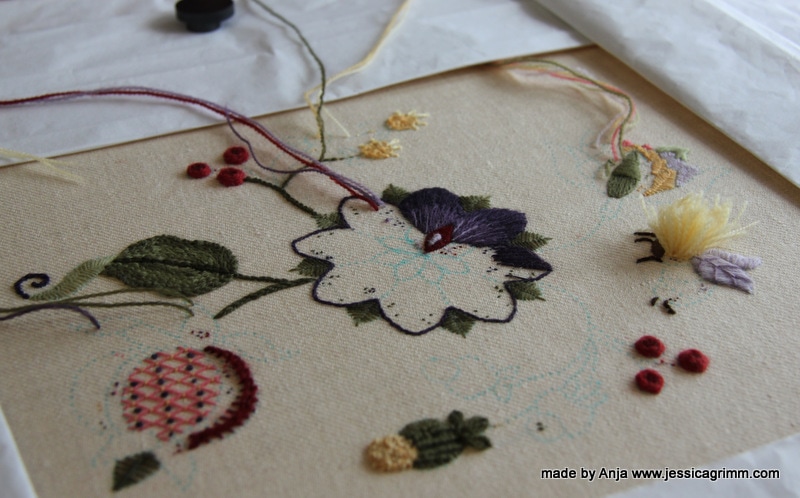
Next up is another piece by Anja. She started it last week during another one of my embroidery retreats. We had great fun designing this piece by using a piece by Hazel Blomkamp as the base. Then we added two flowers from a colouring book by Millie Marotta and a pomegranate from an older embroidery book. Just to illustrate that you don't need to be able to draw your own design from scratch. Mix and match often produces a stunning new design. I have a feeling this piece will turn out great as well!
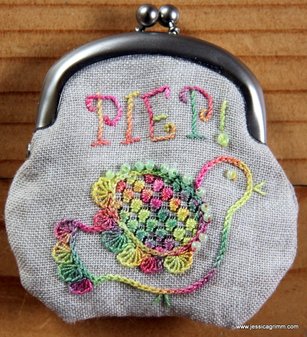
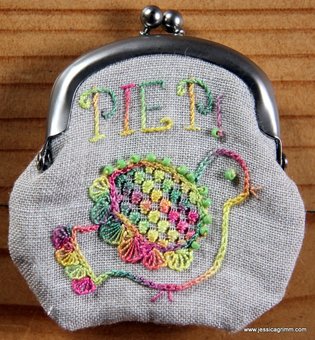
As most of you know by now, I have a subscription to the Broderibox by Nordic Needle. Although I used all threads present in the May box, I wasn't sure what to do with the purse clasp. I am an embroideress and I can mount a finished piece satisfactorily. However, I am not good at finishing. Mainly because I do it so rarely. Time to change that! There are so many lovely products out there to turn your embroidery into something other than a framed picture. Time to become acquainted with the clasp. Luckily for me, there was a website listed on the back of the clasp's packaging: Zakka Workshop. Do visit their website as they have some adorable stuff on there. And best of all, they have a really good Youtube video on how to install the clasp. As I wasn't confident that I could come up with the right size embroidered purse, I ordered their instructions for the simple patchwork pouch. It provided me with a template for the purse and then it was just a matter of adding a cute bird, do some Schwalm embroidery, add some beads and best of all: use a House of Embroidery hand-dyed perle #12 in a colour combination that's totally out of your comfort zone :). Worked a treat so far. Installing the clasp wasn't as easy as the video makes you believe. Especially not as I've probably used the wrong interfacing between the embroidery and the lining of the purse. Mine is probably too thick/stiff. That's the challenge when using instructions from another country. However, I am quite pleased with the result! 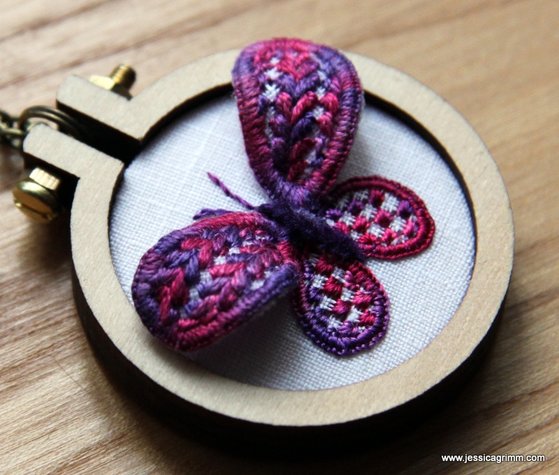 Schwalm whitework embroidery and stumpwork embroidery Another great way to finish your embroidery is to use a tiny wooden hoop by Dandelyne. Since I really like my Schwalm butterfly, I wondered if I could shrink the piece enough to go into a 4cm hoop. Guess what? I could! I used a combination of House of Embroidery hand-dyed fine silk and raw silk as well as paper covered wire to stiffen the upper-wings. I've now worn the piece around my neck for two days straight (I did put it down for sleeping...) and it holds up beautifully. By the way, you can get your Dandelyne hoops here in Germany from the lovely Nadine from Zur lila Pampelmuse. That's where I got mine :).
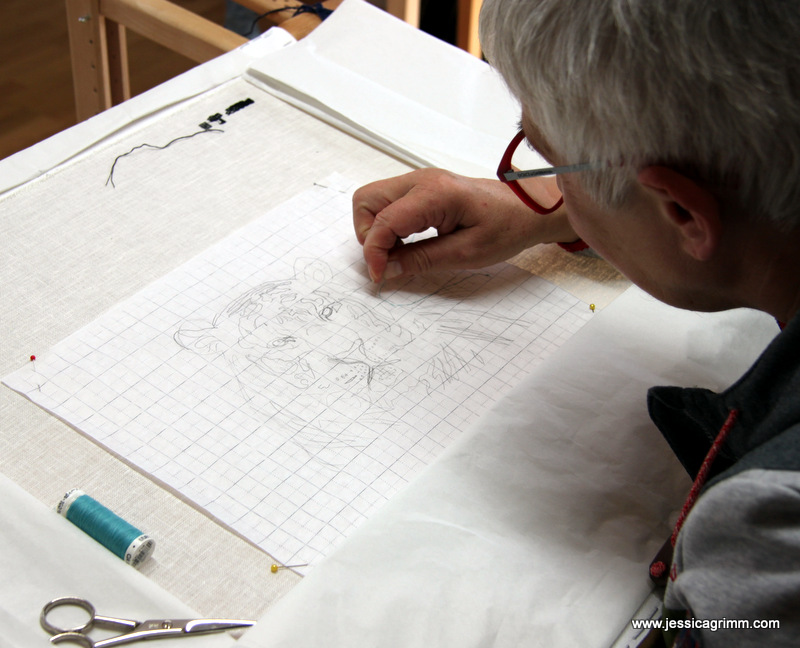
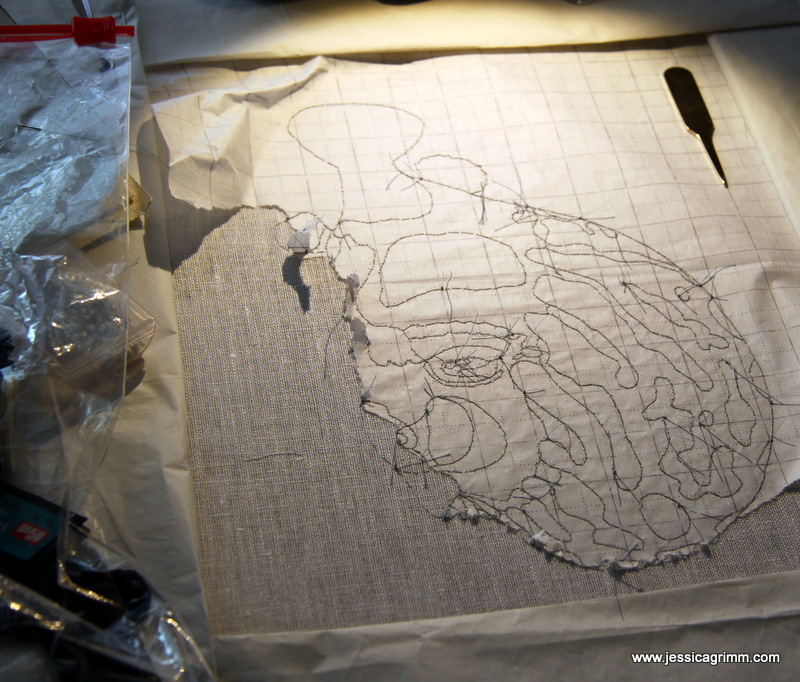
Last week, I was joined by Anja, Elena, Kristin, Mabel and Monika for a five-day blackwork embroidery course. It was great to see how people with different backgrounds got on so well with each other. It was a joy to have them around. Today, I'll give you an impression of how such a five-day course evolves and what my ladies achieved. Note: I no longer offer this course. 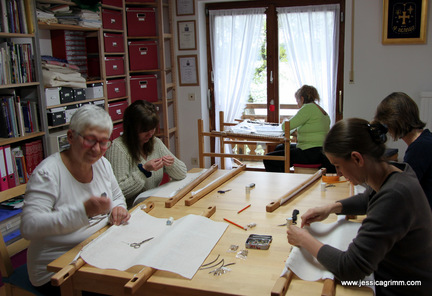 My five-day courses are a great opportunity to try out new things and to step out of your comfort zone. You don't have to, but you are most welcome to try! So my ladies started by dressing their slate frames. As Mabel had previously attended and completed the Royal School of Needlework Certificate Course with me, she came all prepared. 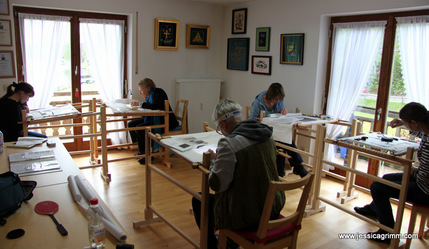 Soon they were all sitting at their trestles. Traditionally, a blackwork pattern is transferred onto even weave linen by the 'paper tear method'. Important pattern lines are drawn onto tissue paper, the paper is attached to the linen and then the lines are stitched using blue sewing thread. After the full pattern has been stitched on, the paper is torn away.
The way blackwork embroidery is taught at the RSN has little in common with its traditional form as seen on court clothing from the 16th century. Instead, it has been transformed into an art form whereby shading is of the utmost importance. This shading is achieved by choosing the appropriate geometric blackwork patterns, thickness of the embroidery thread used and the omission of stitches from the geometric blackwork pattern. In my opinion, the whole process is not unlike that for silk shading. However, if you would like to fill a pattern from a colouring book with a variety of geometric patterns using different thread thicknesses, that's ok too! Above a slide show with the stitched results after five days of hard work. Not bad at all. And thanks to Monika, we did eat a lot of delicious cake as well!
|

Want to keep up with my embroidery adventures? Sign up for my weekly Newsletter to get notified of new blogs, courses and workshops!
Liked my blog? Please consider making a donation or becoming a Patron so that I can keep up the good work and my blog ad-free!

Categories
All
Archives
July 2024
|

 RSS Feed
Contact: info(at)jessicagrimm.com
Copyright Dr Jessica M. Grimm - Mandlweg 3, 82488 Ettal, Deutschland - +49(0)8822 2782219 (Monday, Tuesday, Friday & Saturday 9.00-17.00 CET)
Impressum - Legal Notice - Datenschutzerklärung - Privacy Policy - Webshop ABG - Widerrufsrecht - Disclaimer
Copyright Dr Jessica M. Grimm - Mandlweg 3, 82488 Ettal, Deutschland - +49(0)8822 2782219 (Monday, Tuesday, Friday & Saturday 9.00-17.00 CET)
Impressum - Legal Notice - Datenschutzerklärung - Privacy Policy - Webshop ABG - Widerrufsrecht - Disclaimer