|
Jetlagged and with a nasty cold, but full of wonderful stories about my recent teaching trip to China, I sluggishly slump behind my laptop. To add insult to injury, my dearest coffee machine died on me when we got home from Beijing on Saturday night. I nearly killed someone this morning who carelessly suggested that I could easily survive on instant coffee until my beloved machine gets repaired... Let's talk of happier things, shall we!? Packing my 24 days in China into one blog post might be a little too much :). Instead, I will write several posts in the coming weeks on my adventures in the far East. We'll start today with the actual teaching. I arrived a few days early in Shanghai and was picked up by Edith, a textile enthusiast from Hong Kong, who had organised the workshop. We immediately got on really well! We decided to take the bus to Hangzhou; my first taste of the excellent public transport services in China. After being dropped off in the centre of Hangzhou, we took a taxi to the hotel situated near the famous West Lake. As Bad Bayersoien - Hangzhou takes nearly 24 hours, I was ready to slip between the covers in my lovely hotel room. 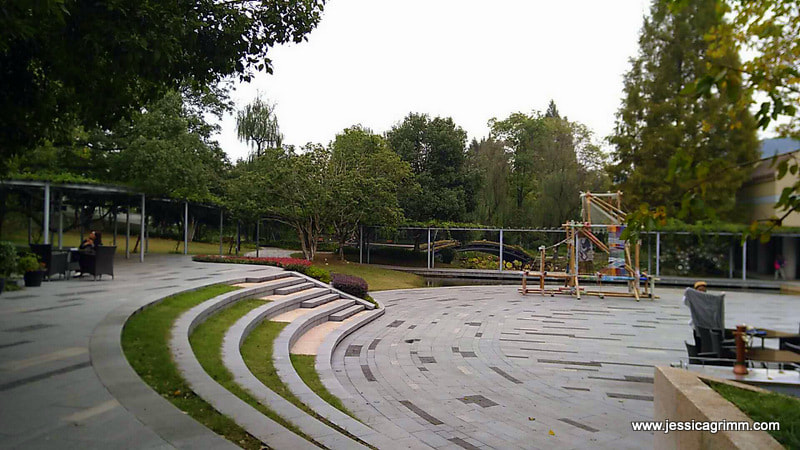 After a delicious breakfast the next morning, we crossed the street to visit the National Silk Museum. The museum is quite large with several buildings housing different exhibitions related to silk. The buildings sit in a beautifully landscaped park. Exploring the ground floor of the silk road exhibition alone took me about two hours! In the afternoon, I decided to take a walk and explore the famous West Lake. As it was the weekend, many Chinese holiday makers had the same idea. The place is famous for getting your wedding pictures taken and the whole area is an important inland holiday destination. I ended up visiting a Buddhist temple, the tombs of some revolutionaries and ended with Jasmin tea overlooking the lake. As there where not many other Westerners, the Chinese looked upon me with great curiosity :). 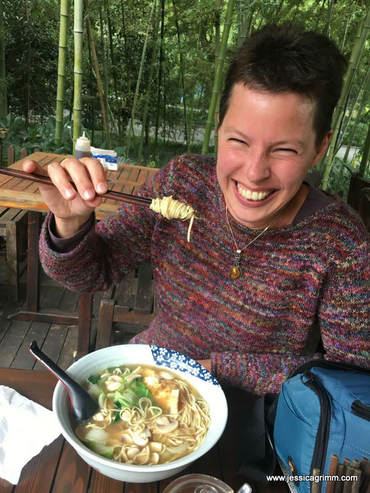 On Sunday, we prepped the classroom for the workshop starting on Monday. I met my assistant and translator Clover who has studied weaving in London. She did a great job translating my English into Chinese during the workshop! And in between, we ate :). Not only breakfast was a treat, the local eateries were fabulous too! Me using chopsticks for the first time was hilarious and I must confess that I don't miss them... 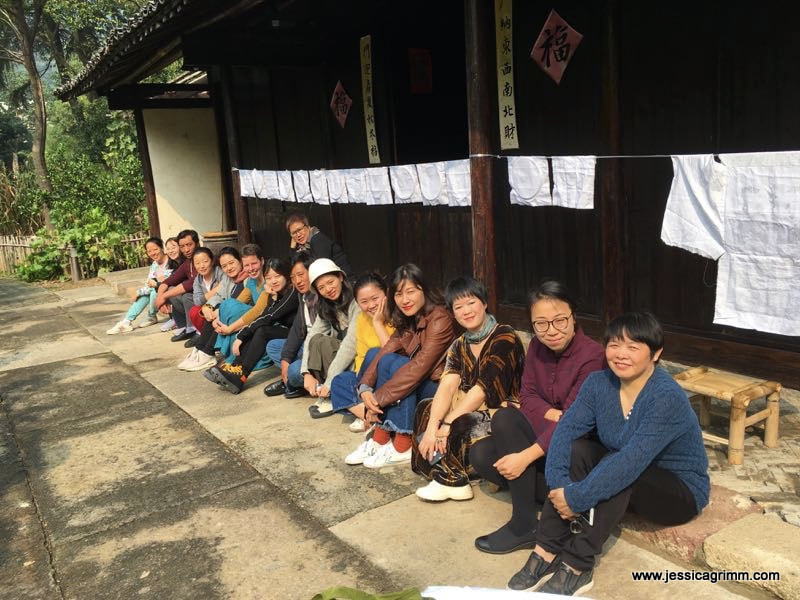 On Monday, the teaching started. The group of students was very divers. I had museum staff, art teachers, fashion designers and even two craftsmen from Tibet. They were all very eager to start! 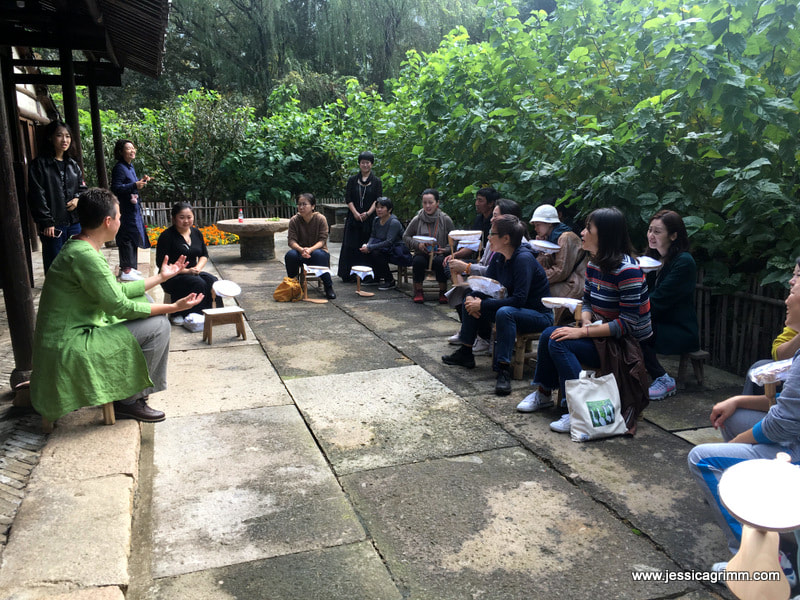 Although the official classroom was in the basement, we decided to use the lovely weather and stitched outside a lot. Sitting in front of an old sericulture farm was a favourite with all of us until the mosquitos found out about it too... We strung a line and hung up the result of the previous day to talk about the experience. I was very impressed with my students as most of them had finished their projects overnight! However, getting them to critique their work publicly or express their experiences with the particular embroidery technique, wasn't easy. 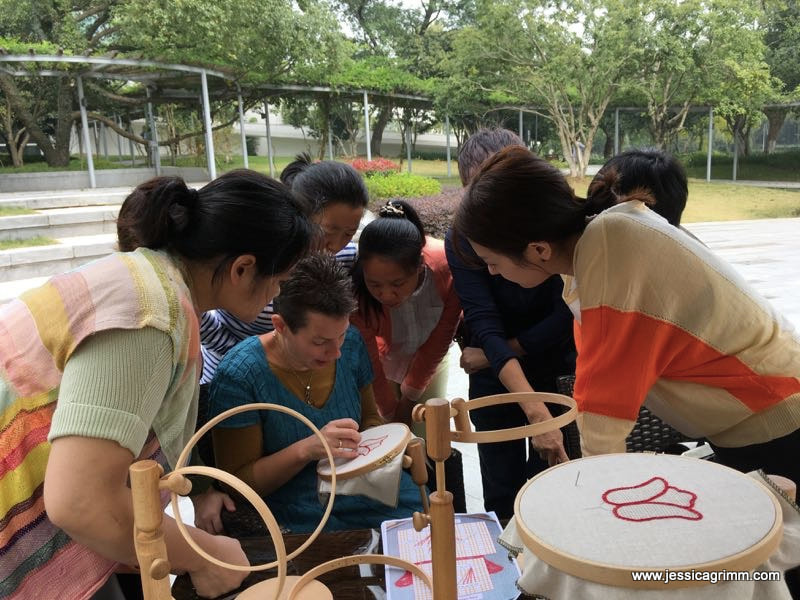 Other favourite stitching spots were the cafe... 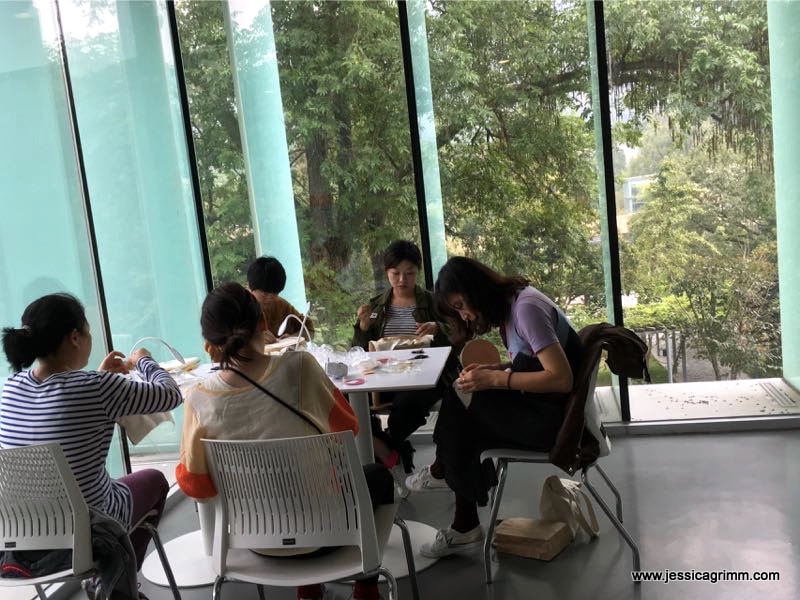 ...and the gallery of the fashion building. Those large windows were fantastic. 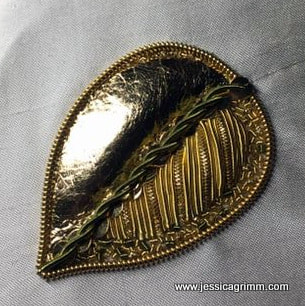 When teaching the goldwork leaf on Thursday, I discovered a mistake with the scale of the leaf. Oopsy! Time for a last-minute change: add some chipping to the original design and all was well again. It shows that no matter how well you prepare, mistakes can always happen. Adapt and carry on! We ended the day with a Chinese high-tea organised by the students. They had brought all sorts of delicacies for me to try. Yummy!  The schedule on Friday and Saturday changed a little. We had the opportunity to pair my talk on medieval embroidery with that of a local master embroiderer on Friday. We had all hoped that she would talk on the techniques she used in her embroideries or the thought process that went into them. Unfortunately, she didn't. It was more a sales talk. However, some of her work was really nice and unusual. It showed that she also experienced difficulties with branding her work as art. My talk went really well. The museum did record it on video and as soon as I know where it is available, I will let you know. If it does not become available, I will put up the original presentation and let you know where to find that. However, it is much more fun to hear a Dutch person talk in English and have that translated into Chinese by Clover :). 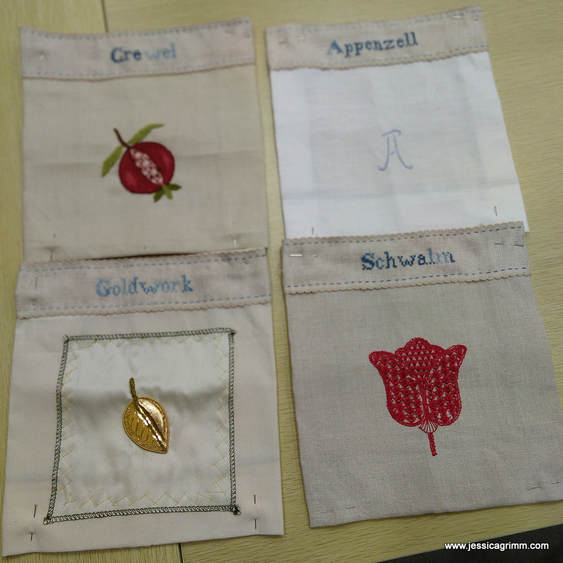 As one afternoon of the original five-day workshop was high jacked by the presentations, we decided to meet again on Saturday morning (in the original plan I would have given my presentation on Saturday). I was completely blown away by the fact that quite a few students had completed all four projects! That's the best praise a teacher can get. It shows that they really enjoyed themselves and loved the tasks I had set them. Those six days were immensely gratifying and I really had a blast! Seeing people figuring things out and going on helping others is such a great experience. I really hope they can implement the things they have learned in one way or the other. 
16 Comments
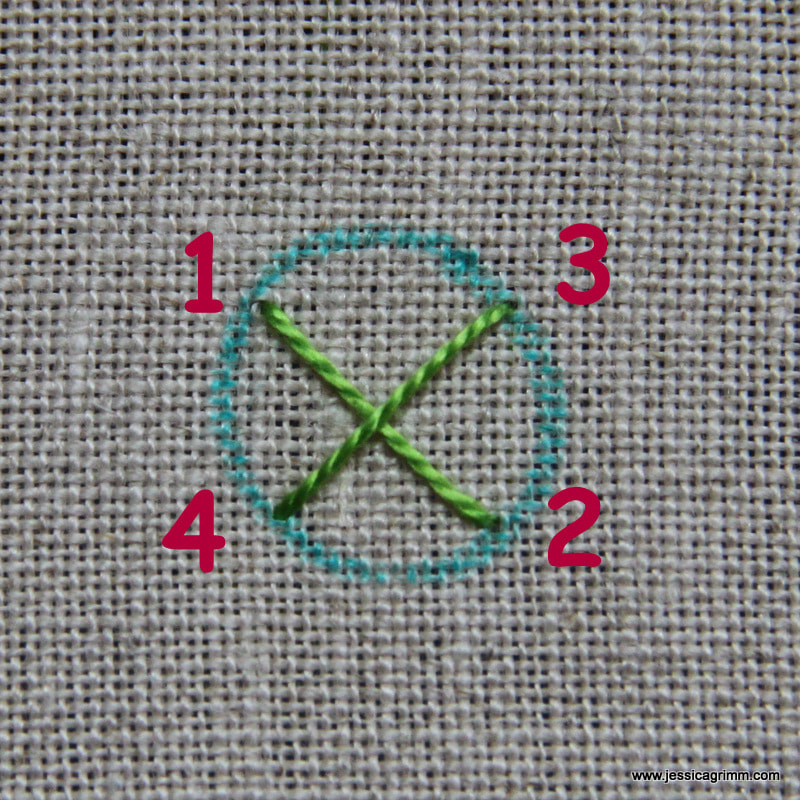
Did you miss me last week? Sorry for not writing a blog post. However, I had a pretty good excuse: another four-day course in Appenzeller fine whitework embroidery with Verena Schiegg. But before we dive into that, I'd like to invite you to listen to my Fibertalk podcast I did with Gary and Christine. What fun we had discussing bones, academic careers and lots of embroidery! 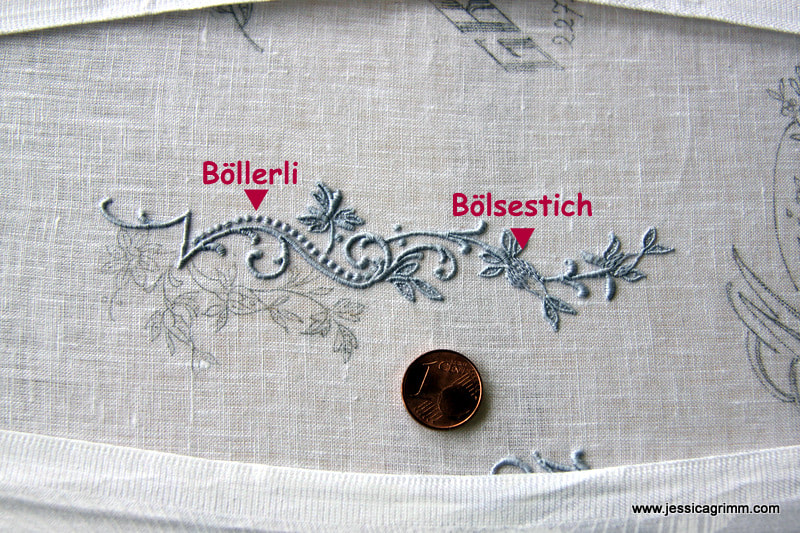 Appenzeller whitework sampler For my four days with Verena, I choose to continue working on my sampler. There are still a few techniques characteristic for Appenzeller fine whitework which I haven't touched. One of them is the 'Figurenstich' or 'Bölsestich'. It is used to fill areas, but it isn't padded (as most of the other elements in this type of embroidery are). It is a very formal stitch, not unlike some of the filling stitches in traditional Chinese embroidery. It creates a brick pattern, and unlike needle painting, stitches aren't split. But you can stitch the drape of clothing with it as you can subtly change the direction of your stitches. You can see the Bölsestich in action on the rosebuds in the picture above. 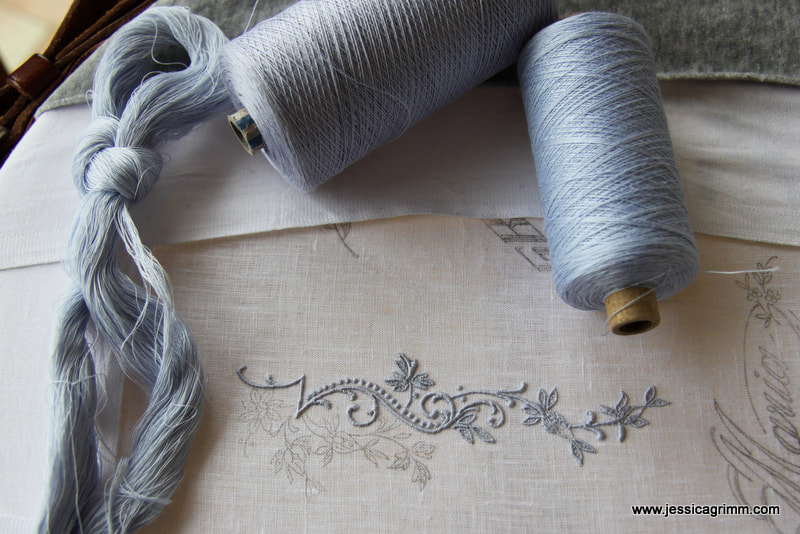 Appenzeller whitework sampler Second new thing I learned were the 'Böllerli'. A way to create a dot of padded satin stitch. As described in a previous post on this type of embroidery made for international export, it was very important to be economical with your threads. The creation of a Böllerli explains this concept very well. So, how does one create a Böllerli? Not by laying your layer of padded satin stitches in one direction and then, starting from the middle, laying your layer of satin stitches at an angle on top. Far too much waste of material!
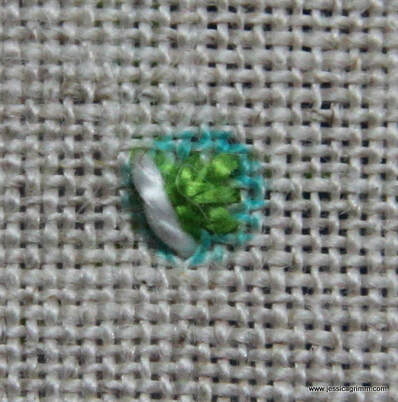
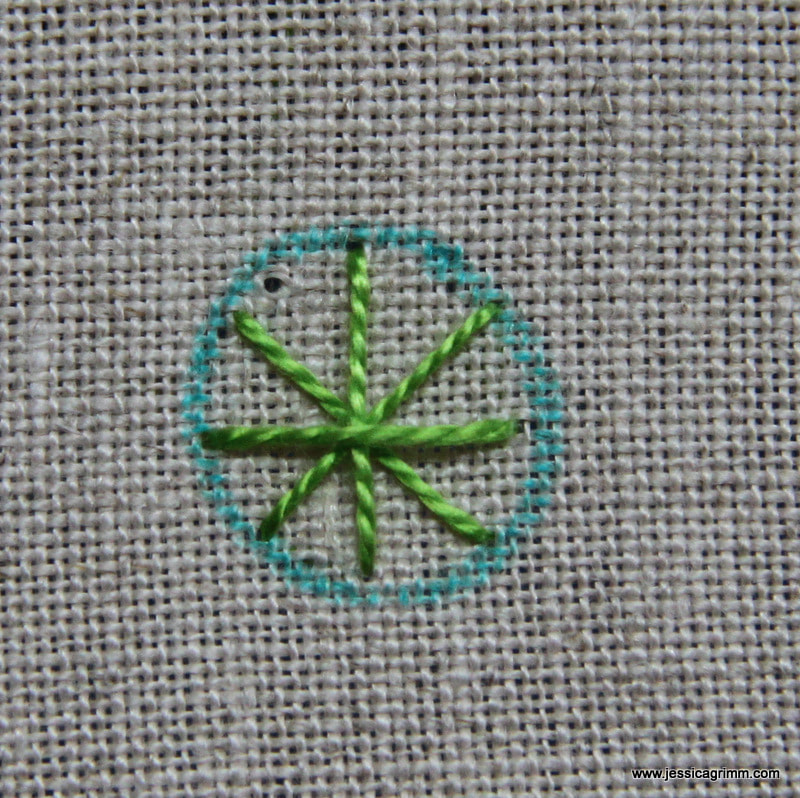
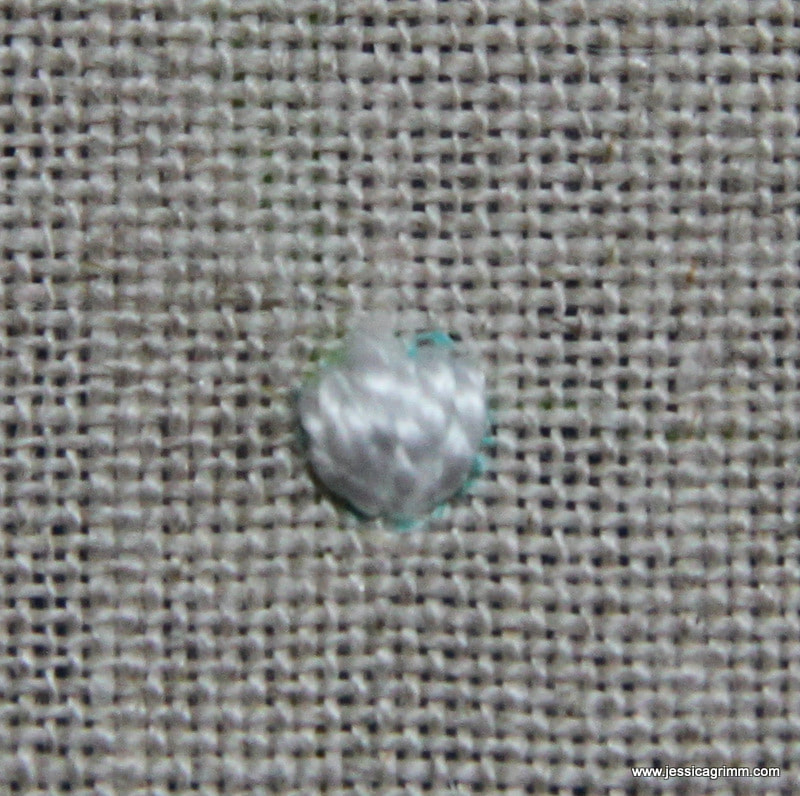
Instead you start with a cross-stitch inside the lines of your dot. You execute the stitches in such a way, that there is as little thread carrying on the back as possible. Add a second cross-stitch on top at an angle. Again, as little thread as possible on the back. Now you start your satin stitches on the left-hand side. You work from top to bottom and you angle your first stitch in. Add as many stitches as needed to completely cover your dot. Your last stitch, on the far right, is angled in too. NOTE: in order for you to be able to see what goes on in these pictures, I used perle #8 and worked at two different colours. The original Böllerli in the picture further above where stitched using cotton threads size #55 and are less than 1mm in diameter... Another big difference between the two ways of stitching a padded satin dot is, that due to all the padding stitches crossing in the middle, the dot is more domed. If you would like to try your hand at a Böllerli, you could use a 2mm circle template and one strand of stranded cotton. You can learn more about Appenzeller fine whitework from my previous blog posts: Appenzell Embroidery (with a link to a documentary), Diligence on white part I, Diligence on white part II & Appenzell re-loaded.
Today I am going to write a bit about my love affair with Schwalm embroidery. You see, I can pinpoint exactly where I encountered this pretty whitework embroidery technique for the first time. Not in its native Hessia, one of the federal states of Germany. Nope. It was Inspirations issue 69 in the spring of 2011. The beautiful 'Sense of Place' by Luzine Happel featured hearts, sunflowers and tulips filled with pretty patterns. I so wanted to learn this embroidery technique! But, I had never done any whitework embroidery other than a huge Richelieu window pane featured in an embroidery special of the Dutch Libelle. Luckily, I had just started my Royal School of Needlework Diploma course. And it happened to include a whitework module. Little did I know that they had never heard of this type of embroidery. And my tutors weren't thrilled at the prospect of teaching me something they were not familiar with. So I ended up with a whitework sampler featuring only a little bit of true Schwalm embroidery. And yes, I didn't like the prospect of an all-white piece either :).  Royal School of Needlework Diploma whitework sampler Now most of you will by now know that I don't like table cloths. Although, to be honest, there is nothing wrong with these pieces of textile. It is just that when I tell people that I embroider for a living, THEY picture me amidst heaps of neatly stacked embroidered table cloths. Now that gives me goose bumps. But for the wrong reasons. It truly freaks me out. Embroidery is so much more than just a means to adore a table cloth! Instead, one of the Schwalm-things I made was a nativity scene to be hung in front of my kitchen window. It is an ongoing process and I hope to add camels, a donkey and an ox this year.  Schwalm embroidery nativity And although I like white, I like colour better. White reminds me of those pretty shoes I once had as a girl. They were lovely, but not so white for long. The same with those pretty lacily white stockings me and my younger sister wore under our Sunday dresses as girls. They attracted dirt like nobody's business. So in came the use of colour in my Schwalm embroidery projects. 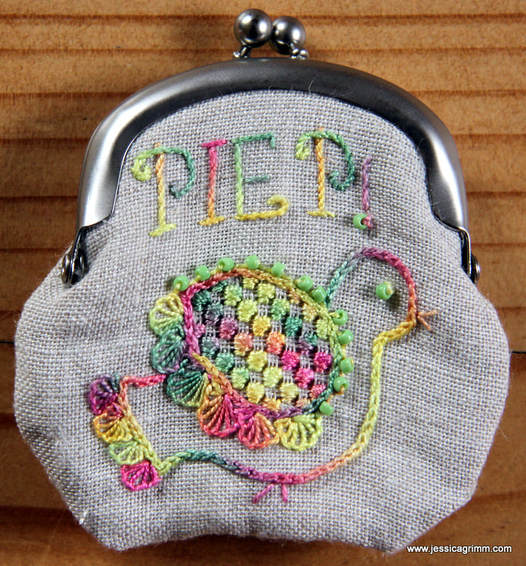 Schwalm embroidery purse Now, traditional Schwalm embroidery is done with cotton a broder. A not so shiny non-strandable cotton thread. It is nice, but cotton perle and silk threads are nicer. Or at least in my opinion they are. I especially like to use variegated threads as they form pretty colour patterns when used with the many different Schwalm filling stitches. 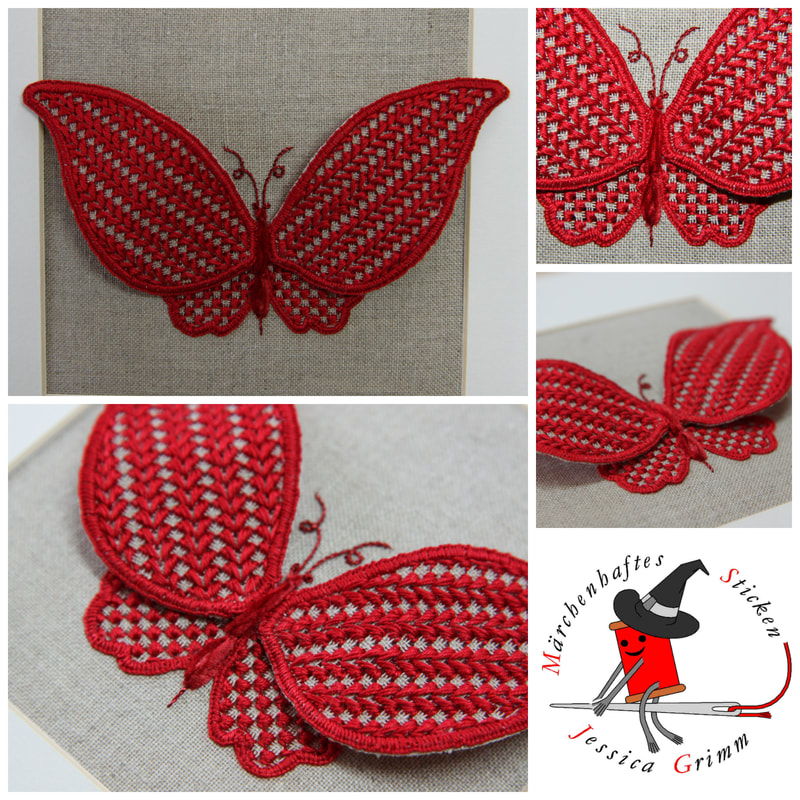 Schwalm embroidery meets stumpwork So, by now, I had changed the colour of things, the materials and the stitching topic. What's next? How about adding a stumpwork technique to the mix? Using wired elements with Schwalm embroidery really tickled my fancy! It looks so elegant and yet isn't too hard to create at all. 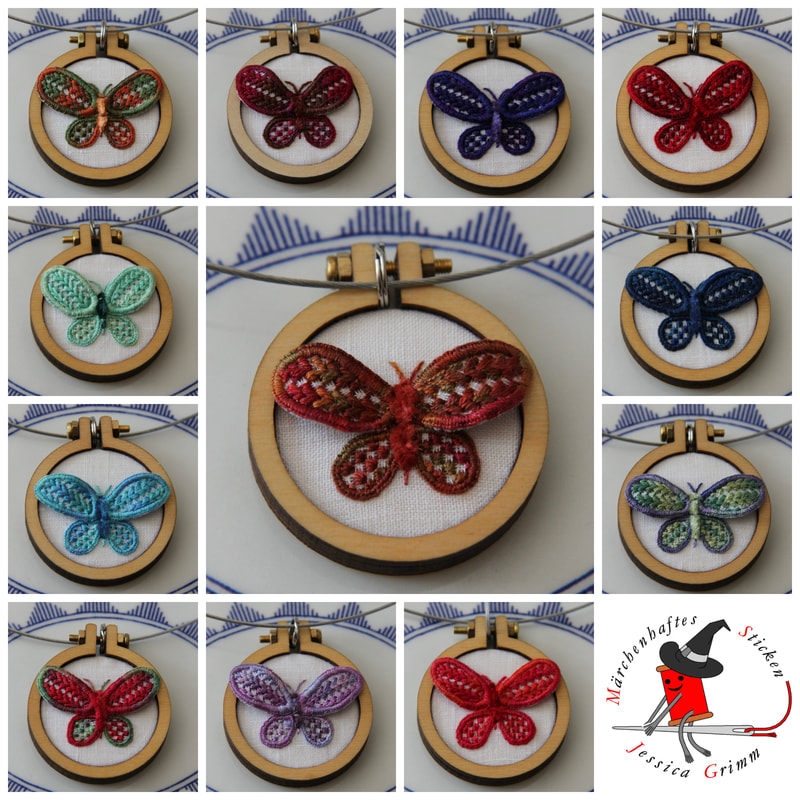 Schwalm embroidery meets stumpwork But I wasn't quite finished yet! How about one shrinks the butterfly? For instance, until it fits a tiny 4cm Dandelyne wooden hoop. Thanks to my training in Appenzeller whitework embroidery, I knew that you can add tiny filling stitches (some the same as in Schwalm embroidery; after all there is only so much you can do with a blank grid) into a tiny grid of withdrawn threads. Born where the elegant butterfly pendants! Still using original heritage skills, but sans the table cloth. After weeks of stitching (one butterfly takes about six hours to create), I now have a colourful bunch of lovely butterfly pendants.
If you would like to know more about the traditional form of Schwalm embroidery (including its use on folk costumes), check out Luzine Happel's website and blog. Also available in English. Luzine self-published a whole library on Schwalm embroidery. These are very good books if you want to learn this pretty whitework technique. I highly recommend them! The books are available in German, English and even French. Happy stitching! This weekend another chapter was added to my pursuit of learning Appenzeller whitework. Let me introduce you to the Möggler. The Möggler is a filling stitch used in drawn thread work. As always, cutting out threads makes your fabric weaker and is therefore left till the end. In this particular case it meant that I had to finish all the Blatten areas (padded satin stitch), seeding and my Löchli (eyelets). And then disaster struck. Had I only paid head to Trish's good advice: Embroidery forever, housework whenever. I made a wrong move whilst cleaning the bathroom and since then my left shoulder has been sore. It is getting better, but I can't use my left arm for longer than about 30 mins. when stitching. Oh, pooh. 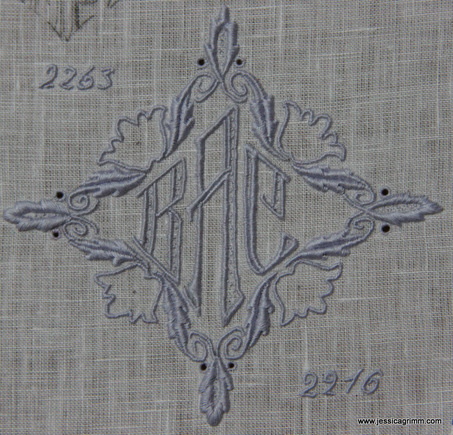 Appenzell whitework sampler This meant that the above is not perfect as I simply didn't have the time to take stitched areas out that weren't up to my usual standard. On the other hand, this is a sampler and a lot of the designs have repetitive areas. So I just strived to do better on the next element. And I can see myself progress nicely in this particular part. The other thing I had to come to terms with was the Spengen (padding). The Appenzeller way of padding is a really wild one. Or that's at least how I perceive it. For starters, there is no split stitching the contours of the element you want to pad. Then there are no neat alternating layers of satin stitches. The embroideress just bangs in stitches until she has reached a satisfactory amount of padding. In the process, she takes care to have only a minimum amount of thread on the back (this saves thread when adding the satin stitches as they have to go around less 'bulk' on the back). This was not for me. As, due to an eye condition, I live in a 2D world, I have no way of telling when this 'satisfactory amount of padding is reached' and, more importantly, if the result is even. No even amount of padding, no smooth satin stitching on top. So, I reverted back to the 'orderly' way of padding and am a much happier bunny now. 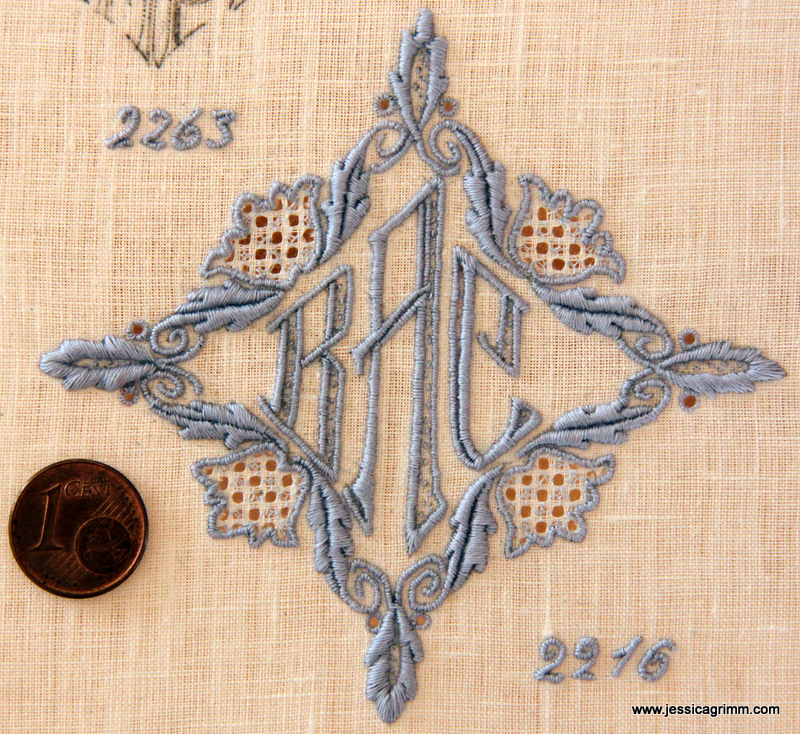 Appenzell whitework sampler What did I add? Four areas of drawn thread work in the tulip-like flower heads. For each tiny area, I cut two threads and left three threads standing. In both directions. Every other 'hole' was filled with a Möggler using a thread approximately half the thickness of the thread used for the satin stitches. As the filling area is of irregular shape, it was a bit of a puzzle to put my Möggler in. And as the final flower head was worked at the end of the day with the light fading, I will have to do it again sometime in the future. In two weeks' time, I will attend a four-day course with Verena in Appenzell. I've decided to focus more on these filling stitches. Using them in tiny irregular spaces was a big challenge as you never come into a comfortable rhythm. So next time, I will start a sampler with neat rectangles. Want to try your hand at the Möggler? Have a look at Luzine Happel's website on Schwalm embroidery. The same stitch is known as Rosenstich in Schwalm whitework and is also used in Hardanger embroidery. Here is the step by step explanation in german and in english.  And for those of you coming to visit, you are now greeted by a shining sign. Hope to see you soon!
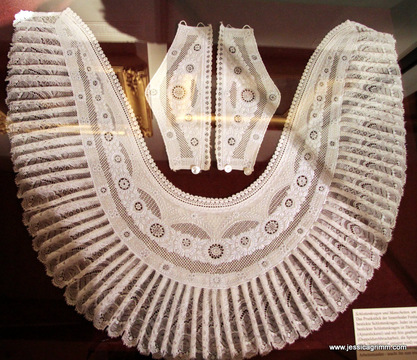
Last week, we examined the basis of Appenzell embroidery: padded satin stitch. This week, we'll have a closer look at other major components: Höhlen or drawn thread work, Lääteli or pulled thread work and Spetzlistiche or needle lace. 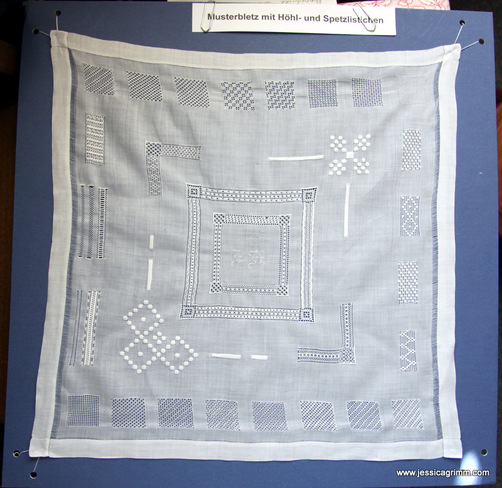 Appenzeller whitework sampler This sampler, made by Martha Ackermann and part of Verena Schiegg's collection, mainly shows pulled thread work. First, the outer line of the design area (in this case squares) is worked in padded satin stitch. Next, threads are taken out from the back to open up the fabric. For instance, every fourth vertical and horizontal thread is cut and taken out. This 'canvas' is now filled with stitches with a thread as fine as the fabric threads. 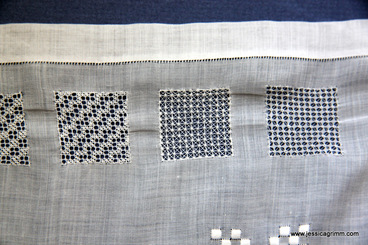 Appenzeller whitework sampler Here is a close up of some of the filling stitches. Today, only about twenty stitch patterns are still in use. However, the Appenzell Museum (well worth a visit!) has a sampler with 124 different patterns. Unfortunately, without taking it apart, it is impossible to tell how these were made. Some patterns are similar or equal to those used in Schwalm embroidery. You can find more on this whitework technique very suitable for beginners on Luzine Happel's blog. 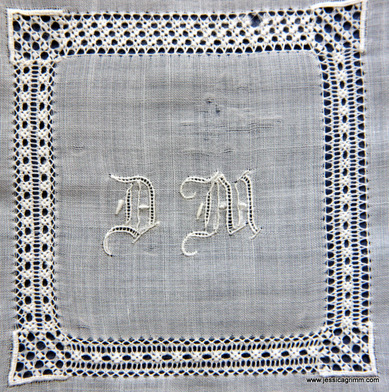 Appenzeller whitework sampler Do you see the ladder-like structures in the above monograms? These are called Lääteli and are a form of pulled thread work made with hem stitch. 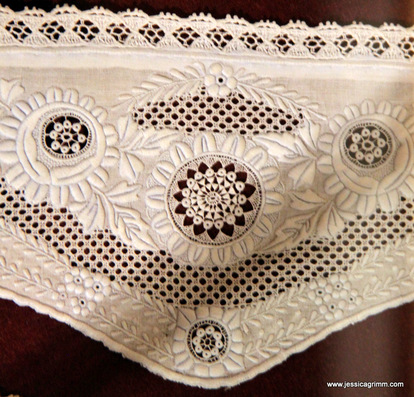 Appenzeller whitework cuff Finally, the creme de la creme of Appenzell embroidery is formed by the Spetzlistiche: very fine needle lace. See the filled roundels on the above cuff? That's the stuff. The outer line of the design element is worked in padded satin stitch. Then the fabric is cut away carefully. Buttonhole stitches are worked over the padded satin stitch to clean up the border. Now a piece of lace is formed by anchoring threads into the buttonhole stitches.
Nowadays, Appenzell embroidery can still be seen on the festive folk costumes of the region. Collar or Schlottechrage and cuffs are elaborately embroidered.
That's all for now folks. Back to packing the last bits needed for the show in Osnabrück at the end of the week. Hope to meet many of you there! My three days learning Appenzell embroidery with Verena Schiegg were very special. I learned a lot, both embroidery-wise and teaching technique-wise. As three days are not nearly enough to conquer any new embroidery technique, I am certain to return soon to Appenzell in Switzerland. For those of you who haven't seen the video in last week's post, I highly recommend it as it gives you an understanding of Appenzell embroidery in its historical context. But first things first. As most of you are probably aware of: Switzerland is expensive! So me and my friend Luise needed a cheap place to sleep. Luckily, Luise had been before and new just such a place: nunnery Maria der Engel in the centre of Appenzell village. The late 17th century nunnery has seen very little modernisation. The last Capuchin nuns left in 2008. Since then the nunnery is run by a small group of dedicated women. They mainly cater for pilgrims on the Camino de Santiago. Below is a picture of my cell. Do follow the link to their website for more pictures of this truly special place. 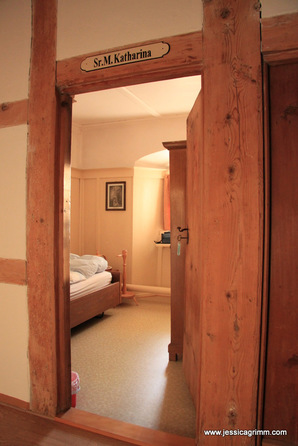 From Maria der Engel, it was only a short walk up the hill to Verena's home. She has a cosy room on the second floor of a traditional Swiss house in which she teaches. Verena teaches individuals and small groups for a fee of 110 Swiss francs per day. This fee is comparable to that of the Royal School of Needlework. Appenzell embroidery uses a limited number of surface stitches combined with drawn and pulled thread work and a form of needle lace. As I am an absolute novice in fine white work, I decided to start work on a surface embroidery sampler. It is in essence a page from a catalogue. Prospective customers could choose their design from such a catalogue and have it stitched. Several different stitchers would work on the piece, each with her own field of competence. 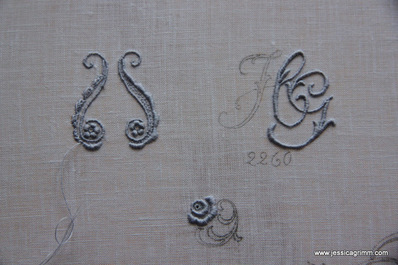 Appenzeller whitework sampler This is the result of three days stitching. Verena had transferred the pattern onto the linen with the help of a Stöpfel (pricking), charcoal powder and a fixative. The Stöpfel is made with a machine and forms a separate craft not executed by the stitcher. The holes need to be fine and quite close together in order for the powder to form a continuous line to stitch on. An art in itself. One of the characteristics of Appenzell embroidery is the use of light blue cotton yarn of different thicknesses. My particular sampler will be stitched with a #55. However, the finest threads are about #160 used for the needle lace parts. Unfortunately, both the very fine linen we stitched on and the special threads are very hard to come by nowadays. 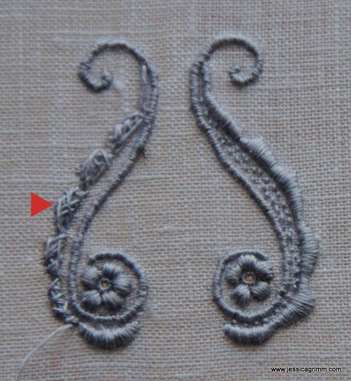 Appenzeller whitework sampler As Appenzell embroidery was made for export, it was important to be economical with time and materials whilst still achieving a masterpiece. This becomes apparent when taking a closer look at the Spengen (padding technique) used under the Blatten (satin stitches). These produce long stitches on the top and small stitches at the back. In this way, thread is saved with the padding itself, but also during the later satin stitching as there is no bulk on the back for the satin stitch to also go around. You'll see the padding stitches in the picture above (red arrow). Each and every bit of the above design is padded with at least two threads before being satin stitched. Only exception: the tiny little eyelets forming the hearts of the flowers. To give you an idea of size: the above stitched area is only 28x32 mm! Part of the design is filled with tiny seeding. Getting a smooth finish and keeping the sheen on the thread will be beyond my grip for a while. This only comes with practice. From tomorrow onwards until Sunday, I will be stitching at the Pilatus Haus in Oberammergau again. This will give me plenty of time to make a good head start with my sampler. 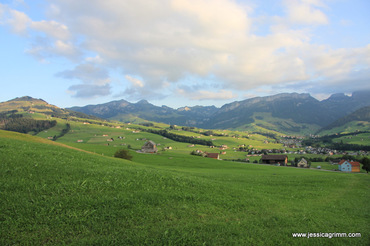 I will leave you with a picture of the beautiful alpine surroundings of Appenzell. If you are interested in learning this very fine white work technique, do contact Verena. There are no books from which you could learn the typical Appenzeller way of stitching. In addition, the materials are very hard to come by and are either old left overs or especially made for Verena. Before embarking on learning such a fine embroidery technique do keep in mind that you'll need very good eyesight, diligence and a patience butt to sit on!
Hope to see you next week for more on the pulled and drawn thread work and the needle lace involved in Appenzeller embroidery. Happy stitching!
In a few hours, I will leave for Switzerland. Together with a friend, I will go to Verena Schiegg in Appenzell. Verena is one of only a handful of people who teach the very fine Appenzeller Whitework. I am so looking forward to the coming days! Will tell you all about it next Monday. In the meantime, for all of you not familiar with this type of whitework embroidery, here's some background information.
Hand embroidery as a way to earn a living dates back to the early 19th century in this rural alpine area near St. Gallen in Switzerland. Times were hard and hunger was either present or never far away. Talented people of either sex and children started to earn a little extra by stitching handkerchiefs, collars, christening robes, shawls and the like as home workers. The older pieces use fine chain stitches to stitch out the patterns. After only a decade or so, satin stitch took over. The products were highly valued and exported to France and the United States. The decline set in the third quarter of the 19th century with the introduction of embroidery machines. However, some very delicate work couldn't be done with a machine. Finely embroidered handkerchiefs, dresses, men's shirts and bed sheets were still highly valued around the turn of the century. Finely worked pieces were the stars of national and international exhibitions with young embroideresses demonstrating their skill. The Second World War led to the final demise of this type of home work. Export opportunities broke away and after the war, fashion had changed and Appenzeller embroideries were no longer 'hot'.
For those of you who haven't seen the documentary 'Fleiss auf Weiss' (Diligence on White), do click on the video above. Flash forward to 54 minutes for English spoken commentary.
And last but not least, a very warm welcome to all my new readers who signed up after last week's blog post was featured on Mary Corbet's Needle 'n Thread on Friday! It is amazing to think that Appenzell will soon be known in Australia, Argentina, Canada, Colombia, Denmark, France, Germany, Guatemala, Gabon, Morocco, New-Zealand, Netherlands, Portugal, Romania, Spain, Tanzania, United Kingdom and the United States. |

Want to keep up with my embroidery adventures? Sign up for my weekly Newsletter to get notified of new blogs, courses and workshops!
Liked my blog? Please consider making a donation or becoming a Patron so that I can keep up the good work and my blog ad-free!

Categories
All
Archives
July 2024
|

 RSS Feed
Contact: info(at)jessicagrimm.com
Copyright Dr Jessica M. Grimm - Mandlweg 3, 82488 Ettal, Deutschland - +49(0)8822 2782219 (Monday, Tuesday, Friday & Saturday 9.00-17.00 CET)
Impressum - Legal Notice - Datenschutzerklärung - Privacy Policy - Webshop ABG - Widerrufsrecht - Disclaimer
Copyright Dr Jessica M. Grimm - Mandlweg 3, 82488 Ettal, Deutschland - +49(0)8822 2782219 (Monday, Tuesday, Friday & Saturday 9.00-17.00 CET)
Impressum - Legal Notice - Datenschutzerklärung - Privacy Policy - Webshop ABG - Widerrufsrecht - Disclaimer