|
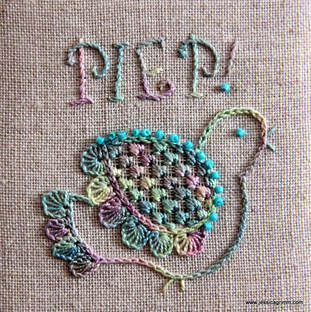
Between chasing supplies for the next online embroidery course, trying them out and processing fruit and vegetables for winter storage, I managed to finish Royal Garden by Debbie Rowley. This was originally a SAL organised by FiberTalk to promote counted canvas/needlepoint. As this is a technique not taught by the Royal School of Needlework, I was curious to try it out (NOTE: the RSN does teach canvaswork/needlepoint, but either as a shaded version using tent stitch or as a free-er version using traditional canvas stitches mainly based on satin stitch). The technique is quite popular in the US, but virtually unknown in Europe. Designs make extensive use of speciality threads. The technique is well-suited for beginners as long as the instructions are clear. 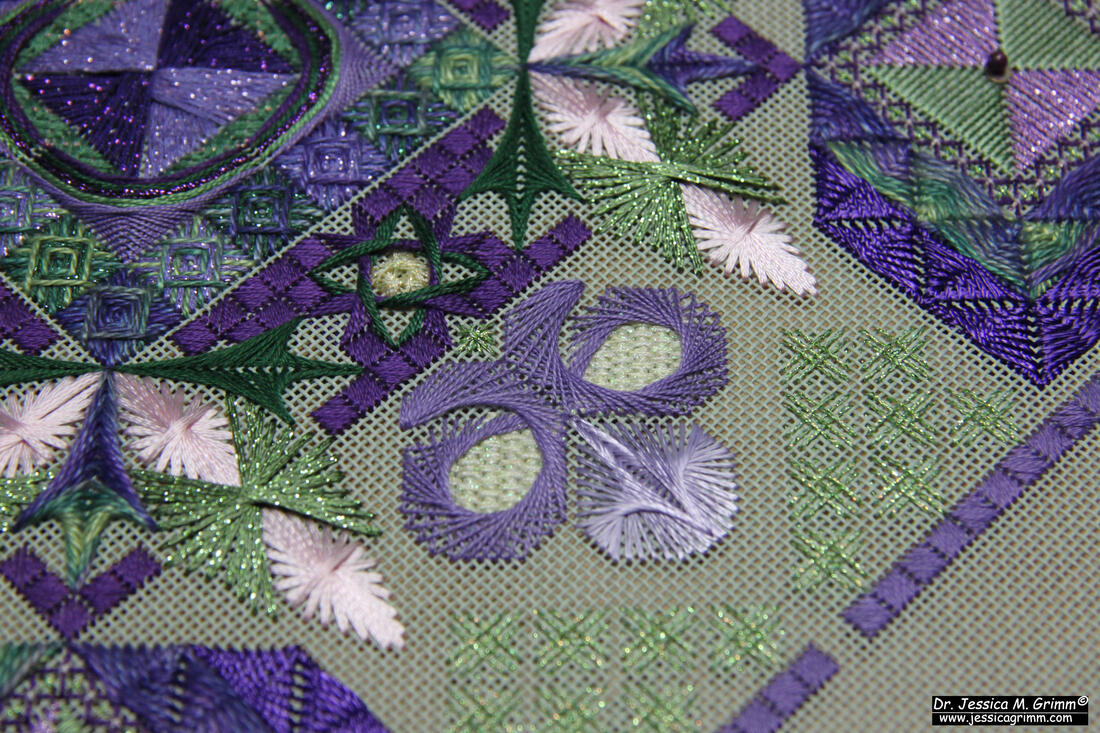 Royal Garden by Debbie Rowley As noted in my previous blog post on the project, the instructions contain a number of mistakes. Some more serious than others. I spotted one additional mistake when finishing the project. Page 41: "Begin with the silk/metallic braid, and stitch as shown in Diagram 56" (and not 55 as stated). Furthermore, the numbering in some of the diagrams is rather difficult to read as they are placed on top of each other or other elements in the drawing. 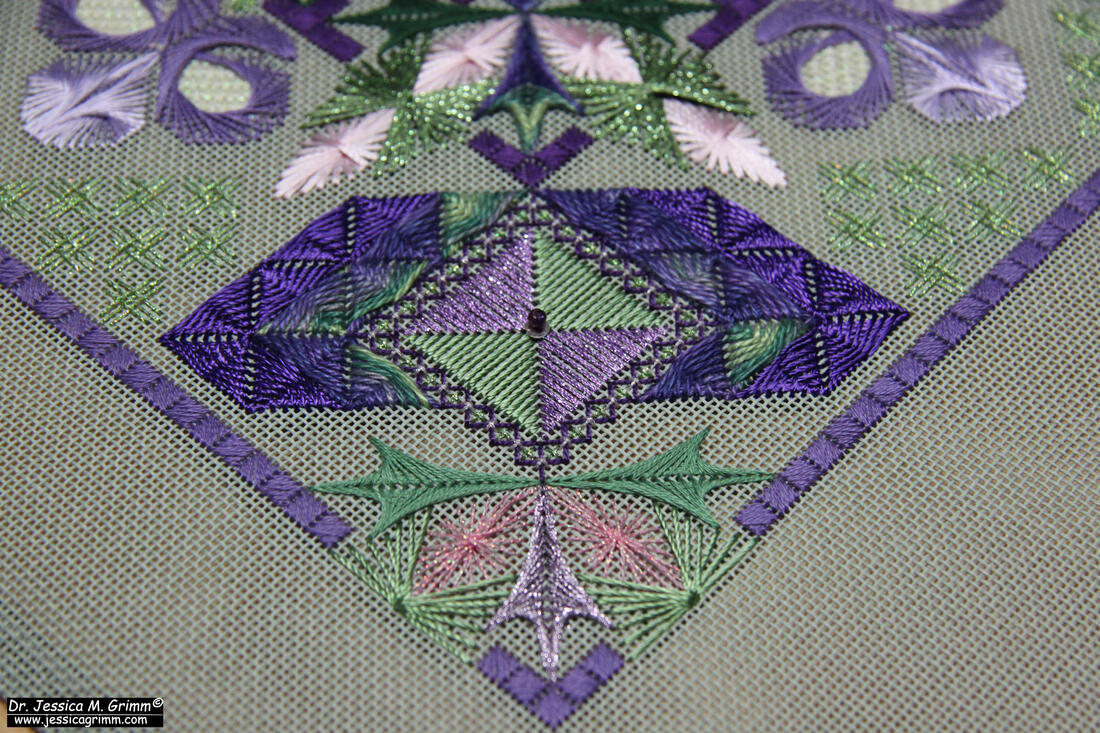 Royal Garden by Debbie Rowley As with previous parts of the design, I decided to make some changes. For the life of me, I could not execute a Chilly Hollow stitch with the threads specified. The rayon cord (Rainbow Gallery Panache) was so slippery that in order to maintain tension, I distorted the canvas and broke the centre foundation stitches. I decided to opt for simple satin stitches mimicking the shape of a Chilly Hollow stitch. Unfortunately, I had run out of the correct colour Rainbow Gallery silk lame braid. That was a major annoyance. In my opinion, kits should contain enough material so that occasional ´backwards stitching` is covered. Luckily, I had some leftover silk lame braid in a slightly different colour. In the middle, I stitched a bead on a silver-plated spangle for some added interest.  Royal Garden by Debbie Rowley Whilst I enjoyed the first part of Royal Garden (centre part, before adding the lilac crescents with a tail with the yellow teardrops), I did not particularly like stitching the rest of the design. I think some colours do not work so well with the middle part of the design. Especially the Sword Amadeus in DMC #320 are an odd choice. The colour does not really harmonise with the rest. One wonders if DMC changed the colour between when the design was created and me stitching it.
Is counted needlepoint for me? Not really. Although I liked learning new stitches, I did not like working with threads that are, if you are honest, not suitable for the job. Most of the speciality threads are made of artificial fibres. Some need ironing to get the wrinkles out or glue to stay put. That's not my cup of tea. My other problem is that most of these threads, whilst some are even made in Europe, must be ordered from the US. This makes counted needlepoint for me more expensive than goldwork embroidery. Personally, I also missed further instructional videos by Debbie Rowley or FiberTalk. It would have been nice to keep the SAL going and finish the project together. Has anybody else stitched Royal Garden? What were your experiences? Please leave a comment below!
10 Comments
What is Royal Garden? This is a counted canvas/needlepoint design by Debbie Rowley of Debbee Designs. FiberTalk organises a SAL for it. Yesterday, saw the first live-show in which Debbie demonstrated the double fan doubles stitch. There will be future live-shows, but there doesn't seem to be a schedule for them yet. 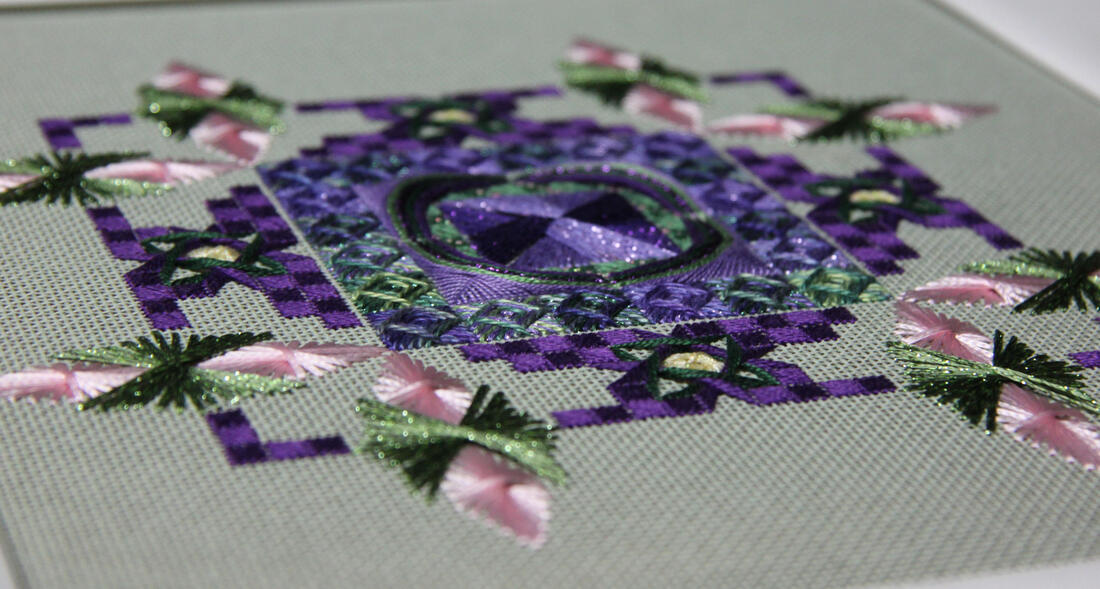 Royal Garden by Debbie Rowley Counted needlepoint uses embroidery stitches such as: waffle stitch, walnettos, Jessicas, crescents, sword amadeus etc. to form colourful and highly textured geometric designs. You use a plethora of speciality threads like those produced by Rainbow Gallery, together with stranded cotton and perle. Counted needlepoint is huge in the USA, but not very well known in Europe. That's precisely why I joined the SAL! The embroidery technique is not very difficult as long as the instructions are well-written and clear. And Debbie's instructions are. However, I did stumble upon a few mistakes. I've pointed them out to Debbie and she has corrected them in her master-copy. Future instruction booklets will be updated. However, if you already own a copy, you might benefit from knowing what these mistakes are: - on page 5, the before last sentence should read: 'Bring the needle up one hole above 5 and park the needle on top of the canvas.' - on the master chart, there are two blocks of reverse Scotch stitches missing on the right-hand side just right of the waffle stitches. - the numbering in Diagram 31 on page 22 is partly illegible. If you email Debbie (address on the instruction booklet) she will happily mail a correct diagram to you.
It was all plain sailing until I hit the weaving on page 32 :). I just could not get it to look pretty. And my hands hurt a great deal after working only one side. Asking Debbie for help during the live-show did provide me with some helpful tips on how to manage this stitch, but I kept struggling. As one of the points of advice was to perhaps change the stitch, I decided to do just that. To keep a bit of a 'woven look', I opted for condensed Scotch stitch. It worked a treat! 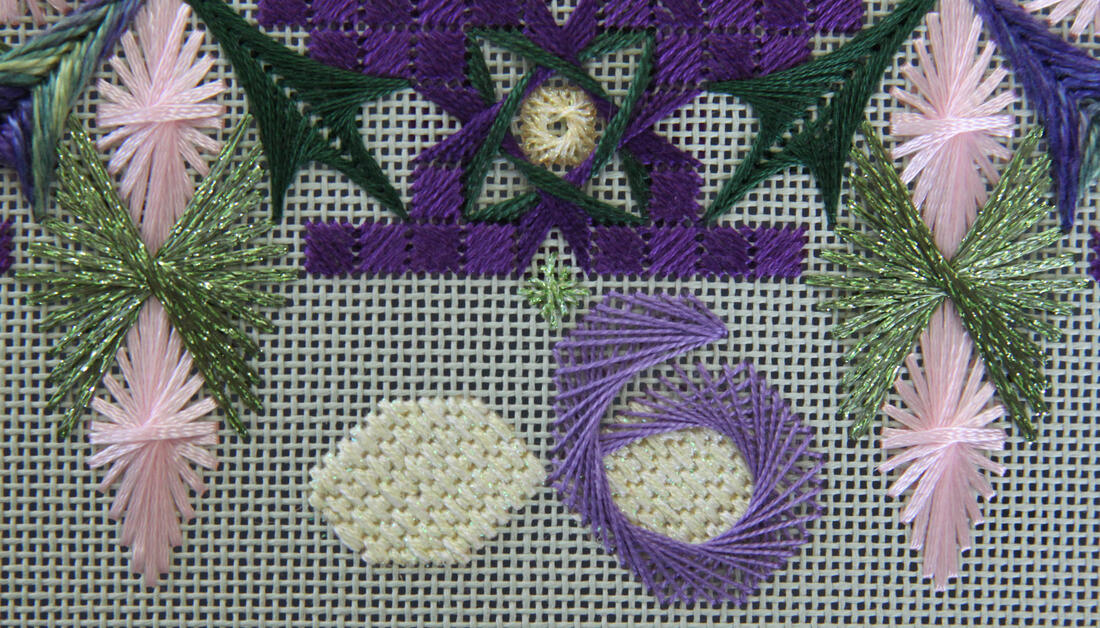 If you would like to swap the woven filling stitch for the Condensed Scotch stitch, I think you will be able to use the above photograph for stitch placement.
Who else is joining in with the Royal Garden fun? Last week I ran my last five-day embroidery workshop of the year. Due to my trip to China, I had to move some students to this new date. I thus ended up with one person doing crewel embroidery, one person doing canvas and one person doing goldwork. And that was actually really nice and varied! Let's have a look at what the ladies worked on. Unfortunately, my good camera gave up the ghost in China, so I had to take these pictures with my phone. Today my good camera was returned to me all cleaned and with a brand new diaphragm. Can't wait to shoot with it again! 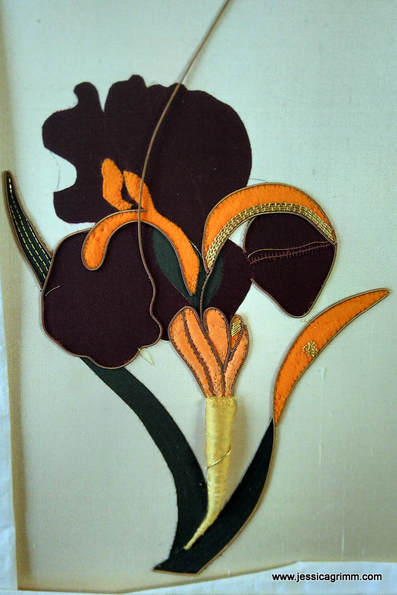 First up is Elena from Switzerland. She worked a design from an older RSN book. As she is originally from Russia, the copy of the book is in Russian too. Luckily for me, the names and sizes of the gold threads were not being translated. In the original design, the petals and leaves are coloured in with aquarelle pencils. We opted for silk appliques instead. Unfortunately, the picture does not really do justice to the very elegant feel of this design. I can't wait to see it when it is finished! 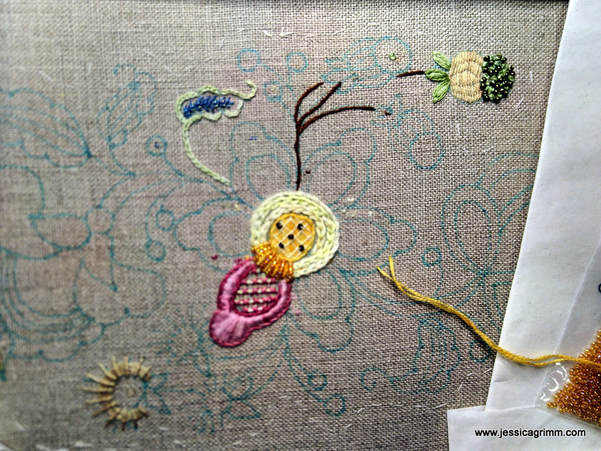 Anja L. worked a crewel embroidery design from a book by Hazel Blomkamp 'Crewel Twists'. It was her first encounter with embroidery since primary school. Getting to grips with the fact that this type of embroidery is not very productive, took some time. But she persisted and I think we have our latest convert! It will be lovely to see Anja develop her own style when she gains confidence in her own stitching abilities.  And then there was Anja D. from the Netherlands. She worked on her first canvas piece and really loved it. And so did we all! Once completely stitched, the beech trees will form a stark contrast with the beautiful autumn background. Instead of blending each colour shade in the needle, we opted for the variegated threads by House of Embroidery. This brand just happened to have such beautiful autumny colour combinations that it would have been a waste of time not to use them. And last but not least, you can watch my talk on historical embroideries I held at the National Silk Museum last month. As the whole talk is being translated into Chinese, I really needed to stick to my text so as not to throw off my lovely translator Clover. Pretty quickly we established a good rhythm and the whole presentation went rather smoothly. Enjoy!
This weekend, I had set up shop at the Klosterladen at Ettal Abbey. In the video below, you can see me and my good friend Kathrin working on the needlepoint church kneeler. Later in the day, a young man with his father and grandfather came along. The young lad had a go at embroidery and was really good at it! Apart from demonstrating stitching a church kneeler, I chat quite a bit with the visitors. That's fun too. But the best part of my 'job' is to observe how people react to monks :). couple: Are you a real monk? monk: Do you want to touch? (stretches out an arm) couple: Do you really live here? monk: Ofcourse! couple: Where exactly? monk: Oh, madam, I couldn't possibly tell you. I already have so many fans standing under my window at night! And to prove that we not only laugh our socks off all day, here is a picture of process so far:  Needlepoint church kneeler P.S. I ordered my church kneeler kit from www.churchkneelers.com
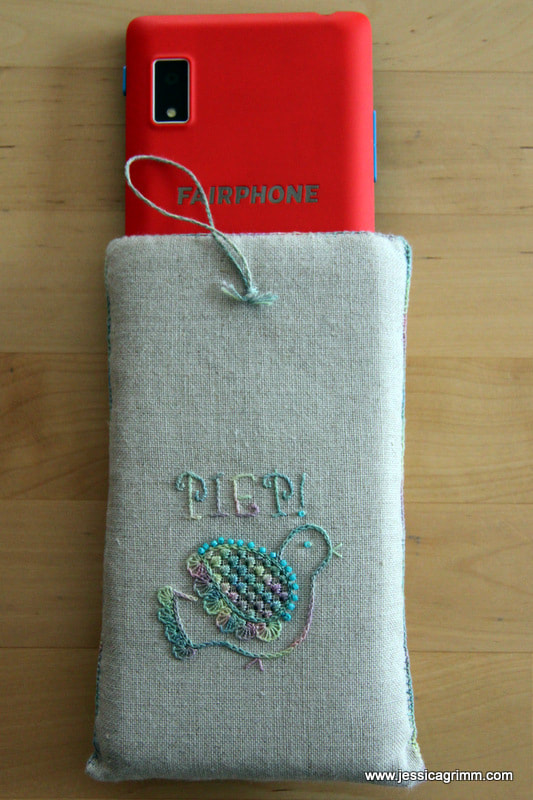
Yup, it is true: I have arrived in the modern area too. It took me years. But when I heard that Fairphone makes smart phones that last, are repairable and don't use blood minerals; I ordered one. So far, I have used it to download (and use!) a 5K running app, WhatsApp with my family, use Google for directions and information AND made the very occasional phone call :). Still much prefer my Ipad and Laptop... Maybe I should seek professional help? Pondering this option, I did make my Fairphone a cozy home to live in.
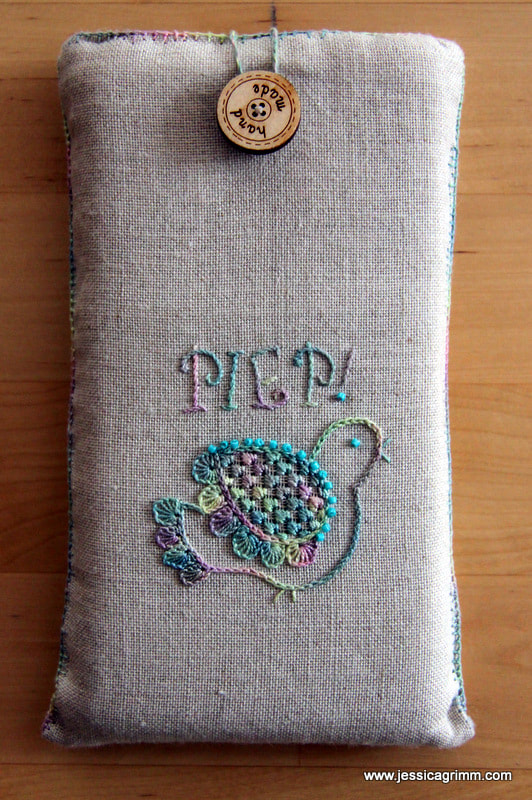
On Zweigart Newcastle natural coloured 40ct linen, I outlined the bird with chainstitch using a #12 variegated House of Embroidery perle colour Grapes C. Then I stitched partial buttonhole wheels for the feathers on the tail and the wing. I added straight stitches for the feet and the beak and attached some blue beads along the upper-edge of the wing. From the back, I withdrew every fourth thread in both directions and then added a Schwalm filling stitch called 'Gefieder'. The lettering was stitched using stem stitch. To make my 'phone home' a bit sturdier, I added wadding and a sheet of template plastic. The seams were then pimped with knotted pearl stitch. So far, my phone seems to be pretty comfy in her new home! I've asked my very talented husband to make a nice clean digital drawing of my scribbled birdy pattern. You can download it at the end of this article. Apart from using it as I did in a Schwalm embroidery way (finished design including lettering H 55mm), there is tons of other possibilities. How about stitching it monochrome on a piece of felt? Or applique with a few simple stitches for embellishment? Surprise me! 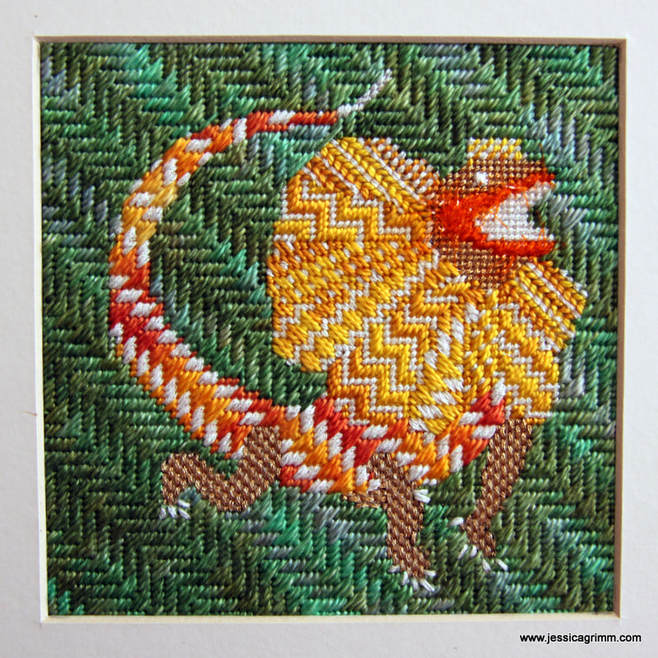 Canvaswork or Needlepoint Next up is another broderibox project using a design of a Chlamydosaurus by Millie Marotta. This amazing creature can impress by unfolding his neck frill. However, it can only do so in opening its mouth widely. The bones in the frill are extensions of the hyoid or tongue bone. Isn't nature amazing?! The lovely people of Nordic Needle had put in a glow-in-the-dark thread made by Rainbow Gallery. I made sure to add it to every canvas stitch I used on the chlamydosaurus (it is the white thread you see). And it glows beautifully at night! Unfortunately, it doesn't translate well in a picture. You have to take my word for it.
Last finish for today: the Floral Pomander by Hazel Blomkamp. I really enjoyed this project with all the little flowery scenes using simple embroidery stitches and tiny beads. However, the instructions were a bit messy with tiny pictures of the finished panels. And piecing the pomander together was a little fiddley. That said, it makes a great project if you like miniature embroidery, beads and a different way of finishing your embroidery. Oh, and thanks to the dried lavender mixed in with the toy stuffing, it is my best smelling project ever :)!
But before I'll address my latest stitched beetle, a bit of new additional information regarding Hiroko's cat embroidery book featured in my last blog post. Remember from last week's post that I recommended looking at the pictures in the book through a magnifier? Well, not only Mary Corbet and I remarked upon the small size of the pictures, more people did. To overcome this, Hiroko opened a password protected website for those who purchased the book. She will upload key pictures from the cat embroidery projects featured in her book onto that website. These pictures can then be downloaded onto your computer and zoomed in on as much as you like. I downloaded the first project and it works a treat! Unfortunately, for security reasons, Hiroko can't upload all the pictures. But this is a very good compromise! Hiroko has also let me know that she will not re-print the book once it sells out. So, if you want one, visit Hiroko's shop and order!  Canvaswork or Needlepoint Let's now move on to the beetle. I picked a line drawing from one of Millie Marotta's genius colouring books and transferred it onto 18 TPI Antique brown canvas with a black permanent marker. Why a permanent marker? Well if you'll need to block your embroidery afterwards, you don't want the black ink to run and ruin it :). I then started to play with the contents of my June broderibox by Nordic Needle based in the US. First up was a lovely blue metallic braid called Variegated GoldRush by Rainbow Gallery. It is a mixture of 20% metalized polyester and 80% viscose and it comes in 10 yards on a card. I decided to stitch long stitches to cover various parts of the beetle's body. The thread is just a little bit too meagre to fill out the canvas completely. However, it is not so sparse that I could have used a double thread. Instead, I just added a second stitch here and there on top of the first until I was happy with the coverage. For the neck, I used Byzantine stitch and since the single stitches making up the pattern are shorter here, I had no problems with coverage. Last but not least, I used tent stitches to stitch the mouth pieces and French knots for the eyes. This particular soft metallic braid is a joy to work with and doesn't snag or become worn. Will certainly keep it in mind for future uses! 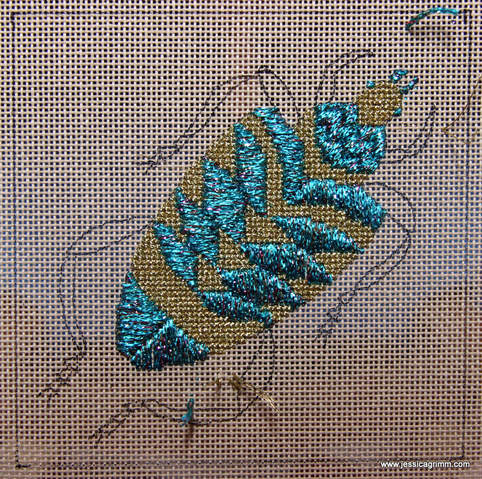 Canvaswork or Needlepoint Next up was another metallic thread: DMC Diamant colour D3852, a three-ply metallic. I filled the blanks on the body and the head with cross-stitches. In order to get good coverage, I doubled my thread. I like DMC Diamant as it is much better than many metallic threads out there. However, it isn't perfect. It unravels, wears and snags. That said, it is manageable as long as you use short lengths and watch your thread tension. 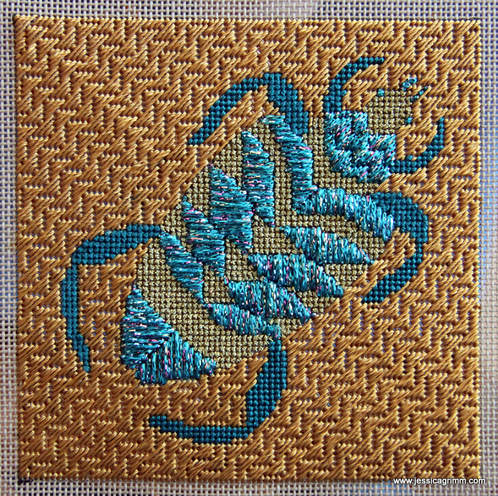 Canvaswork or Needlepoint Up next were the beetle's legs. I used Soie Cristale by Caron to stitch them. In order to get a subtle difference between the meatier upper legs and the thinner lower legs, I stitched the upper legs with a cross-stitch and the lower legs with a tent stitch. This particular silk thread is a dream to work with and the colour is just gorgeous. It is nicely behaving silk thread and thus particularly suitable for silk embroidery virgins! And now it is time for a serious confession: I do love Rayon. Or at least the type sold as Panache by Rainbow Gallery. The shine is unbelievable and gives the Byzantine stitch pattern a whole different quality. Hard to describe, but it shows a little in the above photograph. It adds movement to the background as the light comes off differently on different parts of the embroidery. And you can actually stitch quite nicely with this particular rayon! Yup, I am not lying. Yes, this three-ply thread unravels a bit, but nothing really serious. Yes, it is a bit slippery, but as long as you maintain good thread tension, it is a dream to stitch with. Conclusion: I do like at least some rayon threads. Still not sure if I should seek out professional help, though... 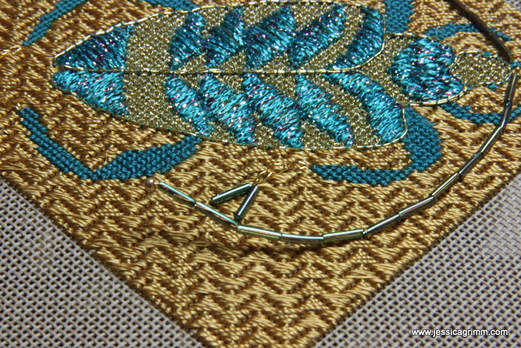 Canvaswork or Needlepoint Now it was time for the really fun part: embellishment. I started by couching a Japan Thread #7 by Kreinik around the edge of the beetle's body. I used one strand of the Soie Cristale for the couching stitches. Then I decided to stitch three chain stitches at the end of each leg with the Japan Thread. Quite heavy duty for the Japan Thread, but it worked perfectly. It didn't even harm the rayon stitches in the slightest. At the end of the Japan Thread chain stitches, I stitched down two Mill Hill medium bugle beads #82045 using Soie Cristale again. And then it was time for the really, really fun part: the feelers. I used brass wire to string up the bugle beads and placed a golden bead at the end before stringing back through the bugle beads. I plunged the ends of the wire through the canvas and secured them on the back. As the feelers are quite long and therefore had a will of their own, I partly couched them down with the DMC Diamant. And here is the finished beetle:  Canvaswork or Needlepoint I hope you had fun reading about another one of my broderibox projects! On a personal note, my husband started his new job today! After officially being laid-off in April when his employer filed for insolvency, he initially looked for a new job as an archaeologist. It quickly became clear that nobody really wanted a 50-year old digger. My husband realized that he didn't want to start at the bottom of the career ladder again. And we both realized that we didn't want to spend the next 17 years living the crazy living-apart life we had lived the previous 17 years. It was high-time to find an alternative. And luckily we found one! My husband now works part-time in a bookstore and part-time as a self-employed archaeometallurgist. Onwards and upwards from here :).
A couple of days ago, I received my July broderibox from Nordic Needle. It contained grey and silver metallic threads, silver beads, beading thread and a bead nabber (more on the tool, further down). Flicking through my Millie Marotta colouring books, I came across Euchoreutes naso or long-eared Jerboa. A kind of mouse with large ears, a tuff on its tail and the ability to jump high, living in China and Mongolia. Although the creature is light reddish-brown with a white underside, I decided to make mine grey. As usual, I worked my embroidery doodle on 18 TPI Antique canvas. The pattern was transferred using a fine black permanent marker.  Canvaswork or Needlepoint First thread to play with: Nordic Gold by Rainbow Gallery. The bobbin it comes on advertises it as 'Very fine, easy-to-use metallic stronger than blending filament'. It is a blend of metallized polyester and nylon. The thread is not stranded, but knitted. Using long cross-stitches and normal cross-stitches, I filled the Jerboa's tail, right foot and paw. To create the illusion of the left foot being further to the back, I used the smaller tent stitch. The Jerboa's nose was also stitched in tent stitch. This metallic thread works well indeed and stitches went in quickly. Just take care not to pull too much as the knitted structure might unravel. 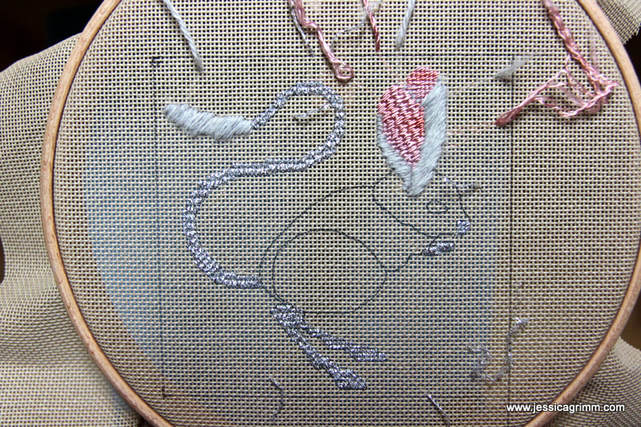 Canvaswork or Needlepoint Next up were the ears and the tuff on the tail. My broderibox contained another Rainbow Gallery thread: Alpaca 18. This is a 100% fluffy Alpaca thread; perfect for recreating the illusion of hair. After all, it IS hair :). To let the thread express its fluffiness, I decided to use simple straight stitches to fill the fluffy bit on the tail and the rims of the ears. I LOVE this thread. It is so soft and has such a perfect structure. Certainly a thread to remember for future projects! By the way, the pink inside of the Jerboa's ears was stitched with a three-ply rayon thread from my stash. I think it might have been an Oliver Twist thread. This thread unravelled itself faster than I could stitch. So glad the Jerboa comes with tiny ears... Again, I used a slightly larger stitch (condensed cashmere stitch) for the ear closest to the viewer and the smaller tent stitch on the ear further to the back. This approach creates the illusion of depth. 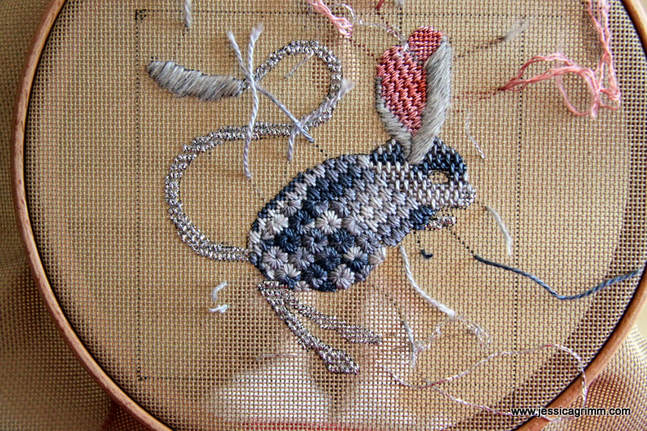 Canvaswork or Needlepoint Next up was one of my favourite threads: Vineyard Silk. A two-ply non-strandable spun silk. Before the whole broderibox adventure, I had never heard of this brand of silk thread. What a shame! It is a really good thread for Silk Virgins as it is so well behaved. It doesn't snatch; just a dream to stitch with! I started by stitching the curved thigh with circular eyelet stitch. I don't think I ever used this particular stitch before. It is quite a textured stitch and it screams 'floral'. However, I think it works well for this particular area. Following the thigh, I filled the main body with condensed scotch stitch. This diagonal stitch fits the elongated curved back of my mouse perfectly. Last, I filled the head with Parisian stitch. This straight stitch contrasts very nicely with the diagonal stitch of the main body. 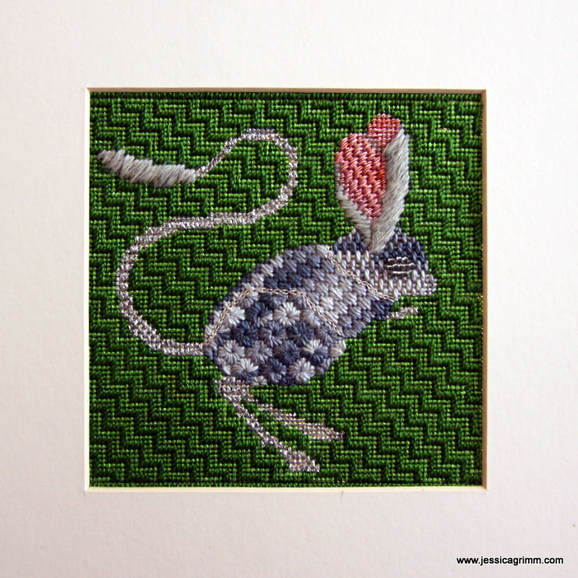 Canvaswork or Needlepoint I could have left it at that. The different areas of the body of my Jerboa are distinct enough through the use of different stitches (diagonal, straight and composite). However, my broderibox contained one more embroidery thread: Kreinik Metallics very fine (#4) braid. A great test to see how a particular metallic thread holds up, is to use it on top of already embroidered areas. I decided to stitch a chain stitch edge between the different areas of my mouse's body. The thread holds up well and didn't snatch on the previous stitches. However, compared to the Nordic Gold thread, this one unravels far quicker.
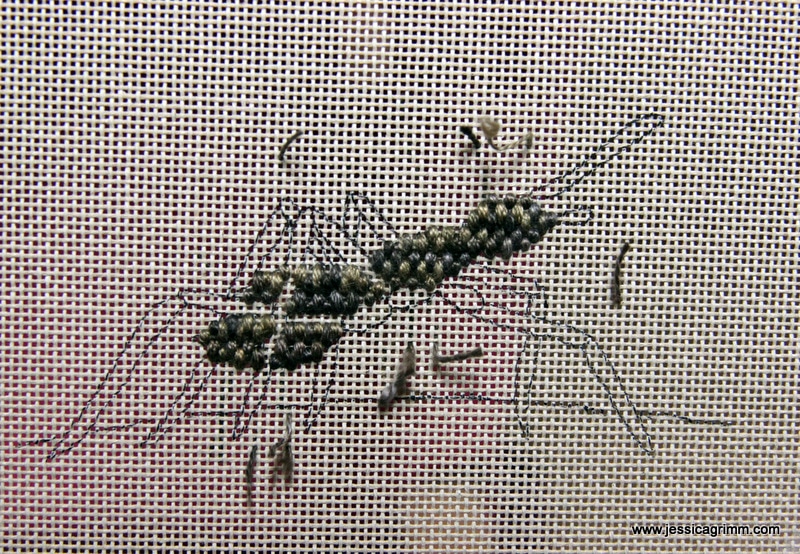
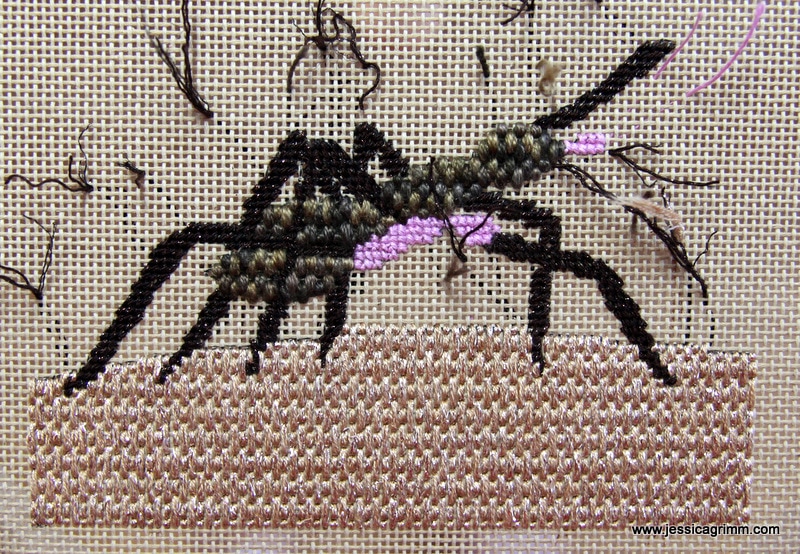
The Jerboa's eye is made up of a base layer of tent stitches using the Kreinik braid. Then I used the YLI Silamide beading thread to stitch down the silver Mill Hill glass sees beads; both part of the broderibox. I planned to try the bead nabber tool on this part of the project, but I forgot... I will keep the tool in mind for my next beading job. Since it looks like a thimble with a sticky tip, I am particularly interested to find out if the stickiness affects the beads. For the background of my Jerboa doodle, I used two shades of green Anchor perle #5 thread from my stash. The stitch used is Jaquard stitch and in real life, it creates such depth and movement! That's another broderibox doodle finished. I hope to have inspired you to try your own doodles. Using colouring book graphics as a base, you can easily create fun embroideries. Look at your subject carefully to decide which stitch fits best where. Remember to use smaller stitches towards the back and more bold stitches towards the front. It is easier than you think! And great fun too :). Happy start of the week dear reader! I am back from a week full of wonderful sight-seeing with my family. And one of the sites we visited was the Bauernhofmuseum in Illerbeuren. A pretty open air museum showcasing farm life from the Swabia area of Germany. And of course, there was some lovely embroidery on display as well. Mostly on household linens and mainly involving monogramming and whitework embroidery. How about these gorgeous Richelieu embroidered curtains featured in an inn?  Embroidery at Bauernhofmuseum Illerbeuren In between family commitments, I sneaked in enough embroidery moments to complete my next broderibox project. The broderibox is a monthly embroidery threads subscription put together by the lovely people of Nordic Needle. This month's box contained: five embroidery threads, beads and a purse clasp. Since the threads had a lot of browns in them; an ant sprang to my mind. Lucky for me, the amazing Millie Marotta has drawings of ants included in her colouring-in book 'Wild Savannah'.
As many of you probably know, canvaswork or needlepoint embroidery is stitched front to back. Or: object first, background later. Now be good and do not ever do that with your silk shading ;)! So, in this case, I started with my ant. She is called Truus de Mier, by the way. A favourite ant from a children's tv-show in the Netherlands. For Truus' body, I used a variegated perle #8 by Valdani. I really wanted to try this brand of embroidery threads. It worked a treat! No 'typical-low-grade-Eastern-European-Quality' here. As I wanted Truus to have a little 'body' to her body, I used the raised spot to fill it. As this stitch required me to pass 8-times through the same hole, I expected the thread to wear beyond pretty. But it didn't. They surely do know how to produce a fine perle in Romania! Next up were Truus' legs. I stitched them in tent stitch and used both directions for different legs. This made the whole thing a little less tangled-up when legs crossed. The legs were stitched using Vineyard Silk shimmer. It is a silk thread with a shimmering filament added. It does not have a nice feel and it unfortunately stitched accordingly. A bit disappointing as I really liked the previous 100% silk threads by Vineyard Silk!
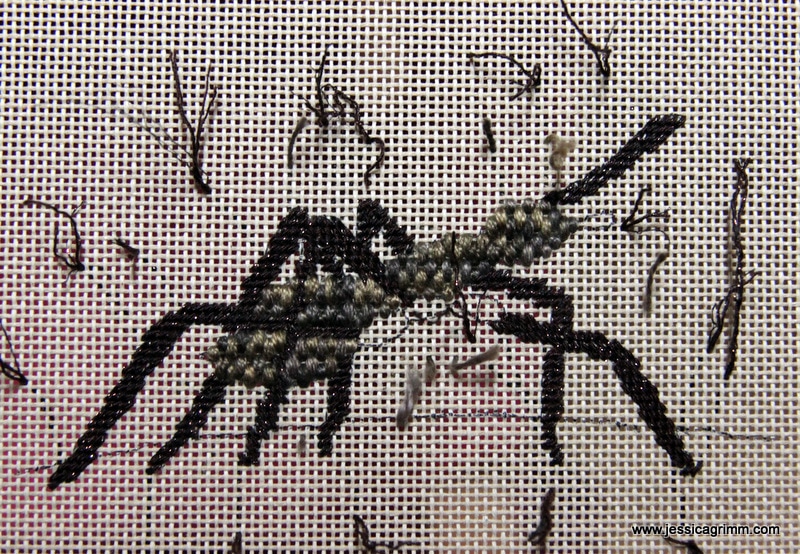
Apparently, ants have segmented legs that start with a bit of a bulky part. And ants have a mouth piece with which they cut leaves in handy transportable portions. Since this month's broderibox had a violet Londonderry linen thread in it, I decided to use it to stitch these parts in cross-stitch. Lovely thread! I do stitch some whitework embroidery with linen threads and really love it. That's Ms Truus de Mier sorted. On to the background. I decided to stitch the earth on witch Truus walks with Silk Lame Braid by Rainbow Gallery. Despite it being a silk thread mixed with metalized polyester and some rayon, it felt and stitched fantastically. Very well suited for the vertical Parisian stitch.
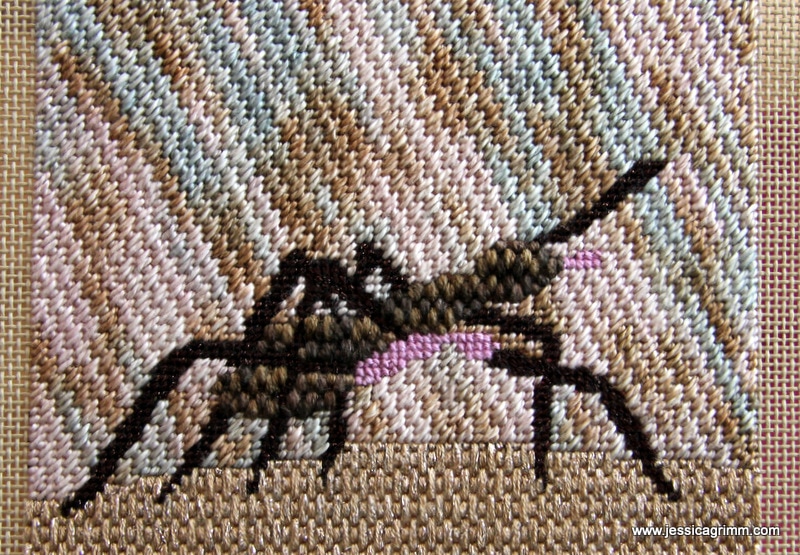
As the variegated cotton thread Watercolours by Caron had some blue in it, that was going to be turned into the sky. I separated the three plies and stitched the diagonal Cashmere stitch with one ply. I really love these cotton threads by Caron! They are so soft and hold up so well whilst stitching on canvas.
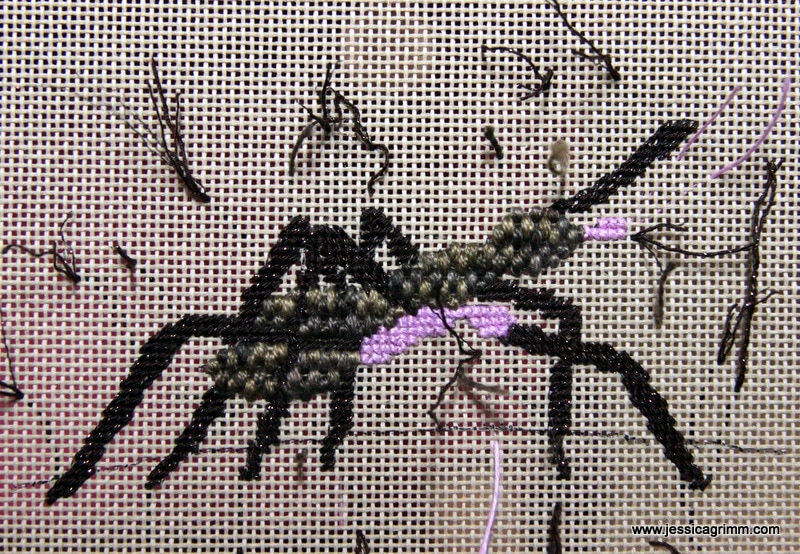
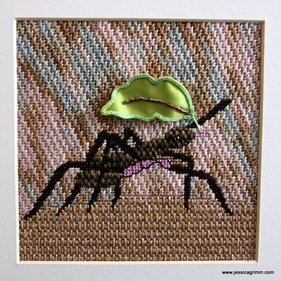
To finish my Truus de Mier, I decided that she needed a bright green stumpwork leaf. I wired a piece of dupion silk backed with calico. The buttonhole edging was stitched using a #12 House of Embroidery perle from my stash. I added the Mill Hill magnifica beads provided in the broderibox to my leaf. Subsequently, I stitched a few beads onto Truus for an eye. And that's another broderibox project finished satisfactorily! P.S.: Us dummies did take the camera with us to the Bunter Markt craft fair in Wessobrunn on Sunday, however, we forgot to take a picture of our stand... On the up-side, we did manage to sell two pendants and shed a few flyers and business cards! Let's start with a joyful 'Happy Easter' to you all! Then we talk a bit about embroidery. And at the bottom of this blog article there will be, very aptly, naked bottoms. I won't judge you if you scroll :). 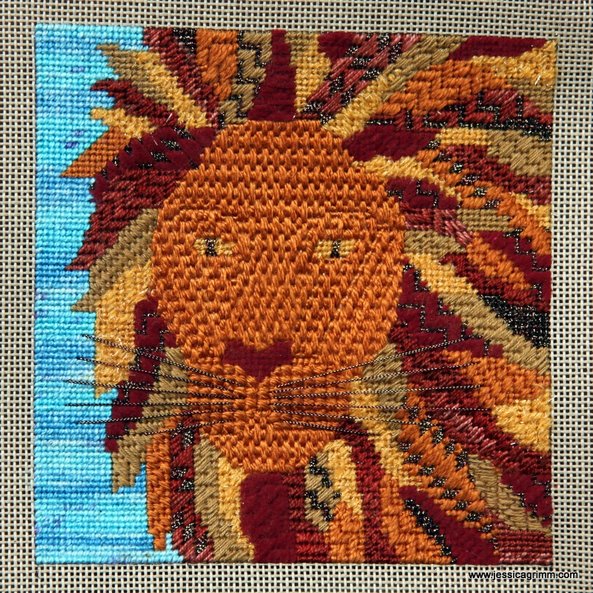 Let's kick-off with my canvas lion who somehow reminds me of Lenny Kravitz. So now the piece is referred to as Lenny the Lion :). Early April, I received another broderi box from Nordic Needle. This time filled with pretty golden, yellow and rustic red threads. When I saw the threads, I knew they would suit a lion well. Luckily for me, Millie Marotta has issued a new colouring book called: Wild Savannah. It took me quite a while to get Lenny's face right. I wanted to use a single colour and only generate some definition through the use of different stitches. I used an amber coloured 100% silk called Autumn Orange by Vineyardsilk. I so love this twisted spun silk with a pretty lustre! It is such a well-behaved thread. For Lenny's manes, I ran riot with stitches and threads. So much fun! I used a variegated rustic red cotton thread called Chili of the Wildflowers range by Caron. And a dark red velvet thread by Rainbow Gallery. Also from them is the yellow thread aptly called 'Fuzzy Stuff'. I feared the worst, but you can actually stitch with it :). Also in my broderibox and thus in Lenny's manes: Londonderry Linen thread 'Maple Sugar'. Quite nice to stitch with and a real 'calmer' in the manes-craze. But best of all, was a spool with a metallic thread called Bijoux 'Tiger Eye'. Since my family widely believes there are magpies in our ancestry, it is no wonder I like threads with a sparkle! I finished Lenny by filling in the African sky behind him with a thread from February's broderibox: Tropic Seas from the Watercolours range by Caron. As you can probably guess by now, I thoroughly enjoy my monthly broderiboxes. It is the perfect way to learn about new materials. And in order to prevent these lovely goodies from cluttering up my stash, I've set myself the challenge of using them straight away. So far, I stuck to my plan!
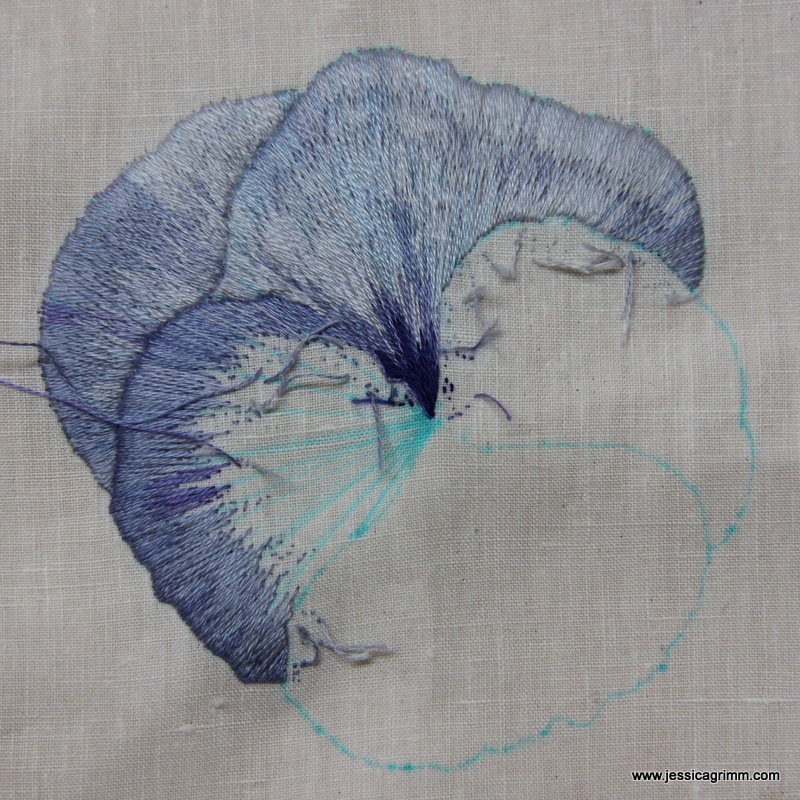
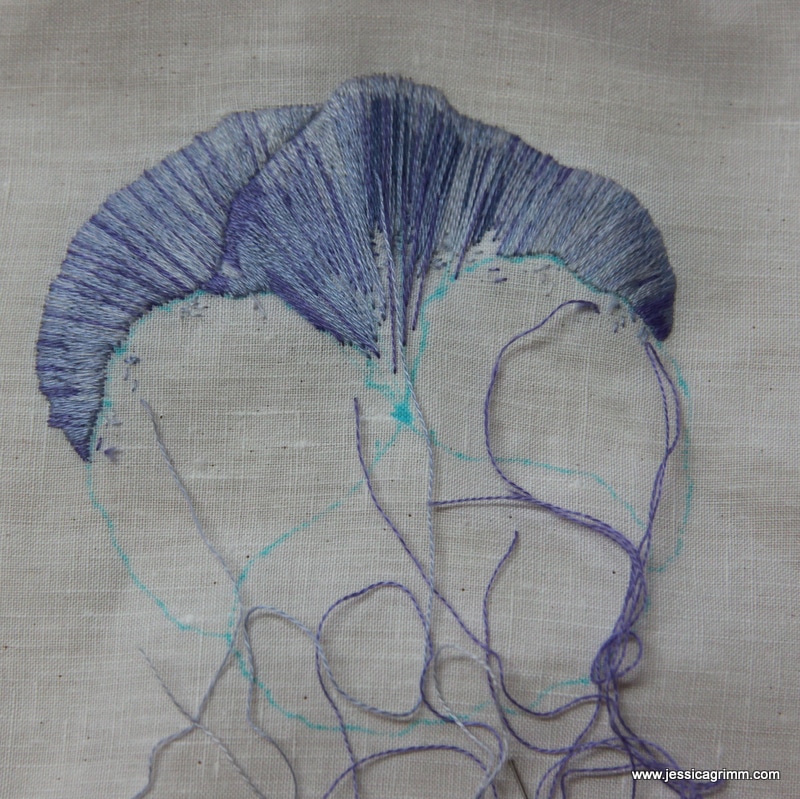
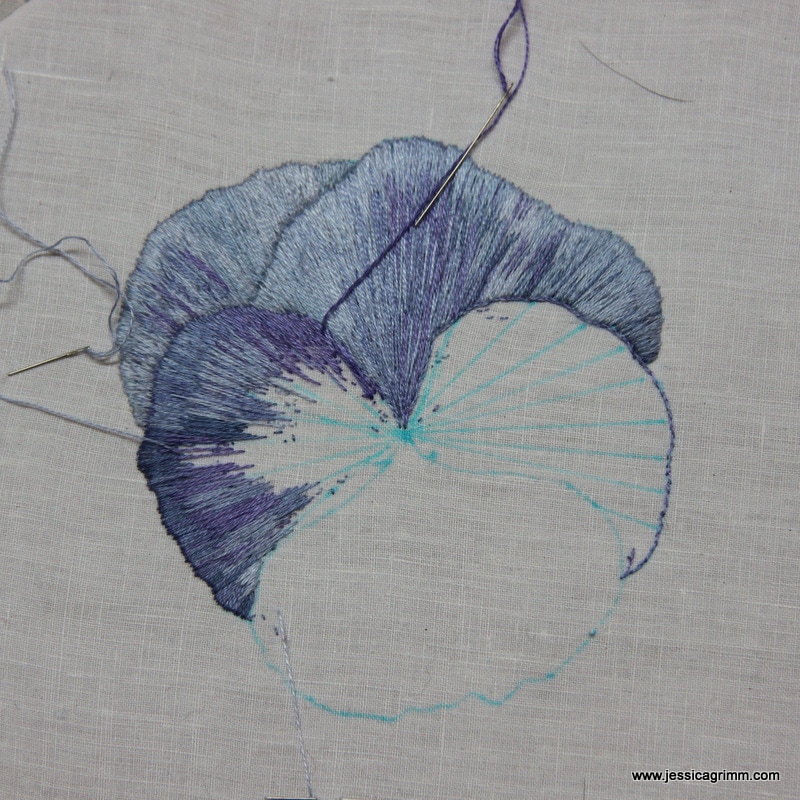
Let's move on to the pansies, shall we? Last week saw three women stitching away in my studio. They took part in my silk shading embroidery retreat. Personally, I think silk shading is an embroidery technique which you either love or hate, you can or you can't. It is deeply personal and progress is slow. My lovely ladies worked from a picture of a large blue-violet pansy. After five days of stitching diligently, eating lots of cake and laughing until our bellies hurt; you can see Elena's pansy on the left, Sabine's in the middle and Monika's on the right. I think they did a great job! Hopefully, I get to see the finished results upon their next visit. Now: THE naked bottoms! As probably many of you know, my husband is a Catholic and I am a Protestant. Since we live in a predominantly Catholic environment, I sing in a Catholic church choir and worship in the same church. Although both Christian denominations, there are some differences and I am not always getting it. I usually blame that on John Calvin :). However, this Easter Mass, I wasn't the only one who was confused... This is what happened:
Due to a severe lack of priests, we got the 'monk-who-never-smiles' on loan from the local abbey. So far so good. However, he compared integrating the Lord's resurrection into our everyday lives with an ad for the protection of the environment. And you guessed it: This ad featured naked bottoms on a bench. With his ever-straight-face he even described these naked bottoms as being: Greek, Roman or of such making that they 'needed a little more space'... This left us very, very confused! My head spins with creative ideas for yet more embroidery projects. I wish my hands were faster... So, let's check in with progress on my Bavarian Hösenträger (suspenders)!  Bavarian Hosenträger Here they are, just before I rolled my slate frame. This is about a quarter of the total length of 112 cm. Right now, I've progressed to one third of the total length and that has taken me 51.5 hours. Apart from these two 'lengths', I also need to stitch a breast piece, or the Steg as it is called. This year, I am also attending a course on wild herbs. I love to know what is edible and/or has medicinal uses. And I've discovered that some of our local wild herbs can even be used for dying. However, since Bad Bayersoien lies at 850 m above sea level, I need to be patient for spring to really kick in. But then I will be out and about collecting wild herbs!
And as part of my course portfolio, I need to make a 15 plant herbarium. Now that got my creative juices flowing big time! How about a stitched version? I am thinking silk shading the plants, mounting them, adding a pocket on the back for the pressed herb and a sheet with botanical information, and then turning the whole thing into a leporello. That would be fun, wouldn't it? Can't wait to start :). On a personal level, my husband finally comes to live with me. Ten more days and he will be here! So far, we haven't been able to find him a new job. However, he has secured many short-term free-lance projects. Not the security one wants, but it is a start! As we will have to move his stuff from his accommodation in the Netherlands to here, we will be on the road in a couple of weeks' time. I will try to keep my blogging going, but life might take me out... |

Want to keep up with my embroidery adventures? Sign up for my weekly Newsletter to get notified of new blogs, courses and workshops!
Liked my blog? Please consider making a donation or becoming a Patron so that I can keep up the good work and my blog ad-free!

Categories
All
Archives
July 2024
|
|||||||||||||||||||

 RSS Feed
Contact: info(at)jessicagrimm.com
Copyright Dr Jessica M. Grimm - Mandlweg 3, 82488 Ettal, Deutschland - +49(0)8822 2782219 (Monday, Tuesday, Friday & Saturday 9.00-17.00 CET)
Impressum - Legal Notice - Datenschutzerklärung - Privacy Policy - Webshop ABG - Widerrufsrecht - Disclaimer
Copyright Dr Jessica M. Grimm - Mandlweg 3, 82488 Ettal, Deutschland - +49(0)8822 2782219 (Monday, Tuesday, Friday & Saturday 9.00-17.00 CET)
Impressum - Legal Notice - Datenschutzerklärung - Privacy Policy - Webshop ABG - Widerrufsrecht - Disclaimer