Gold threads and paintings in silk: Velvets and embroidery from the Gothic era and the Renaissance30/9/2019 Last week I was finally able to visit this magnificent embroidery exhibition in the Castello Buonconsiglio in Trento, Italy. It is on until the third of November and I urge you to visit if at all possible as it is as important as the Dutch exhibition in Utrecht in 2015 or the Opus Anglicanum exhibition in London in 2016. And yes there is a wonderful catalogue, but just as the Dutch did, the Italians thought it a brilliant idea to publish the scientific papers on these extraordinary pieces in their own language. At 423 pages, it will take me aeons to translate ... However, it is packed full with stunning pictures of the embroidery. Including many close-ups. Together with the 400+ pictures I took during my three-hour visit, it will be a treasure trove for years to come! You will hopefully understand that I can't publish all the 400+ pictures in this one blog post. Instead, I will concentrate on three (well actually four) extraordinary pieces that were on display. First up is a chasuble made in the middle of the 15th century in Venice. Why did I pick this particular one to show you? If you are used to the orphreys from the Low Countries, these Venetian examples look very different. They show the same main principle: saint in front of some fancy architecture. But the embroidery techniques used are somewhat different. The examples from the Low Countries use much more gold thread for the architectural backgrounds. And their linen background is fully covered with embroidery. Not so in this piece: the background is stitched on green silk. They look airy and light; a typical sign of the art of the Renaissance. The examples from the Low Countries are in comparison much stiffer and heavy. The figures themselves are also embroidered in a different way than the majority of the pieces from the Low Countries. As in the Low Countries, the figures are embroidered onto a linen base. However, the embroidery technique used is a form of shaded laid-work using untwisted coloured silk for the undergarments. Simple couching of pairs of fine passing thread for the cloak and fine silk shading for the faces and hands. The figures in the orphreys from the Low Countries are mainly done in splendid or nue. Unfortunately, the stiffness of the linen base in comparison to the lightness of the green silk makes the piece pucker. Not easy to photograph! Most incredibly, this chasuble is still worn every 3rd of May on the feast of the Apostles Philip and James! Next up is an example of a chasuble which fascinates me hugely. This is serious stumpwork made at the start of the 16th century somewhere in the German-speaking parts of Central Europe. You come across this type regularly in this part of the world (there are in fact two more in the exhibition), but this is an exceptionally stunning piece with highly sculptured figures. The faces are incredible! And look at Jesus's curly hair. A theory put forward by Aleth Lorne (2015, p. 99-102) to explain these highly sculptural pieces is that the embroiderers and the woodcarvers in the German-speaking parts of Central Europe influenced each other in their search for the three-dimensional rendition of the world. Both craftsmen were often part of the same guild and probably used the same designs made by yet another craftsman. These pieces were so well-known that they are recognisably depicted on paintings from the same period, but not necessarily from the same area. People were clearly fascinated by these pieces. Particularly good examples further adorned with thousands of fresh-water pearls can be seen in the treasury of the Basilica of Mariazell in Austria. There is just one thing about this chasuble which I do not understand. See the bottom? Someone brutally cut through Saint Joachim when the taste in chasuble shapes changed from wide to a violin-case. This probably happened in the 17th century (Stolleis 2001, p. 29). I hope the scissors wore out :). And last but not least, I am going to show you two dalmatics (vestments worn by the deacon) made in the Netherlands at the start of the 16th century. These new acquisitions by the museum lead to this exquisite exhibition. They are displayed in the last room together with three other chasubles. And the best thing is: they are not behind glass! You can get up close and personal with them :). The orphreys on these dalmatics are of the typical type seen on vestments from the Low Countries from this era (you now clearly see the difference with the first chasuble I showed you which was made in Venice). Completely covered in embroidery and featuring beautiful or nue on the figures. The pieces are quite similar to the vestments made for David of Burgundy, bishop of Utrecht in the 15th century. They are in fact so similar that I for a moment thought that they were the ones made for David.
The vestments made for David were probably embroidered by an atelier in Utrecht. These slightly later dalmatics could either be embroidered in Amsterdam or indeed Utrecht. I got the giggles when I saw that the museum Castello Bonconsiglio thinks that Amsterdam and Utrecht are situated in Flanders. Not quite. But close :). Sources: Dal Pra, L., M. Carmignani & P. Peri (2019): Fili d'oro e dipinti di seta. Velluti e ricami tra Gotico e Rinascimento. Castello del Buonconsiglio. Lorne, A. (2015): Borduurwerkers en beeldhouwers in de Nederlanden en het Rijnland in de late Middeleeuwen. In: M. Leeflang & K. van Schooten, Middeleeuwse borduurkunst uit de Nederlanden, Museum Catharijneconvent Utrecht, pp. 95-103. Stoleis, K. (2001): Messgewänder aus deutschen Kirchenschätzen vom Mittelalter bis zur Gegenwart, Regensburg. P.S. If you like what you see, please consider making a donation using the PayPal button in the right-side column. Hugely appreciated!
6 Comments
Whenever I could, I have been joining these wonderful young people who take to the streets each Friday as part of the Fridays for Future movement. I've been to large demonstrations in Munich and to much smaller, cosier ones in Murnau and Weilheim. These young people are so full of energy and creativity; it's infectious and it fills me with hope. This Friday they invite us all to stand with them in their demand for change. I hope many of you will find an opportunity to attend a demonstration near where you live. And if you are in need of some inspiration on what to wear: 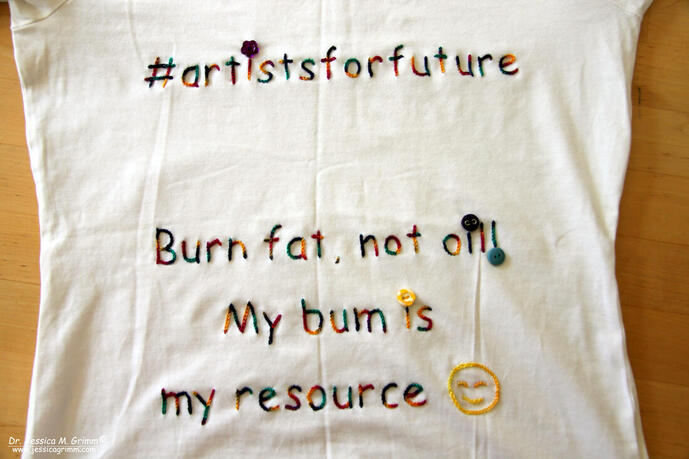 If we happen to be stitcher's-bum-buddies and you feel so inclined, please copy! As most T-shirts are stretchy nowadays, I used chain stitch to accommodate for it. I found myself a nice rounded font (Comic Sans to be precise) in Word to create a pattern. The pattern was transferred onto my T-shirt using a blue aqua-trick marker. My huge stash of embroidery threads coughed up a rather brightly coloured variegated Anchor perle #8 colour 1375. Just perfect, don't you think?
Ever since my visit to Cheb in the Czech Republic earlier this year, when we went to see the Egerer antependium, I wanted to try my hand at a small replica. Since the beading on the antependium is done on parchment/vellum, that was easier said than done! However, I finally managed to recreate a small portion of this stunning medieval beadwork. And I am going to share my journey with you in this blog post. 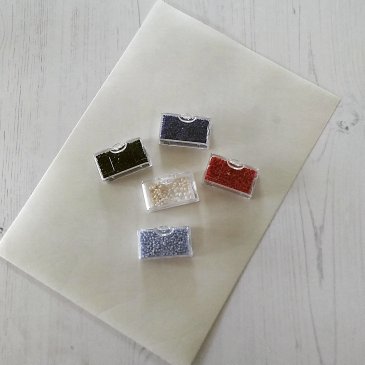 Parchment and glass beads The first thing I needed for my efforts was a piece of parchment/vellum. Luckily there is a German online-shop (run by archaeologists!) who sell all sorts of re-enactment stuff. And they do parchment/vellum too. I ended up buying good quality parchment rather than vellum, I think. They are in essence the same material: thinly scraped animal skin. Vellum is the absolute premium version made of the skins of young animals. For months I was actually afraid to start the stitching. On the one hand my fingers were itching to start, but on the other hand I did not quite know where to begin. So my sheet of parchment sat on the shelves, patiently waiting. 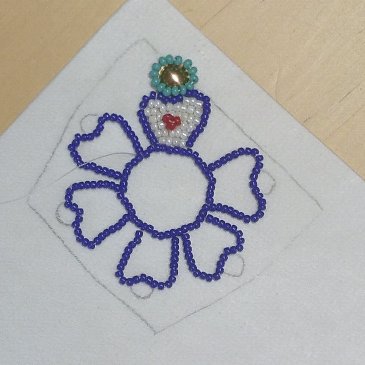 Bead embroidery on parchment The main question I needed to get answered was how to work with the parchment. Does one hold it in hand and stitch or does one put it in some sort of embroidery frame? Searching the internet, I came across a blog entry of a re-enactment lady. She just stitched a small motive in the hand and was successful. I decided to do the same and worry about the framing of a larger piece of parchment later :). The parchment is actually so stiff that you can hold it comfortably in hand whilst stitching. 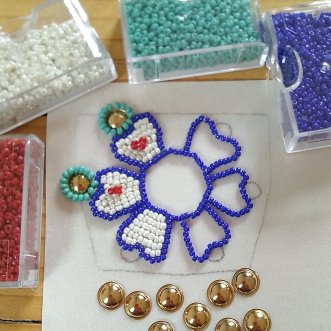 Bead embroidery on parchment The second main component would be the beads. On the original, the beads are quite small but irregular. Using some of my collection of perfectly formed Japanese high-quality beads would just not be the same. Luckily, I hade some, otherwise crappy, cheap hobby beads in about a size 9 and a size 10. Perfectly irregular :). The original beads are more like a size 11. I even had these in roughly the right colours: sea-green, dark blue, pearly white and coral red. 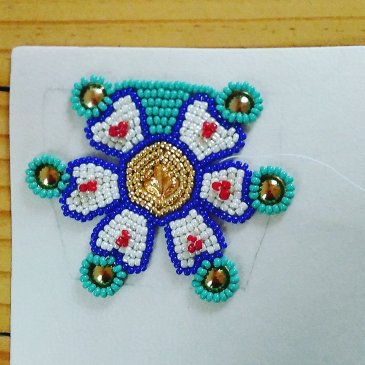 Bead embroidery on parchment The third component proved to be quite difficult and partly impossible to get. In amongst the beadwork on the original are stamped metal decorations. The closest I could get were those gilt 'folien' used to make a bundle of grapes in goldwork embroidery. Whilst they worked fine for some parts of the capital motive I had chosen to replicate, it did not work for the centre. I ended up using a fancy 'folie' and filled in the empty space with small golden-coloured beads. 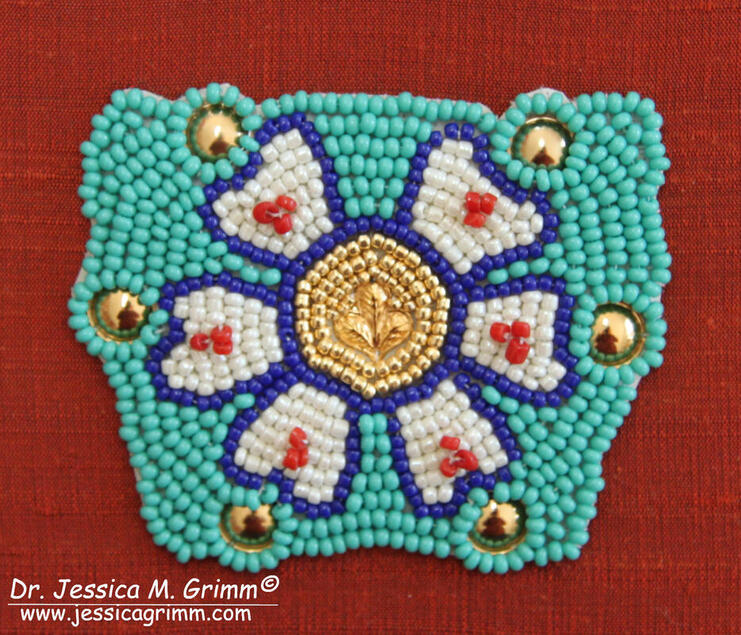 Bead embroidery on parchment On to the stitching! But first, I transferred my chosen motive onto the parchment using a pencil. From my pictures and the written information I had on the antependium, I was able to deduce that the capitals of the columns between the saints were about 5.4 cm in height. That's what I based my pattern on. I then started by stitching the design lines of the petals first using my blue beads, a number 10 needle and Coats Dual Duty glaced hand-quilting thread made of polyester and cotton. In the original piece they probably used a linen thread. According to the written sources and from what I could see in my pictures, the appropriate number of beads were strung first and then couched down with a separate thread and needle every two beads or so. At first, this felt as if I needed an extra pair of hands! Holding the parchment in one and manipulating two working threads with the other wasn't easy. Especially not as the needle only pierces the parchment when a certain amount of force is applied. However, after struggling for a while, I changed my method slightly. Firstly, I did away with the couching thread. Instead, I laid out the strung beads carefully on the design-line, go down with my needle in the appropriate spot, and then couched between the beads using the same thread. In this way I could eliminate the extra pair of hands :). As it proved very hard to hit the exact spot from the back of the parchment (parchment is surprisingly slippery stuff), I ended up making holes from the front and subsequently finding them from the back. Much, much easier! To attach my 'folien', I carefully punched two small holes in the rim using a larger needle and a normal hammer. Usually only one hole turned out successfully, but that proved to be enough to hold the piece in place long enough until I had couched the beads around it. As the folien have a small flat rim or lip, the couched ring of beads keeps it in place. 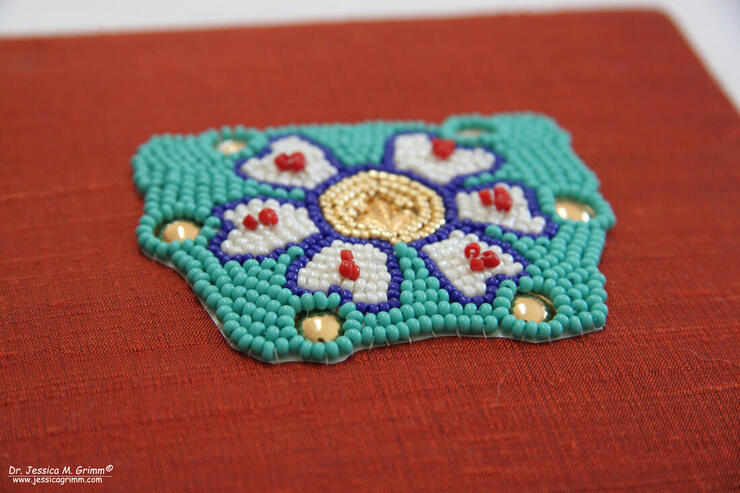 Bead embroidery on parchment Once all the beading was done, I cut out the beaded element as close to the beads as I dared. In my embroidery hoop, I stretched a piece of terracotta dupion silk over 36ct even-weave linen (the original has a linen support too) and appliqued the beaded element in place using the Coats Dual Duty thread. Last but not least, I mounted my small replica onto acid-free cardboard and added a linen backing. I am planning on sending it to the museum so they can use it for educational purposes. As I used slightly larger beads than were used in the original, my motive measures 6.2 cm in height.
I hope you liked my foray into medieval bead embroidery. At some point I would like to attempt one of the saints. However, I will need to find a solution for framing the parchment as that will be too large to hold in hand. I would also like to find a source for larger stamped metal decorations such as were used in the original. If you know of a source, please let me know! There are quite a few embroidery exhibitions going on at the moment or coming up in the near future. As I am going to all of these (in the name of CPD!), you will all have the opportunity to read about them on this blog. However, with this advance notice, some of you might be able to go an visit yourselves! 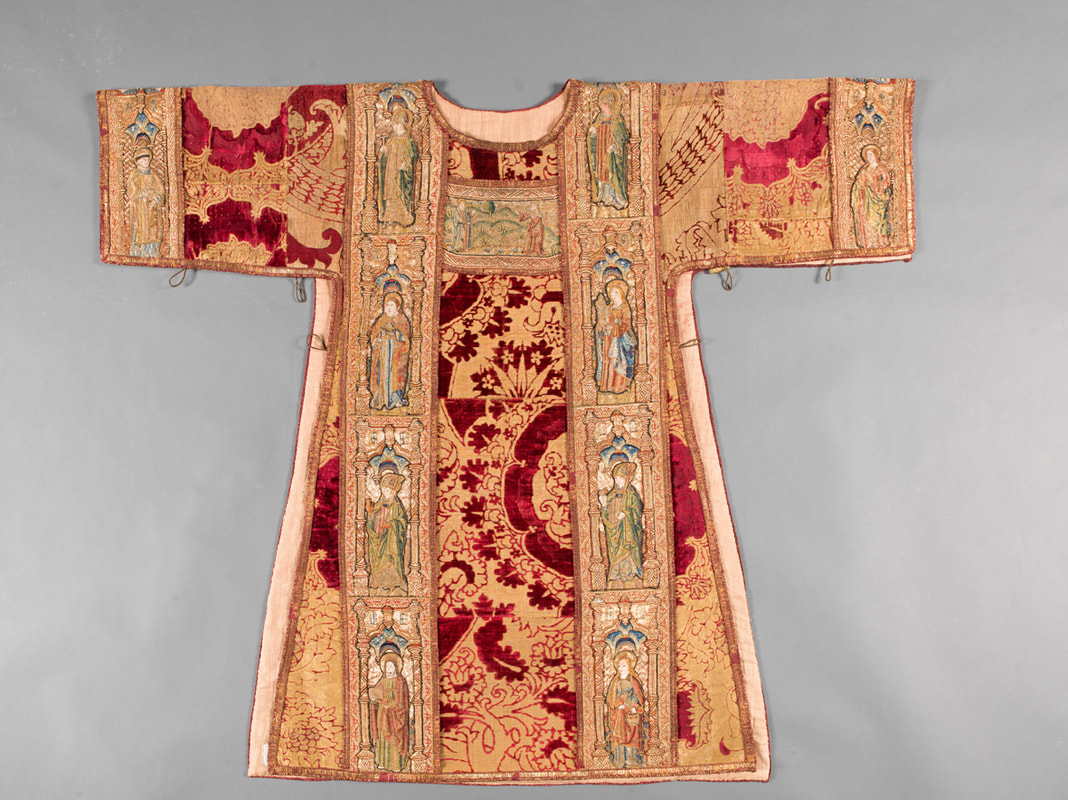 One of the dalmatics on display made with Italian velvet and goldwork embroidery from Flanders. First up is an embroidery exhibition in Trient, Italy. Until the third of November, 40 vestments from all over Northern Italy and dating to the second half of the 15th to the first decades of the 16th century are shown in the Castello del Buonconsiglio. There is also a catalogue available. As some were specially restored for this exhibition, it is surely going to be a treat! 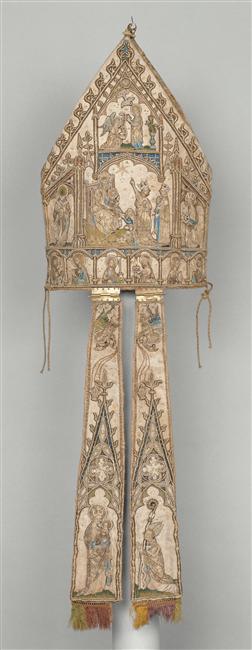 Mitre from the last quater of the 14th century. From the 24th of October till the 20th of January 2020, there is an exhibition on medieval embroidery on at the Museum Cluny in Paris. You can find the general press release here and a full list of high-lights with pictures here. 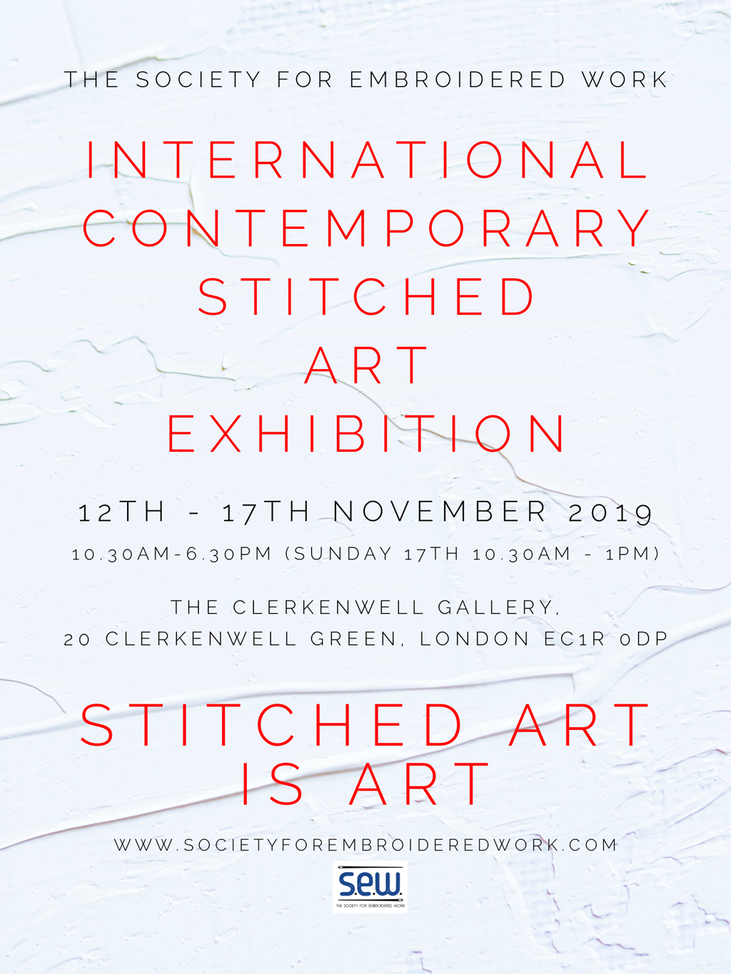 And last but not least: our 'own' exhibition in London from the 12th till 17th November! My piece of Pope Francis will be joined by many, many amazing pieces from a great number of contemporary embroidery artists from all over the world. An opportunity not to be missed!
|

Want to keep up with my embroidery adventures? Sign up for my weekly Newsletter to get notified of new blogs, courses and workshops!
Liked my blog? Please consider making a donation or becoming a Patron so that I can keep up the good work and my blog ad-free!

Categories
All
Archives
July 2024
|

 RSS Feed
Contact: info(at)jessicagrimm.com
Copyright Dr Jessica M. Grimm - Mandlweg 3, 82488 Ettal, Deutschland - +49(0)8822 2782219 (Monday, Tuesday, Friday & Saturday 9.00-17.00 CET)
Impressum - Legal Notice - Datenschutzerklärung - Privacy Policy - Webshop ABG - Widerrufsrecht - Disclaimer
Copyright Dr Jessica M. Grimm - Mandlweg 3, 82488 Ettal, Deutschland - +49(0)8822 2782219 (Monday, Tuesday, Friday & Saturday 9.00-17.00 CET)
Impressum - Legal Notice - Datenschutzerklärung - Privacy Policy - Webshop ABG - Widerrufsrecht - Disclaimer