|
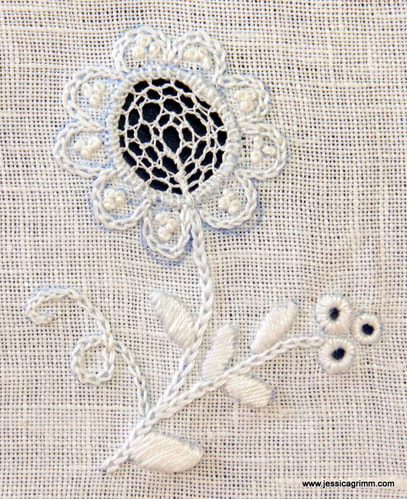
On Friday I had my second, and unfortunately last, lesson in Silesian whitework with Elisabeth Bräuer at ArtTextil, Dachau. As I had prepared all the surface stitching on my sampler, I could now fill the holes with needle lace using cotton crochet thread #80. I am used to work my needle lace quite dense. However, Hirschberg needle lace is worked very open. My first attempts were clearly too dense, then invitably some became too open until I finally arrived at something in the middle. As our stitching afternoon with Mrs Bräuer wasn't long enough to try out all the different types of needle lace, I struggled quite a bit with the drawings and discriptions she had given us (see previous post for a link to a PDF on Mrs. Bräuer's website). Some parts came out four times and even the fifth final version isn't quite right. So, I really hope Mrs. Bräuer will hold another course in the future! This is what my finished sampler on Bielefelder Kettgarnleinen looks like: 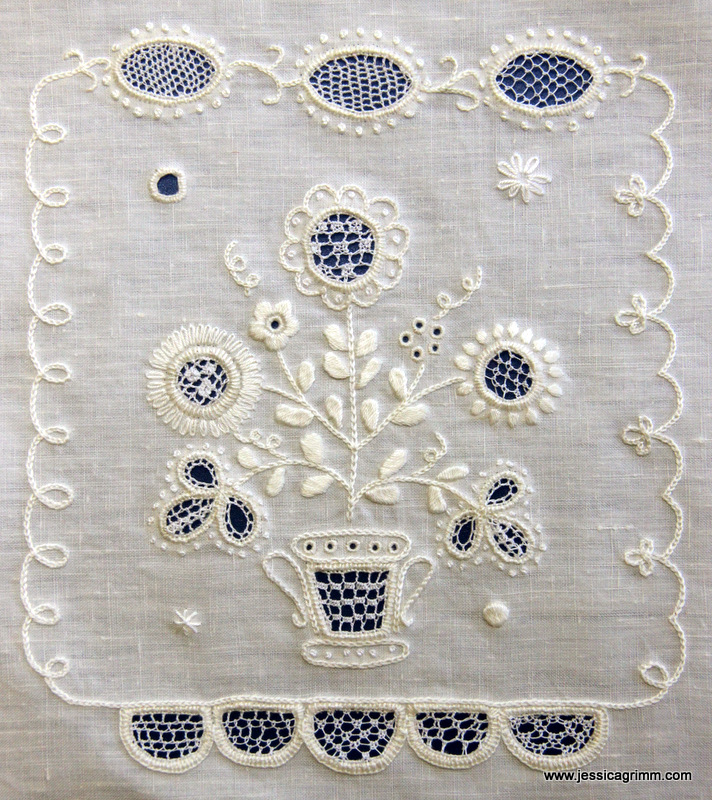 Silesian whitework with Hirschberg Lace sampler Let's explore the history of the Hirschberg needle lace a bit. This particular type of needlelace started to emerge around 1856 in the Hirschberg valley. Due to the continental system under Napoleon (1805-1813), the linen weavers in this area prospered as the British competition fell away. However, when trade functioned normal again, British linen had become much cheaper due to the fact that the process had been mechanised as a result of the Industrial Revolution. To provide the linen weavers with a different source of income, lace schools were opened where girls would be taught Venetian needle lace. 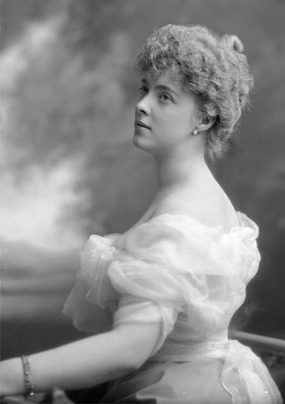 Fürstin Daisy von Pleß One of these schools was established by Fürstin Daisy von Pleß. She was born in 1873 at Ruthin Castle in Wales. She married Fürst Hans Heinrich the 15th of Pleß, wealthiest heir in the German Empire, in 1891. Although at first she didn't really like the primitive life in Germany, she became very popular with the local people. She instigated many projects to help women, children and the disabled. She was at the center of high society before the Great War and her extravagant lifestyle and family scandals were all over the tabloids. She was well aquinted with Kaiser Wilhelm II, King Edward VII and the Queen of Rumania.
Sadly, it all didn't last. Due to the war, she had to leave her new home in Silesia. And although she was met with a lot of dispise due to the fact of her British nationality, she worked as a nurse and took care of wounded soldiers. After the war, she divorced her husband. As a result of chronic medical conditions and social isolation, she died lonely and poor in 1943 in Waldenburg (now Poland).
12 Comments
Last Friday, I attended a course on Silesian whitework by Elisabeth Bräuer at ArtTextil in Dachau. This particular form of whitework was practiced by the German population of Silesia, which after the second World War became part of Poland. Those Germans that had not fled for the Russian army, were expelled by the new rulers and fled into Germany. They brought with them their cultural heritage and folk costumes. The linen apron worn on feast days and for other special occasions was richly decorated with whitework and needlelace.
On Friday, we started by practicing the surface stitches with cotton a broder (#16 - #30) on a scrap of linen. This particular form of whitework only uses buttonhole stitch, satin stitch, french knots, chain stitch and eyelets. As with for instance Richelieu, parts are cut out and the rim is strengthened with buttonhole stitch. The order of work is a little different though. You start by outlining the design line with a double row of closely worked running stitch. Then you make cuts in the middle and you turn the unwanted fabric flaps under. The edge is then fastened with not too closely worked buttonhole stitch. Any unwanted fabric bits still protruding on the back, are then cut off. The so formed holes are then filled with needlelace using crochet yarn #80. There are about 19 different forms of this needlelace. However, only five different patterns were ever used on one apron. I presume that using more would result in an unbalanced and unpleasing design. The needle lace consists of differently worked buttonhole stitches and is anchored in the previously worked buttonhole rim. The aim is to create a very open lace. This results in a striking contrast between the surface stitches done in a thick type of thread and the lace being worked very open in a thin type of thread. I must confess that I find this contrast not very esthetically pleasing. One of the things I had to come to terms with was the very different technical aspects of working the surface stitches. I am a stabber and I don't sew my embroidery stitches. And I am simply too old to change :). It always takes me a while to translate the demonstrated 'sewing' into 'stabbing'. Furthermore, I am used to outline with split stitch before I cover with satin stitch. Silesian women used running stitch. Since I wanted to learn this particular type of embroidery, I went with it. But it wasn't a success. My leaves aren't as crisp as they normally would be. Another technical improvement I would make, concerns the cutting of the fabric. I would outline with one row of closely worked running stitch, then cut and then secure the unruly flaps of fabric with my second row of running stitch. This prevents the fabric pieces from being caught up in the subsequent buttonhole stitching. 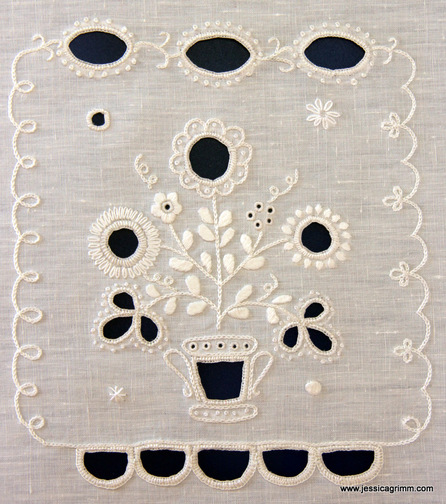 Silesian whitework with Hirschberg Lace sampler This is how far I have come preparing for coming Friday which sees the second part of our course when we will learn to do the different Hirschberg lace patterns. I will tell you all about it in next week's blog post. Would you like to try your hand at this particular form of whitework? No problem. Elisabeth Bräuer has kindly published the instructions on her website. Do browse through the different articles, although they are all in German, they do have lovely pictures of embroidered Silesian folk costumes.
Save the date! In September, ArtTextil organizes an interesting exhibition in Dachau, Germany. Many different works of textile art, inspired by journeys and travels in different cultures and countries, will be on display. 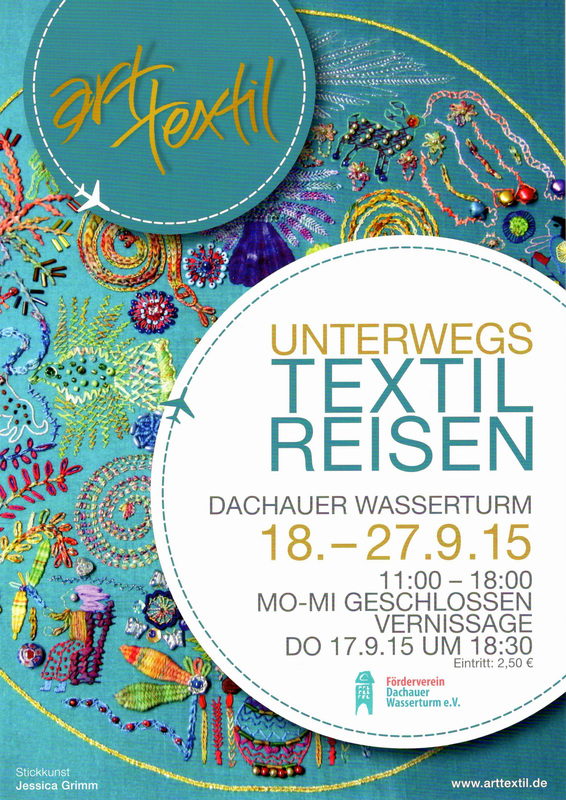 P.S. I am more than a little proud that they choose my piece as the background for their posters and flyers!
Last week, I attended a tambour embroidery course with Elisabeth Roulleau at ArtTextil in Dachau, Germany. Elisabeth has been trained as an Haute Couture and soft furnishings embroideress at the famous Lesage School of Embroidery in Paris. Do check out her website for inspiration and perhaps a chance to study this fascinating type of embroidery with her. 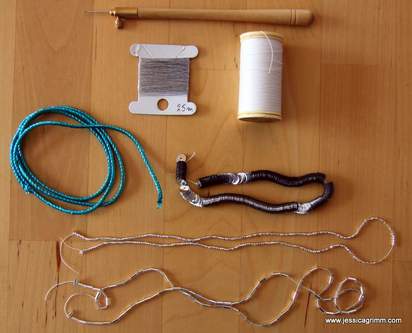 So what do you need for tambour embroidery? Firstly, a frame. We used a cheap roller frame made by Elbesee in the UK. These frames are ok and in fact I use them for my Bavarian Hosenträger courses as they are really cheap and offer a decent solution. However, as always: if you intend to stitch a lot, do invest in a sturdier frame such as a traditional slate frame. Secondly, you will need a tambour hook or Luneville needle (pictured at the top). It consists of a wooden holder and insert needles available in different sizes. You can find them on this website. You will also need fabric, threads and of course pre-strung beads and sequins. As a complete beginner, it is easiest to start with a see through fabric such as silk organza. After all, you need to work with one hand under the frame. This hand slings the thread around the hook and feeds beads or sequins to the fabric and hook. The thread used was a complete surprise to me. And a major re-think. Confession time: it turns out I sometimes do like Sajou products. Not only to look at, but actually to work with as well. In this case: Fil a Gant Applications Au Chinois, coton glace. It is a coated cotton thread that smoothly glides through the fabric and is very strong. Pretty important as tambour embroidery gets completely undone when the thread breaks. For the record: all other Sajou products are still suspect until otherwise proven. The other thread we used was a fine metallic thread (probably from Sajou too, oh dear). 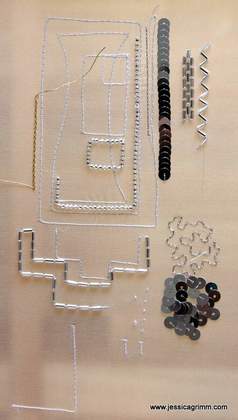 And then the stitching. Not so easy with a hook. But just be patient and you will succeed. So did I. The hardest thing to remember is to push the fabric open with the smooth side of the hook before you try to retract the hook. Otherwise you get stuck and you'll lose the loop of your chain stitch in the making. My other major, and not yet fixed, problem is my high thread tension. It is perfect for all other types of embroidery, but completely doof if you do tambour embroidery. Elisabeth constantly had to take me hands and make them relax. If she ever gives up embroidery, she should definitely consider becoming a masseuse :)! 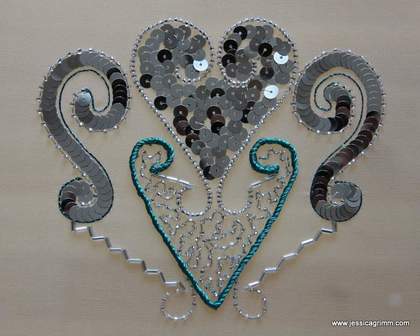 And this is the end result after three days of hard graft. I might embellish it even more sometime in the future. However, at the moment I have more pressing things to stitch. We worked with sequins, beads, bugle beads and metallic cord during class. I added a blue line of chain stitches with a flat thin lurex ribbon thread at home to add a bit more colour. As you can see, the whole piece is rather bling. And it is rather different from my normal stitching style. Good to get me out of my comfort zone.
The next step will be to return to the basics for a while and get my thread tension sorted out. This will mean that I will do miles and miles of lines with the basic chain stitch without any beads or sequins. Once sorted, I will make another piece on silk organza. Once that's done, I will progress to using a non-transparent fabric. That will open a whole new can of worms, I am sure of it! Feeding beads to the fabric and hook whilst I cannot see them, must be a bit of a challenge. To sum it up: Elisabeth is a great teacher and I learned a lot. Although Haute Couture embroidery is not my cup of tea, I will perfect my technique so that I will be able to incorporate parts of it into future projects. I paid €325 course fee for 18 hours of tuition in an eight person group + €60 materials including hook and frame. A good Continued Professional Development investment, me thinks! If you would like to try your hand at tambour embroidery and you are not able to find a suitable course, have a look on Mary Corbet's fantastic site. What do you think of tambour embroidery? Would you like to give it a go? Or what else are you stitching right now? Do leave your comments below, I love to read them! |

Want to keep up with my embroidery adventures? Sign up for my weekly Newsletter to get notified of new blogs, courses and workshops!
Liked my blog? Please consider making a donation or becoming a Patron so that I can keep up the good work and my blog ad-free!

Categories
All
Archives
July 2024
|


 RSS Feed
Contact: info(at)jessicagrimm.com
Copyright Dr Jessica M. Grimm - Mandlweg 3, 82488 Ettal, Deutschland - +49(0)8822 2782219 (Monday, Tuesday, Friday & Saturday 9.00-17.00 CET)
Impressum - Legal Notice - Datenschutzerklärung - Privacy Policy - Webshop ABG - Widerrufsrecht - Disclaimer
Copyright Dr Jessica M. Grimm - Mandlweg 3, 82488 Ettal, Deutschland - +49(0)8822 2782219 (Monday, Tuesday, Friday & Saturday 9.00-17.00 CET)
Impressum - Legal Notice - Datenschutzerklärung - Privacy Policy - Webshop ABG - Widerrufsrecht - Disclaimer