|
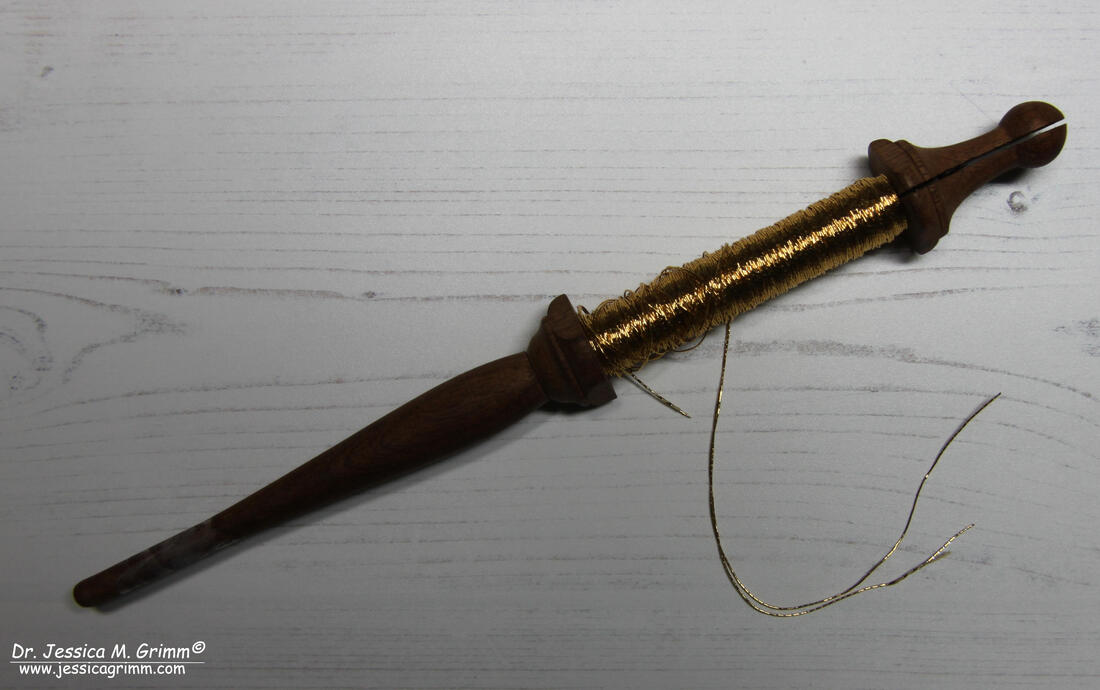
A couple of years ago, the above wooden tool arrived in the mail. It was sent by Nuria Picos, fellow RSN-student who had gone on studying with the famous goldembroidery masters in her native Spain. Luckily, Nuria had taken the trouble to include a step-by-step instruction on how to use this particular tool as I had never seen it before. At the RSN, we didn't use fancy spools like this to wrap our goldthreads on. At best, you were given a piece of rolled-up felt wrapped in tissue paper. It works. But this works so much better! At the time, this wooden tool was simply called a spool for goldthreads. It protects your precious threads from oxidation by touching them too much with your hands. The spool also prevents them from tangling. It wasn't until I started to read older instruction books on goldwork embroidery, that I came across the proper name of this type of spool: broche (French/English), brodse (Dutch) and Bretsche (German). You can tell from the spelling that they all have a common origin.
The brodse is an old tool. In the 1970s, a complete wooden brodse was found during an excavation in Dordrecht, the Netherlands. The piece measures 18,2 x 1,6 cm and dates to the third quarter of the 14th-century. It is held under inventory number F 6395 at the Boijmans van Beuningen museum in Rotterdam, the Netherlands. And it shows the same characteristics as my modern-day Spanish brodse: two prongs at one end, a long shaft and some embellishment that prevents the spool from rolling off your frame. Although I am an archaeologist who has dug medieval deposits, I would not have known what the above object was used for prior to becoming a goldembroiderer. Let alone if I would have found an incomplete one. I suspect many of my colleagues have the same problem. I've contacted wood-expert Silke Lange to see if she knows of any other examples. So far, her search has not turned up any more brodse. However, I'll keep you posted if she comes up with any.
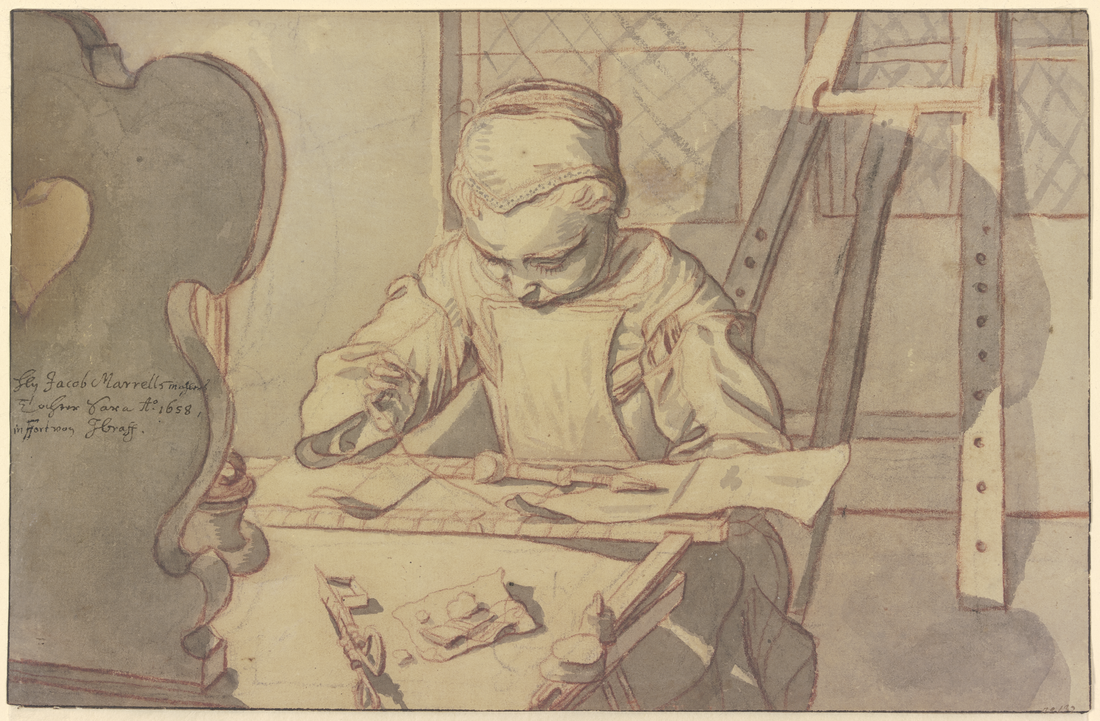
How do we know that the wooden object found in Dordrecht was really used in embroidery? Well, we do have a picture. The above drawing shows Sara Marrel sitting at a table on which rests her embroidery frame (weighed down!) and on which lies a brodse. The drawing was made in 1658 (about 300 years younger than the brodse from Dordrecht) by Johann Andreas Graff (husband of Maria Sibylla Merian, famous scientific illustrator) in Frankfurt am Main (Germany). I just wished the drawing was a bit more detailed when it comes to how the goldthread is wrapped around the brodse!
We know that the above-shown objects were named brodse in Dutch from the embroiderers guild regulations from Utrecht written down in 1610: 'Gelijck oock niemandt sich sal mogen vervorderen op de Raempte off mette Brodse, eenich werck te maken, ten sij hij off zij het Gildt voldaen hebben, op poene van telcken maendt te verbeuren een daelder' (De Bodt 1987, 4). It means that nobody is allowed to make any piece on an embroidery frame or with a brodse when they don't pay the embroiderers guild. The Worshipful Company of Broderers still displays two crossed brodse in their coat of arms.
As said before, you do encounter the brodse in older literature. But not in all. It is notably absent from M. Louis de Farcy's 'La broderie du XIe siecle jusqu'a nos jours' written in 1890 in France. But that other famous embroidery institution from France, Ms Therese de Dillmont (who actually was Austrian ...), does mention the Bretsche in her famous 'Encyclopedia of Needlework' from the DMC library, first published in 1886. The original German text from the 'neue, vermehrte und verbesserte Auflage' from 1925 reads: 'Die Spindel auch Bretsche genannt, ist aus hartem Holz gearbeitet und ungefähr 23 Zentimeter lang. Sie dient zum Aufwinden des Metallfadens. Der Holzstab, sowie die Gabel sind mit doppellaufendem DMC Perlgarn (Coton perle) in hellgelber Farbe zu umwinden. Der Goldfaden ist dann an die Schlinge zu Knüpfen und um den unter der Gabel befindlichen runden Stab zu winden. Der Stickfaden ist ein- oder mehrfach, meistens zweifach auf die Spindel zu winden' (Dillmont 1925, 189). In the English translation it reads like this: 'The spindle is an instrument made of hard wood, about 9 inches long, on which the metal threads are wound and with which they are guided while the work is in progress, so that they need not be touched by the hands. The body and the lower part of the prongs are first covered with a double thread of DMC pearl cotton (Coton perle), yellow or grey, ending with a loop, to which the gold or silver thread to be wound on to the spindle is attached. The thread is usually wound double on to the spindle' (Dillmont 1945, 186-187).
Those of you who can read both languages will have noticed that there are marked differences in what they say. No wonder. This book has been revised many times. The most noticeable differences are that the German text has the original name for the wooden spool 'Bretsche' whereas the English text only mentions spindle. But the English text mentions why the spool is used (so as not to touch the metal thread) and this is not mentioned in the German text. But this is not what puzzles me most. Has any of you understood the part on the actual wrapping of the spool? Not even the drawing published in both editions of the book is much help to me. It does not make sense. Why would you wrap the spool first with the perle? Passing thread would happily snag on it :). I think Ms Dillmont has never used a Bretsche or seen it being used. The tool had probably become rare by the time she did her apprenticeship in 1873 in Vienna. This would also explain why De Farcy does not mention the tool in his book although he does cite Ms Dillmont frequently on other embroidery matters.
Luckily, we have other sources! The above drawing comes from a Dutch embroidery instruction manual written in 1910. Here the thread is wound around the shaft of the 'houten rol waaromheen de goud- of zilverdraad gewonden wordt' (Van Emstede-Winkler 1910, 84). This translates as: wooden reel on which the gold- or silver thread is wrapped. The drawing completely ignores the prongs. Again, one gets the impression the tool was no longer standard practice in goldwork embroidery when Mrs van Emstede wrote her manual.
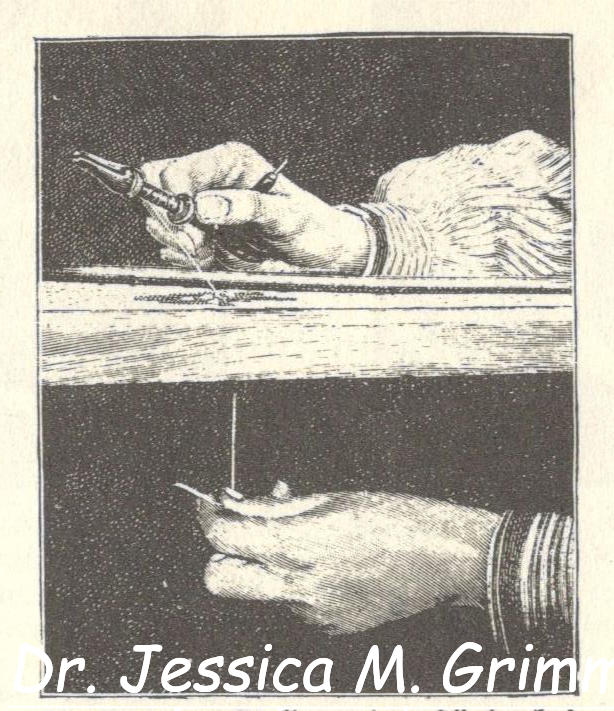
And last but not least, I found the above picture in a German source from 1913. Here it reads: 'Unentbehrlich für jede Art der Goldstickerei ist ... die Sprenggabel oder Bretsche ... (Donner & Schnebel 1913, 406). And further: 'Der ganz feine Metallfaden wird 2, seltener 4 fach, über die Bretsche glatt gewickelt' (Donner & Schnebel 1913, 419). This translates as 'essential for any type of goldembroidery ... is the broche ...' and 'the very fine metal thread is wrapped double, less often four times, flat onto the broche'. And luckily for us, they also provide a picture of the tool in action:
Now this makes complete sense! The embroiderer works on an embroidery frame with the left hand under the frame (with the needle) and the right hand on top of the frame holding the Bretsche (and a stiletto). Can you see how a single metal thread runs through the pronged bit before it is wrapped onto the shaft of the Bretsche? That's how Nuria instructed me to load up my Spanish goldwork spool. I've made a FlossTube video so you can see me do it in 3D. The writers of this excellent manual used or had seen the Bretsche being used. No hear-say, but actual experience.
You can order your wooden broche directly from Richard Pikul in Canada.
P.S. Did you like this blog article? Did you learn something new? When yes, then please consider making a small donation. Visiting museums and doing research inevitably costs money. Supporting me and my research is much appreciated ❤!
Literature
Bodt, S. de (1987). ... op de Raempte off mette Brodse ... Nederlands borduurwerk uit de zeventiende eeuw. Haarlem: Brecht. Dillmont, Th. de (1925). Encyklopaedie der weiblichen Handarbeiten. Mulhouse: Th. de Dillmont. Dillmont, Th. de (1945). Encyclopedia of Needlework, revised edition. Mulhouse: Th. de Dillmont. Donner, M. & C. Schnebel (1913). Ich kann handarbeiten. Illustriertes Hausbuch für die Techniken der weiblichen Handarbeit. Berlin: Ullstein. Emstede-Winkler, I. van (1910). De technieken van kunstnaaldwerk. Amsterdam: Van Looy.
11 Comments
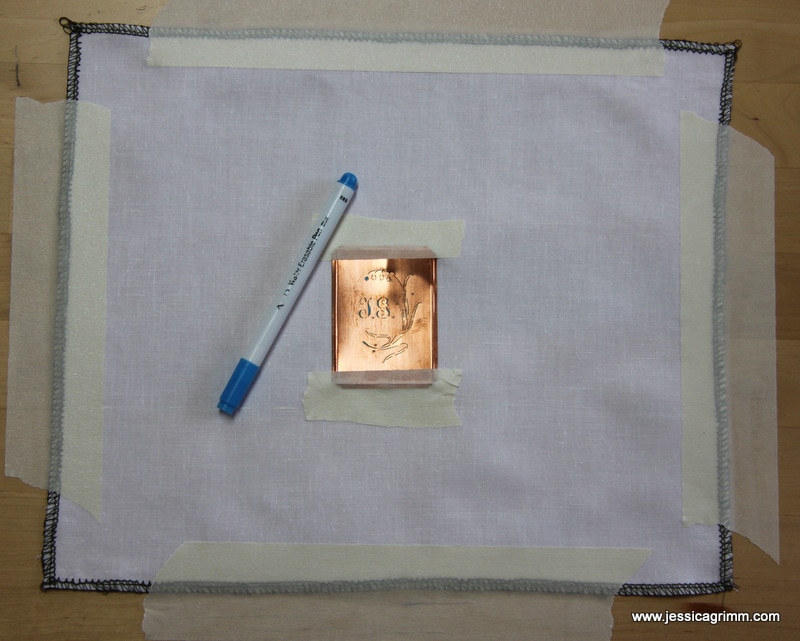
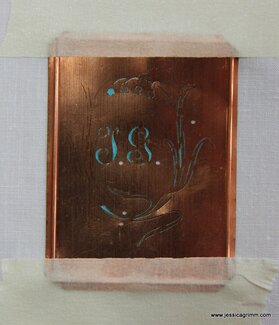
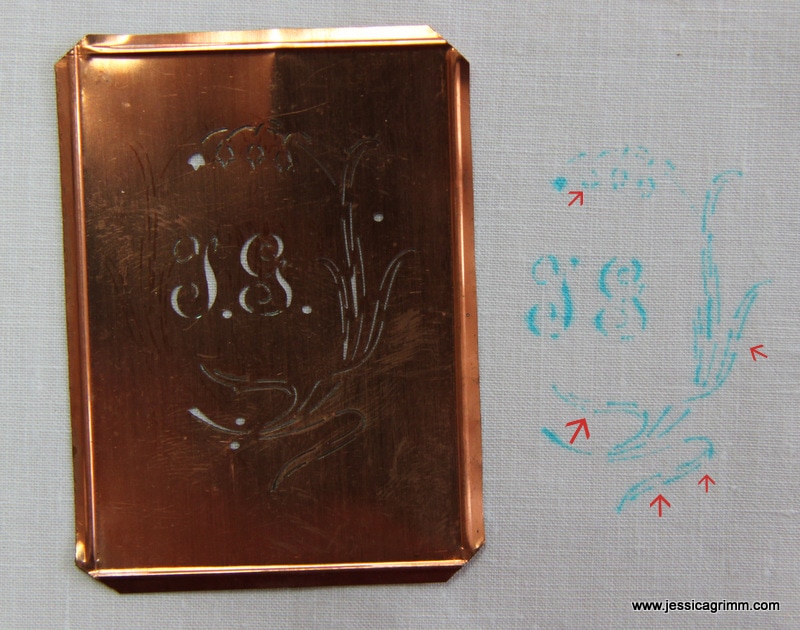
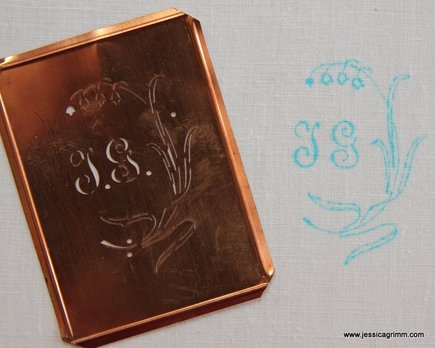
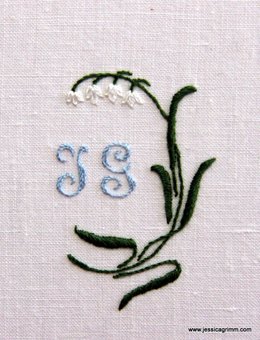
A couple of months ago, I wrote about antique monogram stencils produced by Johann Merkenthaler. In the meantime, I started experimenting with using these stencils. First, I wanted to use some sort of water-based paint as was used originally. Although, you should be able to wash-out watercolours by Caran d'Ache, my experiments weren't satisfactory. When fresh, the marks do wash-out, but not after they have completely dried and are a few weeks old. Now, I am a fast stitcher, but you can't always predict how soon you will be able to finish a project! By the way, you can find my original blog about the stencils here; it includes a free download of an old Merkenthaler catalogue. So, what to use? In comes the best invention since sliced bread: the aqua trick marker! I had thought of using a marker before, but dismissed it in my head as some of the lines in the stencils are soooooo tiny. However, I was getting desperate. Out came the marker, fine white linen, the stencil and some masking tape. But first things first, iron your linen flat until it resembles a sheet. Tape it onto a surface using masking tape. Position your stencil sheet and tape that too. Now you are all set to go! The stencil sheets are so waver-thin that you CAN easily trace those tiny lines with your marker. Remove the masking tape and the stencil. One of the things you need to remember, is that these stencils mostly don't produce continuous lines. For reasons of stability, most elements produce an interrupted design line. I've marked some of the interruptions with red arrows in the left picture above. In comes your handy marker again! Look carefully at the original stencil and complete any breaks in the lines. It can take some getting used to in order to be able to read the design correctly. Especially with very elaborate and floral script. You can see the enhanced design in the right picture above. And this is the embroidered design after rinsing. I used one strand of stranded cotton throughout. The initials are stitched using rows of stem stitch. The flower heads are made up of a central larger lazy daisy flanked by two smaller lazy daisies. The stem is also stitched in stem stitch and the leaves are satin stitch over a split stitch border. A pretty design just right for spring!
|
Want to keep up with my embroidery adventures? Sign up for my weekly Newsletter to get notified of new blogs, courses and workshops!
Liked my blog? Please consider making a donation or becoming a Patron so that I can keep up the good work and my blog ad-free!
Categories
All
Archives
July 2024
|
Contact: info(at)jessicagrimm.com
Copyright Dr Jessica M. Grimm - Mandlweg 3, 82488 Ettal, Deutschland - +49(0)8822 2782219 (Monday, Tuesday, Friday & Saturday 9.00-17.00 CET)
Impressum - Legal Notice - Datenschutzerklärung - Privacy Policy - Webshop ABG - Widerrufsrecht - Disclaimer
Copyright Dr Jessica M. Grimm - Mandlweg 3, 82488 Ettal, Deutschland - +49(0)8822 2782219 (Monday, Tuesday, Friday & Saturday 9.00-17.00 CET)
Impressum - Legal Notice - Datenschutzerklärung - Privacy Policy - Webshop ABG - Widerrufsrecht - Disclaimer






 RSS Feed