|
How much does the size of the finished embroidery differ from the cartoon and the pricking it was made with? Any idea? Me neither. But I read a reference by Evelin Wetter a couple of years ago that tried to link a rare surviving medieval pricking to a surviving embroidery. However, the measurements of both were slightly different. So how different are cartoons, prickings and the resulting embroideries? Time for an experiment and in comes Elisabeth. 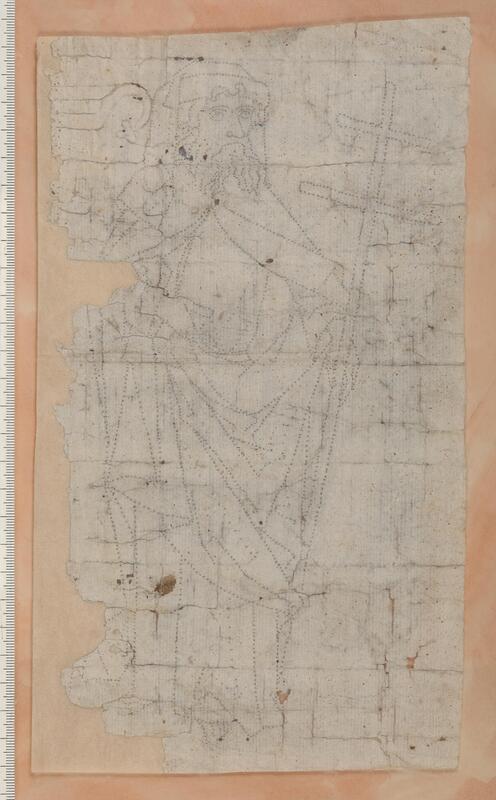 Pricking of Philip the Apostle, Historiska Museet Stockholm, Inv. Nr. 21324. Upphov: Hildebrand, Gabriel, Historiska museet/SHM (CC BY 4.0) The original reference mentions the find of a pricking being reused as the backing for a finished embroidered antependium (to stiffen it) found in Hillersjö, Sweden. The pricking shows Philip the Apostle. The pricking is identical to an embroidered Philip the Apostle on a cope orphrey from Linköping Cathedral in Sweden. According to the reference, "compared to the pricking, the embroidery appears to have shrunk by a few millimeters". Unfortunately, I wasn't able to find precise measurements of either the pricking or the finished embroideries on the cope orphrey. From the ruler depicted in the picture of the pricking, the pricked figure must be about 24,75 cm. 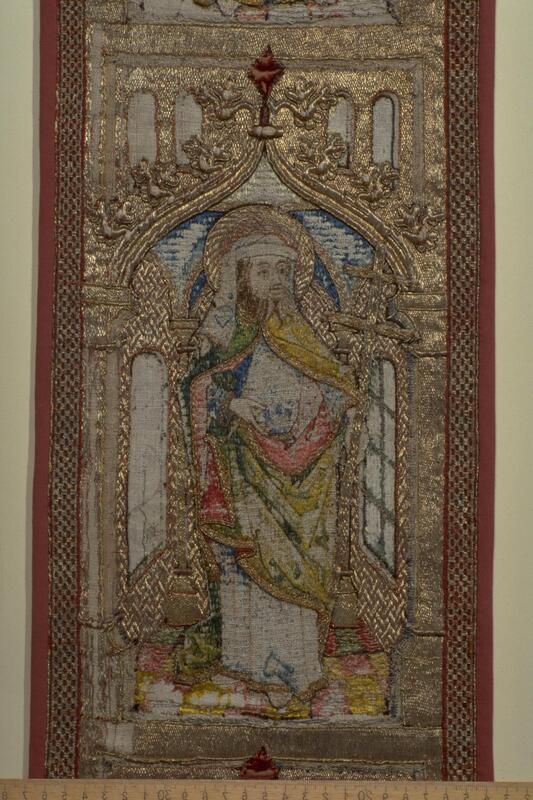 Pricking of Philip the Apostle, Historiska Museet Stockholm, Inv. Nr. 2920:2. Upphov: Hildebrand, Gabriel, Historiska museet/SHM (CC BY 4.0) From the ruler in the picture with the orphrey of Philip the Apostle, the embroidered figure must be about 23.7 cm high (excluding the halo, just as in the pricking). If we compare this with the height of the pricked figure (24.75 cm) we have a difference of about 10.5 millimeters (slightly over a cm!). This would more or less correspond with the original reference's mention of 'a few millimeters'. It looks a little high to me, to be honest. And when my deducted measurements are correct, I doubt pricking and embroidery are identical. In the original reference, the difference between the size of the pricking and that of the embroidery is explained by the transfer process described by Cennini in his Libro dell'Arte of c. AD 1370. In it, a near-dry sponge is used to slightly wet the free-hand drawing to add shading. Now, there's several things mixed up here. Cennini described the embroidery design transfer process for a design drawn onto the embroidery process free-hand. The pricking of Philip the Apostle and the resulting embroidery stem from a very different process. No free-hand drawing. And as we can see in the damaged parts of the finished embroidery: it is a line drawing with no shading. The embroidery linen can thus not have shrunk, as the original reference of Evelin Wetter suggests, due to the application of a little water in the wetting process to add shading. 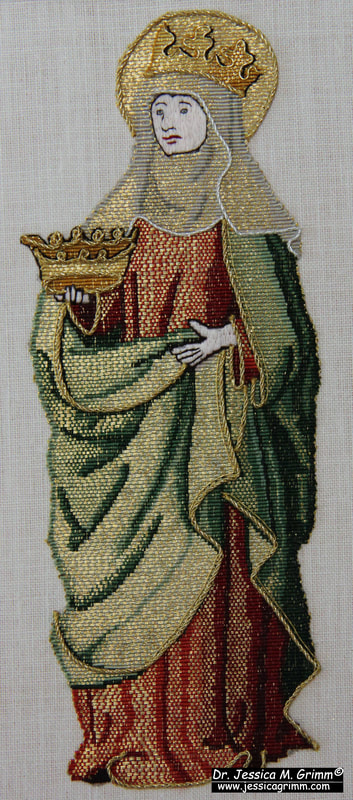 My finished figure of Elisabeth of Thuringia in or nue and silk embroidery If art historians make assumptions like the one by Evelin Wetter, you might think that they have conducted an experiment with modern embroiderers, don't you? But, nope. So, I decided to use my teaching at the Alpine Experience in 2022 as such an experiment. Just having my own measurements would be a bit skimpy on the data side of things. And I am very grateful that three students of that class finished their embroideries and that I was able to measure their embroideries during 2023's class. Here are the results: 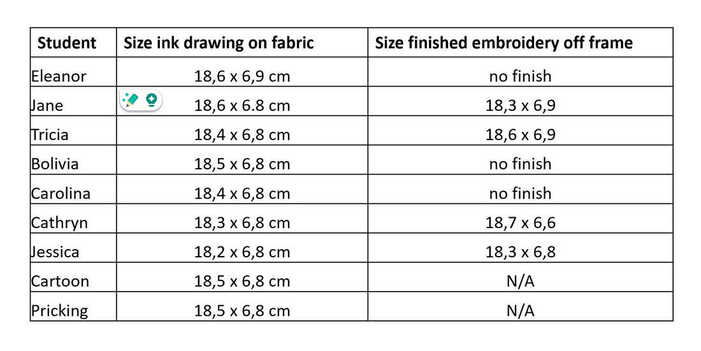 As you can see from the above table, the cartoon (design drawing) and the resulting pricking do not differ in their measurements. Everyone used the same pricking. The resulting design drawing on the embroidery fabric made with pounce and ink already differs slightly: up to 3 millimeters in height and 1 millimetre in width. Some are larger, others are smaller than the pricking. The finished embroidery differs up to 2 mm in height and 2 mm in width. Again, some are larger and some are smaller. This is the comparison we are after as this compares the pricking with the finished embroidery just as for Philip the Apostle.
My conclusion thus is that small differences in measurements between a pricking and the resulting embroidery are normal. These differences can go either way: larger or smaller. They are the result of the maker going through several transfer steps: pounce dots from the pricking, turned into an inked line drawing, turned into an embroidery. The absolute difference in millimetres thus directly relates to the size of the brush for the inking and the size of the embroidery materials. Particularly the width of the gold thread at the turns on the design line probably attributes the most to the size differences seen. A huge thank you to my students who were brave enough to tackle Elisabeth! You have provided me, and the wider research community, with tangible data on this particular topic. Literature Nisbeth, Åke; Estham, Inger (Eds.) (2001): Linköpings domkyrka. Inredning och inventarier. Linköping: Linköping Domkyrka. Wetter, Evelin (2012): Mittelalterliche Textilien III. Stickerei bis um 1500 und figürlich gewebte Borten. Riggisberg: Abegg-Stiftung.
4 Comments
Last week, we looked into the history and the different parts of the Grandson Antependium. This week, we will have a closer look at the actual embroidery techniques used to produce the piece around AD 1300. As I needed to try out a new mixture of pounce powder, I even worked a small sample of freehand pattern couching. Journeyman and Master Patrons will be able to download PDF instructions with lots of tips and tricks. Medieval goldwork embroidery is perfect for beginners as the techniques are simple and quite forgiving! This Saturday 23-09-23, I will meet with my Master Patrons for a Zoom lecture with Q&A on the Grandson Antependium. If this interests you, please consider becoming a Patron. It helps me cover the bills and do my research into medieval goldwork embroidery. And now, onto some early 14th-century stitching! 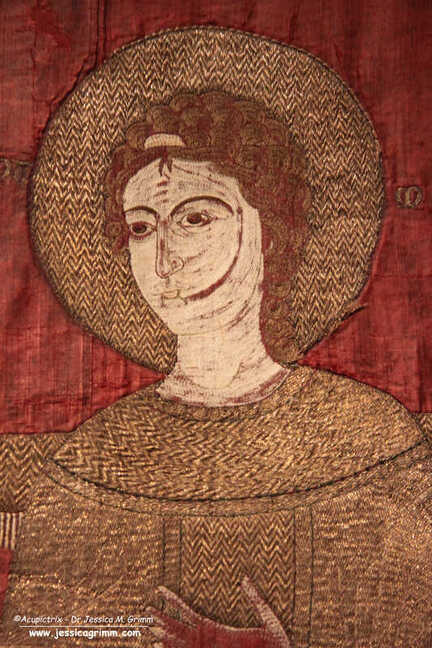 Grandson Antependium, Historisches Museum Bern, Nr. 18, around AD 1300. The central part of the embroidery is worked on a layer of waxed purple silk (tabby weave) backed with a layer of linen. The two components of the purple have not aged in equal measure, resulting in the silk now looking more red than purple. The original colour can be glimpsed along the edge of the halo of the angel where some of the goldwork embroidery has come undone. The goldwork and the silk embroidery are worked through both layers of fabric. As you can see in the picture of the angel above, the silk embroidery mainly consists of directional split stitch. This technique is often associated with Opus anglicanum. However, it was also used in other parts of Europe and bordering Asia at this time. 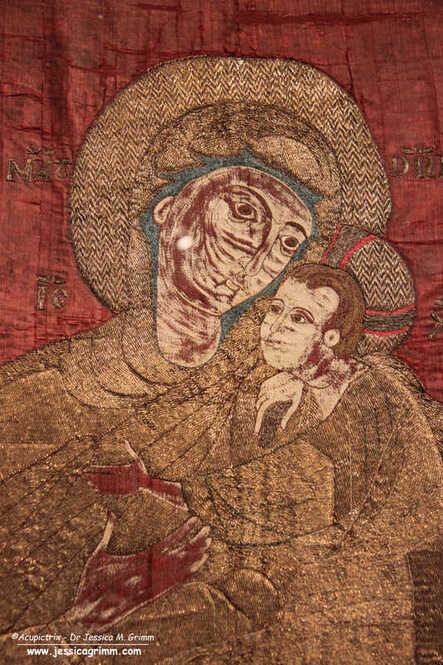 Grandson Antependium, Historisches Museum Bern, Nr. 18, around AD 1300. The other technique extensively used on the central part of the Antependium is surface couching over two parallel gold threads (gilded silver, yellow silken core). And although I think that there are possibly only two different couching patterns present, they are used to great effect. By following the contours of the drapery, the simple bricking pattern can change its appearance drastically. The way the light plays of gold threads that are laid in different directions accounts for different hues and thus movement in the design. The other couching pattern used is a nine-step chevron. As the chevron pattern isn't entirely regular, I suspect it was not drawn onto the embroidery fabric. With practice, a master embroiderer probably becomes quite good at keeping the pattern regular and simply does not need to go through the hassle of transferring the pattern onto the embroidery fabric first. Also, as soon as the chevron pattern is worked to follow the shape of the design, drawing it out first is probably almost as complicated as just stitching it. But I might be wrong and there might be guidelines underneath the gold.  Grandson Antependium, Historisches Museum Bern, Nr. 18, around AD 1300. The two side parts were clearly not made by the same embroidery workshop. Firstly, the embroidery fabric is different: it is a red silk twill. And the embroidery technique is very different too: underside couching with a pair of gold threads (gilded silver, yellow silken core). In order to see the different parts of the design clearly, the direction of the gold threads is changed. Not unlike the method used in the central part of the design.
One of the things that keeps puzzling me when I see this composite piece is how different in age the three pieces look. The central part looks so much older than the two side parts. Is this just due to the difference in materials and techniques used? Or are the side parts of a later date? What do you think? Literature Martiniani-Reber, Marielle (2007): An exceptional piece of embroidery held in Switzerland: the Grandson Antependium. In Matteo Campagnolo, Marielle Martiniani-Reber (Eds.): From Aphrodite to Melusine: Reflections on the Archaeology and the History of Cyprus. Geneva: La pomme d'Or, pp. 85–89. Schuette, Marie; Müller-Christensen, Sigrid (1963): Das Stickereiwerk. Tübingen: Wasmmuth. The 14th century Grandson Antependium. It is a pretty mix of embroidery techniques, styles, languages and geographical areas. Let's explore! The Grandson antependium is housed at the Historisches Museum in Bern, Switzerland and catalogued under Nr. 18. It is 244 cm wide and 88 cm high and consists of three separate parts. The knight kneeling to the left of the central figure of the Virgin and Child is the donor of the piece. His coat of arms identifies him as Othon de Grandson (c. 1238-1328). Although born near Lausanne in Switzerland, he became a close friend of King Edward I of England. Othon de Grandson travelled widely throughout Europe and the Mediterranean area when he joined the 9th Crusade. Othon accumulated great wealth and donated it to various religious institutions in both England and Switzerland. This particular antependium was donated to the Cathedral of Lausanne where Othon is entombed. With the amount of gold used for the embroidery, it must have been a very expensive piece. 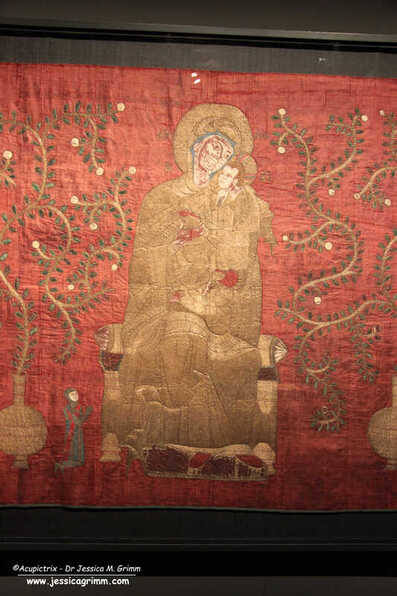 Grandson Antependium, Historisches Museum Bern, Nr. 18, around AD 1300. The central part of the antependium shows the enthroned Virgin and Child with two vases with foliage and two angels with censers on either side. The design has a Byzantine flavour which is emphasised by the Greek embroidered inscription for the name of Christ. But that's not the only language used. Mary is addressed in Latin and the two angels are addressed in ancient French. The design isn't purely Byzantine either: the censers are distinctively Western European. Byzantine embroideries with embroidered donor figures are not known in this era either. Where was this piece made? And for whom originally? Most scholars now agree that the central part of the embroidery was likely made in Cyprus. The island is conveniently placed en route to the Holy Land and also served as a retreat base when things went wrong during the crusade. Cyprus belonged to the Byzantine Empire with its Eastern Orthodox version of Christianity. At the same time, it had ample visitors from the West. Was the central composition mostly finished when Othon saw it at a Cypriot embroidery workshop? Where the texts added on his request? The knightly figure and the coats of arms certainly were.
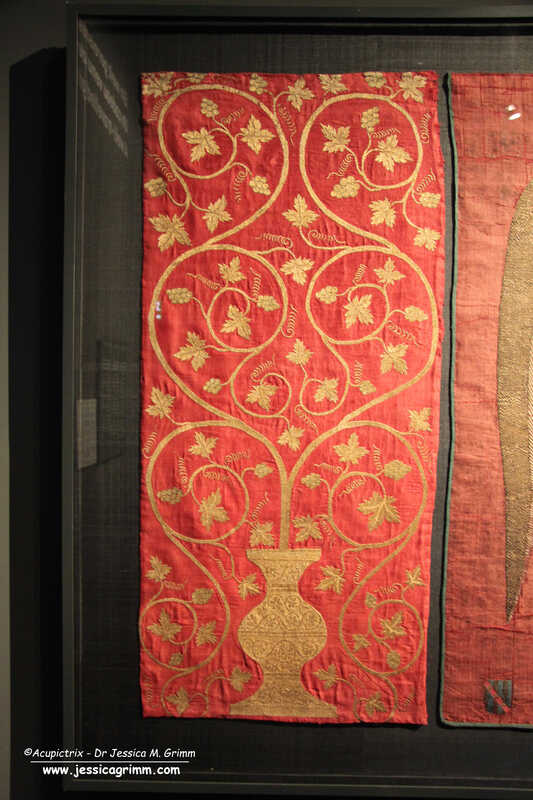
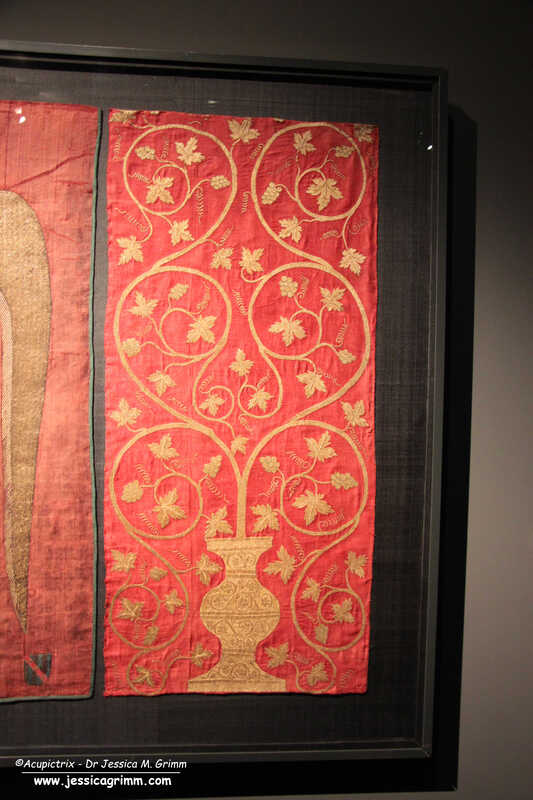
And then we have the two separate side panels. Very different from the central panel. Style, embroidery technique and materials used differ from the central panel. And their design is non-religious. The side panels are thought to have been embroidered in England as they sport underside couching. Is this a rare remnant of non-religious opus anglicanum? Did Othon come across two embroidered soft furnishings in England that together with the panel he probably acquired in Cyprus would make up a fitting antependium for the high altar in his cathedral back home? As the embroidery is cut at the top, the two panels were not specifically intended for that high altar when they were made. I think we see a rare glimpse of opus anglicanum 'for the noble home' preserved in this extraordinary antependium. What do you think? Literature
Martiniani-Reber, Marielle (2007): An exceptional piece of embroidery held in Switzerland: the Grandson Antependium. In Matteo Campagnolo, Marielle Martiniani-Reber (Eds.): From Aphrodite to Melusine: Reflections on the Archaeology and the History of Cyprus. Geneva: La pomme d'Or, pp. 85–89. Stammler, Jakob (1895): Der Paramentenschatz im historischen Museum zu Bern in Wort und Bild. Bern: Buchdruckerei K.J. Wyss. Schuette, Marie; Müller-Christensen, Sigrid (1963): Das Stickereiwerk. Tübingen: Wasmmuth. Woodfin, Warren T. (2021): Underside couching in the Byzantine world. In Cahiers Balkaniques 48, pp. 47–64. |

Want to keep up with my embroidery adventures? Sign up for my weekly Newsletter to get notified of new blogs, courses and workshops!
Liked my blog? Please consider making a donation or becoming a Patron so that I can keep up the good work and my blog ad-free!

Categories
All
Archives
July 2024
|

 RSS Feed
Contact: info(at)jessicagrimm.com
Copyright Dr Jessica M. Grimm - Mandlweg 3, 82488 Ettal, Deutschland - +49(0)8822 2782219 (Monday, Tuesday, Friday & Saturday 9.00-17.00 CET)
Impressum - Legal Notice - Datenschutzerklärung - Privacy Policy - Webshop ABG - Widerrufsrecht - Disclaimer
Copyright Dr Jessica M. Grimm - Mandlweg 3, 82488 Ettal, Deutschland - +49(0)8822 2782219 (Monday, Tuesday, Friday & Saturday 9.00-17.00 CET)
Impressum - Legal Notice - Datenschutzerklärung - Privacy Policy - Webshop ABG - Widerrufsrecht - Disclaimer