|
I am getting really excited as the vernissage of my first-ever solo-exhibition draws nearer! As this is my first time organising and promoting such an event myself, I really do hope I have managed to think of everything :). Apart from sending invitations to important people, gallery owners and friends; I and my husband also spent two days dropping them in every mailbox in our village. The only things left: hanging the exhibition posters around the village for the tourists to see, signing the insurance papers, preparing my speech and hanging the exhibition. So cool! 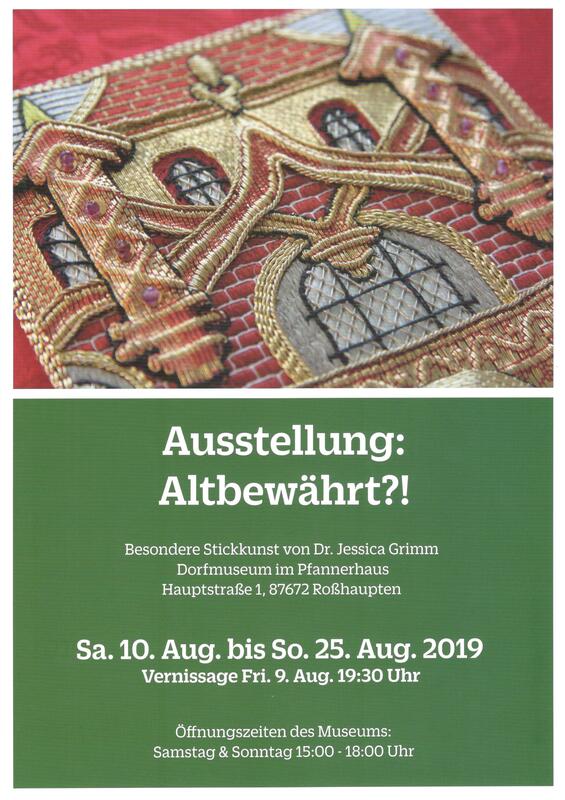 But that's not all that has been happening in my embroidery life! Last week, I taught crewel embroidery to Kristin from Berlin and Elena from Switzerland. As the three of us were born in the 70s, love to travel, have no kids, love our men (but think they are a rather peculiar species), we had a lot of fun! And cake, of course. Oh, and we stitched too :).  Kristin Lorenz Kristin chose an image from one of these generic pattern books you can find in most bookshops. You can use these patterns for a variety of crafts and they are an especially good starting point for embroidery. Picking colours from the full range of Heathway Milano super-quality crewel wool was a true Qual der Wahl (the agony of choice). But she chose well in combining Pomegranate with Laurel and a dash of Daffodil! Kristin really wanted to incorporate lots of colours and even some pearls. Way out of her comfort zone, but working so well! I can't wait to see this piece getting finished.  Elena Golovkina Elena has been working the same image for years. Don't get me wrong, she isn't slow or anything, but she works the same image in different techniques :). As a base, she uses a Russian translation of the RSN-embroidery book. So far she has worked two beautiful irises: one in goldwork and one in blackwork. It was now time to tackle the crewelwork one! Beautiful Heathway Milano Violet and Gobelin Green were the perfect colours for the job. As the original piece in the book is made with variegated threads, we also added some hand-dyed raw silk by House of Embroidery. The fluffy nature of the wool combines very well with the spun silk. And of course, we added some sparkly pearls as well. As Elena really liked working with the wool and filling areas with trellis stitch, I am hoping for a speedy finish :).
That's all for now! I hope to see at least some of you during the vernissage or the opening hours of the exhibition. All my work will be on display and I will be present during the opening hours.
14 Comments
Last week I ran my last five-day embroidery workshop of the year. Due to my trip to China, I had to move some students to this new date. I thus ended up with one person doing crewel embroidery, one person doing canvas and one person doing goldwork. And that was actually really nice and varied! Let's have a look at what the ladies worked on. Unfortunately, my good camera gave up the ghost in China, so I had to take these pictures with my phone. Today my good camera was returned to me all cleaned and with a brand new diaphragm. Can't wait to shoot with it again!  First up is Elena from Switzerland. She worked a design from an older RSN book. As she is originally from Russia, the copy of the book is in Russian too. Luckily for me, the names and sizes of the gold threads were not being translated. In the original design, the petals and leaves are coloured in with aquarelle pencils. We opted for silk appliques instead. Unfortunately, the picture does not really do justice to the very elegant feel of this design. I can't wait to see it when it is finished! 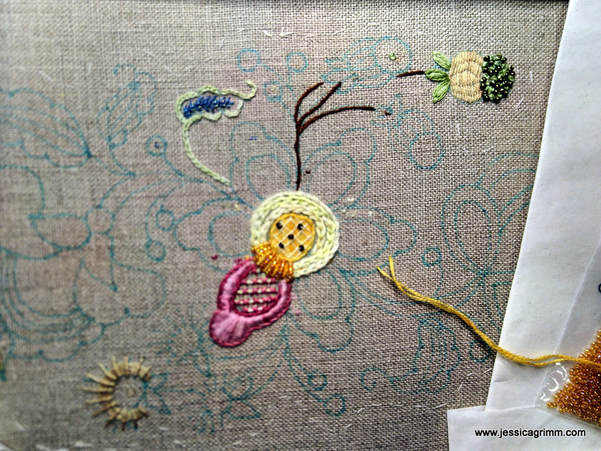 Anja L. worked a crewel embroidery design from a book by Hazel Blomkamp 'Crewel Twists'. It was her first encounter with embroidery since primary school. Getting to grips with the fact that this type of embroidery is not very productive, took some time. But she persisted and I think we have our latest convert! It will be lovely to see Anja develop her own style when she gains confidence in her own stitching abilities.  And then there was Anja D. from the Netherlands. She worked on her first canvas piece and really loved it. And so did we all! Once completely stitched, the beech trees will form a stark contrast with the beautiful autumn background. Instead of blending each colour shade in the needle, we opted for the variegated threads by House of Embroidery. This brand just happened to have such beautiful autumny colour combinations that it would have been a waste of time not to use them. And last but not least, you can watch my talk on historical embroideries I held at the National Silk Museum last month. As the whole talk is being translated into Chinese, I really needed to stick to my text so as not to throw off my lovely translator Clover. Pretty quickly we established a good rhythm and the whole presentation went rather smoothly. Enjoy!
Jetlagged and with a nasty cold, but full of wonderful stories about my recent teaching trip to China, I sluggishly slump behind my laptop. To add insult to injury, my dearest coffee machine died on me when we got home from Beijing on Saturday night. I nearly killed someone this morning who carelessly suggested that I could easily survive on instant coffee until my beloved machine gets repaired... Let's talk of happier things, shall we!? Packing my 24 days in China into one blog post might be a little too much :). Instead, I will write several posts in the coming weeks on my adventures in the far East. We'll start today with the actual teaching. I arrived a few days early in Shanghai and was picked up by Edith, a textile enthusiast from Hong Kong, who had organised the workshop. We immediately got on really well! We decided to take the bus to Hangzhou; my first taste of the excellent public transport services in China. After being dropped off in the centre of Hangzhou, we took a taxi to the hotel situated near the famous West Lake. As Bad Bayersoien - Hangzhou takes nearly 24 hours, I was ready to slip between the covers in my lovely hotel room. 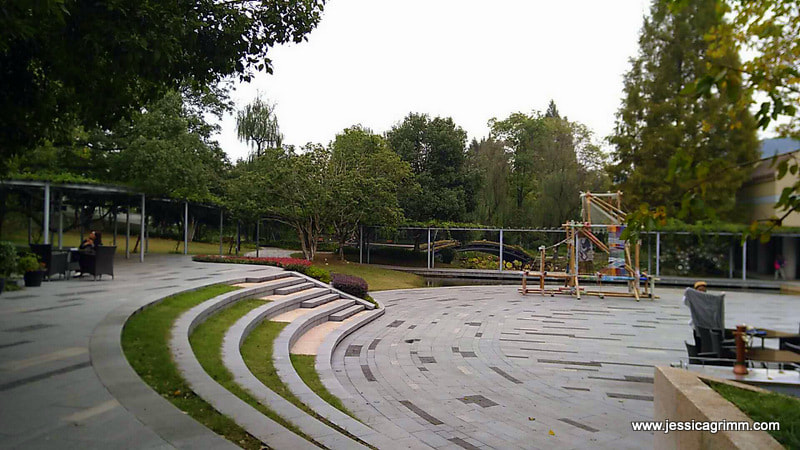 After a delicious breakfast the next morning, we crossed the street to visit the National Silk Museum. The museum is quite large with several buildings housing different exhibitions related to silk. The buildings sit in a beautifully landscaped park. Exploring the ground floor of the silk road exhibition alone took me about two hours! In the afternoon, I decided to take a walk and explore the famous West Lake. As it was the weekend, many Chinese holiday makers had the same idea. The place is famous for getting your wedding pictures taken and the whole area is an important inland holiday destination. I ended up visiting a Buddhist temple, the tombs of some revolutionaries and ended with Jasmin tea overlooking the lake. As there where not many other Westerners, the Chinese looked upon me with great curiosity :). 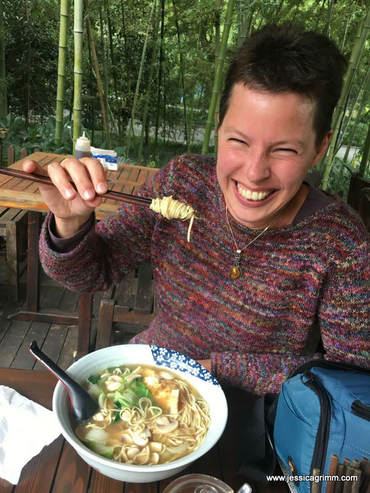 On Sunday, we prepped the classroom for the workshop starting on Monday. I met my assistant and translator Clover who has studied weaving in London. She did a great job translating my English into Chinese during the workshop! And in between, we ate :). Not only breakfast was a treat, the local eateries were fabulous too! Me using chopsticks for the first time was hilarious and I must confess that I don't miss them... 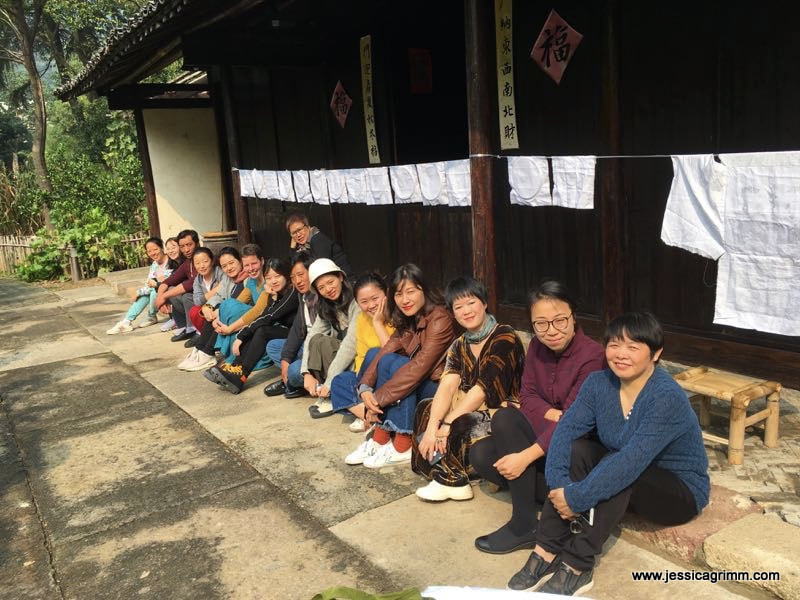 On Monday, the teaching started. The group of students was very divers. I had museum staff, art teachers, fashion designers and even two craftsmen from Tibet. They were all very eager to start! 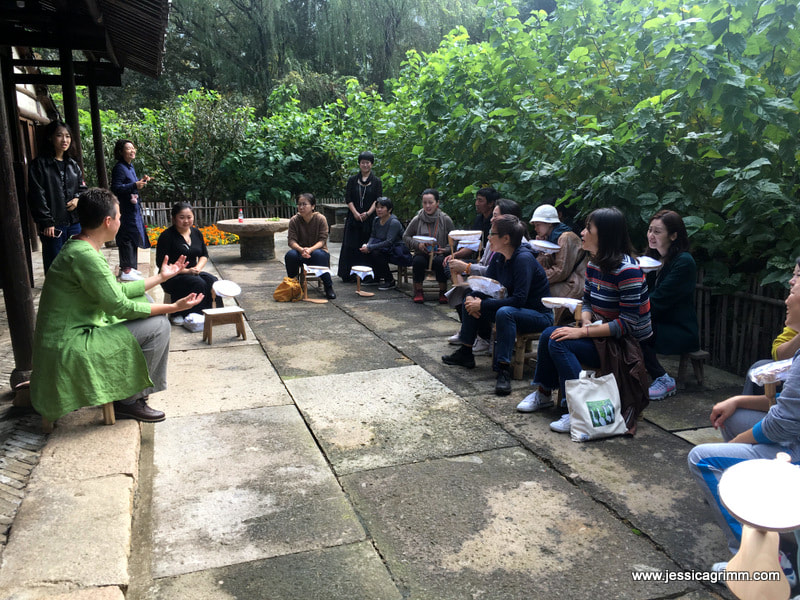 Although the official classroom was in the basement, we decided to use the lovely weather and stitched outside a lot. Sitting in front of an old sericulture farm was a favourite with all of us until the mosquitos found out about it too... We strung a line and hung up the result of the previous day to talk about the experience. I was very impressed with my students as most of them had finished their projects overnight! However, getting them to critique their work publicly or express their experiences with the particular embroidery technique, wasn't easy. 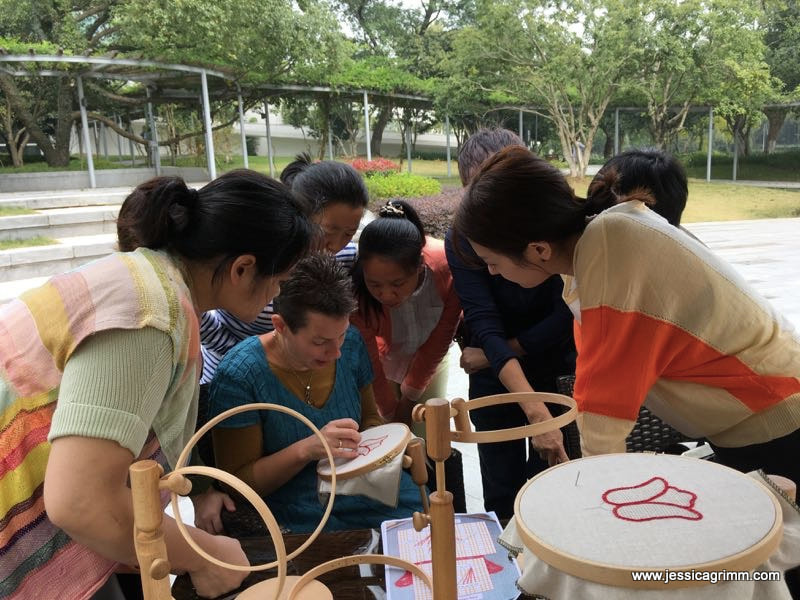 Other favourite stitching spots were the cafe... 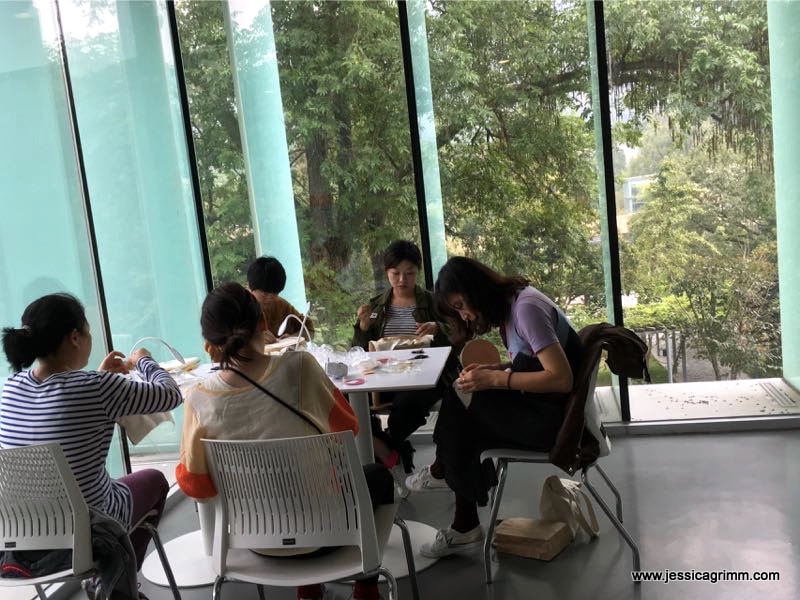 ...and the gallery of the fashion building. Those large windows were fantastic. 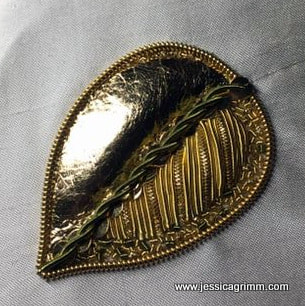 When teaching the goldwork leaf on Thursday, I discovered a mistake with the scale of the leaf. Oopsy! Time for a last-minute change: add some chipping to the original design and all was well again. It shows that no matter how well you prepare, mistakes can always happen. Adapt and carry on! We ended the day with a Chinese high-tea organised by the students. They had brought all sorts of delicacies for me to try. Yummy! 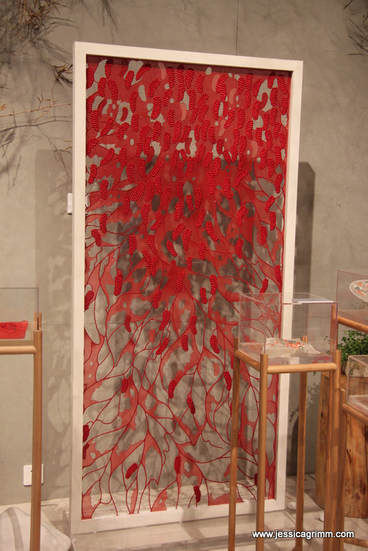 The schedule on Friday and Saturday changed a little. We had the opportunity to pair my talk on medieval embroidery with that of a local master embroiderer on Friday. We had all hoped that she would talk on the techniques she used in her embroideries or the thought process that went into them. Unfortunately, she didn't. It was more a sales talk. However, some of her work was really nice and unusual. It showed that she also experienced difficulties with branding her work as art. My talk went really well. The museum did record it on video and as soon as I know where it is available, I will let you know. If it does not become available, I will put up the original presentation and let you know where to find that. However, it is much more fun to hear a Dutch person talk in English and have that translated into Chinese by Clover :).  As one afternoon of the original five-day workshop was high jacked by the presentations, we decided to meet again on Saturday morning (in the original plan I would have given my presentation on Saturday). I was completely blown away by the fact that quite a few students had completed all four projects! That's the best praise a teacher can get. It shows that they really enjoyed themselves and loved the tasks I had set them. Those six days were immensely gratifying and I really had a blast! Seeing people figuring things out and going on helping others is such a great experience. I really hope they can implement the things they have learned in one way or the other.  I've continued work on Strawberry Fayre and have finished the first of the four inner hearts. The stitching is largely the same as for the front and the back heart. As I really did not like the way the picots under the strawberries had turned out on the front heart, I swapped threads. The instructions tell you to use a stranded variegated spun silk (Gumnut Yarns 'Stars'). This thread is far too fluffy to make a nicely defined stitch. As a result, my picots turned quite fizzy. Strangely enough, the picots in the Inspirations pictures are sharply defined... Another hint that the threads listed in the instructions might not have been the ones used by Carolyn Pearce :). As I wanted better picots, I looked for a thread less fluffy and with a tighter twist. So here are my new picots using House of Embroidery #12 perle 'bush'. Much better indeed!  Carolyn Pearce Strawberry Fayre Unfortunately, I ran out of the green Güttermann Sulky thread. Although I was able to substitute it with a thread from my stash, I wasn't a happy bunny. I am not the only one who has run out. I don't think this is acceptable for a kit priced at €138 or $170. So far, I only had good experiences with kits from Inspirations. I stitched my needlecase 'Cottage Garden' and 'Home Sweet Home' with the original kits and had no problems. My issues with Strawberry Fayre, and the solutions I have started to implement, have given me the confidence that I will be able to stitch future projects from Inspirations using my own stash!
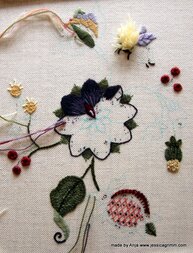
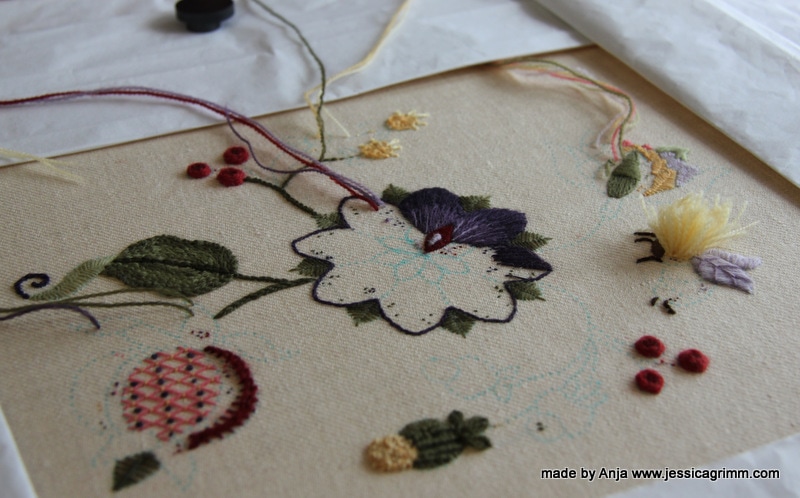
Note: I did not finish this project as the instructions were faulty and there was not enough material in the kit. Before I open the candy tin, I would like to voice a big thank you to all who left comments of encouragement on last week's blogpost. I also received many personal emails. Thank you very much! What will happen next? The farm building is beyond help and will be demolished. The cattle will be sold over the next weeks. The Lötschmüllerhof will no longer be a farm. That's a strange idea. As reference to 'the farm' in my family was always to this particular place. However, we are all settling in to our new lives and the help from others is balsam to our souls. 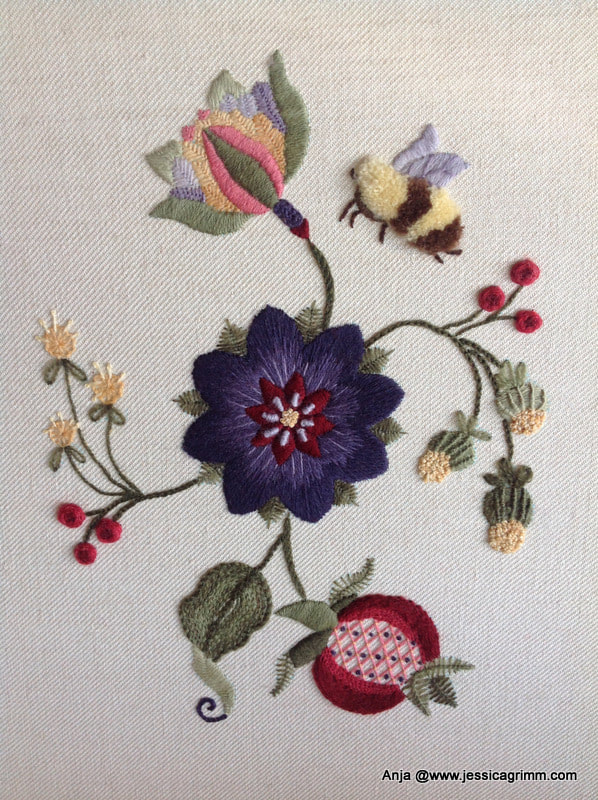 On to the eye candy! Remember this piece by Anja from the Netherlands? She started it earlier this year during one of my stitching retreats. I think she did a terrific job! The piece is balanced and the purple flower is such a beautiful centre piece. So proud of her :). Note: I no longer run this course.
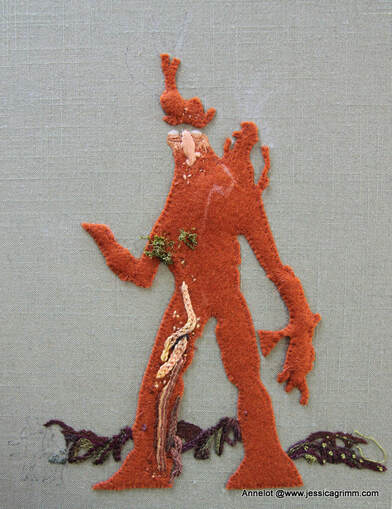
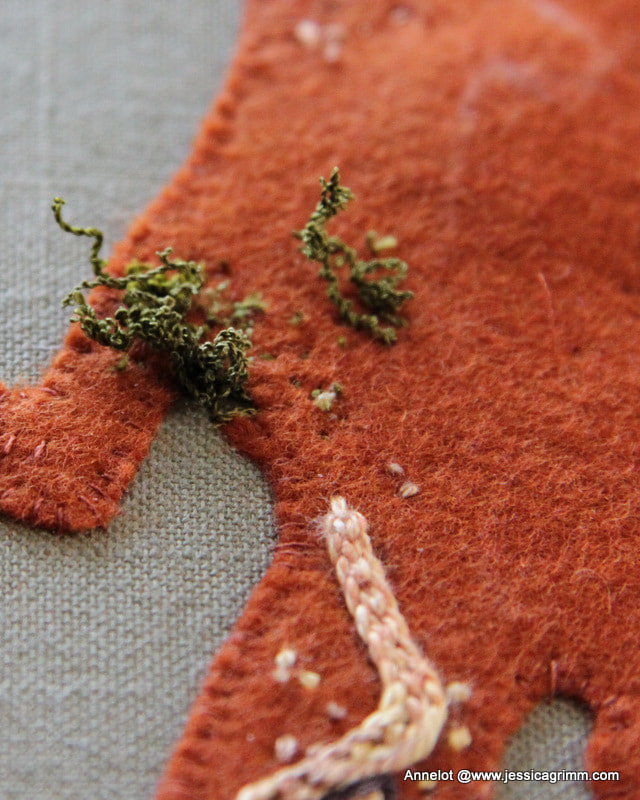
Next up is a stumpwork piece by Annelot from the Netherlands. She started it last week during my stumpwork stitching retreat. Annelot is creating a stitched version of Treebeard, the oldest Ent from the tales of J.R.R. Tolkien. For his mossy beard we tried the overtwisting method as described by Alison Cole in her great book on stumpwork (you can read my review here). This is a fun method with great texture. Can't wait for the piece to be finished. 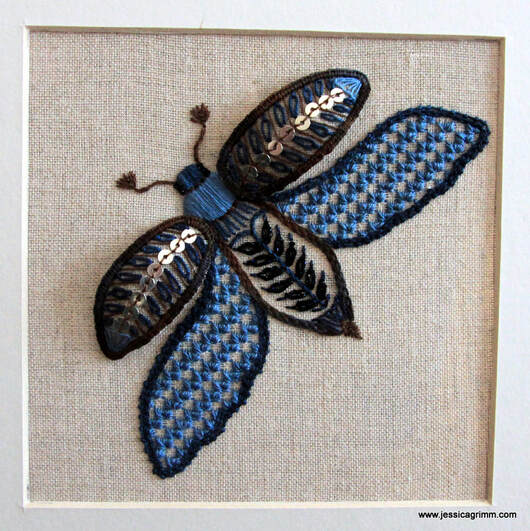 Over the years, I have learned that embroidery calms and sooths my soul. So I was particularly happy to find the September broderibox by Nordic Needle in my mail last week. With this month's threads I worked a moth from one of Millie Marotta's books. I used Snow by Caron, Watercolours by Caron, Kreinik Silk, Colour variations by DMC, Londonderry linen thread and silver plated spangles. The moth is stitched using a combination of Schwalm drawn-thread work, surface embroidery and stumpwork. 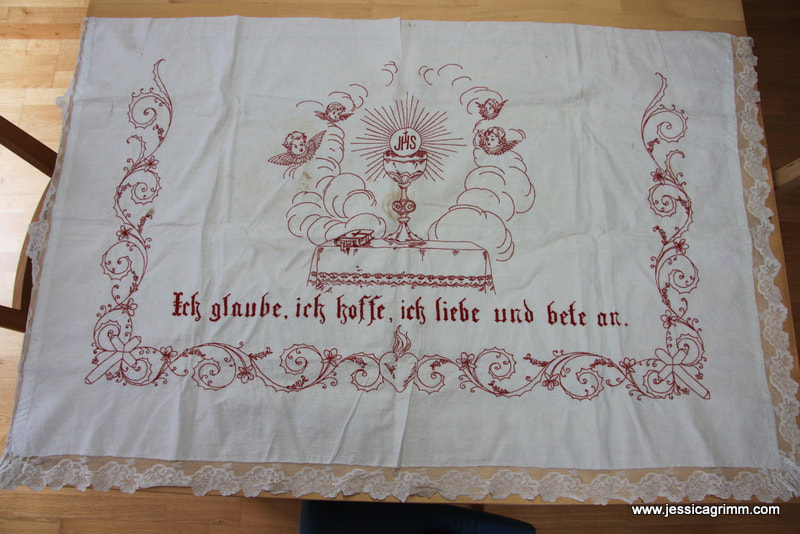 And last but not least, this altar frontal or antependium was saved from the fire. It used to adorn the Corpus Christi altar put up in front of the farm every other year. It is a little dirty, so I will try to gently clean it. Since the altar did burn, we need to construct a new one. But the antependium will still adorn it!
And that's it. All candy distributed :). See you next week! Today I am going to share some lovely embroidery pieces with you. We'll start off with the work of one of my students, then we'll have a look at some new pieces I made and we'll finish with a new initiative to bring Mastercrafts People together. Let's start with a stunning blackwork piece: 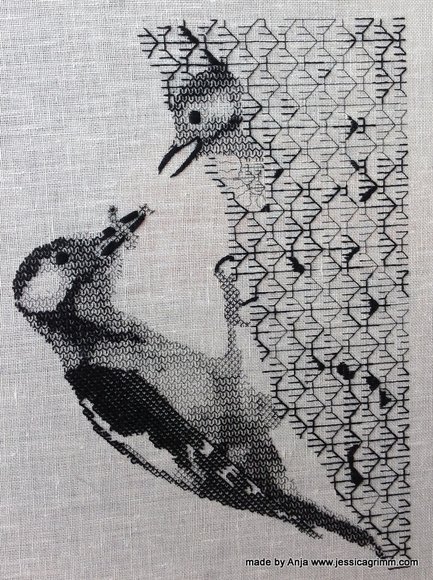 Blackwork embroidery by Anja This piece has been embroidered by Anja from the Netherlands. She started it last year during one of my week-long embroidery retreats. Anja worked from a picture and translated the different textures and shades beautifully into blackwork's geometric patterns. Anja will add some white highlights to the eyes to make the birds even more life-like. I so enjoy seeing a finished piece which started under my tuition!
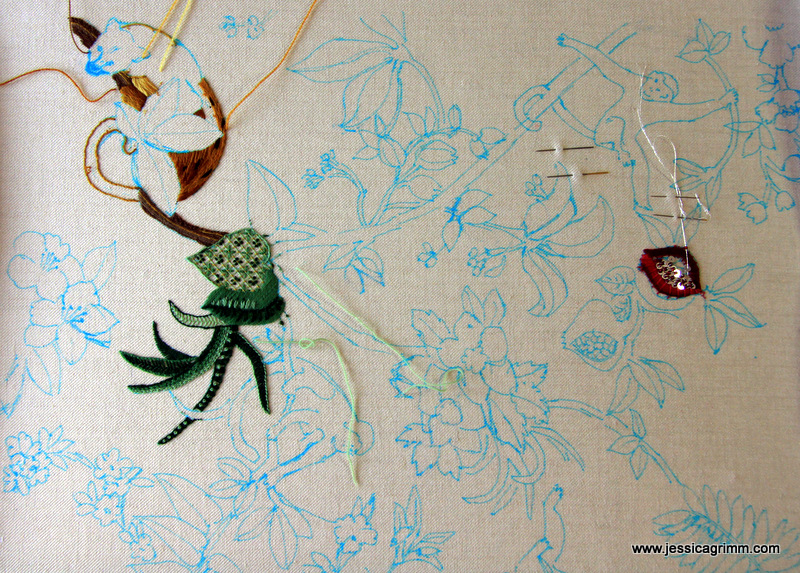
Next up is another piece by Anja. She started it last week during another one of my embroidery retreats. We had great fun designing this piece by using a piece by Hazel Blomkamp as the base. Then we added two flowers from a colouring book by Millie Marotta and a pomegranate from an older embroidery book. Just to illustrate that you don't need to be able to draw your own design from scratch. Mix and match often produces a stunning new design. I have a feeling this piece will turn out great as well!
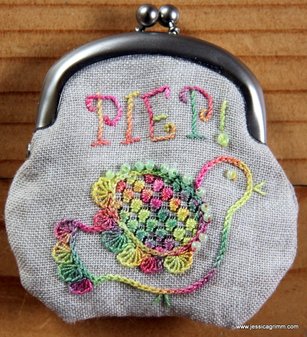
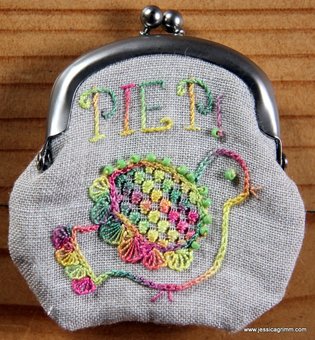
As most of you know by now, I have a subscription to the Broderibox by Nordic Needle. Although I used all threads present in the May box, I wasn't sure what to do with the purse clasp. I am an embroideress and I can mount a finished piece satisfactorily. However, I am not good at finishing. Mainly because I do it so rarely. Time to change that! There are so many lovely products out there to turn your embroidery into something other than a framed picture. Time to become acquainted with the clasp. Luckily for me, there was a website listed on the back of the clasp's packaging: Zakka Workshop. Do visit their website as they have some adorable stuff on there. And best of all, they have a really good Youtube video on how to install the clasp. As I wasn't confident that I could come up with the right size embroidered purse, I ordered their instructions for the simple patchwork pouch. It provided me with a template for the purse and then it was just a matter of adding a cute bird, do some Schwalm embroidery, add some beads and best of all: use a House of Embroidery hand-dyed perle #12 in a colour combination that's totally out of your comfort zone :). Worked a treat so far. Installing the clasp wasn't as easy as the video makes you believe. Especially not as I've probably used the wrong interfacing between the embroidery and the lining of the purse. Mine is probably too thick/stiff. That's the challenge when using instructions from another country. However, I am quite pleased with the result! 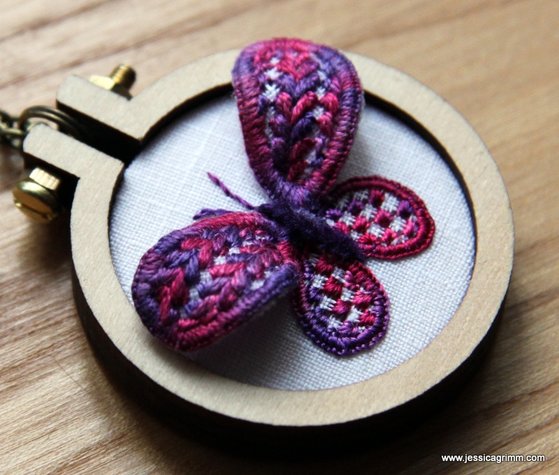 Schwalm whitework embroidery and stumpwork embroidery Another great way to finish your embroidery is to use a tiny wooden hoop by Dandelyne. Since I really like my Schwalm butterfly, I wondered if I could shrink the piece enough to go into a 4cm hoop. Guess what? I could! I used a combination of House of Embroidery hand-dyed fine silk and raw silk as well as paper covered wire to stiffen the upper-wings. I've now worn the piece around my neck for two days straight (I did put it down for sleeping...) and it holds up beautifully. By the way, you can get your Dandelyne hoops here in Germany from the lovely Nadine from Zur lila Pampelmuse. That's where I got mine :).
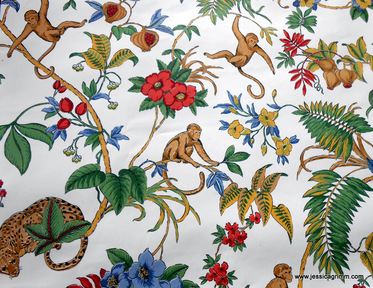
Today we are going to have a look at a few embroidery pieces my students work on. As I have only two hands and there are only so many hours in the day, tutoring others to embroider is THE solution. It is the perfect way to see some of my ideas put to work, without me actually stitching them :). First up is a crewel piece by Elisabeth Stix, which was started during one of my crewel embroidery courses. Please note: I no longer offer these courses. 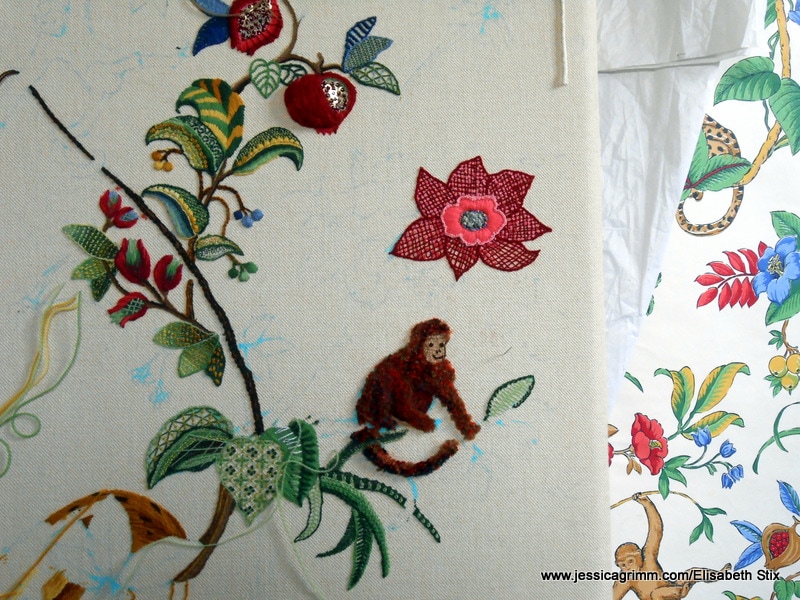 Elisabeth's piece is really big. It has been inspired by a beautiful piece of wall paper. You can see a glimpse of it on the right in the above picture. Elisabeth works on and off on this epic piece. Just stitching what takes her fancy. She mainly uses Heathway Milano crewel wool, but beads and other threads are also included. 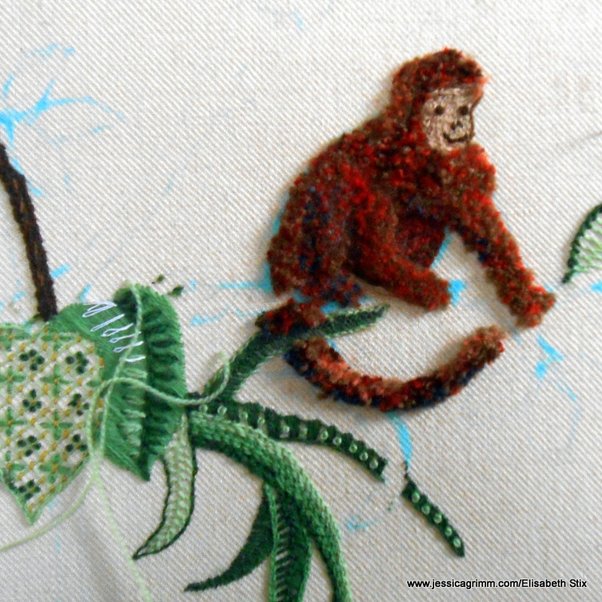 Latest addition to the piece is this adorable monkey in Turkey rug stitch. He is just such a lively chap amongst all the greenery! And I love the fact that his coat is so nicely mottled. Elisabeth must have had great patience whilst filling such a large area with Turkey rug stitch. And a lot of courage cutting it into shape :). 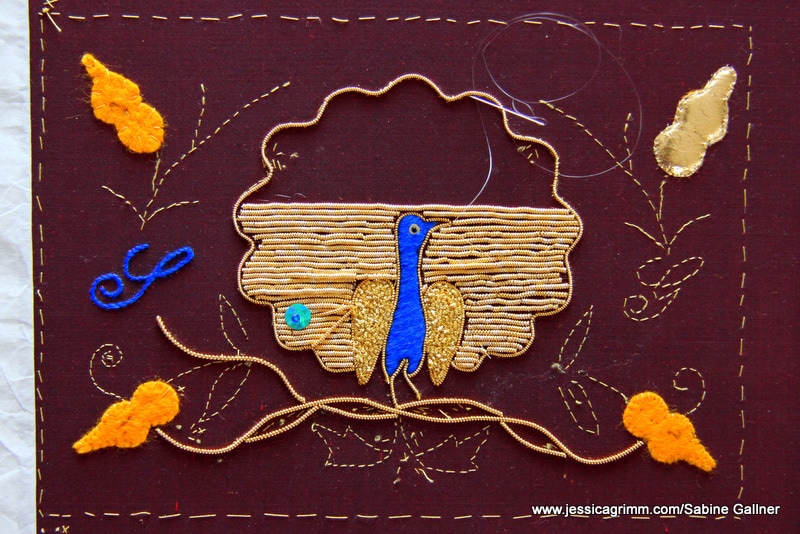 Next up is Sabine Gallner's peacock clutch bag in the making. This piece was started during my goldwork embroidery course a few weeks ago. Although it was originally inspired by an antique clutch bag, we have moved away form an exact copy. It is quite a challenge to use these long stretches of wire check to fill the peacock's tail. They later get secured with pearl purl and a blue spangle with a bead. You can get the idea from the one in the left-hand corner. This will be a real showstopper once finished!
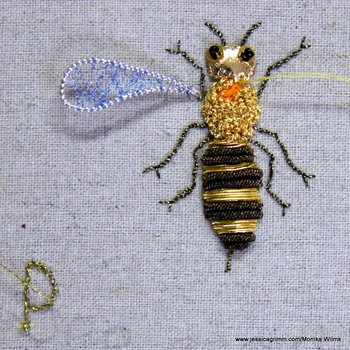
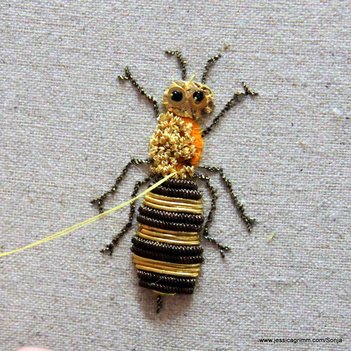
And last, but not least: two creative bees made during yesterday's goldwork embroidery workshop. The left bee was stitched by Monika Wilms. She is now planning to stitch a larger floral-with-creepy-crawlies-piece which will combine stumpwork embroidery and goldwork embroidery. So looking forward to mentor her on that one!
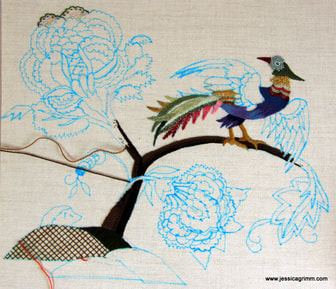
The bee on the left was started by Sonja, a lace-making friend of Monika and Sabine. Sonja had not embroidered in a long time and had never done any goldwork embroidery. I think she did a terrific job! As promised in last week's post, this week we'll explore some of my students' embroidery projects. First up is Elizabeth's stumpwork piece she started last week. She brought along with her a beautifully illustrated children's book. The colourful and witty illustrations are by Lilo Fromm. Do check out her website (and scroll down a bit as it starts rather 'grey'!) as there is inspiration to be had. Her illustrations would be wonderful as canvas embroideries too! 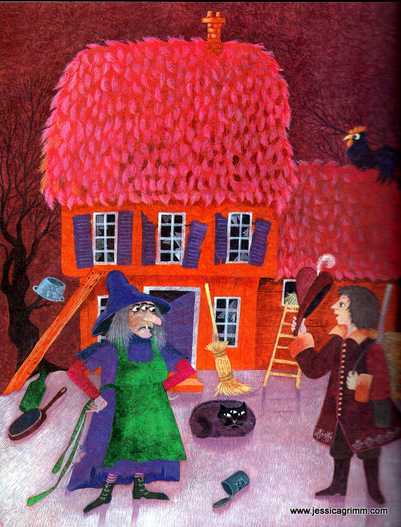 Elizabeth choose this lovely illustration of the witch's house. It is a nicely layered picture, ideal for stumpwork embroidery. It does however mean, that you'll need to do a lot of stitching before you can start the nice lady and the gorgeous chap in the foreground. That said, stitching a witch's house is never dull! 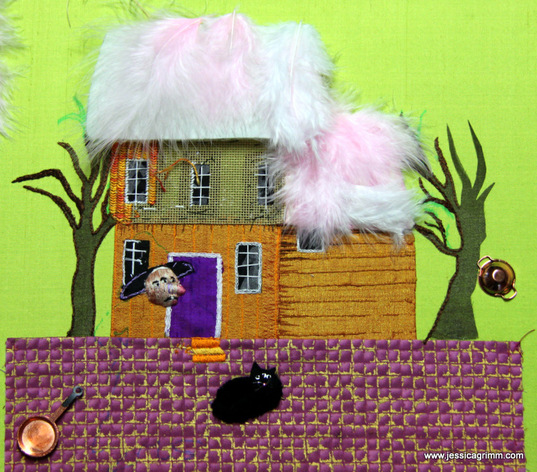 This is progress after five days of stitching. We had particular fun with the broken glass windows. We opted for black silk with white sheer fabric 'glass sherds' fused with bondaweb. Cleverly stitching the partitions and the frame over the fused fabrics should ensure that they'll stay put even when the bondaweb disintegrates with time. 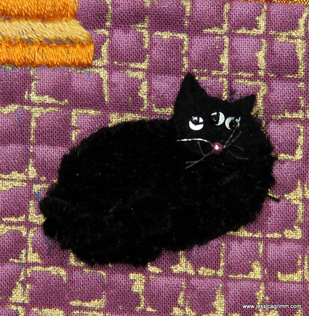 And what do you think of our cat with the three eyes? He, or are three-eyed cats female?, has been created by covering a black felt base with black silk chenille. He then got a felt head adorned with three silver plated spangles and tiny black beads for his eyes. I think he is an adorable witch's cat. 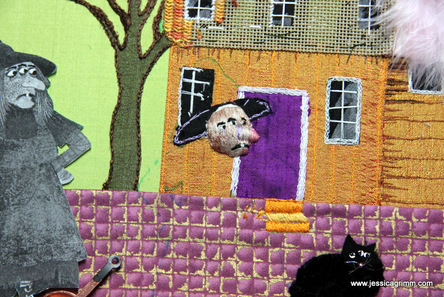 Although we only barely touched upon stitching the witch, we did manage to stitch her face. You can tell she is the cats mother, as she has three eyes too! Elizabeth now has lots of fun homework to do. And once she gets stuck for inspiration, I'll get to help her on her way again. I am very much looking forward to see this lovely piece grow.  And then there is this fantastic crewel piece by Ellen. She started it in February and finished it a couple of weeks ago. It is always so nice to see how a piece eventually turns out. Five days of stitching is rarely enough to finish projects of this scale, so I am always very pleased when I find pictures in my inbox!
Before I'll tell you about two upcoming course possibilities here in Bad Bayersoien, let's take a look at some 'work in progress'. Remember Ellen and Elisabeth who did a crewelwork embroidery course way back in January? They have graciously allowed me to share their progress with you all. Note: I no longer offer these courses. 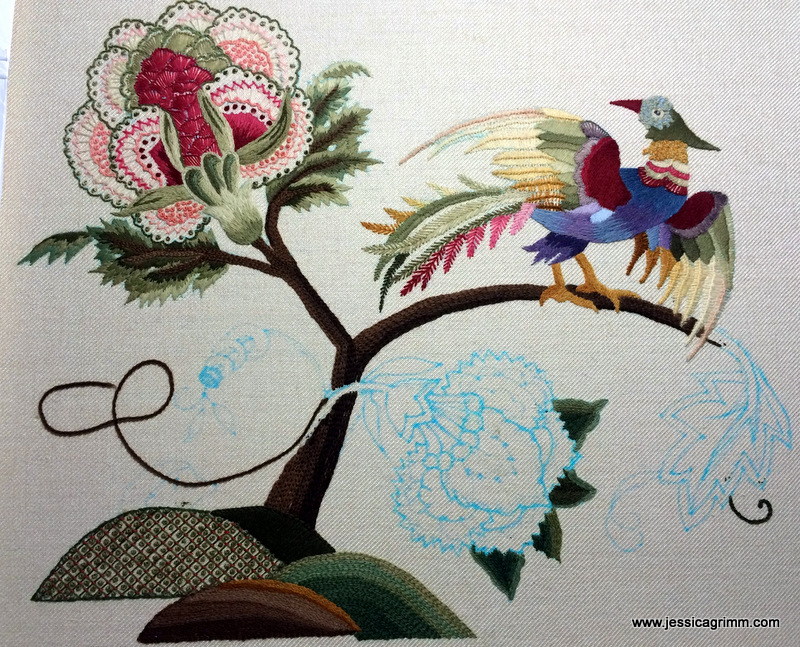 First up is Ellen her piece. The design was made up of all things 'crewel' Ellen came across and liked. Eclectic, colourful, vibrant and fun. Perfect for trying out many different stitches and colour combinations. The shading on the green leaves of the pink and coral flower has been worked very nicely!
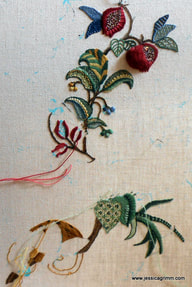
Next up is Elisabeth's piece. She used a designer piece of jungle wall paper as her design source. Her piece takes a modern approach on Jacobean crewel as she incorporates stumpwork elements and beads. Below is a detail of the pomegranates. 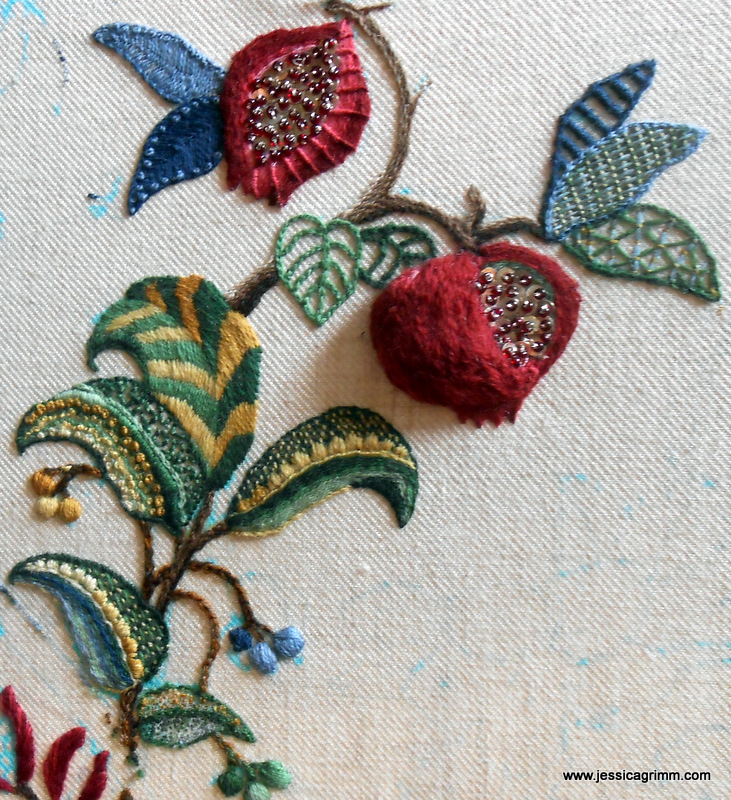 I love both pieces and think the ladies have made great progress! Five days are nearly always too short to finish a piece of embroidery. This blog is a great way of keeping track of each other's progress; especially as both ladies live 675 kilometres apart.
Last week saw the launch of my first five-day embroidery courses new-style. Students can either bring their own design, make one up using my extensive library of embroidery books or simply pick a ready-made design from one of those books. Equally, they can choose to work a small design in an embroidery hoop or opt for a more professional approach and use a slate frame. I've also moved away from the very formal approach of my training at the Royal School of Needlework. Good as it was, it has proven not to be suitable for copying one to one for mainland Europe. So, what did we do?  Ellen from the Netherlands decided to create a design out of pictures she had found on the internet. It works really well to copy bits of designs you like, re-group them and amalgamate them into a new design. And then the fun part comes: choosing colours. Although traditional crewel embroidery involves a woollen thread on linen, you can equally use embroidery floss, perle and the like.  Elizabeth from Augsburg had brought with her a magnificent wall paper she wanted to recreate in stitch. An exotic jungle view with nice vivid colours. As both projects were quite big, and will last them well beyond the five days we had, they both opted to work on a slate frame. For larger projects that are not table cloths or the like, this will always be my preferred option to work with. OK, it takes some time to set up, but it will keep your fabric drum taut for a long time and give you a lovely overall stitching experience. 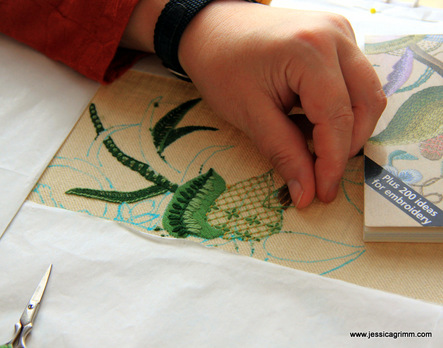 The ladies had so much fun experimenting with different stitches and colour combinations. Pomegranates with silver plated spangles and deep red beads added extra interest. As did a magnificently colourful bird with its many feathers.
And these were the results after five days of hard work, yet relaxed stitching. I think they did marvellously, don't you think? We all agreed that we could have added another week. Note: I no longer offer this course.
|

Want to keep up with my embroidery adventures? Sign up for my weekly Newsletter to get notified of new blogs, courses and workshops!
Liked my blog? Please consider making a donation or becoming a Patron so that I can keep up the good work and my blog ad-free!

Categories
All
Archives
July 2024
|

 RSS Feed
Contact: info(at)jessicagrimm.com
Copyright Dr Jessica M. Grimm - Mandlweg 3, 82488 Ettal, Deutschland - +49(0)8822 2782219 (Monday, Tuesday, Friday & Saturday 9.00-17.00 CET)
Impressum - Legal Notice - Datenschutzerklärung - Privacy Policy - Webshop ABG - Widerrufsrecht - Disclaimer
Copyright Dr Jessica M. Grimm - Mandlweg 3, 82488 Ettal, Deutschland - +49(0)8822 2782219 (Monday, Tuesday, Friday & Saturday 9.00-17.00 CET)
Impressum - Legal Notice - Datenschutzerklärung - Privacy Policy - Webshop ABG - Widerrufsrecht - Disclaimer