|
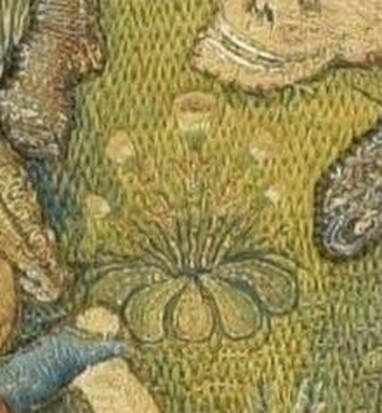
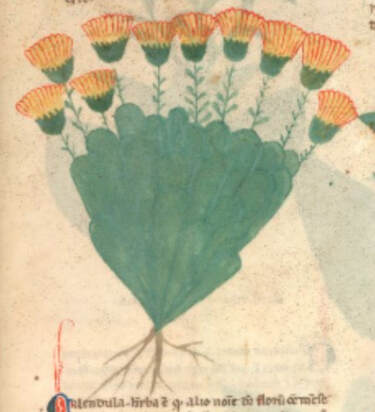
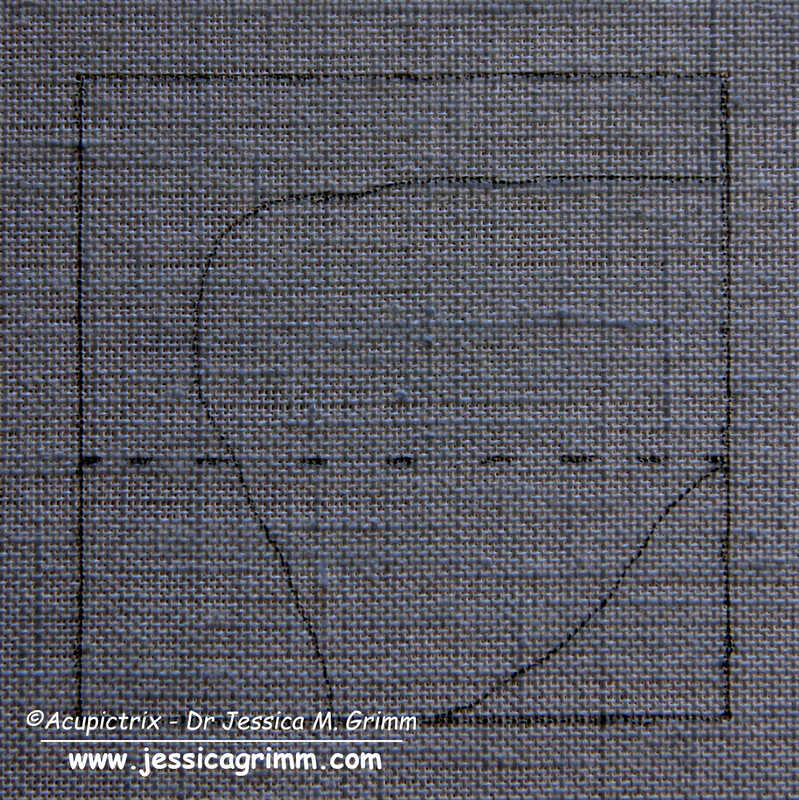
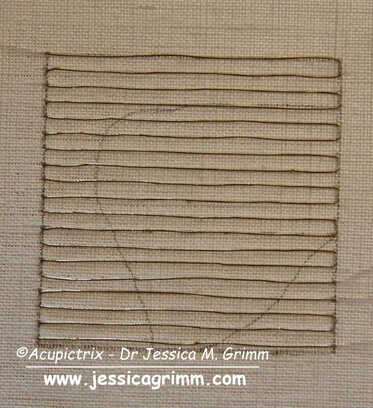
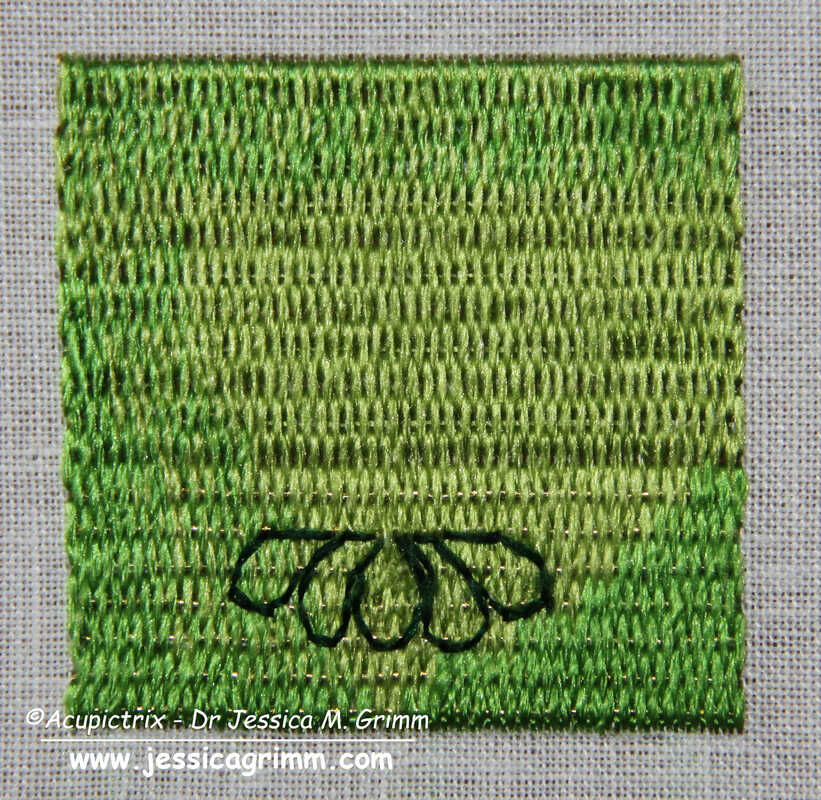
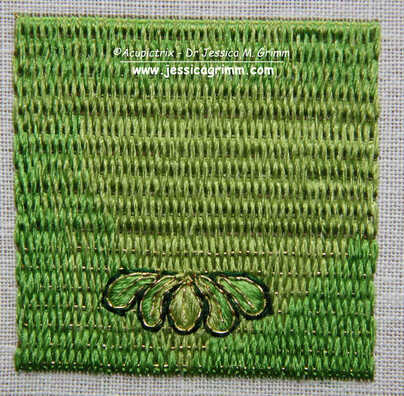
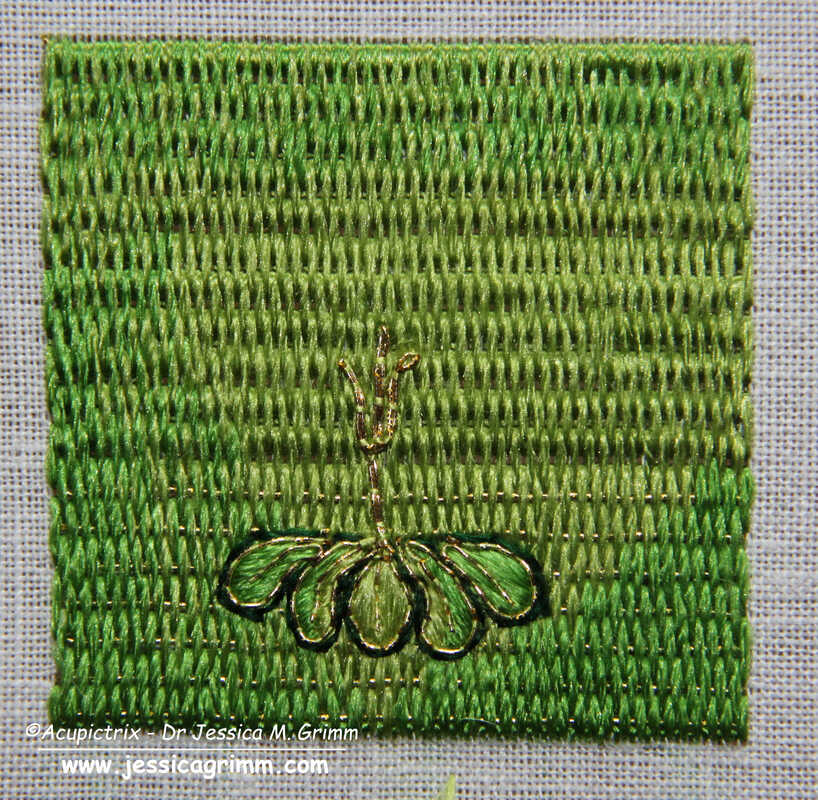
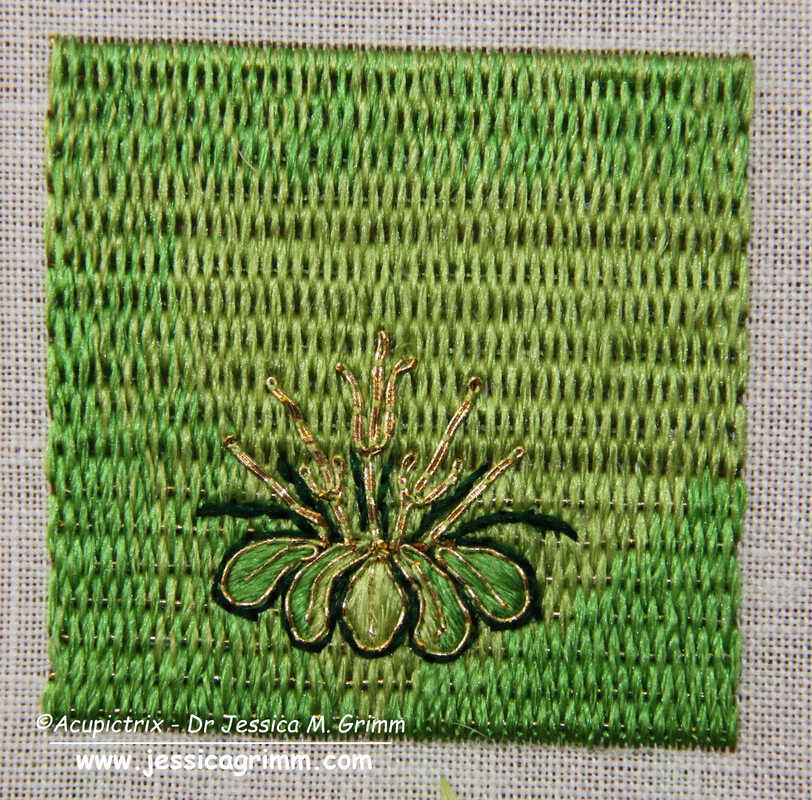
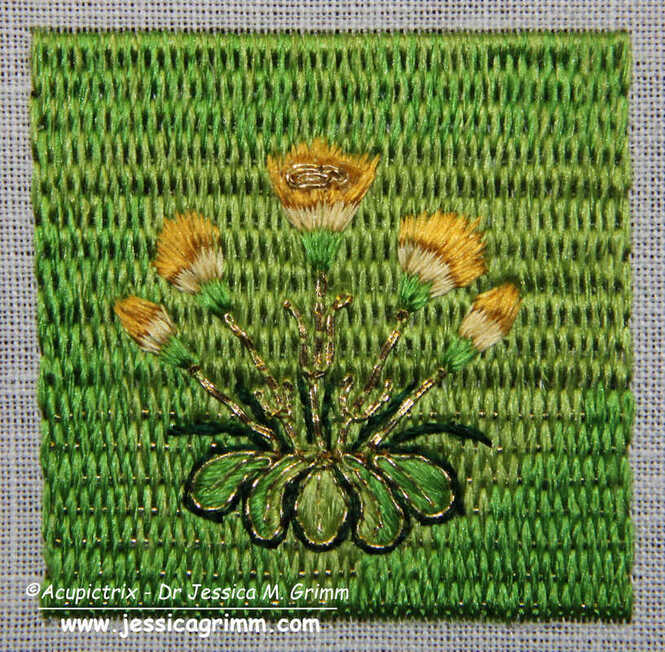
We have been exploring the embroidery and the iconography on the lone cope hood from the V&A (990-1888) in the past two weeks (part 1 & part 2). This week, I'll show you how to work a small embroidery sample based on one of the flowers seen on that cope hood. It is an exercise in both counted threadwork and free-hand embroidery. It also teaches you to work goldwork embroidery on top of a base layer of goldwork embroidery. This was common practice in late-medieval goldwork embroidery. It is often done to hide the ends/turns of gold threads and it adds some depth. Below is a summary of how the sample was probably originally stitched. Journeyman and Master Patrons can download a 9-page PDF with detailed instructions. My clever husband happened to have a book on medieval flowers and was able to identify one of the flowers on the original cope hood as marigolds. The Egerton Manuscript from c. AD 1300 (MS 747, f. 30r) shows a drawing of the marigold that is quite comparable to the embroidered version. The embroidered version is about 3,5 cm high, and the detail is amazing. As you can see in the original, the marigolds are stitched on top of a layer of Brick Stitches (upper part) and Burden Stitch (lower part). These are both counted thread techniques. The foundation thread for the Burden Stitch (a passing thread) also runs under the Brick stitches. It is just being ignored. It is needed under the Brick stitches as padding. If you omit it, this section will be flatter compared to the Burden stitches. As the gold thread is (nearly) completely covered by the Brick stitches it shows that the price of gold thread had come down considerably by the end of the medieval period. Start your sample by drawing a 5 x 5 cm square on the grain of the fabric. You can also add guidelines for the shading and for when you want to change from Brick to Burden stitch. I am using a 46 ct linen, Stech vergoldet 80/90 (comparable to passing thread #4) and Chinese flat silk from Oriental Cultures. Start by laying the passing thread foundation. My passing threads are spaced 5 fabric threads apart. Once your base layer of Brick and Burden stitches is in, the fun free-hand part begins! And this is where each sample will become truly unique. Start with outlining the five green leaves. I've used a simple back stitch, but you can also use stem stitch. These are then filled with a few satin/straight stitches. On top comes an outline and vein (stitched in one go) in couched gold thread. Next up are the stems. They are made of gold thread. Start at the top (where the flower attaches) and separate the two threads to form a leaf on either side of the stem. Re-unite the threads again to form the bottom of the stem. Add dark green stems for a bit more definition. I've used stem stitches. The flower heads are stitched in long-and-short stitches (i.e. split your stitches). Start with the green bits at the bottom. Then add the light-yellow bottoms of the petals and end with the dark yellow tops. The central flower gets a flower heart made of a couched piece of gold thread. And that's your marigolds finished! Mine turned out more like dandelions ...
One of the things that amazed me when I was whipping up this embroidery sample, is the fineness of the original embroidery. My rendition looks bulky in comparison. Another hint that the original cope hood was once part of a very high-end vestment intended for an important clergyman and/or church! Literature Fisher, C., 2007. The Medieval Flower Book. The British Library, London.
1 Comment
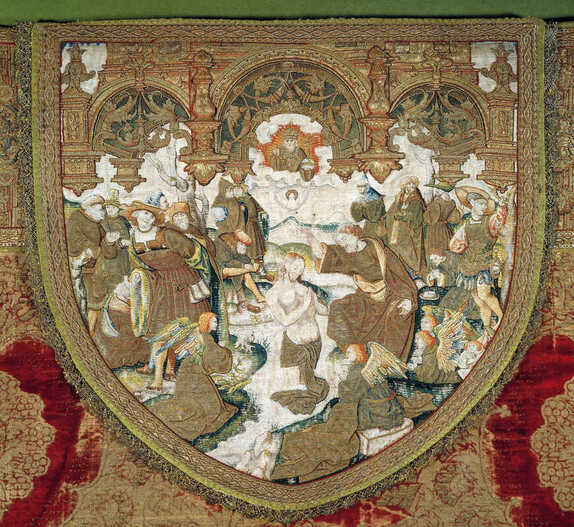
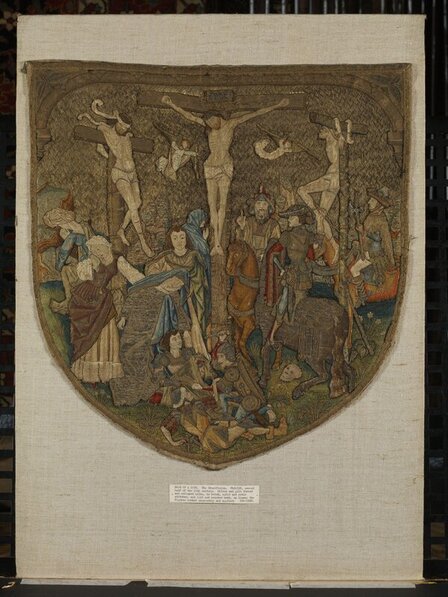
Last week, we explored the iconography and the embroidery techniques used on a cope hood from the V&A. The museum acquired the cope hood in 1888 and nothing more is known about it. Ever since I saw the piece in November 2019, I have wanted to know more about this outstanding piece of embroidery. And I have found some intriguing parallels in my ever-growing database of medieval goldwork embroidery. By now, my database contains 40 cope hoods that date to the 15th and 16th centuries and that are made in the historic Netherlands (present-day Belgium and the Netherlands). Of these, only 22 also have their matching orphreys preserved. Not a huge amount of data to work with ... My closest match is a cope hood from a cope from Averbode Abbey in Belgium. The scene is very similar to the crucifixion scene on the lone cope hood from the V&A. And the embroidery techniques are similar too. There's a lot of high-quality or nue in the figures. And the grassland is partly stitched in Burden stitch with additional plant motives on top (some grassland is or nue). Thanks to the accounts of Averbode Abbey, this cope can be precisely dated to AD 1530. The lone cope hood from the V&A dates to the second half of the 15th century (1450-1499). This would mean that there is a time difference of 30-80 years between the two. As this cope is still complete, we also have an idea of what the matching cope orphreys of the lone cope hood of the V&A might have looked like. There are six orphreys in total and they show: Agony in the Garden of Gethsemane, Betrayal of Christ, Christ before Pontius Pilate, Flagellation of Christ, Crowning with thorns and Christ carrying the cross. Do click on the link above to see more pictures of the cope. You can enlarge them and/or download them. One of the things that makes the design of the lone cope hood from the V&A so outstanding is the amount of storytelling that's going on. Embroidered art can be pretty static. The above cope hood from Museum Catharijneconvent also has a very dynamic design with whimsical details. See the man untying his shoes? And the woman being helped out of her coat? These people are preparing for their own baptism. Some people look on in quiet contemplation whilst others look a bit sceptical. It needs a good designer, in this case, Jacob Corneliz van Oostsanen, and an equally brilliant embroiderer to put it into stitch!
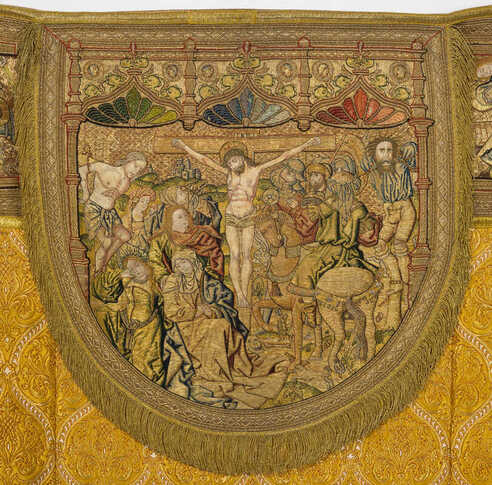
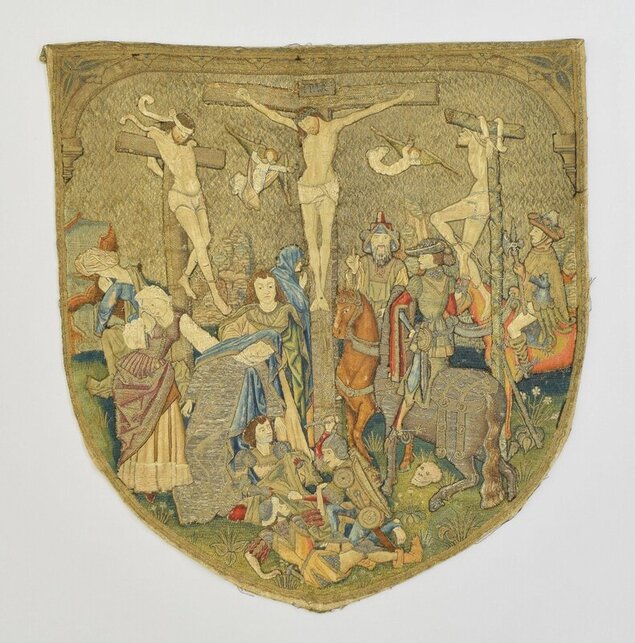
This cope hood was made around AD 1520-1529 in Amsterdam. That's about 30-70 years after the supposed stitching date of the lone cope hood from the V&A. Maybe the lone cope hood from the V&A should be dated a little later? Any art historians in the audience that could chime in on this? When everything goes to plan (hear the universe roar with laughter?), we will try our hands at a little bit of recreation of a small part of the lone cope hood next week! Literature: Gerits, T. J. (1973): Historische schoonheid van Averbode. Averbode: Abdij der Norbertijnen. In November 2019, I visited the Clothworkers' Centre in London to study several pieces of embroidery kept in the V&A collection. One of these pieces was a cope hood from Flanders made in the second half of the 15th century (Accession Nr. 990-1888). The piece was bought in 1888 by the museum and lacks any further provenance. Lone cope hoods are pretty common in museum collections. This part of a cope is already relatively loose and could easily be separated before being sold on the art market. Pieces without provenance, like this lone cope hood, always make me a bit sad. So much information was lost. Nevertheless, it is a very fine piece of late-medieval goldwork embroidery. Let's explore! The cope hood measures 53.3 x 51.4 cm and the embroidery fabric is a finely woven linen. Originally, the hood would have been trimmed with some sort of decorative fringe. It likely also had a tassel of some sort dangling from its lowest point. In those areas where the embroidery has fallen out (lower part of the undergarment of the lady with the red dress on the left), a finely shaded underdrawing is visible. Although I am generally not very keen on crucifixion scenes, this one I quite 'like'. There is so much going on. There is so much movement. And there are so many fine details. This is late-medieval art at its best! The design is very high quality and was likely made by a famous artist. Maybe a painter or someone who designed church windows (we know from written sources that they provided embroiderers with designs too). It is highly unlikely that the design stems from an embroiderer who happened to be a fine draftsman too. So, what do we see? And how was it embroidered? We, the viewers, are looking towards Golgotha from under an arch (probably the city gate of Jerusalem as Golgotha was 'outside the city gate' according to Hebrews 13:12). The arch is a far more intricate piece of embroidery than what it looks at first glance. It is partly embroidered as a continuation of the diaper pattern background (capitals on the sides), whilst the gold threads of the rounded arch neatly cover the turns of that same diaper pattern. The silver trefoils in the corners are also very intricately embroidered. There's twist and something that looks like a chain stitch executed with passing thread. On the arch itself, halved quatrefoils are embroidered at regular intervals. Their 'petals' are actually part of the arch. By couching 'petal' outlines onto the arch, the quatrefoils emerge. The diaper pattern used for the background is of the common open basketweave type. The couching stitches were once bright red; the most common colour used. Also part of the background are beautifully stitched rocks. They are embroidered directly onto the background linen. The rocks are made with Burden stitch and use a variety of green and brown silks. On top of this base layer, additional details are stitched with silks and gold thread. The rest of the background consists of a meadow stitched with several shades of green in Burden stitch. At the top, the Burden stitch is worked very densely so that the foundation gold thread can hardly be seen. Towards the bottom, we see the gold thread clearly. On top of the grassy base layer, grasses and several species of plants are stitched with silk and gold. None of the plant shapes is repeated. The flowering plants have different flowers. Maybe the plant lovers in my audience can identify them? Also present in the meadow is a rather funny-looking skull. It has lost most of its embroidery but is still readily identifiable. The skull is a hint to show that we are at Golgotha. According to the bible, Golgotha means 'place of the skull'. And what's with all the people on this piece? They actually tell different parts of the gospels in one very lively scene. Firstly, there are the three crucified people: Jesus in the middle flanked by two criminals. See the body language of those two criminals? The one on the left looks submissive. The one on the right not so much. He even sticks out his tongue. The story of the good thief and the unrepentant thief is told in the gospel of Luke. Interestingly, the crosses of Jesus and the good thief are identical (made of timber), whereas the cross of the unrepentant thief is made of green wood. Has anyone seen this before in embroidery or a painting? Oh, and then there are the two angels with their chalices catching Jesus' blood for the Eucharist.
Next up, are the people on the left. They are on the good side with the good thief. We see four women and a man. The woman on the left with a fancy laced red dress is Mary Magdalene. The woman to her right is Mary mother of Jesus. She is fainting and being caught by Saint John who stands behind her. The two other women in the back are sometimes known as Salome and Mary the wife of Clopas. The bible is vague about these other women. Is this why the designer decided to show them only from the back? On the 'wrong' side are three horsemen. Two are clearly soldiers as they wear weapons. But who is the guy with the strange hat? He points up. What does he want? Is he pointing at Jesus? Is he the centurion who according to the gospel of Mark identifies Jesus as the son of God? Or is he a Jewish priest (as the V&A website suggests)? Any ideas? The last group of figures sits at the bottom of the cross. Three soldiers are dividing Jesus' garment to each have a piece. This is also a well-known story from the gospels. Whoever drew the design for this cope hood was very well acquainted with the biblical stories. Far more so than most people are today. How are all these different figures stitched? None of them are stitched directly onto the background linen. Instead, single figures or a group of figures are stitched on a separate piece of linen and then appliqued onto the background. This creates a little bit of depth in the embroidery. Can you see some of the crude white tacking stitches along the edges of parts of some of these figures? These are later repairs. It never ceases to amaze me that people repaired these very high-class embroideries with such crude stitching in later times! Have a good look at the embroidery of the figures. You will see beautiful or nue in the clothing of some of the figures, on the crosses and on the horse. There is also beautifully shaded medieval long and short stitch (it is more a counted thread technique than our modern version of long and short). The use of both gold and silver thread further enhances the design. The quality of the embroidery matches the quality of the design. This would once have been a very expensive piece of embroidery. It was probably commissioned by an important church or important church leader. Think cathedral or bishop. If we only knew for which church it was originally intended. Or who designed or stitched it! |
Want to keep up with my embroidery adventures? Sign up for my weekly Newsletter to get notified of new blogs, courses and workshops!
Liked my blog? Please consider making a donation or becoming a Patron so that I can keep up the good work and my blog ad-free!
Categories
All
Archives
July 2024
|
Contact: info(at)jessicagrimm.com
Copyright Dr Jessica M. Grimm - Mandlweg 3, 82488 Ettal, Deutschland - +49(0)8822 2782219 (Monday, Tuesday, Friday & Saturday 9.00-17.00 CET)
Impressum - Legal Notice - Datenschutzerklärung - Privacy Policy - Webshop ABG - Widerrufsrecht - Disclaimer
Copyright Dr Jessica M. Grimm - Mandlweg 3, 82488 Ettal, Deutschland - +49(0)8822 2782219 (Monday, Tuesday, Friday & Saturday 9.00-17.00 CET)
Impressum - Legal Notice - Datenschutzerklärung - Privacy Policy - Webshop ABG - Widerrufsrecht - Disclaimer



 RSS Feed