|
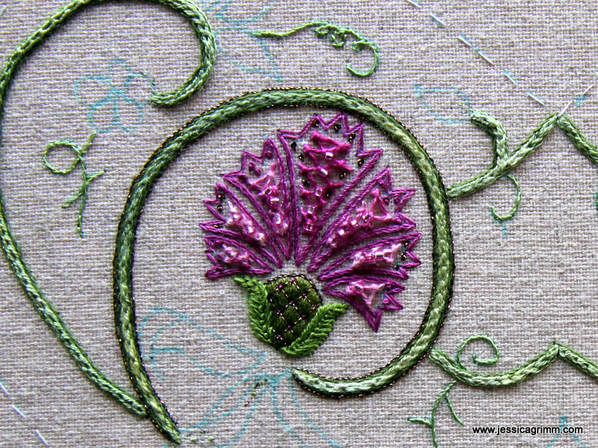
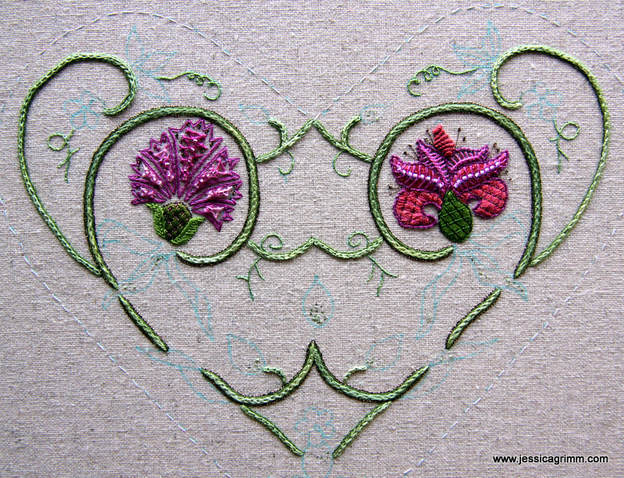
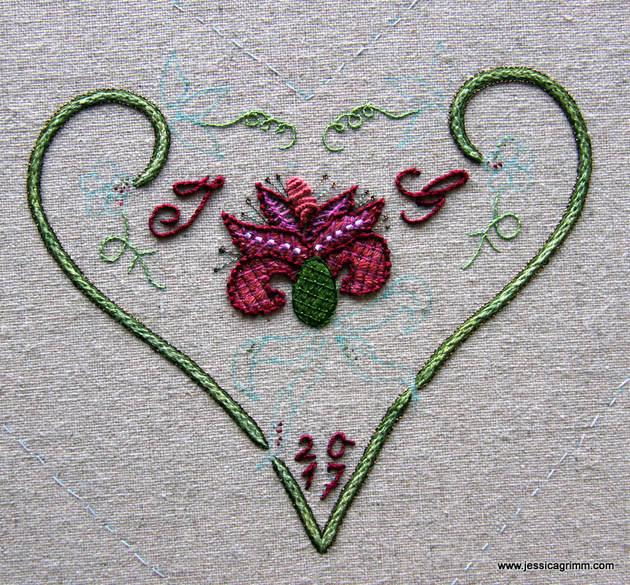
This time we are going to talk about the two big pink flowers in the big hearts. Now, since Janet Granger has published two excellent thread substitution lists on her blog, I'll concentrate on the actual stitching. Do visit Janet's blog as it is a really good read and personally I can't wait for her to start the actual stitching! First up was the carnation. And the first stitch called for was the beaded diamond stitch. Never heard of it. But the step-by-step photographs provided in Inspirations were excellent and I soon mastered this stitch. It is quite pretty with the beading. However, as the space is limited in the lower petals, it all becomes a little crammed. I am especially proud of my padded satin stitch calyx covered with a tiny trellis. I love this stitch combination and the threads used (silk and metallics). As I am severely allergic to fishbone stitch, I swapped it for fly stitch on the flanking petals. You see, it is ok to push yourself to learn new things. But, you'll find that there are certain stitches that give you the creeps. In my case: fishbone stitch. And it is perfectly ok to swap stitches in a design devised by somebody else! Oh, and once I completed the carnation and compared it with Carolyn's original, I spotted a further difference. My petals do not touch the calyx. Then I checked the line drawing of the pattern and saw that this is indeed different from Carolyn's piece. Personally, I quite like the separation and will leave it. However, if you don't like it: pay heed before you start stitching. Next up is the lily. Quite straight forward stitching with Vandyke stitch (one of my favourites!), satin stitch and fly stitch. The largest lower petals were covered with satin stitch using two strands of silk. The instructions advice you to follow the petal-curve with your stitches. However, as this is a rather small area and you are working with a double strand, it is a bit hairy. Therefore, I stitched the second lily on the back heart with a single strand and the result is a lot smoother. Note to self: only ever execute satin stitch with a single strand :). And then I hit a block. Oh dear. I ran into cable plait stitch. Another unknown stitch to me and this time I could not make heads or tails from the step-by-step instructions. So what does an embroidering damsel in distress do? Well, certainly not call for a handsome, but rather big-boned knight with zero-knowledge of embroidery stitches. Instead one consults Mary Corbet's excellent how-to-video on cable plait stitch. Then one grabs a thicker thread and a spare piece of cloth and practices. Then one finally returns to Strawberry Fayre and continues to stitch. Do I like cable plait stitch? Yes!, or at least when I stitched it with perle #8 on 40ct linen. Even when closely spaced. Do I like it as an outline on the lily petals stitched with Gütermann silk? Not so much. The thread is so thin and the subsequent stitches so tiny, that the braid-like appearance is lost to the naked eye. Another annoyance was the thread itself. Gütermann silk breaks a lot with this stitch. Instead, I have opted for coral stitch with a slightly thicker thread (Soie Perlee #384 by Au ver a soie) on the other lily. I liked this thread and its colour so much, that I also embroidered my initials and the year with it. I think my overall impression so far with Strawberry Fayre is that it is basically crewel embroidery on the scale of fine whitework. This is by no means a mistake or displeasing, but it does mean that most of my young-at-heart-but-with-older-eyes readers will need to use a magnifier for the whole project. In comparison, I liked the Home Sweet Home project better as, at least for me, thread choice and stitches were better. I would love to hear your thoughts on this! Please do leave a comment below. Next time we are going to check in with this project, the leaves and the beaded flowers will make an appearance.
Note: I have not finished this project as the instructions were faulty and the kit did not contain enough materials.
18 Comments
30/10/2017 16:29:23
I really love the way you give a commentary on your own reactions to the threads and stitches as you go along! It is like sitting beside you and stitching together. As I am bedridden and alone a lot, this is so full of gemutlichkeit for me.Thank you from Cape Town! Ros
Reply
30/10/2017 17:07:11
Oh, I am so sorry to hear that Ros! But it is indeed quite fun to follow people along on their projects. I always feel like I have a whole sweat shop of people working for me (chuckles!). Seeing what works and doesn't work for others is so inspiring and basically helps with the next project you will stitch.
Reply
Beth P
30/10/2017 16:44:55
Ah, Jessica, love your sharing what stitches you substituted on the project. I am following Janet Granger's blog, but really want to know what threads you are using for each stitch as well. Thank you for sharing the Soie Perle that you used. I plan to use some Soie D'Alger in place of the Gutermann silk, seeing that I'm unable to source that thread. Sounds like that's ok, though☺
Reply
30/10/2017 17:08:57
Thank you Beth! I bought the kit from Inspirations, so I use all the original threads and beads. However, I will say when I swap things out. And I think Soie d'Alger is a good substitute. However, it is a very fine and slippery one :).
Reply
Beth P
30/10/2017 17:26:22
I don't know what the Gutermann silk thread is like thickness wise, etc. Is it heavier than the Soie d'Alger? Would you suggest using DMC rather than the Soie D'Alger? I have never used the Soie before, so don't know what to compare it to. Thanks again for sharing your progress! 30/10/2017 17:45:24
The Gütermann silk has about the same thickness as their polyester sewing thread. From what I recall, the Soie d'Alger must be the same. I used it in the past, but wasn't able to retrieve it from my stash. Just see what works for you. Personally, I think it is too much of an ornamental stitch to work with such a thin thread at such a small scale. But, that might just be me!
Monica
30/10/2017 18:50:53
I really love the carnation with the added beads; beautiful!
Reply
31/10/2017 09:35:51
Thank you Monica! It is certainly a stitch combination I will keep in mind for future projects.
Reply
Jan Smith
30/10/2017 19:32:34
Love your site Jessica
Reply
31/10/2017 09:36:53
Thank you Jan! I am sure you will love stitching this project as much as I do. So many new things to try!
Reply
31/10/2017 09:38:50
Thank you Rachel! That's so encouraging. I kept thinking my eyes had gone bad and I couldn't do this kind of fine work anymore without a magnifier. But when I checked my fine whitework, I was still perfectly able to see the individual stitches :).
Reply
Thanks so much for such a comprehensive review of the piece, kit and instructions so far. It is interesting to know how you are going with the stitching of it, and what your thoughts are. Especially that perhaps the Home Sweet Home project is more to your liking. Maybe I will approach that one first!
Reply
31/10/2017 09:39:46
Thank you Catherine! I think you should as it would be good practice for the box making module in the RSN Diploma :).
Reply
Ginette
30/10/2017 22:19:46
Good day Jessica,
Reply
31/10/2017 09:41:12
Thank you Ginette! I think that is one of the great strengths of embroidery; the diversity of things you can learn and incorporate in future projects. I really liked the cable plait in a thicker thread. Such a lovely braid!
Reply
Your comment will be posted after it is approved.
Leave a Reply. |
Want to keep up with my embroidery adventures? Sign up for my weekly Newsletter to get notified of new blogs, courses and workshops!
Liked my blog? Please consider making a donation or becoming a Patron so that I can keep up the good work and my blog ad-free!
Categories
All
Archives
July 2024
|
Contact: info(at)jessicagrimm.com
Copyright Dr Jessica M. Grimm - Mandlweg 3, 82488 Ettal, Deutschland - +49(0)8822 2782219 (Monday, Tuesday, Friday & Saturday 9.00-17.00 CET)
Impressum - Legal Notice - Datenschutzerklärung - Privacy Policy - Webshop ABG - Widerrufsrecht - Disclaimer
Copyright Dr Jessica M. Grimm - Mandlweg 3, 82488 Ettal, Deutschland - +49(0)8822 2782219 (Monday, Tuesday, Friday & Saturday 9.00-17.00 CET)
Impressum - Legal Notice - Datenschutzerklärung - Privacy Policy - Webshop ABG - Widerrufsrecht - Disclaimer


 RSS Feed