|
As several people have enquired after Laurence, I figured that I should make him the star of this week's blog post. Do you think a saint from the Roman period should get media training first before he makes an online appearance? 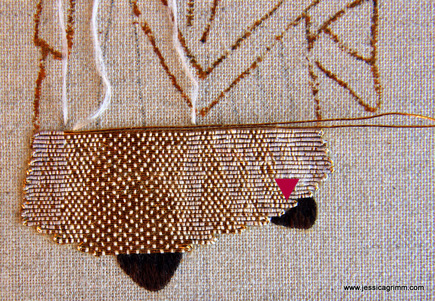 Start of the or nue on Saint Laurence After previously stitching his feet with Chinese flat silk, I've now made a start on his alb. An alb is worn by clergy under other garments such as the dalmatic or chasuble. As the Christian faith developed during the Roman Empire, many of its organisational structure and costumes are Roman. The alb, from the latin albus, meaning white, is a Roman tunica. Laurence's alb is stitched in or nue technique. Which means that, in this case, Japanese Thread #8 is covered by couching stitches of Chinese flat silk in two off-white tones. To give the impression of folds, the couching stitches are placed closer together or spaced out. It is not unlike silk shading or black work as taught at the Royal School or Needlework. As you can see, I have several needles on the go at the same time. Not bad for a first attempt. See the pink arrow in the picture above? There is a little bit of fabric showing between the alb en Laurence's left shoe. I'll mend that with a few extra stitches. And make a mental note to self that in the future I should go over the design line when working such areas. 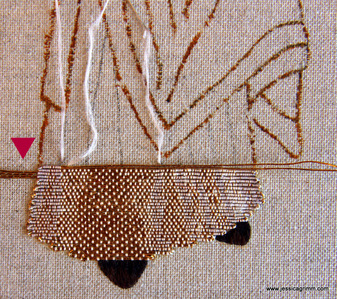 Oversewing the ends of gold threads instead of plunging Oh, and just as modern gold embroiderers, our medieval counterparts didn't like plunging. So they just didn't. Really, they didn't! They just couched the thread till the desired design line and then snipped it off. As a good Royal School of Needlework girl, I was a little sceptical at that. However, no guts no glory. Below the pink arrow in the above picture, you see the tails of my old threads and the tails of my new threads. I ignored the fact that they are tails and just couched over them as my design required. I took the picture just before I snipped the tails off. Laurence has been brave too; after snipping he was still fine...
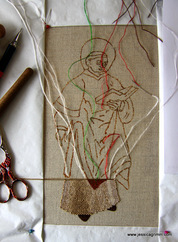
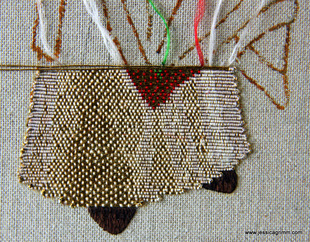
And this is what Laurence looks like after 16 hours of stitching. I made a start on his green cloth of gold dalmatic with the red trim. Past and future blog posts on this project can be easily found by selecting 'St Laurence' in the category list to the right of this post.
7 Comments
Mabel
18/4/2016 13:00:50
Hoi Jessica, wat ben je toch een bezige bij! je goudborduurwerk ziet er fantastisch uit en ik ben blij dat ik dit prachtige werkstuk in mei zelf kan komen bekijken. Veel succes en groetjes. 19/4/2016 09:04:19
Dank je wel Mabel! Inmiddels lijkt Laurentius een beetje op iemand waarbij de acupuntuur heel erg fout is gegaan... Ik heb nog nooit zo veel naalden op mijn werk gehad! Thank you for sharing your progress on St Laurence! He is looking fabulous. I had no idea what or-nue was, so thank you for the insight, and the way you make the folds in the fabric is quite fascinating, and very effective! I'm also going to be checking out your 'new' kits in English - I just can't help myself! Thank you for your hard work, and I do hope you get to your class soon. 19/4/2016 09:06:27
Thanks Catherine! It is a really nice stitching technique. As you work on the grain of the linen, it is not too hard to keep your rows straight. Laurence has grown some more and lots of needles are parked on top.
Marina
18/4/2016 17:23:53
Looks amazing - I'm really looking forward to seeing this saint in progress! Bravo! 19/4/2016 09:07:43
Thanks Marina! He is great fun to work on as specially as I allow myself to make mistakes and not worry about them. After all, he is my sampler. Your comment will be posted after it is approved.
Leave a Reply. |

Want to keep up with my embroidery adventures? Sign up for my weekly Newsletter to get notified of new blogs, courses and workshops!
Liked my blog? Please consider making a donation or becoming a Patron so that I can keep up the good work and my blog ad-free!

Categories
All
Archives
July 2024
|

 RSS Feed
Contact: info(at)jessicagrimm.com
Copyright Dr Jessica M. Grimm - Mandlweg 3, 82488 Ettal, Deutschland - +49(0)8822 2782219 (Monday, Tuesday, Friday & Saturday 9.00-17.00 CET)
Impressum - Legal Notice - Datenschutzerklärung - Privacy Policy - Webshop ABG - Widerrufsrecht - Disclaimer
Copyright Dr Jessica M. Grimm - Mandlweg 3, 82488 Ettal, Deutschland - +49(0)8822 2782219 (Monday, Tuesday, Friday & Saturday 9.00-17.00 CET)
Impressum - Legal Notice - Datenschutzerklärung - Privacy Policy - Webshop ABG - Widerrufsrecht - Disclaimer