
|
A couple of weeks ago I saw a sign in a shop in Oberammergau and it nearly made me wet my pants. I just couldn't stop chuckling. That's sad, I know. But it sometimes just happens. I immediately knew that I wanted to make a stitched version in 'black board style' to go onto my front door. After all: forewarned is forearmed.  I also decided to turn my 'warning in the making' into a tutorial for my faithful blog readers. After all, I could see some difficulties pop up with this whole black board thing-y. So where did I start? Well, by writing out this quote and searching Google Images and Pinterest for examples of ornate black board script. Then I typed the hilarious quote into a Word Document and started to play with layout, fonts and size. Once I was happy, I printed it off. Added swirls, tendrils, lines and other ornaments in pencil. After a few tries, I copied the final version with pencil onto transparent drawing paper. And then I met the first ugly stone on my path... Black board style means I will be stitching with a white thread onto a black fabric. Obvious. Now the looming sword of less than easy-peasy pattern transfer methods hung over my head. I had chosen a woollen cloth as my black board and wanted to use white cotton a broder as my chalk. Woollen cloth and light box don't scream perfect match. Instead, I opted for the tacking method. Especially as any type of painting or drawing on woollen cloth is difficult too, due to the fluffiness of the surface. I didn't want to copy my pattern onto pattern paper by hand. Too much hand-copying going on to my taste and too little stitching. This is where my scanner/printer comes in. I scanned the image and printed it onto a fresh piece of transparent paper. Just to be on the safe side, I changed the settings to light weight paper. It came out beautifully! 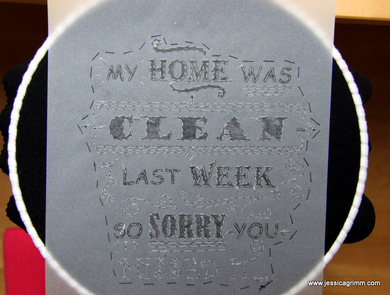 As you can see, I tacked the sheet in place with black sewing thread. After all, you don't want any obtrusive fibres on your sparkly clean black board after you've ripped the paper off. Contrary, I did use white sewing thread for tacking the lettering. No matter how carefully you tack and subsequently rip the paper, some stitches will come out. Any 'fibre shadows' left can only help. Start tacking from the middle outwards. It helps keeping the paper nice and flat. 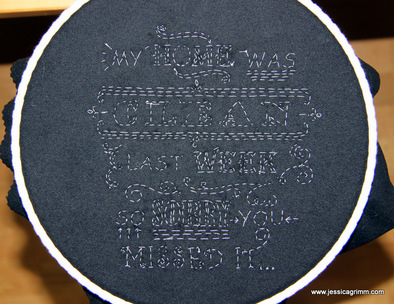 Tacking hours later, I ended up with this. I pulled some loose stitches from the back so that the image became clear again. Then I started to play with DMC cotton a broder #12 for the thicker lines and a #30 (I think, it lurked in one of the boxes and had lost its label) for the finer lines. No complicated stitches, just a lot of fun. Try experimenting with straight stitch, chain stitch, fly stitch and running stitch. 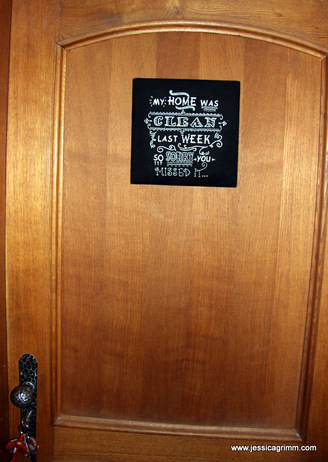 So, dear visitors, from now on don't blame it on my cleaning regime. It is all down to bad timing.
10 Comments
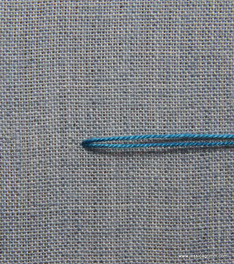
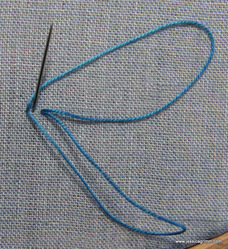
Today I am going to show you a stitch my Ukrainian friend Tetiana showed me last week. I showed her and Rushda from Pakistan how to make beautiful bullion roses and spider web silk ribbon roses. In return, I learned of a new stitch which Tetiana calls figure-of-8-stitch. The difference with the stitches I usually use, is that you start with a double thread:
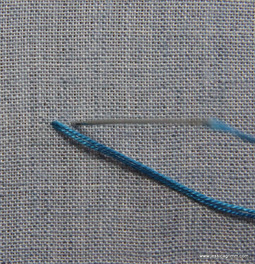
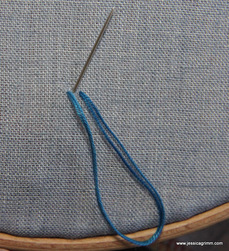
You make a stitch, but don't pull the thread all the way through!
Come up with the needle close to where you started. Now split the two threads and lay one above the needle.  Pull through gently and this is what your first stitch should look like. Now does that remind you of something? A bit chain stitchy, isn't it? 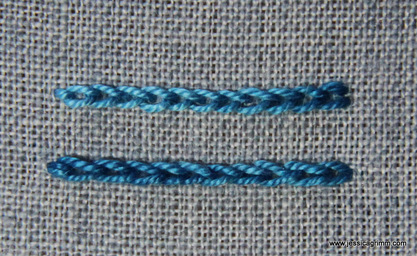 Here are both stitches side by side. I started on the right with both stitches. The new stitch below and ordinary chain stitch above (for which I used a single thread, as you would). I can't really tell the difference. Can you? 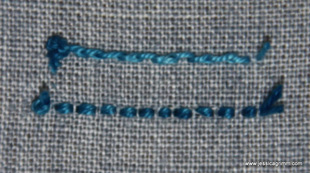 However, the difference becomes apparent on the reverse. Above the continuous line of an ordinary chain stitch and below a running stitch. So there really is a difference. And I can see that the cleaner back of the new stitch has its merits for some projects. 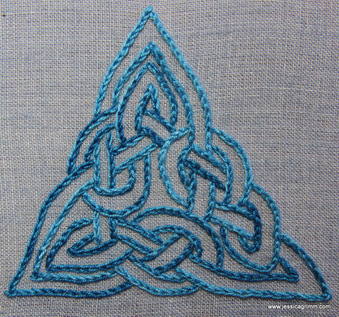 I decided to stitch a quick sampler to see how the Ukrainian stitch behaves in curves and points. It follows curves really well. But the real advantage compared to chain stitch is that it can do sharp points easily. You just follow the same trick as when you would make a sharp point with stem stitch (that is; you reverse stitch direction for the first stitch past the point). And it works similarly quick as chain stitch, once you have the hang of it.
So now it is over to you. Have you encountered this stitch before? And if so: where? And what was it called? As promised in last week's post; here's the tutorial for easy peasy embroidered bookmarks. And don't be fooled. Although mine are aimed at children, grown up bookmarks are just as easy. When I let my imagination run wild, I can come up with elegant silk and goldwork bookmarks quite happily :).  For the star bookmark (left) I started by stitching the large comet star. I knotted the end of a yellow perle thread and made five lazy daisy stitches to form the star. I left the knot at the back and just took care not to pierce it with my needle (children get that quite easily). Since my thread was long enough, I also stitched the central line of the tail in running stitch. Then I secured my thread by weaving it through the back of my stitching. Now I took a pale yellow thread and stitched back stitches inside my lazy daisies and between them. I also stitched both outer lines of the tail in running stitch and the little top star with three crossing straight stitches. The same for the three bottom stars, but now in bright yellow. Time to attach the felt to the elastics. Place both felt circles over the sewing spot of the elastics. Pin in place. Take a pale yellow perle thread and place the knot between the circles. Stitch the felt together with running stitch and make sure you pierce the elastic on both sides too. Hide your ending stitches on the backing felt circle only. And finished is your bookmark! For the flower power version: stitch lazy daisy flowers and fill them with backstitches in a contrasting colour. Place lazy daisy leaves in green between the petals. Need help with any of these stitches? Head over to Mary Corbet's fantastic site and have a look at her 'How to' video's!  So what do we need? Scissors, pencil/pen, chenille needle #22, various colours of perle #5, broad (white) elastics, (wool) felt, pins and a sewing machine. Start by searching for your favourite book soon to be given its own glorious bookmark. Open it in the middle. Take the elastics and wrap it snug around the cover and half of the pages lengthwise. Head for the sewing machine. Overlap the ends of the elastics and sew together thoroughly. When you now place the bookmark lengthwise over the cover and the pages, you need to stretch it a bit. Cut two circles from the felt. I used my coffee cup as a guide and a sewline chalk pencil. Now you are ready to stitch! 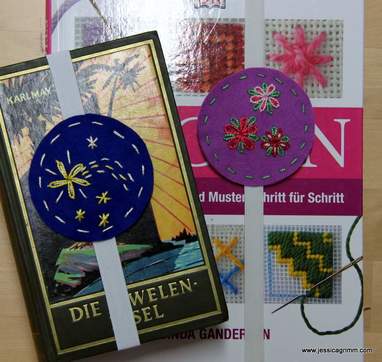 These bookmarks are really, really easy and perfect to introduce children to the magical world of embroidery. They don't need to worry about following a pattern closely, starting or ending threads in the 'right' way or fraying fabric. Just concentrate on the fun of stitching!
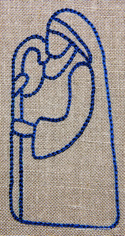
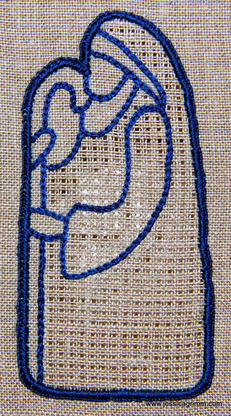
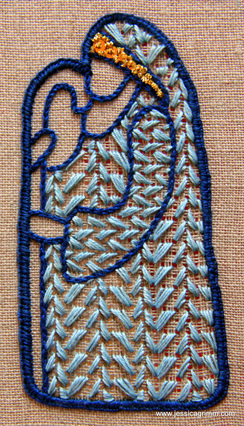
Do you know of other easy and cool looking embroidery projects for children? Do share your thoughts below! You have seen my lovely nativity figures in the previous post and now you want to make your own? Fantastic! Here are the general instructions. I am using 36ct natural linen even weave from Zweigart as my embroidery fabric. This guarantuees that I get a nice smooth and strong edge for my figures. And once the threads are cut, my embroidery grid is fairly fine so that the filling patterns look like lace. Using an aqua trick marker and a light box, I transferred the patterns onto the fabric. The embroidery is executed with one strand of Anchor coton a broder #25 in navy blue (224) and light blue (237). In order to keep both hands free and my work taut, I am working using a seat frame.
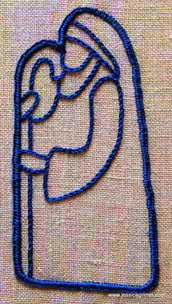
Now it is time to cut out the good shepherd. It is best not to aim for a close cut end result immediately. Cut him out a bit bigger and get closer to the buttonhole edge bit by bit. Again, don't panic if you cut a buttonhole stitch. Keep calm and put some white glue on it. Let it dry and nine out of ten, you don't need to repair it any further by placing a few fresh buttonhole stitches on top. I don't wash my finished figures, but I spray them with a little water to get rid of the aqua trick marker. I hope you liked my blogpost on the making of a Schwalm shepherd. Have you tried anything similar? Please share it below with us! In the future, I would love to write a post on the work of my readers. So please don't be shy! My next blogpost will feature Christmas wishes and a picture of the finished result of my nativity scene.
|

Want to keep up with my embroidery adventures? Sign up for my weekly Newsletter to get notified of new blogs, courses and workshops!
Liked my blog? Please consider making a donation or becoming a Patron so that I can keep up the good work and my blog ad-free!

Categories
All
Archives
April 2024
|
 RSS Feed
Contact: info(at)jessicagrimm.com
Copyright Dr Jessica M. Grimm - Mandlweg 3, 82488 Ettal, Deutschland - +49(0)8822 2782219 (Monday, Tuesday, Friday & Saturday 9.00-17.00 CET)
Impressum - Legal Notice - Datenschutzerklärung - Privacy Policy - Webshop ABG - Widerrufsrecht - Disclaimer
Copyright Dr Jessica M. Grimm - Mandlweg 3, 82488 Ettal, Deutschland - +49(0)8822 2782219 (Monday, Tuesday, Friday & Saturday 9.00-17.00 CET)
Impressum - Legal Notice - Datenschutzerklärung - Privacy Policy - Webshop ABG - Widerrufsrecht - Disclaimer