|
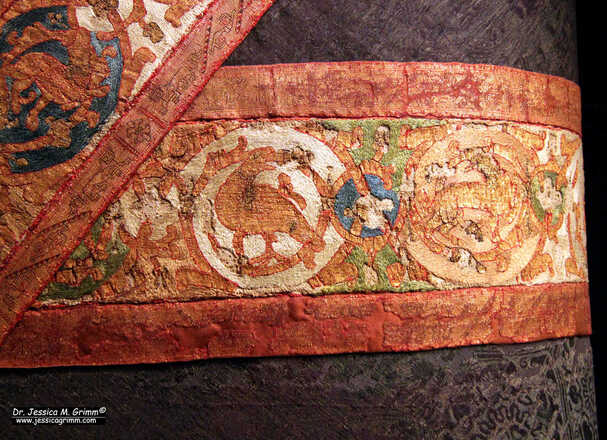
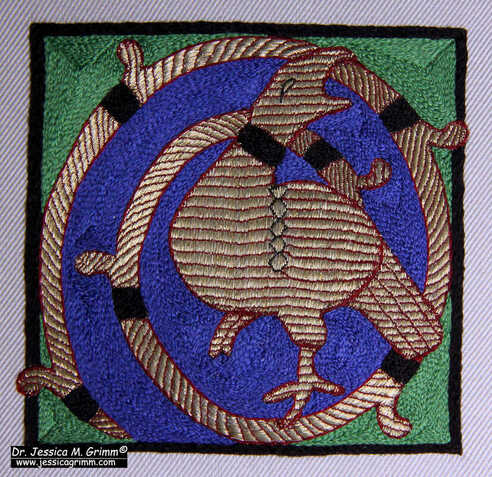
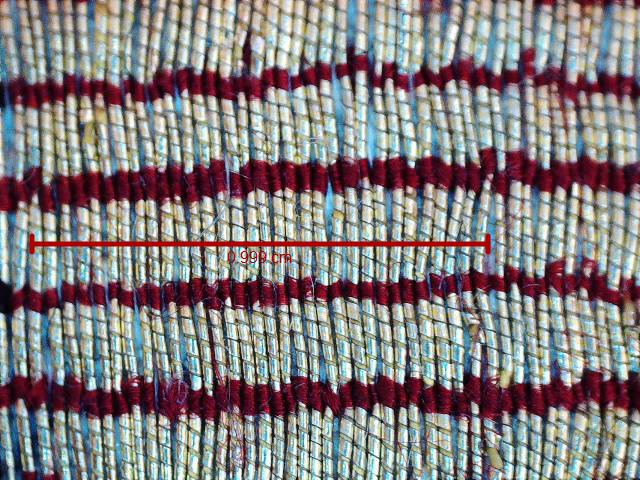
Before we dive into the re-making of an 11th-century gold and silk embroidery, I would like to thank those lovely people who have already become a patron. Thank you so very much! Writing a weekly blog on medieval (goldwork) embroidery and related topics takes up a lot of my time. If you enjoy the blog please consider becoming a patron. You can choose between buying me a weekly coffee (Apprentice) or giving a bit more and getting a bonus with each blog post published (Journeyman). All patrons have access to regular 'behind the scenes' posts. Your monthly contribution makes a real difference! Now let us explore my re-creation of a golden bird from the so-called Wolfgangskasel kept at the Domschatz Regensburg. Restauration work on the 11th-century Wolfgangskasel has shed light on the order of work for the embroidery. Firstly, the contours were stitched on a layer of silk twill backed with a layer of linen. The contours are stitched in red and dark-brown silk. Then the golden areas were filled with couched gold threads. Probably to stiffen the embroidery further, another layer of linen was added before the remaining areas were filled with coloured silk. We know that the embroidered orphreys were often stiffened by glueing paper on their backs in later times. The whole process of starting with red and dark-brown outlines and then filling in the other areas reminds me a lot of how illuminated manuscripts were made. The order of work and the colours used are very similar. As is the design. It is well possible that the design was drawn onto the silk by a person who also worked on illuminated manuscripts. The course 'avis aurea' is available as a self-paced online course with video instrictions. You will learn to set up a professional slate frame and to transfer the design the medieval way: with pounce and ink. The actual embroidery stitches (stem stitch, split stitch and couching) are not very difficult to learn. Instead, the emphasis will be on executing them as regularly as possible. All stitches are in this case 'free-form' embroidery. There is no counting and you are not working on an even weave fabric. Instead, you determine stitch placement and stitch length. The original 11th-century embroidery on the Wolfgangskasel is very, very fine. It has about 40 parallel gold threads per centimeter. I was able to get to about 32. Not bad at all! As you can see from the picture above, there is certainly room to pack in more threads. But not with the thickness of the red silken couching thread used. Splitting Chinese flat silk isn't easy for students. And I did not want them to despair. That's why you will only split the flat silk twice. To pack in 40 threads per centimetre you will need to split the silk four times. You can read all about that experiment here.
For my Journeyman patrons: hop over to Patreon for a short video on suitable silken fabrics for medieval embroidery and where to buy them. Enjoy! Literature: Hubel, A. (Ed.), 1976. Der Regensburger Domschatz. Schnell & Steiner.
12 Comments
Melody Mcmath
6/3/2023 14:33:52
I would be interested in an online class!
Reply
Rebecca Brent
6/3/2023 15:49:51
I would also consider taking an online class.
Reply
Nina
6/3/2023 18:06:24
I am also interested in an online class!
Reply
Janyce Short
7/3/2023 00:32:50
I would love to have an online version. (As long as we can buy a kit. Sadly, I don't have a local needlework store anymore.)
Reply
7/3/2023 08:45:46
Thank you, Janyce! My courses will always come with a kit as the materials cannot be bought from a local needlework store.
Reply
Victoria Wood
7/3/2023 22:53:09
An online class sounds great!
Reply
Your comment will be posted after it is approved.
Leave a Reply. |
Want to keep up with my embroidery adventures? Sign up for my weekly Newsletter to get notified of new blogs, courses and workshops!
Liked my blog? Please consider making a donation or becoming a Patron so that I can keep up the good work and my blog ad-free!
Categories
All
Archives
July 2024
|
Contact: info(at)jessicagrimm.com
Copyright Dr Jessica M. Grimm - Mandlweg 3, 82488 Ettal, Deutschland - +49(0)8822 2782219 (Monday, Tuesday, Friday & Saturday 9.00-17.00 CET)
Impressum - Legal Notice - Datenschutzerklärung - Privacy Policy - Webshop ABG - Widerrufsrecht - Disclaimer
Copyright Dr Jessica M. Grimm - Mandlweg 3, 82488 Ettal, Deutschland - +49(0)8822 2782219 (Monday, Tuesday, Friday & Saturday 9.00-17.00 CET)
Impressum - Legal Notice - Datenschutzerklärung - Privacy Policy - Webshop ABG - Widerrufsrecht - Disclaimer


 RSS Feed