|
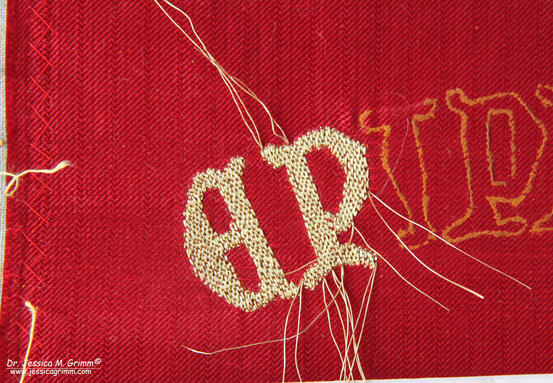
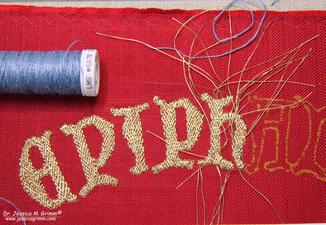
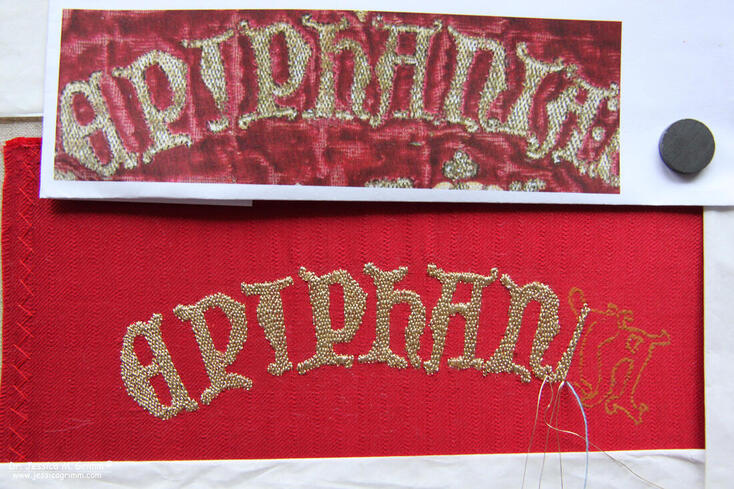
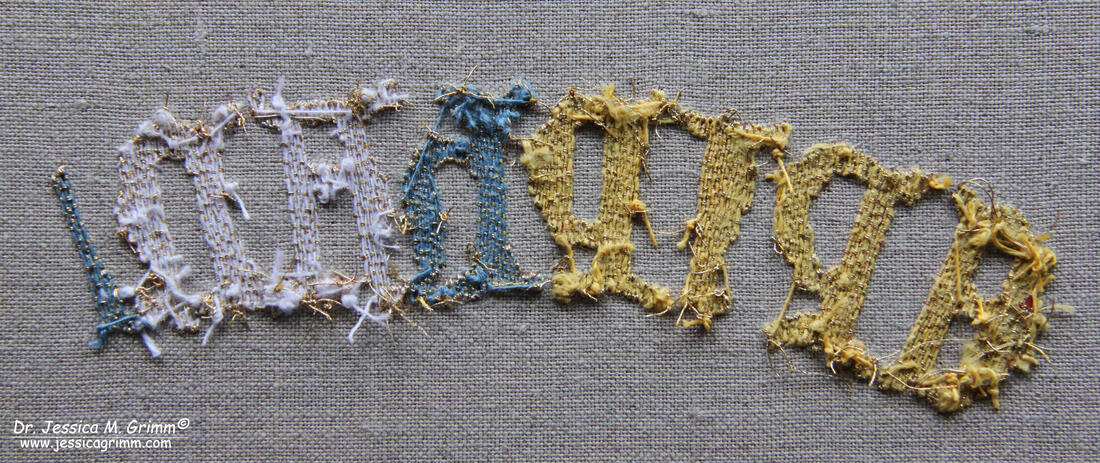
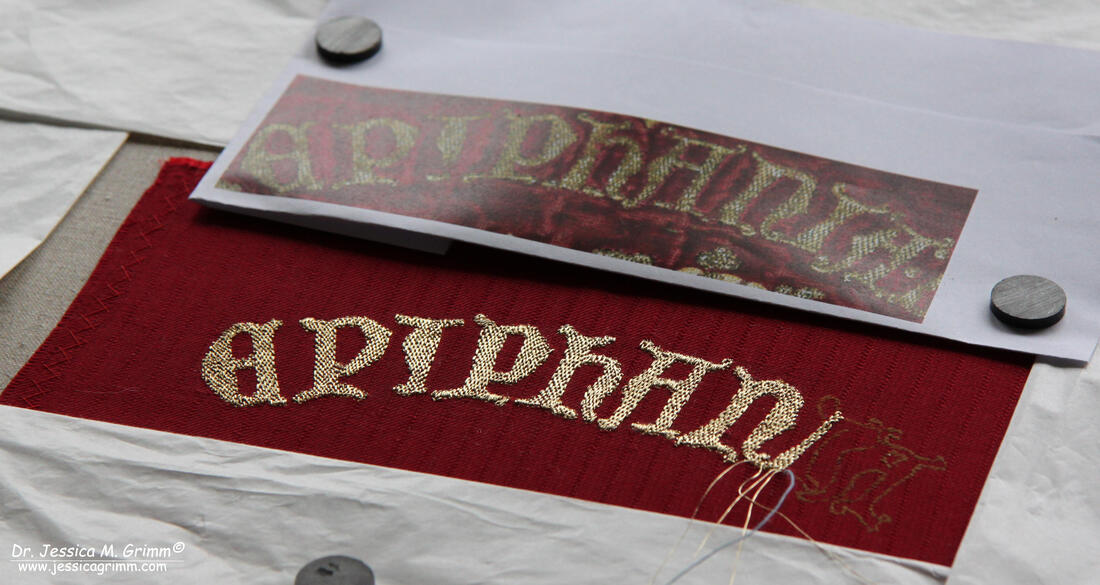
For the epigraphy conference held in Munich next week, I am working on several samples of lettering in goldwork embroidery. More information on the conference can be found in part I of this series. Today we will look at the goldwork lettering on the Vic cope made in England between AD 1350-75. The cope was probably made for, but certainly worn by, Bishop Ramon de Bellera of Vic in Spain. It is all worked in underside couching, typical of Opus Anglicanum. When looking for online information on this particular cope, I found the excellent website of the Museu Episcopal de Vic. The website is in English and there is an abundance of information on their textile collection. Amongst which is a lovely video on the Vic cope (see below). This was my first foray into underside couching and I am going to share my explorations with you below. Unfortunately, my stash did not contain a piece of silk velvet, so I opted for red silk with a twill weave. The original underside couching on the Vic cope is done on three layers of fabric: linen, velvet and plain silk. After the embroidery was finished, the plain silk was carefully cut away. My reconstruction omits the layer of velvet. Although the article (see below for a link to the download) on the recent conservation of the cope mentions a lot of details on the materials used, it does not disclose the width of the gold threads used. However, the pictures in the literature suggest a very fine thread. I decided to go with Stech vergoldet 50/60 CS, which is finer than smooth passing #3. It has a width of 0.12 mm. I started by transferring the lettering of the word 'Epiphania' by using the prick and pounce method. This is the original method for pattern transfer and it would probably have been used by the makers of the Vic cope in the 14th century. I deliberately left my Siena water paint a little thick so that I could scrape off mistakes easily. From the pictures, I could tell that the gold threads were actually couched down in pairs. The couching pattern used for the lettering is the traditional basket weave. I would start with a long stretch down the length of the letter and use the twill pattern of the silk to get my spacing correct between the couching stitches. I found this not too easy as you'll need a rather large needle for the linen couching thread. For the first four letters ('epip') I used Fil de lin glace, au Chinois, #40 colour #363 (yellow), which I bought at Maison Sajou when I was in Paris. It is rather thick and not very strong. Even when I changed from a needle #7 to a chenille needle #22, it broke frequently. No matter how carefully I tried to guide the thread through the fabrics. What else could I use? First up was Londonderry linen thread #5070 cornflower 50/3. It is only slightly thinner than the Maison Sajou thread used before. On stitching the 'H', the thread broke three times. This is far less than when I used the Maison Sajou thread. One other thing that eludes me at the moment: what does one do with the tails of the goldthreads? After consulting with a re-enactment lady on Instagram, she said she plunges them and ties them back with the linen couching thread. Sounds reasonable, don't you think? Except for the fact that the stitches on the back are rock solid and I can't weave any thread tails through them at all. Maybe I should use a finer linen thread? Next up was Goldschild 50/3. Although the numbers suggest the thread is comparable in thickness to the Londonderry, it is actually less thick. It did break easily, especially on the small bar-like parts of the 'A'. These parts are really tricky to do as you can't keep the basket weave pattern going. You'll end up with a kind of underside couching satin stitch. The quick turns for both the gold threads and the linen couching threads take their toll. I had one more brand of linen threads I could test: Bockens Knyppelgarn. I started with the rather thin Nel 90/2 and this was no good as it broke every other stitch. But when I tried the thicker Nel 35/2, it was much better. A similar amount of breaks to the Londonderry thread. But again, I am unable to tie back the goldthreads with the linen couching thread on the back. Since I know that medieval stitchers were not averse to using knots, I did the same. Works a treat. So what did I learn from this experiment? Quite a lot actually! Firstly, turning your threads at the design line is done with an underside couching stitch. There is no additional 'normal' couching stitch on top to achieve this. Secondly, underside couching is a bit like constantly plunging. No matter how drum taut your slate frame is, it will lose a bit of tension. Thirdly: my silk did not take the stitching very well. Fibres of the weft were pulled out. Fourth: the stitching is rather harsh on your body. My fingers are all swollen and my back aches (muscle ache). How the flip did they do it back then? They worked through three layers of fabric. That puts even more strain on your body and on the linen threads. I must have some of the parameters wrong. Suggestions are greatly appreciated! Literature
Brow, C, G. Davies & M.A. Michael (eds.), 2016. English medieval embroidery. Yale University Press. ISBN: 978-0-300-22200-5. Calonder, N. & A. Wos-Jucker, 2008. Conservation of the Cope of Bishop Ramon de Bellera, Quaderns del Museu Episcopal de Vic 2, pp. 83-99. Grimm, J.M., 2021. A hands-on approach - Epigraphy in medieval textile art, in: Kohwagner-Nikolai, T., Päffgen, B., Steininger, C. (Eds.), Über Stoff und Stein. Knotenpunkte von Textilkunst und Epigraphik. Harrassowitz, Wiesbaden, pp. 141–147. P.S. Did you like this blog article? Did you learn something new? When yes, then please consider making a small donation. Visiting museums and doing research inevitably costs money. Supporting me and my research is much appreciated ❤!
5 Comments
They might have been more used to pain than us!
Reply
4/2/2020 12:28:46
It would be interesting if we could study their skeletons to see what permanent damage it did. I would love to be able to work with the 'real deal'. Hand spun gold threads made of gold leaf and gut. Not sure if I will be ever able to due to the costs and the lack of artisans. Yes, I would much rather have whipped the ends as I do for the gothic embroidery as it was common then.
Reply
Thank you for sharing, Jessica! I have to say, I did shudder when I first read 'underside couching'. It is certainly challenging, and you have done a great job of re-creating the wording, even with your thread problems. I hope the trip to Munich is enjoyable and worthwhile.
Reply
7/2/2020 15:43:20
Thank you Catherine! I actually liked the underside couching better than I thought I would. And the shine of it is amazing. A bit like chipping as the light gets reflected under many angles. Have you tried it?
Reply
I've only tried a small sampler of it, though as much as it wasn't the easiest thing to do, I would like to explore it more. Currently the only time I've tried it is on my sampler, but I think it would be really interesting to try it on a 'garment style' piece as it was traditionally used. Then the light and way it moves would be very interesting! Your comment will be posted after it is approved.
Leave a Reply. |
Want to keep up with my embroidery adventures? Sign up for my weekly Newsletter to get notified of new blogs, courses and workshops!
Liked my blog? Please consider making a donation or becoming a Patron so that I can keep up the good work and my blog ad-free!
Categories
All
Archives
July 2024
|
Contact: info(at)jessicagrimm.com
Copyright Dr Jessica M. Grimm - Mandlweg 3, 82488 Ettal, Deutschland - +49(0)8822 2782219 (Monday, Tuesday, Friday & Saturday 9.00-17.00 CET)
Impressum - Legal Notice - Datenschutzerklärung - Privacy Policy - Webshop ABG - Widerrufsrecht - Disclaimer
Copyright Dr Jessica M. Grimm - Mandlweg 3, 82488 Ettal, Deutschland - +49(0)8822 2782219 (Monday, Tuesday, Friday & Saturday 9.00-17.00 CET)
Impressum - Legal Notice - Datenschutzerklärung - Privacy Policy - Webshop ABG - Widerrufsrecht - Disclaimer



 RSS Feed