|
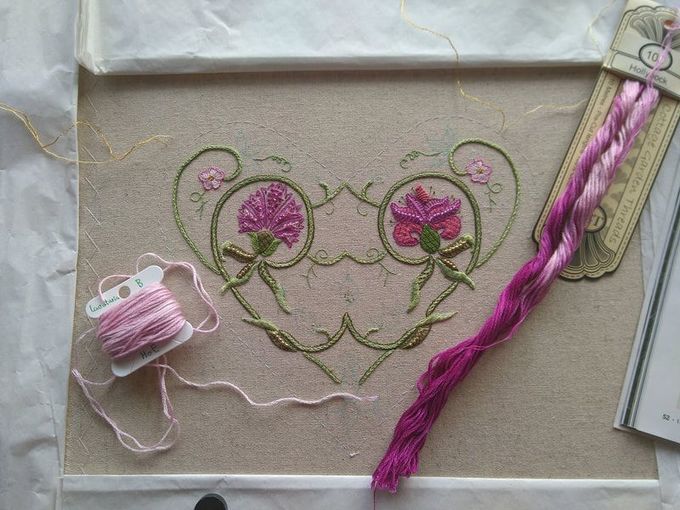
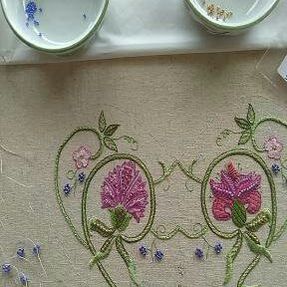
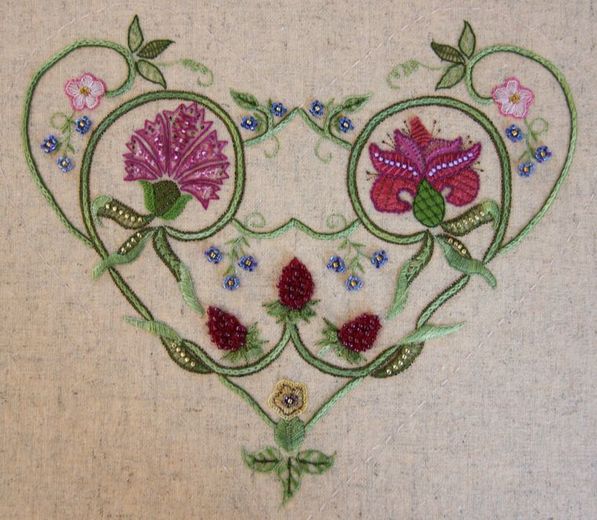
With the snowflakes gently falling in front of my studio windows, I decided to crack on with Carolyn Pearce's Strawberry Fayre. Next up were the small pink flowers. The instructions advice to only use the lighter parts of a variegated stranded cotton (Hollyhock by Cottage Garden Threads). Unfortunately, these are pre-cut threads and the lighter part is the one-third in the middle... What a waste! However, I can't just use the whole thread, as the other parts are far too dark and of a non-compatible shade. I decided to save the Hollyhock thread for another day and substitute for House of Embroidery stranded cotton Lavataria B. The small leaves were filled using chained feather stitch. This is an interesting filling stitch I would normally not remember to use. Stitching the yellow primrose at the bottom, I made a few changes too. The instructions tell you to whip each blanket stitch with a pesky metallic thread. That's sound advice if you really hate yourself :). The metallic fibres constantly catch on your silk blanket stitches. Instead, I worked a few arbitrary back stitches to add the required sparkle. Much easier. Then the instructions want you to use a different silk thread to add two detached blanket stitches into every other blanket stitch. Now again, if you don't like yourself too much... Instead, I worked a normal blanket stitch edge around the whole flower. This produces pretty much the same look as the pictures in Inspirations do. It seems that the Strawberry Fayre project follows a certain mantra: be as complicated with your needle and thread as you can be in tight spaces! This does not make for an enjoyable nor easily achievable stitching project. Struggling on your own can be quite disheartening. So, I stopped being hard on myself and I dived into the forget-me-not sprays. You make the tiny beaded flower heads separately and then you couch them into place. I really fell back in love whit the project. Maybe beads are the solution for everything? To finish off the front heart, only the three strawberries remained. They are quite fun to do as well. What do you expect? They contain beads as well :). However, once these gorgeous red fruits were finished, my husband started an argument about them being raspberries rather than strawberries.
P.S. If you would like to see how others tackle Raspberry Fayre, hop over to Janet Granger's blog for another detailed stitch along.
10 Comments
I’m sorry to hear about your aunt, all the best for her service.
Reply
20/2/2018 08:56:01
Thank you Catherine! It is always a bit more difficult if you live far away to attend these type of unexpected 'parties'. Regarding the instructions in Inspirations: I've never had a problem before, but this one is really bad. I hope it is a one off!
Reply
20/2/2018 08:58:25
I am not even sure if I (or Janet) are actually making changes from Carolyn's design... It seems that the instructions were written up by someone else than Carolyn. Ah well, so glad I enjoy the project once more!
Reply
20/2/2018 00:25:19
So sorry to hear about the loss of your Aunt. May God bless everyone with peace during this difficult time. Love the "strawberries." :)
Reply
20/2/2018 09:00:23
Thank you Karen! We will need it as things are more than just a little pear-shaped. It will be a bumpy ride and I will be so relieved when it is all over and I am back in my embroidery studio next week :)!
Reply
23/2/2018 21:56:13
So happy you decided to let go an do your own thing. It's no fun if you're stressing out over a project.
Reply
Elizabeth Wellons
26/2/2018 15:23:42
Hi Jessica. Quick question about the "strawberries". My instructions tell you to place the felt berry with the adhesive side facing up. Why would you do that? Or is it a mistake. Thanks for giving permission to do it in different ways.
Reply
26/2/2018 16:02:03
Thank you Elizabeth! Sometimes you just have to do what you have to do to enjoy a project! The instructions are correct. The idea is that the adhesive layer prevents the felt from becoming fluffy when you stitch through it. The felt fibers can thus not interfere with your stitching. However, the adhesive stuff might (and it did when I used the felt and Bondaweb provided in the kit). If it does, just poke with a thicker needle until the intruder is gone :). Good luck!
Reply
Your comment will be posted after it is approved.
Leave a Reply. |
Want to keep up with my embroidery adventures? Sign up for my weekly Newsletter to get notified of new blogs, courses and workshops!
Liked my blog? Please consider making a donation or becoming a Patron so that I can keep up the good work and my blog ad-free!
Categories
All
Archives
July 2024
|
Contact: info(at)jessicagrimm.com
Copyright Dr Jessica M. Grimm - Mandlweg 3, 82488 Ettal, Deutschland - +49(0)8822 2782219 (Monday, Tuesday, Friday & Saturday 9.00-17.00 CET)
Impressum - Legal Notice - Datenschutzerklärung - Privacy Policy - Webshop ABG - Widerrufsrecht - Disclaimer
Copyright Dr Jessica M. Grimm - Mandlweg 3, 82488 Ettal, Deutschland - +49(0)8822 2782219 (Monday, Tuesday, Friday & Saturday 9.00-17.00 CET)
Impressum - Legal Notice - Datenschutzerklärung - Privacy Policy - Webshop ABG - Widerrufsrecht - Disclaimer


 RSS Feed