
Saint John and his identical twin: mass production of goldwork orphreys in the late-medieval period7/9/2020
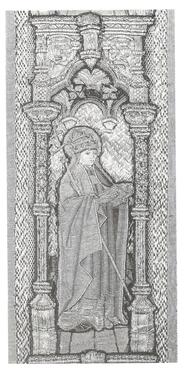
Last year I visited the Dommuseum in Fulda and was struck by a particular goldwork orphrey. It sported a beautiful rendition of Saint John in or nue with a rather unusual background. Not one of these typical golden backgrounds with architectural features and a cloth of gold in diaper couching. Nope. His background consisted of blue silk satin stitches with some basic architectural features and less gold. What was going on here? There wasn't much information displayed in general in this museum and the information on Saint John was even more basic. But this wasn't the end of the story. Those who have watched my latest FlossTube with the Acupictrix video on Vimeo, already know that I found Saint John's identical twin in a book on the Frankfurter Domschatz. But that's not all. Here comes the rest of the story.
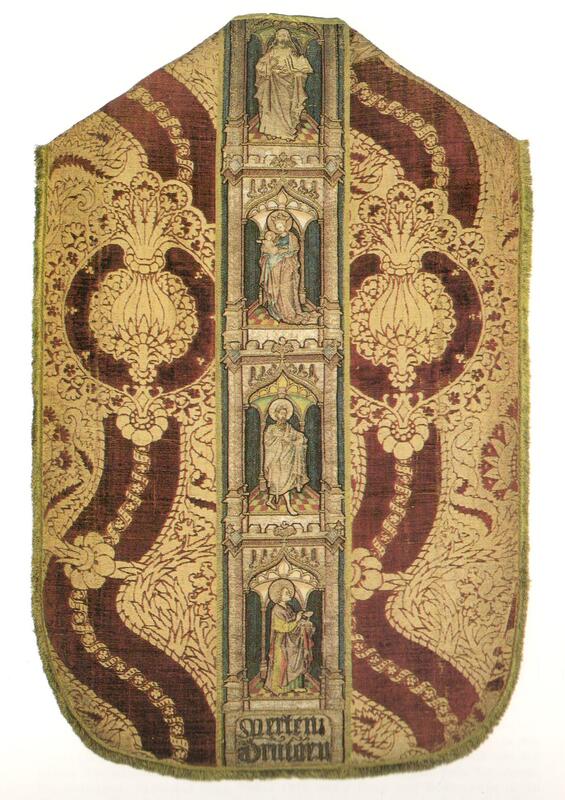
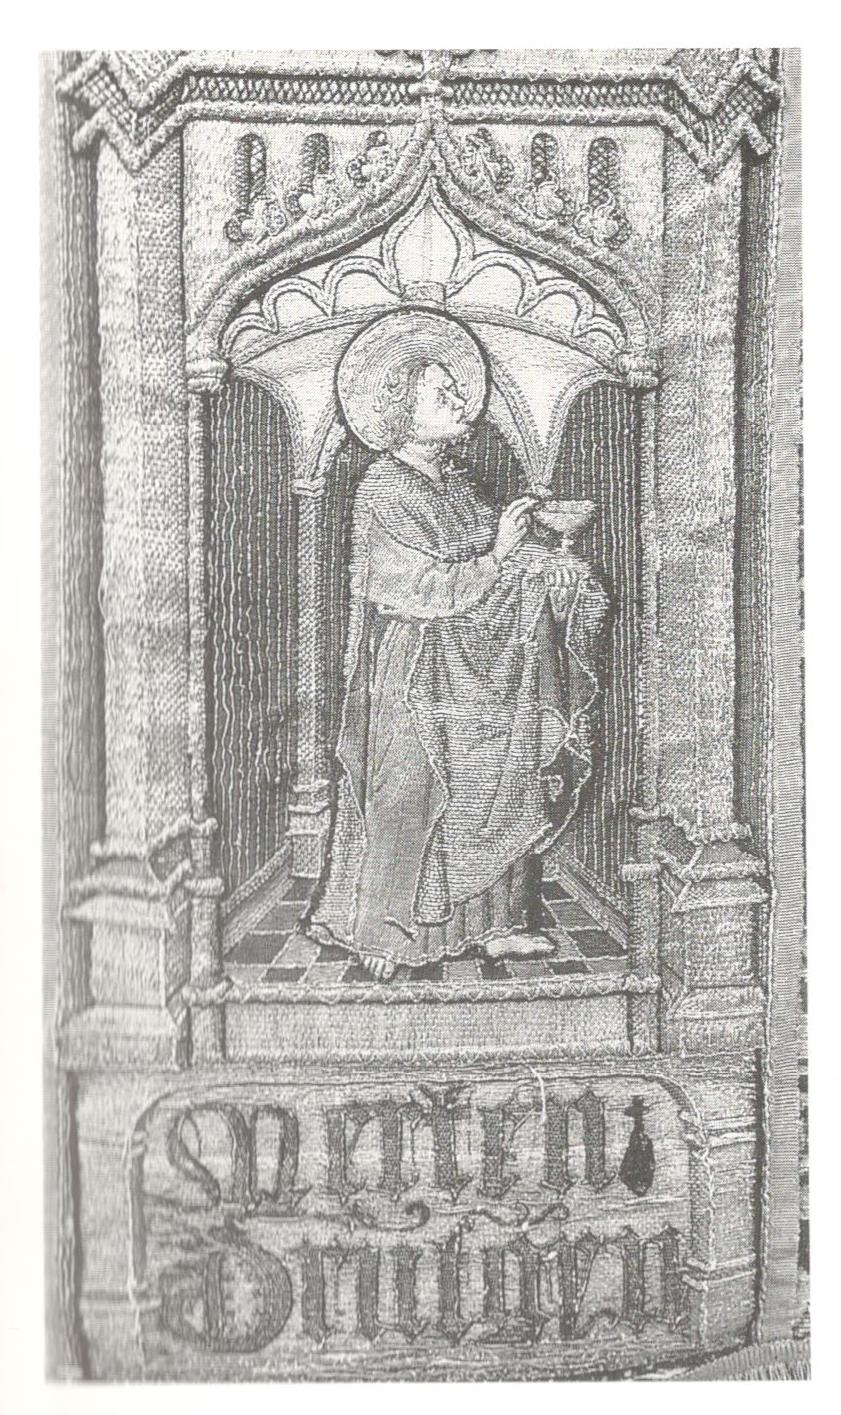
The chasuble that sports the identical twin of Saint John in the Frankfurter Domschatz is part of a set consisting of one chasuble and two dalmatics. The cope, which would have made the set complete, is missing. Although the set is now housed in Frankfurt, it probably originated in a church in 's-Hertogenbosch in the Netherlands. Below the orphrey with Saint John are the names 'Merten' and 'Drutgen' stitched. The beneficiaries of this set of vestments. Merchant and member of the city council, Merten Moench/Maarten Monicx and his wife Drutgin von der Groeven. Merten was born in 's-Hertogenbosch in the Netherlands, but his wife was from Cologne. She died in AD 1451 and he died in AD 1466. Maarten likely donated the vestment set in 1460 to a church in his hometown of 's-Hertogenbosch.
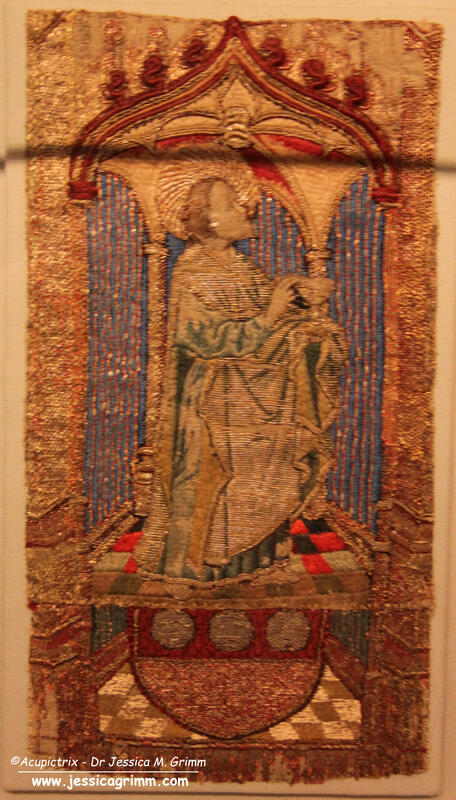
The chasuble is made of red velvet shot with goldthreads. It is one of these famous red velvets made in Florence, Italy sporting pomegranates. The orphreys on the front show: Paul, Peter and Mary Magdalene. The ones on the back show: God, Mary with child, John the Baptist and our Saint John. All of them sport high-quality or nue figures set in a golden architectural background with blue silk stitches with a similar tiled floor stitched in yellow, red and green silks. Whilst the figures look very Dutch, the backgrounds don't. The blue vaguely reminds of the 'Kölner Borte'. These were mass-produced woven orphreys that sometimes showed additional stitching for the details.
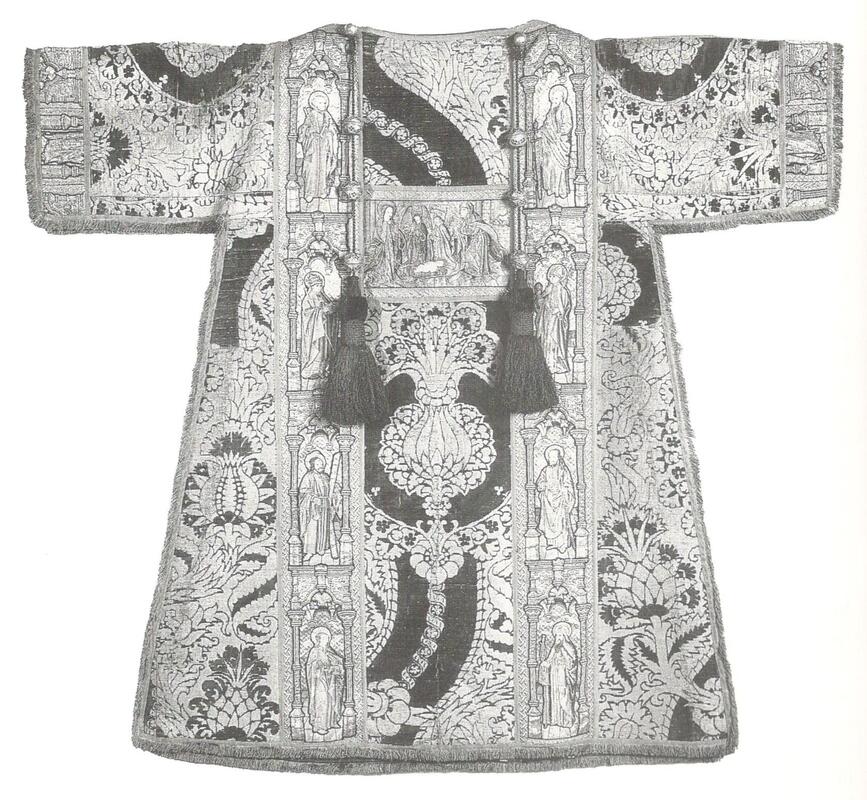
The two dalmatics are made of the same red velvet. But this time the orphreys are 'right'. High quality or nue figures sitting in a proper golden background so typical of the Dutch style.
What is going on here? We know from the historical records that the vestments were extensively restored in 1842/43 by the painter Edward Steinle and a parament maker and his two daughters from Cologne, with the help of another painter and conservator, Johann Anton Ramboux. It took them about a year to clean the vestments up and make them presentable again. They were paid 100 Taler for their work. That's about €4860 in today's money according to Google. I really hope they had additional income ... Anyway, although the vestments were extensively restored, the difference in backgrounds between the chasuble and the dalmatics is a medieval one and not the result of these restorations.
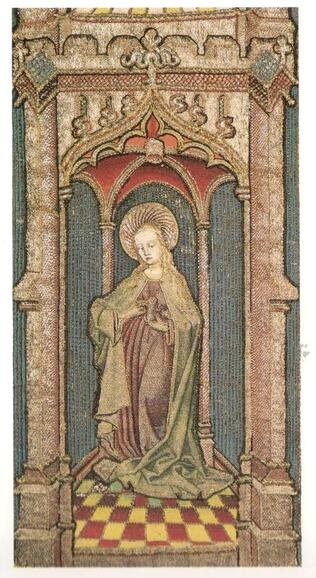
How does the single orphrey from Dommuseum Fulda fit into this story? As this orphrey has the same figure and background as the ones on the chasuble from Frankfurt, he is very likely part of the original set of vestments donated to the church in 's-Hertogenbosch. Beneath the original orphrey, another coat of arms is displayed. On the chasuble, the names of the beneficiaries are stitched beneath the orphrey of Saint John.
Looking closely at the figures on the chasuble, we see that they either look to the left or to the right. Furthermore, the orphreys are significantly wider than those on the dalmatics. This is a typical convention. Orphreys on a chasuble, but also on a cope, are wider than those on a dalmatic. The orphreys on a cope sit opposite each other at the front when the cope is being worn. The orphrey figures face each other: one faces to the right and the other faces to the left. This means that both the orphreys on the chasuble and the single orphrey from the Dommuseum Fulda were originally made for a cope. God would have sat opposite of Mary with child, Peter and Paul, Mary Magdalene and Saint John and John the Baptist is missing his partner in crime. 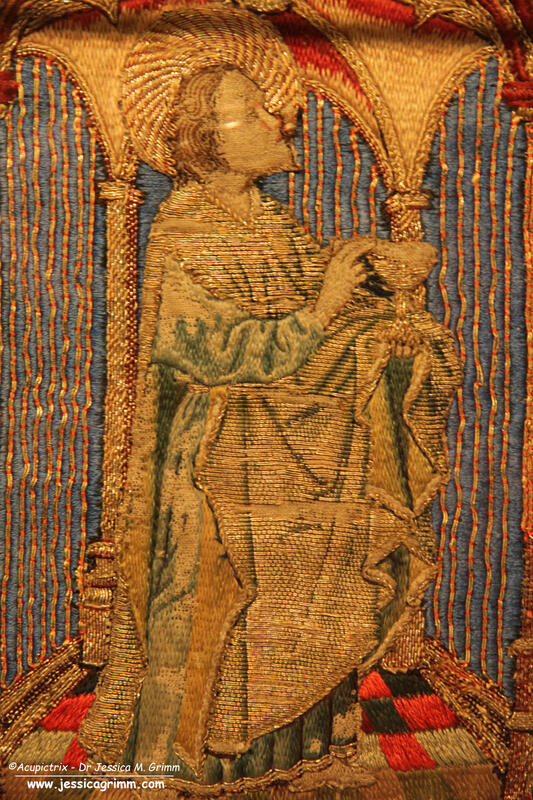
Saint John from the Dommuseum Fulda.
Now, this can mean several things:
1) Merten and his family were merchants with connections to the (Southern) Netherlands. They knew this type of goldwork embroidery well and valued it. Getting it from the Netherlands instead of opting for locally produced 'Kölner Borte' shows that these vestments were quite valuable and perfect to show off. 2) They were able to lay their hands on a number of loose orphreys and figures from the Netherlands and velvet from Italy. 3) These orphreys, figures and precious velvet were turned into vestments in Cologne by local craftsmen. These saw the 'complete' Dutch orphreys and worked orphrey backgrounds in a similar style, but with local influences to go with the loose Dutch figures. Names and coats of arms were added to make clear who bestowed these riches onto the church. 4) Orphreys intended to go onto a cope were instead applied to a chasuble. Or were they moved from a cope to the chasuble between AD 1460 and AD 1842/43? Does Saint John from the Dommuseum Fulda come from the original missing cope or copes? Or were so many figures bought at the same time and turned into 'Cologne-style' orphreys by the same workshop and then spread within Germany? Is the orphrey of Saint John in the Dommuseum Fulda the only remnant of a whole different set of vestments made in Cologne? One way of finding out is by identifying the coat of arms on the loose Saint John orphrey. I intend to write to both museums to ask if they know more. So exciting! I will keep you posted. Literature Fircks, Juliane von (2010): Serienproduktion im Medium mittelalterlicher Stickerei - Holzschnitte als Vorlagenmaterial für eine Gruppe mittelrheinischer Kaselkreuze des 15. Jahrhunderts. In: Uta-Christiane Bergemann, Annemarie Stauffer (Eds.): Reiche Bilder. Aspekte zur Produktion und Funktion von Stickereien im Spätmittelalter. Regensburg: Schnell & Steiner, pp. 65–82. Stolleis, K., 1992. Der Frankfurter Domschatz Band I Die Paramente. Kramer, Frankfurt.
10 Comments
Due to the pandemic, we won't do much travelling this year. However, I did want to visit at least one museum new to me that has some medieval embroidery on display. As my husband cannot get time off work due to, you guessed it, the pandemic, we decided to visit the Germanisches Nationalmuseum in Nuremberg. It is huge, so we will need to return. This time we concentrated on the medieval embroidery on display. There's not much, but the pieces that are on display are rather magnificent!
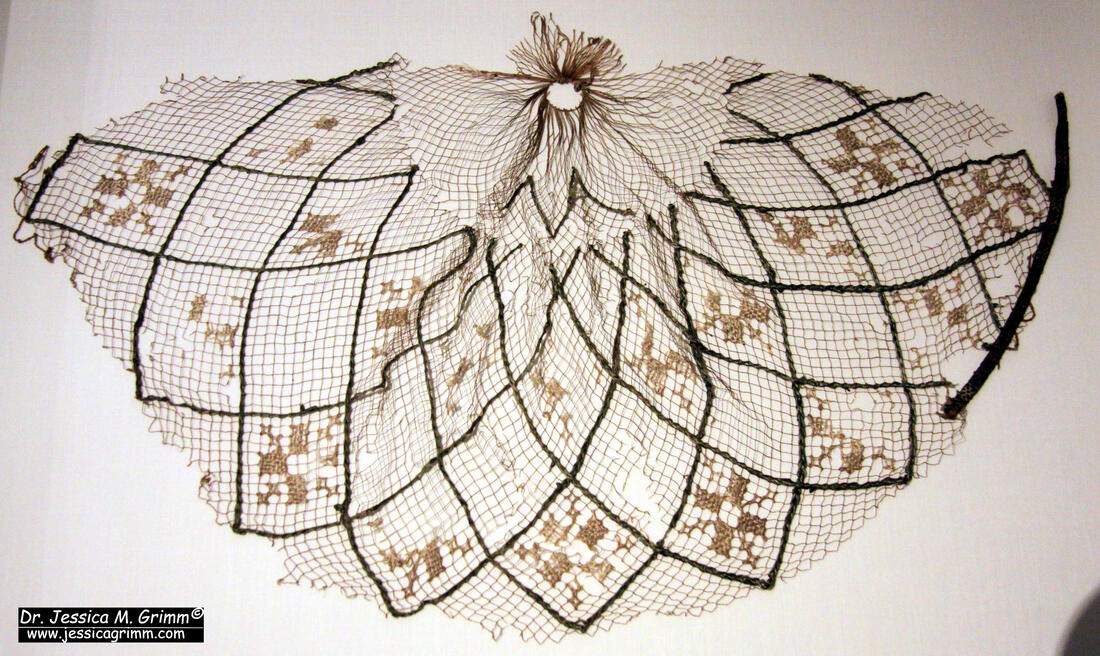
What to think of this hairnet (Inv. Nr. GEW 2980) from the 13th-century? It was apparently found in the grave of a Hessian landgrave. Very fine filet embroidery on silk net.
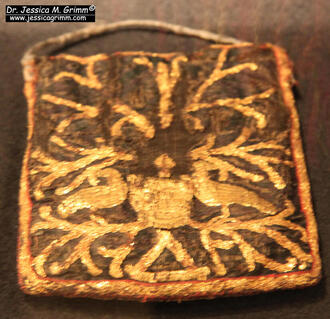
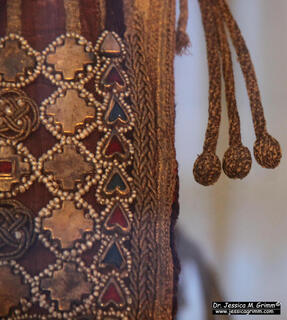
Look at this reliquary pouch made in Trier around AD 993 (Inv. Nr. KG 562). It was my favourite piece on display. Extremely hard to photograph as it is placed on a glass plate above a mirror as the back looks very different. The pouch consists of silk fabric embroidered with metallic threads, metal shapes, glass, gemstones and silk threads. Unfortunately, it does not come across well in the pictures, but this piece has a real presence. It never ceases to amaze me how long ago these pieces were made and how well they have survived. It's like somebody blogging about St. Laurence in AD 3047 :).
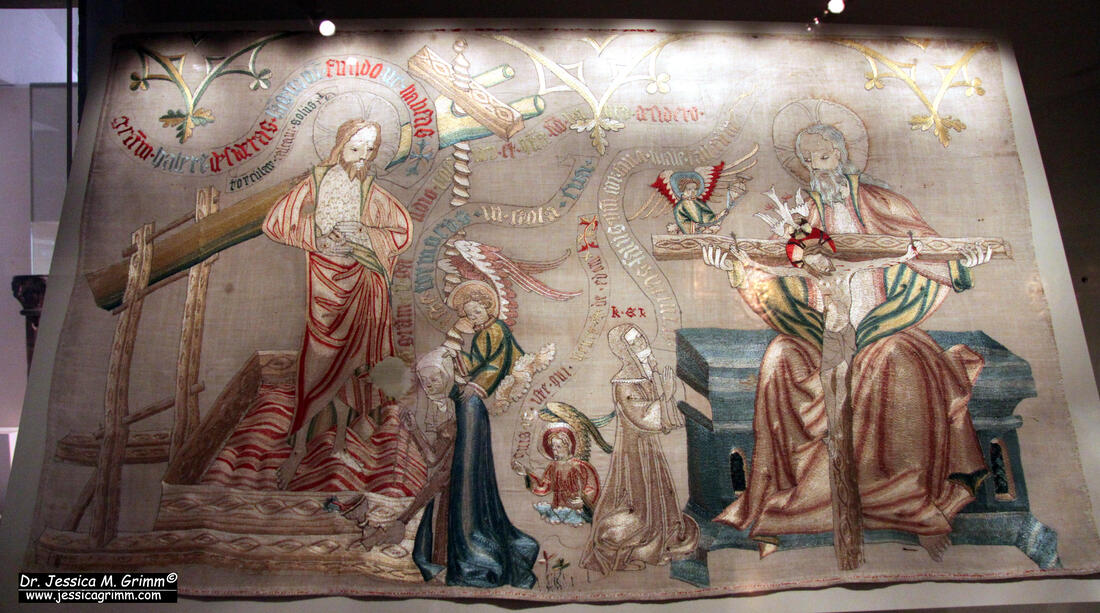
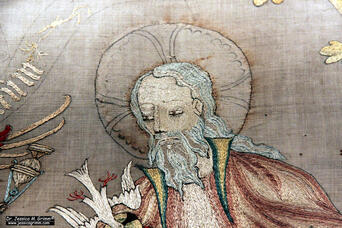
This rather large piece of very fine silk embroidery on fine linen (Inv. Nr. GEW 2464) was probably used as an altar cloth or antependium. It shows Christ in the winepress and the Seat of Mercy. It was embroidered in a Nuremberg convent around AD 1370. Look how fine the split stitches are and the use of colour and shading is superb. You can even see the design drawing on the very fine linen. 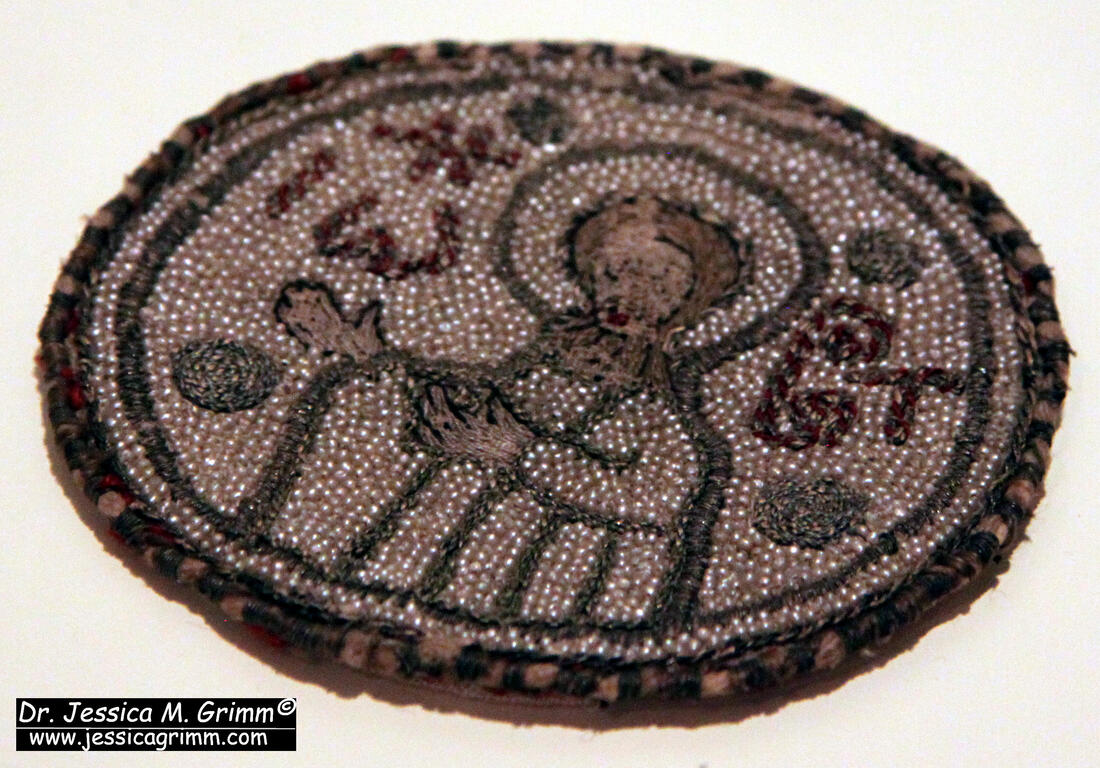 Medallion showing John the Baptist in very fine silk and pearl embroidery (Inv. Nr. GEW 2430a). This tiny medallion shows John the Baptist in very fine silk and pearl embroidery (Inv. Nr. GEW 2430a). It was made in the 13th or 14th-century in Byzantium.
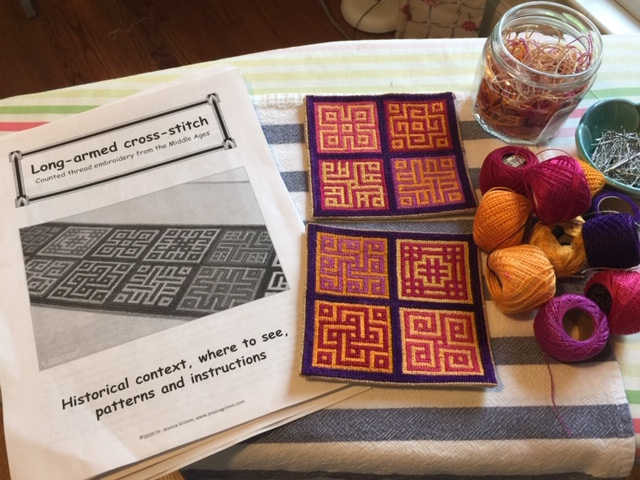
That's enough eye-candy for now! I hope you enjoyed seeing some beautiful embroidery from so long ago. During August, I am taking a break from blogging. See you again in September with, hopefully, more details on the next online goldwork embroidery course! I was delighted when Gina sent me pictures of her biscornu showing some of the long-armed cross-stitch patterns from my latest eBook. Gina filled her biscornu with dried lavender. This is an excellent way of using these beautiful medieval patterns and stitch!
During the zoom-meeting on Saturday evening for my online goldwork class 'Imperial Goldwork Course' we stumbled upon the sizing systems for metal threads. Some students from the US had trouble finding the correct sizes of purls mentioned in the PDF-handouts as they claimed that the sizing system in the US is different from that used in Europe. They mentioned that on the websites of Garibaldi's Needleworks and Berlin Embroidery the sizing would run in such a way that the higher the number the thicker the metal thread. This was opposite to my sizing system mentioned in the PDF-handouts. This was new to me. Immediately after class, I started to investigate. However, on the aforementioned websites, I found exactly the same measuring system as I was using. After a while, I realised what had happened. A quick email to the said students confirmed my suspicion. It was a stark reminder that, for somebody starting with goldwork embroidery, it can be a jungle out there! Let me clear the confusion.
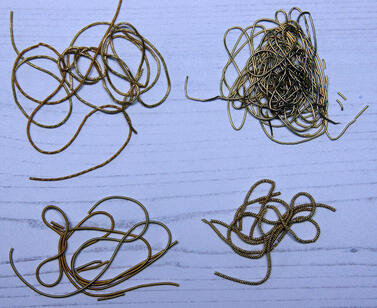
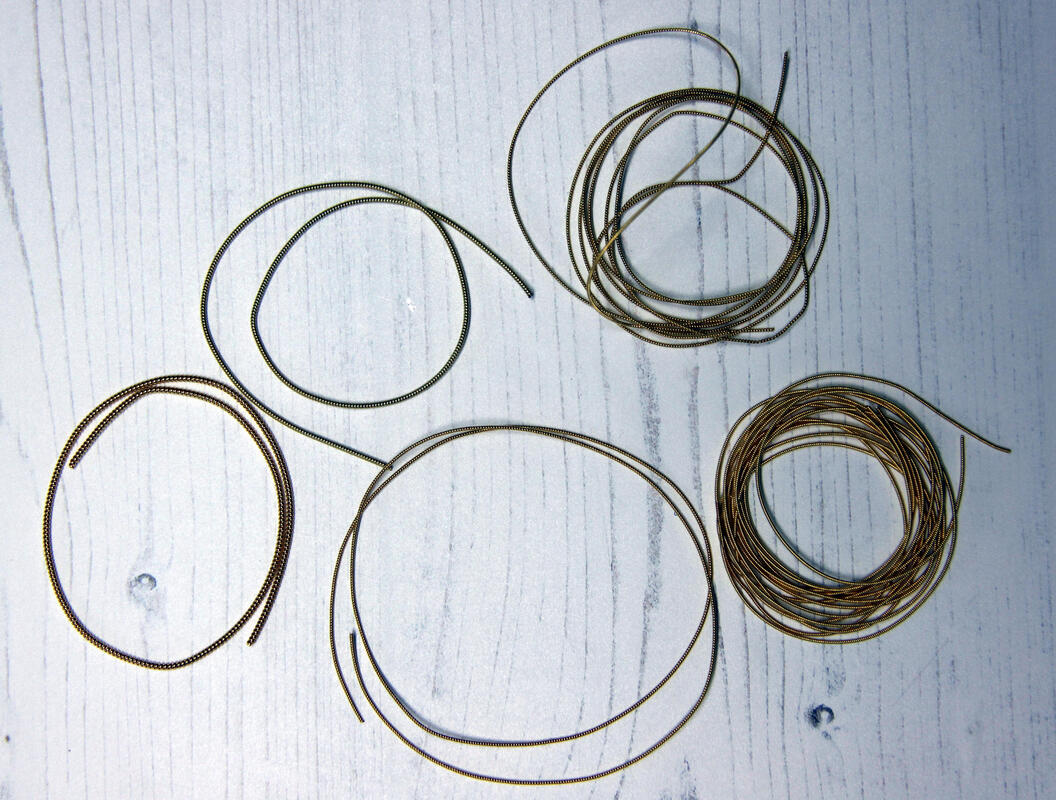
In the first eight lessons of the Imperial Goldwork Course, we learn about the different forms of cutwork used in 19th-century goldwork embroidery. For cutwork you normally use: smooth purl, rough purl, wire check and bright check. These purls have a sizing system that runs from #4 (the wire with the largest diameter) to #10 (the wire with the smallest diameter). For the course we use the larger #6 and the smaller #8 as they are the two most commonly used sizes. An opposite sizing system is used for pearl purl. It runs from Very Fine (the wire with the smallest diameter) to #3 or #4 (the wire with the largest diameter) depending on the manufacturer. Said students had previously worked kits with pearl purl in them and logically assumed that the higher the number the fatter the metal thread. One word of warning here: whilst the sizing system in the English-speaking world is the same for metal threads, the sizing system in the German-speaking world is different. Although I am based in Germany, I use the English sizing system as it is the most common system used by goldwork embroiderers. Oh, and the French system differs too :).  Rough and coloured purl over cardboard padding. This week's class sample from the Imperial Goldwork Course Another student mentioned that it would be a wonderful idea if I would measure the diameter of the purls the students need to use and then tell them that number instead of the sizing system commonly used. Although I mentioned that my gut feeling was that this would be rather cumbersome for a number of reasons (measuring accuracy would be difficult to maintain and all students would need high-speck calipers too), the said student was not convinced. What does every good teacher do? Investigate! Here we go.  As I have been an archaeozoologist for 15 years and measured 100-thousands of animal bones with scientific digital calipers, I still had several pairs laying around the house. The pair I used are made by Milomex Services in the UK. The measuring range is 0-150 mm with a resolution of 0.01 mm. Measuring accuracy is: 0-100 mm +/- 0.02 mm and 100-150 mm +/- 0.03 mm. This means that if you measure something that's between 0 and 100 mm the inaccuracy is +/- 0.02 mm and for something between 100-150 mm it is +/- 0.03 mm. As the smaller purls have tiny diametres, this measuring accuracy is potentially important. Apart from the measuring inaccuracy innate to the calipers, there is the problem of the metal threads being rather soft compared to the tips of the caliper. It is therefore rather easy to squash your metal threads ever so slightly and getting a wrong (lower) diametre. To prevent the very pointy tips of the caliper to slide between the coils of the purls, I placed the purls between the broader parts of the caliper's tips (see picture above). To further try to minimise the measuring error caused by the relative softness of the metal threads, I took multiple readings of each wire sample and noted the average. 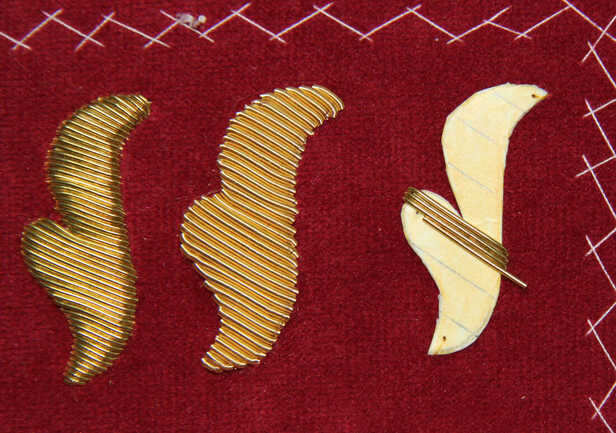 Experimenting with different sizes of rough purl over cardboard padding What were my findings? As my gut feeling told me and the measurements confirmed: samples from different manufacturers can differ. Even different samples from the same manufacturer can differ. What are the sizes of the most common metal threads used according to my measurements? - gilt or silver-plated bright check #6: 1.1 mm - gilt or silver-plated rough purl #6: 0.9-1.1 mm - gilt or silver-plated smooth purl #6: 0.9 mm - gilt or silver wire check #6: 1.2-1.3 mm - gilt or silver-plated bright check #8: 0.9-1.0 mm - gilt or silver-plated rough purl #8: 0.7 mm - gilt or silver-plated smooth purl #8: 0.7-0.8 mm The results are discrete enough that it is possible to distinguish between #6 and #8 purls when you accurately measure their diametre. Can these measurements assist you when you want to buy goldwork supplies? Not so much. For instance, on the website of Berlin Embroidery you will find that the measurements are approximately: - gilt or silver-plated bright check #6: 1.5 mm - gilt or silver-plated rough purl #6: 1.5 mm - gilt or silver-plated smooth purl #6: 1.5 mm - gilt or silver wire check #6: 1.5 mm - gilt or silver-plated bright check #8: 1.0 mm - gilt or silver-plated rough purl #8: 1.0 mm - gilt or silver-plated smooth purl #8: 1.0 mm As Tanja Berlin and I use the same goldthread suppliers, her measurements should have been exactly the same as mine. Instead, they differ (she probably used a ruler to measure the purls). As a beginning goldwork embroiderer, what would you have bought from for instance Berlin Embroidery when I would have told you that we are going to use a gilt smooth purl with a diameter of 0.9 mm? You would probably have ordered a #8 from Tanja Berlin's website and then have ended up with a wire that could have had a diameter 0.2 mm smaller than I am using. This does not sound like much, but it makes a huge difference. By just ordering the #6 as stated in my PDF-handout you would have ended up with the correct thread. That's why we use the numbering system instead of accurately measuring the diameter of the threads. Besides, not all goldthread suppliers state the diameter nor do most teachers or books. And as every good scientist should do, you can find the raw data in the document below.
Spanish goldwork embroidery broche/brodse/Bretsche
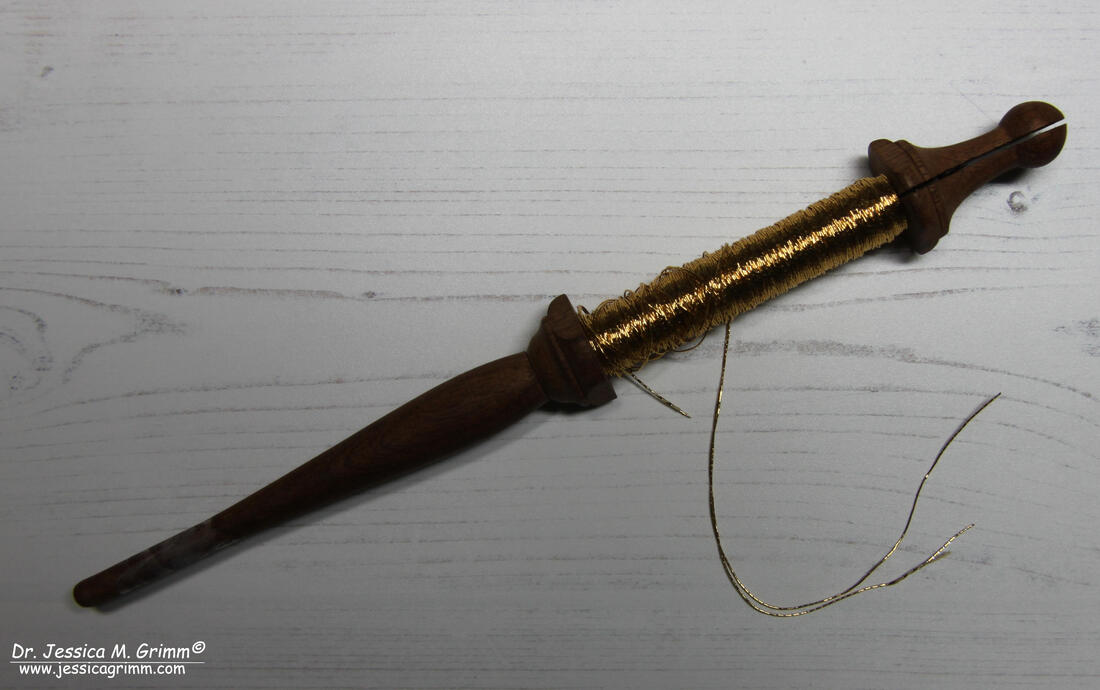
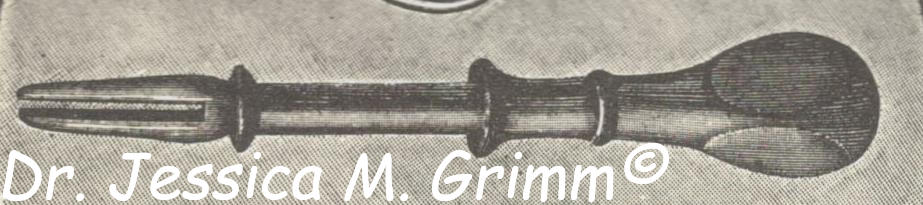
A couple of years ago, the above wooden tool arrived in the mail. It was sent by Nuria Picos, fellow RSN-student who had gone on studying with the famous goldembroidery masters in her native Spain. Luckily, Nuria had taken the trouble to include a step-by-step instruction on how to use this particular tool as I had never seen it before. At the RSN, we didn't use fancy spools like this to wrap our goldthreads on. At best, you were given a piece of rolled-up felt wrapped in tissue paper. It works. But this works so much better! At the time, this wooden tool was simply called a spool for goldthreads. It protects your precious threads from oxidation by touching them too much with your hands. The spool also prevents them from tangling. It wasn't until I started to read older instruction books on goldwork embroidery, that I came across the proper name of this type of spool: broche (French/English), brodse (Dutch) and Bretsche (German). You can tell from the spelling that they all have a common origin.
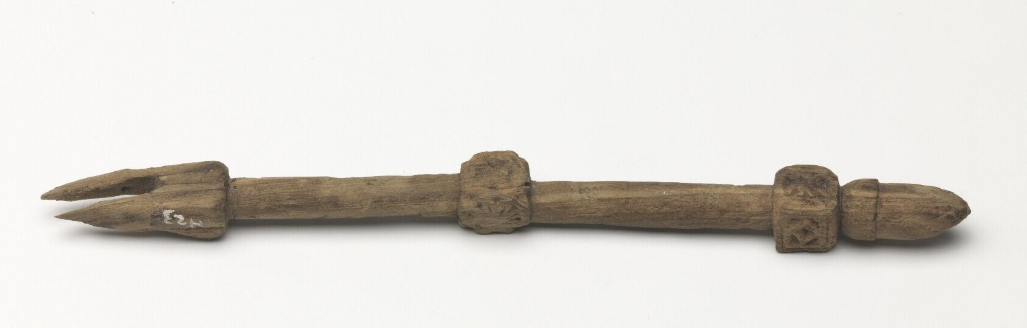
Medieval brodse/Broche/Bretsche from the Netherlands. Copyright: Museum Boijmans van Beuningen, Rotterdam (NL)
The brodse is an old tool. In the 1970s, a complete wooden brodse was found during an excavation in Dordrecht, the Netherlands. The piece measures 18,2 x 1,6 cm and dates to the third quarter of the 14th-century. It is held under inventory number F 6395 at the Boijmans van Beuningen museum in Rotterdam, the Netherlands. And it shows the same characteristics as my modern-day Spanish brodse: two prongs at one end, a long shaft and some embellishment that prevents the spool from rolling off your frame. Although I am an archaeologist who has dug medieval deposits, I would not have known what the above object was used for prior to becoming a goldembroiderer. Let alone if I would have found an incomplete one. I suspect many of my colleagues have the same problem. I've contacted wood-expert Silke Lange to see if she knows of any other examples. So far, her search has not turned up any more brodse. However, I'll keep you posted if she comes up with any.
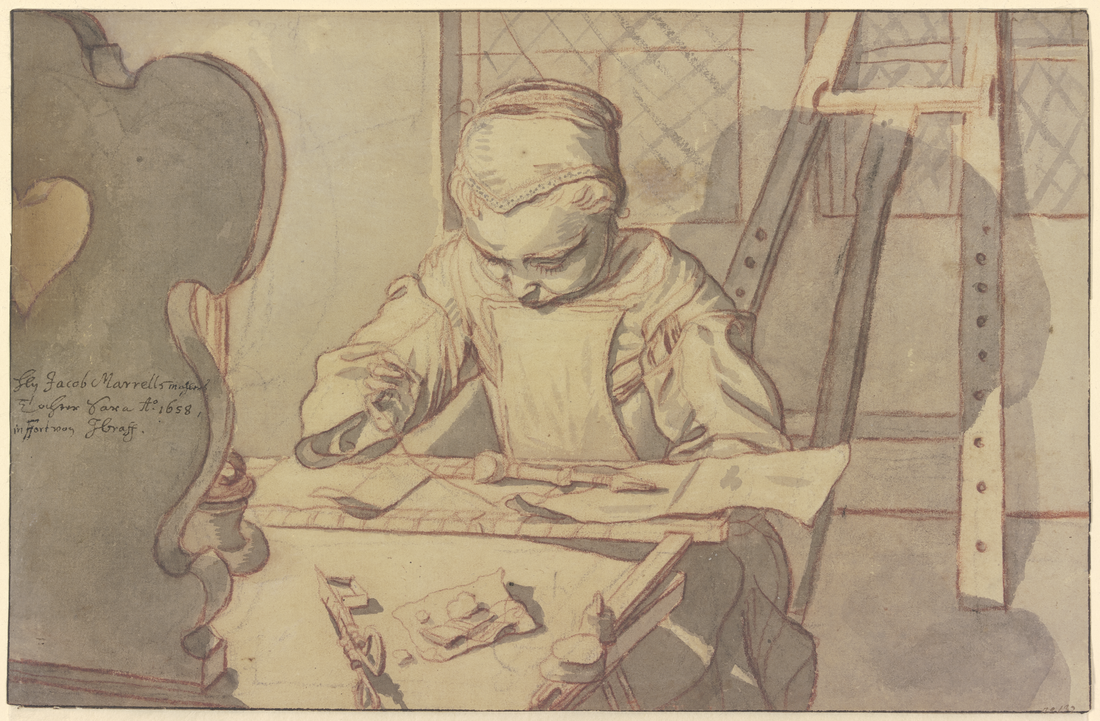
Historical image of how a brodse/broche/Bretsche was used in goldwork embroidery. Copyright: Städel Museum, Frankfurt am Main
How do we know that the wooden object found in Dordrecht was really used in embroidery? Well, we do have a picture. The above drawing shows Sara Marrel sitting at a table on which rests her embroidery frame (weighed down!) and on which lies a brodse. The drawing was made in 1658 (about 300 years younger than the brodse from Dordrecht) by Johann Andreas Graff (husband of Maria Sibylla Merian, famous scientific illustrator) in Frankfurt am Main (Germany). I just wished the drawing was a bit more detailed when it comes to how the goldthread is wrapped around the brodse!
We know that the above-shown objects were named brodse in Dutch from the embroiderers guild regulations from Utrecht written down in 1610: 'Gelijck oock niemandt sich sal mogen vervorderen op de Raempte off mette Brodse, eenich werck te maken, ten sij hij off zij het Gildt voldaen hebben, op poene van telcken maendt te verbeuren een daelder' (De Bodt 1987, 4). It means that nobody is allowed to make any piece on an embroidery frame or with a brodse when they don't pay the embroiderers guild. The Worshipful Company of Broderers still displays two crossed brodse in their coat of arms. 
Bretsche in Dillmont
As said before, you do encounter the brodse in older literature. But not in all. It is notably absent from M. Louis de Farcy's 'La broderie du XIe siecle jusqu'a nos jours' written in 1890 in France. But that other famous embroidery institution from France, Ms Therese de Dillmont (who actually was Austrian ...), does mention the Bretsche in her famous 'Encyclopedia of Needlework' from the DMC library, first published in 1886. The original German text from the 'neue, vermehrte und verbesserte Auflage' from 1925 reads: 'Die Spindel auch Bretsche genannt, ist aus hartem Holz gearbeitet und ungefähr 23 Zentimeter lang. Sie dient zum Aufwinden des Metallfadens. Der Holzstab, sowie die Gabel sind mit doppellaufendem DMC Perlgarn (Coton perle) in hellgelber Farbe zu umwinden. Der Goldfaden ist dann an die Schlinge zu Knüpfen und um den unter der Gabel befindlichen runden Stab zu winden. Der Stickfaden ist ein- oder mehrfach, meistens zweifach auf die Spindel zu winden' (Dillmont 1925, 189). In the English translation it reads like this: 'The spindle is an instrument made of hard wood, about 9 inches long, on which the metal threads are wound and with which they are guided while the work is in progress, so that they need not be touched by the hands. The body and the lower part of the prongs are first covered with a double thread of DMC pearl cotton (Coton perle), yellow or grey, ending with a loop, to which the gold or silver thread to be wound on to the spindle is attached. The thread is usually wound double on to the spindle' (Dillmont 1945, 186-187).
Those of you who can read both languages will have noticed that there are marked differences in what they say. No wonder. This book has been revised many times. The most noticeable differences are that the German text has the original name for the wooden spool 'Bretsche' whereas the English text only mentions spindle. But the English text mentions why the spool is used (so as not to touch the metal thread) and this is not mentioned in the German text. But this is not what puzzles me most. Has any of you understood the part on the actual wrapping of the spool? Not even the drawing published in both editions of the book is much help to me. It does not make sense. Why would you wrap the spool first with the perle? Passing thread would happily snag on it :). I think Ms Dillmont has never used a Bretsche or seen it being used. The tool had probably become rare by the time she did her apprenticeship in 1873 in Vienna. This would also explain why De Farcy does not mention the tool in his book although he does cite Ms Dillmont frequently on other embroidery matters. 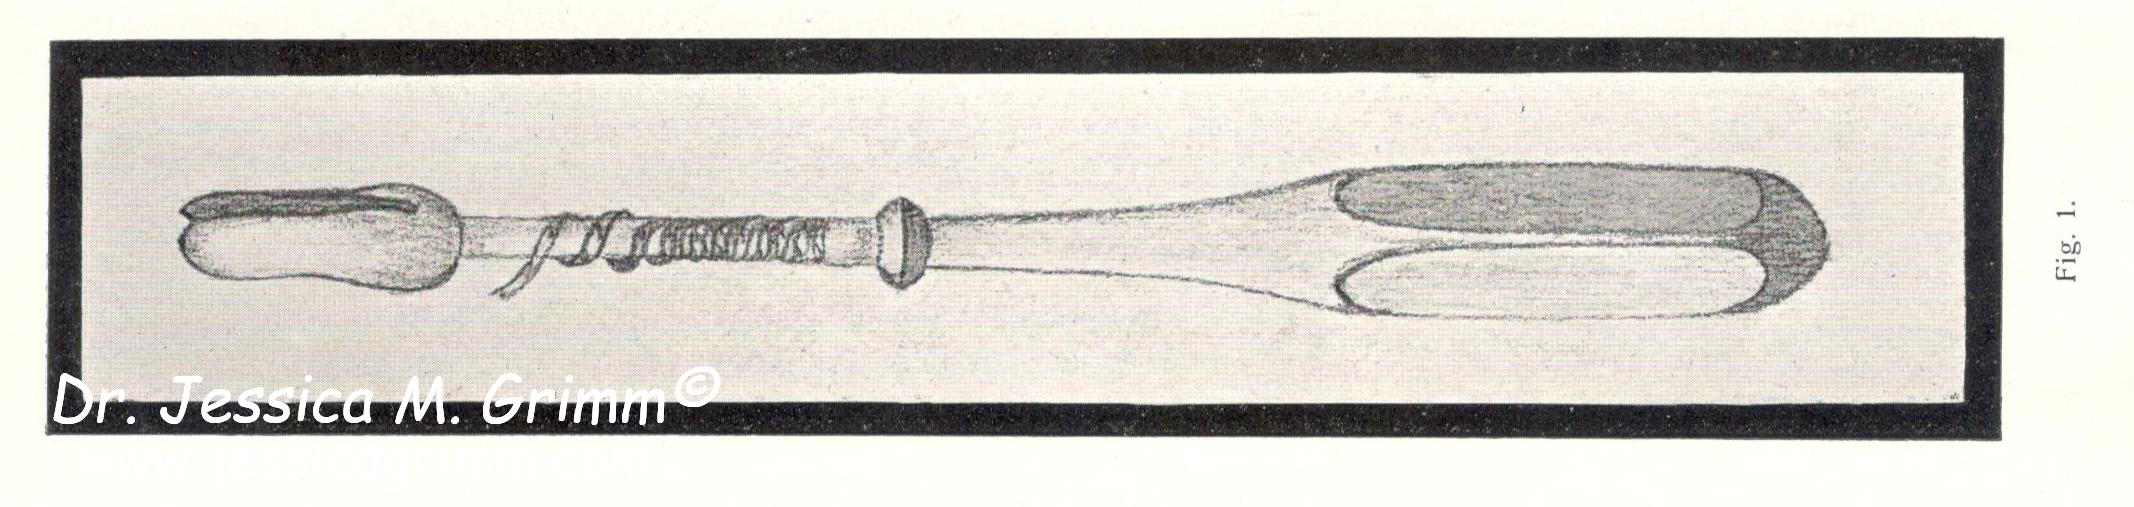
Drawing of a Bretsche/brodse/broche in Van Emstede-Winkler 1910.
Luckily, we have other sources! The above drawing comes from a Dutch embroidery instruction manual written in 1910. Here the thread is wound around the shaft of the 'houten rol waaromheen de goud- of zilverdraad gewonden wordt' (Van Emstede-Winkler 1910, 84). This translates as: wooden reel on which the gold- or silver thread is wrapped. The drawing completely ignores the prongs. Again, one gets the impression the tool was no longer standard practice in goldwork embroidery when Mrs van Emstede wrote her manual.
Drawing of a Bretsche/brodse/broche in Donner & Schnebel 1913.
And last but not least, I found the above picture in a German source from 1913. Here it reads: 'Unentbehrlich für jede Art der Goldstickerei ist ... die Sprenggabel oder Bretsche ... (Donner & Schnebel 1913, 406). And further: 'Der ganz feine Metallfaden wird 2, seltener 4 fach, über die Bretsche glatt gewickelt' (Donner & Schnebel 1913, 419). This translates as 'essential for any type of goldembroidery ... is the broche ...' and 'the very fine metal thread is wrapped double, less often four times, flat onto the broche'. And luckily for us, they also provide a picture of the tool in action:
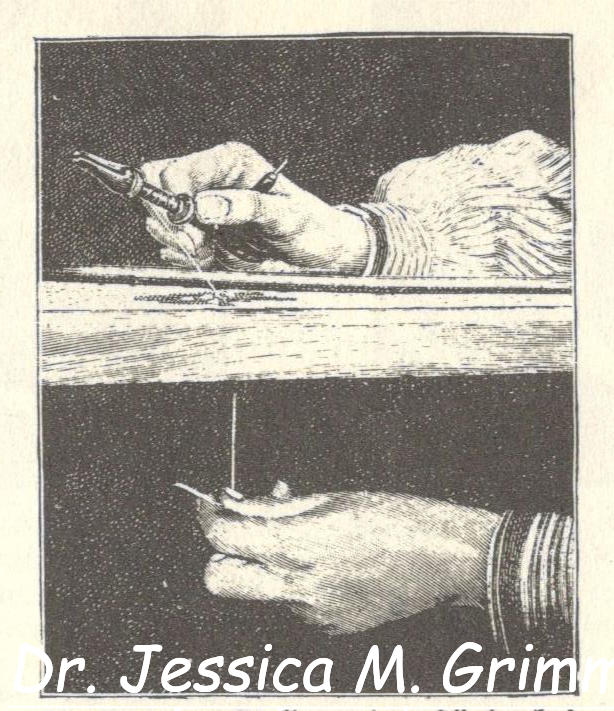
Drawing of a Bretsche/brodse/broche in Donner & Schnebel 1913.
Now this makes complete sense! The embroiderer works on an embroidery frame with the left hand under the frame (with the needle) and the right hand on top of the frame holding the Bretsche (and a stiletto). Can you see how a single metal thread runs through the pronged bit before it is wrapped onto the shaft of the Bretsche? That's how Nuria instructed me to load up my Spanish goldwork spool. I've made a FlossTube video so you can see me do it in 3D. The writers of this excellent manual used or had seen the Bretsche being used. No hear-say, but actual experience.
You can order your wooden broche directly from Richard Pikul in Canada.
P.S. Did you like this blog article? Did you learn something new? When yes, then please consider making a small donation. Visiting museums and doing research inevitably costs money. Supporting me and my research is much appreciated ❤!
Literature
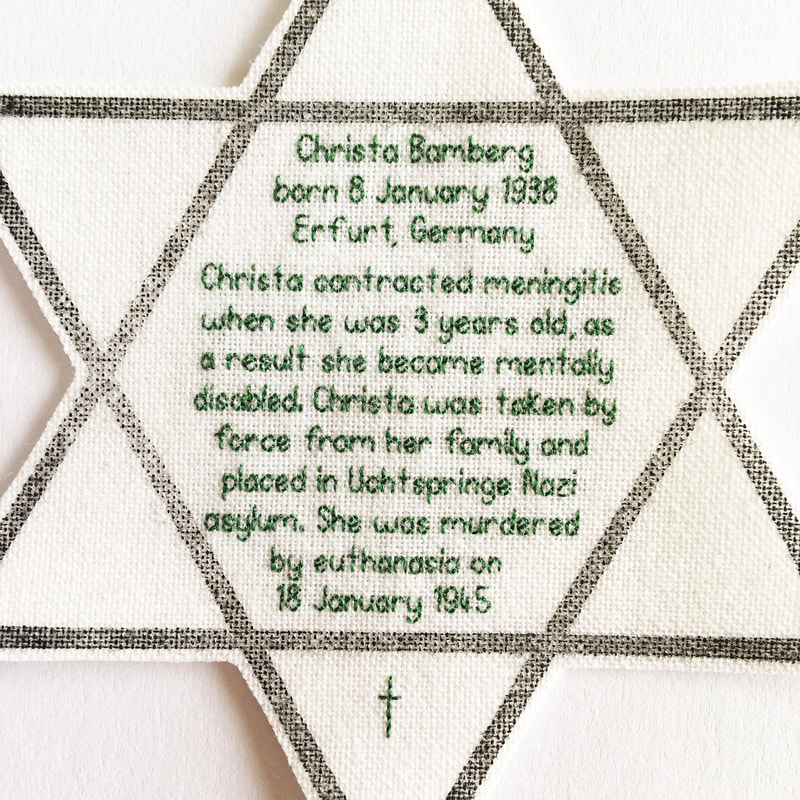
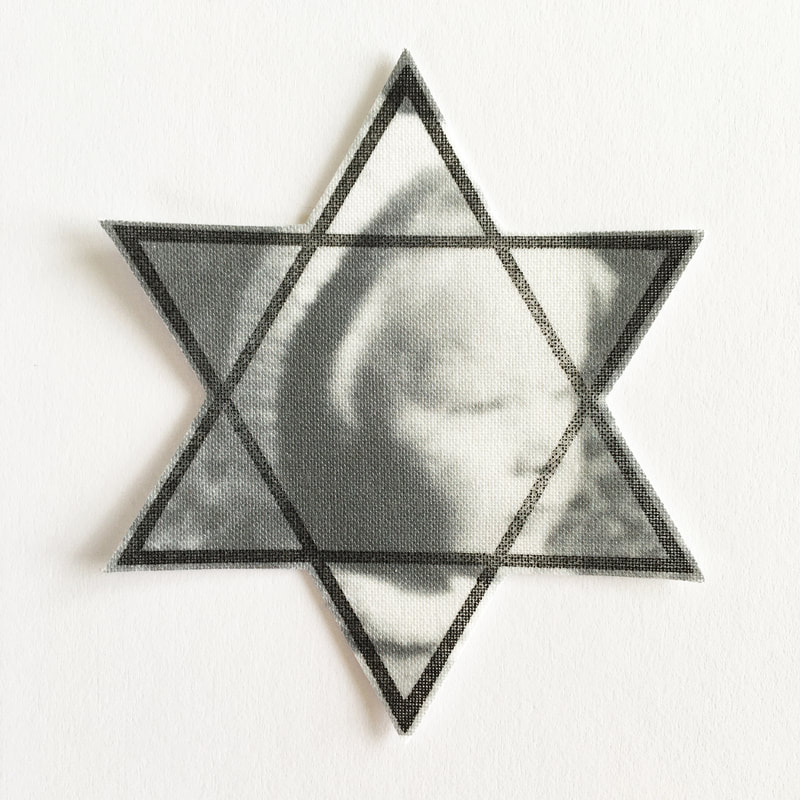
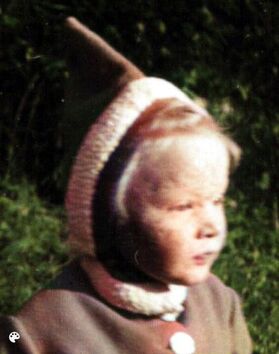
Bodt, S. de (1987). ... op de Raempte off mette Brodse ... Nederlands borduurwerk uit de zeventiende eeuw. Haarlem: Brecht. Dillmont, Th. de (1925). Encyklopaedie der weiblichen Handarbeiten. Mulhouse: Th. de Dillmont. Dillmont, Th. de (1945). Encyclopedia of Needlework, revised edition. Mulhouse: Th. de Dillmont. Donner, M. & C. Schnebel (1913). Ich kann handarbeiten. Illustriertes Hausbuch für die Techniken der weiblichen Handarbeit. Berlin: Ullstein. Emstede-Winkler, I. van (1910). De technieken van kunstnaaldwerk. Amsterdam: Van Looy. Today is Remembrance Day in my native Netherlands. Tomorrow will be Liberation Day (and my mum's birthday!), but today is a day of grief and compassion. And this year, my family will remember a very special little girl. Her name was Christa Bamberg. She was not a soldier, nor Jewish, nor Roma, nor an enemy of the state. She was a little German girl killed by the Nazis. You might find her story confusing and disturbing; it isn't often told. And I am very grateful to textile artist Caren Garfen for including Christa's story in her powerful Star Witness project. 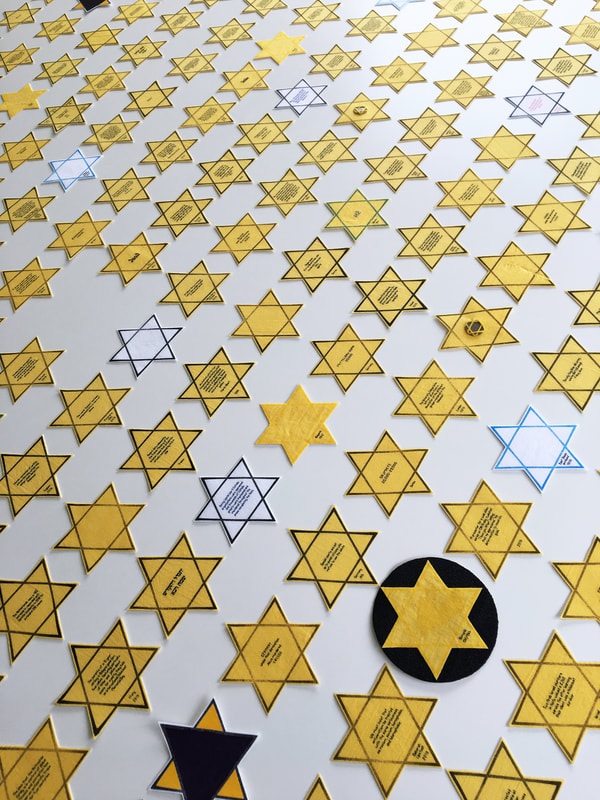 Caren Garfen Star Witness Project I've been following Caren Garfen for a while and have always been greatly moved by her art. Some of you might know her project with all the little beds. It is called 'Room for improvement` and draws attention to the fact that there are not enough beds in the UK to help all young people who suffer from eating disorders. Although this is a growing horrible condition in the Western world with all its pressures. Several months ago, Caren started to post updates on her latest installation. Hand-sewn yellow cloth badges in the form of the infamous Judenstern. Each star features a story. From the past, but maybe even more chilling: from the present. Anti-semitism isn't dead. 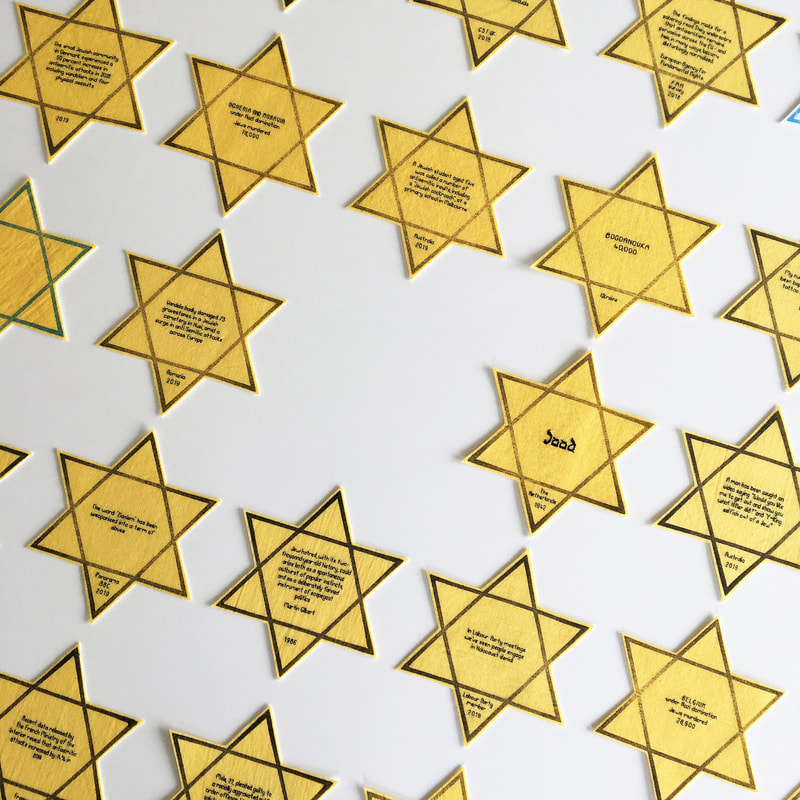 Caren Garfen Star Witness Project In her post on the 25th of February, Caren shared stars on the stories of the 1,5 million Jewish children that were murdered by the Nazis. For me, it called to mind Christa's story and I asked Caren if she would be willing to include it in her Star Witness project. Even though Christa was not Jewish. I and my family are very grateful that Caren said yes.
Christa Bamberg was born on the 8th of January 1938 in Erfurt, Germany. She contracted meningitis at the age of three and as a result, became mentally disabled. The Nazis had very strong opinions on who was 'fit' for life. Mentally disabled people were not. At some point after June 1941, Chista was taken by force from her family and sent to Uchtspringe mental asylum. From 1940 onwards, this asylum was used for research on the genetics of mental disability. It had a special ward for children. Tötungsärtzte (=killing doctors) Hermann Wesse, his wife Hildegard Wesse and Gerhard Wenzel actively killed many children or ordered the nurses to do so. Either by mixing their food with phenobarbital, a common drug used in the treatment of epilepsy in children, but fatal when given an overdose. Or children were given an overdose of morphine by lethal injection. Hermann Wesse spent 20 years in jail and repented, his wife Hildegard only about two years. She continued to work as a doctor and did not think she had done anything wrong by killing mentally disabled children and women. Gerhard Wenzel was not in jail, did never repent and continued to work as a doctor. Christa was killed on the 18th of January 1945, ten days after her seventh birthday. Was it Hermann? Hildegard? Gerhard? or an unnamed nurse?
How is Christa related to me? Christa is my father's niece and my grand-father was her uncle. That might sound far, far away and long ago. However, I know Christa's brother quite well as Klaus-Dieter and his wife Doris have regular contact with my parents. After all, Klaus-Dieter is my father's cousin. Klaus-Dieter was born on the 2nd of December 1944 and never knew his sister. We have not told him about Christa being included in Caren's Star Witness project as we fear that he will be unable to cope.
Originally, I was going to include a few other family stories with Christa's story. Before Corona, I and my parents would have spent last week on holiday in Rappelsdorf, the village in Thuringia where my grandfather was born. Enroute to Rappelsdorf, I and my husband were going to visit the war grave of my grandfather's youngest brother Erwin. He was a radio operator with the Wehrmacht. As a result of being shot, he died on the 30th of July 1945 aged only 21. And he was Christa's uncle too.
As we are entering week six of the lock-down here in Bavaria, we can look forward to some restrictions being lifted a little in the near future. But we are a long way off normality. And I am not sure we will or want to go back exactly to how things were six weeks ago. For my part: I love the clear blue skies, the fresher air and the lower levels of noise. I really enjoy seeing and hearing more wild-life on our daily walks. But as a small business owner, I can't help but be worried. Will my business survive the storm? Will the small family businesses I order my embroidery supplies from, survive? Will my customers still have disposable income to spend on my products? That's why I decided to write a blog post on all the big and small things you can do to help small businesses during this pandemic and beyond!
As we cannot gather, find other ways to stay in touch with your favourite small businesses. If your favourite small businesses offer digital newsletters: sign up to them! This is a great way to stay up to date with what is going on. These newsletters can be opened and enjoyed when you want to! This is a great way to support small businesses for free. If you are not a subscriber yet, please follow this link to subscribe to my weekly newsletter.
Many small businesses have used the past few weeks to come up with new-to-them digital ways of staying connected with their community. I've started a FlossTube channel for which I make short videos on my medieval embroidery. This is my latest video on my last finish. Please subscribe to my channel, like my videos and leave comments. The Vimeo algorithm loves popular videos/channels and the more social interaction, the wider the reach, the more potential customers I can serve! Thank you very much for your support!
But, and I won't lie, it comes all down to this: buy from us regularly. As international parcel service is severely disrupted, please buy smaller items such as threads, my petite needlepoint kits, most goldwork supplies, fabric and needles and which can easily be put in a padded envelope. Yes, they take longer to reach you, but let's face it: most of us aren't going anywhere soon :). And most small creative businesses have a variety of digital downloads for purchase as well! These don't require any shipping as you can instantly download the PDF. Please browse my collection of embroidery patterns or my eBooks on 17th-century silk embroidery from Tyrol and my latest one on the long-armed cross-stitch. Every purchase is very much valued and the survival of my business depends on it now that I can't teach embroidery!
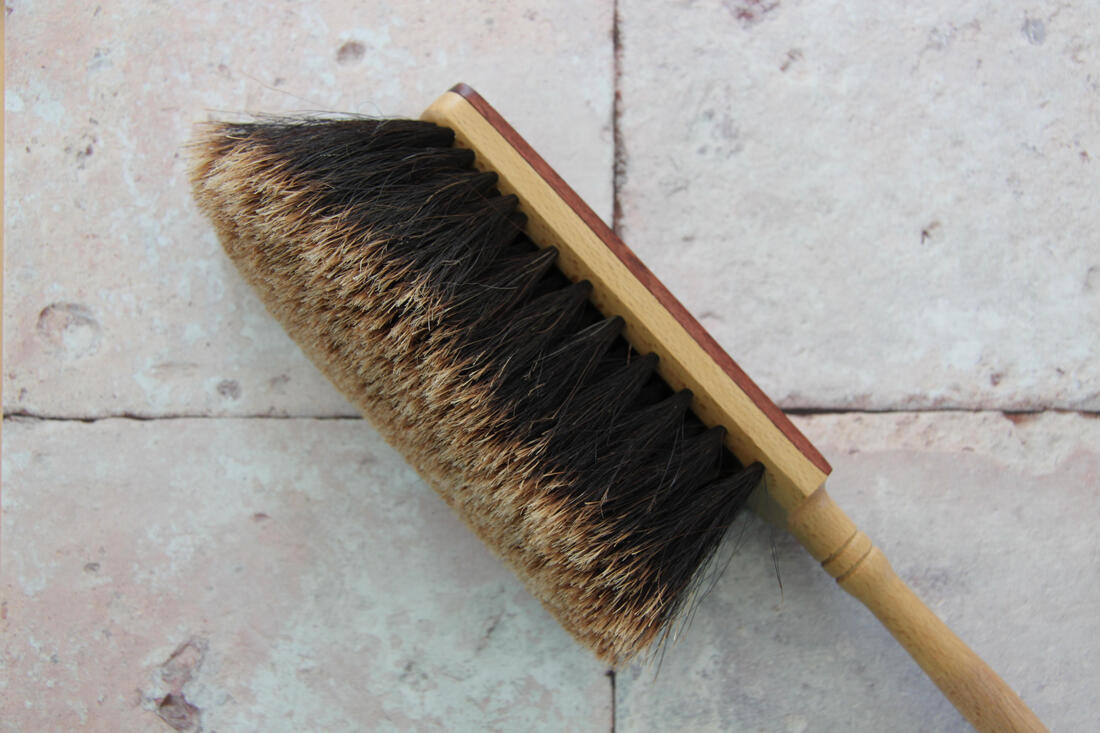
And last, but not least: your support has a knock-on effect. Small business owners tend to shop with small businesses themselves! Not only do I mainly sell products from small family businesses, but when I shop for groceries, household items or clothing, I am almost only buying from independent small businesses. The only exception: cat food and cat litter. When we tried to use an organic brand from our local organic store, Timmie and Sammie were sure we were trying to not so subtly kill them :). Above you see my latest purchase: a hand broom made from wood and horsehair by the last surviving authentic brush/broom binder in Germany. I've been purchasing high-quality brooms and brushes from Volker Kees for years. He is a travelling craftsman and we usually meet at open-air fairs here in the South of Bavaria. He has no website, but can be contacted by email. As I was pretty sure that he struggles to sell his products now that all fairs have been cancelled, I sent him an email and a couple of days later this functional beauty arrived.
Supporting small businesses is something I have been firmly integrating into my life over the past few years. If you did not already do so: please take this pandemic as an excuse to start doing the same. You'll be surprised at how much impact your purchases have!
As the lock-down here in Bavaria, and indeed elsewhere, continues till at least the 19th of April, my embroidery courses at the open-air museum Glentleiten and the stumpwork course here in my studio had to be cancelled. Unfortunately, teaching is literally my bread-and-butter. Over the past two weeks, I have been looking into other avenues of promoting my embroidery business and making up for the financial downturn. One project will be another eBook. It will be on a little-known counted medieval embroidery technique with huge potential. I hope to be able to release it next week. The other project underhand is starting a FlossTube channel on medieval embroidery. The second episode is now up:
In these short videos, I'll talk about a specific aspect of medieval embroidery. In the first one, we explore the name acupictrix and the Babylonian confusion regarding the word 'embroidery' in Greek and Roman written sources. If you have missed it, you can watch it below. In the second episode, I'll show you how to search a fantastic online catalogue of medieval (textile) art in the Netherlands. It contains many high-resolution pictures of embroidery which you can download and use freely as long as you cite the source.
I am currently working on the third episode in which we will explore the rich silken fabrics used for these magnificent medieval goldwork embroideries. Please subscribe to my channel, give me the thumbs up and help me to promote my business. These are crazy times and we will only make it if we support one another. Thank you!
P.S. Did you like this blog article? Did you learn something new? When yes, then please consider making a small donation. Visiting museums and doing research inevitably costs money. Supporting me and my research is much appreciated ❤! The lovely Sarah from LoveCrafts sent me some embroidery threads to play with. And since I am a self-proclaimed thread-addict, I was up for the challenge. Browsing the LoveCafts website, I came across the beautiful hand-dyed stranded cotton by the Roumanian brand Valdani. Now I had heard that name before but never seen these threads, let alone played with them. So I picked some reds and pinks as I already had a design in mind: a Millie Marotta crab. You see, not only do I love her designs, but I and my husband happen to be Cancerians. 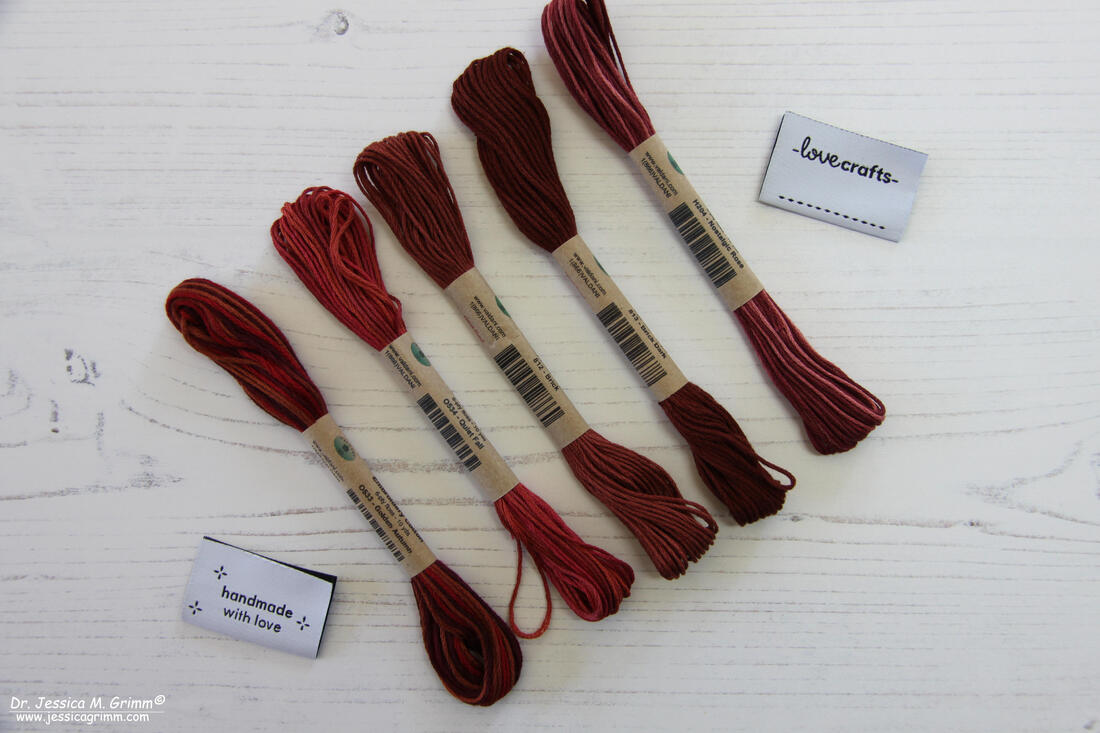 Valdani stranded cotton These are the lovely variegated threads I picked: 0533 Golden Autumn, 0534 Quiet Fall, 812 Brick, 813 Brick Dark and H204 Nostalgic Rose. Even the two 'bricks' are ever so subtly variegated. These would be perfect for those of you who recreate historical samplers. And what I really like about theses skeins? The wrapper is made of recycled paper. Not those horrible plastic wrappers the more modern DMC skeins have. We all need to do our bit to preserve our planet and I am glad Valdani does their bit. 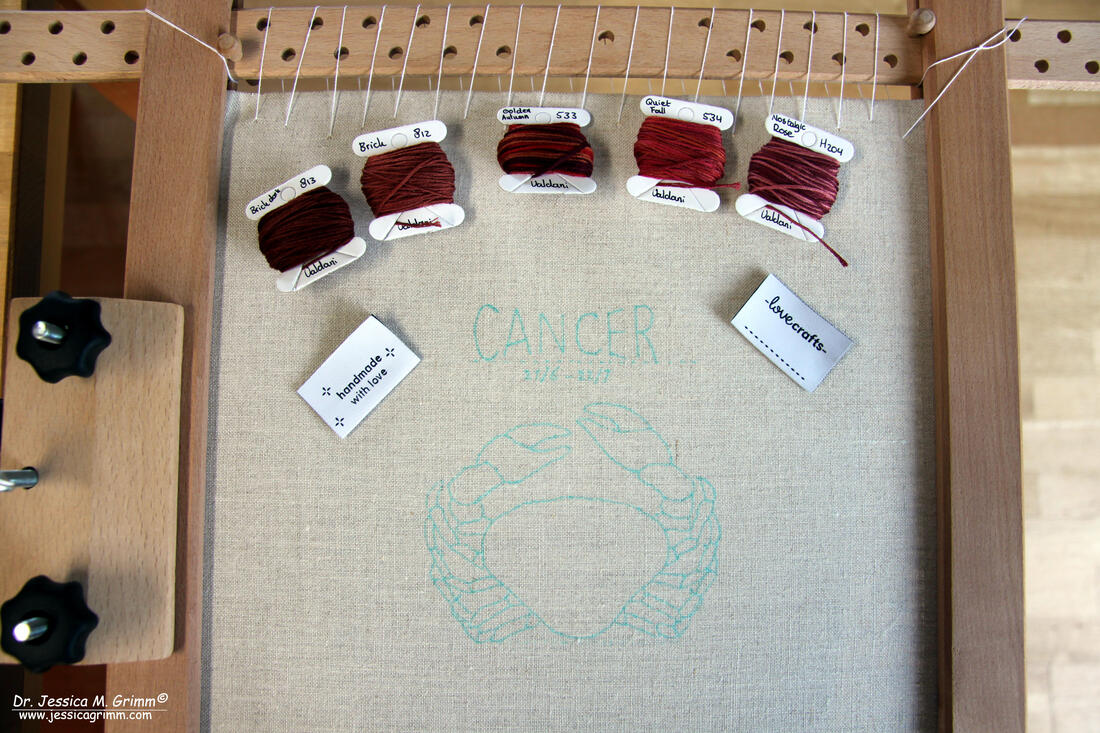 Valdani stranded cotton So how does one go from the intricate Millie Marotta drawing to a stitch-able pattern? In this case, as I approach the whole project as a doodle rather than a thoroughly pre-planned affair, I simply copied the outlines of the crab. I decided upon the size of the project (I like to use a particular brand of frames, so I decided on 14 x 14 cm) and I added some lettering. Apart from wanting to use some Schwalm embroidery on the main body of the crab and simple surface embroidery for all the other parts, nothing was planned. The combination of Schwalm and surface embroidery determined the fabric I was going to use: not too fine, as that would make the cutting of threads for the Schwalm too much of a challenge, but not too coarse either so as not to hamper the surface embroidery. I settled for 40 ct (16 threads/centimetre) Zweigart Newcastle natural coloured linen. As the label says that the Valdani threads are colourfast, I used an aqua-trick marker for the pattern transfer. And here are my stitching steps: - lettering 'Cancer' chain stitch with three strands Brick Dark - lettering dates simple backstitch with two strands Brick - outline body of the crab in the classic Schwalm way of doing things: chain stitch with three strands of Quiet Fall followed by coral stitch with three strands of Quiet Fall - preparing the grid for the Schwalm filling pattern by cutting out every fourth fabric thread in both directions - filling the grid with the Schwalm filling pattern 'Pfauenauge' (from Limetrosen I by Luzine Happel) using two strands of Quiet Fall. I've picked this particular pattern as it mimics the shape of the crab's body - filling the first segment of the legs with satin stitch using two strands of Brick - the second segment is filled with fly stitch using two strands of Quiet Fall - the third segment is filled with Cretan stitch using two strands of Golden Autumn - the fourth segment on the lower legs is filled with Van Dyke stitch using two strands of Quiet Fall - the claws were filled with chain stitch using two strands of Nostalgic Rose - at this point, I realised that the bottom parts of the upper claws would lend itself well to being filled with Schwalm embroidery too - again I made sure that the Schwalm filling pattern resembled the shape I was filling: 'Rippen nach links' and 'Rippen nach rechts'. I used two strands of Nostalgic Rose 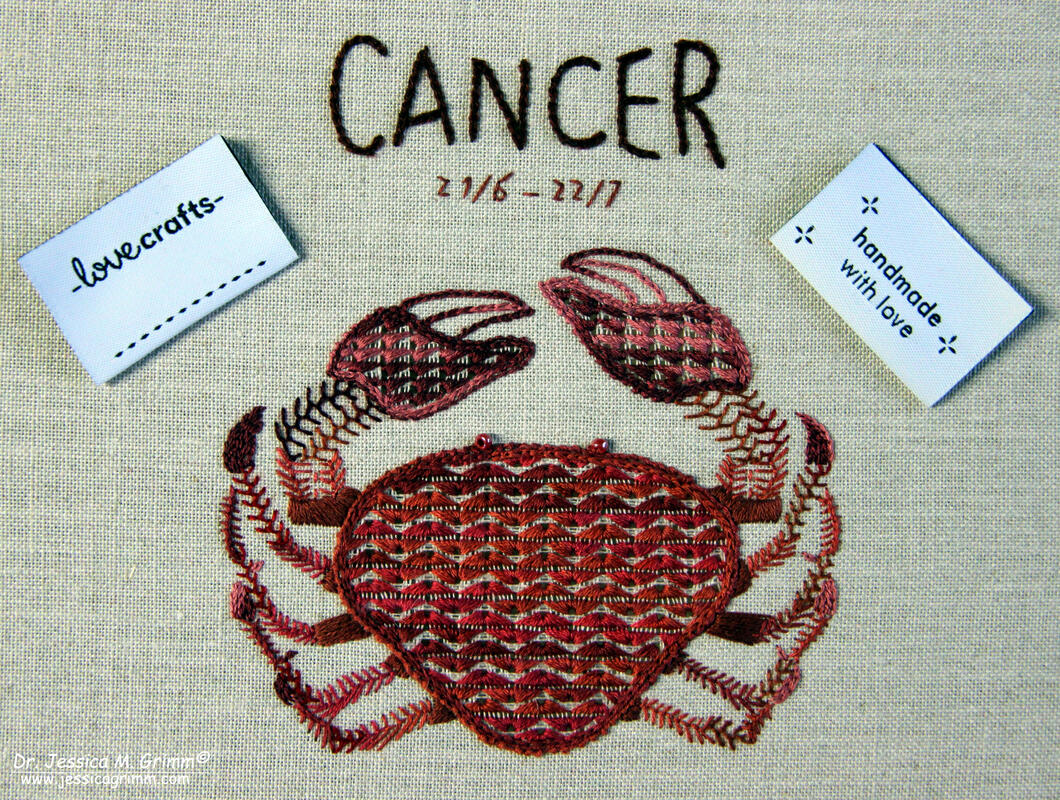 Schwalm embroidery made with Valdani stranded cotton Behold the result: I added two matching beads for the crab's eyes. So what do I think of Valdani stranded cotton? Firstly, I really like the colours of these hand-dyed variegated threads. Nostalgic Rose and Quiet Fall were my favourites. Secondly, I love the more environmentally friendly packaging compared with other brands. Thirdly, each skein holds 10 yards consisting of six strands. That's over a meter more than DMC or Anchor :).
Any disadvantages? Unfortunately, yes. I have found that the single strands of the stranded cotton are a bit more irregular and a bit fuzzier than those of either DMC or Anchor. This was especially noticeable with the darker colours: Brick Dark and Golden Autumn. Although I switched to a bigger needle, the appearance of my stitching is slightly fuzzy. This becomes especially noticeable when you compare the chain stitch + coral stitch edge around the Schwalm filling of the crab's main body. The stitches look dull on the edge, but there is a nice sheen on the filling stitch. As the filling stitch is worked in a grid, friction is much less and the thread keeps its sheen. Furthermore, you definitely can't re-use a thread when you made a mistake and stitches needed to come out. The thread will shred. What are your experiences with Valdani stranded cotton? Have you used other Valdani threads? I've seen that they do perle and silks as well. How do they compare to the leading brands? Do let me know in the comments below! Once again a huge thank-you to the lovely people of LoveCrafts.com who were kind enough to let me play with the Valdani stranded cotton! Be sure to check out their website for lots of embroidery threads, embroidery kits and amazing free inspiration. When I saw a picture of the beaded easter egg on the Fire Poppies website, I was immediately charmed by the pretty design. I had never seen anything like it. When my kit arrived, I found out that the company who makes them is called Riolis from Russia. The actual designer is called Anna Petrosyan. Pardon my ignorance, but I had never heard of either. I do however know that embroidery is huge in Russia and that there are many talented designers living there. I just wished there wasn't such a language barrier! 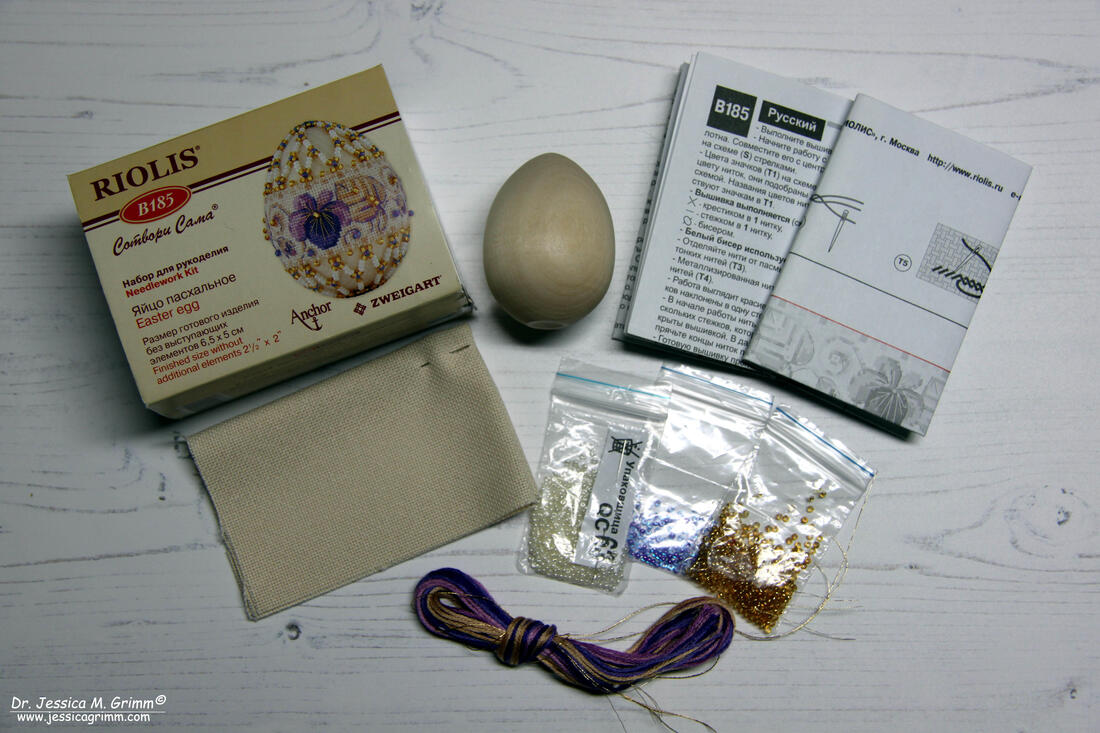 Easter egg kit by Riolis embroidery My easter egg kit came with most of the materials needed to finish the design. I just needed to add sewing thread and beading thread. Fabric, floss, beads, needles and wooden egg were all included. And everything was very good quality too. Fabric came from Zweigart and Anchor supplied the floss. The instructions were very good too. With clear diagrams and an adequate translation into English. Not perfect, but very doable if you are anything other than an absolute beginner. 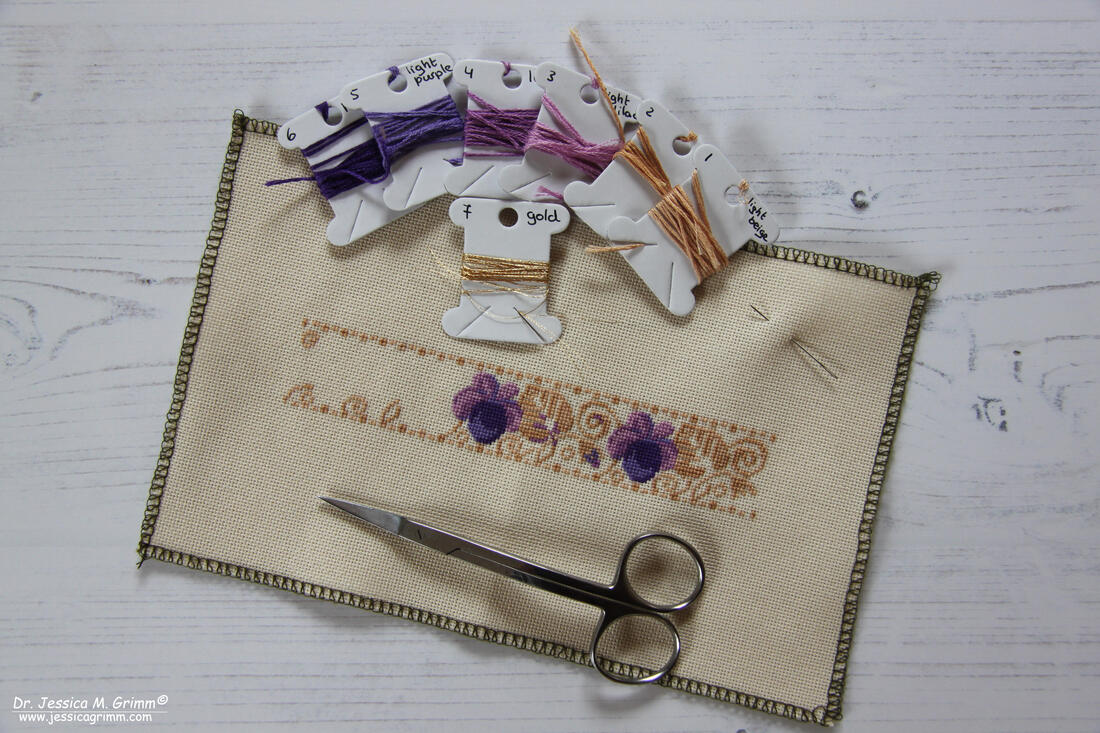 Easter egg kit by Riolis embroidery As always, I started by locking my fabric to prevent fraying. I also wrapped my floss onto some paper bobbins. The actual embroidery was very straight forward working with one strand of floss over one fabric thread (Zweigart Lugana). This explains why the finished embroidery looks so very refined. 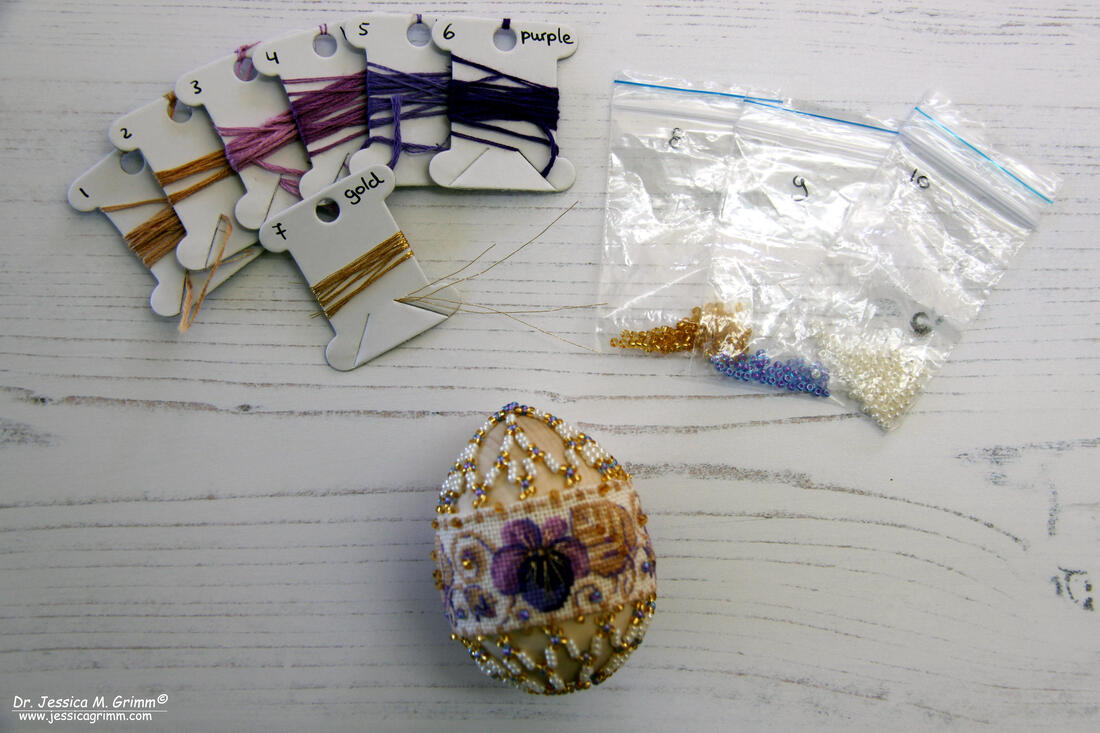 Easter egg kit by Riolis embroidery When it came to the construction of the actual egg, I had some minor difficulties. The translation isn't very good here. When you follow it to the letter, you will find that one of your seams shifts when you pull your finished embroidery over the wooden egg. The upper and lower seams are only fastened at the central seam at the back. If I were to stitch another one of these eggs, I would prevent this by sticking the seams to the back of my embroidery with the help of some Vlisofix/Bondaweb. Or, more likely, I would only stitch half cross-stitches for the border. When turning the seams, I would fasten them by finishing the border cross-stitches (i.e. put the other half cross-stitch in). This would secure the seams perfectly and would prevent shifting. The actual beading was great fun! I certainly learned a new skill. And I am very pleased with the result. Not as perfect as the pictures shown in the kit, but pretty good for a first attempt. And being an embroidery designer, I am already thinking of improving the finishing on these eggs (or Christmas baubles?). How about using linen banding? That would eliminate the whole drama with the seams :). If you would like to stitch your own Riolis easter egg, then please ask Google. The kit was released in 2014 and has sold out on the Fire Poppies' website. The design number is 'B185'. However, I hope my review has shown that embroidery kits from Riolis are high-quality, contain plenty of materials and are well worth a try! But beware: I have now stitched another egg in this series (the one with the red flowers) and here the measurements are all wrong. The design is not long enough to wrap around the egg. DO NOT follow the size recommendations for the seam allowence as you will end up with a piece of cloth that is too short. Instead place your finished embroidery on the egg and take your seam allowance from there. P.S. Did you like this blog article? Did you learn something new? When yes, then please consider making a small donation. Visiting museums and doing research inevitably costs money. Supporting me and my research is much appreciated ❤!
|

Want to keep up with my embroidery adventures? Sign up for my weekly Newsletter to get notified of new blogs, courses and workshops!
Liked my blog? Please consider making a donation or becoming a Patron so that I can keep up the good work and my blog ad-free!

Categories
All
Archives
April 2024
|
||||||||||||||||||||||


 RSS Feed
Contact: info(at)jessicagrimm.com
Copyright Dr Jessica M. Grimm - Mandlweg 3, 82488 Ettal, Deutschland - +49(0)8822 2782219 (Monday, Tuesday, Friday & Saturday 9.00-17.00 CET)
Impressum - Legal Notice - Datenschutzerklärung - Privacy Policy - Webshop ABG - Widerrufsrecht - Disclaimer
Copyright Dr Jessica M. Grimm - Mandlweg 3, 82488 Ettal, Deutschland - +49(0)8822 2782219 (Monday, Tuesday, Friday & Saturday 9.00-17.00 CET)
Impressum - Legal Notice - Datenschutzerklärung - Privacy Policy - Webshop ABG - Widerrufsrecht - Disclaimer