
|
When you start to analyse medieval goldwork in detail, you'll find all sorts of things that are not practised in modern goldwork embroidery. One of these is the use of madder (Rubia tinctoria), a red pigment to colour the embroidery linen in those areas that get covered with goldthreads. How widespread the use of this pigment was is difficult to say. Its use can only be observed when an embroidery is damaged. However, as it is not present on each damaged embroidery the use of madder was not a necessity. As far as I know, the madder was first chemically identified on pieces from the Schnütgen Museum. The reason given by Sporbeck for its use is that the inferior quality of the membrane gold used in Germany needed this reddish base to enhance its shininess. She falsely concludes that the use of madder is probably unique to embroideries made in Cologne. However, the madder can be found under Dutch embroideries also. It was probably simply used to prevent the white linen to shine through the golden backgrounds stitched with geometric diaper patterns. Especially when patterns with larger intervals between the individual couching stitches were used, the goldthreads may gape and reveal the white linen. The colour red enhances the shine of the gold and tricks our eyes into believing that the background is whole and smooth. But how was the madder applied?
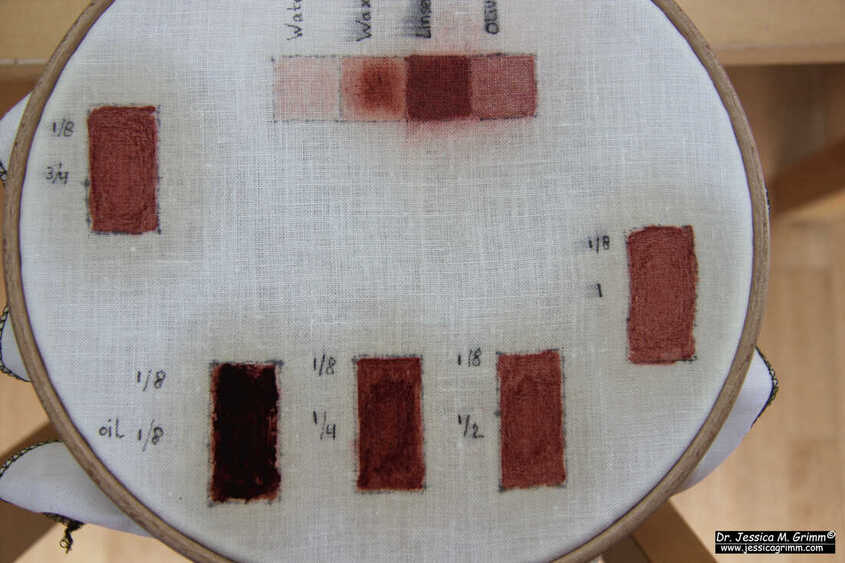
Testing madder dye on linen
As the madder is only applied on those areas of the embroidery linen that later get covered with goldthread, the medieval embroiderers did not simply use madder dyed embroidery linen. I think this has to do with the silk embroidery. The red background colour might interfere with the very light silk used in the faces. In order to be able to only use the red colour in certain areas the person who drew or printed the design onto the embroidery linen must have used a paint-like substance. What binding agent was used to turn madder powder into paint?
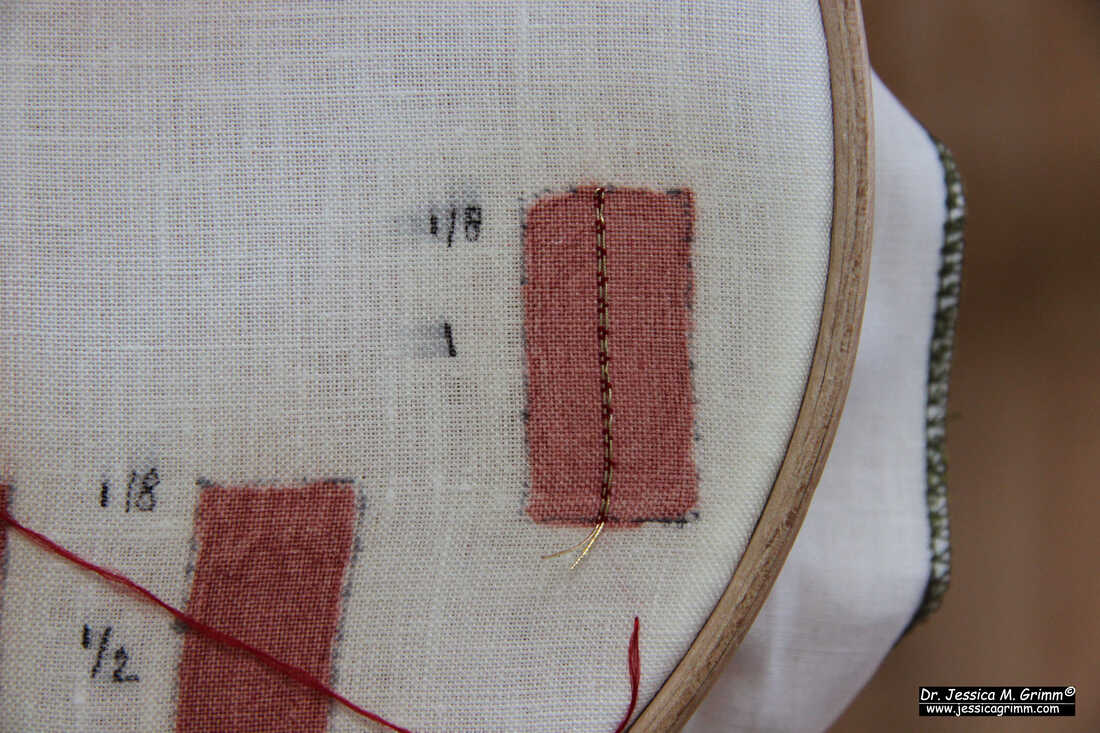
In the above FlossTube with the Acipictrix video, you'll see me experimenting with different binding agents. Whilst madder powder is hydrophobe and does not dissolve well in water, you can actually stain your embroidery linen just enough to get rid of the stark white. The binding agent that has worked best so far is linseed oil. You'll need 1/8 teaspoon of madder powder and 1 teaspoon of linseed oil to get a paint-like substance that adheres well to the linen without excess madder powder sitting loosely on top of the fabric. This shows that the pigment is very economical in its use. Both madder and linseed were common, inexpensive and local products.
Testing madder dye on linen
The one thing that bugs me about the use of oil as the binding agent is that it seeps into the embroidery linen. This was apparently a common problem for painters too. In the reconstruction of the Nachtwacht by Rembrandt, the modern painters had the same problem. The canvas kept sucking up the linseed oil paints. They remedy this problem the same way the people in Rembrandt's workshop would have done: by drenching the canvas in more linseed oil. However, this would not have been necessary for the medieval goldwork embroideries. They were completely covered with embroidery and the 'halos' of seeped oil would simply not be visible.
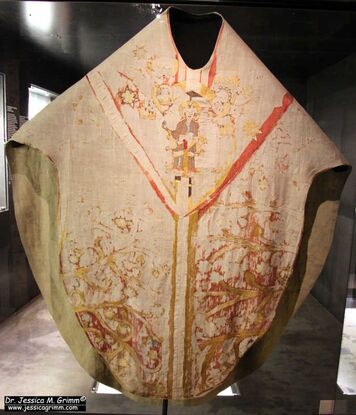
ABM t2107f, Museum Catharijneconvent, Utrecht, foto Ruben de Heer
When I had found my preferred recipe for the madder paint and applied it to my embroidery linen, I was amazed that you can easily stitch on it. It does not feel oily and it does not seem to interfere with either your silken couching thread or with the goldthreads. I have no idea how long the 'halo' stays visible. It is difficult to see if there is a halo on the damaged goldwork embroideries (explore: ABM t2007, ABM t2107a, ABM t2121b, ABM t2147, ABM t2149, ABM t2158 & OKM t156a). However, in the picture above, you do see some staining on the back of ABM t2107f. This might be the result of the oil used as a binding agent.
Just a word of caution: If you would like to experiment with making your own madder paint with linseed oil, be careful. Linseed oil generates heat when it dries. Under the right circumstances, it can combust and cause a fire. Always let fabrics drenched in linseed oil dry completely before you throw them in the bin. Literature Leeflang, M., Schooten, K. van (Eds.), 2015. Middeleeuwse Borduurkunst uit de Nederlanden. WBOOKS, Zwolle. Sporbeck, G., 2001. Die liturgischen Gewänder 11. bis 19. Jahrhundert. Sammlungen des Museum Schnütgen 4. Museum Schnütgen, Köln.
11 Comments
Seldom do we have a chance to meet the people who created the medieval embroideries. Especially written sources containing the names of female embroiderers are rare as hen's teeth. Imagine my delight when I found an older Belgian publication that contains precisely that! It is a list of 175 (!) people who were drawn in from all over the place to help embroider equipment, clothing and tents for a duel between Philip the Good, Duke of Burgundy, and Humphrey Duke of Gloucester. The original documents preserved do not only tell us something about the embroiderers and other craftspeople involved, we also have a list of the embroidered items. Let's explore!
Why did these two men think it a good idea to fight till death? It was about a woman: Jacqueline Countess of Hainaut. She interfered, with her second husband Humphrey, in the power politics of Philip the Good by trying to claim her rights in Hainaut. In essence, it was a family feud as most of these people were closely related to each other. In order to have the most splendid kit to try to kill Humphrey, Philip ordered his man Andre de Thoulongeon to ride to Paris in haste to collect master craftsmen in the art of weaponry, painting and embroidery. Andre contacted Thomassin de Froidmont, Philip's weaponry master, Thierry du Chastel, who later surfaces in the historical sources as Philip's head embroiderer and the painter Hans de Constance (his name suggests he came from Konstanz in Southern Germany). Painter Hans came to Bruges and worked for 70 days on the embroidery designs. Simon de Brilles, an embroiderer of Philip, was asked to take care of the masters that came from Paris and to direct the embroiderers that worked on repairing the embroidery on the weapons and Philip's tent. 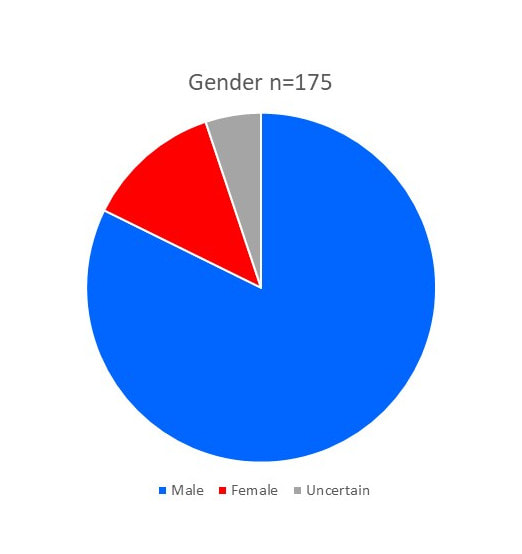 Gender of the embroidery workers in the list of AD 1425 The first embroiderers arrived at Bruges on the 26th of March 1425. They worked in the ducal palace. Over the next weeks, more and more embroiderers arrived. They came from Bruges, Ghent, Lille, Brussels, Mechlin, Antwerp, Tournai and many other places. All in all, 175 people of which 22 were certainly women (I wasn't sure about 9 names if they were male or female). This underlines the general impression I have so far gotten from the historical documents that significantly more men worked as professional embroiderers than did women. Some people stayed the whole 70 days and others came for only a couple of days. They finally completed the task on the 21st of June. 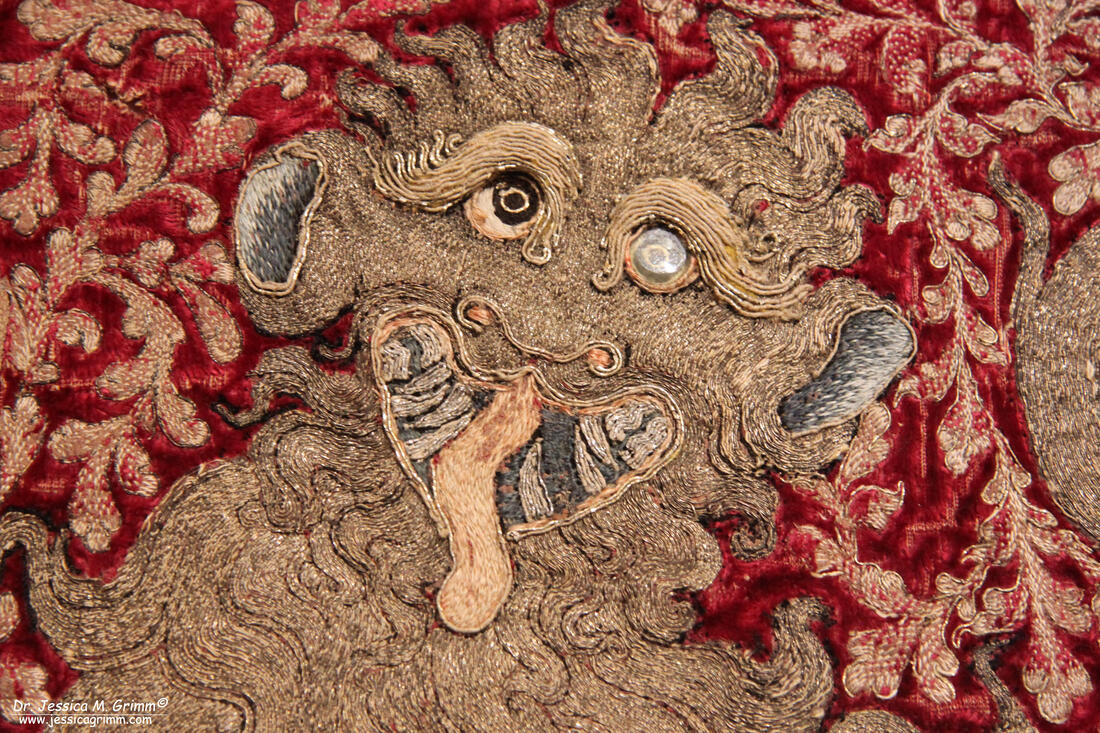 Detail horse trapper from Musee Cluny (Cl. 20367 a-g), made in England around 1330-1340). What did 175 embroiderers produce between the 26th of March and the 21st of June 1425? They made seven horse trappers made of velvet and embroidered with the coat of arms of Philip or his counties, his motto and the cross of St Andrew. As far as I know, the only surviving medieval embroidered horse trapper is held at Musee Cluny in Paris (Cl. 20367 a-g). They also made tabards, those heavily decorated tunics that were worn over chainmail or harness. Furthermore, banners and a tent needed to be decorated with embroidery. The Belgian authors think this not to be very much ... Why then did some embroiderers have to work through the night to get it finished in time?! 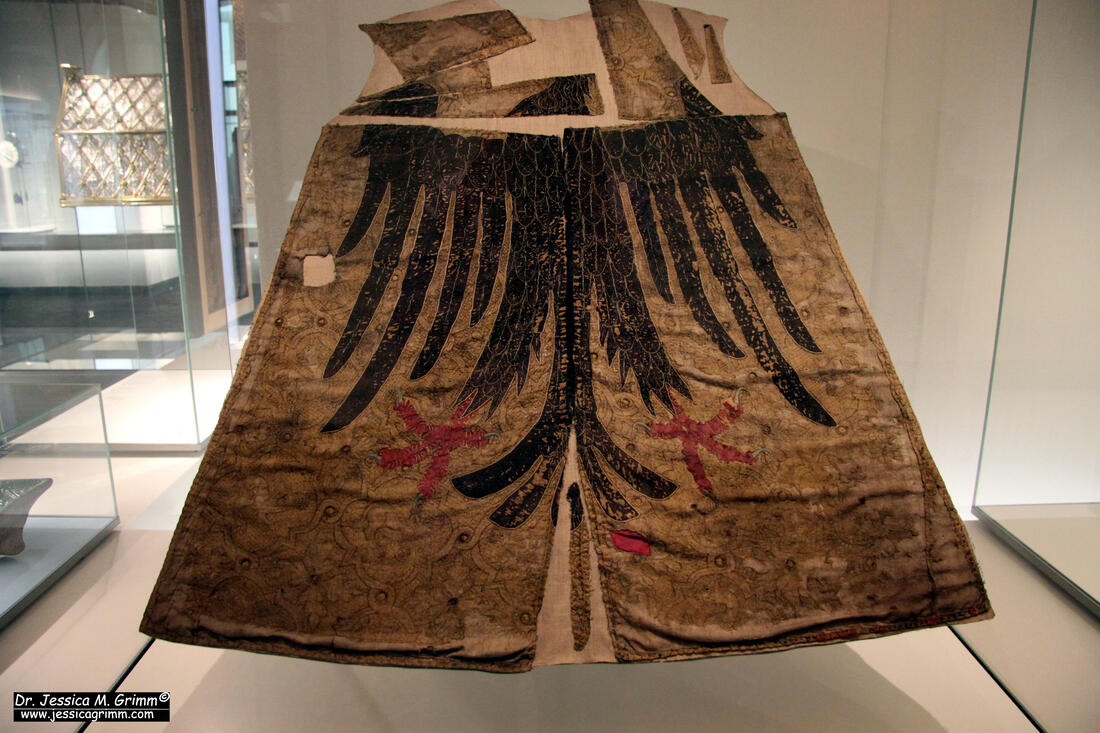 Back of a 14th-century herald's tabard held at the Germanisches Nationalmuseum (T548). In the end, it was all for nought. Philips and Humphrey decided that trying to kill each other wasn't the best way to solve the conflict. Diplomacy did. On the 23rd of Mai 1425, the duel was called off. Interestingly, the embroidery works continued until the 21st of June. The, no doubt, splendid embroideries were transported to Lille on the 9th of September and kept there for safekeeping. Maybe they were used for the tournament in which Philip the Good and John of Lancaster both appeared in 1427. There is a written source that confirms that the tent made for the duel could still be admired in Lille in 1460. Unfortunately, none of the embroideries seems to have survived till the present day. 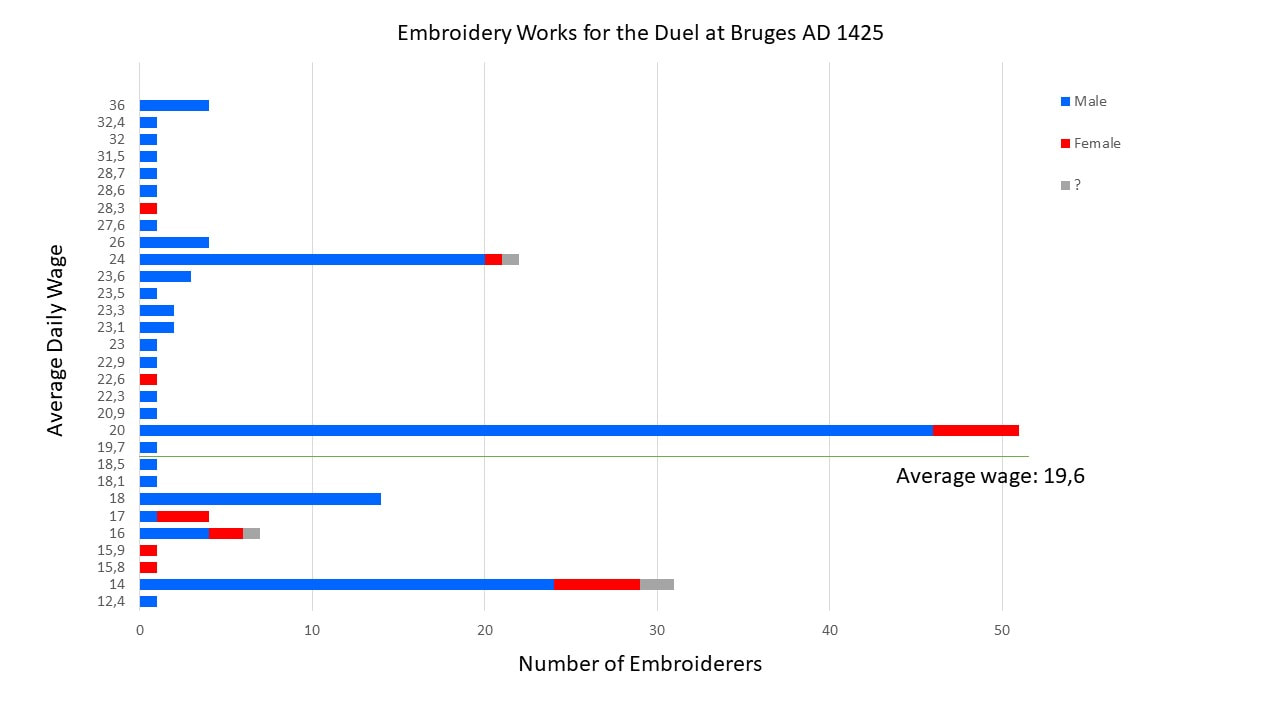 Wages of the embroidery workers in the list of AD 1425 The list in which the embroiderers are listed shows some interesting details. Foremost, we learn how much each of them was paid. Some got the same payment for each day they worked, others got different wages on different days. Was this because costs spiralled out of control? Or were different tasks paid differently? I tend to think it is the latter. You were presumably assigned to a certain task and when that task was completed you got assigned the next one when you decided to stay on. Those who practice goldwork embroidery probably know that some techniques and designs require more skill than others. Related to this is the payment of the female embroiderers. The Belgian authors state that the work of women was rewarded less. This conclusion is probably cut too short. Lievin van Bustail, Lyzebette Peytins and Yoncie Hevre all earn quite a bit above the average wage of 19,6 gr. It is true, however, that the top earners are men and that 14 of the 22 women earned wages below the average. Four women came with their husbands: Ernoul and Marguerite de Wesemale both became the same wage of 20 gr., the same is true for Alard and Katherine du Dam. Jaquet d'Utrecht earns 20 gr, his wife (not named) earns 16 gr. and his boy (not named) 14 gr. Pietre de Hond only earns 18 gr. and his wife (not named) earns even less at 14 gr. Young boys either earned 14 gr. or 11 gr. This seems only fair as these were probably still training with their masters (maybe their fathers?) and were thus not that skilled. I am therefore thinking that embroiderers were primarily paid according to skill and not according to their gender. For those of you who like to play with the raw data below is the Excel list for you to download. If you can help sex any of the names now a '?' or if you see a mistake, please let me know!
Literature
Duverger, J., Versyp, J., 1955. Schilders en borduurwerkers aan de arbeid voor een vorstenduel te Brugge in 1425. Artes Textiles II, 3–17. Today, we are going to revisit the Uta-chasuble in Marienberg Abbey in Southern Tyrol (Italy). I originally visited the small museum in 2017, but I was never able to lay my hands on a publication. Last week, however, I found the only publication on this extraordinary piece in my favourite second-hand bookstore on the internet. So here comes my updated blog post on the Uta-chasuble.  Picture by: Manuel Velazquez During my second trip to Northern Italy, I visited the Benedictine Abbey of Marienberg in Mals. Their museum is also part of the exhibition 'Samt und Seide 1000-1914: Eine Reise durch das historische Tirol' curated by the European Textile Academy (you can read about my first trip here). This museum houses one of the crown jewels of medieval embroidery in Europe: the Uta chasuble stitched around 1160 AD. To give you an idea of its importance, the oldest pieces in the famous 'Opus Anglicanum' exhibition in the Victoria & Albert museum in 2016/2017 were a seal bag from 1100-40 AD and several embroidered fragments from 1150-1200 AD. The oldest embroidered complete chasuble in the exhibition was the Clare Chasuble from 1272-94 AD! Similarly, the oldest embroidered chasubles in the exhibition 'Middeleeuwse borduurkunst uit de Nederlanden' in the Catharijneconvent in Utrecht in the Netherlands in 2015 is dated to the late 15th century. High time I introduced you to the Uta-Chasuble!
The above pictures show you the Uta-Chasuble from the front and the back. In the right picture, you also see the matching stole. The embroidery shows a tree of life spread all over the chasuble. Inside the top part of the forked cross, you see Jesus inside the mandorla flanked by two angels and several stars and crowns. Jesus is seated on a throne, holding a book in his left hand and raising his right hand in a blessing. This is the so-called Christ Pantocrator. On the back of the chasuble, we see the Agnus Dei flanked by the symbols of the evangelists. The evangelists are portrayed as winged figures on which only the heads differ (Matthew man, Mark lion, Luke ox and John eagle). Originally, the chasuble would have been a bell chasuble. At some point, probably in the 14th or 15th-century, the sides were cut for easier movement. 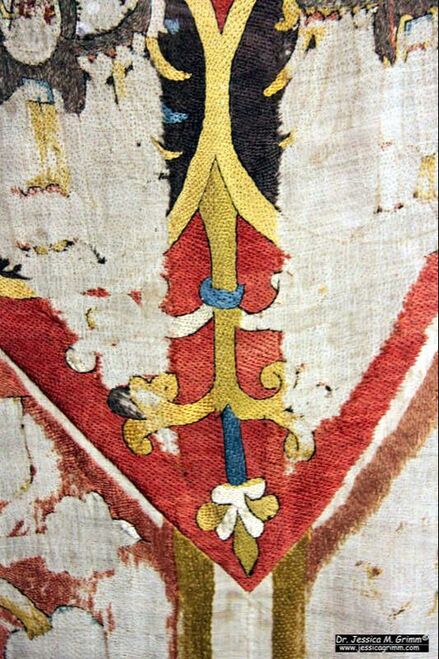 Detail of the embroidery on the Uta-chasuble Here you see a detail of the back of the chasuble, just inside the forked cross, showing two of the winged evangelists. You can see every silken stitch (they are between 2-7 mm long). In the literature, the stitch is described as alternating rows of stem stitch. However, I think the stitch is brick stitch. This was a stitch particularly popular in the German-speaking areas. You can also see the faint lines of the original drawing. It looks like the design drawing was done free-hand. There is also some couching with metal thread left on the winged evangelists (single metal thread couched with red silk). Two different types of gold thread were used in the embroidery: Membrane gold with a white linen core and gilt silver foil wrapped around a yellow silken core. These parts of the embroidery are so well preserved because a forked cross was appliqued onto the embroidery. 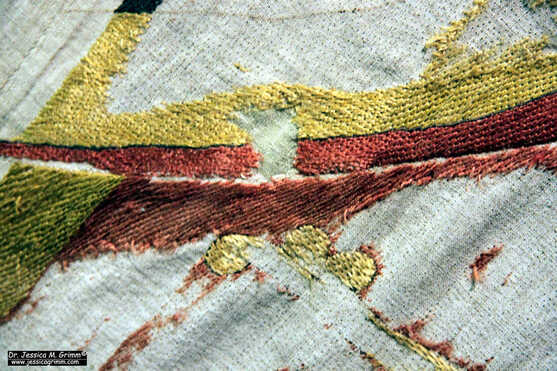 Detail of the embroidery on the Uta-chasuble This forked cross was made by cutting up a precious piece of lampas silk. This silk came from Persia and dates to the 10th or 11th-century and is thus much older than the chasuble. The pattern on the purple silk consists of pairs of parrots. These birds are framed with circles filled with Kufic script and small animals. Now, why would you cover parts of your embroidery with pieces of silk? Once the silk was taken off the chasuble it revealed that they covered the seams between the different parts of the chasuble. It turns out that the chasuble consists of seven separate pieces. And they were clearly embroidered by different people. When they stitched the embroidered pieces together to form the chasuble, the difference in stitch length and direction was far too noticeable. That's why the seams were covered with the strips of silk. 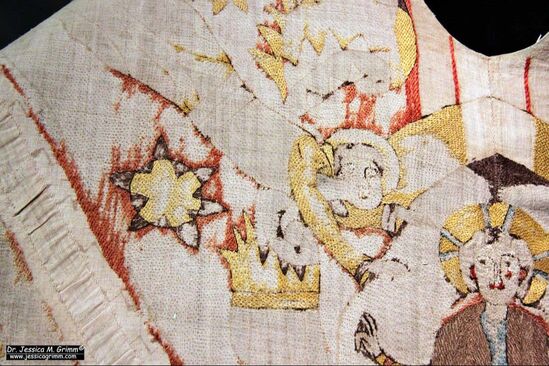 Detail of the embroidery on the Uta-chasuble Here you see one of the angels flanking Jesus inside the mandorla. Pattern couching is present on Jesus' clothing. Instead of the now common bricking pattern, the couching pattern forms a slanting line. This pattern can be seen more often in medieval goldwork embroidery. The colour palette for the silk embroidery on the fine linen background (43-58 ct) is quite restricted: red, yellow, blue and brown.
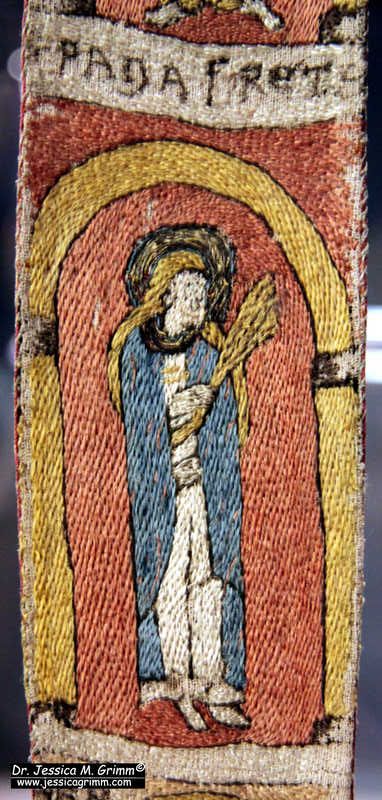
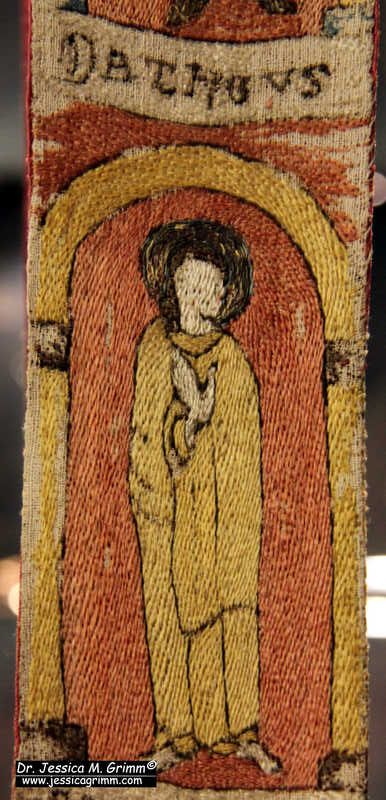
Accompanying the chasuble is a matching stola showing saints. In the picture on the left, you see St. Panafreta, one of the 11.000 virgins following St. Ursula to her martyrdom in Cologne. On the right, you see St. Datheus. He was archbishop of Milan and opened the first home for abandoned children in 787 AD.
Oral history claims that the chasuble was stitched by Uta von Tarasp and her ladies. Uta and her husband Ulrich were the beneficiaries of Marienberg Abbey. But who drew the pattern? Was it the same person who painted the frescoes in the Abbey Crypt? And where were the precious embroidery threads coming from? A large quantity of consistently spun and dyed silk thread as well as metal threads. Apparently, the silk threads came from Sicily. Did Uta and her ladies work the chasuble on large embroidery frames in a room in Tarasp castle? How was the work divided amongst the women? How fine were their needles? Did they have artificial lighting or could they only work in daylight? Would there be music played or a book read aloud when they were working? Let me know what you think! Literature Hörmann-Weingartner, M., 2004. Die Uta-Kasel in Kloster Marienberg, in: Stampfer, H. (Ed.), Romanische Wandmalerei im Alpenraum. Veröffentlichungen des Südtiroler Kulturinstitutes 4. Südtiroler Kulturinstitut, Bozen, pp. 129–148. The majority of medieval goldwork embroidery is ecclesiastical showing corresponding iconography. A tiny proportion of surviving pieces can be associated with the nobility and might show non-religious designs. Absolutely unique are the finds of Villach-Judendorf in Austria near the Slovenian border. Archaeological excavations in 1968 revealed the graves of people who had been buried during the Hallstatt era till the high Middle Ages. Among the younger graves were at least four women who were buried wearing a bonnet with goldwork embroidery. The finds were extensively published in 1970 by Ingeborg Petrascheck-Heim. As far as I am aware, no newer publications exist. So out comes my lovely, always grinning, assistant Elisabeth to make sense of the black-and-white pictures in this important publication. How come so few examples for "normal" goldwork have survived from the Middle Ages? Gold can be recycled without quality loss. This means that worn clothes were deconstructed or simply burnt to retrieve the bullion. In addition, you needed a certain amount of disposable income as goldthreads, even the gilt ones, were quite expensive; the majority of the population did not have access to them. And even when people were buried in their goldwork-finery, only in exceptional circumstances did these textiles survive. Your best bet would be a sarcophagus in a cosy, slightly drafty, family vault. However, sarcophagi and family vaults are a rather expensive luxury reserved for higher-level clergymen and the nobility. Thank goodness for silver-gilt threads! Upon burial in the ground, the humidity and the larger silver component in the threads form salts that leak onto the surrounding area. In the case of goldwork embroidery, this is the textile component of said embroidery. The salts preserve this textile component. And although we will not end up with complete pieces of clothing as sometimes is the case in sarcophagi, the salt-caked fragments can still tell us a lot about the original goldwork embroidery. This is the case in Villach-Judendorf.
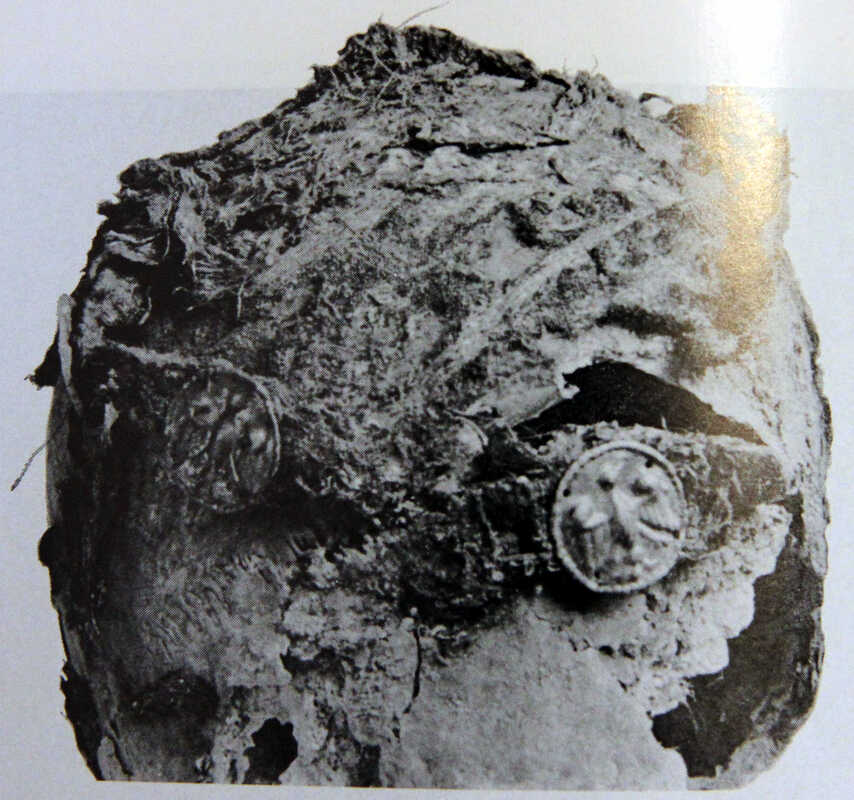
Let's examine the four graves with the goldwork bonnets in some more detail. First up is grave J 57. Even with the help of my lovely assistant, I, as a former archaeozoologist, found it hard to correctly orientate the pictures in the article (see above). I think the suture on the left in the black-and-white picture is the one between the frontale and the parietale. The bonnet sits on the back of the head and the face (bones not preserved) would be towards the bottom of the picture. Amongst the textile remains you see in the above black-and-white picture is a black woollen bonnet with a design consisting of a nine-part trellis with spirals and trefoils. Unfortunately, the poor preservation of the bonnet does not allow for a more accurate pattern reconstruction. The goldwork embroidery consists of normal couching of two parallel threads with a silken couching thread. The goldthread (width 0.25 mm) consists of a 0.3 mm wide silver-gilt strip spun (S-direction) around a silken core. 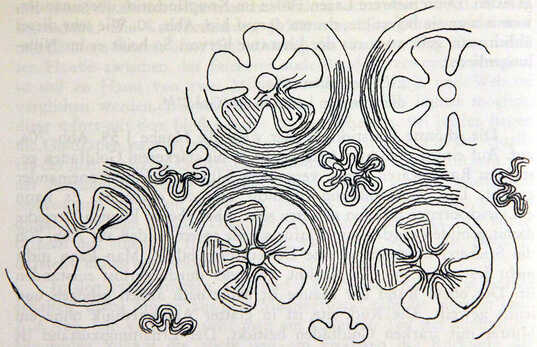 Embroidery pattern of bonnet J 59 (picture taken from Petrascheck-Heim 1970). Grave J 59 contained a bonnet made of silk on which a repeat pattern of simple five-petal flowers in a circular frame (c. 3.6 cm high) was stitched. The areas between the circles are also filled with a kind of abstract wavy thingy :). Again, the goldthreads are couched down in pairs with 35-40 threads per centimetre. Two different goldthreads are used in this design: 0.25 mm width (0.25 mm wide silver-gilt strip around silk core) and 0.4 mm width (0.4 mm wide silver-gilt strip around red silken core). There is also a strip of bead embroidery on this bonnet. The beads are 2-3 mm in diameter and are made of gilt silver foil. The beading design could not be confidently reconstructed. 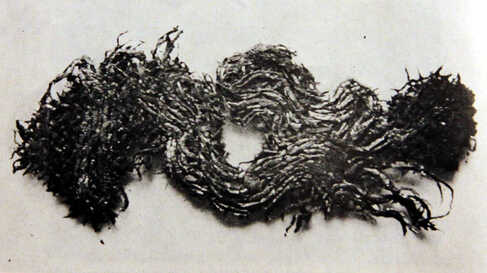 Embroidered trefoil from J 57 (picture taken from Petrascheck-Heim 1970). Although the remains of the bonnet from Grave J 63 are poorly preserved, they do show that the goldwork embroidery is worked in underside couching. The publication does contain Ingeborg Petrascheck-Heim's reconstructed of the pattern. For the embroidery, two parallel threads are couched with a single stitch. The couching thread itself has not survived (probably thus linen) but the characteristic loops of goldthread at the back of the silk twill fabric unmistakably point to underside couching. The silver-gilt thread has a width of only 0.15 mm. 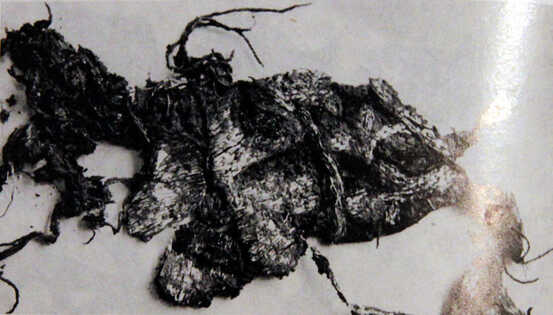 Goldwork embroidery from bonnet J 105 (picture taken from Petrascheck-Heim 1970). The goldwork embroidery on the fragments of the bonnet in Grave J 105 is of very high quality. Unfortunately, the fabric has hardly survived but points to some sort of canvas. The embroidery design included roses in a circular frame, spirals, trefoils and acanthus leaves. Unfortunately, it cannot be confidently reconstructed. The goldthreads have a width of 0.15 mm and were couched down in pairs with silk. There are 45-50 threads per centimetre. The author assumes that, because of the higher quality of the embroidery, the bonnets in graves J 63 and J 105 (and probably J 57 too) were made by professionals. Bonnet 59 might have been worked by the wearer herself or someone else in her household. Where did these professional bonnets or the raw materials come from? Either complete bonnets were imported from beyond the Alps or raw materials were imported from beyond the Alps and fashioned into bonnets by local craftspeople. Certain characteristics of the (design of the) goldwork embroidery and the used fabrics point to a date around the middle or in the third quarter of the 13th century (AD 1250-1275). Although I concentrated on the goldwork embroidery, the complete headdresses of these women also included tablet-woven bands which include goldthreads and very fine veils made of silk. All this luxury points to a wealthy population that buried their dead in the burial ground of Villach-Judendorf. As the name "Judendorf" implies, some of these people might have been Jews.
If you are interested in non-ecclesiastical medieval goldwork embroidery, you should consider buying the publication from Ingeborg Petrascheck-Heim. It contains a full catalogue of all the gold bonnets (they have woven ones too) and 101 pictures and illustrations of the finds. You can order a copy by writing an email to Stadtmuseum Villach. The book costs only € 11 + shipping. Literature Petrascheck-Heim, I., 1970. Die Goldhauben und Textilien der hochmittelalterlichen Gräber von Villach-Judendorf, Neues aus Alt-Villach (= 7. Jahrbuch des Stadtmuseums), p. 56-190. The past weekend, I have been demonstrating goldwork embroidery at the Open Air Museum Glentleiten near my home. Although Covid numbers are sharply rising and the weather was rather drab and wet, quite a few visitors knocked on the door of building 11 to learn all about late medieval or nue. My abode for the weekend was a farmhouse from Sauerlach near Munich built in AD 1637/38. It had a fantastic built-in oven. With ceramic beakers in the oven wall. The air warms quickly in these ceramic pockets and then expands into the room. This meant that I had a constant hot airflow over my neck and shoulders as I was working. I herewith propose a UN stichers charter in which embroiderers have a right to such ovens in their dwellings :).  I started a "new" old project for my demonstration of the or nue technique: St Nick. THE St Nick from "On the shores of St Nick" a piece I have been working on, on and off, for a couple of years now. As I wanted to copy the likely method used in the late-medieval period for working or nue saints, I started by finding a suitable painting. I choose one by Gherardo Starnina painted around AD 1422. Then I turned this painting into a simplified stitch plan. It is believed that medieval stitchers worked from existing models too. After all, plenty of inspiration was on display in every church.  For the next step, I made a pricking of my stitch plan and used some black pounce to get it onto my Sotema 48 ct 100% linen. I then connected my dots with iron gall ink. By working slowly and with very little ink on my tiny brush, I was sometimes able to achieve the same thin lines you see on medieval embroidery pieces. One thing that certainly helps to make very thin lines is using as little pounce as you can get away with. Heavy black dots seem to make the ink bleed more. The rest is: practice, practice and then practice some more. The advantage of using ink over paint: when done well, you can make much thinner lines. This is especially useful when transferring an intricate design drawing.  Then came the fun part: choosing colours! I use Chinese flat silk for most of my projects. It is high-quality and I can split the thread easily in as many fractions as I like. This means that I have total control over thread thickness. A similar thread was used in medieval embroidery. Alice from Oriental Cultures is always very helpful and dispatches my orders super-fast. I recommend buying a real-thread colour chart as there are nearly 1000 shades of silk available. The goldthread I am using is Stech gilt 80/90 made by Maurer.
As I was talking to visitors most of the time, I haven't made a lot of progress :). And things aren't as neat as they are when I work concentrated. But that's okay! I find it much more important to convey knowledge about an almost forgotten embroidery technique to people who, at best, are familiar with tent stitch and cross-stitch. With a bit of luck, I will become a regular at the museum next year! Last week's simple experiments told me a lot about the anatomy of the modern gold threads we use in our embroideries. But how does this compare to the gold threads that were being used in the medieval period? When you are familiar with goldwork embroidery, you probably know that there is a myriad of different gold threads available nowadays. This plethora of forms and shapes is a relatively new invention. Before the end of the Middle Ages, your stash would have looked rather clear and orderly. If, for instance, you lived in England, France or the Low Countries, your threads were probably made of a gilded silver foil wrapped around a silken core. However, if you lived in Germany, your thread was probably made of a strip of gilded silver glued onto a membrane (animal gut) and wrapped around a linen core. Membrane threads (usually with a silken core) were also used in the weaving of luxurious silk fabrics. But probably not in embroideries in England, France and the Low Countries. Sorry for the use of the word "probably" so frequently. Unfortunately, the makeup of the metal threads used in medieval embroideries is not routinely stated in the literature. And researchers that analyse metal threads do usually not differentiate between thread samples taken from an embroidery and those taken from a woven textile. However, I have a gut feeling that there might be a difference. After all, the technique and motions are quite different. And whilst you can use many threads for both embroidery and weaving, some work much better than others. I do not have many answers yet, as I am currently in the process of untangling the gold threads from the published data.
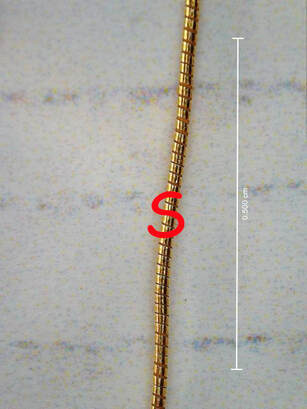
What I can say is that the twist of the foil around the core in these medieval passing threads seems to be S-twisted. This is also the case in the modern passing threads I took apart last week. However, seeing the passing thread under the digital microscope made me realise that the width of the metal foil is very small (especially when compared to the Japanese threads). How does this compare to medieval gold threads? The number of wrappings per centimetre is hardly ever stated :(. When you look at the close-up of ABM 2107f held at the Catharijne Convent, at first glance, it does seem to correspond well with the modern passing thread. However, if you zoom in and measure the ratio of the width of the gold thread and the width of the gold foil, the gold foil is about twice as wide as the width of the thread. For the modern passing thread, this ratio is about 1:1. This means that the strips of gold foil in a modern passing thread are thinner and that there are more wraps per centimetre. Is this difference important? Does it make for a different embroidery experience? And how will we ever be able to tell?
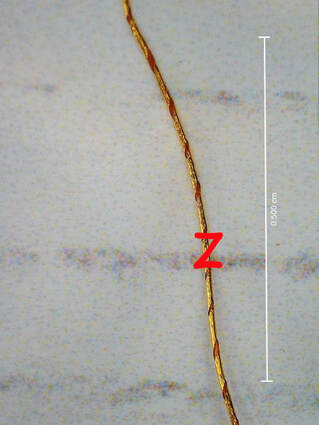
What also struck me during the second run of my medieval goldwork course was that we use modern passing threads on the two samples that were originally stitched with membrane gold. It works, but would the use of a modern Japanese thread be closer to the medieval membrane thread? Is the paper substrate comparable with the animal gut substrate when it comes to the behaviour of the thread? How heavily gilded were the original medieval membrane threads? Do they compare better with non-tarnish Japanese threads or with the real deal in which a high gold content is used? And what about the core? There are some membrane threads used in medieval embroidery that do have a silken core. But the majority is linen. And from the pictures above you can tell that the modern Japanese threads are Z-spun, whereas the historical sample (ABM t2007) on the right is S-spun. How does this affect the embroidery experience? I am definitely going to do some experiments before the start of the third run of my course.
Please do leave a comment below as I very much welcome your input on this! Literature Járó, M., 1990. Gold embroidery and fabrics in Europe: XI-XIV Centuries. Gold Bulletin 23 (2), 40–57. And references cited in this paper. Karatzani, A., Rehren, T., Zhiyong, L., 2009. The metal threads from the silk garments of the Famen temple. Restaurierung und Archäologie 2, 99–109. One of the hardest things in recreating medieval goldwork embroidery is finding embroidery materials that are similar to those used in the past. Although the composition of the gold threads used is not routinely stated in publications and museum catalogues, generally speaking, modern threads contain less real gold or even none at all. But what else can be learned from having a closer look at them? Out come the digital microscope and some matches. Although I have quite a collection of gold threads, I am going to take apart a few key ones that you are probably familiar with too: - imitation Japanese thread (#8 from Golden Threads) - passing thread (Stech 120/130 from M. Maurer) - "real" gold passing thread (Stech 120/130 Echt Gold with silken core from M. Maurer) - pure goldthread (vintage Japanese from Hauser Gallery) All these threads have a thin foil that's wrapped around a textile core thread. Let's start by having a look at how the foil has been wrapped around the core thread. Interestingly, you can see the core thread between the foil wraps in all specimens. The glare of the gold is such that we don't see this with the naked eye. If you click through the above picture gallery, you will see that the two Japanese threads are Z-spun and the two passing threads are S-spun. You'll also see that the width of the foil is much greater for the Japanese threads than for the passing threads. This probably explains why you don't have pesky pieces of foil standing up in tight turns when you are using passing thread. The changes of you "folding" a single wrap in a turn is less. It is more likely that you'll push two wraps a little apart with your couching thread. To quantify things a bit: there are c. 13 wraps/cm for the imitation Jap, c. 16.5/cm for the pure gold thread and c. 64 wraps/cm for both passing threads. Let's unwrap the foil from the core and see what it's actually made of. This exercise reveals the biggest difference between the Japanese threads and the Stech. You can clearly see in the pictures above that both Japanese threads have a golden foil on the outside of the strips and a substrate on the inside. It is white in the imitation Jap and brownish in the real gold thread. The latter is very likely a special high-quality paper, but the white stuff might be an artificial membrane. The foil of the Stech looks very differently and behaves very differently: it really is a strip of metal without another material. It stretches considerably upon unwrapping. In the pictures, you can see that the foil has a silver colour on one side and a golden colour on the other. According to the manufacturer, the normal Stech consists of a silvered copper thread which is then very thinly gilded on one side. The Stech Echt Gold is a pure silver thread that is then gilded with pure gold on one side resulting in a higher karate. Above, you see pictures of the cores of the different gold theads. All are yellow, except for the vintage pure gold thread which has a more reddish hue. To determine if they are made of real silk or polyester, I have burnt them by holding them in a flame with tweezers. The core of the imitation Japanese thread burnt with a small flame and the smell was one of something being burnt. The core of the Stech burnt with angry sparks and there was no smell at all. The core of the Stech Echt Gold burnt very quickly with a faint smell of something being burnt. The core of the Pure Gold thread burnt very quickly, but I could not detect a smell. The results hint at the core of the imitation Jap being cotton, the core of the Stech being artificial and the cores of the Stech Echt Gold and the Pure Gold thread being silk.
How do these results compare to the gold threads that were being used in medieval embroidery? Find out in next week's blog post! On Friday I got an email from DHL saying that they would finally deliver the next volume in the monograph series on the Imperial Vestments the next day. And they did! Probably due to the worldwide paper crisis, this book has been on pre-order for more than a year. The third, and last volume, is still on pre-order and is said to be released before the end of the year. Since there are three books on the topic, all written in German, it can be a little difficult to determine which ones to order. Read on for my review of the second volume: Die Bamberger Kaisergewänder unter der Lupe - Methoden und Ergebnisse der aktuelle Forschungen (The Imperial Vestments under scrutiny - methods and results of the current research project). 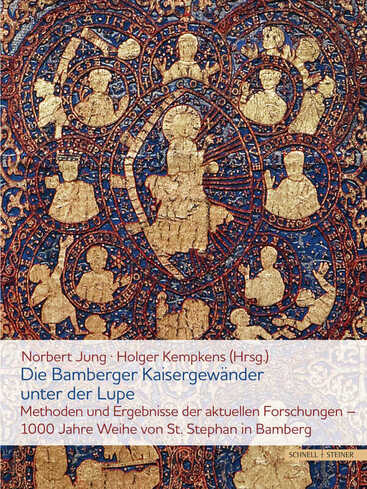 Die Bamberger Kaisergewänder unter der Lupe - Methoden und Ergebnisse der aktuelle Forschungen When I pre-ordered all three volumes in the series, I wasn't quite sure what to expect from each of them. Reading through the introduction of this second volume, I now understand that this volume was intended as the catalogue for the recent exhibition in the Diocesan Museum Bamberg. This means that the first part of the book (p. 14-97) is the catalogue entries for the exhibits. In essence, this is a summary of the first volume: Kaisergewänder im Wandel - Goldgestickte Vergangenheitsinszenierung which I reviewed a while back. Whilst this part contains some new pictures not seen in the first volume, these mainly depict written sources. A tiny part of the book, pages 101-115, describes the art-technological and material science research conducted on the Imperial Vestments. I assume this is a summary of the third and last volume that hopefully gets published before the end of the year. Personally, this is the volume I am looking forward to the most as it promises to hold a lot of technical information important to us as embroiderers. The "summary" on pages 101-115 does whet my appetite but is not meaty enough to satisfy my appetite. The second half of the book (p. 119-209) contains papers on the papal visit in AD 1020 and the consecration of the St Stephan Church in Bamberg.  Die Bamberger Kaisergewänder unter der Lupe - Methoden und Ergebnisse der aktuelle Forschungen Should you buy this book? Only if you like to have a complete set on your shelves. Whilst the first volume contains a lot of information and beautiful detailed pictures of the Imperial Vestments that are useful to us as embroiderers, this second volume is clearly only intended as a summary for the general public. If I had known what was the content of each volume exactely before buying, I would probably not have bought this second volume. This second volume can be ordered from the publisher Schnell & Steiner.
Jung, N. & H. Kempkens (eds), 2021. Die Bamberger Kaisergewänder unter der Lupe. Methoden und Ergebnisse der aktuellen Forschungen, Schnell & Steiner: Regensburg. Before I'll provide you with some incredible eye candy, let us return to last week's blog post. Some of you wrote to tell that they were sorry to see another embroidery shop close. A few were even dismayed as it now meant that it was even harder for them to source materials. Please know that it wasn't an easy choice for me to start selling off my stock. Precisely because high-end embroidery materials are harder and harder to find, I had always hoped that I could make a success of my webshop/brick-and-mortar shop. Alas, it never happened. Before the pandemic, I had about five visitors a year. I never managed to become a needlework destination where you could both buy gorgeous threads and feast your eyes on pretty spectacular embroideries. Being located in a National Park with many places to visit, one would think that my shop and atelier had everything going for it. But it didn't. And even now, with a 50% discount on most goods things aren't exactly flying off the shelves. This has proven to me, that although a bit painful, closing my shop is the right thing to do. Onto greener pastures! 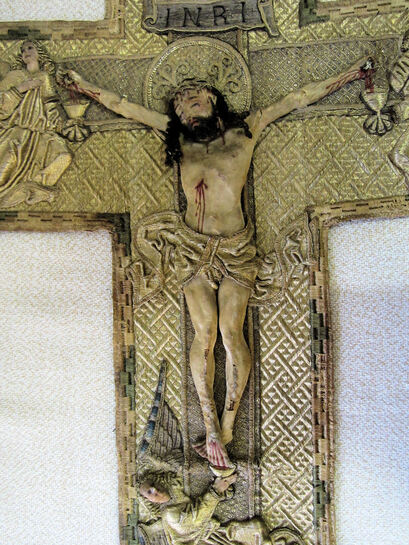 Central depiction of the Crucifixion on a chasuble cross made around AD 1500 and now held at Museum St. Peter, Salzburg, Austria. Retrieved from the website: www.evergabe.de At the beginning of the month, my husband and I made a day trip to Salzburg in Austria. We visited the various church museums and saw many spectacular pieces of ecclesiastical art. And although hardly any embroidery was on display, the Museum St. Peter had an amazing chasuble cross on display. As you are not allowed to take pictures of it, I was lucky to find a couple of detailed pictures on a website for tenders.
As you can see from the above picture, this is not your average piece of stumpwork or raised embroidery! The figure of Christ is nearly fully three-dimensional. He really is a textile sculpture. And although those of you familiar with 17th-century stumpwork from England will see some similar techniques and threads, the main figure of Christ was made in a technique not seen in these 17th-century pieces. He was made in a mould. Built-up with linen scraps soaked in glue and stuffed with pieces crafted from wood and leather. Although "minor" padding can be seen in medieval goldwork embroidery from quite early on, these very three-dimensional pieces were made in the South of Germany, Austria and Hungary during a short period of time. As a group, they are so far not really systematically studied and the academic literature is older and patchy. This seems to be due to the fact that they are an 'in-between': not seen as sculpture, but not quite normal embroidery either. And some people have an aversion to these pieces as they look a bit like the priest has a dolls house on his back ... (just like with those elaborately decorated skeletons of saints, these textile pieces end up in the attic and are forgotten about!). Wouldn't it be cool to gather a group of interdisciplinary academic researchers and start a research project? Have each piece go through a scanner to see which materials are hiding beneath the outer layers of silk and embroidery? Just like those Egyptian mummies projects! So far, there does not seem to be much interest from those who research the later 17th-century stumpwork embroidery from England. This is likely due to the language barrier. Equally, those 17th-century pieces are not mentioned in the literature on these 15th- and 16th-century pieces. Are both traditions independent of each other or can we find a continuous line of development? By publishing this short introduction on my blog, I hope to alert people to the existence of these amazing textile sculptures! A couple of weeks ago, I and my husband visited the lovely Diocesan Museum of Eichstätt. Apart from the normal sacral art on display, were a few important medieval vestments. The most interesting of them all is the so-called chasuble of St Willibald dating to the 12th-century. Goldwork embroidery was either made in Byzantium or in Cyprus according to the meagre information displayed in the museum and the literature. 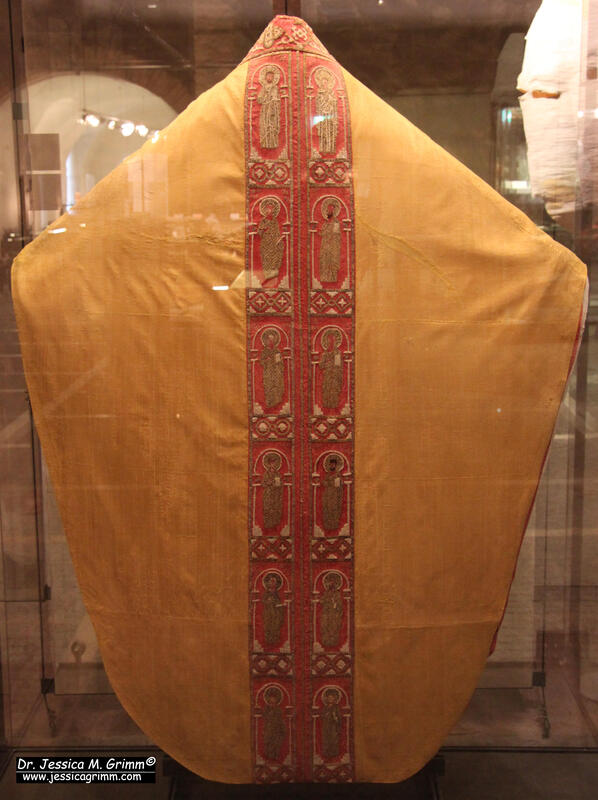 Back of the St Willibald chasuble Originally, the shape of the chasuble would have been bell-shaped. The yellow silk twill dates to the 12th-century as well and was either made in Italy or in Byzantium. Although the chasuble is attributed to St. Willibald, he never wore it. St. Willibald was the founder of the diocese of Eichstätt und lived c. AD 700-787. Being the son of a Wessex chieftain and with a host of saintly relatives, he seems to have been predestined for the job! 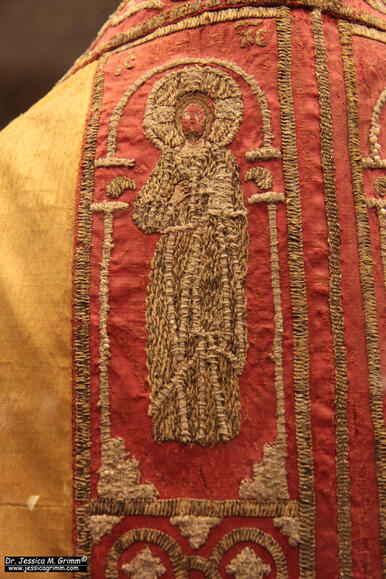 Jesus on the St Willibald chasuble Depicted on the back of the chasuble are Jesus and Mary with 10 Apostles. Each figure is depicted under a Romanesque arch. The persons are identifiable through their stitched Greek names above the arches. 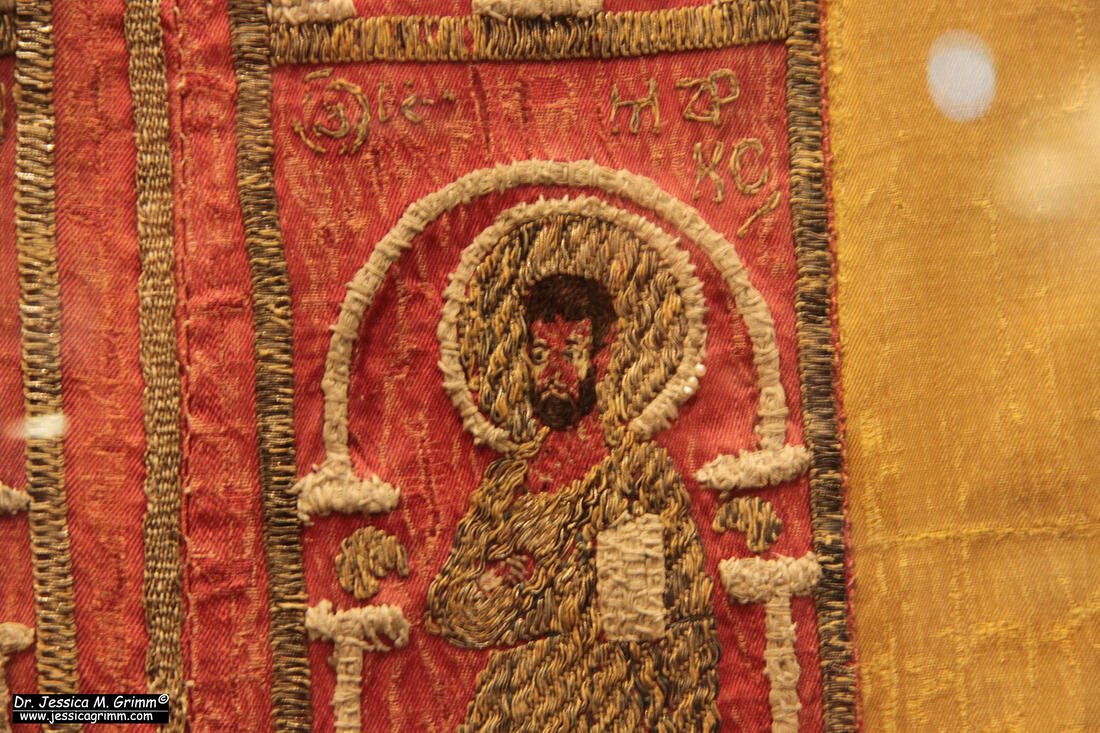 Detail Apostle Andrew? on the Willibald chasuble The embroidery is worked on a strip of red silk twill. The goldthreads are couched down in pairs in a characteristic slanting couching pattern. Today, we are used to a couching pattern forming a brick pattern. However, a pattern forming a simple slant was very popular in the medieval period. As a rule of thumb: medieval embroideries where a single goldthread has been couched down are older than those where two (or more) goldthreads are couched down with each couching stitch. 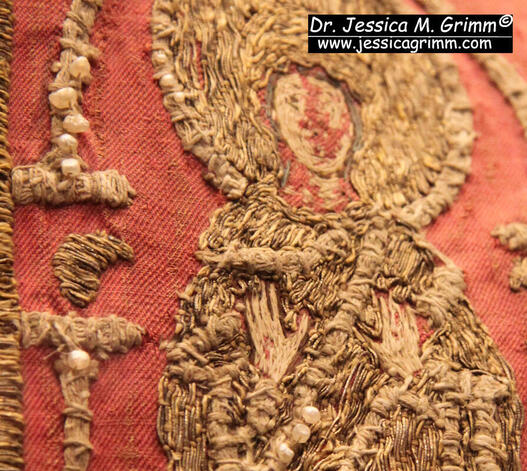 In this detail of Mary, you can see that her face and hands are stitched with small silken stitches. The literature states that these are stem and chain stitches. However, it looks more like irregular split stitch to me for the hands and typical "contour-following" split stitch as seen in Opus Anglicanum, for the face. Especially the latter can look like very fine chain stitches. The literature also states that Mary and Jesus were originally the only figures where the halo, architecture and clothing were further decorated with pearls. However, if you look carefully at the picture of the Apostle, you spot pearls there too. Just imagine what these embroideries once looked like with all the pearls still intact! As the pearls were padded with the beige string (linen or cotton) you see almost everywhere in these embroideries, the pearls would have sat proud of the surface catching the light better.  Front of the St Willibald chasuble The front of the chasuble was incredibly difficult to photograph due to a piece of modern art being right behind it. But you get an impression from the picture above. It is the same type of goldwork embroidery as seen on the back. Interestingly, many more pearls have survived on the front.
Unfortunately, it is unknown how this splendid piece of Byzantine embroidery ended up in the Cathedral treasury of Eichstätt. However, Eichstätt was an important Diocese in the Middle Ages and still has a Catholic University and Seminary. Literature Müller-Christensen, S., 1955. Sakrale Gewänder des Mittelalters. Hirmer, München. |

Want to keep up with my embroidery adventures? Sign up for my weekly Newsletter to get notified of new blogs, courses and workshops!
Liked my blog? Please consider making a donation or becoming a Patron so that I can keep up the good work and my blog ad-free!

Categories
All
Archives
April 2024
|
||||||||||||||
 RSS Feed
Contact: info(at)jessicagrimm.com
Copyright Dr Jessica M. Grimm - Mandlweg 3, 82488 Ettal, Deutschland - +49(0)8822 2782219 (Monday, Tuesday, Friday & Saturday 9.00-17.00 CET)
Impressum - Legal Notice - Datenschutzerklärung - Privacy Policy - Webshop ABG - Widerrufsrecht - Disclaimer
Copyright Dr Jessica M. Grimm - Mandlweg 3, 82488 Ettal, Deutschland - +49(0)8822 2782219 (Monday, Tuesday, Friday & Saturday 9.00-17.00 CET)
Impressum - Legal Notice - Datenschutzerklärung - Privacy Policy - Webshop ABG - Widerrufsrecht - Disclaimer